
阅读量:0
系统信息
系统安装
系统安装这里就不再赘述,推荐使用ventory作为PE盘,来安装系统,这样方便快捷,可同时包含多个镜像,无需重复制作,需要注意的是在安装系统的时候需要手动进行分区,我们可以看一下我的分区结果:
在安装系统之后请先确认系统版本等内容和预想一致:
使用命令:
uname -m && cat /etc/*release结果:
x86_64 DISTRIB_ID=Ubuntu DISTRIB_RELEASE=22.04 DISTRIB_CODENAME=jammy DISTRIB_DESCRIPTION="Ubuntu 22.04.3 LTS" PRETTY_NAME="Ubuntu 22.04.3 LTS" NAME="Ubuntu" VERSION_ID="22.04" VERSION="22.04.3 LTS (Jammy Jellyfish)" VERSION_CODENAME=jammy ID=ubuntu ID_LIKE=debian HOME_URL="https://www.ubuntu.com/" SUPPORT_URL="https://help.ubuntu.com/" BUG_REPORT_URL="https://bugs.launchpad.net/ubuntu/" PRIVACY_POLICY_URL="https://www.ubuntu.com/legal/terms-and-policies/privacy-policy" UBUNTU_CODENAME=jammyGCC版本:
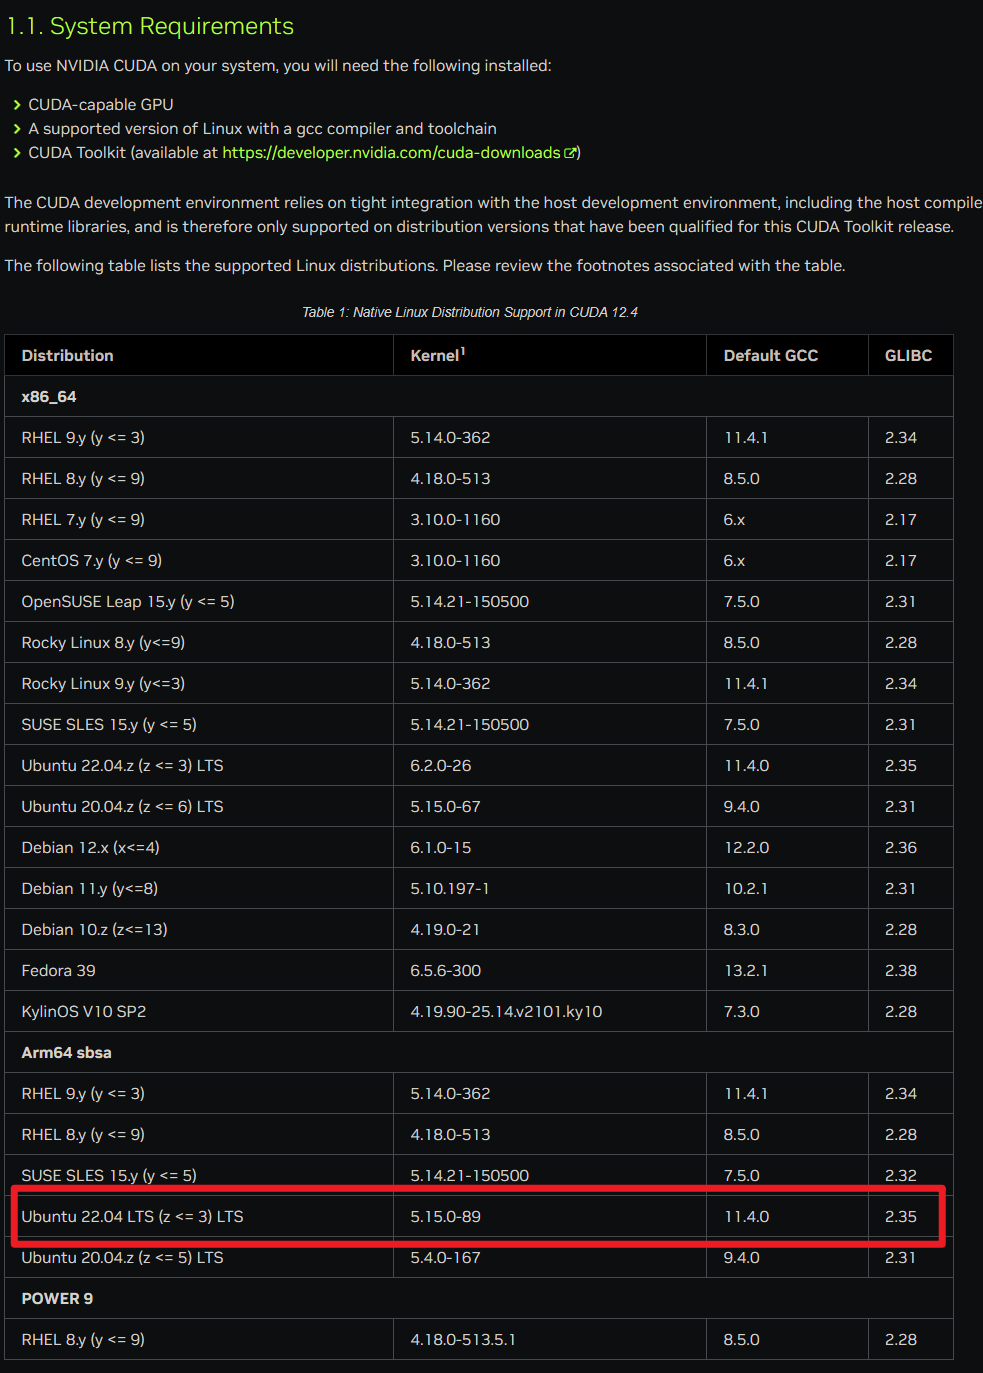
gcc --versionbionet@Bionet:/usr/local/cuda-12.4$ gcc --version gcc (Ubuntu 11.4.0-1ubuntu1~22.04) 11.4.0 Copyright (C) 2021 Free Software Foundation, Inc. This is free software; see the source for copying conditions. There is NO warranty; not even for MERCHANTABILITY or FITNESS FOR A PARTICULAR PURPOSE.由于后边要配置cuda信息,这里就直接先把需求放上来,各位要看符不符合要求:
下图由CUDA官方文档发布:1. Introduction — Installation Guide for Linux 12.4 documentation (nvidia.com)
硬件配置:
硬件安装指南
由于服务器上存在几个残缺的pcie插槽,什么叫残缺的呢?如下图:

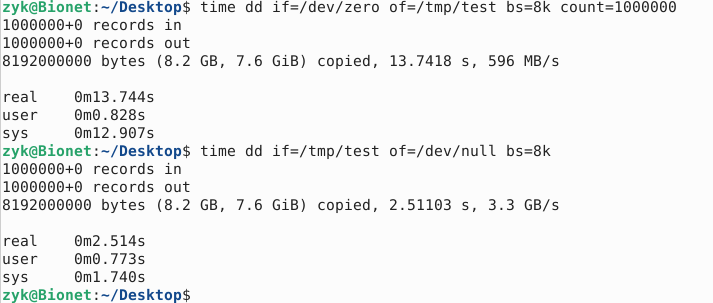
不适合安装显卡,所以通过转接版来安装PCIE下的NVME协议M.2接口固态硬盘,其优点是稳定,速度快。
相比普通的SATA顺序读写快上5倍~10倍,测试效果如下:
CPU
bionet@Bionet:~$ lscpu Architecture: x86_64 CPU op-mode(s): 32-bit, 64-bit Address sizes: 46 bits physical, 48 bits virtual Byte Order: Little Endian CPU(s): 32 On-line CPU(s) list: 0-31 Vendor ID: GenuineIntel Model name: Intel(R) Xeon(R) CPU E5-2620 v4 @ 2.10GHz CPU family: 6 Model: 79 Thread(s) per core: 2 Core(s) per socket: 8 Socket(s): 2 Stepping: 1 CPU max MHz: 3000.0000 CPU min MHz: 1200.0000 BogoMIPS: 4199.71 NUMA: NUMA node(s): 2 NUMA node0 CPU(s): 0-7,16-23 NUMA node1 CPU(s): 8-15,24-31GPU
bionet@Bionet:~$ nvidia-smi Sat Mar 23 19:30:36 2024 +---------------------------------------------------------------------------------------+ | NVIDIA-SMI 535.161.07 Driver Version: 535.161.07 CUDA Version: 12.2 | |-----------------------------------------+----------------------+----------------------+ | GPU Name Persistence-M | Bus-Id Disp.A | Volatile Uncorr. ECC | | Fan Temp Perf Pwr:Usage/Cap | Memory-Usage | GPU-Util Compute M. | | | | MIG M. | |=========================================+======================+======================| | 0 NVIDIA GeForce RTX 2080 Ti Off | 00000000:04:00.0 Off | N/A | | 0% 27C P8 16W / 300W | 1MiB / 11264MiB | 0% Default | | | | N/A | +-----------------------------------------+----------------------+----------------------+ | 1 NVIDIA GeForce RTX 4090 Off | 00000000:09:00.0 Off | Off | | 0% 29C P8 20W / 450W | 1MiB / 24564MiB | 0% Default | | | | N/A | +-----------------------------------------+----------------------+----------------------+ | 2 NVIDIA GeForce RTX 2080 Ti Off | 00000000:86:00.0 Off | N/A | | 0% 28C P8 13W / 300W | 1MiB / 11264MiB | 0% Default | | | | N/A | +-----------------------------------------+----------------------+----------------------+ | 3 NVIDIA GeForce RTX 3090 Off | 00000000:8A:00.0 Off | N/A | | 0% 23C P8 7W / 370W | 1MiB / 24576MiB | 0% Default | | | | N/A | +-----------------------------------------+----------------------+----------------------+ +---------------------------------------------------------------------------------------+ | Processes: | | GPU GI CI PID Type Process name GPU Memory | | ID ID Usage | |=======================================================================================| | No running processes found | +---------------------------------------------------------------------------------------+简单查询:
bionet@Bionet:~$ nvidia-smi --query-gpu=index,name,uuid,serial --format=csv index, name, uuid, serial 0, NVIDIA GeForce RTX 2080 Ti, GPU-2fdf7ca3-be62-5646-3d62-2e2db057e8b2, [N/A] 1, NVIDIA GeForce RTX 4090, GPU-3d19dd88-2507-8278-5045-9f68011b7ce0, [N/A] 2, NVIDIA GeForce RTX 2080 Ti, GPU-6384bfe4-3e8a-18a2-2132-fc5e686d1404, [N/A] 3, NVIDIA GeForce RTX 3090, GPU-d91f3e9a-e7d0-4f91-2798-1d8b05587fb6, [N/A]验证显卡速率正常:
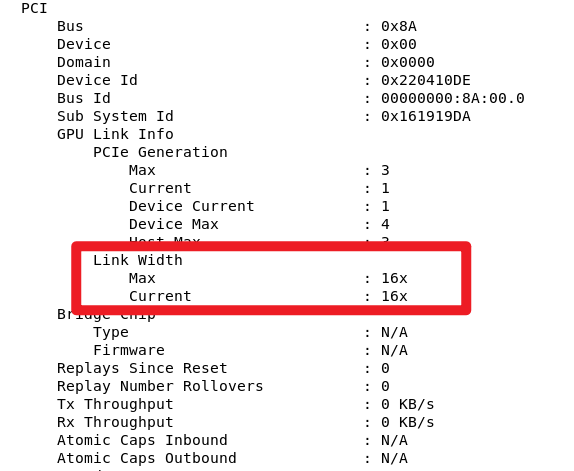
nvidia-smi -i 0 -q指定GPUID来实现,0为0号设备,再输出信息中找到:
16x带宽为正常
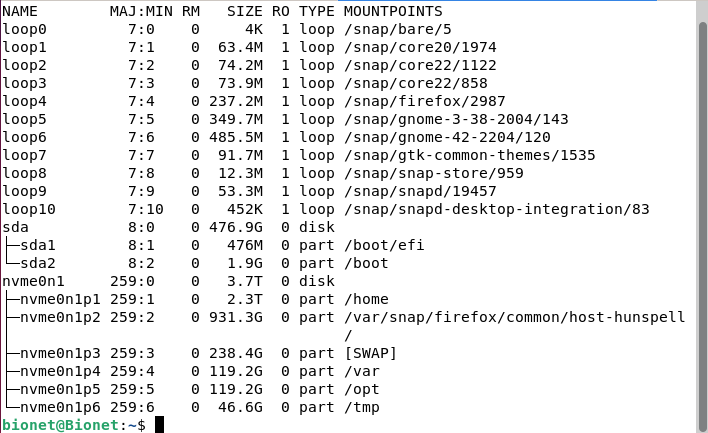
硬盘分区结果
以太网和IP设置
使用命令查看目前已安装的,能检测到对应的驱动的网卡信息:
bionet@Bionet:~$ lspci | grep -i 'eth'结果如下:
81:00.0 Ethernet controller: Intel Corporation I350 Gigabit Network Connection (rev 01) 81:00.1 Ethernet controller: Intel Corporation I350 Gigabit Network Connection (rev 01) #双千兆网口基础内容配置
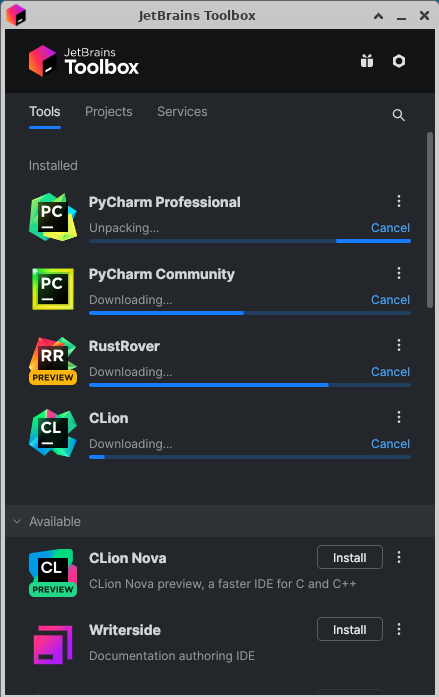
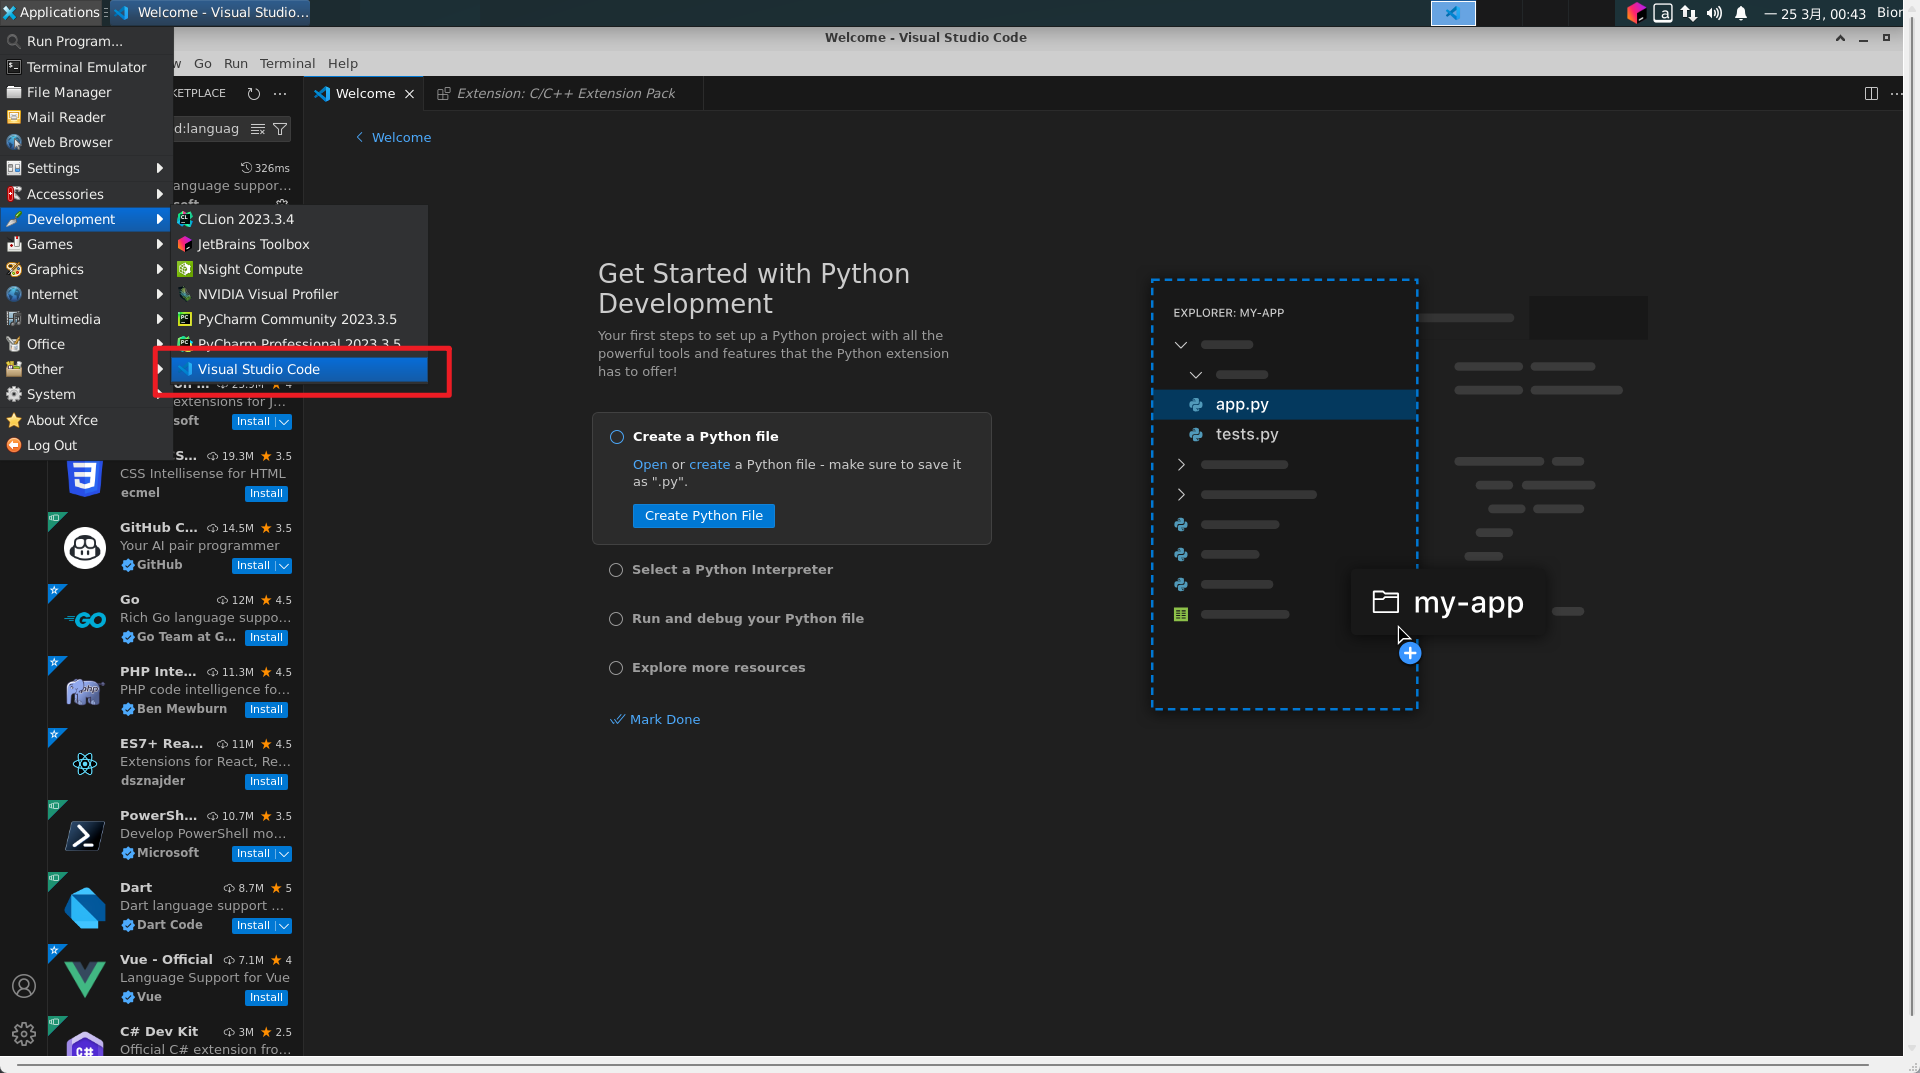
Jetbrain IDE & VSCode安装
Jetbrain系IDE针对在校大学生都是免费的,该如何申请JetBrian系的IDE呢?
详见此文,申请后就拥有了一个免费的JetBrain全家桶账号,非常方便,可以使用他们家的全部IDE,关于IDE的使用和优化,可以参考我的专栏:Jetbrain入门指南 - 文章分类 - NeoNexus - 博客园 (cnblogs.com)
为了方便管理和使用IDE这里使用Toolbox来操作IDE:
首先下载ToolBox:

下载之后是一个.tar.gz的压缩包,我们使用命令解压即可:
tar -zxvf 文件名.tar.gz其中,-z 表示使用 gzip 解压缩,-x 表示解压缩,-v 表示显示详细信息,-f 表示指定文件名。
(base) bionet@Bionet:~/Downloads$ tar -zxvf ./jetbrains-toolbox-2.2.3.20090.tar.gz 如下图所示解压之后效果如下:
jetbrains-toolbox-2.2.3.20090/ jetbrains-toolbox-2.2.3.20090/jetbrains-toolbox (base) bionet@Bionet:~/Downloads$ ls Anaconda3-2024.02-1-Linux-x86_64.sh jetbrains-toolbox-2.2.3.20090 cudnn-local-repo-ubuntu2204-9.0.0_1.0-1_amd64.deb jetbrains-toolbox-2.2.3.20090.tar.gz将解压过后的文件夹的内容迁移到我们规定的目录,命令执行如下:
base) bionet@Bionet:~/Downloads$ sudo mv jetbrains-toolbox-2.2.3.20090 jetbrain-toolbox-2.2.3 [sudo] password for bionet: (base) bionet@Bionet:~/Downloads$ ls Anaconda3-2024.02-1-Linux-x86_64.sh jetbrains-toolbox-2.2.3.20090.tar.gz cudnn-local-repo-ubuntu2204-9.0.0_1.0-1_amd64.deb jetbrain-toolbox-2.2.3 (base) bionet@Bionet:~/Downloads$ sudo mv ./jetbrain-toolbox-2.2.3 /home/jetbrain-toolbox-2.2.3 (base) bionet@Bionet:~/Downloads$ cd /home/ (base) bionet@Bionet:/home$ ls anaconda3 bionet jetbrain-toolbox-2.2.3 lost+found Neo同时将其添加到启动项中:
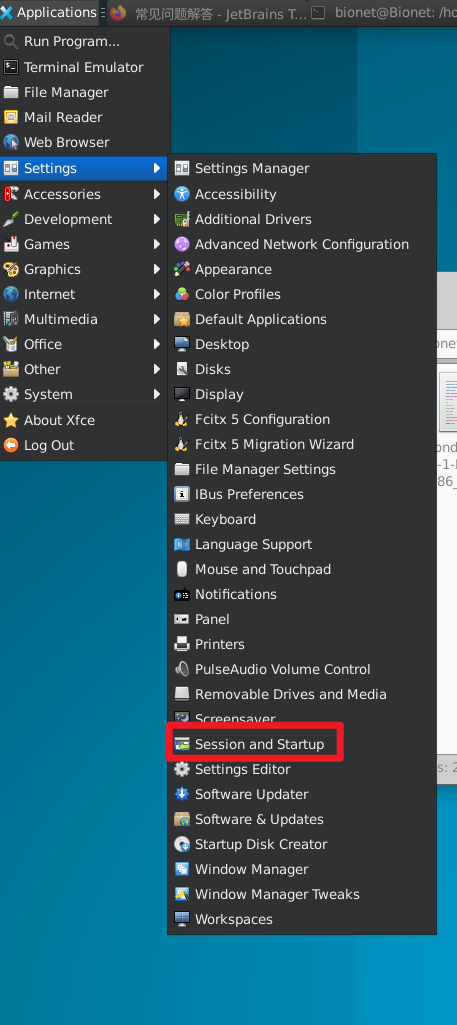
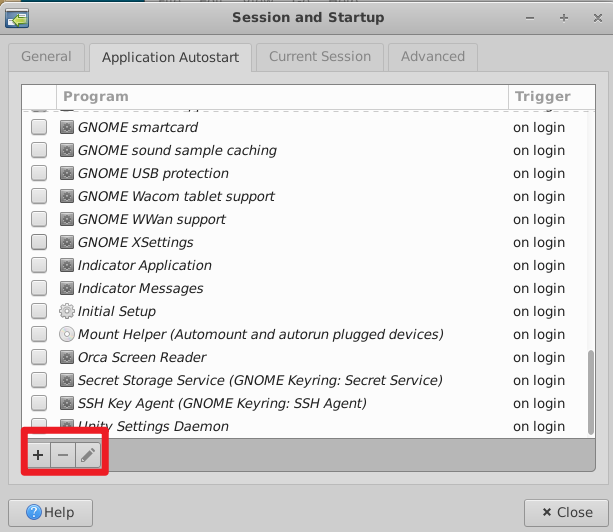
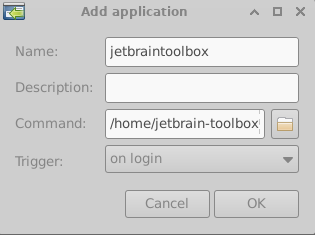
添加即可:
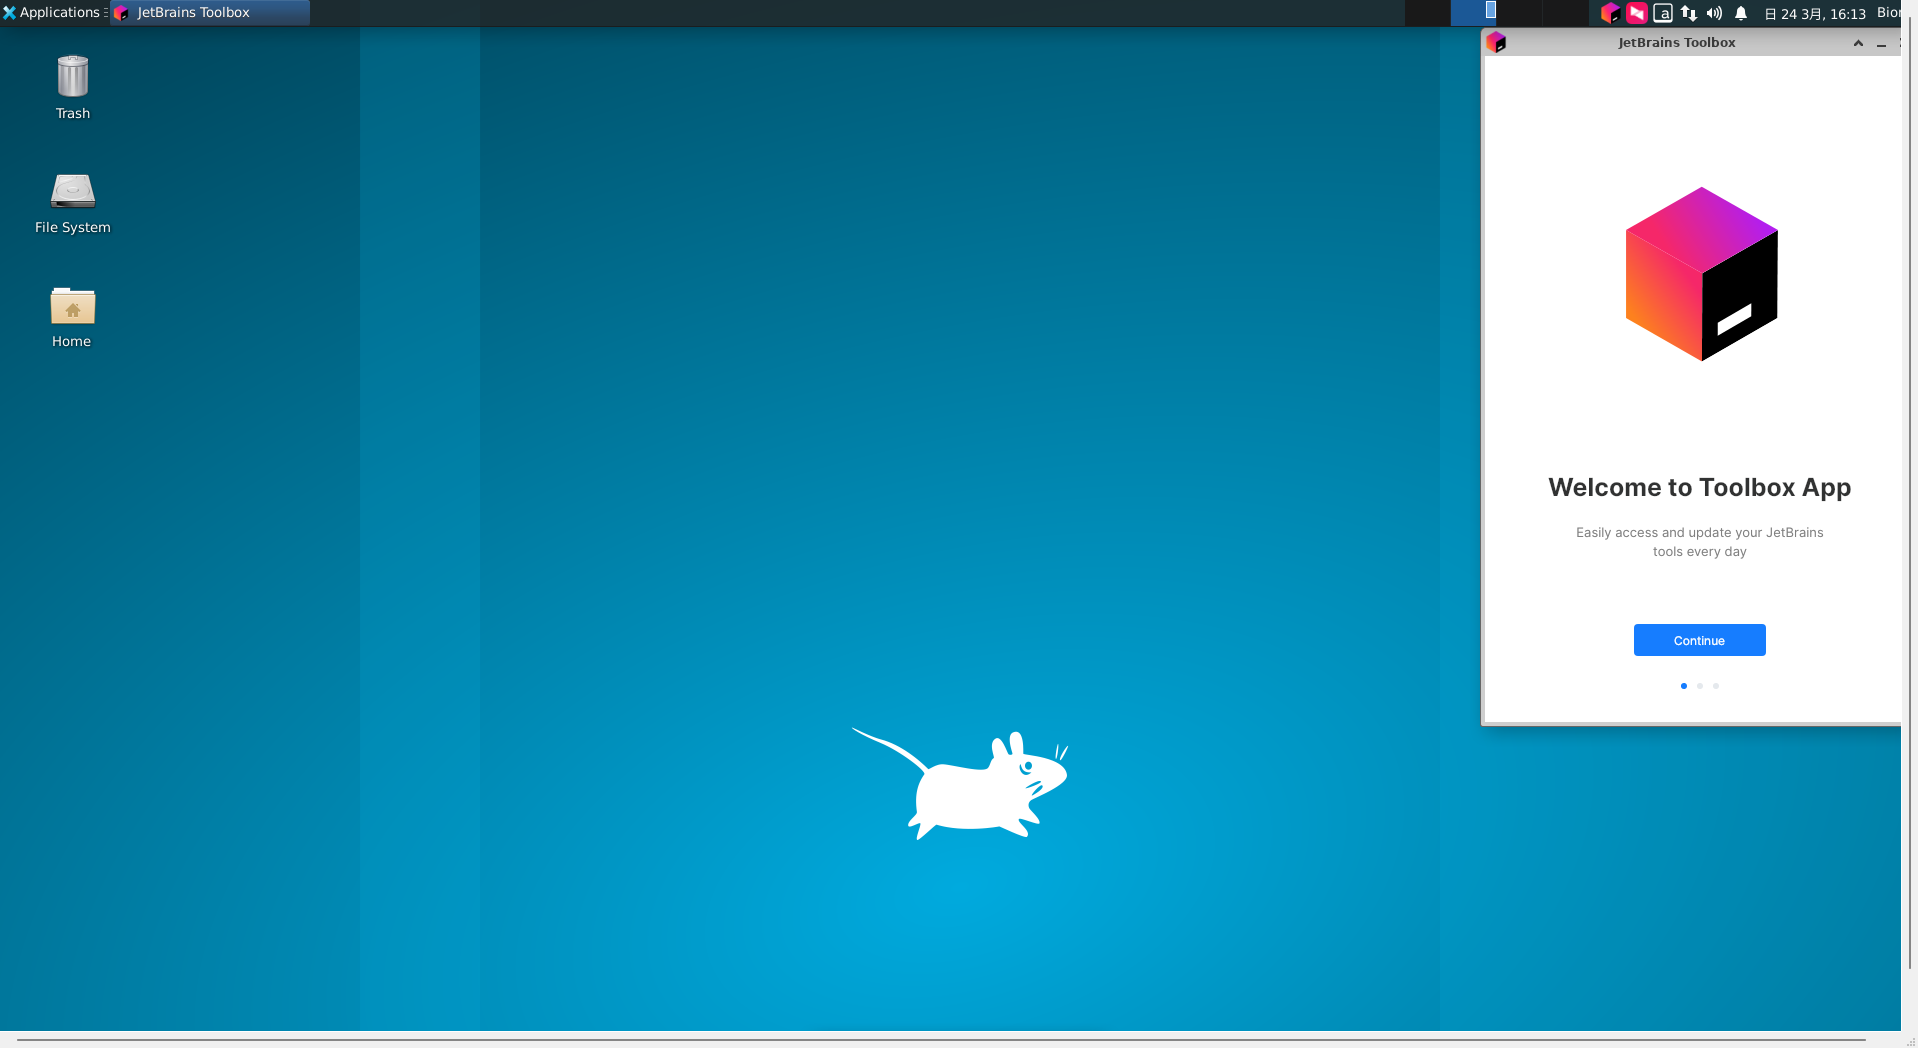
用户登录之后toolbox就可以启动:
登录过程稍微有点慢,慢慢等就行。
当然选择之后登陆即可下载对应的IDE:
效果如下:
需要注意的是我们需要修改安装路径到指定位置:
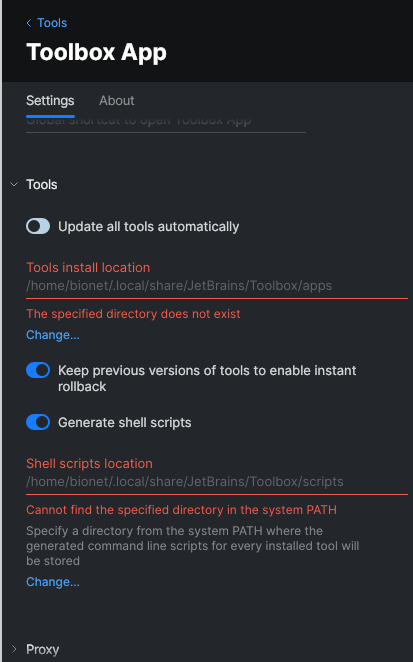
我们在管理用户的Home下创建一个文件夹来专门存放IDE,这样每个用户就不需要重复下载IDE了,同时需要有一个环境变量的路径来存放安装的IDE的运行脚本:
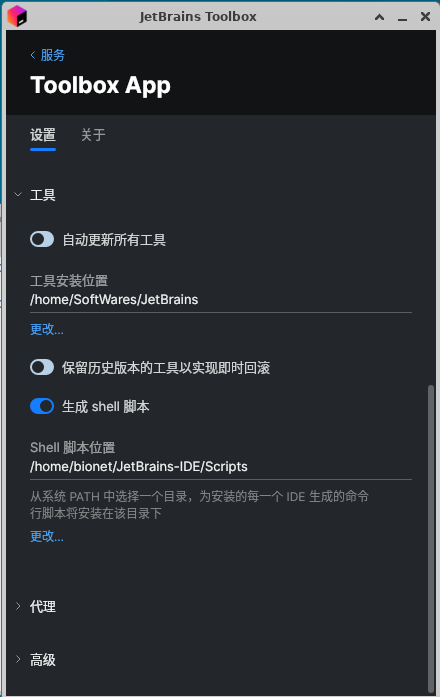
向全局变量中导入一个PATH:
(base) bionet@Bionet:~/Desktop$ sudo vim /etc/profile打开后在最下面添加一个PATH:
export PATH="/home/SoftWares/JetBrains/Scripts:$PATH"注意这里的路径要放在有权限的地方,大家都有权限可以使用才可以。
工具安装位置也要放置到大家都能使用的位置,如下图所示(隔了一个命令)。
让环境变量生效:
source /etc/profile这时候你会发现shell scripts location还是会报错,不过没关系,我们只需要将此用户重新登出再登入即可:
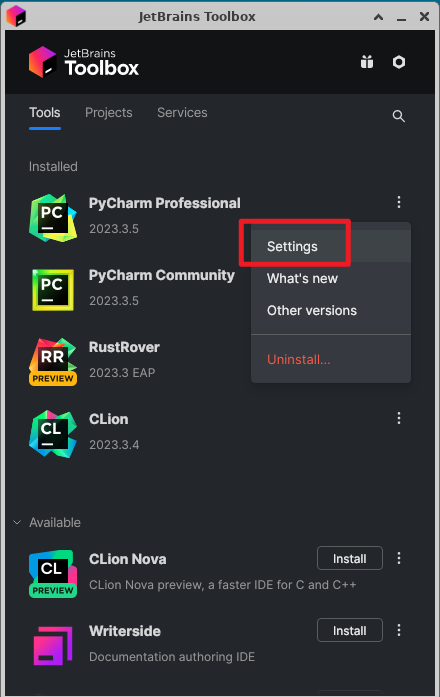
Jetbrains shell scripts有什么用?
让我们先安装一个IDE在讨论这个问题:
打开一个IDE设置:
我们拉到最下面:
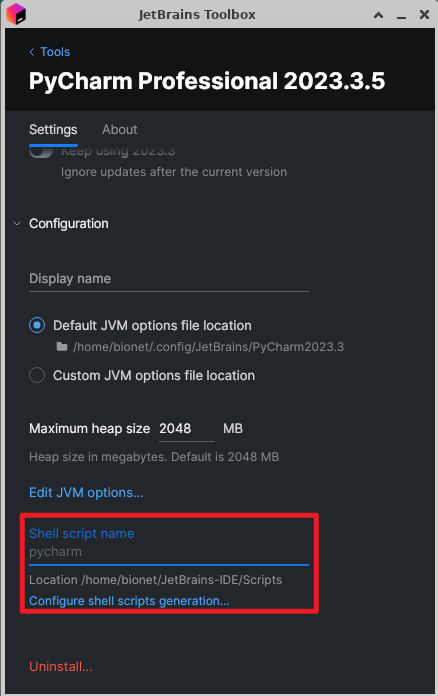
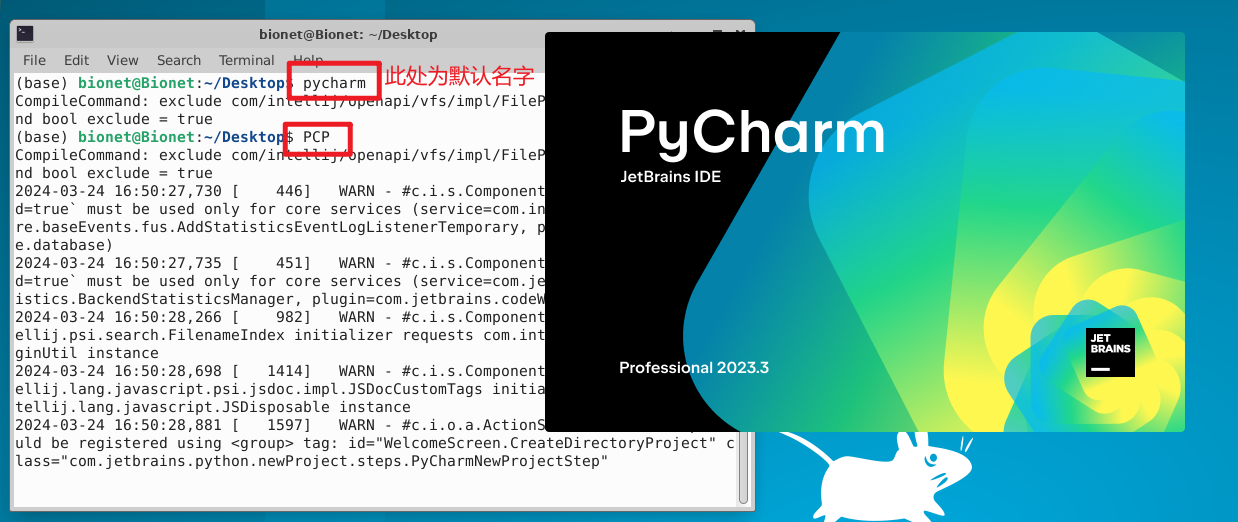
随便写个缩写名字,比如:
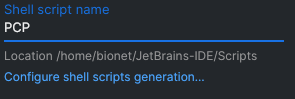
打开命令行直接执行PCP,可以发现直接运行了~
需要注意的是JetbrainToolBox只能让一个用户来使用!每个用户如果要使用ToolBox的话需要单独安装,这里只给root用户安装,是为了方便管理。
Matlab安装与配置
MATLAB学校购买了正版,这里需要按照学校的安装步骤来走:
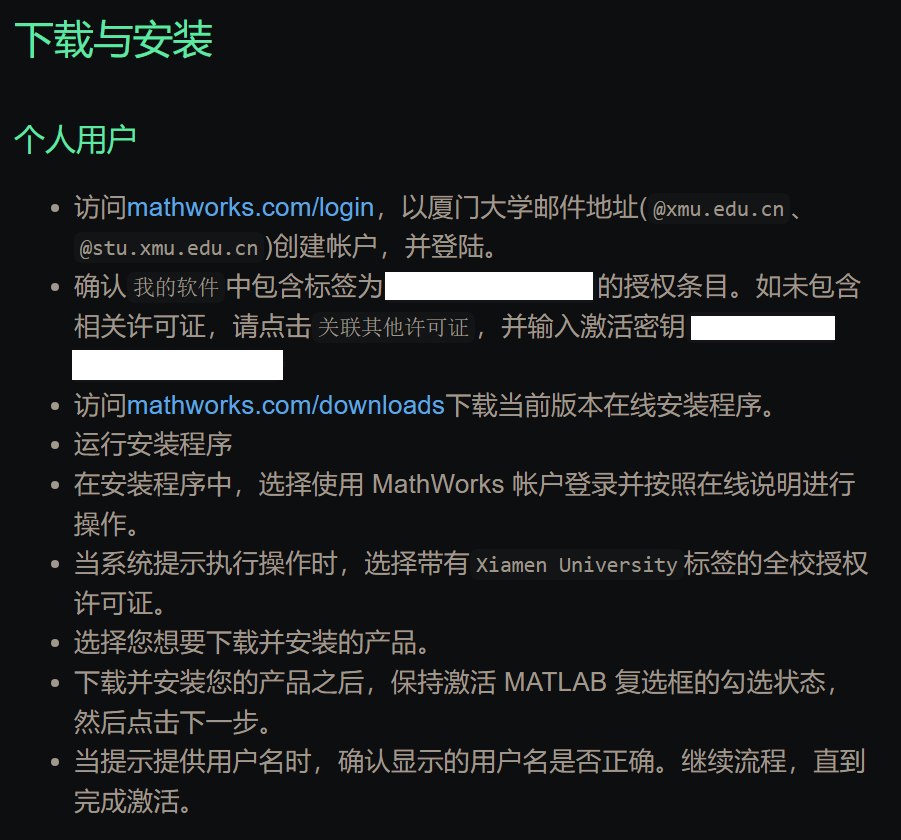
我们直接跳转到下载的步骤:

登录之后下载,在之后是一个安装包:
注意要解决安装路径的问题我们可以把他放在我们建立好的SoftWare目录之下:
参照官方教程安装:下载并安装 MATLAB - MATLAB & Simulink - MathWorks 中国
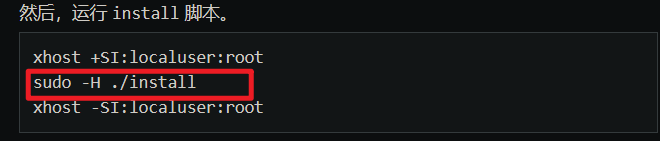
注意这一步只需要执行这个既可:
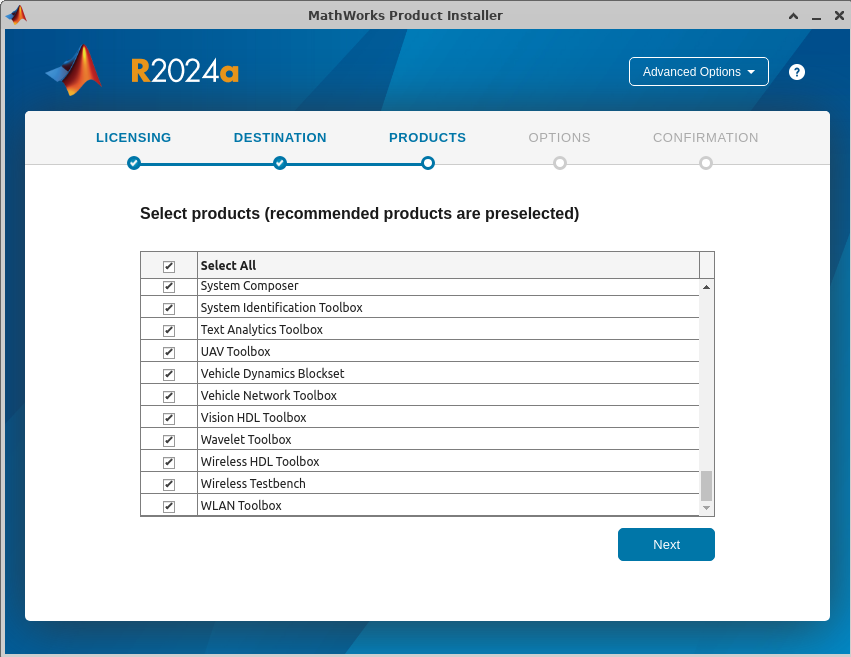
一路安装下去即可:
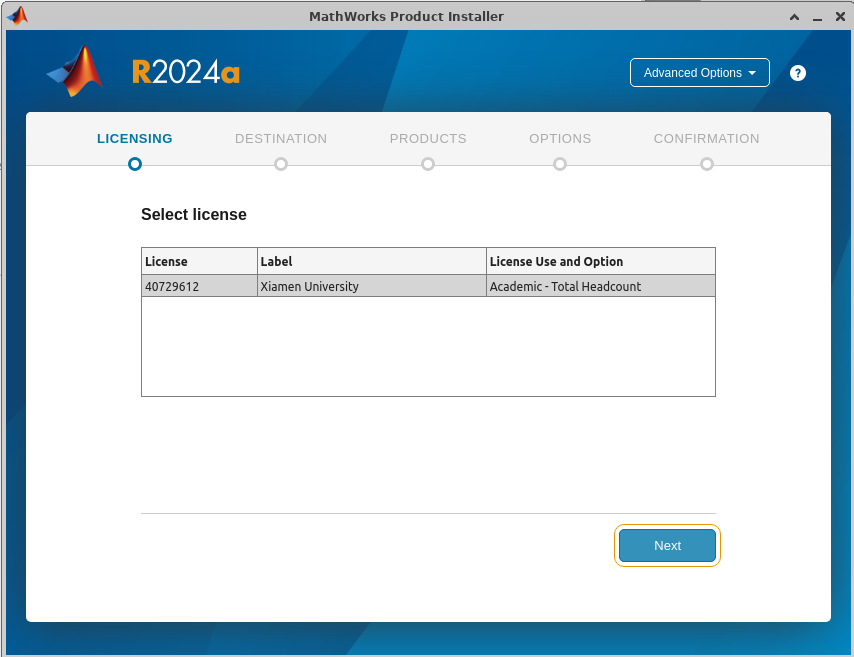
勾选全部内容:
注意下一页需要将脚本映射到合理位置,这里映射到了如下路径,就不放图了:
/home/SoftWares/MATLAB/MATLABScripts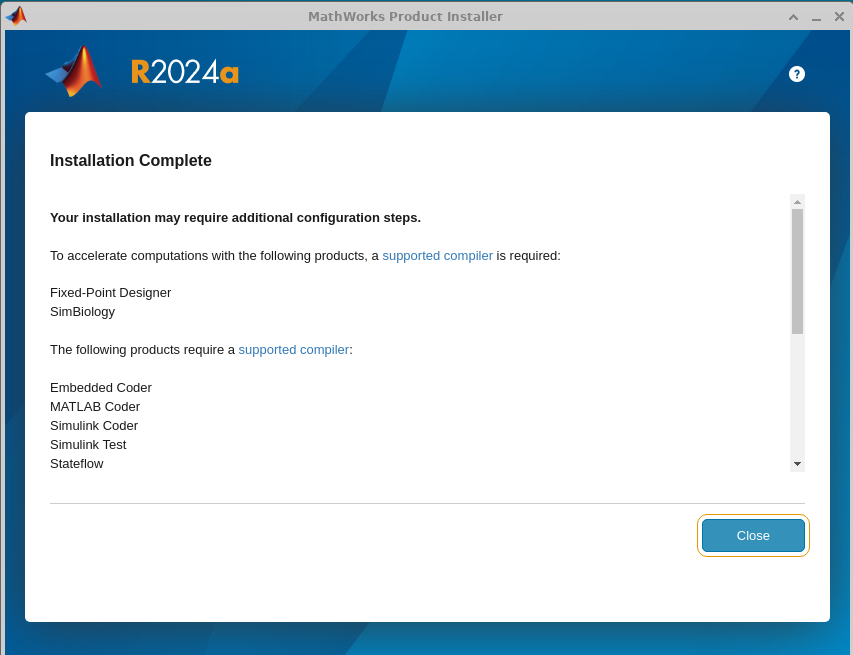
在对应安装目录下运行一下:
![]()
效果如下:
R Studio Server安装
R使用过Docker来部署的:
R-studio server版本的镜像都在这里:rocker/rstudio Tags | Docker Hub
我们直接创建一个容器:
docker run -d -p 8787:8787 -p 8788:22\ -v /home/SoftWares/R_Share:/home/rstudio/R_Share \ -v /etc/timezone:/etc/timezone \ -v /etc/localtime:/etc/localtime \ --name R_422 \ rocker/rstudio:4.2.2-v /etc/timezone:/etc/timezone \ -v /etc/localtime:/etc/localtime \为时间同步命令
-v /home/SoftWares/R_Share:/home/rstudio/R_Share \将对应的文件挂载到系统上某个盘
--name R_422 \名字命名为R422
rocker/rstudio:4.2.2拉去这个版本的镜像
-p 8787:8787 -p 8788:22端口映射命令 主机的8788映射到22端口
进入容器里面:
docker exec -it R_422 /bin/bashR_422是容器的名字。可根据需要切换
我们安装一些必要的内容,来保证容器的运行:
首先设置密码:
passwd root设置完毕之后需要安装ssh,来方便管理,使用命令:
sudo apt update sudo apt-get install -y vim openssh-server sudo apt upgrade配置容器内的SSH:
echo "PermitRootLogin yes">>/etc/ssh/sshd_config echo "export VISIBLE=now" >>/etc/profileecho "PermitRootLogin yes">>/etc/ssh/sshd_config添加一段信息到sshd_config中。
echo "export VISIBLE=now" >> /etc/profile:向 /etc/profile 文件中添加一行 export VISIBLE=now,这个设置使得 SSH 会话可以在登录时创建 utmp 记录,使得用户能够在 w 或 who 命令中看到 SSH 登录的用户信息。
然后运行重启:
service ssh restart这时候你如果打开另一个宿主机命令行运行以下命令可以看到:
Neo@Bionet:~/Desktop$ docker port pytorch 22 0.0.0.0:10003 [::]:10003这时候我们打开一个远程的命令行来来连接一下容器:
输入后正常登录即可。
为什么要添加用户呢因为RStudio默认不允许root用户登录,我们需要添加一些用户进来,这里可以使用我的脚本,来批量添加用户,我们直接运行即可:
sudo ./createuser4R.sh默认密码为名字+123即 名字123.
登录之后可以看到:
VSCode安装与配置
首先下载VsCode安装包,在官网这里:Visual Studio Code - Code Editing. Redefined
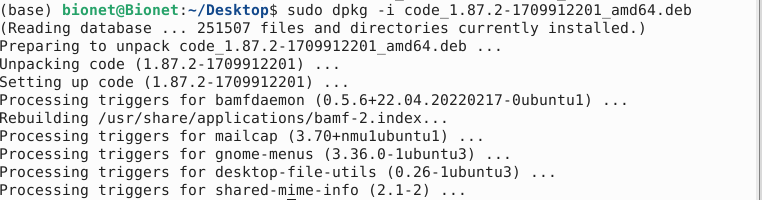
然后使用命令:
(base) bionet@Bionet:~/Desktop$ sudo dpkg -i code_1.87.2-1709912201_amd64.deb 报错了不要慌,实际上是传输过来的时候安装包损坏了,也就是无法通过校验。
安装完成之后就可以在目录中看到了:
将软件快捷方式(desktop)送到用户桌面
到这里还没结束呢,安装完成之后我们还需要再把快捷方式丢去每个用户的目录,这里提示一下,每个创建的用户都需要在这个目录下有对应的文件才能看到应用程序,或者直接将软件丢去此目录也可以这里展示其中一个比较通用的方式:
一般桌面的软件的快捷方式都在此文件夹下:
/usr/share/applications/用户安装的软件目录在:
~/.local/share/applications/我们需要将安装软件的用户的目录下的图标迁移到此目录下,使用如下命令:
sudo cp -r ~/.local/share/applications/. /usr/share/applications/ r如果无法执行,需要切换到对应的用户,这里安装的用户就是bonet所以可以使用bionet的,如果还不行的话只能使用root来实现,输入以下命令之后安装:
sudo -i这样后来的用户都可以看到安装的软件了。
内网磁盘映射
虽然目前已经实现了文件的传输,直接复制粘贴就可以,但是对于一些稍微大一点的文件,还是不靠谱,所以通过另一个服务将服务器上的磁盘映射过来:
使用SAMBA服务
安装SAMBA:
sudo apt-get install samba samba-common-bin配置SAMBA:
sudo gedit /etc/samba/smb.conf在最下面加入一行:
# 共享文件夹显示的名称 [Storge] # 说明信息 comment = Bionet No1 WorkStation Storage # 可以访问的用户 valid users = Neo,root,Bionet # 共享文件的路径 path = /home/SAMBA/Storge/ # 可被其他人看到资源名称(非内容) browseable = yes # 可写 writable = yes # 新建文件的权限为 664 create mask = 0664 # 新建目录的权限为 775 directory mask = 0775运行以下命令来测试:
bionet@Bionet:~$ testparm结果如下:
Load smb config files from /etc/samba/smb.conf Loaded services file OK. Weak crypto is allowed Server role: ROLE_STANDALONE Press enter to see a dump of your service definitions # Global parameters [global] log file = /var/log/samba/log.%m logging = file map to guest = Bad User max log size = 1000 obey pam restrictions = Yes pam password change = Yes panic action = /usr/share/samba/panic-action %d passwd chat = *Enter\snew\s*\spassword:* %n\n *Retype\snew\s*\spassword:* %n\n *password\supdated\ssuccessfully* . passwd program = /usr/bin/passwd %u server role = standalone server server string = %h server (Samba, Ubuntu) unix password sync = Yes usershare allow guests = Yes idmap config * : backend = tdb [printers] browseable = No comment = All Printers create mask = 0700 path = /var/spool/samba printable = Yes [print$] comment = Printer Drivers path = /var/lib/samba/printers [Storge] comment = Bionet No1 WorkStation Storage create mask = 0664 directory mask = 0775 path = /home/SAMBA/Storge/ read only = No valid users = Neo root Bionet添加SMB用户(必须是已经创建了的linux用户):
bionet@Bionet:~$ sudo smbpasswd -a Neo New SMB password: Retype new SMB password: Added user Neo.这里由于学校网络分割,这一部分暂且搁置
安装Git
使用命令:
sudo apt install git版本:
bionet@Bionet:~$ git --version git version 2.34.1git本身需要设置用户名等内容,这里建议先设置一个全局的通用的用户名和账号,个人用户有需求再用个人的key来进行代码同步,这里就简单说一下,详细内容敬请百度。
git config --global user.name "Your Name" git config --global user.email "youremail@yourdomain.com"配置完成以后验证一下:
bionet@Bionet:/usr/local/cuda-12.4$ git config --global user.name "Bionet" bionet@Bionet:/usr/local/cuda-12.4$ git config --global user.email "Bionet@xmu.edu.cn" bionet@Bionet:/usr/local/cuda-12.4$ git config --list user.name=Bionet user.email=Bionet@xmu.edu.cn注册一个Github账号(实验室已经有账号了,详询老大):
生成密钥:
bionet@Bionet:/usr/local/cuda-12.4$ ssh-keygen -t ed25519 -C "BioNet@xmu.edu.cn" Generating public/private ed25519 key pair. Enter file in which to save the key (/home/bionet/.ssh/id_ed25519): Created directory '/home/bionet/.ssh'. Enter passphrase (empty for no passphrase): Enter same passphrase again: Your identification has been saved in /home/bionet/.ssh/id_ed25519 Your public key has been saved in /home/bionet/.ssh/id_ed25519.pub 然后添加到咱们的账户中即可,如果重装的话,此处就要把原来的删除掉,在生成一个新的来作为验证。
没有添加密钥,验证失败结果如下:
bionet@Bionet:/usr/local/cuda-12.4$ ssh -T git@github.com git@github.com: Permission denied (publickey). 等待添加密钥即可
(base) bionet@Bionet:~/Desktop$ ssh -T git@github.com Hi NeoNexusX! You've successfully authenticated, but GitHub does not provide shell access.Docker部署
Docker也是虚拟化环境的神器,前面说的conda虽然可以提供python的虚拟环境并方便地切换,但是有的时候我们的开发环境并不只是用到python,比如有的native库需要对应gcc版本的编译环境,或者进行交叉编译时哟啊安装很多工具链等等。如果这些操作都在服务器本地上进行,那时间久了就会让服务器的文件系统非常杂乱,而且还会遇到各种软件版本冲突问题。
简单理解Docker为一个轻量化的虚拟机即可,但是其并不是虚拟机,虚拟机需要提供操作系统等,Docker只需要提供程序运行所需要的环境,对与常规开发流程来说一般是:

这里主要考虑服务器环境搭建和运行
docker官方教程:Install Docker Engine on Ubuntu | Docker Docs
首先设置docker的apt仓库信息:
# Add Docker's official GPG key: sudo apt-get update sudo apt-get install ca-certificates curl sudo install -m 0755 -d /etc/apt/keyrings sudo curl -fsSL https://download.docker.com/linux/ubuntu/gpg -o /etc/apt/keyrings/docker.asc sudo chmod a+r /etc/apt/keyrings/docker.asc # Add the repository to Apt sources: echo \ "deb [arch=$(dpkg --print-architecture) signed-by=/etc/apt/keyrings/docker.asc] https://download.docker.com/linux/ubuntu \ $(. /etc/os-release && echo "$VERSION_CODENAME") stable" | \ sudo tee /etc/apt/sources.list.d/docker.list > /dev/null sudo apt-get update命令一条一条复制,比较安全。
安装docker:
sudo apt-get install docker-ce docker-ce-cli containerd.io docker-buildx-plugin docker-compose-plugin 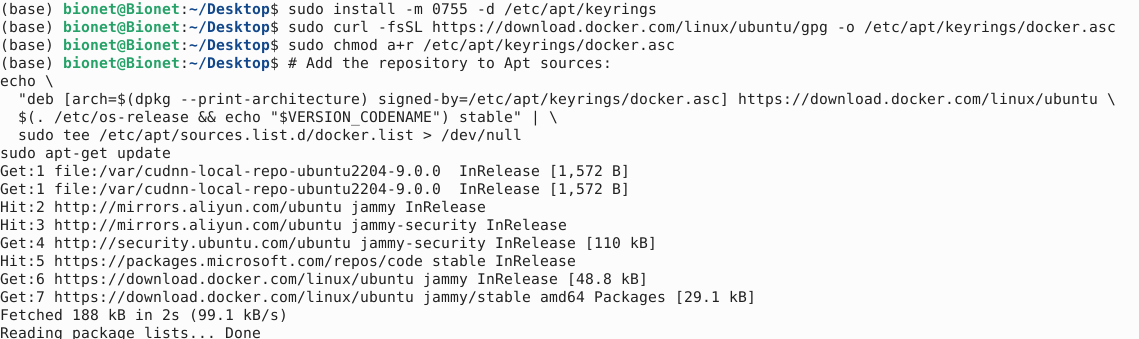
运行测试的镜像:
sudo docker run hello-world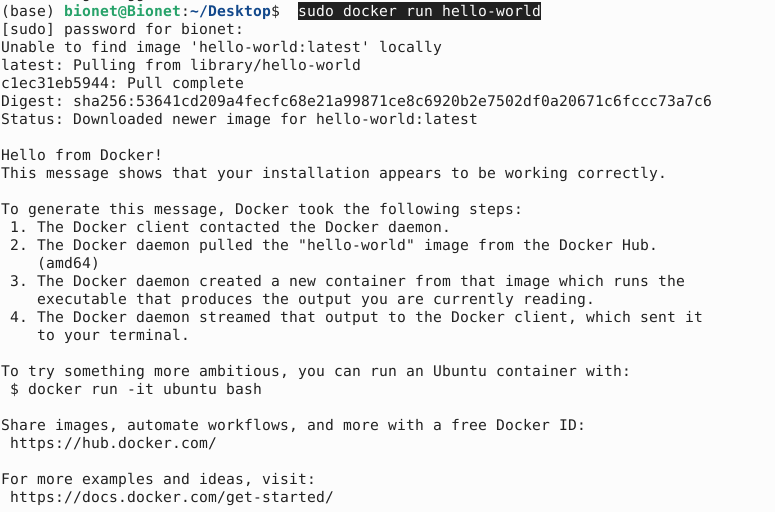
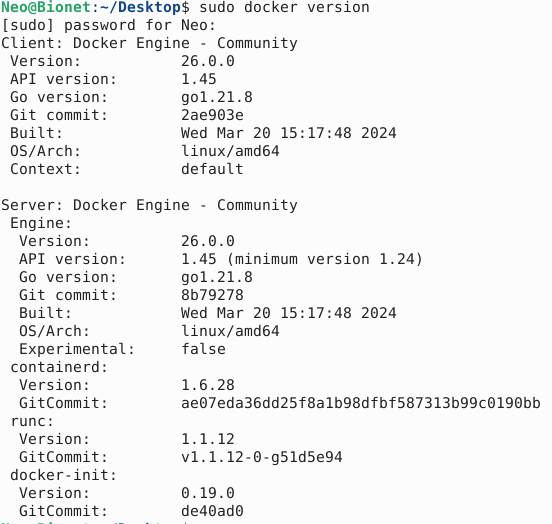
运行版本信息查看一下:
为了方便后边Docker设置:我们先来创建一个用户组,因为对于后面使用docker来说,其守护进程使用的是Unix socket,并不是TCP socket,Docker的守护进程通常只能运行在root权限用户下,因此我们只能创建一个docker用户组来专门赋予权限,我们先看看是否有docker用户组,已经被创建好了,因为在某些发行版的linux下,安装完成docker后会自行创建:
使用命令:
getent group![]()
果然有!所以我们就需要把当前的需要使用docker的用户加入到这个用户组里面去,这样运行的时候就不需要sudo权限了。
sudo usermod -aG docker $USER-aG:这是 usermod 命令的选项之一,其中:
-a表示“追加”,它告诉usermod命令将用户添加到指定的组,而不是覆盖原有的组成员资格。-G表示“组”,它指定要操作的组。
登出后重新登录这个账户,并输入以下内容:
newgrp docker重新再来验证一下,目前是否能使用了
设置开机自启动:
Neo@Bionet:~/Desktop$ sudo systemctl enable docker.service sudo systemctl enable containerd.service [sudo] password for Neo: Synchronizing state of docker.service with SysV service script with /lib/systemd/systemd-sysv-install. Executing: /lib/systemd/systemd-sysv-install enable docker 如果需要关闭请使用:
sudo systemctl disable docker.service sudo systemctl disable containerd.service 到此完成docker的基本部署,接下来安装Nvida的docker,这部分在深度学习配置最后。
深度学习配置相关
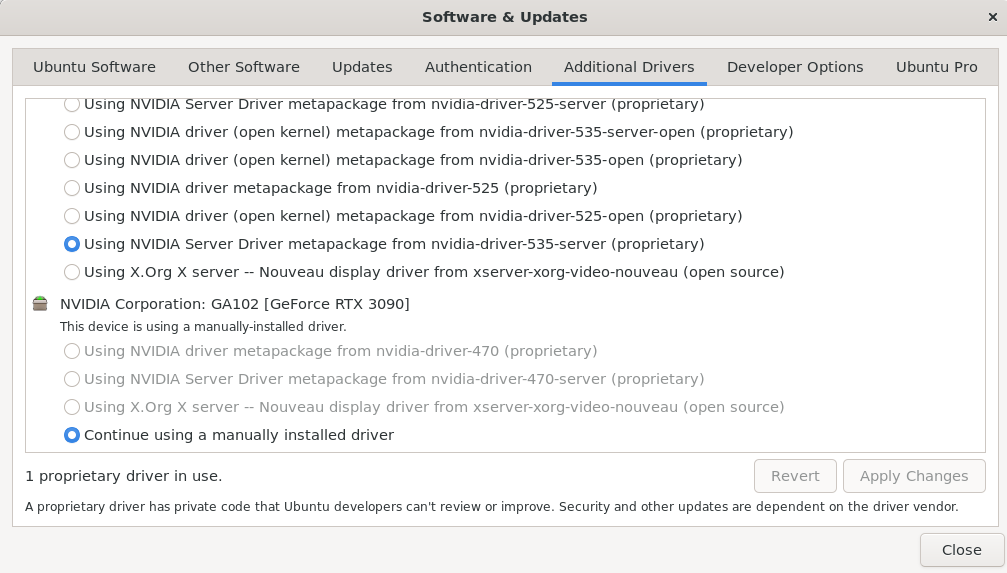
安装NVIDIA驱动,由于新的版Ubuntu可以在管理器中直接安装,这里就不再赘述,只需要点击即可,新的显卡使用较新的驱动是最好的了:
安装Python和Pip
使用命令
sudo apt install python3 sudo apt install python3-pip 安装完成之后,替换python的pip源
bionet@Bionet:~$ cd ~ bionet@Bionet:~$ mkdir .pip bionet@Bionet:~$ sudo gedit ~/.pip/pip.conf 其中gedit是ubuntu自带的图形化文本编辑器,如果你喜欢vim那么可以替换成:
bionet@Bionet:~$ sudo vim ~/.pip/pip.conf 将以下内容填入:
[global] index-url = https://pypi.tuna.tsinghua.edu.cn/simple/ [install] trusted-host = pypi.tuna.tsinghua.edu.cn 测试一下:
bionet@Bionet:~$ python3 Python 3.10.12 (main, Nov 20 2023, 15:14:05) [GCC 11.4.0] on linux Type "help", "copyright", "credits" or "license" for more information. >>> quit();安装CUDA Toolkit
这里选择最新的CUDA Toolkit12.4,在网页上按我的选择如下:

复制对应的命令后下载下来:
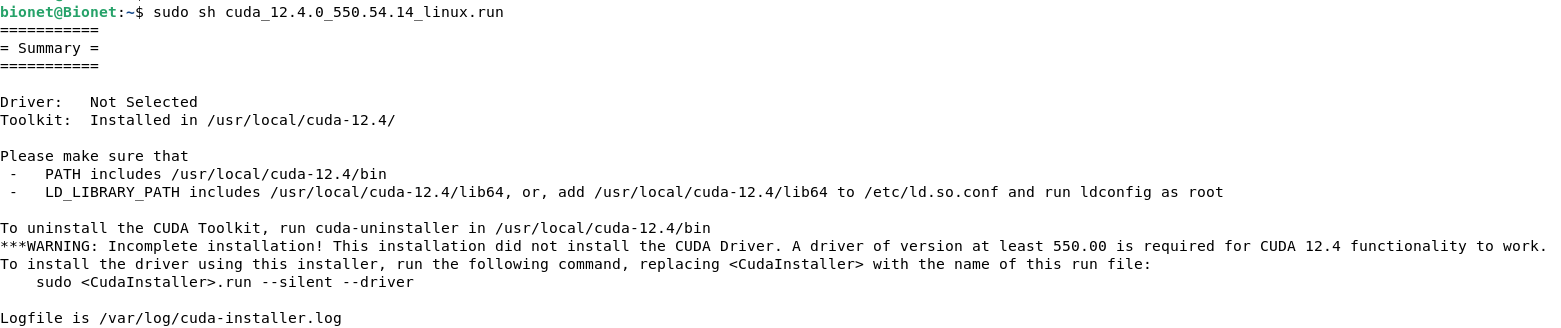
bionet@Bionet:~$ wget https://developer.download.nvidia.com/compute/cuda/12.4.0/local_installers/cuda_12.4.0_550.54.14_linux.run Saving to: ‘cuda_12.4.0_550.54.14_linux.run’ cuda_12.4.0_550.54.14_linux.run 100%[==============================================================================================>] 4.15G 89.4MB/s in 57s 2024-03-23 20:26:43 (73.9 MB/s) - ‘cuda_12.4.0_550.54.14_linux.run’ saved [4454353277/4454353277] bionet@Bionet:~$ ls cuda_12.4.0_550.54.14_linux.run Desktop Documents Downloads matlab Music Pictures Public snap Templates thinclient_drives Videos使用命令执行:
sudo sh cuda_12.4.0_550.54.14_linux.run注意进入选择模式之后,不要选择驱动,我们已经打了新驱动了,无需在安装一次:
至于这里选择不选择新驱动要看这个图:
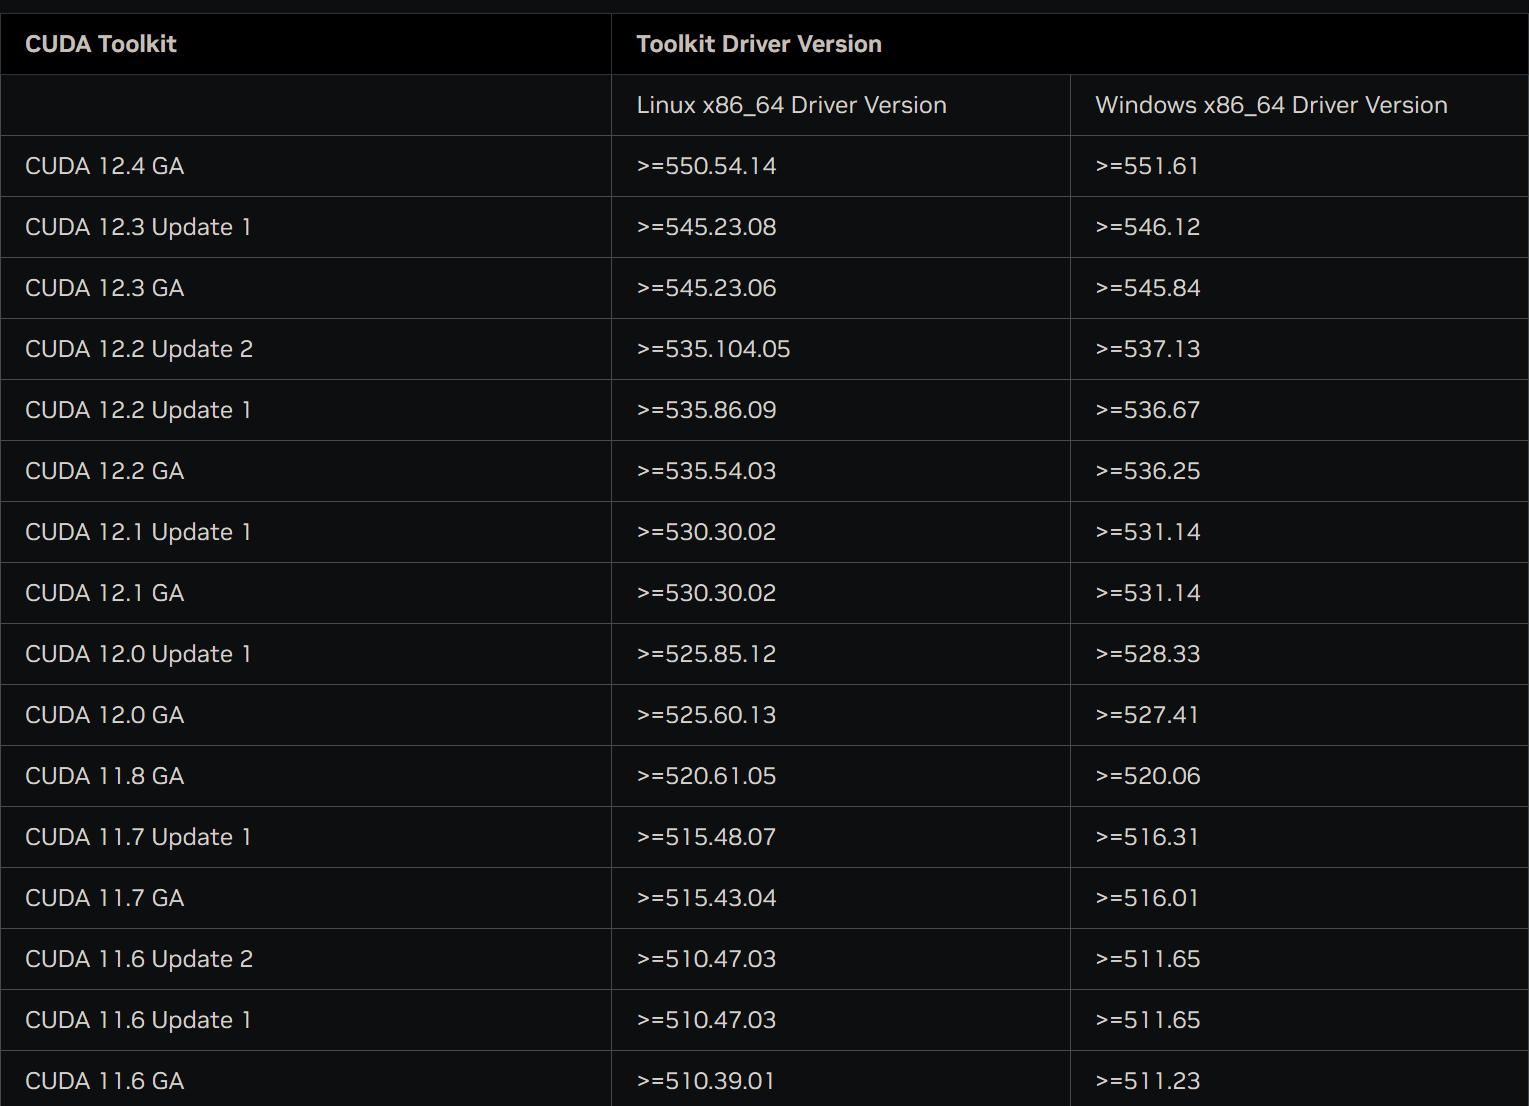
如果你不满足对应的驱动条件我建议可以打上新驱动。
根据提示我们需要套件的内容添加到环境变量里面:
bionet@Bionet:~$ sudo gedit ~/.bashrc环境变量如下:
export CUDA_HOME=/usr/local/cuda-12.4 export LD_LIBRARY_PATH=${CUDA_HOME}/lib64 export PATH=${CUDA_HOME}/bin:${PATH} 使其生效:
bionet@Bionet:~$ source ~/.bashrc 使用命令测试:
bionet@Bionet:~$ nvcc -V nvcc: NVIDIA (R) Cuda compiler driver Copyright (c) 2005-2024 NVIDIA Corporation Built on Tue_Feb_27_16:19:38_PST_2024 Cuda compilation tools, release 12.4, V12.4.99 Build cuda_12.4.r12.4/compiler.33961263_0 到这一步并不代表成功了,要成功运行cuda才说明环境没有问题:
自从11.7之后cuda不再单独提供测试样例,我们可以从github上克隆下来,直接编译后运行即可:
cd /usr/local/cuda-12.4/ git clone https://github.com/NVIDIA/cuda-samples.git cd /cuda-samples/Samples/1_Utilities/deviceQuery make ./deviceQuery结果如下:
bionet@Bionet:/usr/local/cuda-12.4/cuda-samples/Samples/1_Utilities/deviceQuery$ ./deviceQuery ./deviceQuery Starting... CUDA Device Query (Runtime API) version (CUDART static linking) Detected 4 CUDA Capable device(s) Device 0: "NVIDIA GeForce RTX 4090" CUDA Driver Version / Runtime Version 12.2 / 12.4 CUDA Capability Major/Minor version number: 8.9 Total amount of global memory: 24217 MBytes (25393692672 bytes) (128) Multiprocessors, (128) CUDA Cores/MP: 16384 CUDA Cores GPU Max Clock rate: 2580 MHz (2.58 GHz) Memory Clock rate: 10501 Mhz Memory Bus Width: 384-bit L2 Cache Size: 75497472 bytes Maximum Texture Dimension Size (x,y,z) 1D=(131072), 2D=(131072, 65536), 3D=(16384, 16384, 16384) Maximum Layered 1D Texture Size, (num) layers 1D=(32768), 2048 layers Maximum Layered 2D Texture Size, (num) layers 2D=(32768, 32768), 2048 layers Total amount of constant memory: 65536 bytes Total amount of shared memory per block: 49152 bytes Total shared memory per multiprocessor: 102400 bytes Total number of registers available per block: 65536 Warp size: 32 Maximum number of threads per multiprocessor: 1536 Maximum number of threads per block: 1024 Max dimension size of a thread block (x,y,z): (1024, 1024, 64) Max dimension size of a grid size (x,y,z): (2147483647, 65535, 65535) Maximum memory pitch: 2147483647 bytes Texture alignment: 512 bytes Concurrent copy and kernel execution: Yes with 2 copy engine(s) Run time limit on kernels: No Integrated GPU sharing Host Memory: No Support host page-locked memory mapping: Yes Alignment requirement for Surfaces: Yes Device has ECC support: Disabled Device supports Unified Addressing (UVA): Yes Device supports Managed Memory: Yes Device supports Compute Preemption: Yes Supports Cooperative Kernel Launch: Yes Supports MultiDevice Co-op Kernel Launch: Yes Device PCI Domain ID / Bus ID / location ID: 0 / 9 / 0 Compute Mode: < Default (multiple host threads can use ::cudaSetDevice() with device simultaneously) > Device 1: "NVIDIA GeForce RTX 3090" CUDA Driver Version / Runtime Version 12.2 / 12.4 CUDA Capability Major/Minor version number: 8.6 Total amount of global memory: 24260 MBytes (25438126080 bytes) (082) Multiprocessors, (128) CUDA Cores/MP: 10496 CUDA Cores GPU Max Clock rate: 1755 MHz (1.75 GHz) Memory Clock rate: 9751 Mhz Memory Bus Width: 384-bit L2 Cache Size: 6291456 bytes Maximum Texture Dimension Size (x,y,z) 1D=(131072), 2D=(131072, 65536), 3D=(16384, 16384, 16384) Maximum Layered 1D Texture Size, (num) layers 1D=(32768), 2048 layers Maximum Layered 2D Texture Size, (num) layers 2D=(32768, 32768), 2048 layers Total amount of constant memory: 65536 bytes Total amount of shared memory per block: 49152 bytes Total shared memory per multiprocessor: 102400 bytes Total number of registers available per block: 65536 Warp size: 32 Maximum number of threads per multiprocessor: 1536 Maximum number of threads per block: 1024 Max dimension size of a thread block (x,y,z): (1024, 1024, 64) Max dimension size of a grid size (x,y,z): (2147483647, 65535, 65535) Maximum memory pitch: 2147483647 bytes Texture alignment: 512 bytes Concurrent copy and kernel execution: Yes with 2 copy engine(s) Run time limit on kernels: No Integrated GPU sharing Host Memory: No Support host page-locked memory mapping: Yes Alignment requirement for Surfaces: Yes Device has ECC support: Disabled Device supports Unified Addressing (UVA): Yes Device supports Managed Memory: Yes Device supports Compute Preemption: Yes Supports Cooperative Kernel Launch: Yes Supports MultiDevice Co-op Kernel Launch: Yes Device PCI Domain ID / Bus ID / location ID: 0 / 138 / 0 Compute Mode: < Default (multiple host threads can use ::cudaSetDevice() with device simultaneously) > Device 2: "NVIDIA GeForce RTX 2080 Ti" CUDA Driver Version / Runtime Version 12.2 / 12.4 CUDA Capability Major/Minor version number: 7.5 Total amount of global memory: 11012 MBytes (11546394624 bytes) (068) Multiprocessors, (064) CUDA Cores/MP: 4352 CUDA Cores GPU Max Clock rate: 1650 MHz (1.65 GHz) Memory Clock rate: 7000 Mhz Memory Bus Width: 352-bit L2 Cache Size: 5767168 bytes Maximum Texture Dimension Size (x,y,z) 1D=(131072), 2D=(131072, 65536), 3D=(16384, 16384, 16384) Maximum Layered 1D Texture Size, (num) layers 1D=(32768), 2048 layers Maximum Layered 2D Texture Size, (num) layers 2D=(32768, 32768), 2048 layers Total amount of constant memory: 65536 bytes Total amount of shared memory per block: 49152 bytes Total shared memory per multiprocessor: 65536 bytes Total number of registers available per block: 65536 Warp size: 32 Maximum number of threads per multiprocessor: 1024 Maximum number of threads per block: 1024 Max dimension size of a thread block (x,y,z): (1024, 1024, 64) Max dimension size of a grid size (x,y,z): (2147483647, 65535, 65535) Maximum memory pitch: 2147483647 bytes Texture alignment: 512 bytes Concurrent copy and kernel execution: Yes with 3 copy engine(s) Run time limit on kernels: No Integrated GPU sharing Host Memory: No Support host page-locked memory mapping: Yes Alignment requirement for Surfaces: Yes Device has ECC support: Disabled Device supports Unified Addressing (UVA): Yes Device supports Managed Memory: Yes Device supports Compute Preemption: Yes Supports Cooperative Kernel Launch: Yes Supports MultiDevice Co-op Kernel Launch: Yes Device PCI Domain ID / Bus ID / location ID: 0 / 4 / 0 Compute Mode: < Default (multiple host threads can use ::cudaSetDevice() with device simultaneously) > Device 3: "NVIDIA GeForce RTX 2080 Ti" CUDA Driver Version / Runtime Version 12.2 / 12.4 CUDA Capability Major/Minor version number: 7.5 Total amount of global memory: 11012 MBytes (11546394624 bytes) (068) Multiprocessors, (064) CUDA Cores/MP: 4352 CUDA Cores GPU Max Clock rate: 1650 MHz (1.65 GHz) Memory Clock rate: 7000 Mhz Memory Bus Width: 352-bit L2 Cache Size: 5767168 bytes Maximum Texture Dimension Size (x,y,z) 1D=(131072), 2D=(131072, 65536), 3D=(16384, 16384, 16384) Maximum Layered 1D Texture Size, (num) layers 1D=(32768), 2048 layers Maximum Layered 2D Texture Size, (num) layers 2D=(32768, 32768), 2048 layers Total amount of constant memory: 65536 bytes Total amount of shared memory per block: 49152 bytes Total shared memory per multiprocessor: 65536 bytes Total number of registers available per block: 65536 Warp size: 32 Maximum number of threads per multiprocessor: 1024 Maximum number of threads per block: 1024 Max dimension size of a thread block (x,y,z): (1024, 1024, 64) Max dimension size of a grid size (x,y,z): (2147483647, 65535, 65535) Maximum memory pitch: 2147483647 bytes Texture alignment: 512 bytes Concurrent copy and kernel execution: Yes with 3 copy engine(s) Run time limit on kernels: No Integrated GPU sharing Host Memory: No Support host page-locked memory mapping: Yes Alignment requirement for Surfaces: Yes Device has ECC support: Disabled Device supports Unified Addressing (UVA): Yes Device supports Managed Memory: Yes Device supports Compute Preemption: Yes Supports Cooperative Kernel Launch: Yes Supports MultiDevice Co-op Kernel Launch: Yes Device PCI Domain ID / Bus ID / location ID: 0 / 134 / 0 Compute Mode: < Default (multiple host threads can use ::cudaSetDevice() with device simultaneously) > > Peer access from NVIDIA GeForce RTX 4090 (GPU0) -> NVIDIA GeForce RTX 3090 (GPU1) : No > Peer access from NVIDIA GeForce RTX 4090 (GPU0) -> NVIDIA GeForce RTX 2080 Ti (GPU2) : No > Peer access from NVIDIA GeForce RTX 4090 (GPU0) -> NVIDIA GeForce RTX 2080 Ti (GPU3) : No > Peer access from NVIDIA GeForce RTX 3090 (GPU1) -> NVIDIA GeForce RTX 4090 (GPU0) : No > Peer access from NVIDIA GeForce RTX 3090 (GPU1) -> NVIDIA GeForce RTX 2080 Ti (GPU2) : No > Peer access from NVIDIA GeForce RTX 3090 (GPU1) -> NVIDIA GeForce RTX 2080 Ti (GPU3) : No > Peer access from NVIDIA GeForce RTX 2080 Ti (GPU2) -> NVIDIA GeForce RTX 4090 (GPU0) : No > Peer access from NVIDIA GeForce RTX 2080 Ti (GPU2) -> NVIDIA GeForce RTX 3090 (GPU1) : No > Peer access from NVIDIA GeForce RTX 2080 Ti (GPU2) -> NVIDIA GeForce RTX 2080 Ti (GPU3) : No > Peer access from NVIDIA GeForce RTX 2080 Ti (GPU3) -> NVIDIA GeForce RTX 4090 (GPU0) : No > Peer access from NVIDIA GeForce RTX 2080 Ti (GPU3) -> NVIDIA GeForce RTX 3090 (GPU1) : No > Peer access from NVIDIA GeForce RTX 2080 Ti (GPU3) -> NVIDIA GeForce RTX 2080 Ti (GPU2) : No deviceQuery, CUDA Driver = CUDART, CUDA Driver Version = 12.2, CUDA Runtime Version = 12.4, NumDevs = 4 Result = PAS可以看到4090的ECC没有开启不过问题不大,这个以后再处理。
同样可以再跑一个BandwidthTest,编译后结果如下
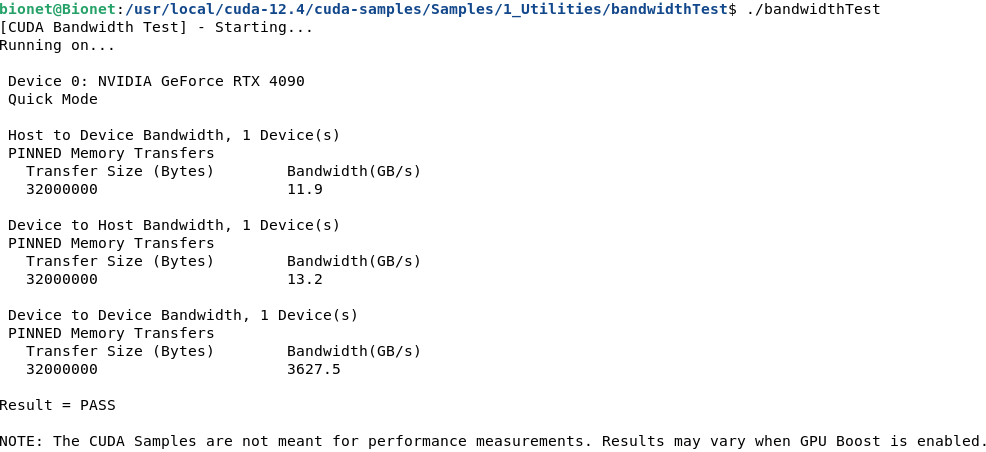
bionet@Bionet:/usr/local/cuda-12.4/cuda-samples/Samples/1_Utilities/bandwidthTest$ ./bandwidthTest [CUDA Bandwidth Test] - Starting... Running on... Device 0: NVIDIA GeForce RTX 4090 Quick Mode Host to Device Bandwidth, 1 Device(s) PINNED Memory Transfers Transfer Size (Bytes) Bandwidth(GB/s) 32000000 11.9 Device to Host Bandwidth, 1 Device(s) PINNED Memory Transfers Transfer Size (Bytes) Bandwidth(GB/s) 32000000 13.2 Device to Device Bandwidth, 1 Device(s) PINNED Memory Transfers Transfer Size (Bytes) Bandwidth(GB/s) 32000000 3627.5 Result = PASS NOTE: The CUDA Samples are not meant for performance measurements. Results may vary when GPU Boost is enabled.未完待续~~~
文章转载自:NeoNexus
