
阅读量:2
注意:
1、cuda-sample需要和cuda版本对应,否则会报错
2、只有进行hpcg测试时才需要设置当前环境变量为cuda-10,其它测试时设置cuda-12.0,否则在进行浮点性能测试时会报错
一、准备测试程序
1.环境变量要求cuda11.8
# centos7 ubuntu18.04 ubuntu20.04 ubuntu22.04 # 只需安装nvcc不需要安装驱动 wget https://developer.download.nvidia.com/compute/cuda/11.8.0/local_installers/cuda_11.8.0_520.61.05_linux.run sudo sh cuda_11.8.0_520.61.05_linux.run # 安装完毕后声明cuda11.8环境变量 export PATH=/usr/local/cuda-11.8/bin:$PATH export LD_LIBRARY_PATH=/usr/local/cuda-11.8/lib64:$LD_LIBRARY_PATH2.cuda-samples-11.8测试包
wget https://mirrors.qiql.net/pkgs/cuda-samples-11.8.tar.gz tar -zxvf cuda-samples-11.8.tar.gz3.hpcg测试环境
# cuda10.0安装 wget https://mirrors.qiql.net/pkgs/cuda_10.0.130_410.48_linux.run sh cuda_10.0.130_410.48_linux.run # 声明cuda10环境变量 export PATH=/usr/local/cuda-10.0/bin:$PATH export LD_LIBRARY_PATH=/usr/local/cuda-10.0/lib64:$LD_LIBRARY_PATH # 安装OpenMPI3.1.0 wget https://mirrors.qiql.net/pkgs/openmpi-3.1.0.tar.gz tar -zxvf openmpi-3.1.0.tar.gz cd openmpi-3.1.0 ./configure --prefix=/opt/support/soft/openmpi/3.1.0 make -j make install cd /opt/support/soft/openmpi/3.1.0 vim env.sh “ base_dir=/opt/support/soft/openmpi/3.1.0 export PATH=${base_dir}/bin:$PATH export LD_LIBRARY_PATH=${base_dir}/lib:$LD_LIBRARY_PATH export CPATH=${base_dir}/include:$CPATH export MANPATH=${base_dir}/share:$MANPATH ” # 保存退出,后续要加载openmpi3.1.0,执行source /opt/support/soft/openmpi/3.1.0/env.sh 命令即可 ############# # 如果无法编译安装 OpenMPI-3.1.0 # 直接下载编译好的包: wget https://mirrors.qiql.net/pkgs/openmpi-3.1.0.tgz # 将其解压到/opt/support/soft/openmpi目录,然后source env.sh 即可 # hpcg包下载解压 cd /opt/support wget https://mirrors.qiql.net/pkgs/hpcg-3.1_cuda-10_ompi-3.1_gcc485_sm_35_sm_50_sm_60_sm_70_sm75_ver_10_9_18.tgz tar -zxvf hpcg-3.1_cuda-10_ompi-3.1_gcc485_sm_35_sm_50_sm_60_sm_70_sm75_ver_10_9_18.tgz4.intel oneAPI安装
# intel oneAPI Base Toolkit wget https://registrationcenter-download.intel.com/akdlm/irc_nas/18970/l_BaseKit_p_2022.3.1.17310_offline.sh sh l_BaseKit_p_2022.3.1.17310_offline.sh 进入安装界面 选择 Accpet & customer Next 指定路径 /opt/support/compiler/intel/2022u2/oneapi 后 Next Install 选择 Skip 后 Next 选 I do NOT consent to the collection of my information 后 Begin Installation 等待安装完毕后 Close # intel oneAPI HPC Toolkit wget https://registrationcenter-download.intel.com/akdlm/irc_nas/18975/l_HPCKit_p_2022.3.1.16997_offline.sh sh l_HPCKit_p_2022.3.1.16997_offline.sh 进入安装界面 选择 Accpet & customer Next 指定路径 /opt/support/compiler/intel/2022u2/oneapi 后 Next 选择 Skip 后 Next 选 I do NOT consent to the collection of my information 后 Begin Installation 等待安装完毕后 Close # 启动编译器 两个安装完毕后 source /opt/support/compiler/intel/2022u2/oneapi/setvars.sh intel64二、测试流程
1.显存带宽
# 进入解压的cuda-samples-11.8目录里 cd /opt/support/cuda-samples-11.8/Samples/1_Utilities/bandwidthTest # 修该下面这个文件中的 32M 为 2048M vim bandwidthTest.cu # 进入该文件 #define DEFAULT_SIZE (32 * (1e6)) // 32 M 将上面这一行修改为 #define DEFAULT_SIZE (2048 * (1e6)) # 修改cuda路径 vim Makefile CUDA_PATH ?= /usr/local/cuda 将上面这行代码修改为 CUDA_PATH ?= /usr/local/cuda-11.8 make # 测试命令 ./bandwidthTest --device=0 # 测试命令,--device=0 表示对 0 号卡进行测试,依次测试所有卡 记录下Host to Device 、Device to Host 、Device to Device 脚本: #!/bin/bash for device in {0..7} do echo "Testing device$device:" >> band.txt ./bandwidthTest --device=$device >> band.txt echo "-----------------------------------" >> band.txt done2.卡间带宽
cd /opt/support/cuda-samples-11.8/Samples/5_Domain_Specific/p2pBandwidthLatencyTest # 修改cuda路径 vim Makefile CUDA_PATH ?= /usr/local/cuda 将上面这行代码修改为 CUDA_PATH ?= /usr/local/cuda-11.8 make ./p2pBandwidthLatencyTest 记录下 Bidirectional P2P=Enable Bandwidth Matrix(GB/s) P2P=Enabled Latency(P2P writes)Matrix(us)3.浮点性能
cd /opt/support/cuda-samples-11.8/Samples/4_CUDA_Libraries/batchCUBLAS # 修改cuda路径 vim Makefile CUDA_PATH ?= /usr/local/cuda 将上面这行代码修改为 CUDA_PATH ?= /usr/local/cuda-11.8 make ./batchCUBLAS -m8192 -n8192 -k8192 --device=0 # --device=0表示对0号卡进行测试,依次测试所有卡 记录Running N=10 batched的GFLOPS值 #!/bin/bash # 迭代测试device0到device7 for device in {0..7} do echo "Testing device$device:" >> float.txt ./batchCUBLAS -m8192 -n8192 -k8192 --device=$device >> float.txt echo "-----------------------------------" >> float.txt done 报错: ./batchCUBLAS: error while loading shared libraries: libcublas.so.12: cannot open shared object file: No such file or directory4.多卡扩展性
cd /opt/support/hpcg-3.1_cuda-10_ompi-3.1_gcc485_sm_35_sm_50_sm_60_sm_70_sm75_ver_10_9_18/ vim hpcg.dat HPCG benchmark input file Sandia National Laboratories; University of Tennessee, Knoxville 256 256 256 # 无需修改 60 # 运行时间,无需修改 # 单卡运行HPCG: mpirun --allow-run-as-root -n 1 ./xhpcg-3.1_gcc_485_cuda-10.0.130_ompi-3.1.0_sm_35_sm_50_sm_60_sm_70_sm_75_ver_10_9_18 # 双卡运行HPCG mpirun --allow-run-as-root -n 2 ./xhpcg-3.1_gcc_485_cuda-10.0.130_ompi-3.1.0_sm_35_sm_50_sm_60_sm_70_sm_75_ver_10_9_18 # 四卡运行HPCG mpirun --allow-run-as-root -n 4 ./xhpcg-3.1_gcc_485_cuda-10.0.130_ompi-3.1.0_sm_35_sm_50_sm_60_sm_70_sm_75_ver_10_9_18 # 八卡运行HPCG mpirun --allow-run-as-root -n 8 ./xhpcg-3.1_gcc_485_cuda-10.0.130_ompi-3.1.0_sm_35_sm_50_sm_60_sm_70_sm_75_ver_10_9_185.内存带宽
cd /opt/support/ # 获取stream源码文件 wget https://mirrors.qiql.net/pkgs/stream.c # 加载oneAPI环境变量,oneAPI路径根据自己调整 source /opt/support/compiler/intel/2022u2/oneapi/setvars.sh intel64 # 编译Stream.c,根据实际内存数量调整数组大小,以下为在256GB内存节点上的编译命令 icc -o stream.intel stream.c -DSTATIC -DNTIMES=10 -DSTREAM_ARRAY_SIZE=3200000000 -mcmodel=large -shared-intel -Ofast -qopenmp -ffreestanding -qopt-streaming-stores always # 声明环境变量 export OMP_PROC_BIND=true export OMP_NUM_THREADS=64 # 运行Stream ./stream.intel6.NCCL test
安装: wget https://developer.download.nvidia.com/compute/cuda/repos/ubuntu2004/x86_64/cuda-keyring_1.0-1_all.deb sudo dpkg -i cuda-keyring_1.0-1_all.deb sudo apt-get update sudo apt-get install libnccl2 libnccl-dev cd /opt/support/ git clone https://github.com/NVIDIA/nccl-tests cd nccl-tests/ make make报错: root@ubuntu:/opt/support/nccl-tests# make make -C src build BUILDDIR=/opt/support/nccl-tests/build make[1]: Entering directory '/opt/support/nccl-tests/src' Compiling timer.cc > /opt/support/nccl-tests/build/timer.o Compiling /opt/support/nccl-tests/build/verifiable/verifiable.o In file included from /usr/local/cuda/bin/..//include/cuda_runtime.h:83, from <command-line>: /usr/local/cuda/bin/..//include/crt/host_config.h:129:2: error: #error -- unsupported GNU version! gcc versions later than 7 are not supported! 129 | #error -- unsupported GNU version! gcc versions later than 7 are not supported! | ^~~~~ make[1]: *** [../verifiable/verifiable.mk:11: /opt/support/nccl-tests/build/verifiable/verifiable.o] Error 1 make[1]: Leaving directory '/opt/support/nccl-tests/src' make: *** [Makefile:20: src.build] Error 2 手动make: make -C src BUILD_DIR=build CUDA_HOME=/usr/local/cuda-12.0 ./build/all_reduce_perf -b 8 -e 256M -f 2 -g 4三、测试结论
| 设备 | A100 |
|---|---|
| GPU | NVIDIA A100 40GB PCIE |
| 显存 | 40GB HBM2 |
| 显存带宽 | 1555GB/s |
| 功耗 | 250 W |
| FP64 | 9.7 TFLOPS |
| FP64 Tensor Core | 19.5 TFLOPS |
| FP32 | 19.5 TFLOPS |
| TF32 | 156 TFLOPS |
| FP16 Tensor Core | 312 TFLOPS |
| INT 8 | 624 TFLOPS |
| 互连技术* | PCIE,或NVLink 桥接器(仅用于连接两张卡)互连带宽为600GB/s |
| PCIe卡槽 | PCIE 4.0 X16,理论带宽为32GB/s |
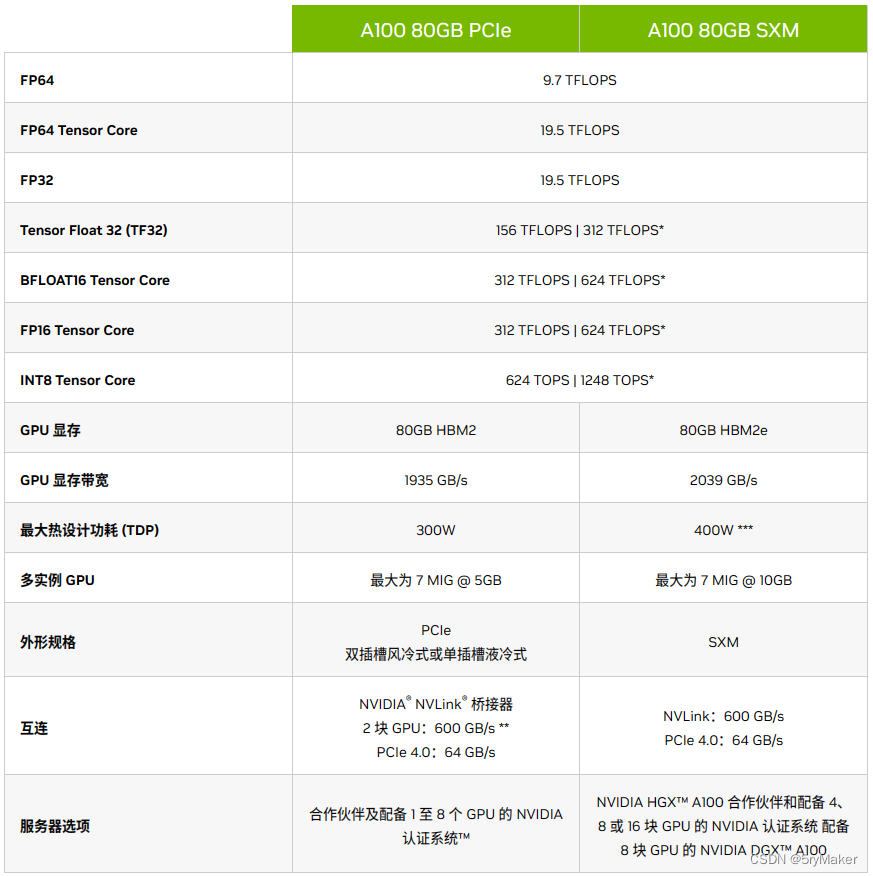
| 设备 | A100 |
|---|---|
| GPU | NVIDIA A100 80GB PCIE |
| 显存 | 80GB HBM2e |
| 显存带宽 | 1935GB/s |
| 功耗 | 300 W |
| FP64 | 9.7 TFLOPS |
| FP64 Tensor Core | 19.5 TFLOPS |
| FP32 | 19.5 TFLOPS |
| TF32 | 156 TFLOPS |
| FP16 Tensor Core | 312 TFLOPS |
| INT 8 | 624 TFLOPS |
| 互连技术* | PCIE,或NVLink桥接器(仅用于连接两张卡)互连带宽为600GB/s |
| PCIe卡槽 | PCIE 4.0 X16,理论带宽为32GB/s |
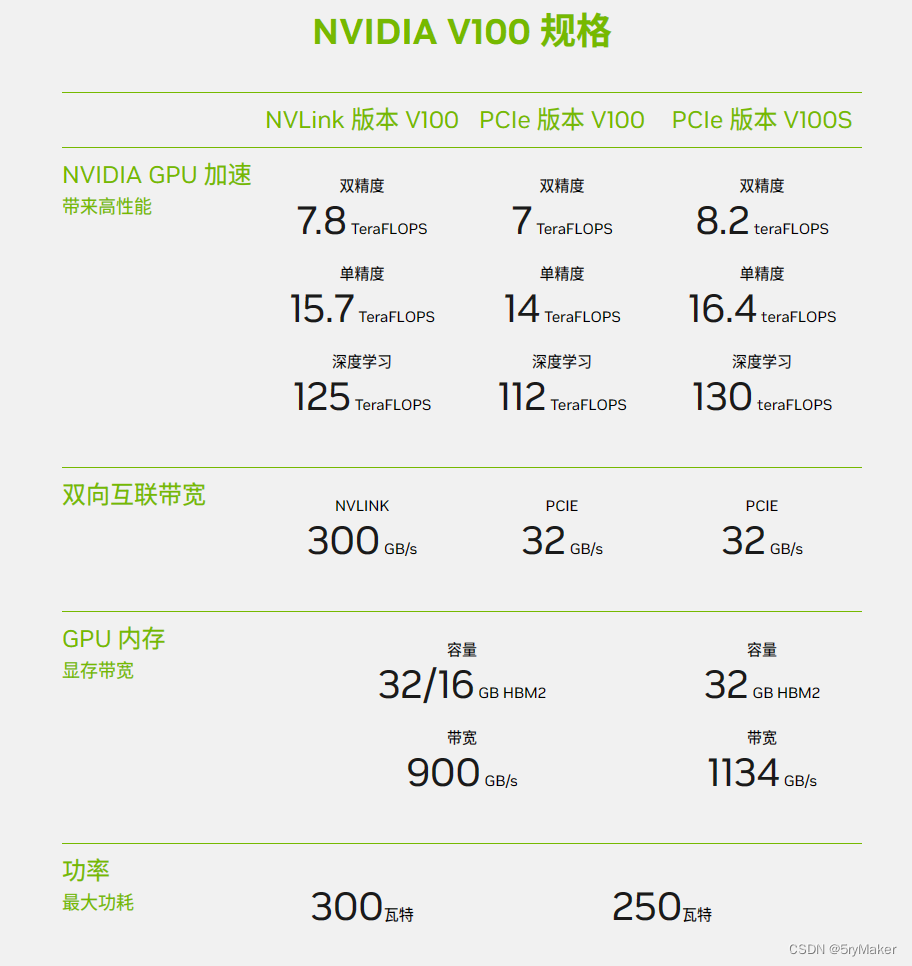
| 设备 | V100S |
|---|---|
| GPU | Tesla V100S-PCIE-32GB |
| 显存 | 32 GB HBM2 |
| 显存带宽 | 1134 GB/s |
| 功耗 | 250 W |
| FP64 | 8.2 TFLOPS |
| FP32 | 16.4 TFLOPS |
| FP16 | 130 TFLOPS |
| PCIe卡槽 | PCIE 3.0 X16,理论带宽为16GB/s |
| 设备 | V100 |
|---|---|
| GPU | NVIDIA V100 16GB PCIE |
| 显存 | 16GB HBM2 |
| 显存带宽 | 900GB/s |
| 功耗 | 250W |
| FP64 | 7 TFLOPS |
| FP32 | 14 TFLOPS |
| FP16 | 112 TFLOPS |
| PCIe卡槽 | PCIE 3.0 X16,理论带宽为16GB/s |
1.显存带宽
这是一个简单的测试程序,测试为GPU显存与服务器内存间双向带宽测试,包括Host To Device(服务器内存到显存)、Device To Host(显存到服务器内存)、显存带宽(GPU芯片到GPU显存)三项测试结果。用于测量 GPU 的内存拷贝带宽和跨 PCI-e 的内存带宽。此测试应用程序能够测量设备到设备复制带宽、可分页和分页锁定内存的主机到设备复制带宽,以及可分页和分页锁定内存的设备到主机复制带宽。该
Device to Device测出来的值对应是 服务器设备的显存带宽,host to device以及device to host 对应的是PCIe卡槽的规格。
结论:
显存带宽的测试百分比为 测试值/显存带宽理论值 ; 内存到显存,显存到内存的百分比为 测试值/PCIe带宽(一般为PCIe 3.0 16GB 或者 PCIe 4.0 32GB)
2.卡间带宽
此应用程序演示了 GPU 对之间的 CUDA 点对点 (P2P) 数据传输,并计算延迟和带宽。对使用 P2P 和不使用 P2P 的 GPU 对进行测试。该测试为GPU卡之间的实测带宽,即数据从其中一张卡通过PCIE槽传输至另一张卡的测试结果。
"P2P" 的全称是 "Peer-to-Peer",它通常指的是一种直接从一个节点到另一个节点进行通信或数据传输的方式,而不需要经过中间服务器或中心化的控制。它表示GPU之间可以直接访问彼此的显存(内存),以便进行数据传输,而不需要将数据通过主机内存进行中转。这可以提高数据传输的效率和性能。"P2P Memory Access" 允许GPU之间进行双向数据传输,从而可以实现更高的带宽和更低的延迟。所以,你可以将 "P2P" 视为与双向数据传输相关的功能,但它更广泛地指代了直接的、点对点的通信和数据访问方式。
PCIe 3.0的每个通道为1GB/s,PCIe 4.0的每个通道的理论带宽是2GB/s,x16插槽有16个通道,因此理论总带宽为32GB/s,实际带宽通常会受到各种因素的影响,包括硬件性能、系统负载和传输模式。在PCIe通信中,双向通信是默认开启的,这意味着PCIe设备可以在发送和接收之间进行双向数据传输。因此,在PCIe 4.0 x16插槽上,理论上可以实现每个方向的带宽都为32GB/s,总带宽为64GB/s。但实际上,系统的硬件和软件配置可能会限制实际带宽。
结论:
卡间带宽的测试值与理论值的对比,理论值根据PCIe插槽的规格判断:一般为PCIe3.0x16,速度为16GB/s;PCIe4.0x16,速度为32GB/s。然后要看p2p点对点通信功能是否开启,如果能够启动,理论传输速率就翻倍。
3.浮点性能
这是一个 CUDA 示例,演示如何使用批处理的 CUBLAS API 调用来提高整体性能。主要测试的是GPU节点的双精度浮点运算能力
主要指标是双精度浮点数:Float64,就是服务器或显卡指标中的FP64。
1 TFLOPS = 1,000,000 GFLOPS
结论:
浮点性能的测试值要根据厂家标注的理论值进行对比: 测试纸/理论值
4.多卡扩展性
利用 环境 cuda10.0 和 MPI:OpenMPI 3.1.0 看hpcg测试最后给出的GFLOPS值,对比单卡,2卡,4卡,8卡的结果。
结论:
看最后测试给出的hpcg值1卡、2卡、4卡、8卡是不是呈上升的线性增长(2卡效率比单卡高,4卡比2卡效率高,依次类推)
5.内存带宽
安装Intel oneAPI到目标主机,默认安装oneAPI2022.2,使用加载的oneAPI编译Stream.c文件,根据实际内存数量调整数组大小。
| 主机名 | Function | Best Rate MB/s | Avg time | Min time | Max time |
|---|---|---|---|---|---|
| ecs-37632405 | Copy | 174014.1 | 2.914759 | 2.353832 | 3.624191 |
| Scale | 167372.9 | 3.101483 | 2.44723 | 3.849923 | |
| Add | 148908.6 | 4.17651 | 4.126021 | 4.227916 | |
| Triad | 150024.4 | 4.203401 | 4.095333 | 4.317513 |
