
阅读量:5
前言


ChatGPT体验地址

文章目录
IO
在Java基础中,IO流是一个重要操作,先上八股
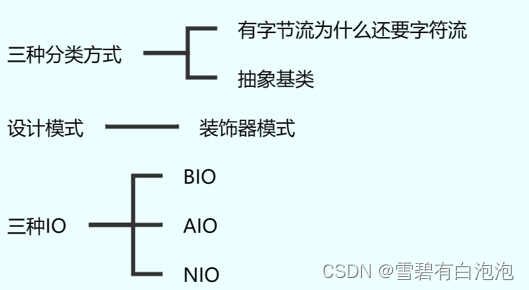
- BIO:传统的IO,同步阻塞,一个连接一个线程。一般不怎么使用
- AIO:JDK7引入的,异步非阻塞IO
- NIO:JDK1.4之后新的API,是多路复用,允许你一次性处理多个连接,而不需要等待每个连接的完成。(NIO 多路复用的核心概念是 Selector(选择器)和 Channel(通道)通过Channel、Buffer和Selector来进行数据传输和事件处理)
Netty
Netty是建立在NIO之上的一个框架,提供了更高级的抽象,如ChannelHandler和EventLoop,简化了事件处理和网络编程。
执行流程如下图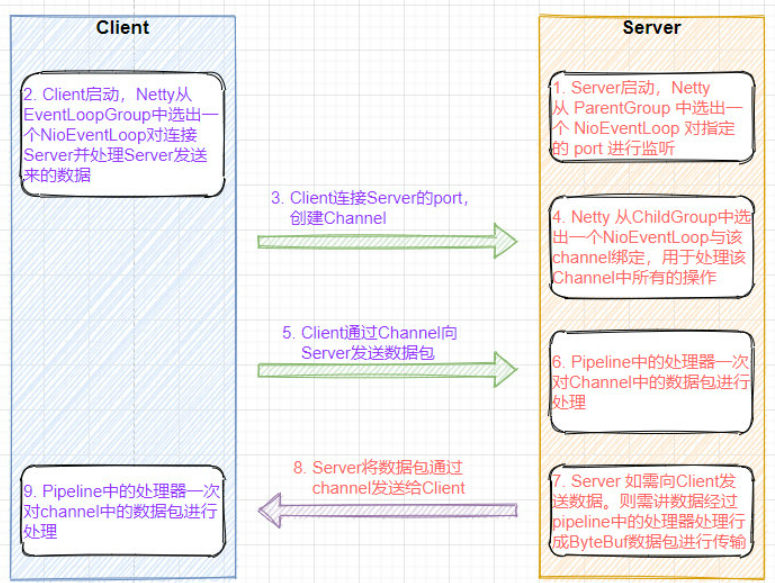
具有高性能,高可靠性,高可扩展性,还支持多种协议
我们以聊天流程为例
- 服务端启动
- 客户端启动
- 客户端启动连接上的时候,告知服务端
- 服务端读取到客户端的信息后立即发送信息给客户端
- 客户端收到信息后也发送给服务端
1. 引入依赖
<dependency> <groupId>io.netty</groupId> <artifactId>netty-all</artifactId> <version>4.1.76.Final</version> </dependency> 2. 服务端
@Slf4j public class NettyServer { private final static int PORT = 9012; public static void main(String[] args) throws InterruptedException { /** * 包含childGroup,childHandler,config,继承的父类AbstractBootstrap包括了parentGroup * */ ServerBootstrap bootstrap = new ServerBootstrap(); /** * EventLoopGroup用于处理所有ServerChannel和Channel的所有事件和IO * */ EventLoopGroup parentGroup = new NioEventLoopGroup(); EventLoopGroup childGroup = new NioEventLoopGroup(); try { /** * 绑定两个事件组 * */ bootstrap.group(parentGroup, childGroup) /** * 初始化socket,定义tcp连接的实例 * 内部调用ReflectiveChannelFactory实现对NioServerSocketChannel实例化 * channelFactory是在AbstractBootstrap,也就是bootstrap的父类 * */ .channel(NioServerSocketChannel.class) /** * 添加处理器 * ChannelInitializer包括了Set<ChannelHandlerContext> initMap * * 这里比较有趣的事情就是使用被注册的channel去初始化其他的channel, * 等初始化结束后移除该channel * 所以SocketChannel是一个工具, * * 在bind绑定端口的时候,进行初始化和注册initAndRegister, * 通过channel = channelFactory.newChannel()得到初始化channel * init(channel)真正开始初始化, * p = channel.pipeline()得到ChannelPipeline, * p.addLast开始添加 * ch.eventLoop().execute将childHandler赋值并开启一个任务setAutoRead * 所以最后在监听读取的时候将会按照下面添加的channel进行读取 * * ChannelInitializer继承了ChannelInboundHandlerAdapter * 间接继承ChannelHandlerAdapter,ChannelInboundHandler, * */ .childHandler(new ChannelInitializer<SocketChannel>() { @Override protected void initChannel(SocketChannel ch) throws Exception { ChannelPipeline pipeline = ch.pipeline(); /** * ByteBuf和String之间的转换 * * Decoders解密 * pipeline.addLast("frameDecoder", new {@link LineBasedFrameDecoder}(80)) * pipeline.addLast("stringDecoder", new {@link StringDecoder}(CharsetUtil.UTF_8)) * * Encoder加密 * pipeline.addLast("stringEncoder", new {@link StringEncoder}(CharsetUtil.UTF_8)) * * 使用上面的加密解密后就可以直接读取字符串 * void channelRead({@link ChannelHandlerContext} ctx, String msg) { * ch.write("Did you say '" + msg + "'?\n") * } * * */ pipeline.addLast(new StringDecoder()); pipeline.addLast(new StringEncoder()); //自定义处理器 pipeline.addLast(new ServerHandler1()); } }); ChannelFuture future = bootstrap.bind(PORT).sync(); log.info("服务器已启动"); future.channel().closeFuture().sync(); } finally { parentGroup.shutdownGracefully(); childGroup.shutdownGracefully(); } } } 这段代码实现了一个使用Netty框架的服务器端,它监听指定的端口并处理客户端的连接请求。
- 创建一个
ServerBootstrap实例,用于启动服务器。- 创建两个
EventLoopGroup实例,parentGroup用于处理服务器的连接请求,childGroup用于处理客户端的数据通信。- 绑定事件组到
ServerBootstrap实例。- 指定使用的
NioServerSocketChannel作为服务器套接字通道的实现类。- 添加处理器到
ChannelInitializer中,该处理器负责初始化和配置新连接的SocketChannel。- 在处理器中,通过
ChannelPipeline添加了如下处理器:
StringDecoder:处理传入的字节数据,并将其解码为字符串。StringEncoder:处理传出的字符串数据,并将其编码为字节。ServerHandler1:自定义的处理器,用于处理客户端发送的消息。- 绑定服务器的端口号,启动服务器。
- 等待服务器的关闭事件。
- 处理器
@Slf4j public class ServerHandler1 extends ChannelInboundHandlerAdapter { @Override public void channelRead(ChannelHandlerContext ctx, Object msg) throws Exception { log.info("Client Address ====== {},读取的信息:{}", ctx.channel().remoteAddress(),msg); ctx.channel().writeAndFlush("服务端writeAndFlush:我是服务端"); ctx.fireChannelActive(); //睡眠 TimeUnit.MILLISECONDS.sleep(500); } @Override public void exceptionCaught(ChannelHandlerContext ctx, Throwable cause) throws Exception { //打印异常 cause.printStackTrace(); //关闭Channel连接,并通知ChannelFuture,通常是出现异常或者是完成了操作 ctx.close(); } } 4. 客户端
@Slf4j public class NettyClient { private final static int PORT = 9012; private final static String IP = "localhost"; public static void main(String[] args) throws InterruptedException { /** * 服务端是ServerBootstrap,客户端是Bootstrap * Bootstrap引导channel连接,UDP连接用bind方法,TCP连接用connect方法 * */ Bootstrap bootstrap = new Bootstrap(); /** * 服务端是EventLoopGroup,客户端是NioEventLoopGroup * 这里创建默认0个线程,一个线程工厂,一个选择器提供者 * */ NioEventLoopGroup eventLoopGroup = new NioEventLoopGroup(); try { bootstrap.group(eventLoopGroup) /** * 初始化socket,定义tcp连接的实例 * */ .channel(NioSocketChannel.class) .handler(new ChannelInitializer<SocketChannel>() { @Override protected void initChannel(SocketChannel ch) throws Exception { ChannelPipeline pipeline = ch.pipeline(); /** * 进行字符串的转换 * */ pipeline.addLast(new StringDecoder(CharsetUtil.UTF_8)); pipeline.addLast(new StringEncoder(CharsetUtil.UTF_8)); /** * 自定义处理器 * */ pipeline.addLast(new ClientHandler1()); } }); ChannelFuture future = bootstrap.connect(IP, PORT).sync(); log.info("客户端访问"); future.channel().closeFuture().sync(); } finally { eventLoopGroup.shutdownGracefully(); } } } 这段代码实现了一个使用Netty框架的客户端,它连接到指定的服务器端并与服务器进行通信。
- 创建一个
Bootstrap实例,用于启动客户端。- 创建一个
NioEventLoopGroup实例,用于处理客户端的事件和IO操作。- 绑定事件组到
Bootstrap实例。- 指定使用的
NioSocketChannel作为客户端套接字通道的实现类。- 添加处理器到
ChannelInitializer中,该处理器负责初始化和配置客户端连接的SocketChannel。- 在处理器中,通过
ChannelPipeline添加了如下处理器:
StringDecoder:处理传入的字节数据,并将其解码为字符串。StringEncoder:处理传出的字符串数据,并将其编码为字节。ClientHandler1:自定义的处理器,用于处理与服务器之间的通信。- 使用
Bootstrap的connect()方法连接到指定的服务器IP和端口。- 等待连接完成。
- 在连接成功后,打印日志信息。
- 等待客户端的关闭事件。
- 处理器
@Slf4j public class ClientHandler1 extends ChannelInboundHandlerAdapter { @Override public void channelRead(ChannelHandlerContext ctx, Object msg) throws Exception { log.info("客户端读取的信息:{}", msg); ctx.channel().writeAndFlush("客户端writeAndFlush:我是客户端"); TimeUnit.MILLISECONDS.sleep(5000); } /** * 当事件到达pipeline时候触发 */ @Override public void channelActive(ChannelHandlerContext ctx) throws Exception { ctx.channel().writeAndFlush("客户端:开始聊天"); } @Override public void exceptionCaught(ChannelHandlerContext ctx, Throwable cause) throws Exception { cause.printStackTrace(); //关闭Channel连接 ctx.close(); } } 
结果
服务端日志
Client Address ====== /127.0.0.1:63740,读取的信息:客户端:开始聊天 Client Address ====== /127.0.0.1:63740,读取的信息:客户端writeAndFlush:我是客户端 Client Address ====== /127.0.0.1:63740,读取的信息:客户端writeAndFlush:我是客户端 客户端日志
客户端读取的信息:服务端writeAndFlush:我是服务端 客户端读取的信息:服务端writeAndFlush:我是服务端 总结

引导类-Bootstarp和ServerBootstrap
Bootstarp和ServerBootstrap被称为引导类,使你的应用程序和网络层相隔离。类似java项目的启动类。
连接-NioSocketChannel
客户端和服务端的启动都是采用配置的channel去连接处理器,这里服务端和客户端是用NioSocketChannel
事件组-EventLoopGroup和NioEventLoopGroup
客户端使用的是NioEventLoopGroup,服务端使用的是EventLoopGroup。 服务端和客户端的引导类启动后实现了配置的运行,客户端和服务端的连接都是采用NioSocketChannel。 连接的流程:
- 客户端创建一个channel
- channel对应一个EventLoop,EventLoop存放到NioEventLoopGroup中
- 服务端监听到后,创建一个channel连接,channel对应一个EventLoop,EventLoop存放到子的EventLoopGroup,父的事件组负责监听,一个事件对应一个子事件组。
在这里可以认为父是boss监听组,子是工作组。- 当客户端发送信息的时候,先被父监听,然后将异步调用工作组。
- 消息会经过事件组的所有处理器。
实际上服务端的事件组也可以使用NioEventLoopGroup。

- 🎁本次送书1~3本【取决于阅读量,阅读量越多,送的越多】👈
- ⌛️活动时间:截止到2024-1月10号
- ✳️参与方式:关注博主+三连(点赞、收藏、评论)
购买链接:https://item.jd.com/13836258.html

