前言
本文阅读提醒:读者需要了解spring框架知识 MyBatis框架知识以及springBoot框架知识.其中涉及到:注册与配置拦截器,MyBatis数据处理,spring Web知识,spring注解标签等,springBoot异常统一处理以及springBoot配置服务器
目录
SpringBoot服务器搭建
第一步:创建Maven项目
第二步:注入依赖
- 依赖的父级工程
- 指定JDK版本
- 添加基本的SpringWeb依赖
- 插入打包组件
<?xml version="1.0" encoding="UTF-8"?> <project xmlns="http://maven.apache.org/POM/4.0.0" xmlns:xsi="http://www.w3.org/2001/XMLSchema-instance" xsi:schemaLocation="http://maven.apache.org/POM/4.0.0 http://maven.apache.org/xsd/maven-4.0.0.xsd"> <modelVersion>4.0.0</modelVersion> <groupId>org.example</groupId> <artifactId>news</artifactId> <version>1.0-SNAPSHOT</version> <!--依赖的父级工程--> <parent> <groupId>org.springframework.boot</groupId> <artifactId>spring-boot-starter-parent</artifactId> <version>2.6.6</version> <relativePath/> </parent> <!--指定 jdk 版本--> <properties> <java.version>1.8</java.version> </properties> <dependencies> <!--添加基本的 spring web 依赖--> <dependency> <groupId>org.springframework.boot</groupId> <artifactId>spring-boot-starter-web</artifactId> </dependency> </dependencies> <!--打包插件--> <build> <plugins> <plugin> <groupId>org.springframework.boot</groupId> <artifactId>spring-boot-maven-plugin</artifactId> <version>2.6.6</version> </plugin> </plugins> </build> </project>第三步:创建启动类(必须创建与组件同包下)
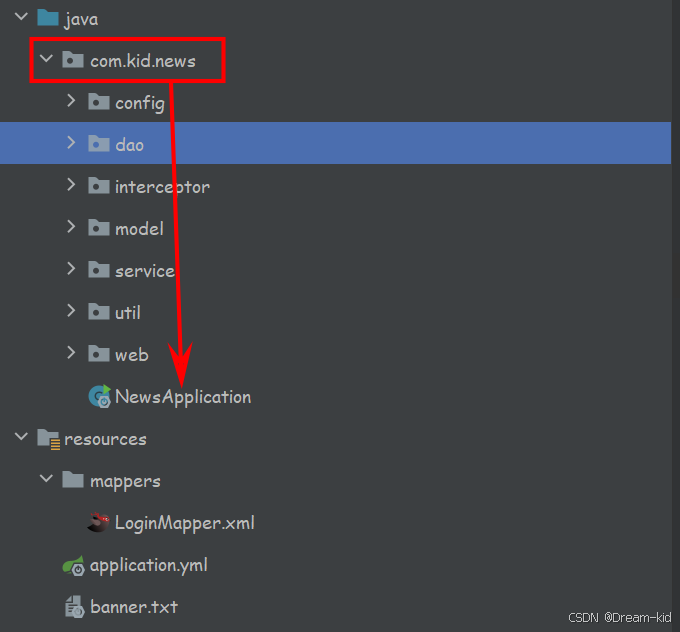
解释:启动类在启动的时候需要扫描全部组件,所以启动类和组件同包.

启动类代码演示
@SpringBootApplication public class NewsApplication { public static void main(String[] args) { SpringApplication.run(NewsApplication.class); } }服务器与数据库链接
第一步:注入依赖
- mysql依赖
- 阿里巴巴数据源(数据库连接管理组件)
- Spring与MyBatis结合
<!--mysql--> <dependency> <groupId>mysql</groupId> <artifactId>mysql-connector-java</artifactId> <version>8.0.16</version> </dependency> <!-- 阿里数据源 数据库连接管理组件 --> <dependency> <groupId>com.alibaba</groupId> <artifactId>druid</artifactId> <version>1.1.10</version> </dependency> <!-- spring+mybatis--> <dependency> <groupId>org.mybatis.spring.boot</groupId> <artifactId>mybatis-spring-boot-starter</artifactId> <version>2.1.4</version> </dependency>第二步:连接数据库
因为SpringBoot管理与mysql连接(我们导入了SpringWeb基础jar包,会自动连接数据库)
applicantion.yml配置数据库地址等
spring: datasource: driver-class-name: com.mysql.cj.jdbc.Driver url: jdbc:mysql://127.0.0.1:3306/ssmdb?serverTimezone=Asia/Shanghai usename: root password: root配置阿里数据库管理
spring: datasource: driver-class-name: com.mysql.cj.jdbc.Driver url: jdbc:mysql://127.0.0.1:3306/ssmdb?serverTimezone=Asia/Shanghai usename: root password: root type: com.alibaba.druid.pool.DruidDataSource initialSize: 10 maxActive: 20配置MyBatis集成
导入jar包(Spring结合MyBatis)
applicantion.yml配置数据原信息
mybatis: type-aliases-package: com.kid.news.model mapper-locations: classpath:mappers/*Mapper.xml configuration: map-underscore-to-camel-case: true cache-enabled: true #日志信息 log-impl: org.apache.ibatis.logging.stdout.StdOutImpl第三步:创建dao接口,编写数据处理接口
package com.kid.news.dao; import com.kid.news.model.Admin; public interface LoginDao { Admin login(Admin admin); }第四步:编写sql语句mapper文件

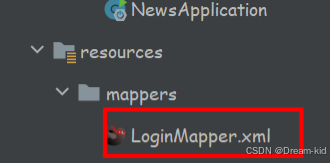
<mapper namespace="com.kid.news.dao.LoginDao"> <select id="login" parameterType="admin" resultType="com.kid.news.model.Admin"> select * from admin where account = #{account} and password = #{password} </select> </mapper>第五步:在启动类上添加@MapperScan("接口所在的包地址")
@SpringBootApplication @MapperScan("com.kid.news.dao") public class NewsApplication { public static void main(String[] args) { SpringApplication.run(NewsApplication.class); } }SpringBoot统一异常处理
SpringBoot对于异常处理也做了不错的支持,他提供了@RestControllerAdvice @ExceptionHandler注解,前者是用来开启全局异常捕获的,后者则是说明捕获那些异常,对那些异常进行处理
代码演示:
@RestControllerAdvice public class GlobalExceptionHandler { @ExceptionHandler(Exception.class) public Result globalException(Exception e) { Result result = new Result(500, "系统忙"+e.getMessage(), null); e.printStackTrace(); return result; } }代码解释:
@ExceptionHandler(Exception.class)---->Exception.class 选择处理的异常类(Exception所有异常)
拦截器注册与搭建
拦截器是Spring框架提供的核心功能之一,主要用来拦截用户请求,在指定的方法前后,根据业务需要执行预先设定的代码.
也就是说,允许开发成员在提前编写一些逻辑,在用户请求响应之前或者之后执行,也可以阻止拦截一些请求(例如:权限验证等).
编写拦截器
首先需要实现HandlerInterceptor接⼝,并重写方法
- preHandle()⽅法:⽬标⽅法执⾏前执⾏,返回true:继续执⾏后续操作;返回false:中断后续操作.
- postHandle()⽅法:⽬标⽅法执⾏后执⾏
- afterCompletion()⽅法:视图渲染完毕后执⾏,最后执⾏(但是现在基于前后端分离的设计模式,一般不需要后端返回视图,故而很少用)
代码示例:token权限验证
public class AdminTokenInterceptor implements HandlerInterceptor { /* 拦截器处理的方法 当请求到达处理器前,进入到拦截器进行处理 返回true --- 离开拦截器,向后执行到达处理器 返回false --- 不在向后执行 */ @Override public boolean preHandle(HttpServletRequest request, HttpServletResponse response, Object handler) throws Exception { String adminToken = request.getHeader("adminToken"); if (adminToken.equals("1234567")){ return true; }else { //向前端响应 Result result = new Result(401,"token验证失败",null); response.getWriter().write(new ObjectMapper().writeValueAsString(result)); } return false; } }注册拦截器
@Configuration public class WebConfig implements WebMvcConfigurer{ // 注册配置拦截器 public void addInterceptors(InterceptorRegistry registry) { InterceptorRegistration inter = registry.addInterceptor(new AdminTokenInterceptor()); inter.addPathPatterns("/**"); //配置进入拦截器的地址 inter.excludePathPatterns("/loginCtl/login");//放行地址 //inter.addPathPatterns("/user/**"); //用户需要拦截过滤地址 } }代码解释
使用 @Configuration 注解的类通常会包含一个或多个使用 @Bean 注解的方法,这些方法会返回一个对象,该对象会被注册为 Spring 应用上下文中的一个 bean
服务器响应前端
接受前端请求
编写web组件
@RestController @RequestMapping(path = "/loginCtl") public class LoginController { @GetMapping(path = "/login") public String login(Admin admin){ LoginService loginService = new LoginService(); loginService.login(admin); return "success"; } }代码解释
@RequestMapping(path = "/loginCtl")----->类地址
@GetMapping(path = "/login")---->方法地址(只处理登录这个事件)
@GetMapping--->只接受get请求
@PostMapping --->只接受post请求
@RequestMapping(path = "/login",method = RequestMethod.POST) ---->method = RequestMethod.POST设置请求格式
编写数据处理组件
@Service @Transactional(rollbackFor = Exception.class) public class LoginService { @Autowired LoginDao loginDao; public Admin login(Admin admin){ Admin admin1 = loginDao.login(admin); return admin1; } }代码解释
@Transactional(rollbackFor = Exception.class) 是 Spring 框架中的一个注解,用于声明一个方法或类的事务属性。它的主要作用是管理数据库事务,确保在方法执行过程中发生异常时能够回滚事务
Admin admin1 = loginDao.login(admin);---->登录验证
感谢大家的观看,本次分享就到这里。希望我的内容能够对您有所帮助。创作不易,欢迎大家多多支持,您的每一个点赞都是我持续更新的最大动力!如有不同意见,欢迎在评论区积极讨论,让我们一起学习、共同进步!如果有相关问题,也可以私信我,我会认真查看每一条留言。期待下次再见!
希望路飞的笑容可以治愈努力路途中的你我!

博主vx:Dreamkid05 --->欢迎大家和博主讨论问题
