阅读量:0
在kickstart的基础上搭建pxe网络安装环境实现服务器自动部署
- 1.首先关闭vmware的dhcp
- 2.开启主机图形
- 3.安装kickstart相关工具
- 4.打开图形化的kickstart脚本生成工具创建安装脚本
- 5.kickstart的基础上搭建pxe网络安装环境实现服务器自动部署
- 6.建立数据目录数据文件
- 7.修改主机上的被读取文件
- 8.测试
1.首先关闭vmware的dhcp
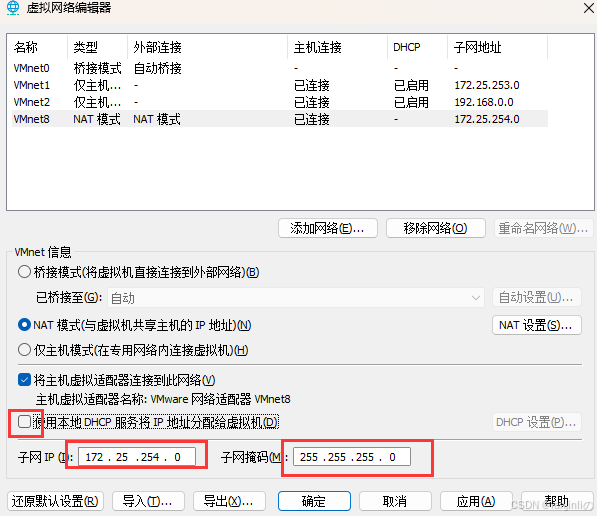
在关闭了dhcp之后会出现没有ip地址的情况,所以需要手动配置ip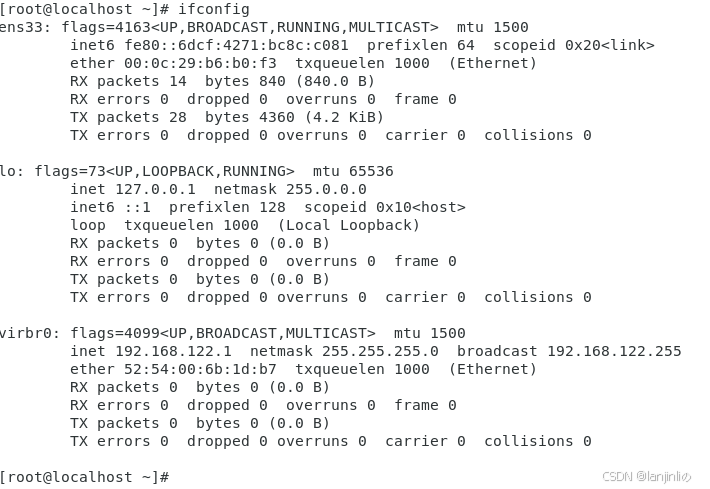

2.开启主机图形
使用hostnamectl查看是否具有图形
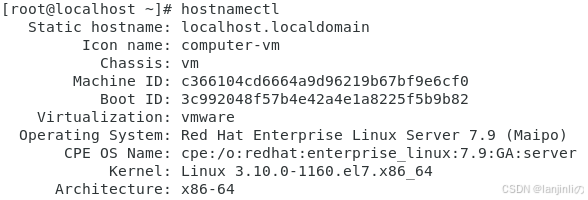
Operating System是指图形化界面
如果在开启虚拟机之后没有打开可以使用init 5命令打开
如果没有安装图形化界面可以使用yum group install “Server with GUI” -y
3.安装kickstart相关工具
安装图形化生成kickstart自动安装脚本的工具
[root@localhost ~]# df -h Filesystem Size Used Avail Use% Mounted on devtmpfs 4.8G 0 4.8G 0% /dev tmpfs 4.8G 0 4.8G 0% /dev/shm tmpfs 4.8G 13M 4.8G 1% /run tmpfs 4.8G 0 4.8G 0% /sys/fs/cgroup /dev/mapper/rhel-root 45G 4.1G 41G 10% / /dev/sda1 1014M 183M 832M 19% /boot tmpfs 982M 44K 982M 1% /run/user/0 /dev/sr0 4.3G 4.3G 0 100% /rhel7.9 [root@localhost ~]# [root@localhost ~]# yum install system-config-kickstart -y Loaded plugins: langpacks, product-id, search-disabled-repos, subscription-manager ...... Installed: system-config-kickstart.noarch 0:2.9.7-1.el7 Dependency Installed: system-config-date.noarch 0:1.10.6-3.el7 system-config-date-docs.noarch 0:1.0.11-4.el7 system-config-keyboard.noarch 0:1.4.0-5.el7 system-config-keyboard-base.noarch 0:1.4.0-5.el7 system-config-language.noarch 0:1.4.0-9.el7 Complete! [root@localhost ~]# 安装apache提供http服务
[root@localhost ~]# yum install httpd -y Loaded plugins: langpacks, product-id, search-disabled-repos, subscription-manager ...... Installed: httpd.x86_64 0:2.4.6-95.el7 Dependency Installed: apr.x86_64 0:1.4.8-7.el7 apr-util.x86_64 0:1.5.2-6.el7 httpd-tools.x86_64 0:2.4.6-95.el7 mailcap.noarch 0:2.1.41-2.el7 Complete! #启动并设置开机自启动 [root@localhost ~]# systemctl enable --now httpd Created symlink from /etc/systemd/system/multi-user.target.wants/httpd.service to /usr/lib/systemd/system/httpd.service. [root@localhost ~]# 4.打开图形化的kickstart脚本生成工具创建安装脚本
system-config-kickstart 基本配置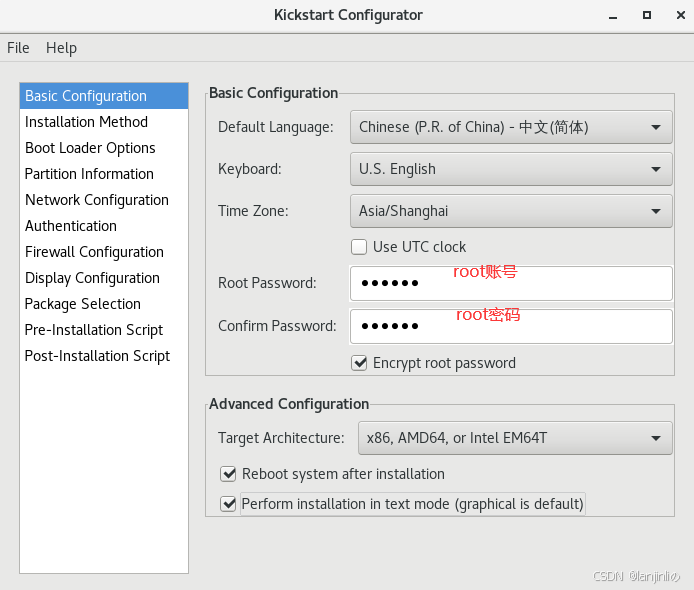
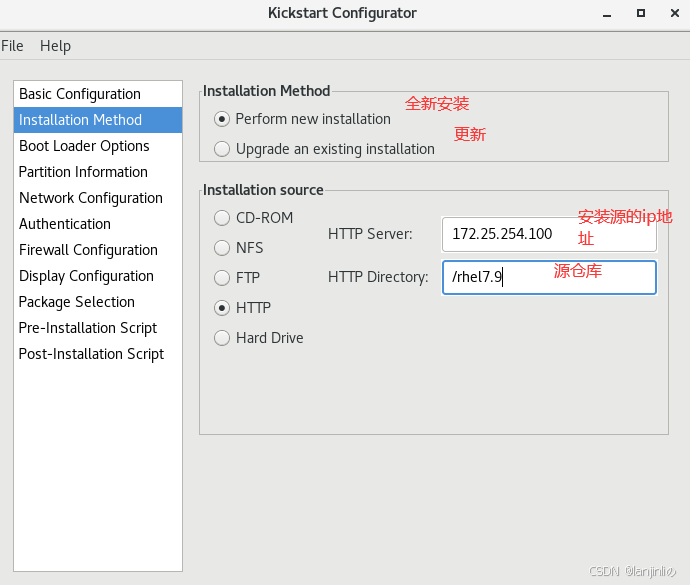
安装源设置如果没有安装httpd的话就不能用http
而且软件仓库是挂载在/rhel7.9的
所以需要创建一个软连接
[root@localhost ~]# ln -s /rhel7.9/ /var/www/html/ [root@localhost ~]# ll /var/www/html/ total 0 lrwxrwxrwx. 1 root root 9 Aug 5 07:32 rhel7.9 -> /rhel7.9/ #关闭防火墙及SELinux [root@localhost ~]# systemctl stop firewalld [root@localhost ~]# setenforce 0 测试: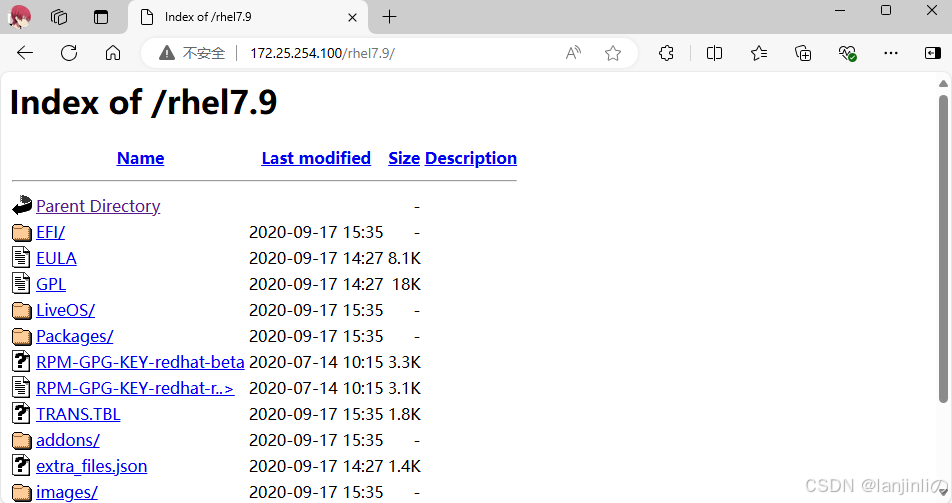
引导加载程序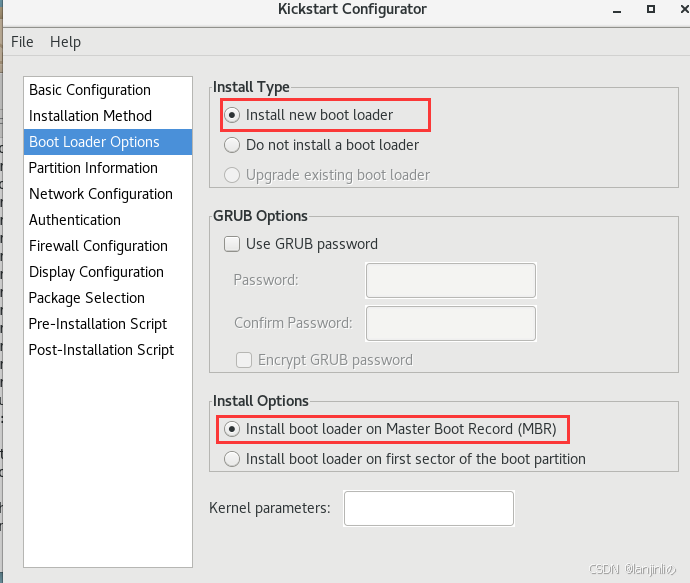
添加分区
/boot分区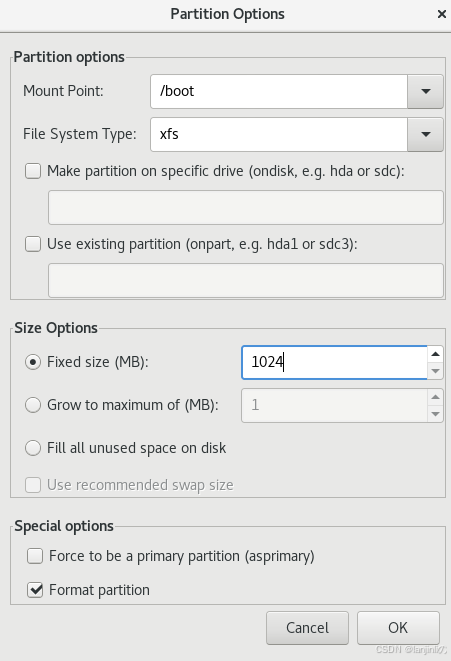
swap分区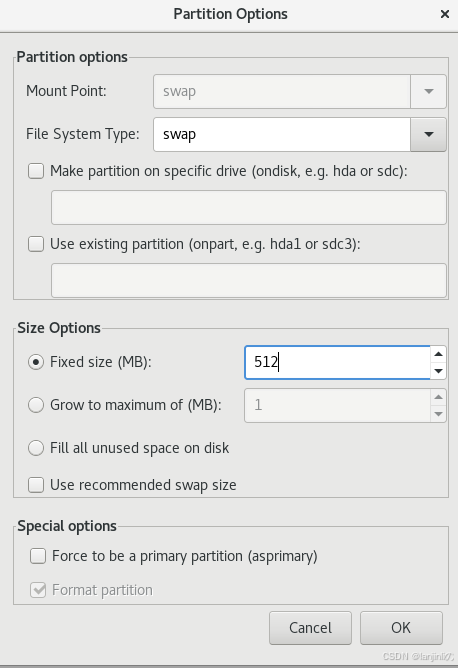
根分区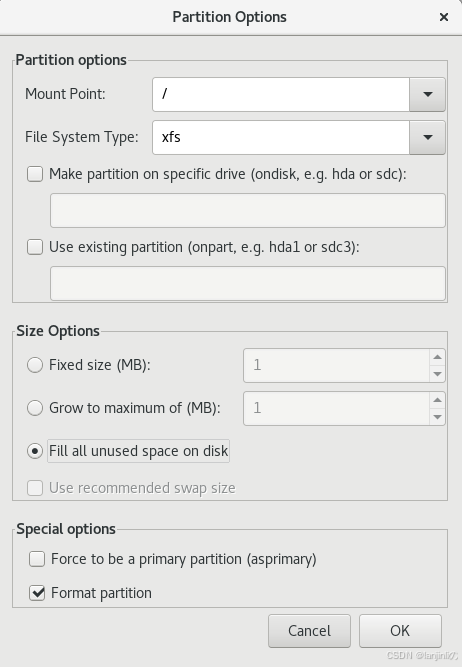
分区设置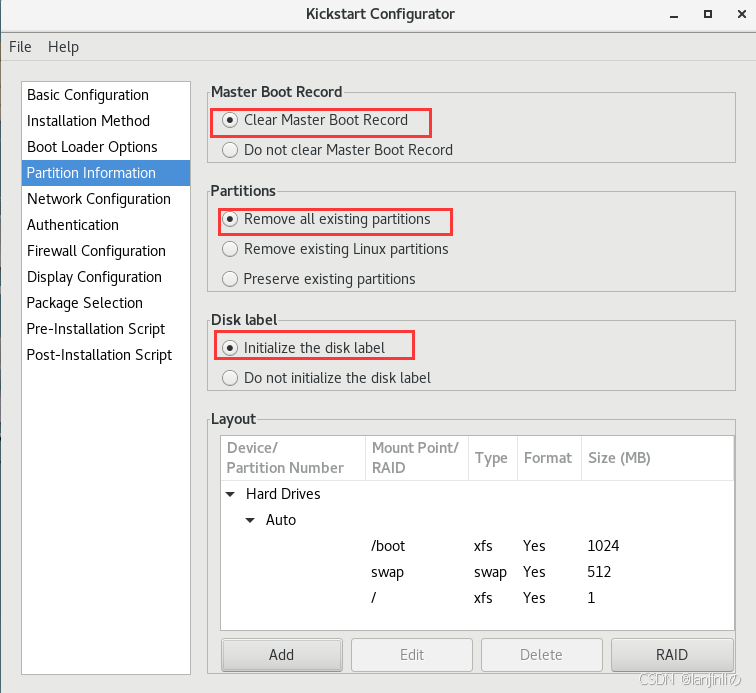
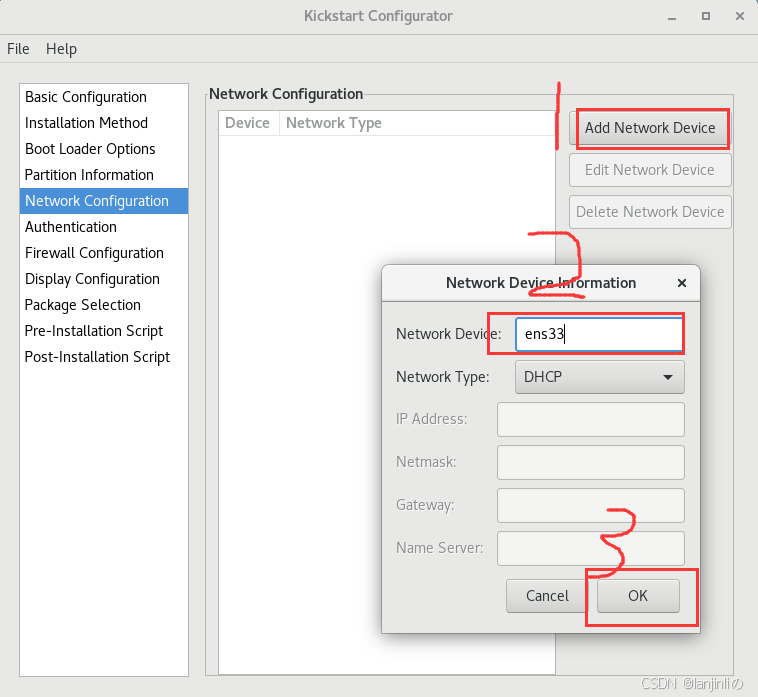
网络设置这是安装好的网卡设置
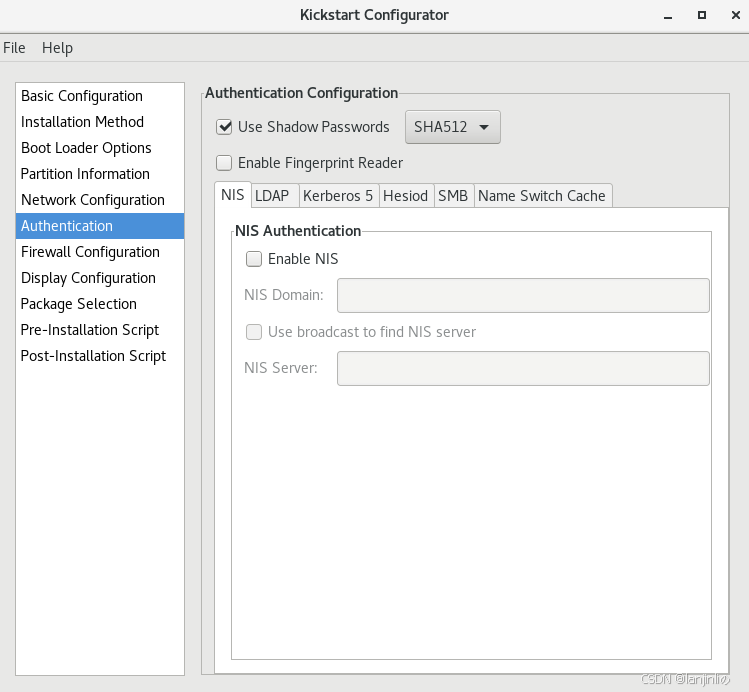
身份认证默认就行
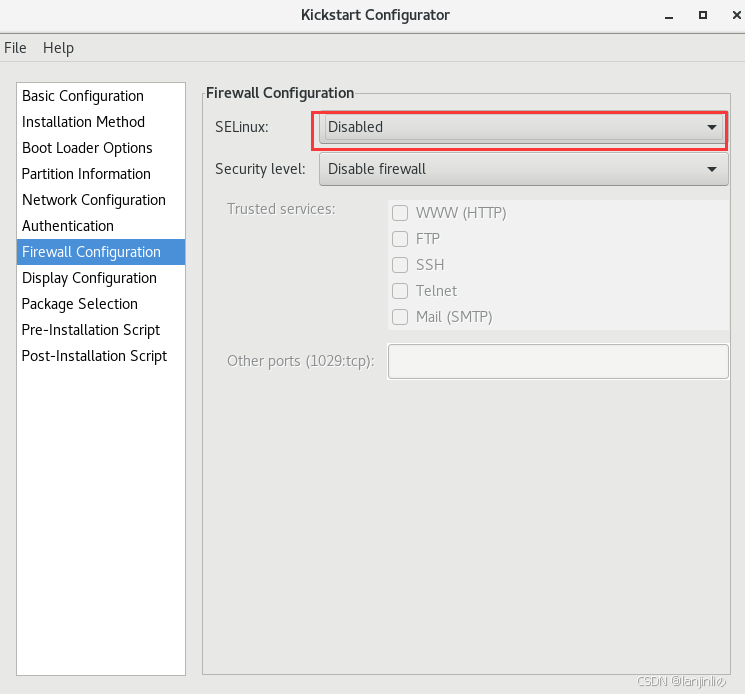
防火墙SELinux设置
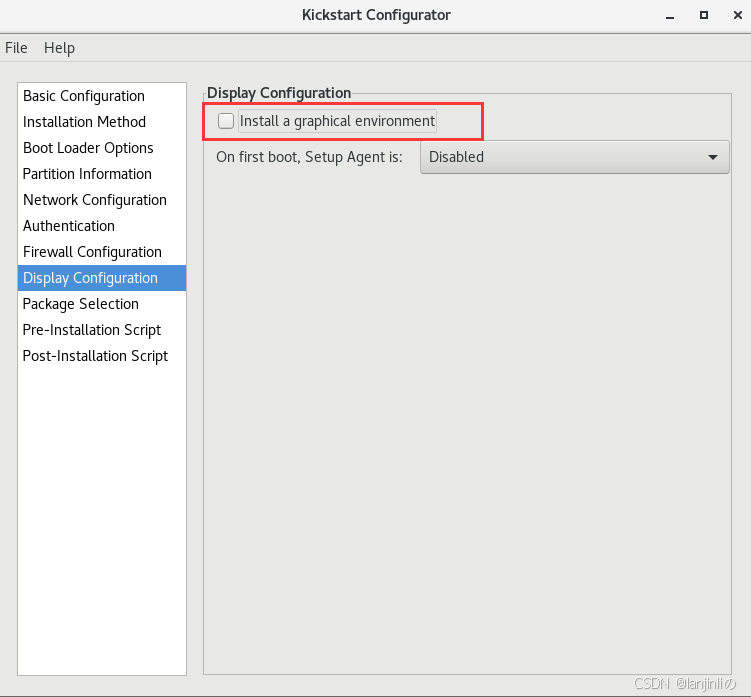
图形界面设置
安装前执行的脚本
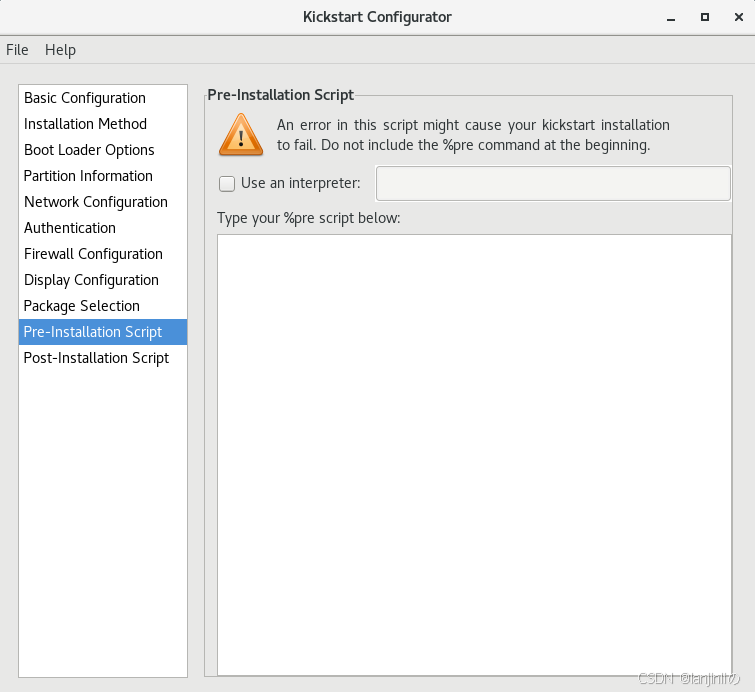
安装后执行的脚本
配置软件仓库
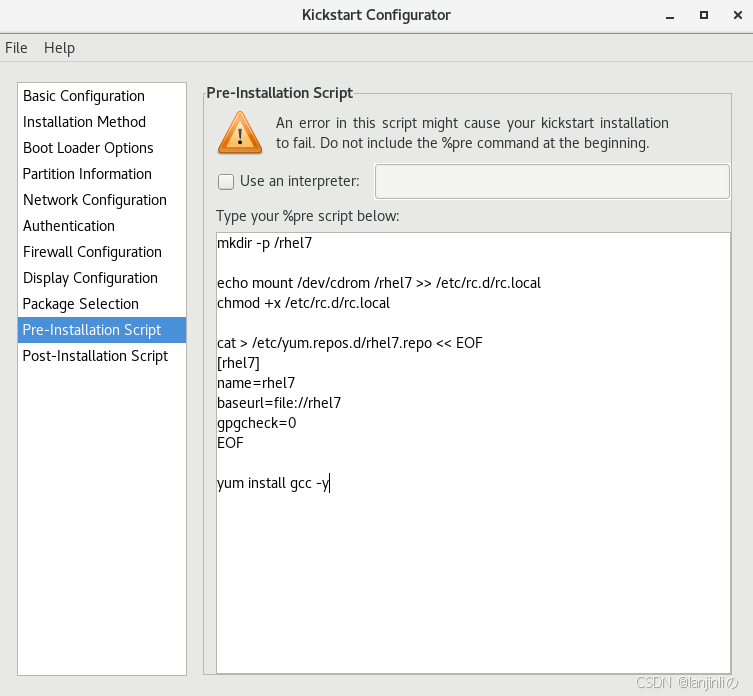
保存到/root目录下面
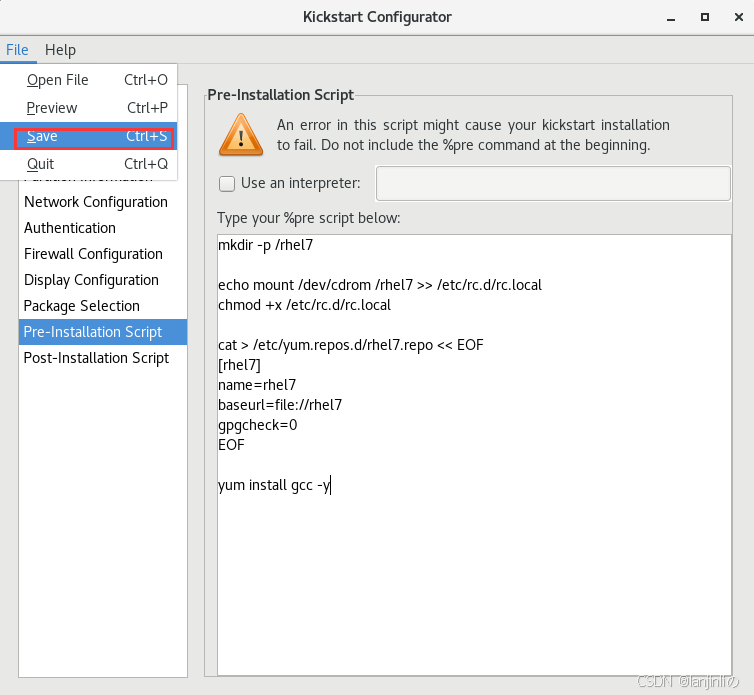
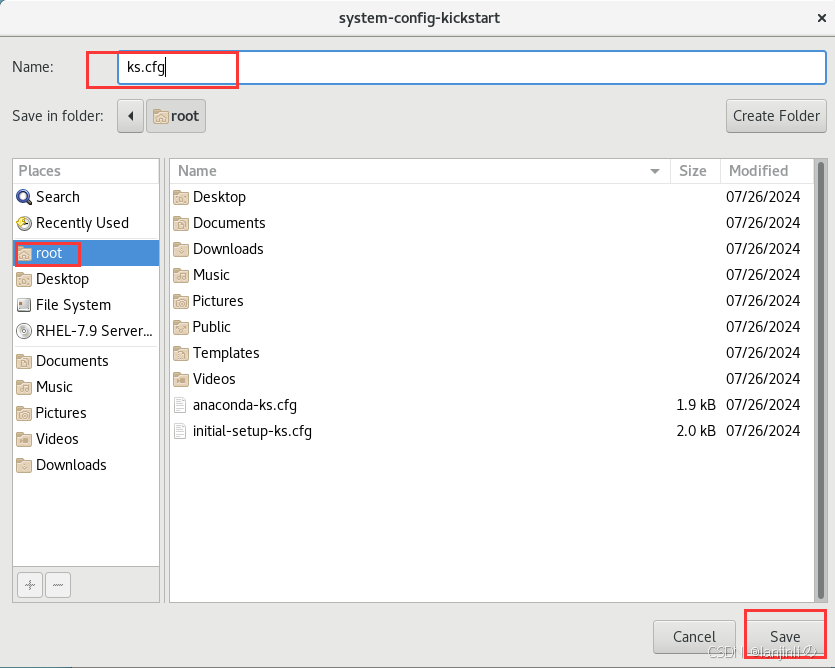
[root@localhost ~]# ll ks.cfg -rw-r--r--. 1 root root 1197 Aug 5 09:40 ks.cfg [root@localhost ~]# 编辑ks.cfs将需要下载的软件包加入其中并测试是否有语法错误
[root@localhost ~]# vim ks.cfg # Clear the Master Boot Record zerombr # Partition clearing information clearpart --all --initlabel # Disk partitioning information part /boot --fstype="xfs" --size=1024 part swap --fstype="swap" --size=512 part / --fstype="xfs" --grow --size=1 #在这后面添加 %packages @base httpd %end %pre ...... #测试语法错误 [root@localhost ~]# ksvalidator ks.cfg [root@localhost ~]# 将ks.cfg移动到http文件中去
[root@localhost ~]# cp /root/ks.cfg /var/www/html/ [root@localhost ~]# ll /var/www/html/ total 4 -rw-r--r--. 1 root root 1225 Aug 5 09:49 ks.cfg lrwxrwxrwx. 1 root root 9 Aug 5 07:32 rhel7.9 -> /rhel7.9/ [root@localhost ~]# 使用浏览器查看是否能够访问
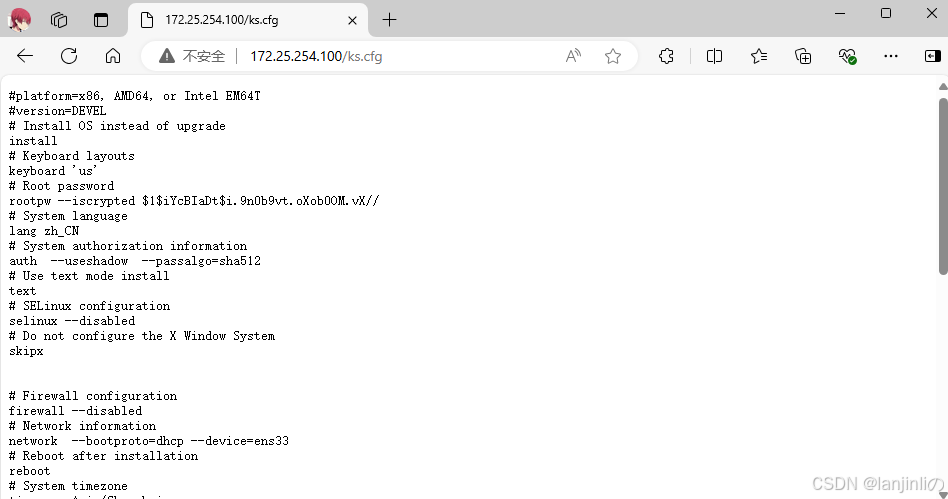
安装dhcp服务器,为其他服务器提供分配ip的功能
[root@localhost ~]# yum install dhcp -y #编写dhcp配置文件 [root@localhost ~]# cp /usr/share/doc/dhcp*/dhcpd.conf.example /etc/dhcp/dhcpd.conf cp: overwrite ‘/etc/dhcp/dhcpd.conf’? y [root@localhost ~]# vim /etc/dhcp/dhcpd.conf [root@localhost ~]# cat /etc/dhcp/dhcpd.conf # dhcpd.conf # # Sample configuration file for ISC dhcpd # # option definitions common to all supported networks... option domain-name "mashang.org"; #公司域名 option domain-name-servers 114.114.114.114; #对外分发的dns地址 default-lease-time 600; max-lease-time 7200; # Use this to enble / disable dynamic dns updates globally. #ddns-update-style none; # If this DHCP server is the official DHCP server for the local # network, the authoritative directive should be uncommented. #authoritative; # Use this to send dhcp log messages to a different log file (you also # have to hack syslog.conf to complete the redirection). log-facility local7; # No service will be given on this subnet, but declaring it helps the # DHCP server to understand the network topology. #subnet 10.152.187.0 netmask 255.255.255.0 { #} # This is a very basic subnet declaration. subnet 172.25.254.0 netmask 255.255.255.0 { #网络位和子网掩码 range 172.25.254.30 172.25.254.40; #地址池 option routers 172.25.254.2; #网关 } [root@localhost ~]# #设置开机启动和运行dhcp [root@localhost ~]# systemctl enable --now dhcpd 5.kickstart的基础上搭建pxe网络安装环境实现服务器自动部署
在主机上安装pxe
[root@localhost isolinux]# yum install syslinux.x86_64 -y 安装tftp软件包,为了共享pxelinux.0数据文件的网络服务
[root@localhost isolinux]# yum install tftp-server.x86_64 -y #启动服务并设置开机启动 [root@localhost isolinux]# systemctl enable --now tftp Created symlink from /etc/systemd/system/sockets.target.wants/tftp.socket to /usr/lib/systemd/system/tftp.socket. [root@localhost isolinux]# 6.建立数据目录数据文件
将服务器需要的资源拷贝到资源目录下
[root@localhost isolinux]# cp /rhel7.9/isolinux/* /var/lib/tftpboot/ [root@localhost isolinux]# cp /usr/share/syslinux/pxelinux.0 /var/lib/tftpboot/ [root@localhost isolinux]# ll /var/lib/tftpboot/ total 112148 -r--r--r--. 1 root root 2048 Aug 5 11:04 boot.cat -r--r--r--. 1 root root 84 Aug 5 11:04 boot.msg -r--r--r--. 1 root root 321 Aug 5 11:04 grub.conf -r--r--r--. 1 root root 51211620 Aug 5 11:04 initrd.img -r--r--r--. 1 root root 24576 Aug 5 11:04 isolinux.bin -r--r--r--. 1 root root 3166 Aug 5 11:04 isolinux.cfg -r--r--r--. 1 root root 190896 Aug 5 11:04 memtest -rw-r--r--. 1 root root 26743 Aug 5 11:05 pxelinux.0 -r--r--r--. 1 root root 186 Aug 5 11:04 splash.png -r--r--r--. 1 root root 2438 Aug 5 11:04 TRANS.TBL -r--r--r--. 1 root root 56427369 Aug 5 11:04 upgrade.img -r--r--r--. 1 root root 153104 Aug 5 11:04 vesamenu.c32 -r-xr-xr-x. 1 root root 6769496 Aug 5 11:04 vmlinuz [root@localhost isolinux]# cd /var/lib/tftpboot/ #创建pxelinux.cfg [root@localhost tftpboot]# mkdir pxelinux.cfg #将isolinux.cfg复制到pxelinux.cfg/default [root@localhost tftpboot]# cp isolinux.cfg pxelinux.cfg/default [root@localhost tftpboot]# 编辑dhcp文件
[root@localhost tftpboot]# cat /etc/dhcp/dhcpd.conf # dhcpd.conf # # Sample configuration file for ISC dhcpd # # option definitions common to all supported networks... option domain-name "mashang.org"; option domain-name-servers 114.114.114.114; default-lease-time 600; max-lease-time 7200; # Use this to enble / disable dynamic dns updates globally. #ddns-update-style none; # If this DHCP server is the official DHCP server for the local # network, the authoritative directive should be uncommented. #authoritative; # Use this to send dhcp log messages to a different log file (you also # have to hack syslog.conf to complete the redirection). log-facility local7; # No service will be given on this subnet, but declaring it helps the # DHCP server to understand the network topology. #subnet 10.152.187.0 netmask 255.255.255.0 { #} # This is a very basic subnet declaration. subnet 172.25.254.0 netmask 255.255.255.0 { range 172.25.254.30 172.25.254.40; option routers 172.25.254.2; next-server 172.25.254.100; filename "pxelinux.0" } [root@localhost tftpboot]# #重启dhcp服务 [root@localhost tftpboot]# systemctl restart httpd 创建一个虚拟机server1
7.修改主机上的被读取文件
[root@localhost tftpboot]# vim /var/lib/tftpboot/pxelinux.cfg/default 修改超时时间:

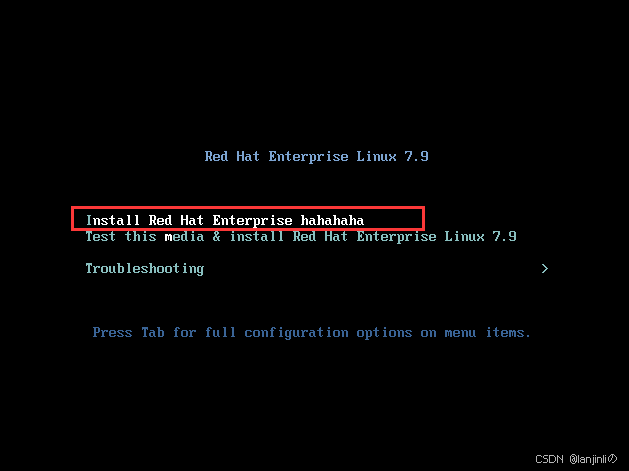
修改首页标题为hahahaha和资源
8.测试
以下列方式打开
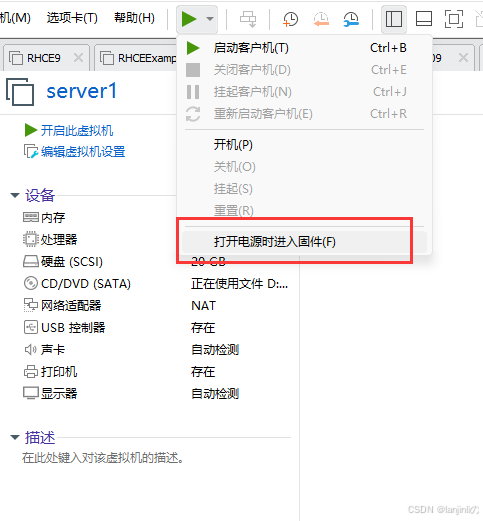
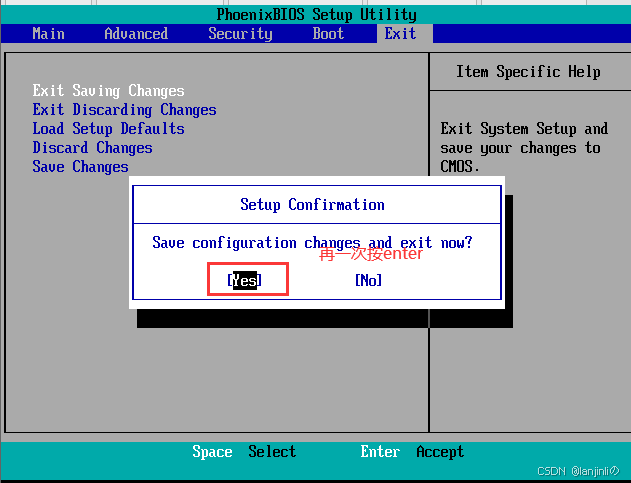
进入此界面使用±来控制上移下移,将Network移动到最上面
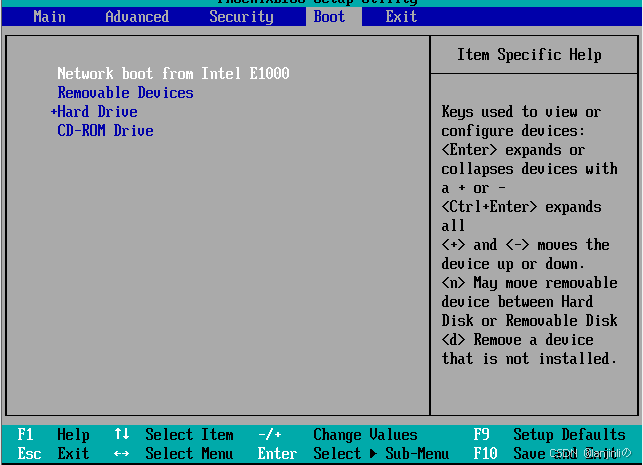
如图选择按enter进入界面
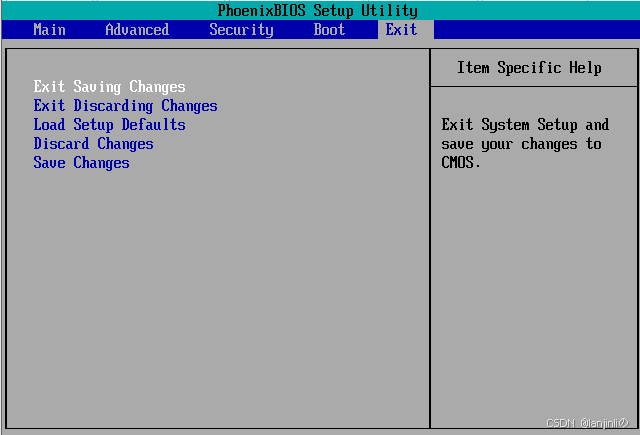
进入页面后可以看到修改的超时时间和标题
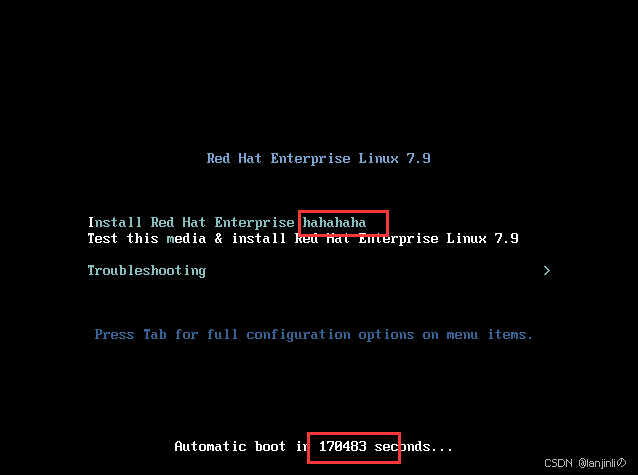
选择第一个回车
