阅读量:0
华子目录
- 前言
- PXE装机的基本工作原理
- PXE组件
- 实验前的准备工作
- 实验步骤
- 1.`server`端安装`kickstart`
- 2.`server`端安装`httpd`
- 3.`server`端安装`dhcp`
- 4.安装`syslinux`
- 5.安装`tftp-server`
- 6.将`/guangpan/isolinux/`下的`所有文件`复制到`/var/lib/tftpboot/`目录下
- 7.将`/usr/share/syslinux/pxelinux.0`文件复制到`/var/lib/tftpboot/`目录下
- 8.在`/var/lib/tftpboot/`目录下创建`pxelinux.cfg`目录
- 9.将`/var/lib/tftpboot/isolinux.cfg`文件复制到`/var/lib/tftpboot/pxelinux.cfg/`目录下并起名为`default`
- 10.修改`/var/lib/tftpboot/pxelinux.cfg/default`文件内容
- 11.重启`httpd,dhcpd,tftp`服务并设置开机自启动
- 12.关闭`client`端的光盘启动
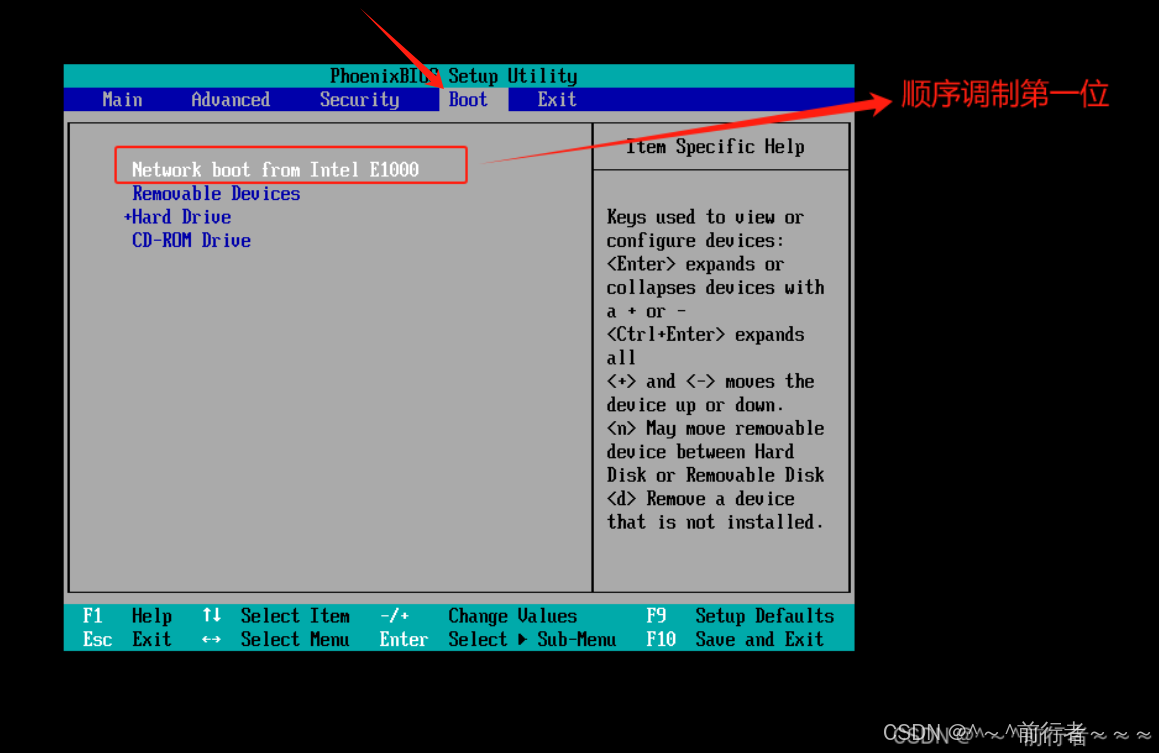
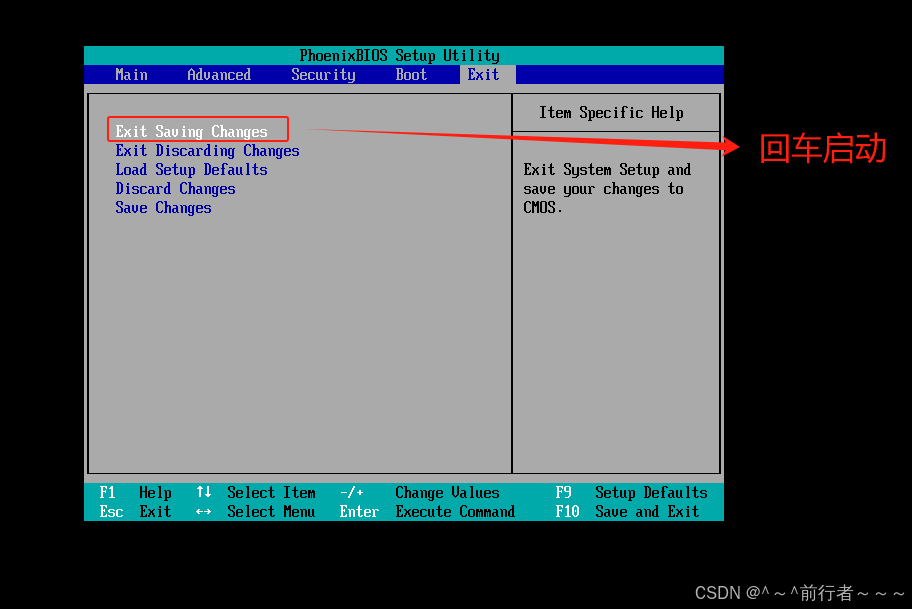
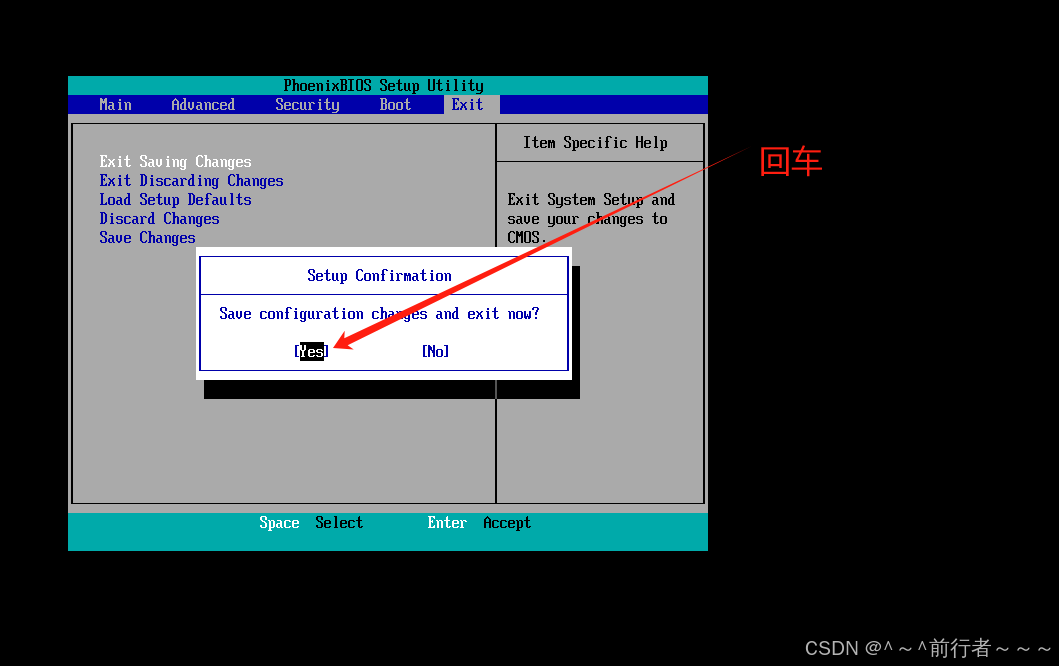
- 13.在`VM`中的`client`端`打开电源时进入固件`设置`BIOS`为网卡启动
- 测试
- 总结
前言
PXE(Preboot Execution Environment)装机是一种通过网络引导和安装操作系统的方法。它允许计算机在没有本地存储设备(如硬盘或光盘驱动器)的情况下,通过网络从远程服务器或网络共享加载操作系统安装文件并实现自动化安装。PXE装机通常用于大规模部署和远程管理计算机,特别适用于服务器和客户机环境。它可以大大简化操作系统的安装和配置过程,提高部署效率和一致性,并减少人工操作的需求
PXE装机的基本工作原理
客户机(待安装的计算机)通过网络启动,并发送DHCP请求以获取IP地址和其他配置信息DHCP服务器回应并提供一个IP地址和PXE启动服务的相关配置客户机使用TFTP(Trivial File Transfer Protocol)从PXE服务器下载引导程序(如pxelinux.0)引导程序加载并启动,提供菜单和选项,允许用户选择所需的操作系统安装- 客户机选择安装选项后,
引导程序从PXE服务器下载适当的操作系统安装文件(如内核、初始化内存盘(initrd)和安装程序) 客户机使用下载的文件进行操作系统安装过程
PXE装机的配置包括设置和维护PXE服务器、创建引导文件、设置DHCP服务器和TFTP服务器等。它通常与其他自动化工具(如Kickstart文件)结合使用,以实现自动化和批量化的操作系统部署
PXE组件
HTTP/FTP服务器:在某些情况下,用于传输更大的文件或提供额外服务TFTP服务器:用于传输启动文件,如PXE引导程序和内核镜像DHCP服务器:为PXE客户端分配IP地址,并提供启动文件的位置信息syslinux:提供pxelinux.0程序,使得客户机能够通过网络从远程服务器下载引导镜像,并加载安装文件或整个操作系统
实验前的准备工作
这里我们需要准备2台机子,server服务端和client客户端
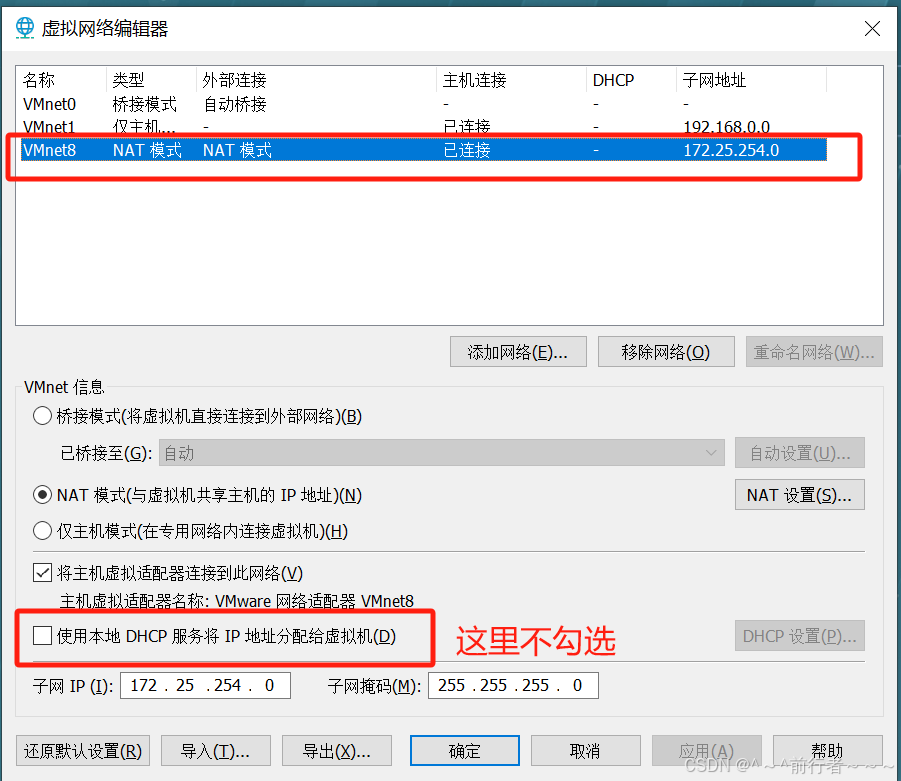
1.VM进入虚拟网络编辑器关闭dhcp功能
- 因为我们的
server端会提供dhcp功能,所以我们要关闭VM虚拟机中的dhcp功能,否则会影响实验效果。
2.从RHEL7母机上克隆一个server端和client端
- 克隆
server端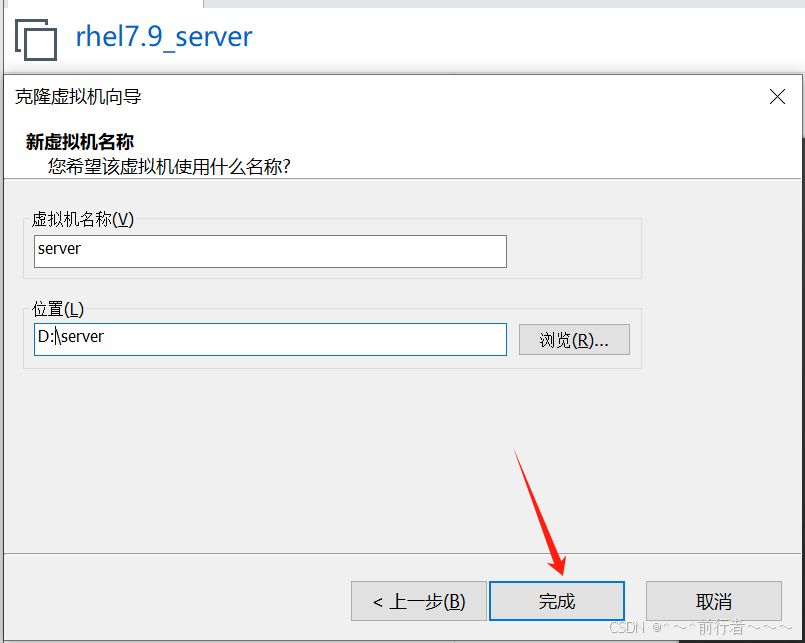
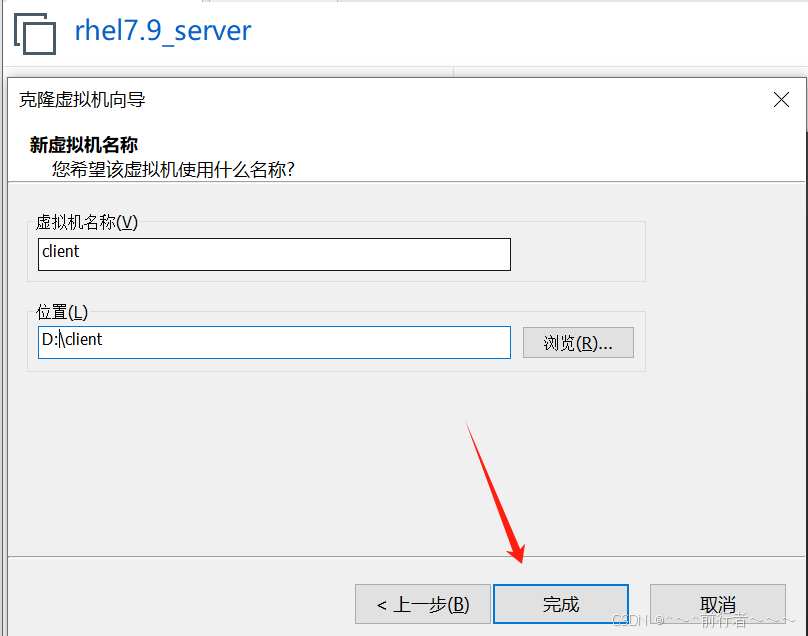
- 克隆
client端
3.配置server端
- 由于我的
RHEL7是刚装好的机子,所以克隆出来的server端也是一样的。 - 这里我写了一个
配置静态IP,修改主机名,永久挂载光盘,配置yum本地仓库的shell脚本,但仅限于RHEL7,CentOS7系列的系统
[root@localhost ~]# vim /bin/vmset.sh #!/bin/bash #配置静态IP,修改主机名,永久挂载光盘,配置yum本地仓库 read -p "请输入主机名 IP 掩码 网关 dns(以空格分开):" name IP netmask gateway dns rm -rfv /etc/sysconfig/network-scripts/ifcfg-ens33 > /dev/null cat > /etc/sysconfig/network-scripts/ifcfg-ens33 <<quit TYPE=Ethernet NAME=ens33 DEVICE=ens33 BOOTPROTO=none IPADDR=$IP NETMASK=$netmask GATEWAY=$gateway DNS1=$dns DEFROUTE=yes PROXY_METHOD=none ONBOOT=yes quit nmcli connection reload nmcli connection up ens33 > /dev/null echo "IP configuration successful!!!" sleep 3 hostnamectl set-hostname $name echo "Host name configuration successful!!!" sleep 3 if [ -e /guangpan ] #将本地光盘挂载在/guangpan中 then mount /dev/cdrom /guangpan &> /dev/null if [[ $(grep -i "^mount /dev/cdrom /guangpan$" /etc/rc.d/rc.local) != "mount /dev/cdrom /guangpan" ]] then echo "mount /dev/cdrom /guangpan" >> /etc/rc.d/rc.local chmod +x /etc/rc.d/rc.local fi else mkdir /guangpan mount /dev/cdrom /guangpan &> /dev/null if [[ $(grep -i "^mount /dev/cdrom /guangpan$" /etc/rc.d/rc.local) != "mount /dev/cdrom /guangpan" ]] then echo "mount /dev/cdrom /guangpan" >> /etc/rc.d/rc.local chmod +x /etc/rc.d/rc.local fi fi echo "CD mounted successfully!!!" sleep 3 rm -rfv /etc/yum.repos.d/* > /dev/null cat > /etc/yum.repos.d/redhat7.repo <<quit [base] name=rhel7 baseurl=file:///guangpan gpgcheck=0 quit sleep 3 echo "Local yum repository configuration successful!!!" bash [root@localhost ~]# chmod +x /bin/vmset.sh [root@localhost ~]# ll /bin/vmset.sh -rwxr-xr-x. 1 root root 1496 8月 5 20:00 /bin/vmset.sh - 运行脚本,检测结果
[root@localhost ~]# vmset.sh 请输入主机名 IP 掩码 网关 dns(以空格分开):server 172.25.254.10 255.255.255.0 172.25.254.2 114.114.114.114 IP configuration successful!!! Host name configuration successful!!! CD mounted successfully!!! Local yum repository configuration successful!!! [root@server ~]# hostname -I 172.25.254.10 [root@server ~]# hostname server [root@server ~]# cat /etc/yum.repos.d/redhat7.repo [base] name=rhel7 baseurl=file:///guangpan gpgcheck=0 [root@server ~]# ping www.baidu.com PING www.a.shifen.com (110.242.68.4) 56(84) bytes of data. 64 bytes from 110.242.68.4 (110.242.68.4): icmp_seq=1 ttl=128 time=43.1 ms 64 bytes from 110.242.68.4 (110.242.68.4): icmp_seq=2 ttl=128 time=70.4 ms 64 bytes from 110.242.68.4 (110.242.68.4): icmp_seq=3 ttl=128 time=47.3 ms 64 bytes from 110.242.68.4 (110.242.68.4): icmp_seq=4 ttl=128 time=42.0 ms 64 bytes from 110.242.68.4 (110.242.68.4): icmp_seq=5 ttl=128 time=46.3 ms 4.关闭firewalld和selinux
[root@server ~]# systemctl stop firewalld [root@server ~]# systemctl disable firewalld Removed symlink /etc/systemd/system/multi-user.target.wants/firewalld.service. Removed symlink /etc/systemd/system/dbus-org.fedoraproject.FirewallD1.service. [root@server ~]# systemctl is-active firewalld unknown [root@server ~]# getenforce Enforcing [root@server ~]# grubby --update-kernel ALL --args selinux=0 #关闭selinux [root@server ~]# reboot #重启之后 [root@server ~]# getenforce Disabled 5.mobaxterm使用ssh -X连接到server端
ssh -X命令是用于通过SSH(Secure Shell) 协议远程登录到另一台计算机,并启用X11转发的一个选项。X11转发允许你在远程计算机上运行图形界面应用程序,并将这些应用程序的图形输出重定向回你的本地计算机进行显示。
ssh root@172.25.254.10 -X root@172.25.254.10's password: Last login: Mon Aug 5 20:14:20 2024 [root@server ~]# 6.anaconda-ks.cfg介绍
- 在正式实验之前,我们有必要介绍一下
/root/anaconda-ks.cfg这个文件。anaconda-ks.cfg是在系统安装好后自动生成的,这个文件记录了系统在安装过程中的所有设定。 anaconda-ks.cfg文件是一个存储着安装程序各种配置信息的文件,通常用于描述一个使用Kickstart安装系统时的配置文件。Kickstart是一种自动化安装Red Hat Linux和其他基于RPM的Linux发行版的工具,通过提供一个文本文件,其中包含了安装期间需要回答的问题的答案,来实现无人值守安装。
6.1文件概述
- 文件名:
anaconda-ks.cfg - 作用:记录并自动化执行系统安装过程中的配置信息
- 生成时机:在系统安装过程中自动生成,位于
/root目录下
6.2文件内容
anaconda-ks.cfg文件包含了Kickstart的配置信息,如:
- 安装源:指定系统安装时使用的安装源,如光盘、网络等。
- 分区布局:定义磁盘的分区方案,包括分区大小、文件系统类型等。
- 软件包选择:列出要安装的软件包,以及是否安装额外的软件包组。
- 用户管理:设置系统管理员账户及其密码。
- 网络设置:配置网络接口的IP地址、子网掩码、网关等。
- 其他配置:如防火墙设置、
SELinux安全策略、系统启动参数等。
6.3文件使用
- 编辑与修改:系统管理员可以使用文本编辑器来编写和修改
anaconda-ks.cfg文件,以实现自定义的安装配置。 - 自动化安装:在
无人值守安装场景中,anaconda-ks.cfg文件可以自动执行安装过程,无需人工干预。
实验步骤
1.server端安装kickstart
- 在安装
kickstart之前,我们首先要确保我们的系统具有图形化功能
[root@server ~]# runlevel N 5 - 安装
system-config-kickstart,system-config-kickstart是安装图形化生成kickstart自动安装脚本的工具
[root@server ~]# yum install system-config-kickstart -y 依赖关系解决 ============================================================================================== Package 架构 版本 源 大小 ============================================================================================== 正在安装: system-config-kickstart noarch 2.9.7-1.el7 base 348 k 为依赖而安装: system-config-date noarch 1.10.6-3.el7 base 591 k system-config-date-docs noarch 1.0.11-4.el7 base 527 k system-config-keyboard noarch 1.4.0-5.el7 base 33 k system-config-keyboard-base noarch 1.4.0-5.el7 base 103 k system-config-language noarch 1.4.0-9.el7 base 134 k 事务概要 ============================================================================================== 安装 1 软件包 (+5 依赖软件包) 总下载量:1.7 M 安装大小:6.2 M Downloading packages: ---------------------------------------------------------------------------------------------- 总计 58 MB/s | 1.7 MB 00:00:00 Running transaction check Running transaction test Transaction test succeeded Running transaction 正在安装 : system-config-date-1.10.6-3.el7.noarch 1/6 正在安装 : system-config-date-docs-1.0.11-4.el7.noarch 2/6 正在安装 : system-config-language-1.4.0-9.el7.noarch 3/6 正在安装 : system-config-keyboard-base-1.4.0-5.el7.noarch 4/6 正在安装 : system-config-keyboard-1.4.0-5.el7.noarch 5/6 正在安装 : system-config-kickstart-2.9.7-1.el7.noarch 6/6 验证中 : system-config-keyboard-base-1.4.0-5.el7.noarch 1/6 验证中 : system-config-language-1.4.0-9.el7.noarch 2/6 验证中 : system-config-keyboard-1.4.0-5.el7.noarch 3/6 验证中 : system-config-kickstart-2.9.7-1.el7.noarch 4/6 验证中 : system-config-date-docs-1.0.11-4.el7.noarch 5/6 验证中 : system-config-date-1.10.6-3.el7.noarch 6/6 已安装: system-config-kickstart.noarch 0:2.9.7-1.el7 作为依赖被安装: system-config-date.noarch 0:1.10.6-3.el7 system-config-date-docs.noarch 0:1.0.11-4.el7 system-config-keyboard.noarch 0:1.4.0-5.el7 system-config-keyboard-base.noarch 0:1.4.0-5.el7 system-config-language.noarch 0:1.4.0-9.el7 完毕! 1.1启动kickstart工具,制作ks.cfg脚本
[root@server ~]# system-config-kickstart #执行该命令后就会启用图形化工具 - 图形化如下
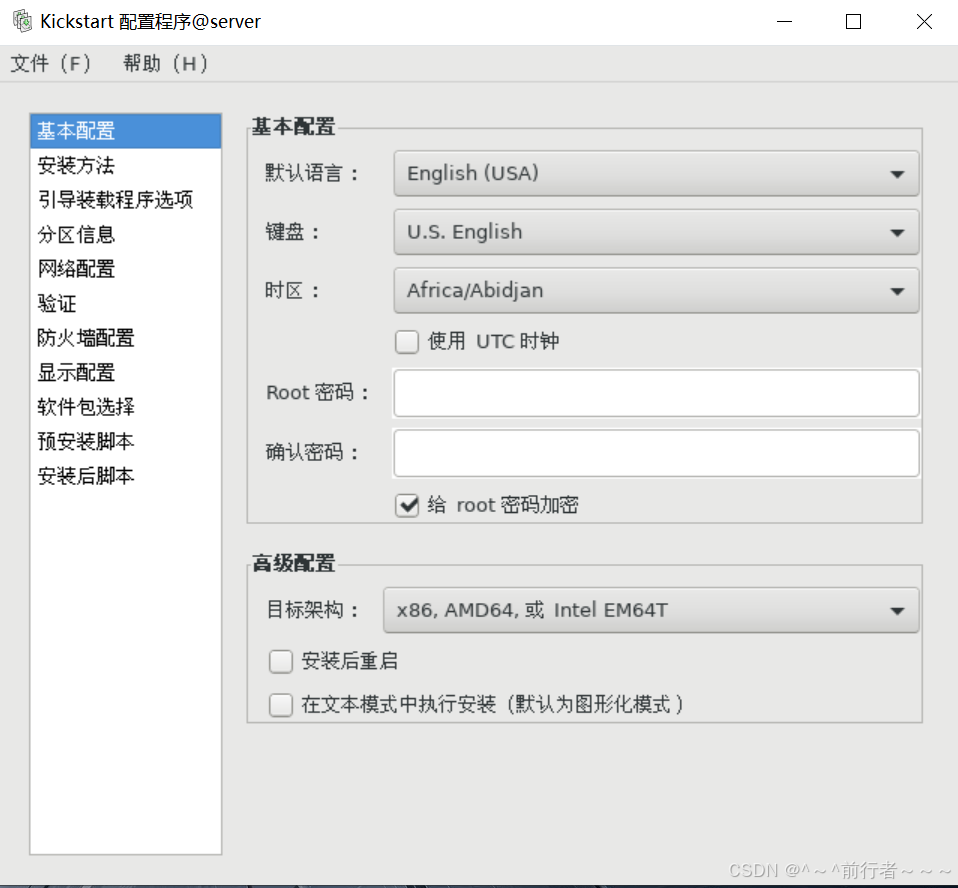
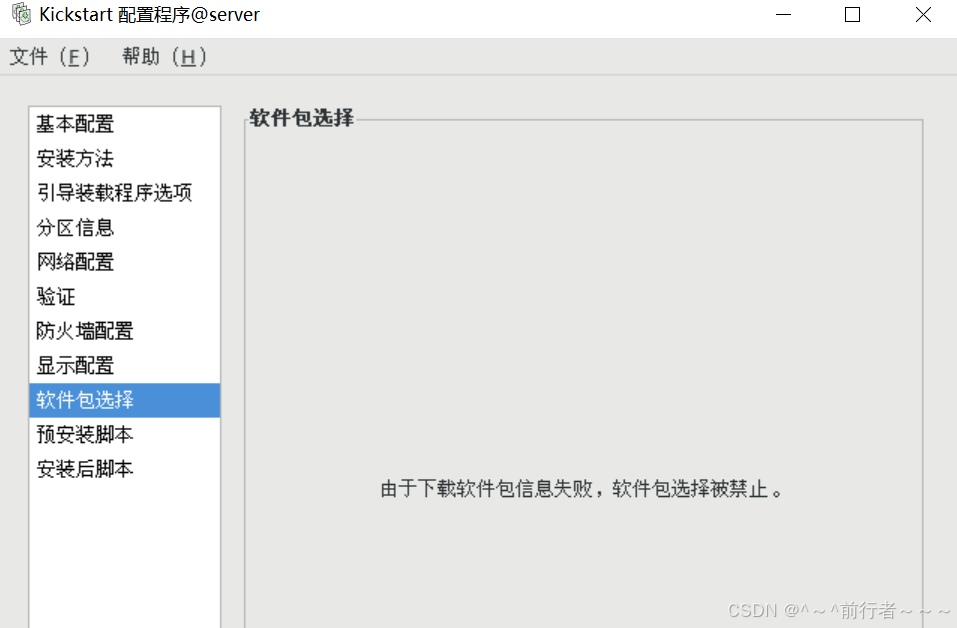
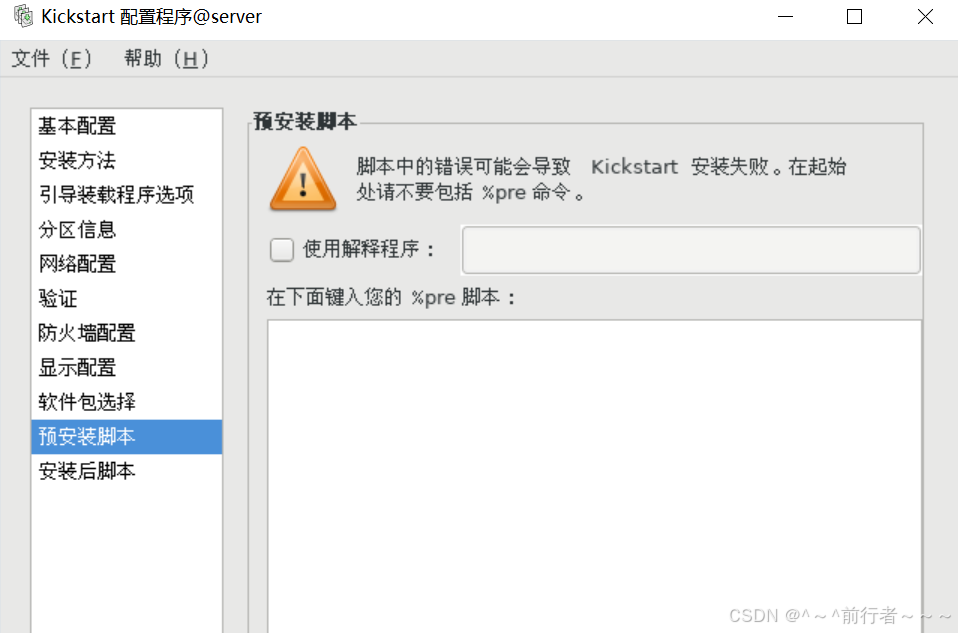
1.2kickstart配置
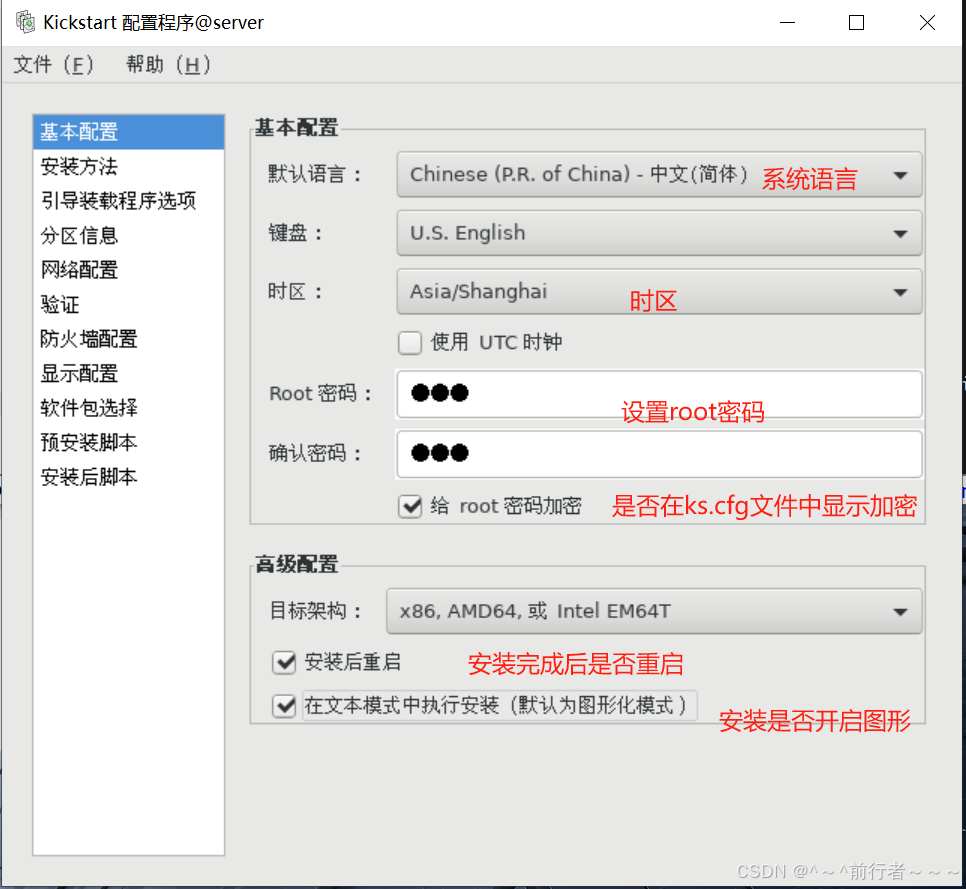
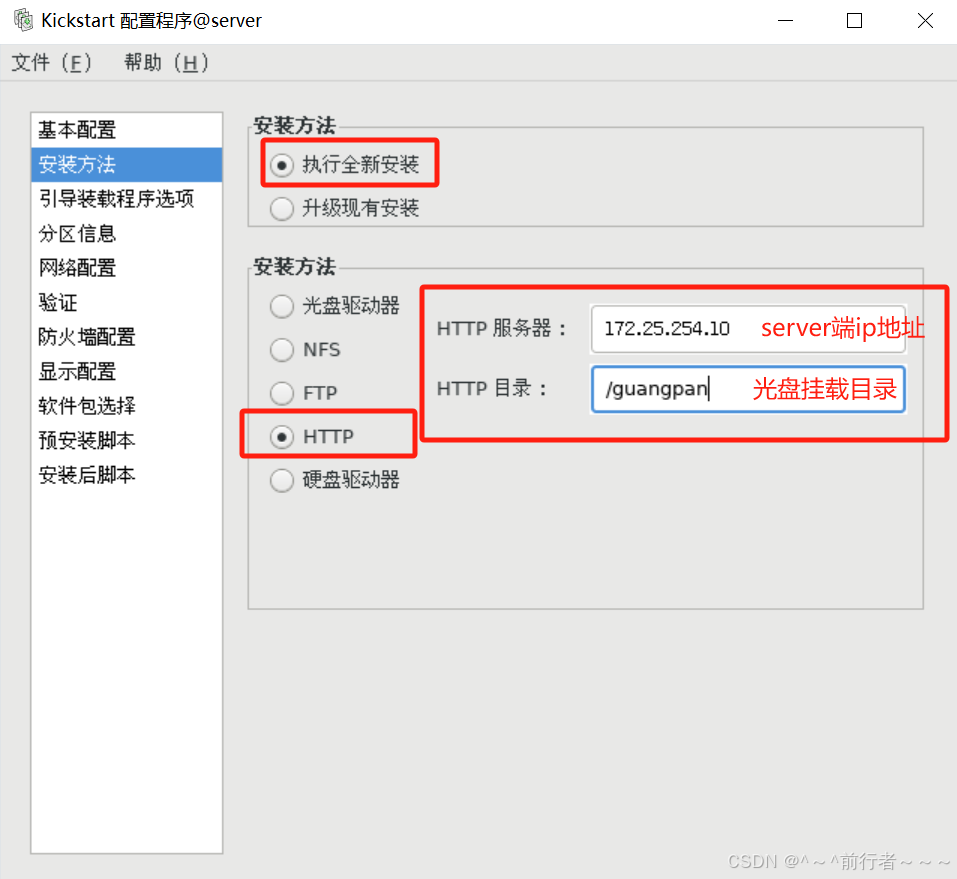
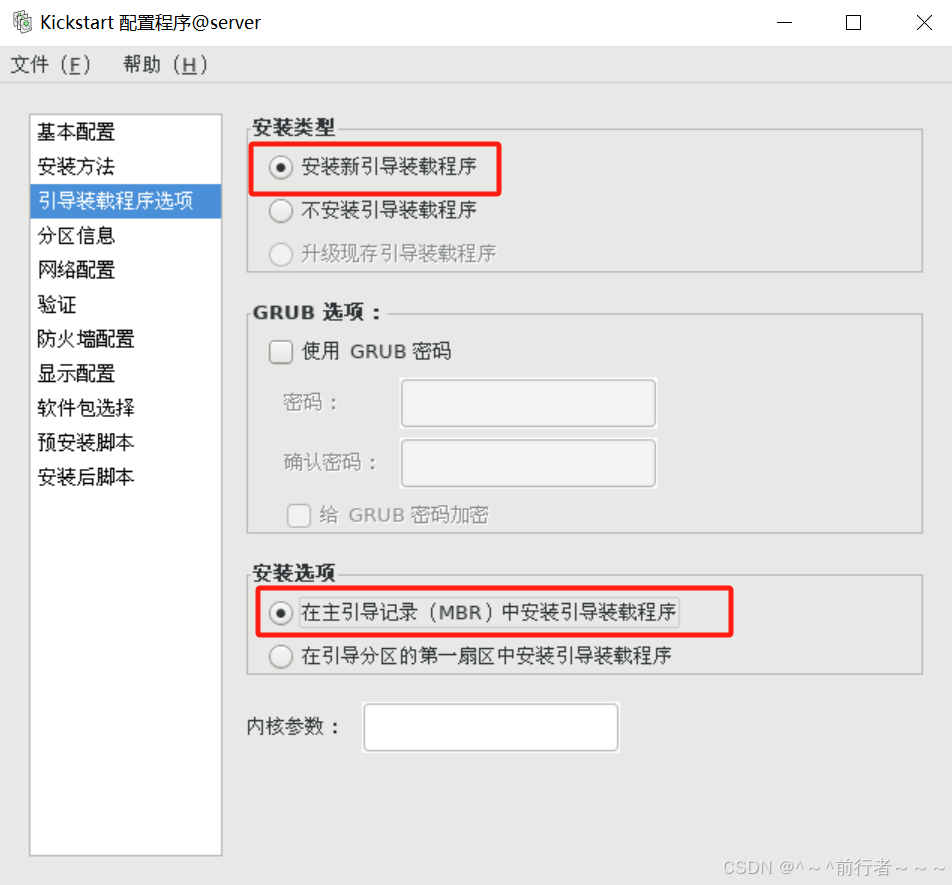
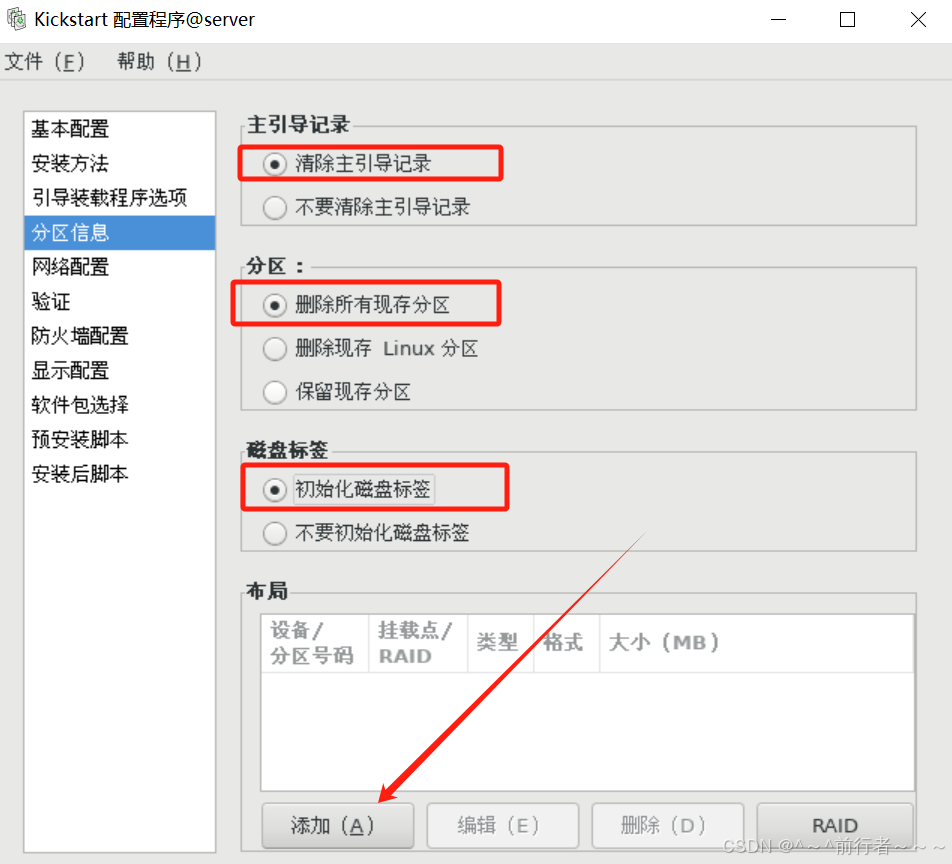
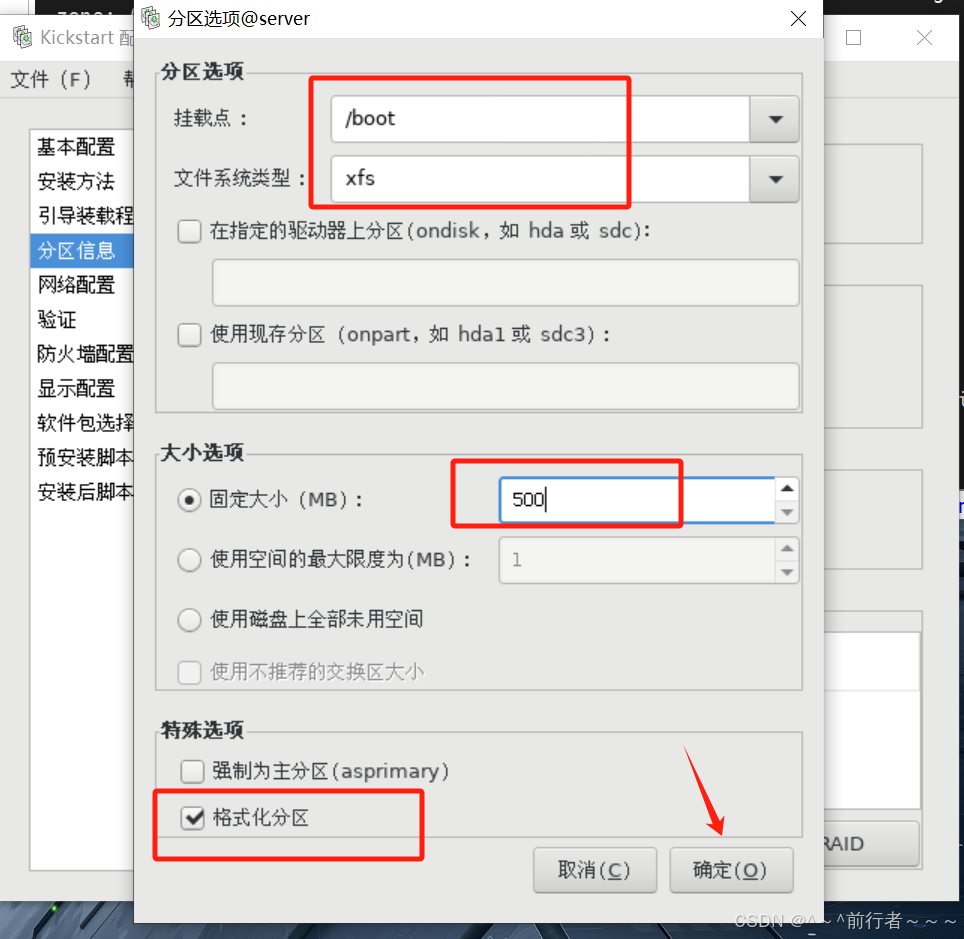
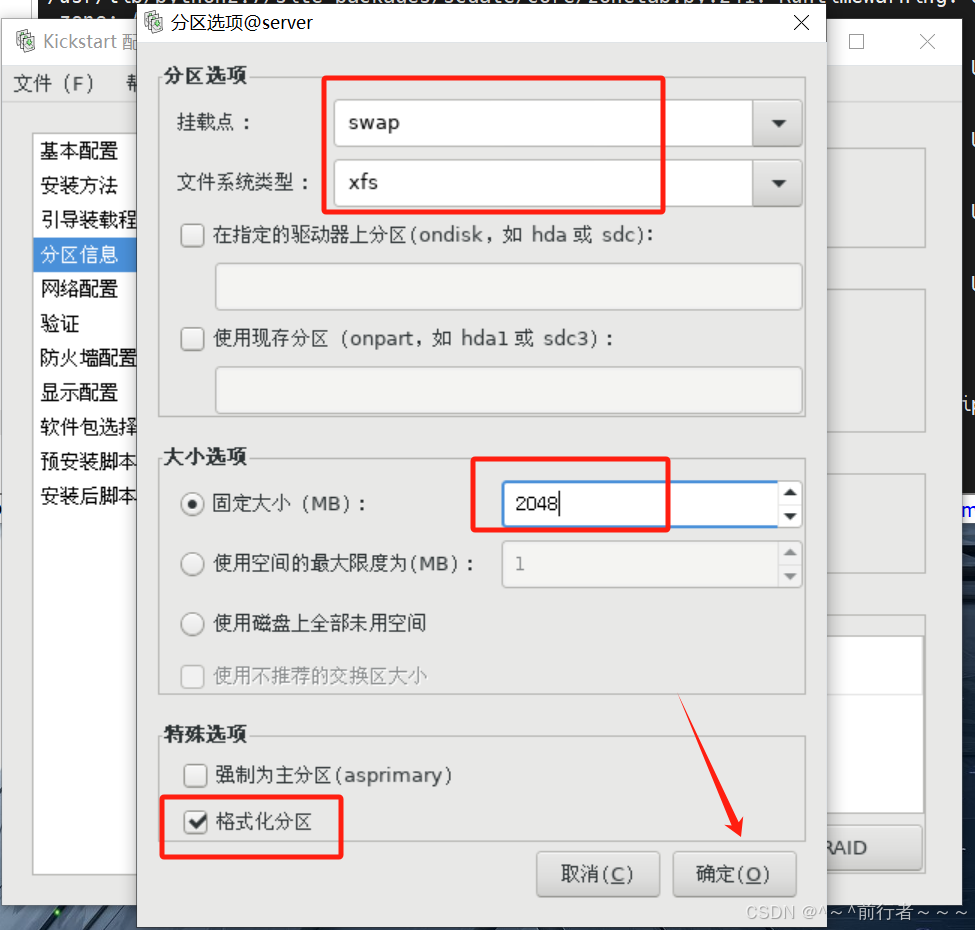
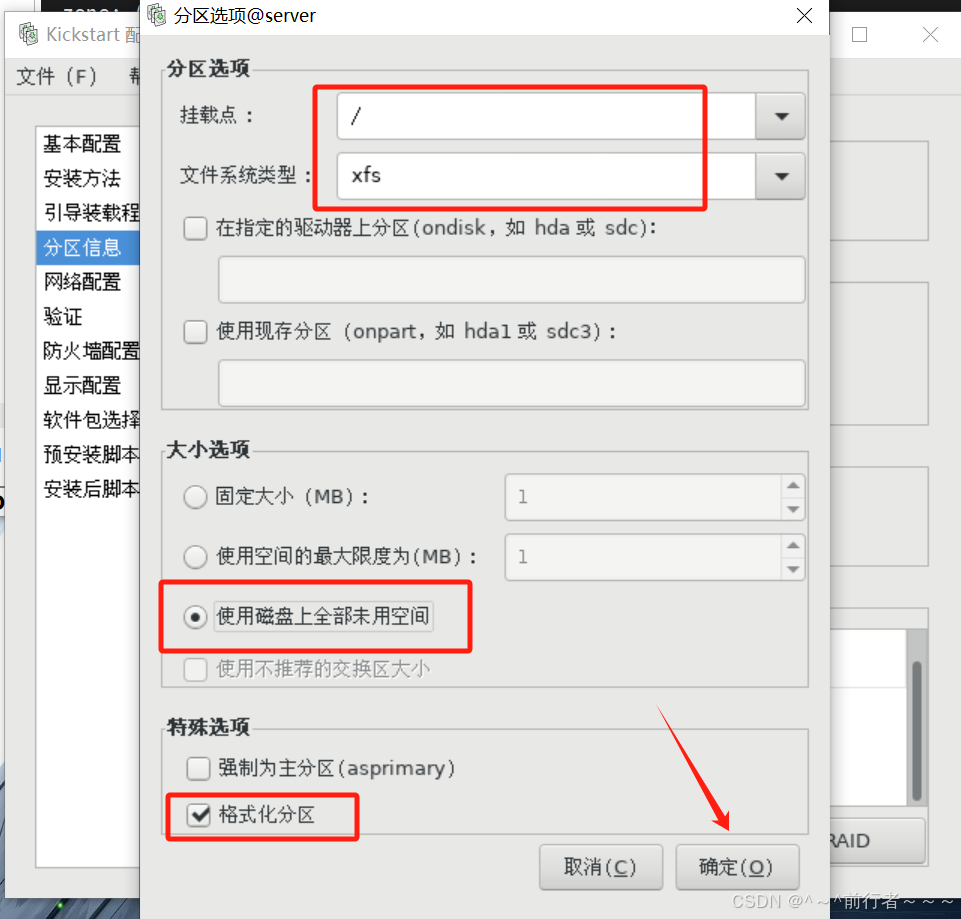
- 分区完后的显示
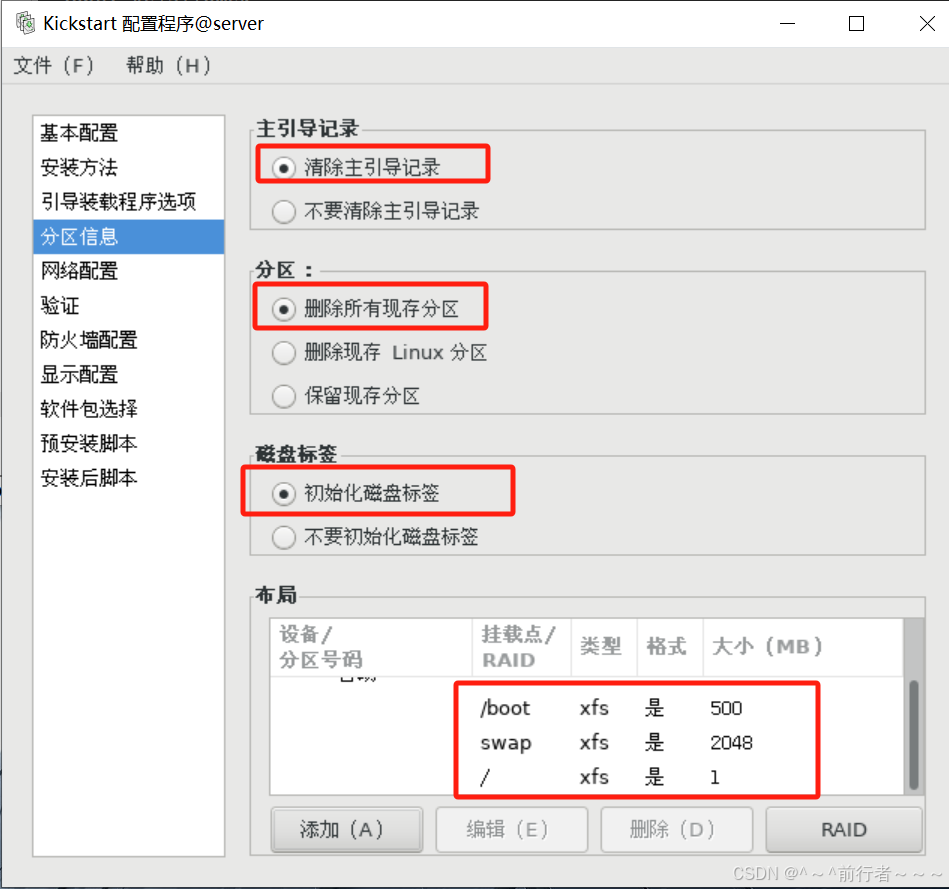
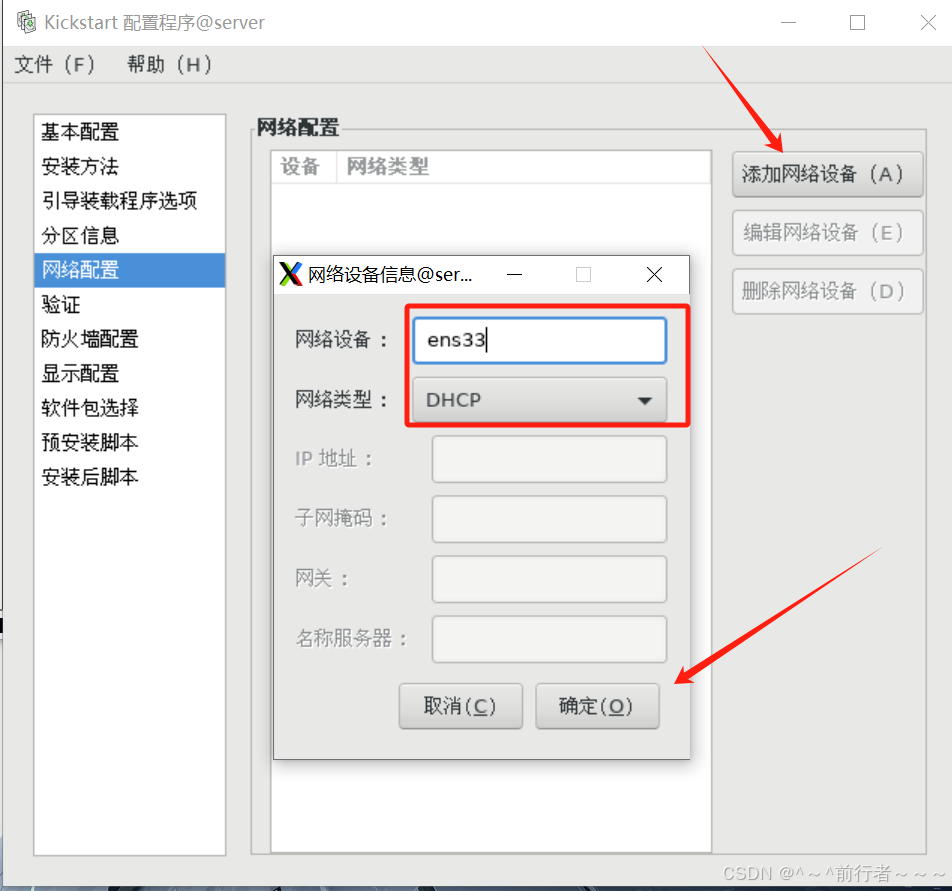
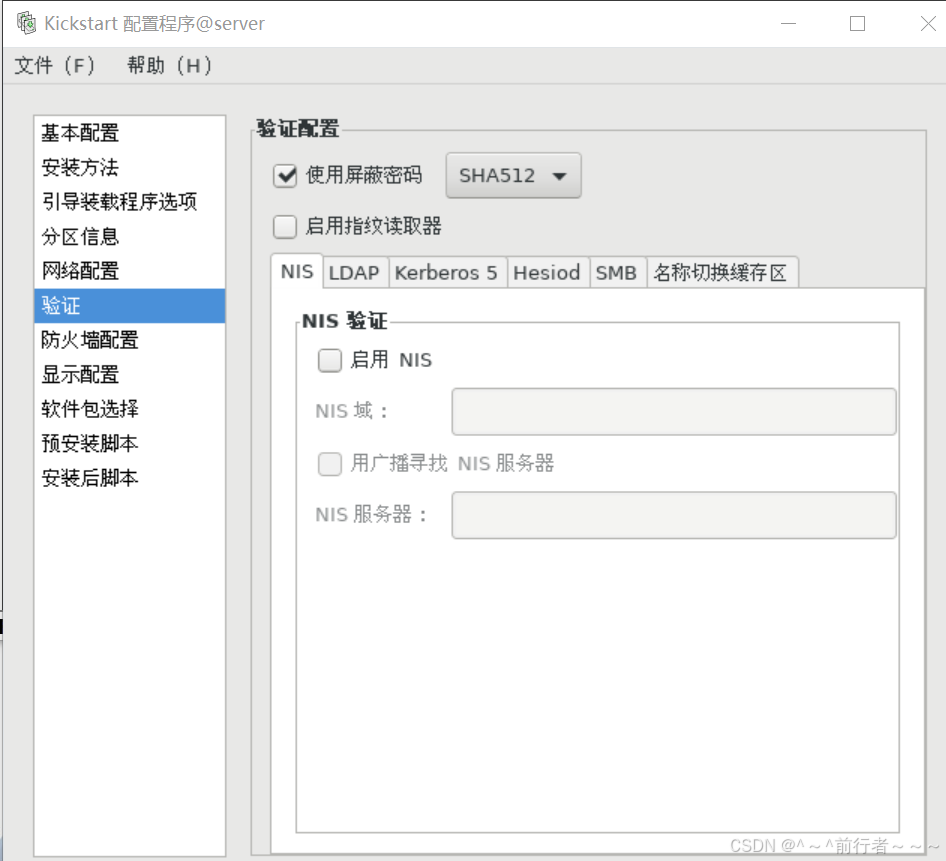
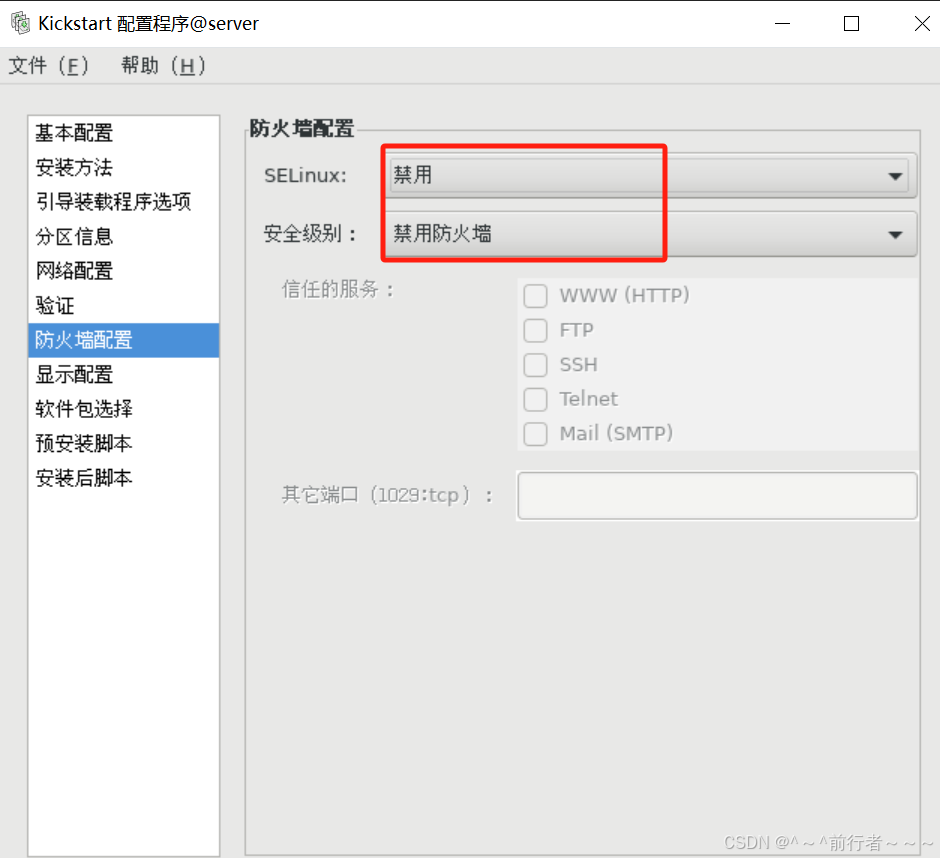
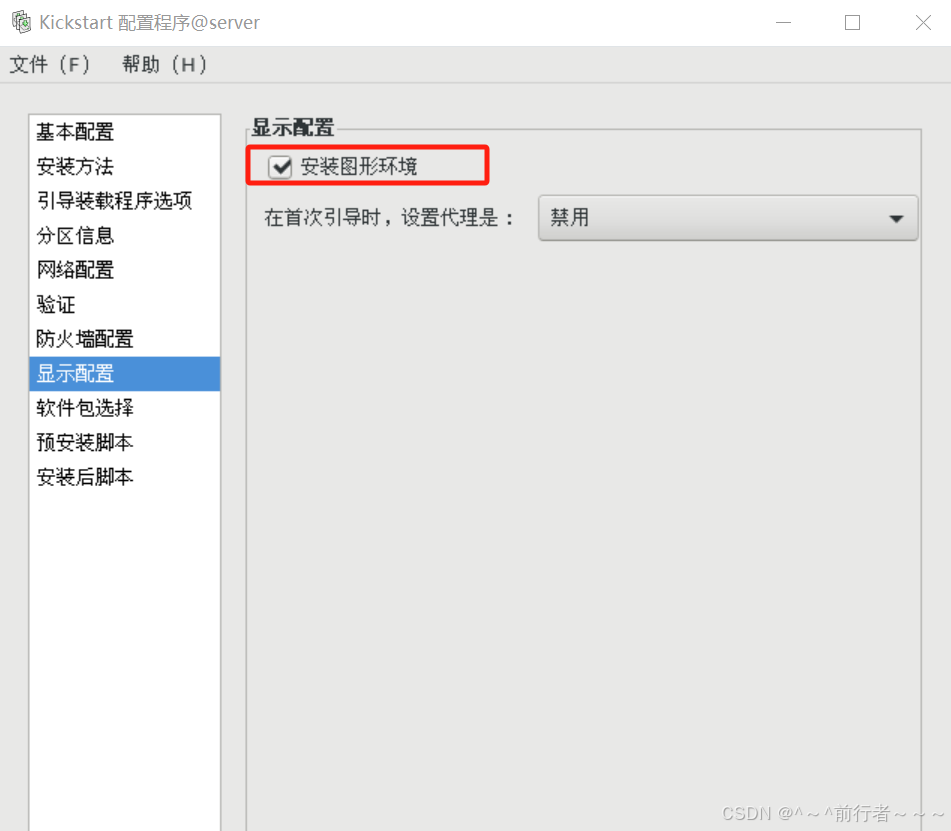
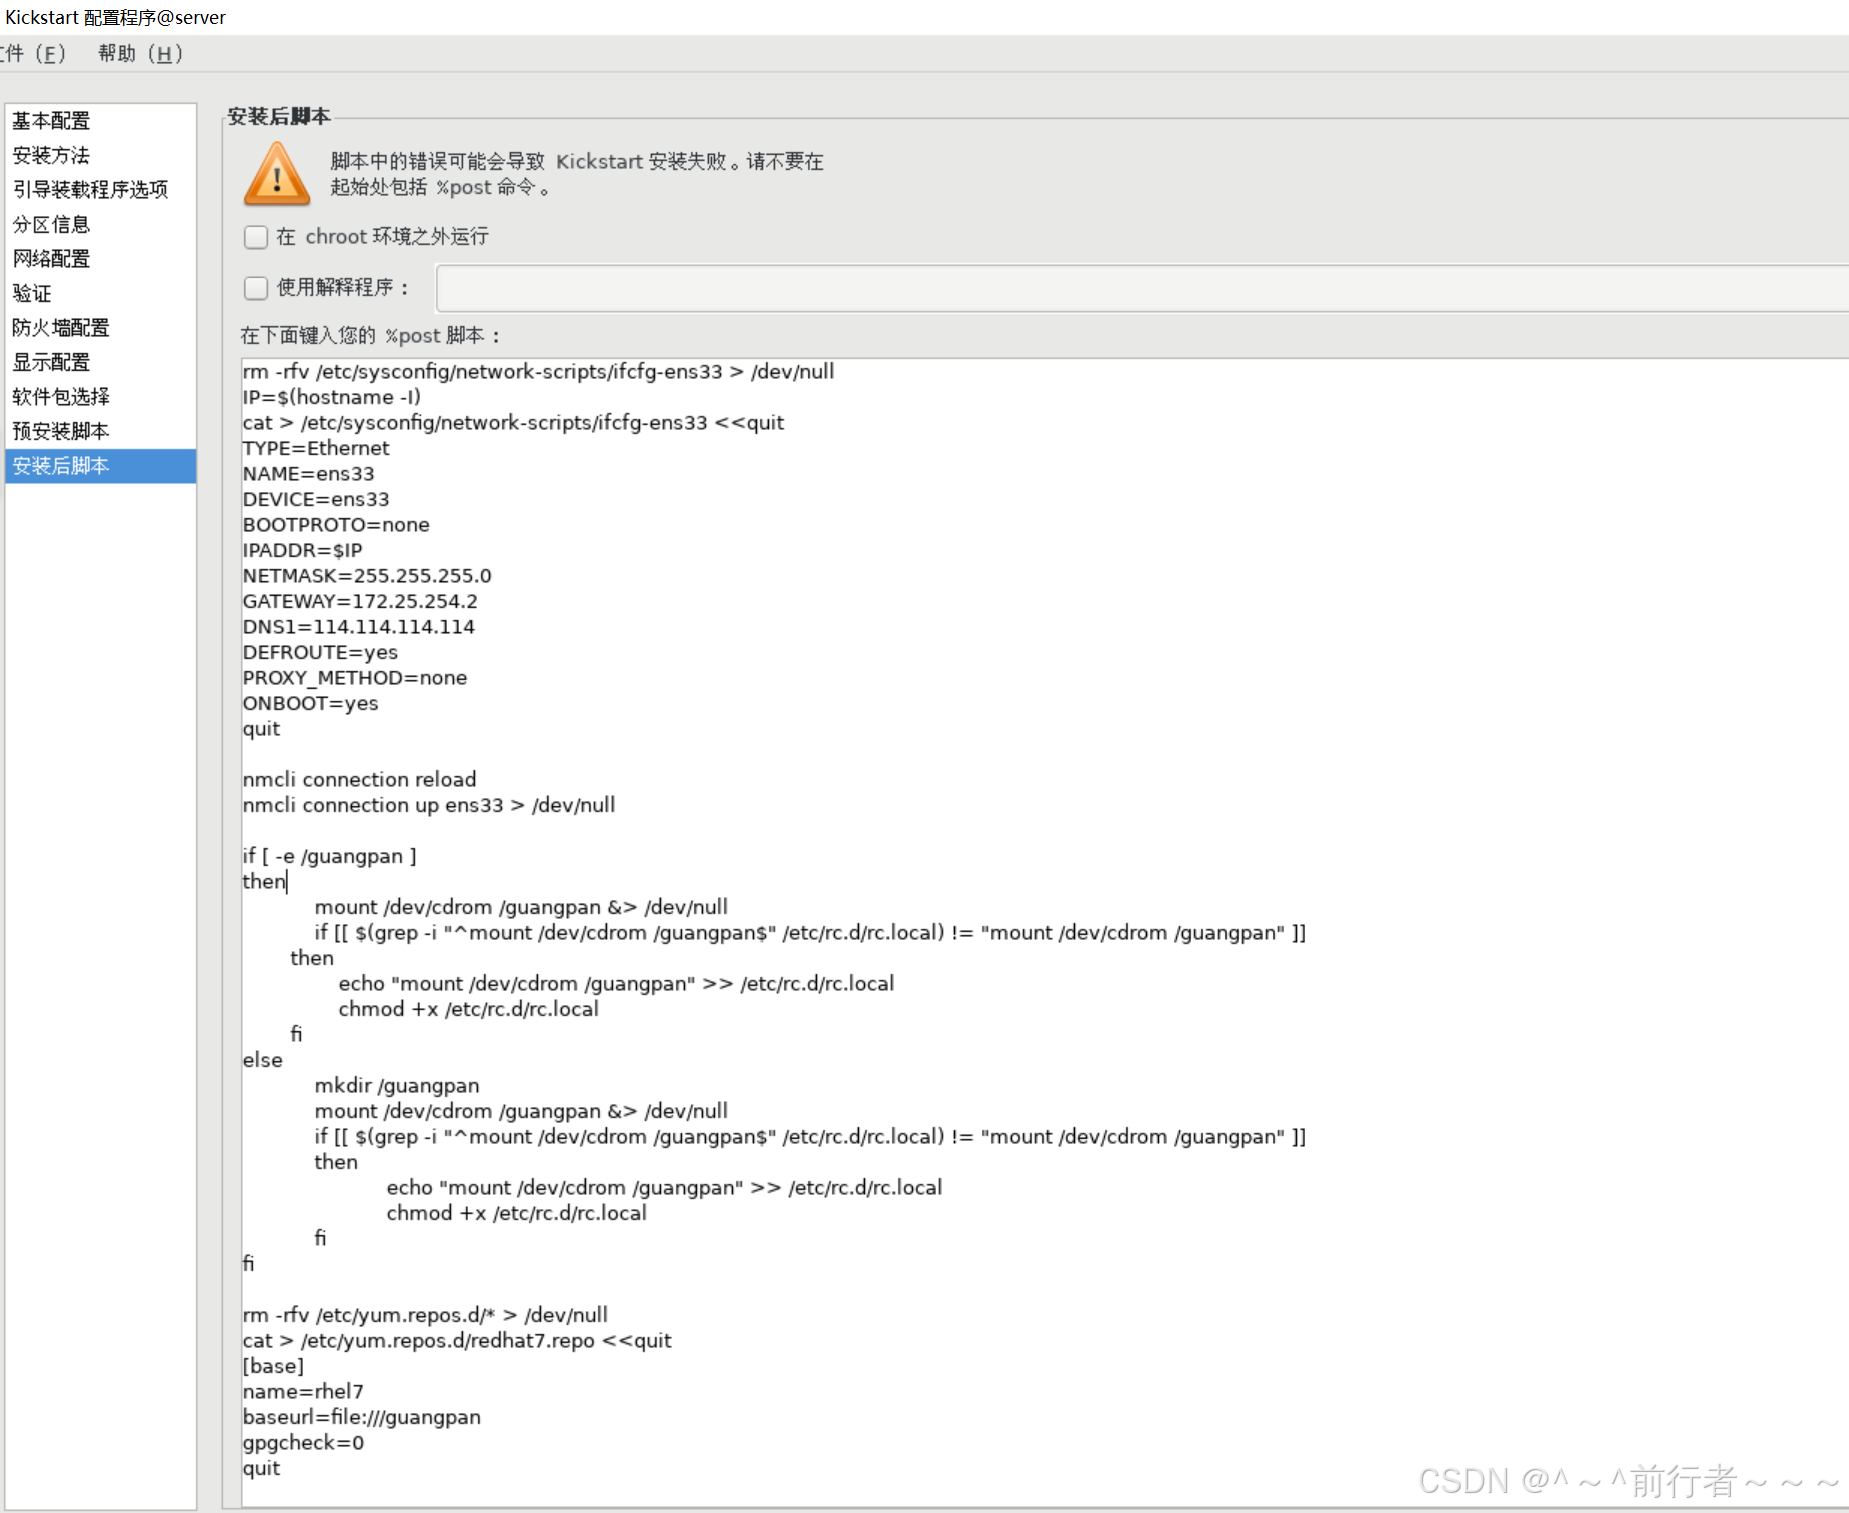
- 上图脚本作用为
配置静态IP,永久挂载光盘,配置yum本地仓库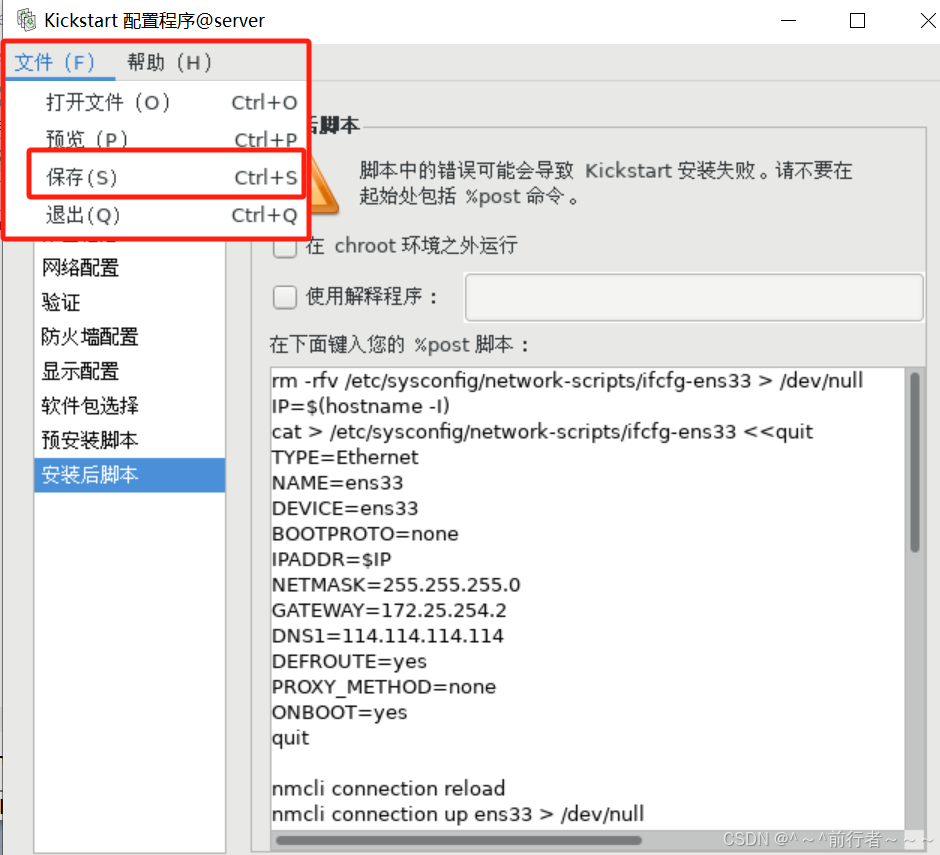
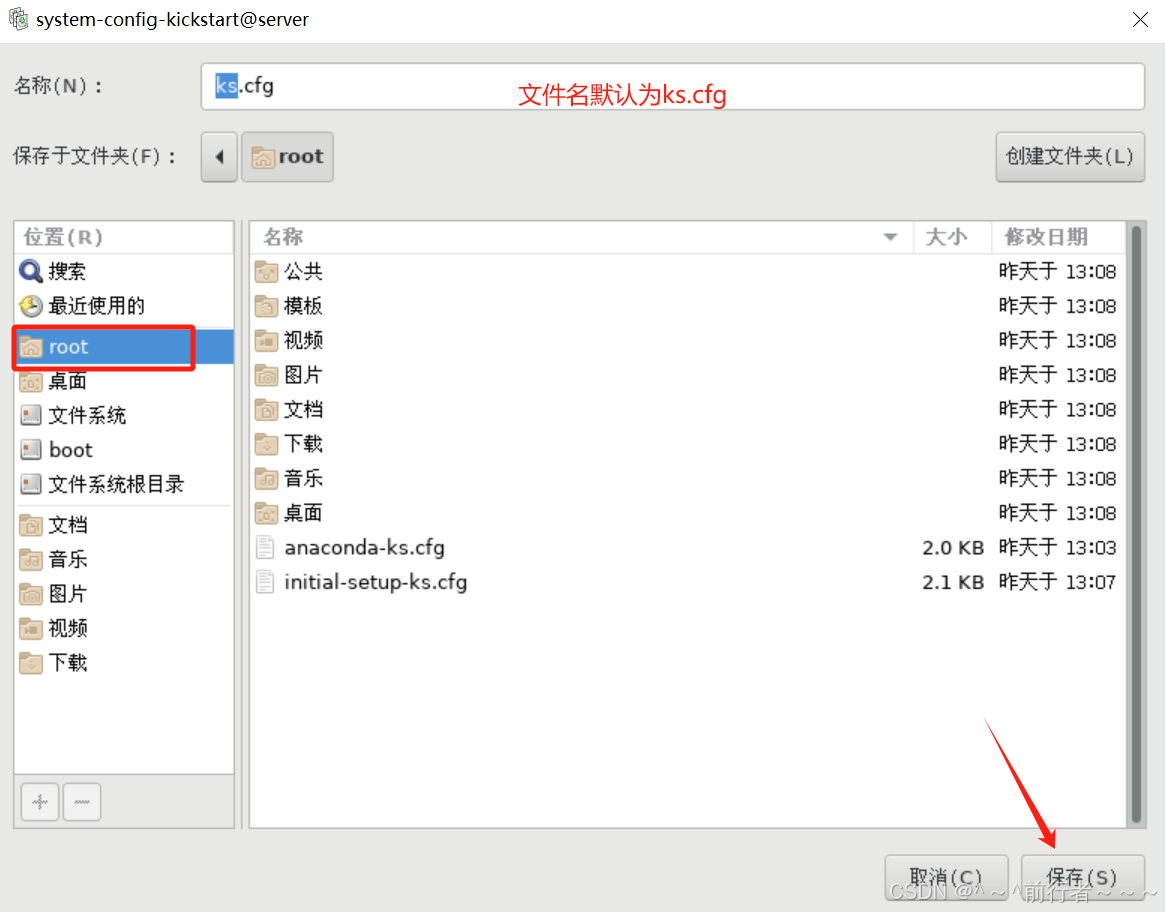
- 保存完后
叉掉即可
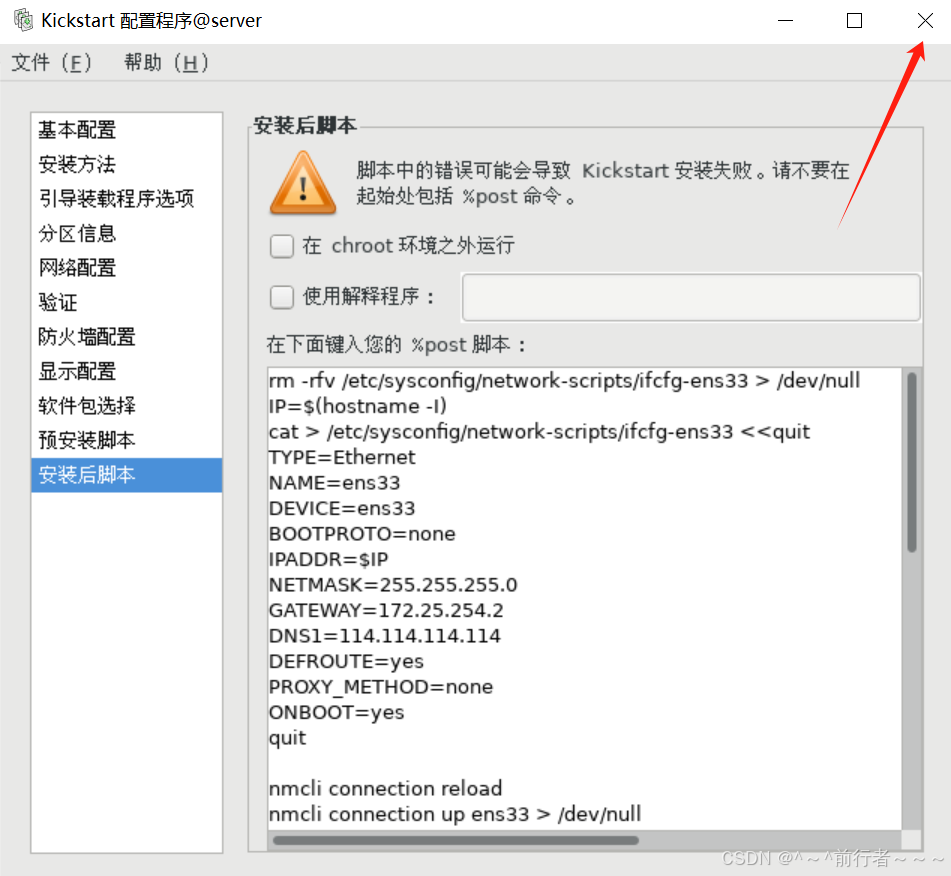
[root@server ~]# ls anaconda-ks.cfg initial-setup-ks.cfg ks.cfg 公共 模板 视频 图片 文档 下载 音乐 桌面 - 检查有没有语法错误
[root@server ~]# ksvalidator ks.cfg [root@server ~]# #没有回显说明语法正确 ks.cfg脚本配置完成
2.server端安装httpd
[root@server ~]# yum install httpd -y 依赖关系解决 ============================================================================================== Package 架构 版本 源 大小 ============================================================================================== 正在安装: httpd x86_64 2.4.6-95.el7 base 1.2 M 为依赖而安装: apr x86_64 1.4.8-7.el7 base 104 k apr-util x86_64 1.5.2-6.el7 base 92 k httpd-tools x86_64 2.4.6-95.el7 base 93 k mailcap noarch 2.1.41-2.el7 base 31 k 事务概要 ============================================================================================== 安装 1 软件包 (+4 依赖软件包) 总下载量:1.5 M 安装大小:4.3 M Downloading packages: ---------------------------------------------------------------------------------------------- 总计 223 MB/s | 1.5 MB 00:00:00 Running transaction check Running transaction test Transaction test succeeded Running transaction 正在安装 : apr-1.4.8-7.el7.x86_64 1/5 正在安装 : apr-util-1.5.2-6.el7.x86_64 2/5 正在安装 : httpd-tools-2.4.6-95.el7.x86_64 3/5 正在安装 : mailcap-2.1.41-2.el7.noarch 4/5 正在安装 : httpd-2.4.6-95.el7.x86_64 5/5 验证中 : httpd-tools-2.4.6-95.el7.x86_64 1/5 验证中 : mailcap-2.1.41-2.el7.noarch 2/5 验证中 : apr-1.4.8-7.el7.x86_64 3/5 验证中 : httpd-2.4.6-95.el7.x86_64 4/5 验证中 : apr-util-1.5.2-6.el7.x86_64 5/5 已安装: httpd.x86_64 0:2.4.6-95.el7 作为依赖被安装: apr.x86_64 0:1.4.8-7.el7 apr-util.x86_64 0:1.5.2-6.el7 httpd-tools.x86_64 0:2.4.6-95.el7 mailcap.noarch 0:2.1.41-2.el7 完毕! 2.1将ks.cfg复制到/var/www/html中
[root@server ~]# cp ks.cfg /var/www/html/ [root@server ~]# cd /var/www/html/ [root@server html]# ls ks.cfg 2.2在/var/www/html中创建一个名为guangpan的软链接文件,指向/guangpan
[root@server html]# ln -s /guangpan guangpan [root@server html]# ll 总用量 4 lrwxrwxrwx 1 root root 9 8月 5 21:40 guangpan -> /guangpan -rw-r--r-- 1 root root 2058 8月 5 21:36 ks.cfg 2.3重启httpd服务,进行简单测试
[root@server html]# systemctl restart httpd - 测试
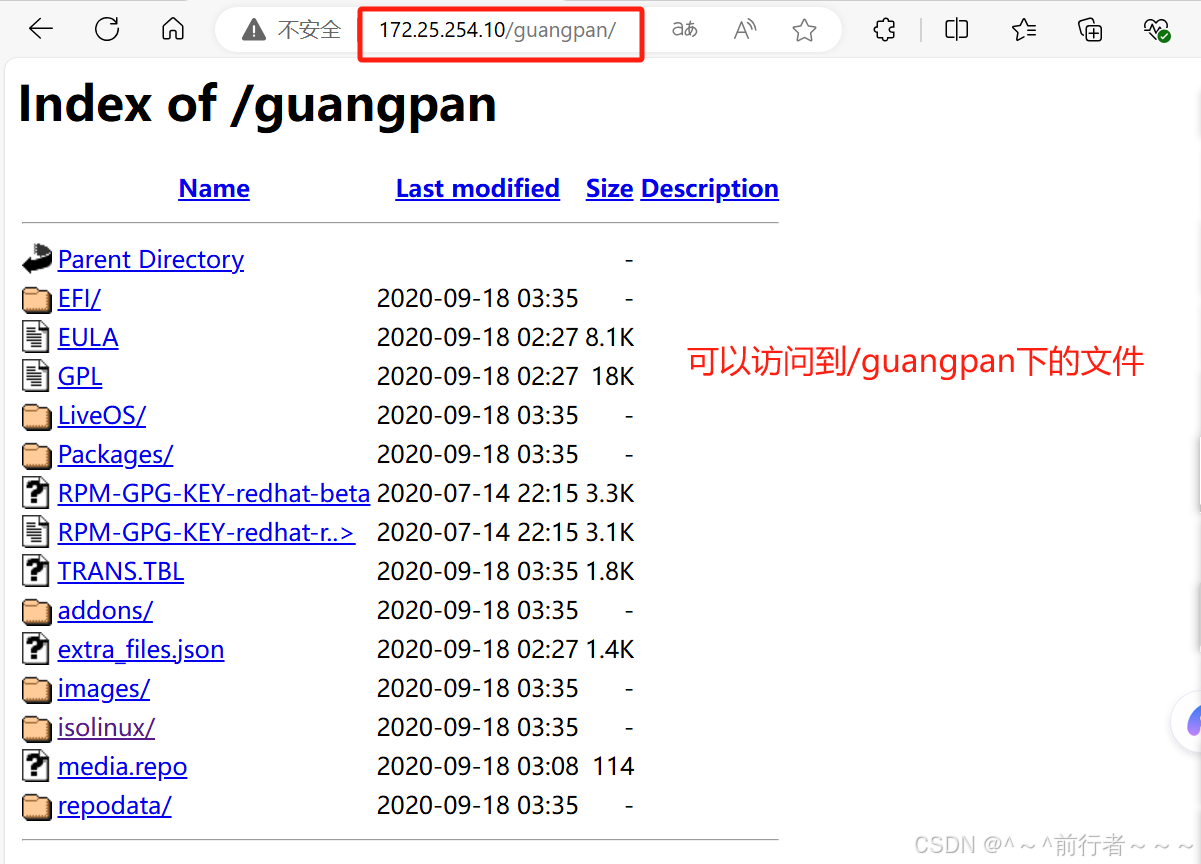
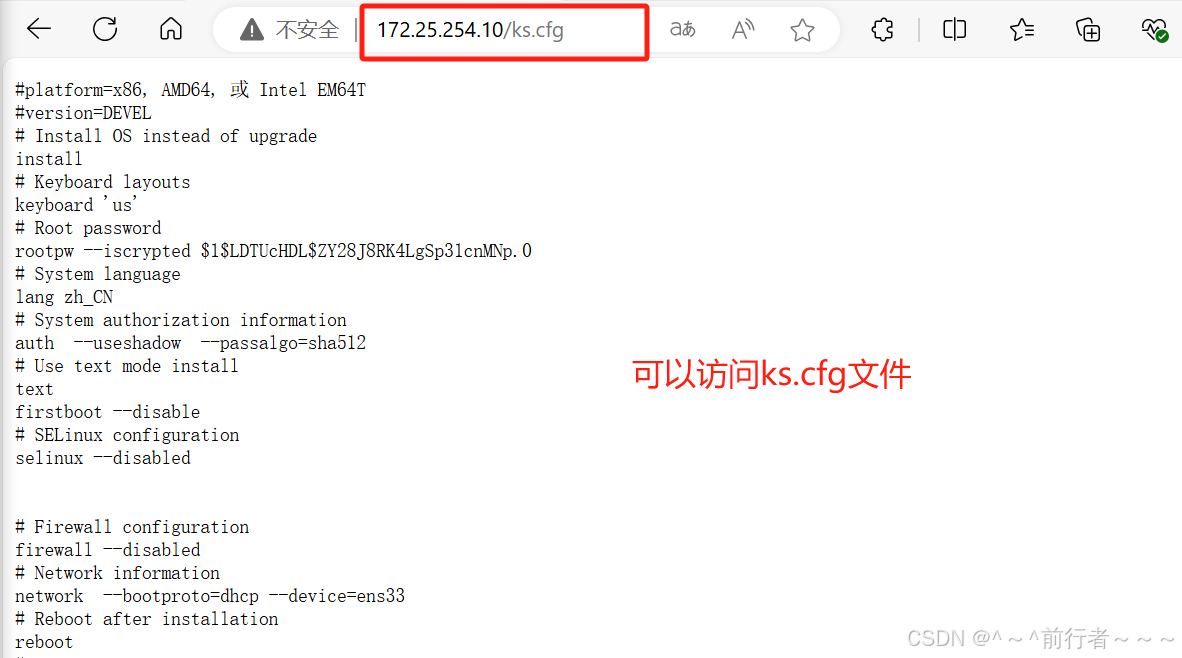
3.server端安装dhcp
- 安装
dhcp服务为其他服务器提供分配ip的功能
[root@server ~]# yum install dhcp -y 依赖关系解决 ============================================================================================== Package 架构 版本 源 大小 ============================================================================================== 正在安装: dhcp x86_64 12:4.2.5-82.el7 base 515 k 事务概要 ============================================================================================== 安装 1 软件包 总下载量:515 k 安装大小:1.4 M Downloading packages: Running transaction check Running transaction test Transaction test succeeded Running transaction 正在安装 : 12:dhcp-4.2.5-82.el7.x86_64 1/1 验证中 : 12:dhcp-4.2.5-82.el7.x86_64 1/1 已安装: dhcp.x86_64 12:4.2.5-82.el7 完毕! - 查看dhcp的配置文件路径
[root@server ~]# rpm -qc dhcp /etc/dhcp/dhcpd.conf #看到这个 /etc/dhcp/dhcpd6.conf /etc/openldap/schema/dhcp.schema /etc/sysconfig/dhcpd /var/lib/dhcpd/dhcpd.leases /var/lib/dhcpd/dhcpd6.leases - 查看
/etc/dhcp/dhcpd.conf文件内容
[root@server ~]# cat /etc/dhcp/dhcpd.conf # # DHCP Server Configuration file. # see /usr/share/doc/dhcp*/dhcpd.conf.example # see dhcpd.conf(5) man page # - 在上面,我们可以看到
dhcp配置文件内容的配置案例的路径 - 我们将
案例文件复制到/etc/dhcp/下,并取名为dhcpd.conf
[root@server ~]# cp /usr/share/doc/dhcp*/dhcpd.conf.example /etc/dhcp/dhcpd.conf cp:是否覆盖"/etc/dhcp/dhcpd.conf"? yes 3.1修改dhcpd.conf配置文件
[root@server ~]# vim /etc/dhcp/dhcpd.conf - 修改前
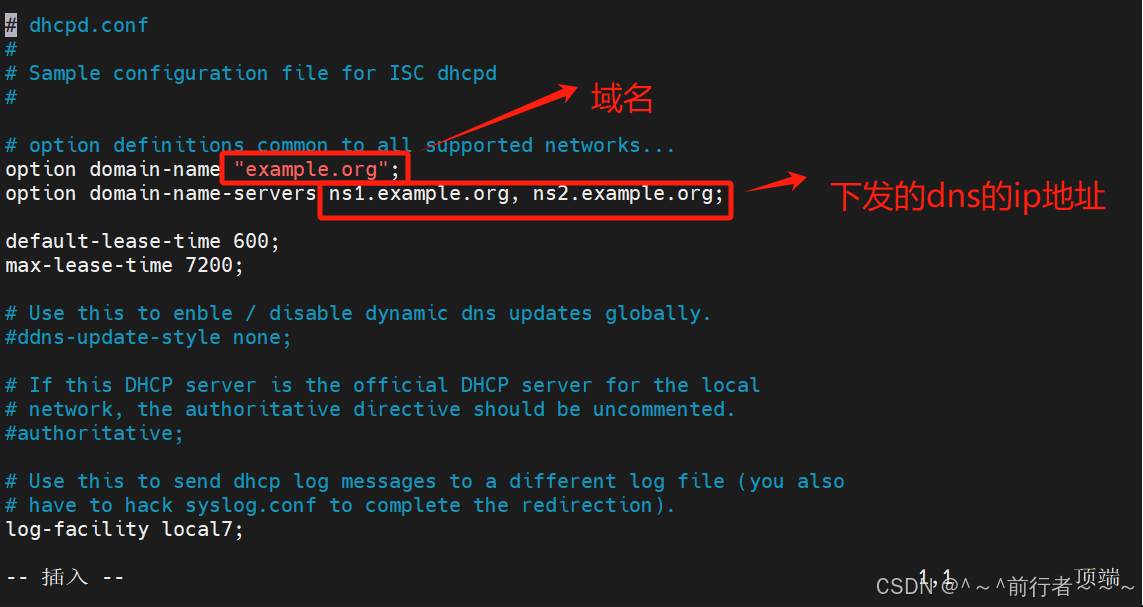
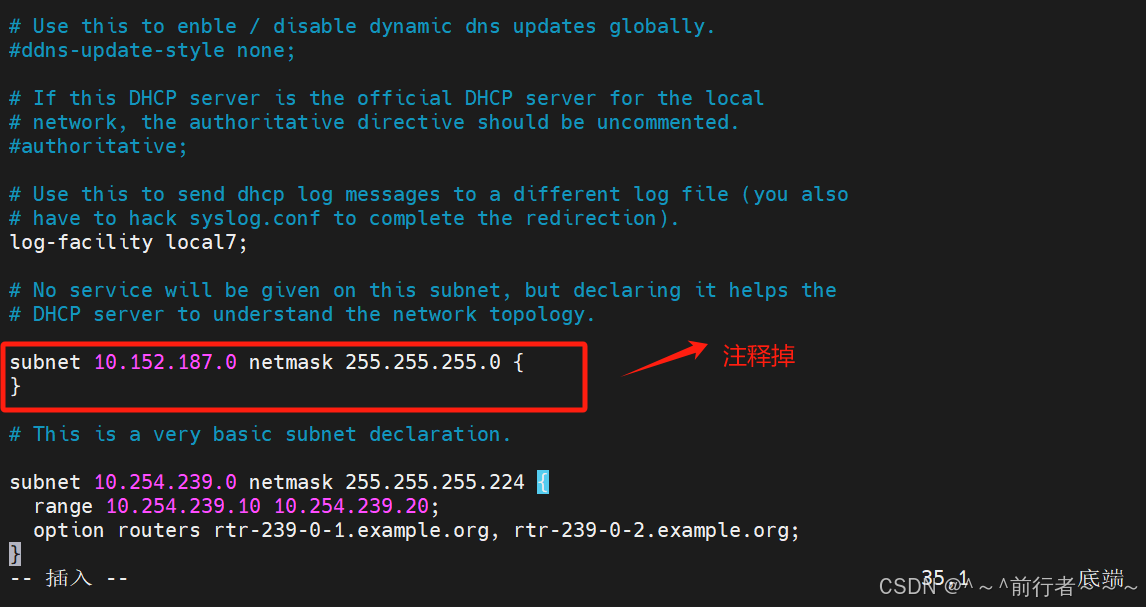
- 留下一个
subnet字段即可
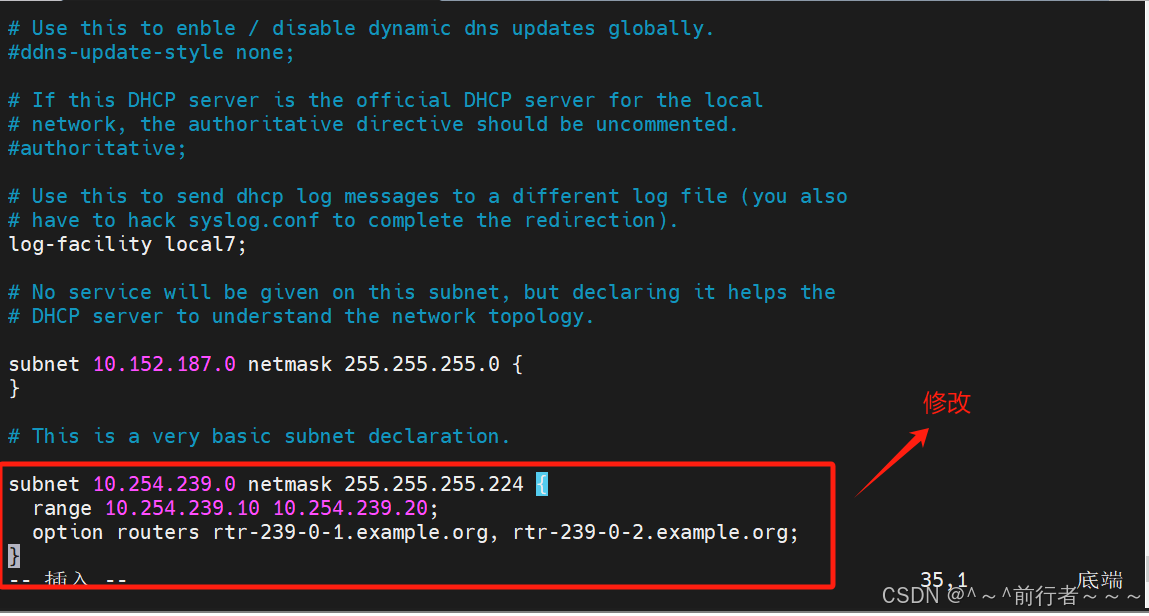
- 修改后
# dhcpd.conf # # Sample configuration file for ISC dhcpd # # option definitions common to all supported networks... option domain-name "openlab.com"; option domain-name-servers 114.114.114.114; default-lease-time 600; max-lease-time 7200; # Use this to enble / disable dynamic dns updates globally. #ddns-update-style none; # If this DHCP server is the official DHCP server for the local # network, the authoritative directive should be uncommented. #authoritative; # Use this to send dhcp log messages to a different log file (you also # have to hack syslog.conf to complete the redirection). log-facility local7; # No service will be given on this subnet, but declaring it helps the # DHCP server to understand the network topology. #subnet 10.152.187.0 netmask 255.255.255.0 { #} # This is a very basic subnet declaration. subnet 172.25.254.0 netmask 255.255.255.0 { range 172.25.254.30 172.25.254.40; option routers 172.25.254.2; next-server 172.25.254.10; filename "pxelinux.0"; } 

server端下发IP时,会让client端读取next-server主机中的pxelinux.0文件- 然后
pxelinux.0会让client读取/var/lib/tftpboot/pxelinux.cfg/default文件
4.安装syslinux
- 提供
pxelinux.0文件
[root@server ~]# yum install syslinux -y 正在解决依赖关系 --> 正在检查事务 ---> 软件包 syslinux.x86_64.0.4.05-15.el7 将被 安装 --> 解决依赖关系完成 依赖关系解决 ============================================================================================== Package 架构 版本 源 大小 ============================================================================================== 正在安装: syslinux x86_64 4.05-15.el7 base 991 k 事务概要 ============================================================================================== 安装 1 软件包 总下载量:991 k 安装大小:2.3 M Downloading packages: Running transaction check Running transaction test Transaction test succeeded Running transaction 正在安装 : syslinux-4.05-15.el7.x86_64 1/1 验证中 : syslinux-4.05-15.el7.x86_64 1/1 已安装: syslinux.x86_64 0:4.05-15.el7 完毕! 5.安装tftp-server
tftp服务是用来共享pxelinux.0数据文件的网络服务
[root@server ~]# yum install tftp-server -y 依赖关系解决 ============================================================================================== Package 架构 版本 源 大小 ============================================================================================== 正在安装: tftp-server x86_64 5.2-22.el7 base 47 k 事务概要 ============================================================================================== 安装 1 软件包 总下载量:47 k 安装大小:64 k Downloading packages: Running transaction check Running transaction test Transaction test succeeded Running transaction 正在安装 : tftp-server-5.2-22.el7.x86_64 1/1 验证中 : tftp-server-5.2-22.el7.x86_64 1/1 已安装: tftp-server.x86_64 0:5.2-22.el7 完毕! 6.将/guangpan/isolinux/下的所有文件复制到/var/lib/tftpboot/目录下
[root@server ~]# cp /guangpan/isolinux/* /var/lib/tftpboot/ 7.将/usr/share/syslinux/pxelinux.0文件复制到/var/lib/tftpboot/目录下
[root@server ~]# cp /usr/share/syslinux/pxelinux.0 /var/lib/tftpboot/ 8.在/var/lib/tftpboot/目录下创建pxelinux.cfg目录
[root@server ~]# cd /var/lib/tftpboot/ [root@server tftpboot]# mkdir pxelinux.cfg 9.将/var/lib/tftpboot/isolinux.cfg文件复制到/var/lib/tftpboot/pxelinux.cfg/目录下并起名为default
[root@server tftpboot]# cp isolinux.cfg pxelinux.cfg/default 10.修改/var/lib/tftpboot/pxelinux.cfg/default文件内容
[root@server ~]# vim /var/lib/tftpboot/pxelinux.cfg/default - 修改前
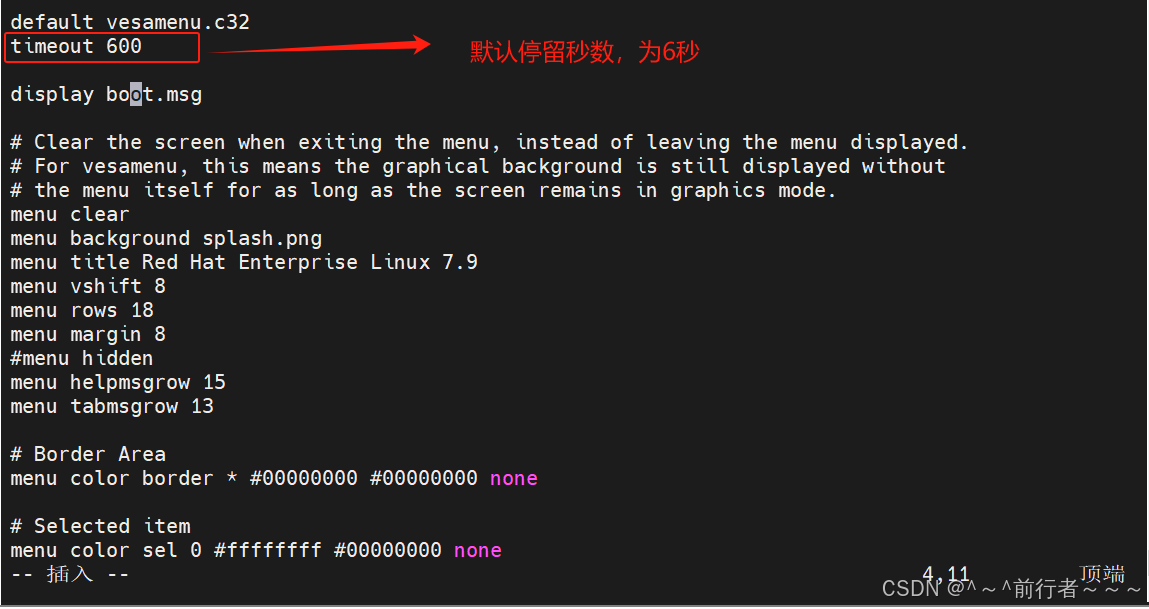
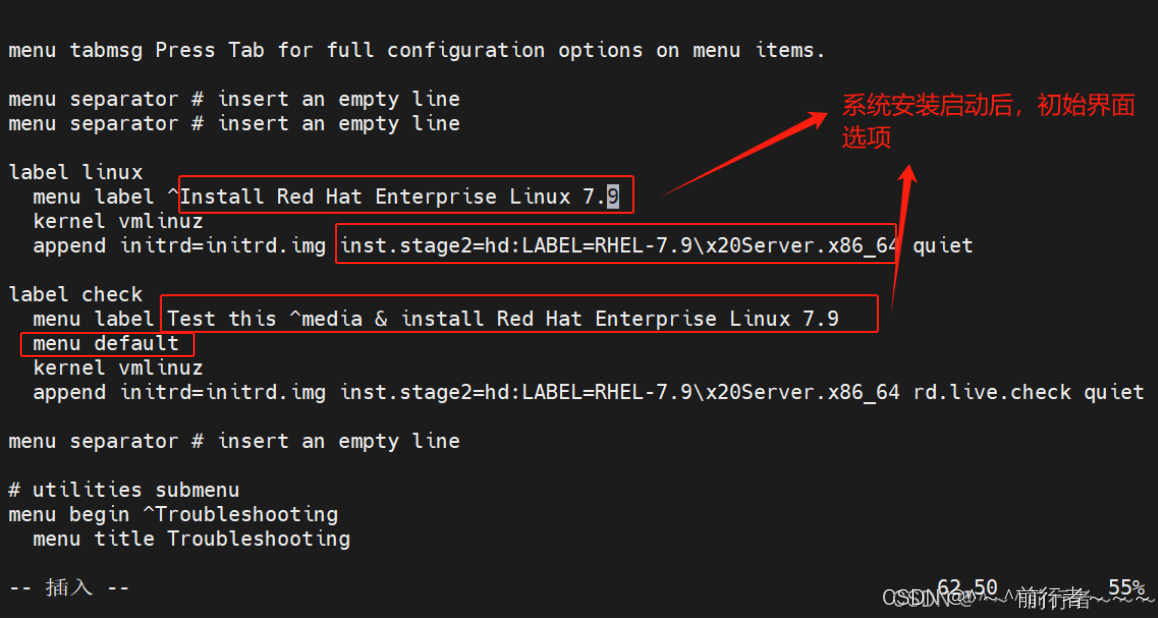
- 修改后
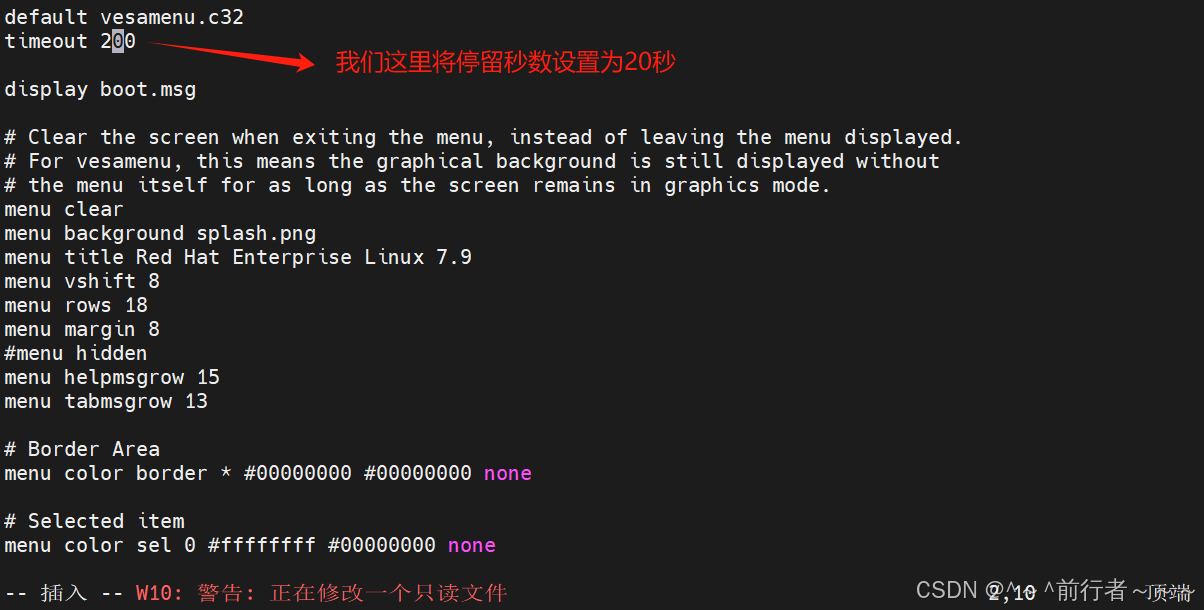
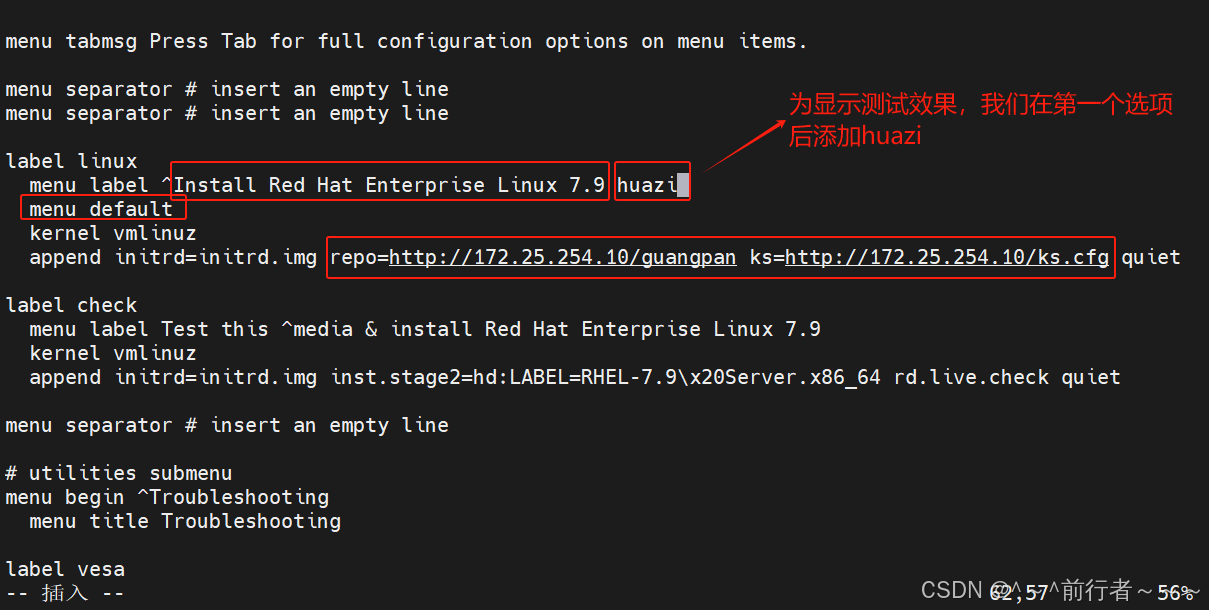
default vesamenu.c32 timeout 200 display boot.msg # Clear the screen when exiting the menu, instead of leaving the menu displayed. # For vesamenu, this means the graphical background is still displayed without # the menu itself for as long as the screen remains in graphics mode. menu clear menu background splash.png menu title Red Hat Enterprise Linux 7.9 menu vshift 8 menu rows 18 menu margin 8 #menu hidden menu helpmsgrow 15 menu tabmsgrow 13 # Border Area menu color border * #00000000 #00000000 none # Selected item menu color sel 0 #ffffffff #00000000 none # Title bar menu color title 0 #ff7ba3d0 #00000000 none # Press [Tab] message menu color tabmsg 0 #ff3a6496 #00000000 none # Unselected menu item menu color unsel 0 #84b8ffff #00000000 none # Selected hotkey menu color hotsel 0 #84b8ffff #00000000 none # Unselected hotkey menu color hotkey 0 #ffffffff #00000000 none # Help text menu color help 0 #ffffffff #00000000 none # A scrollbar of some type? Not sure. menu color scrollbar 0 #ffffffff #ff355594 none # Timeout msg menu color timeout 0 #ffffffff #00000000 none menu color timeout_msg 0 #ffffffff #00000000 none # Command prompt text menu color cmdmark 0 #84b8ffff #00000000 none menu color cmdline 0 #ffffffff #00000000 none # Do not display the actual menu unless the user presses a key. All that is displayed is a timeout message. menu tabmsg Press Tab for full configuration options on menu items. menu separator # insert an empty line menu separator # insert an empty line label linux menu label ^Install Red Hat Enterprise Linux 7.9 huazi menu default kernel vmlinuz append initrd=initrd.img repo=http://172.25.254.10/guangpan ks=http://172.25.254.10/ks.cfg quiet label check menu label Test this ^media & install Red Hat Enterprise Linux 7.9 kernel vmlinuz append initrd=initrd.img inst.stage2=hd:LABEL=RHEL-7.9\x20Server.x86_64 rd.live.check quiet menu separator # insert an empty line # utilities submenu menu begin ^Troubleshooting menu title Troubleshooting label vesa menu indent count 5 menu label Install Red Hat Enterprise Linux 7.9 in ^basic graphics mode text help Try this option out if you're having trouble installing Red Hat Enterprise Linux 7.9. endtext kernel vmlinuz append initrd=initrd.img inst.stage2=hd:LABEL=RHEL-7.9\x20Server.x86_64 xdriver=vesa nomodeset quiet label rescue menu indent count 5 menu label ^Rescue a Red Hat Enterprise Linux system text help If the system will not boot, this lets you access files and edit config files to try to get it booting again. endtext kernel vmlinuz append initrd=initrd.img inst.stage2=hd:LABEL=RHEL-7.9\x20Server.x86_64 rescue quiet label memtest menu label Run a ^memory test text help If your system is having issues, a problem with your system's memory may be the cause. Use this utility to see if the memory is working correctly. endtext kernel memtest menu separator # insert an empty line label local menu label Boot from ^local drive localboot 0xffff menu separator # insert an empty line menu separator # insert an empty line label returntomain menu label Return to ^main menu menu exit menu end 11.重启httpd,dhcpd,tftp服务并设置开机自启动
[root@server ~]# systemctl enable --now httpd Created symlink from /etc/systemd/system/multi-user.target.wants/httpd.service to /usr/lib/systemd/system/httpd.service. [root@server ~]# systemctl enable --now dhcpd [root@server ~]# systemctl enable --now tftp Created symlink from /etc/systemd/system/sockets.target.wants/tftp.socket to /usr/lib/systemd/system/tftp.socket. 12.关闭client端的光盘启动
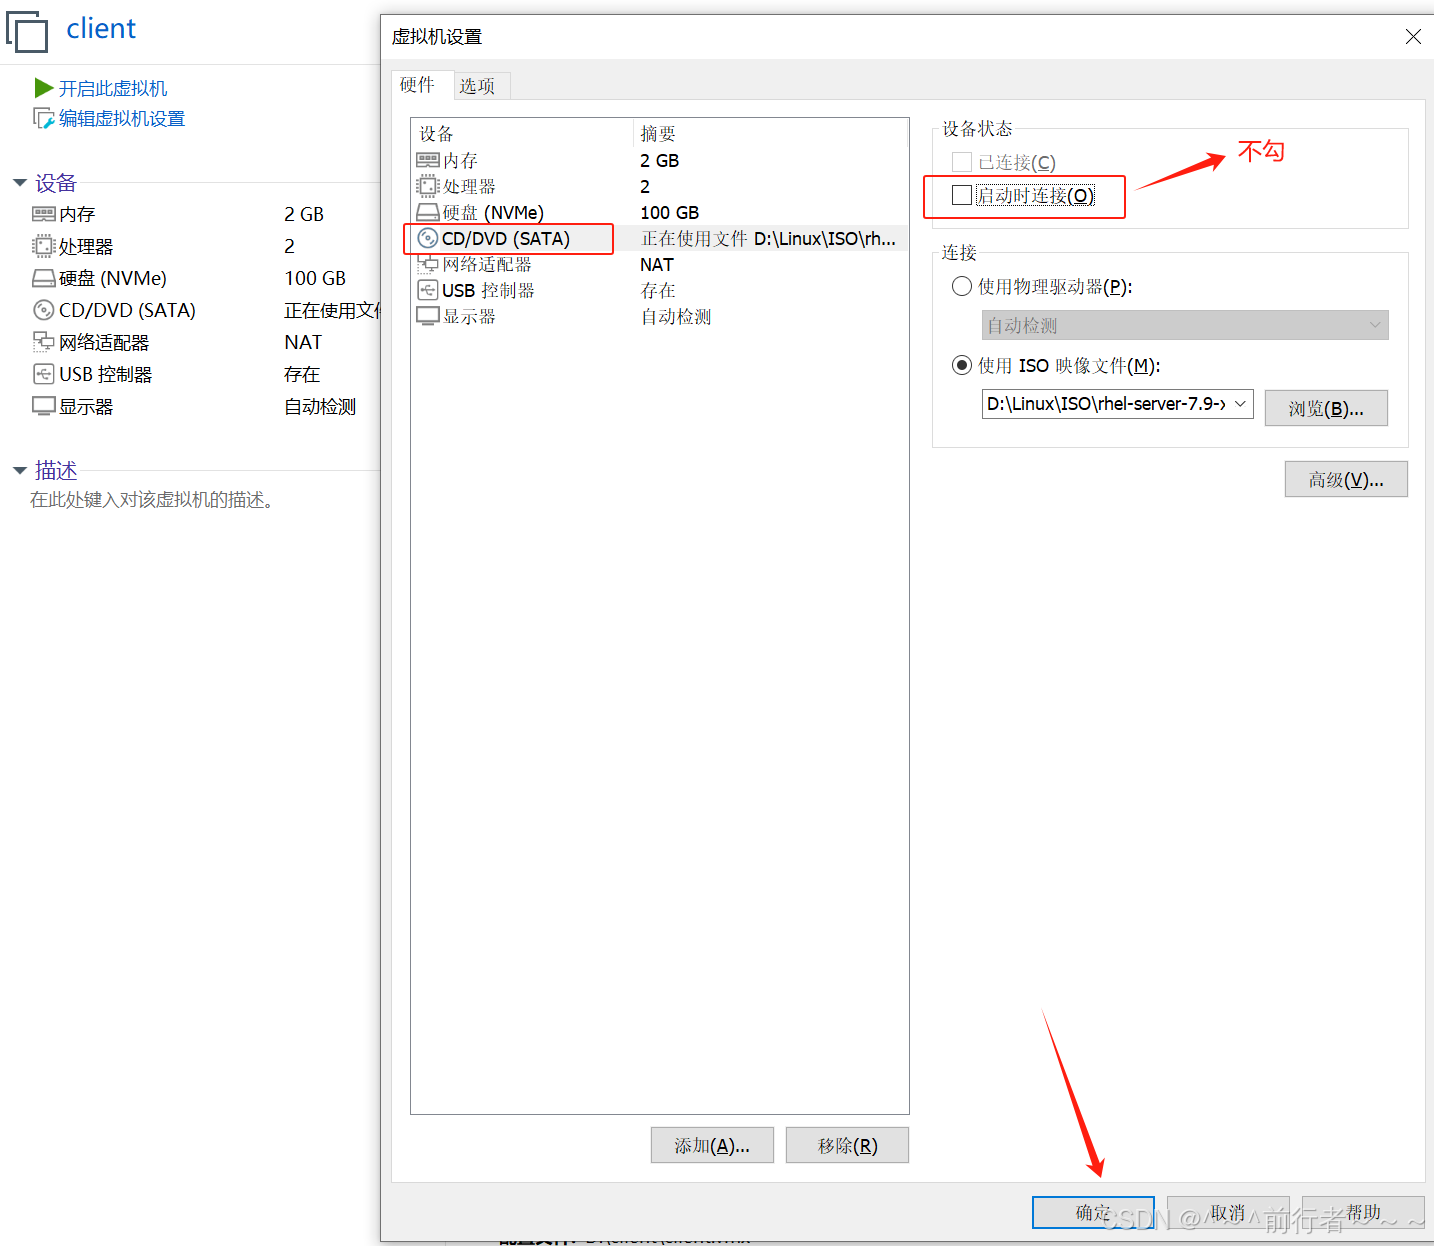
13.在VM中的client端打开电源时进入固件设置BIOS为网卡启动

测试
- 我们可以看到我们自己设置的
停留界面标志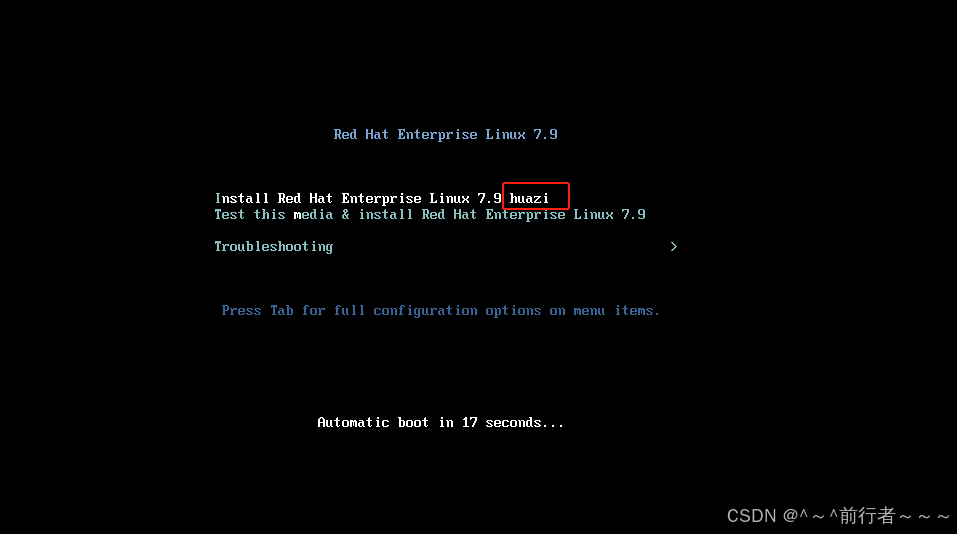
之后我们什么都不用管,等待系统自己安装好就算大功告成了- 安装成功后,我们进入系统

- 查看系统的
ip地址
- 使用
mobaxterm连接上去,发现有我们脚本里创建的文件,设置的静态ip,创建的本地yum仓库


总结
在PXE(Preboot eXecution Environment,预启动执行环境)网络中,syslinux扮演了关键角色。syslinux是一个功能强大的引导加载程序,它支持多种启动介质,包括网络、硬盘、U盘等。在PXE环境中,syslinux通过其提供的pxelinux.0程序,使得客户机能够通过网络从远程服务器下载引导镜像,并加载安装文件或整个操作系统。
syslinux在PXE中的作用
提供引导程序:
syslinux安装后,会生成pxelinux.0文件,这个文件是PXE启动过程中的关键引导程序。当客户机通过PXE启动时,它会从DHCP服务器获取TFTP服务器的地址,并从TFTP服务器上下载pxelinux.0文件。
配置启动选项:
- 除了
pxelinux.0文件外,syslinux还允许用户配置启动菜单,即pxelinux.cfg目录下的配置文件(如default)。这些配置文件指定了客户机启动时需要加载的内核文件(vmlinuz)、系统启动镜像文件(initrd.img)等,以及启动参数。
- 除了
简化安装过程:
- 通过
syslinux和PXE的结合,可以实现操作系统的无人值守安装。管理员只需配置好启动菜单和相应的安装文件,客户机在启动时就会自动从网络下载这些文件,并完成操作系统的安装。
- 通过
syslinux与PXE环境的集成
在PXE环境中,syslinux通常与DHCP服务器、TFTP服务器和FTP/HTTP服务器一起工作,以实现操作系统的远程安装。以下是它们之间的基本交互流程:
DHCP服务器:
- 客户机启动后,首先会查找网络中的
DHCP服务器,以获取IP地址、子网掩码、默认网关等网络参数。 DHCP服务器还会告诉客户机TFTP服务器的地址以及需要下载的引导程序文件名(pxelinux.0)。
- 客户机启动后,首先会查找网络中的
TFTP服务器:
- 客户机根据
DHCP服务器提供的信息,从TFTP服务器上下载pxelinux.0文件。 - 接着,客户机会继续从
TFTP服务器上下载pxelinux.cfg目录下的配置文件(如default),以及内核文件(vmlinuz)和系统启动镜像文件(initrd.img)。
- 客户机根据
FTP/HTTP服务器:
- 对于大型的安装文件(如完整的操作系统镜像),通常会通过
FTP或HTTP服务器进行传输。 - 客户机在获取到必要的引导文件和配置文件后,会从
FTP/HTTP服务器上下载这些大型文件,以完成操作系统的安装。
- 对于大型的安装文件(如完整的操作系统镜像),通常会通过
