背景
最近公司要我测试邮箱系统,评估能否取代公司购买的邮箱。为了能够更加符合日常使用习惯,除了测试邮箱的收发能力,也同步部署了能够管理域名及用户的类似后台系统postfixadmin以及web版本客户端roundcubemail。本文主要介绍基础的部署方式,至于更深层次类似反垃圾、反病毒及SSL等相关配置,后续再进一步介绍。
软件及版本信息
| 软件名称 | 版本 | 说明 |
|---|---|---|
| nginx | 1.22.0 | 公网代理 |
| MariaDB | 5.5.68 | 数据库,建议使用5.7及以上版本 |
| php | 5.4.16 | postfixadmin依赖 |
| docker | 26.1.4 | roundcubemail依赖 |
| postfixadmin | 2.93 | 可以使用更高版本 |
| roundcubemail | 1.6.7-complete | 最好使用complete版本 |
| postfix | 2.10.1-9 | 系统自带 |
| dovecot | 2.2.36-8 | yum安装 |
协议和组件说明
mail协议
- smtp:
简单邮件传输协议,用于从源地址到目的地址发送邮件。它主要负责快速传递邮件,但不保证邮件的可靠性。TCP协议,端口号是25; - pop3:
邮局协议第三版,用于从邮件服务器上接收邮件。POP3允许用户下载服务器上的邮件到本地计算机,然后可以选择是否从服务器上删除这些邮件。TCP协议。端口号是110; - imap:
互联网邮件访问协议,用于从邮件服务器上接收邮件。与POP3不同,IMAP允许用户在服务器上保持邮件的副本,并可以从多个设备访问和同步邮件。TCP协议。端口号是143; - smtps:
SMTP的安全版本,使用SSL/TLS加密技术来安全地传输邮件。SMTPS用于在客户端和服务器之间安全地发送邮件。TCP协议。端口号是465; - pop3s:
POP3的安全版本,同样使用SSL/TLS加密技术来安全地从服务器上接收邮件。TCP协议。端口号是995; - imaps:
IMAP的安全版本,使用SSL/TLS加密技术来安全地访问和同步服务器上的邮件。TCP协议。端口号是993;
总结一下,SMTP和SMTPS用于发送邮件,POP3和POP3S用于接收邮件到本地计算机,而IMAP和IMAPS允许用户从服务器上访问和同步邮件。
mail组件
1. MTA:mail transfer agent 邮件传输代理
常见软件,
Exchange(微软)
Sendmail(开源软件)
Postfix
Qmail
Exim(剑桥大学开发的)
2. MRA:mail retravial agent 邮件检索代理
常见软件,
courier-imap:pop3,imap4,imaps,pop3s (俄罗斯开发)
dovecot (主流)
3. MDA:mail delivery agent 邮件投递代理
常见软件,
procmail (postfix默认)
maildrop (功能强大,效率高)
4. MUA:mail user agent 邮件用户代理
常见软件,
outlook express
Foxmail
pine(linux)
mutt(linux)
5. Mailbox:信箱
常见软件,
mailbox
maildir (主流)
两者的主要区别,mailbox是把所有邮件放在同一个文件中,maildir把每个用户的邮件都单独存放
工作流程
这里我们先介绍收发信的简单流程,至于反垃圾、反病毒组件我们后面再进一步介绍。
对比上面的流程图,简单介绍了下具体的工作流程:
- 当客户端发送邮件到服务器的25号端口,postfix会接受,然后做一些检查
发送者是否在黑名单或者实时黑名单,如果在黑名单,马上拒绝
是否是授权用户,是授权用户可以进行转发
接收者是否是服务器的用户,Postfix通Dovecot提供的SASL进行认证,如果不是,马上拒绝
如果我们启用了灰名单,会进行判断是否会拒绝邮件或者接收 - 检查通过后,postfix会将邮件交给LDA(这里我们使用dovecot提供的LDA功能),邮件会进入用户的邮箱,dovecot会执行用户设置的filter,也就是dovecot通过调用Sieve,放到相关的文件夹
- Dovecot把邮件以maildir的方式放在硬盘上
- 用户使用邮件客户端或者web客户端,通过pop3或imap协议进行连接
安装说明及准备
说明
本次安装使用postfix+dovecot的形式进行邮件收发,使用postfixadmin进行邮件服务器域名及用户管理,RoundCubeMail作为web客户端。安装过程中,由于高版本的postfixadmin的相关php组件一直安装不成功,考虑到只是作为后台管理使用,所以安装的还是低版本postfixadmin,并使用php5.4版本。而RoundCubeMail是作为web客户端使用,面向客户,所以是用的是1.6.7-complete版本,php版本为7.4,同时我将写好Dockerfile文件,可直接生成镜像使用。
安装准备
- 关闭防火墙与selinux
[root@localhost ~]# systemctl stop firewalld [root@localhost ~]# systemctl disable firewalld [root@localhost ~]# vim /etc/selinux/config # This file controls the state of SELinux on the system. # SELINUX= can take one of these three values: # enforcing - SELinux security policy is enforced. # permissive - SELinux prints warnings instead of enforcing. # disabled - No SELinux policy is loaded. SELINUX=disabled # SELINUXTYPE= can take one of three values: # targeted - Targeted processes are protected, # minimum - Modification of targeted policy. Only selected processes are protected. # mls - Multi Level Security protection. SELINUXTYPE=targeted - 修改主机名
[root@localhost ~]# vim /etc/hostname mail.epic.org [root@mail ~]# vim /etc/hosts 127.0.0.1 mail.epic.org.cn [root@localhost ~]# reboot - 下载并安装yum源
[root@mail ~]# cp -a /etc/yum.repos.d /etc/yum.repos.d.backup [root@mail ~]# rm -f /etc/yum.repos.d/* [root@mail ~]# sudo curl -o /etc/yum.repos.d/CentOS-Base.repo http://mirrors.aliyun.com/repo/Centos-7.repo % Total % Received % Xferd Average Speed Time Time Time Current Dload Upload Total Spent Left Speed 100 2523 100 2523 0 0 27076 0 --:--:-- --:--:-- --:--:-- 27423 [root@mail yum.repos.d]# vim /etc/yum.repos.d/CentOS-Base.repo :%s/$releasever/7/g ##将文件所有$releasever替换为7 [root@mail yum.repos.d]# curl -s -o /etc/yum.repos.d/epel.repo http://mirrors.aliyun.com/repo/epel-7.repo [root@mail ~]# sudo yum clean all Loaded plugins: fastestmirror Cleaning repos: base extras updates Cleaning up list of fastest mirrors Other repos take up 9.0 M of disk space (use --verbose for details) [root@mail yum.repos.d]# sudo yum makecache Loaded plugins: fastestmirror Loading mirror speeds from cached hostfile * base: mirrors.cloud.aliyuncs.com * extras: mirrors.cloud.aliyuncs.com * updates: mirrors.cloud.aliyuncs.com base | 3.6 kB 00:00:00 epel | 4.3 kB 00:00:00 extras | 2.9 kB 00:00:00 updates | 2.9 kB 00:00:00 (1/10): base/7/x86_64/group_gz | 153 kB 00:00:00 (2/10): base/7/x86_64/filelists_db | 7.2 MB 00:00:00 (3/10): base/7/x86_64/other_db | 2.6 MB 00:00:00 (4/10): base/7/x86_64/primary_db | 6.1 MB 00:00:00 (5/10): extras/7/x86_64/primary_db | 253 kB 00:00:00 (6/10): extras/7/x86_64/filelists_db | 305 kB 00:00:00 (7/10): extras/7/x86_64/other_db | 154 kB 00:00:00 (8/10): updates/7/x86_64/primary_db | 27 MB 00:00:01 (9/10): updates/7/x86_64/filelists_db | 15 MB 00:00:01 (10/10): updates/7/x86_64/other_db | 1.6 MB 00:00:00 Metadata Cache Created [root@mail yum.repos.d]# yum update -y 配置域名解析
域名解析这块,我就直接贴图了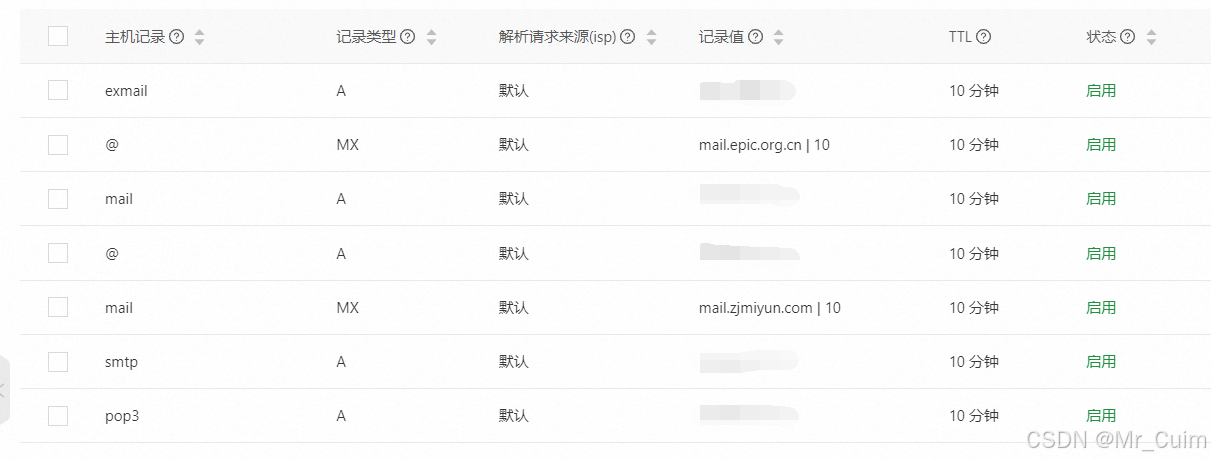
配置公网代理
[root@fwc_40 conf]# cat nginx.conf user nginx; worker_processes 3; events { worker_connections 10240; } http { include mime.types; default_type application/octet-stream; sendfile on; keepalive_timeout 65; } stream { server { listen 80; proxy_pass 192.168.2.16:8080; proxy_protocol on; } server { listen 25; proxy_pass 192.168.2.16:25; } server { listen 110; proxy_pass 192.168.2.16:110; } } - 创建一个vmail用户,用于管理虚拟邮箱的文件夹
[root@mail conf.d]# useradd -u 2000 -d /var/vmail -m -s /sbin/nologin vmail 安装LAMP环境
[root@mail yum.repos.d]# yum install -y httpd mariadb-server mariadb php php-pecl-Fileinfo php-mcrypt php-devel php-mysql php-common php-mbstring php-gd php-imap php-ldap php-odbc php-pear php-xml php-xmlrpc pcre pcre-devel [root@mail yum.repos.d]# systemctl start mariadb [root@mail yum.repos.d]# systemctl enable mariadb Created symlink from /etc/systemd/system/multi-user.target.wants/mariadb.service to /usr/lib/systemd/system/mariadb.service. 相关配置
配置Apache
[root@mail yum.repos.d]# cd /etc/httpd/conf httpd.conf magic [root@mail conf]# mv httpd.conf httpd.conf.bak [root@mail conf]# vim httpd.conf ServerRoot "/etc/httpd" Listen 80 Include conf.modules.d/*.conf User apache Group apache ServerAdmin root@localhost <Directory /> AllowOverride none Require all denied </Directory> DocumentRoot "/var/www/html" <Directory "/var/www"> AllowOverride None # Allow open access: Require all granted </Directory> <Directory "/var/www/html"> Options Indexes FollowSymLinks AllowOverride None Require all granted </Directory> <IfModule dir_module> DirectoryIndex index.html </IfModule> <Files ".ht*"> Require all denied </Files> ErrorLog "logs/error_log" LogLevel warn <IfModule log_config_module> LogFormat "%h %l %u %t \"%r\" %>s %b \"%{Referer}i\" \"%{User-Agent}i\"" combined LogFormat "%h %l %u %t \"%r\" %>s %b" common <IfModule logio_module> LogFormat "%h %l %u %t \"%r\" %>s %b \"%{Referer}i\" \"%{User-Agent}i\" %I %O" combinedio </IfModule> CustomLog "logs/access_log" combined </IfModule> <IfModule alias_module> ScriptAlias /cgi-bin/ "/var/www/cgi-bin/" </IfModule> <Directory "/var/www/cgi-bin"> AllowOverride None Options None Require all granted </Directory> <IfModule mime_module> TypesConfig /etc/mime.types AddType application/x-compress .Z AddType application/x-gzip .gz .tgz AddType text/html .shtml AddOutputFilter INCLUDES .shtml </IfModule> AddDefaultCharset UTF-8 <IfModule mime_magic_module> MIMEMagicFile conf/magic </IfModule> EnableSendfile on IncludeOptional conf.d/*.conf 创建数据库并授权
MariaDB [(none)]> create database postfix; Query OK, 1 row affected (0.00 sec) MariaDB [(none)]> CREATE USER 'postfix'@'%' IDENTIFIED BY 'Fanwen123'; Query OK, 0 rows affected (0.00 sec) MariaDB [(none)]> CREATE USER 'postfix'@'localhost' IDENTIFIED BY 'Fanwen123'; Query OK, 0 rows affected (0.00 sec) MariaDB [(none)]> GRANT ALL PRIVILEGES ON postfix.* TO 'postfix'@'%'; Query OK, 0 rows affected (0.00 sec) MariaDB [(none)]> FLUSH PRIVILEGES; Query OK, 0 rows affected (0.00 sec) 配置postfixadmin
[root@mail conf]# cd /var/www/html/ [root@mail html]# ls [root@mail html]# wget http://nchc.dl.sourceforge.net/project/postfixadmin/postfixadmin/postfixadmin-2.93/postfixadmin-2.93.tar.gz [root@mail html]# ls postfixadmin-2.93.tar.gz [root@mail html]# tar -zxvf postfixadmin-2.93.tar.gz [root@mail html]# mv postfixadmin-2.93 postfixadmin [root@mail html]# systemctl start httpd [root@mail postfixadmin]# cd /var/www/html/postfixadmin/ [root@mail postfixadmin]# vim config.inc.php ##修改下面配置信息 $CONF['configured'] = true; $CONF['database_type'] = 'mysqli'; $CONF['database_host'] = '192.168.2.16'; $CONF['database_user'] = 'postfix'; $CONF['database_password'] = 'Fanwen123'; $CONF['database_name'] = 'postfix'; $CONF['admin_email'] = 'admin@epic.org.cn'; $CONF['encrypt'] = 'dovecot:CRAM-MD5'; $CONF['aliases'] = '1000'; $CONF['mailboxes'] = '1000'; $CONF['maxquota'] = '1000'; $CONF['quota'] = 'YES'; $CONF['used_quotas'] = 'YES'; $CONF['dovecotpw'] = "/usr/bin/doveadm pw"; 浏览器打开http://192.168.2.16/postfixadmin/setup.php可以查看当前配置信息及需要整改的信息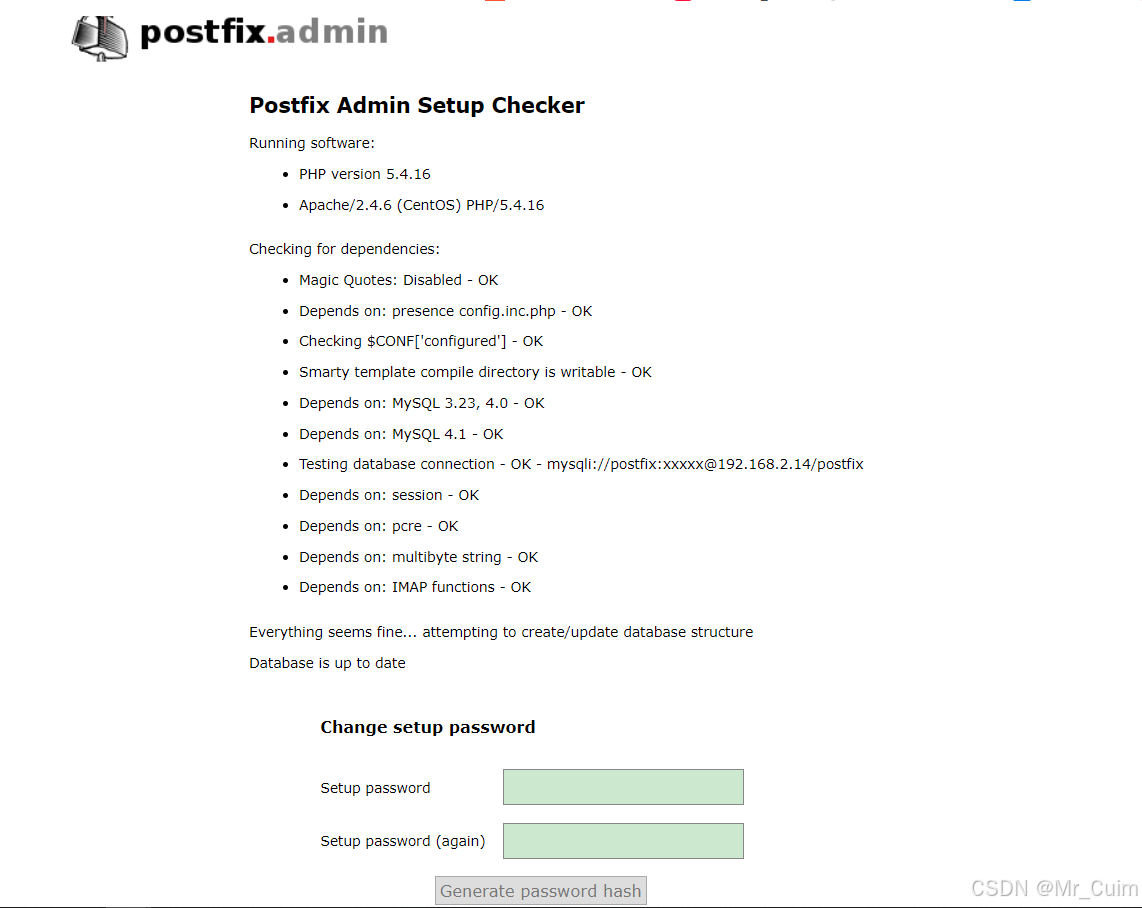
确认各项组件都正常即OK后,安装dovecot
yum install -y dovecot dovecot-devel dovecot-mysql dovecot安装完毕后,继续输入安装密码,并生成对应字段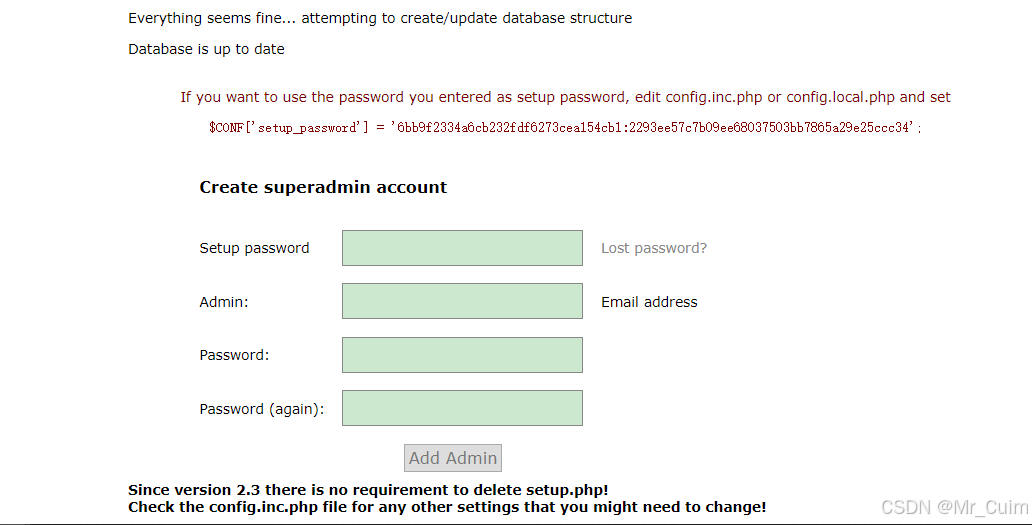
在项目根目录下创建config.local.php文件,并编辑信息:
<?php $CONF['setup_password'] = '6bb9f2334a6cb232fdf6273cea154cb1:2293ee57c7b09ee68037503bb7865a29e25ccc34'; ?> 保存文件,并按照提示输入设置密码、管理员账户及密码信息添加管理员账户。添加成功后会提示新增管理员成功,并在数据库的对应表中可看到管理员账户信息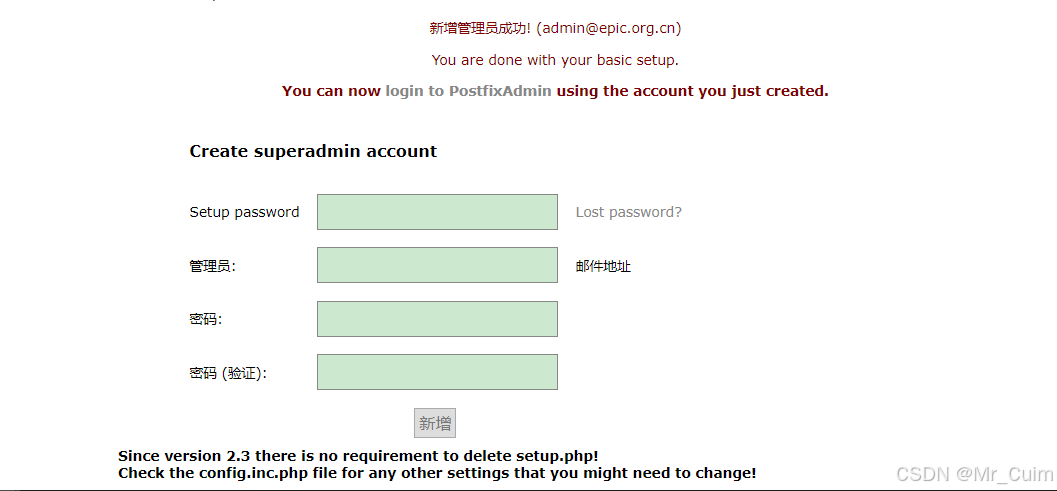
至此,可以打开URL http://192.168.2.16/postfixadmin,通过管理员账号登录登录postfixadmin。
配置Postfix邮件发送代理
查看Postfix版本
[root@mail postfix]# rpm -qa | grep postfix postfix-2.10.1-9.el7.x86_64 配置postfix
- 修改main.cf文件
[root@mail postfix]# cat /etc/postfix/main.cf queue_directory = /var/spool/postfix command_directory = /usr/sbin daemon_directory = /usr/libexec/postfix data_directory = /var/lib/postfix mail_owner = postfix myhostname = mail.epic.org.cn mydomain = epic.org.cn myorigin = $mydomain inet_interfaces = all inet_protocols = all mydestination = $myhostname, localhost.$mydomain, localhost virtual_mailbox_domains = proxy:mysql:/etc/postfix/mysql_virtual_domains_maps.cf virtual_alias_maps = proxy:mysql:/etc/postfix/mysql_virtual_alias_maps.cf virtual_mailbox_maps = proxy:mysql:/etc/postfix/mysql_virtual_mailbox_maps.cf virtual_mailbox_limit_maps = mysql:/etc/postfix/mysql_virtual_mailbox_limit_maps.cf virtual_uid_maps = static:2000 virtual_gid_maps = static:2000 proxy_read_maps = $local_recipient_maps $mydestination $virtual_alias_maps $virtual_alias_domains $virtual_mailbox_maps $virtual_mailbox_domains $relay_recipient_maps $relay_domains $canonical_maps $sender_canonical_maps $recipient_canonical_maps $relocated_maps $transport_maps $mynetworks $virtual_mailbox_limit_maps smtpd_sasl_auth_enable = yes smtpd_sasl_type = dovecot smtpd_sasl_path = private/auth smtpd_sasl_security_options = noanonymous broken_sasl_auth_clients = yes smtpd_recipient_restrictions = permit_mynetworks, permit_sasl_authenticated, reject_unauth_destination virtual_transport = dovecot unknown_local_recipient_reject_code = 550 mynetworks_style = host mynetworks = 0.0.0.0/0 alias_maps = hash:/etc/aliases alias_database = hash:/etc/aliases message_size_limit = 104857600 home_mailbox = Maildir/ debug_peer_level = 2 debugger_command = PATH=/bin:/usr/bin:/usr/local/bin:/usr/X11R6/bin ddd $daemon_directory/$process_name $process_id & sleep 5 sendmail_path = /usr/sbin/sendmail.postfix newaliases_path = /usr/bin/newaliases.postfix mailq_path = /usr/bin/mailq.postfix setgid_group = postdrop html_directory = no manpage_directory = /usr/share/man sample_directory = /usr/share/doc/postfix-2.10.1/samples readme_directory = /usr/share/doc/postfix-2.10.1/README_FILES - 修改master.cf文件
[root@mail postfix]# cat /etc/postfix/master.cf | grep -v ^# smtp inet n - y - - smtpd pickup unix n - n 60 1 pickup cleanup unix n - n - 0 cleanup qmgr unix n - n 300 1 qmgr tlsmgr unix - - n 1000? 1 tlsmgr rewrite unix - - n - - trivial-rewrite bounce unix - - n - 0 bounce defer unix - - n - 0 bounce trace unix - - n - 0 bounce verify unix - - n - 1 verify flush unix n - n 1000? 0 flush proxymap unix - - n - - proxymap proxywrite unix - - n - 1 proxymap smtp unix - - n - - smtp relay unix - - n - - smtp showq unix n - n - - showq error unix - - n - - error retry unix - - n - - error discard unix - - n - - discard local unix - n n - - local virtual unix - n n - - virtual lmtp unix - - n - - lmtp anvil unix - - n - 1 anvil scache unix - - n - 1 scache dovecot unix - n n - - pipe flags=DRhu user=vmail:vmail argv=/usr/libexec/dovecot/dovecot-lda -f ${sender} -d ${recipient} - 创建mysql_virtual_alias_maps.cf文件
[root@mail postfix]# cat /etc/postfix/mysql_virtual_alias_maps.cf user = postfix password = Fanwen123 hosts = 192.168.2.16 dbname = postfix query = SELECT goto FROM alias WHERE address='%s' AND active = '1' - 创建mysql_virtual_domains_maps.cf文件
[root@mail postfix]# cat /etc/postfix/mysql_virtual_domains_maps.cf user = postfix password = Fanwen123 hosts = 192.168.2.16 dbname = postfix query = SELECT domain FROM domain WHERE domain='%s' AND active = '1' - 创建mysql_virtual_mailbox_limit_maps.cf文件
[root@mail postfix]# cat /etc/postfix/mysql_virtual_mailbox_limit_maps.cf user = postfix password = Fanwen123 hosts = 192.168.2.16 dbname = postfix query = SELECT quota FROM mailbox WHERE username='%s' AND active = '1' - 创建mysql_virtual_mailbox_maps.cf文件
[root@mail postfix]# cat /etc/postfix/mysql_virtual_mailbox_maps.cf user = postfix password = Fanwen123 hosts = 192.168.2.16 dbname = postfix query = SELECT CONCAT(domain,'/',maildir) FROM mailbox WHERE username='%s' AND active = '1' - 以上配置文件修改及新增完成后,启动postfix
[root@mail postfix]# systemctl start postfix [root@mail postfix]# systemctl enable postfix 配置dovecot邮件检索代理
- 修改dovecot主配置文件dovecot.conf
[root@mail postfix]# cat /etc/dovecot/dovecot.conf | grep -v ^# | grep -v ^$ protocols = imap pop3 lmtp listen = * default_login_user = dovecot default_internal_user = dovecot dict { quota = mysql:/etc/dovecot/dovecot-dict-sql.conf.ext #expire = sqlite:/etc/dovecot/dovecot-dict-sql.conf.ext } !include conf.d/*.conf !include_try local.conf - 创建dovecot-dict-sql.conf.ext文件
[root@mail dovecot]# cat dovecot-dict-sql.conf.ext connect = host=192.168.2.16 dbname=postfix user=postfix password=Fanwen123 map { pattern = priv/quota/storage table = quota2 username_field = username value_field = bytes } map { pattern = priv/quota/messages table = quota2 username_field = username value_field = messages } - 创建dovecot-sql.conf.ext文件
[root@mail dovecot]# cat dovecot-sql.conf.ext driver = mysql connect = host=192.168.2.16 dbname=postfix user=postfix password=Fanwen123 default_pass_scheme = CRAM-MD5 user_query = SELECT CONCAT('/var/vmail/', maildir) AS home, 2000 AS uid, 2000 AS gid, CONCAT('*:bytes=', quota) as quota_rule FROM mailbox WHERE username = '%u' AND active='1' password_query = SELECT username AS user, password, CONCAT('/var/vmail/', maildir) AS userdb_home, 2000 AS userdb_uid, 2000 AS userdb_gid, CONCAT('*:bytes=', quota) as userdb_quota_rule FROM mailbox WHERE username = '%u' AND active='1' - 修改conf.d目录下10-auth.conf文件
[root@mail conf.d]# cat 10-auth.conf | grep -v ^# | grep -v ^$ disable_plaintext_auth = no auth_mechanisms = plain login cram-md5 !include auth-sql.conf.ext - 修改conf.d目录下10-master.conf文件
[root@mail conf.d]# cat 10-master.conf| grep -v ^# | grep -v ^$ service imap-login { inet_listener imap { } inet_listener imaps { } } service pop3-login { inet_listener pop3 { } inet_listener pop3s { } } service lmtp { unix_listener lmtp { } } service imap { } service pop3 { } service auth { unix_listener auth-userdb { mode = 0660 user = vmail group = vmail } unix_listener auth-client { mode = 0660 user = postfix group = postfix } unix_listener /var/spool/postfix/private/auth { mode = 0666 user = postfix group = postfix } } service auth-worker { } service dict { unix_listener dict { mode = 0660 user = vmail group = vmail } } - 修改conf.d目录下10-mail.conf文件
[root@mail conf.d]# cat 10-mail.conf | grep -v ^# | grep -v ^$ mail_location = maildir:~/Maildir namespace inbox { inbox = yes } first_valid_uid = 1000 protocol !indexer-worker { } mbox_write_locks = fcntl - 修改conf.d目录下10-ssl.conf文件
[root@mail conf.d]# cat 10-ssl.conf | grep -v ^# | grep -v ^$ ssl = no ssl_cert = </etc/pki/dovecot/certs/dovecot.pem ssl_key = </etc/pki/dovecot/private/dovecot.pem - 修改conf.d目录下15-lda.conf文件
[root@mail conf.d]# cat 15-lda.conf | grep -v ^# | grep -v ^$ protocol lda { mail_plugins = quota postmaster_address = admin@epic.org.cn } - 修改conf.d目录下90-quota.conf文件
[root@mail conf.d]# cat 90-quota.conf | grep -v ^# | grep -v ^$ plugin { quota_rule = *:storage=1G } plugin { } plugin { } plugin { quota = dict:user::proxy::quota } - 重启dovecot服务
[root@mail conf.d]# systemctl restart dovecot [root@mail conf.d]# systemctl enable dovecot Created symlink from /etc/systemd/system/multi-user.target.wants/dovecot.service to /usr/lib/systemd/system/dovecot.service. 登录postfixadmin相关配置
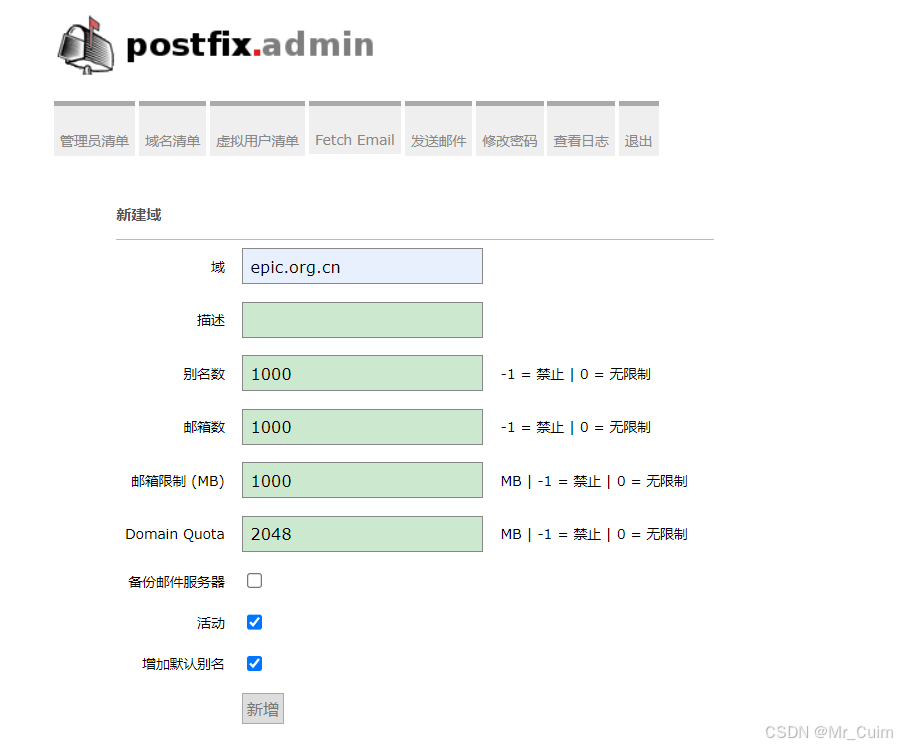
通过上面添加的管理员账户登录postfixadmin,登录完成后,添加域名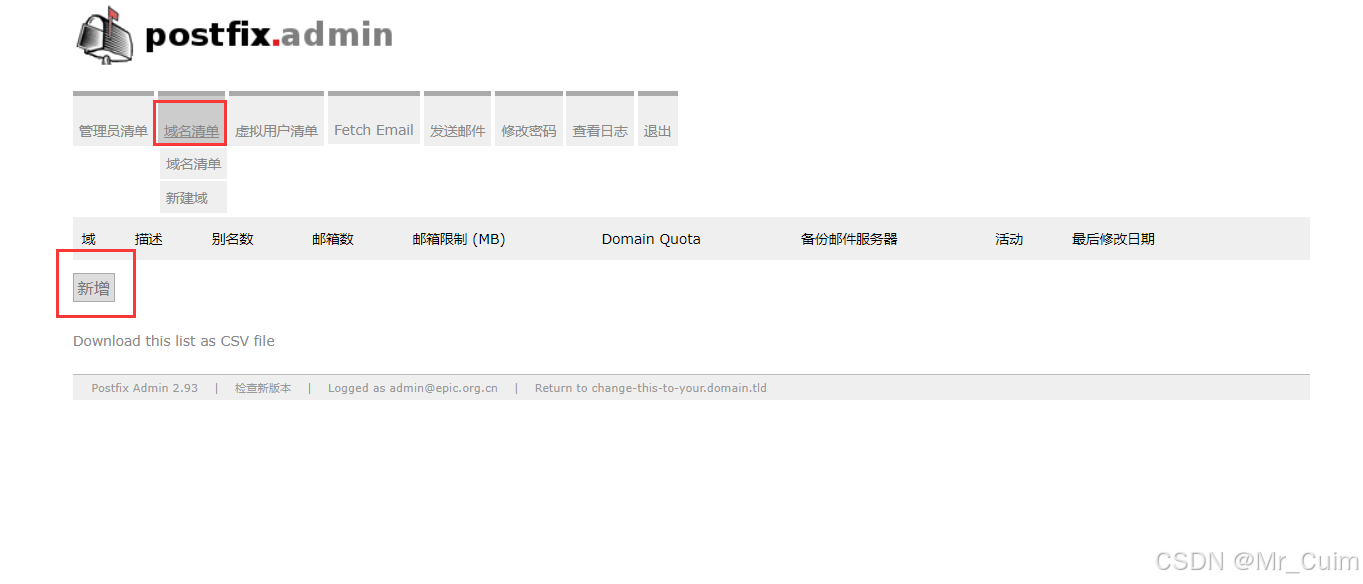
域名添加完成后,添加普通用户邮箱地址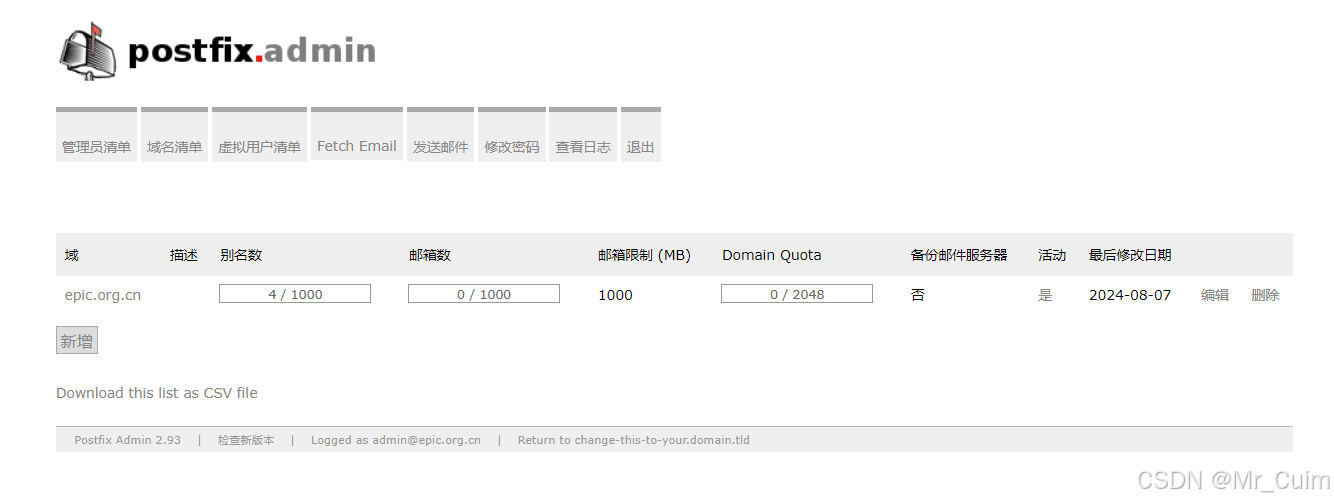
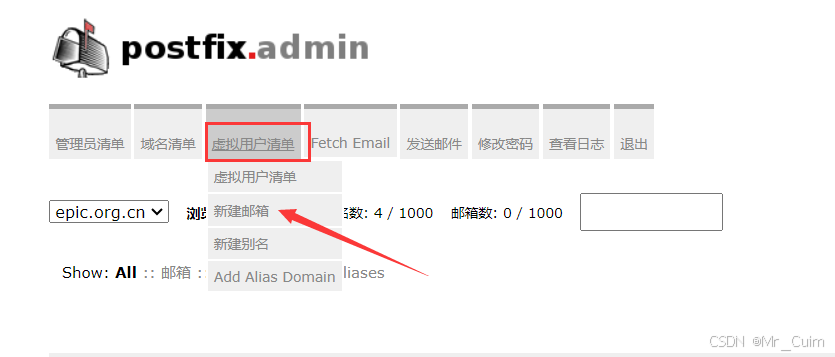

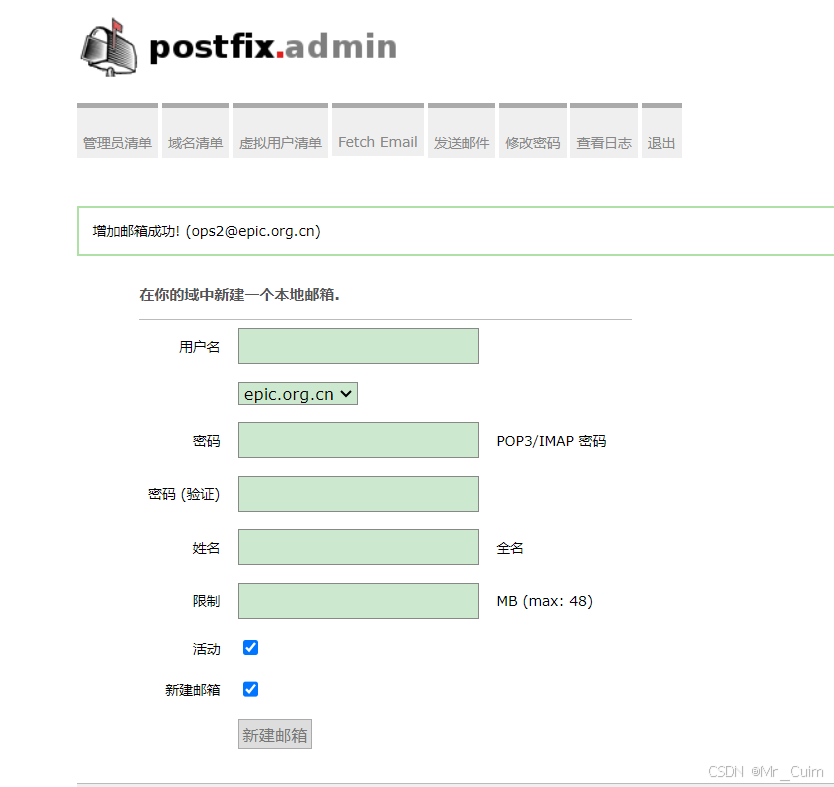
新增了两个邮箱:ops1@epic.org.cn,ops2@epic.org.cn,通过Foxmail登录测试邮件。
测试普通用户邮箱
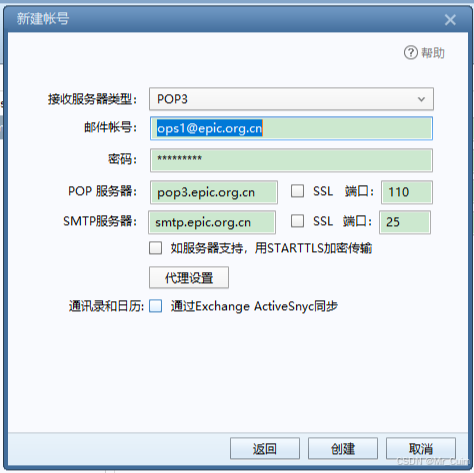
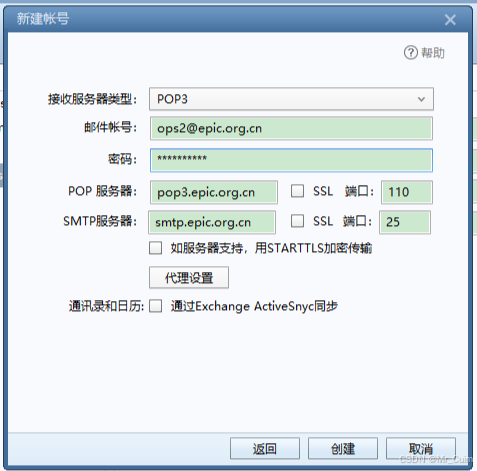
通过普通用户发送邮件测试
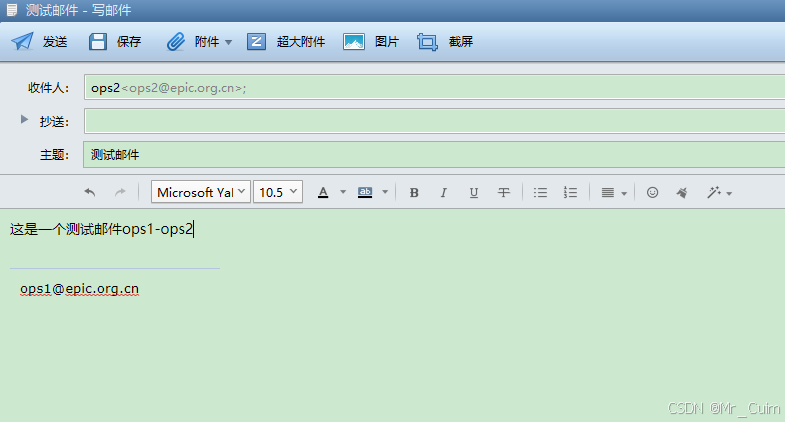
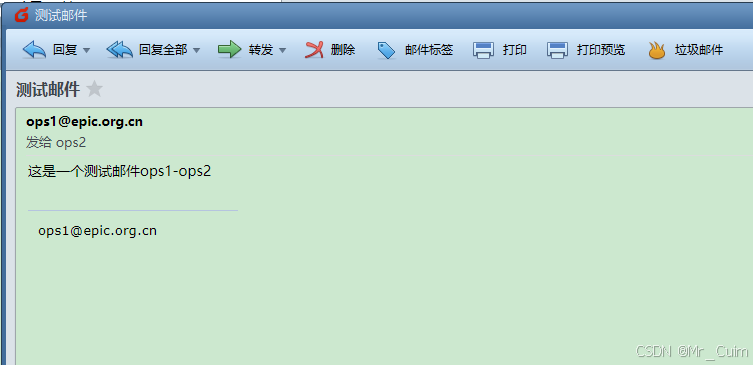
至此,普通用户测试完成。
安装WebMail Roundcubemail
安装之前说明下,Roundcubemail对于php的版本有一定的要求,还会要求安装一些php组件,我也是尝试了很多版本才安装成功,我这里也会明确具体版本,帮大家踩踩坑。另外,我这边会大概将相关配置贴出来,具体安装先不介绍,主要以通过docker或者k8s安装为主,也会提供对应的dockerfile文件,这样就能拿来就用。
- 查看php版本
[root@zjmiyun vhost]# php -v PHP 7.4.24 (cli) (built: Jul 9 2024 16:37:10) ( NTS ) Copyright (c) The PHP Group Zend Engine v3.4.0, Copyright (c) Zend Technologies - 修改主配置文件config.inc.php
<?php $config['db_dsnw'] = 'mysql://roundcube:Fanwen123@localhost/roundcubemail'; $config['imap_host'] = '192.168.2.16:143'; #$config['smtp_host'] = '192.168.2.15:587'; $config['smtp_host'] = 'smtp.epic.org.cn:25'; $config['support_url'] = ''; $config['des_key'] = 'glyeW5xdyzywowzB5VWgWp4m'; $config['product_name'] = 'Webmail 1.6.7-complete'; $config['plugins'] = []; - defaults.inc.php配置较多,这里只介绍修改配置
[root@tools-center roundcubemail]# vim defaults.inc.php $config['db_dsnw'] = 'mysql://roundcube:Fanwen123@192.168.2.16/roundcubemail'; $config['imap_host'] = '192.168.2.16:143'; $config['smtp_host'] = '192.168.2.16:587'; - 如果通过本地部署roundcubemail,则需要nginx作为代理进行访问,下面是nginx相关配置,不用可忽略
[root@mail vhost]# cat mail.conf server { listen 80 proxy_protocol; server_name mail.epic.org.cn; return 301 https://$host$request_uri; location / { root /data/roundcubemail; index index.php; proxy_connect_timeout 600; proxy_send_timeout 600; proxy_read_timeout 600; proxy_redirect off; client_max_body_size 500m; proxy_set_header Host $host; proxy_set_header X-Real-IP $remote_addr; proxy_set_header X-Forwarded-For $proxy_add_x_forwarded_for; } location ~ \.php$ { root /data/roundcubemail; index index.php; fastcgi_pass 127.0.0.1:9000; fastcgi_index index.php; fastcgi_param SCRIPT_FILENAME $document_root$fastcgi_script_name; include fastcgi_params; } } server { listen 443 ssl proxy_protocol; server_name mail.epic.org.cn; access_log logs/www.epic.org.cn.log; ssl_protocols TLSv1.2 TLSv1.3; ssl_certificate /etc/letsencrypt/live/epic.org.cn-0001/fullchain.pem; ssl_certificate_key /etc/letsencrypt/live/epic.org.cn-0001/privkey.pem; ssl_prefer_server_ciphers off; root /data/roundcubemail; index index.php; location / { root /data/roundcubemail; index index.php; proxy_connect_timeout 600; proxy_send_timeout 600; proxy_read_timeout 600; proxy_redirect off; client_max_body_size 500m; proxy_set_header Host $host; proxy_set_header X-Real-IP $remote_addr; proxy_set_header X-Forwarded-For $proxy_add_x_forwarded_for; } location ~ \.php$ { root /data/roundcubemail; index index.php; fastcgi_pass 127.0.0.1:9000; fastcgi_index index.php; fastcgi_param SCRIPT_FILENAME $document_root$fastcgi_script_name; include fastcgi_params; } } 以上是一些主要配置文件信息。
roundcubemail相关信息及安装配置
1. 安装docker
[root@mail html]# cd /etc/yum.repos.d [root@mail yum.repos.d]# wget https://mirrors.aliyun.com/docker-ce/linux/centos/docker-ce.repo [root@mail yum.repos.d]# yum install docker-ce -y 2. 启动docker
[root@mail yum.repos.d]# systemctl start docker [root@mail yum.repos.d]# systemctl enable docker 创建并导入数据库
由于我本次使用的数据库是MariaDB-5.5.68,而本版本对于数据类型(如 VARCHAR)的长度加上字符集编码(如 utf8mb4)的字节长度不能超过了索引键的最大长度限制(767字节)。例如有一个 VARCHAR(255) 的列,并且使用 utf8mb4 编码(每个字符最多4个字节),你可以只索引前191个字符(因为 191 * 4 = 764,接近但不超过767字节的限制)。所以需要将roundcubemail安装包中的mysql.initial.sql的数据类型长度修改成191;对于 InnoDB 存储引擎,从 MySQL 5.7.7 开始,你可以通过更改表的行格式来支持更长的索引键。DYNAMIC 或 COMPRESSED 行格式可以支持更长的索引键,所以通过升级或者使用更高级别的数据库版本也是可以避免这个问题。
3. 创建数据库并授权
MariaDB [(none)]> create database roundcubemail; CREATE USER 'roundcube'@'%' IDENTIFIED BY 'Fanwen123'; GRANT ALL PRIVILEGES ON roundcubemail.* TO 'roundcube'@'%'; FLUSH PRIVILEGES; MariaDB [(none)]> create database roundcubemail; Query OK, 1 row affected (0.00 sec) MariaDB [(none)]> CREATE USER 'roundcube'@'%' IDENTIFIED BY 'Fanwen123'; Query OK, 0 rows affected (0.00 sec) MariaDB [(none)]> CREATE USER 'roundcube'@'localhost' IDENTIFIED BY 'Fanwen123'; Query OK, 0 rows affected (0.00 sec) MariaDB [(none)]> GRANT ALL PRIVILEGES ON roundcubemail.* TO 'roundcube'@'%'; Query OK, 0 rows affected (0.00 sec) MariaDB [(none)]> FLUSH PRIVILEGES; Query OK, 0 rows affected (0.00 sec) 4. 导入数据库表
[root@mail opt]# tar -zxvf roundcubemail-1.6.7-complete.tar.gz [root@mail opt]# cd roundcubemail-1.6.7/SQL/ [root@mail SQL]# mysql -uroundcube -p Enter password: Welcome to the MariaDB monitor. Commands end with ; or \g. Your MariaDB connection id is 4014 Server version: 5.5.68-MariaDB MariaDB Server Copyright (c) 2000, 2018, Oracle, MariaDB Corporation Ab and others. Type 'help;' or '\h' for help. Type '\c' to clear the current input statement. MariaDB [(none)]> use roundcubemail; Database changed MariaDB [roundcubemail]> source /opt/roundcubemail-1.6.7/SQL/mysql.initial.sql; MariaDB [roundcubemail]> show tables; +-------------------------+ | Tables_in_roundcubemail | +-------------------------+ | cache | | cache_index | | cache_messages | | cache_shared | | cache_thread | | contactgroupmembers | | contactgroups | | contacts | | dictionary | | filestore | | identities | | responses | | searches | | session | | system | | users | +-------------------------+ 16 rows in set (0.00 sec) 5. 创建dockerfile文件
FROM centos:7.8.2003 RUN cp /usr/share/zoneinfo/Asia/Shanghai /etc/localtime && echo 'Asia/Shanghai' >/etc/timezone RUN rm -rf /etc/yum.repos.d/*.repo COPY CentOS-Base.repo /etc/yum.repos.d/ RUN yum install epel-release -y RUN rpm -Uvh http://rpms.remirepo.net/enterprise/remi-release-7.rpm RUN rpm -Uvh http://nginx.org/packages/centos/7/noarch/RPMS/nginx-release-centos-7-0.el7.ngx.noarch.rpm RUN yum-config-manager --enable remi-php74 RUN yum update -y RUN yum install -y php php-cli php-fpm php-common php-devel php-mysqlnd php-zip php-gd php-mcrypt php-mbstring php-curl php-xml php-pear php-bcmath php-json php-intl nginx RUN sed -i 's/;date.timezone =/date.timezone = Asia\/Shanghai/g' /etc/php.ini RUN sed -i 's/pid = \/run\/php-fpm\/php-fpm.pid/pid = \/usr\/php-fpm.pid/g' /etc/php-fpm.conf ADD roundcubemail-1.6.7-complete.tar.gz /opt/ COPY config.inc.php /opt/roundcubemail-1.6.7/config/ COPY defaults.inc.php /opt/roundcubemail-1.6.7/config/ COPY nginx.conf /etc/nginx/ COPY run.sh /opt/ EXPOSE 80 CMD ["sh", "/opt/run.sh"] 6. 运行roundcubemail
通过上面dockerfile文件生成镜像文件,可以通过docker或者k8s方式部署roundcubemail,我这边通过docker方式启动
[root@mail ~]# docker run -d --name roundcubemail -p 8080:80 registry-vpc.cn-hangzhou.aliyuncs.com/fanews/tools:roundcubemail-20240809151314 启动成功后,通过访问http://192.168.2.16:8080即可打开roundcubemail登录界面,输入用户的邮箱地址及密码即可登录
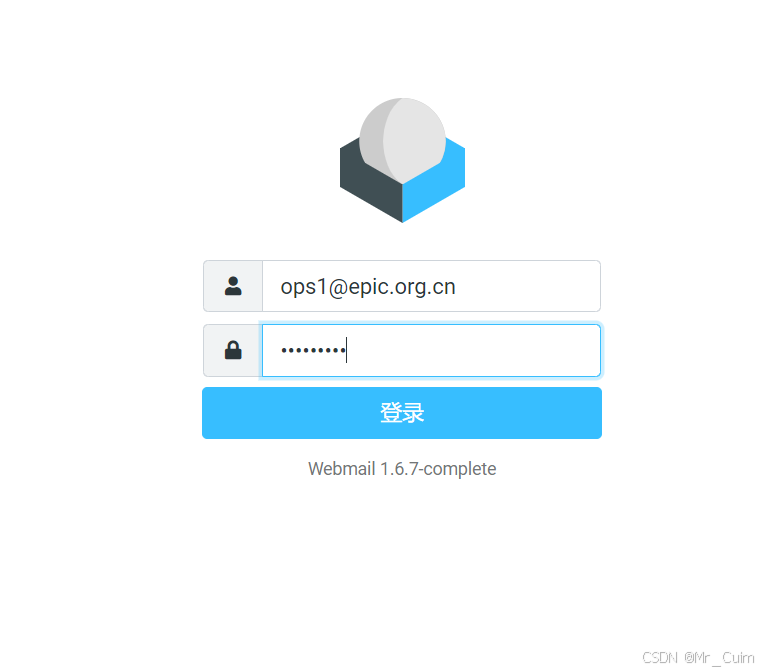
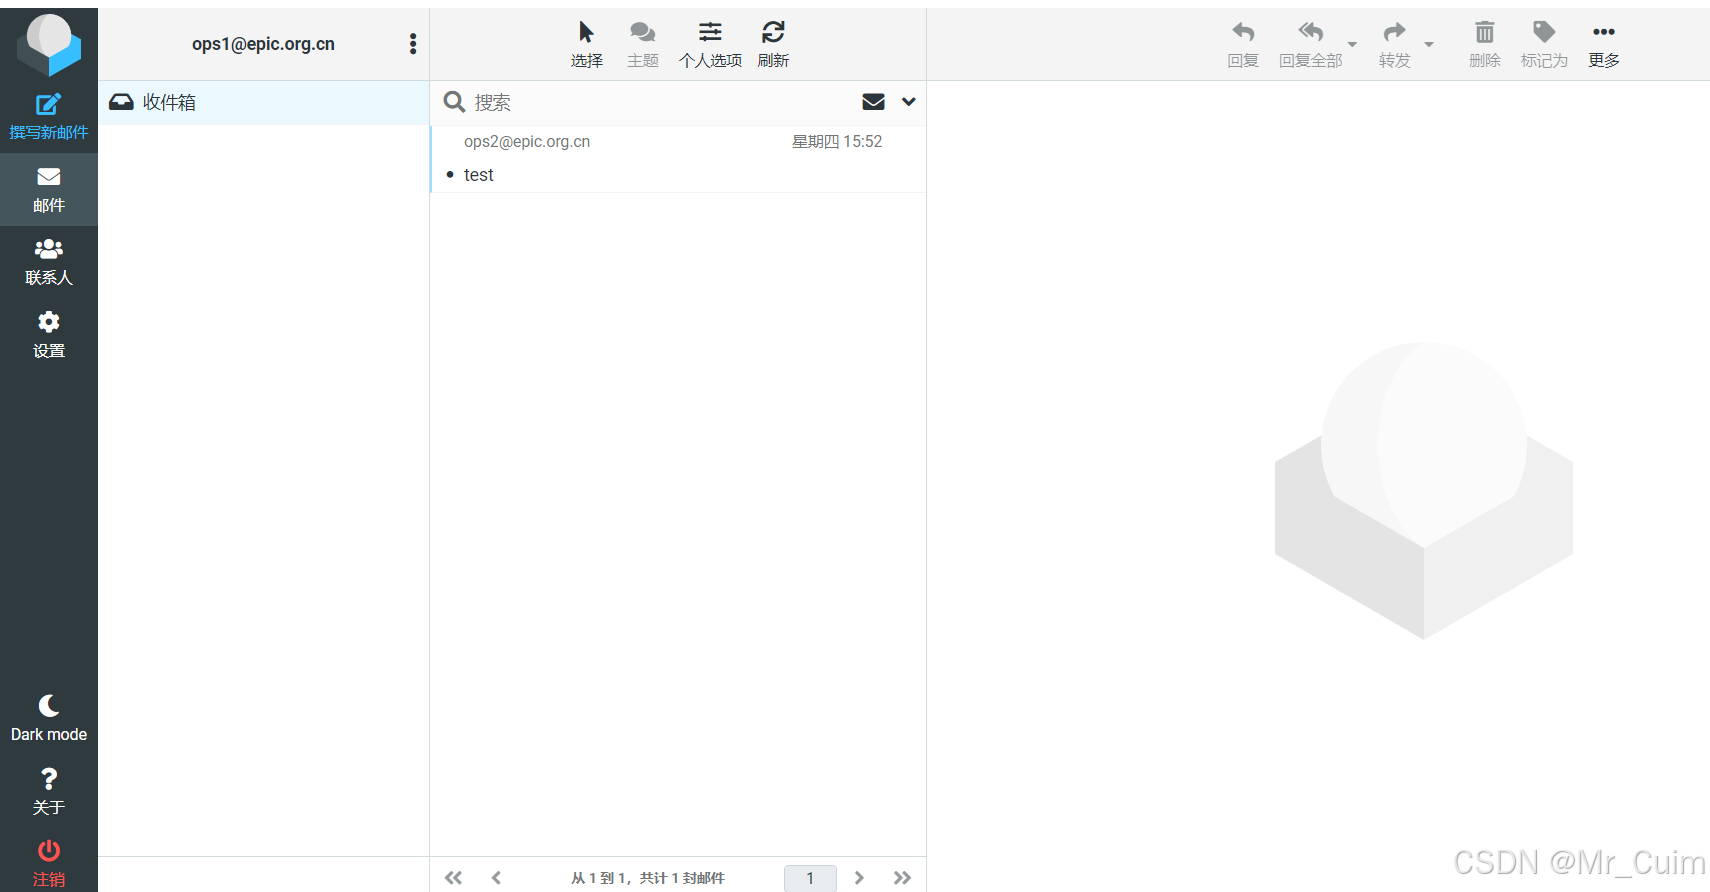
至此,roundcubemail安装完成,用户可通过访问http://192.168.2.16:8080登录邮箱,并进行收发邮件。
说明
- Roundcubemail作为web客户端只是为用户提供了web版本客户端,当然,用户也可以选择类似Foxmail这种客户端进行使用邮箱;
- 本文档仅介绍了关于postfix相关的基础配置,按照此文档可以完成基本的邮件收发。至于部分反垃圾、反病毒以及SSL相关配置,后续会进一步补充;
- 部分文档介绍还不够完善,后续也会逐步补充;
- 文中有错误的,还请多多指教
相关文件
roundcubemail:
链接:https://pan.baidu.com/s/1NHexVHViUKIpwvgTFXY-2g
提取码:zicxpostfixadmin:
链接:https://pan.baidu.com/s/1OktbIjvas7218UBS49FkpA
提取码:bwna
