0. 介绍
mqant技术架构和开发流程的学习笔记。
| https://github.com/liangdas/mqant Introduction · mqant 的文档库 |
mqant是一个微服务框架。目标是简化分布式系统开发。 mqant的核心是简单易用,关注业务场景,因此会针对特定场景研究一些特定组件和解决方案,方便开发者使用。
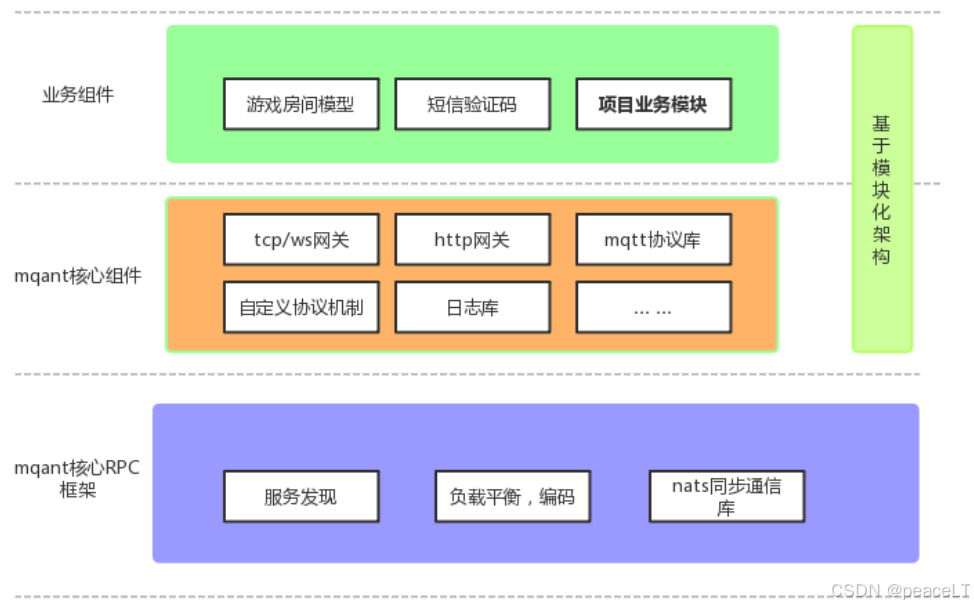
0.1 mqant核心组件组成
核心RPC组件 - 它提供了用于服务发现,客户端负载平衡,编码,同步通信库。
http网关 - 提供将HTTP请求路由到相应微服务的API网关。它充当单个入口点,可以用作反向代理或将HTTP请求转换为RPC。
tcp/websocket网关 - 它提供了tcp和websocket两种客户端连接方式。并且默认内置了一个简单的mqtt协议,可以非常便捷的 提供长连接服务,快速搭建iot和网络游戏通信业务,同时也支持自定义通信协议插件。
0.2 名称定义
- 模块 一类功能的统称,在mqant中以模块划分代码结构。
- 服务 服务即模块,在微服务中服务比模块更容易让人理解。
- 节点 即模块(服务)部署后的实例,一个模块(服务)可以在多台服务器启动多个节点。
0.3 架构
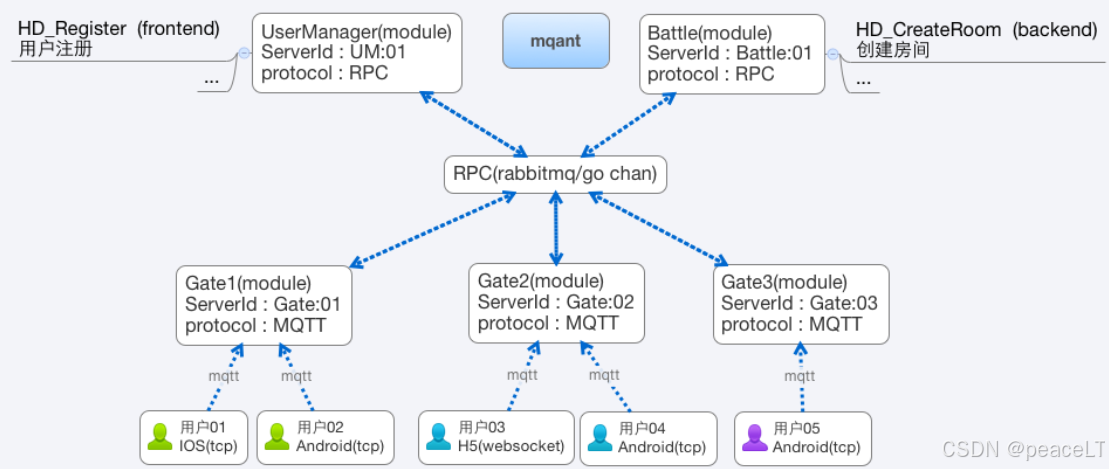
mqant的设计思想是在能用单台服务器时能让充分挖掘服务器的性能,而在需要多进程时再通过简单的配置就可以实现分布式部署。
0.3.1 mqant框架架构图
0.3.2 mqant模块化运行架构图
 0.4 处理器(handler)
每一个模块可以注册多个处理器(handler),例如用户模块可以提供用户注册、用户登录、用户注销、用户信息查询等一系列的处理器。handler就是一个可供远程RPC调用的函数。
0.5 模块间通信RPC
mqant模块间的通信方式应该使用RPC,而非本地代码调用。 mqant的RPC也非采取grpc等消息投递工具,而是选用了nats消息总线。
0.6 为什么选择消息队列进行RPC通信?
选择消息队列而不选择传统的tcp/socket rpc的主要考虑是传统的基于点对点service/client模式的连接比较难于维护和统计,假如服务器存在100个模块,一个进程所需要维护的client连接就>100个(计算可能不太准确(^—^)).
而选择消息队列的话每一个进程对每一个模块只需要维护一条连接即可,nats有完善的监控,报警工具,可以随时监控模块的处理性能和实时性。
1. 起步
1.1 应用
应用(app)是mqant的最基本单位,通常一个进程中只需要实例化一个应用(app). 应用负责维护整个框架的基本服务
- 服务注册与发现
- RPC通信
- 模块依赖
1.1.1 应用生命周期
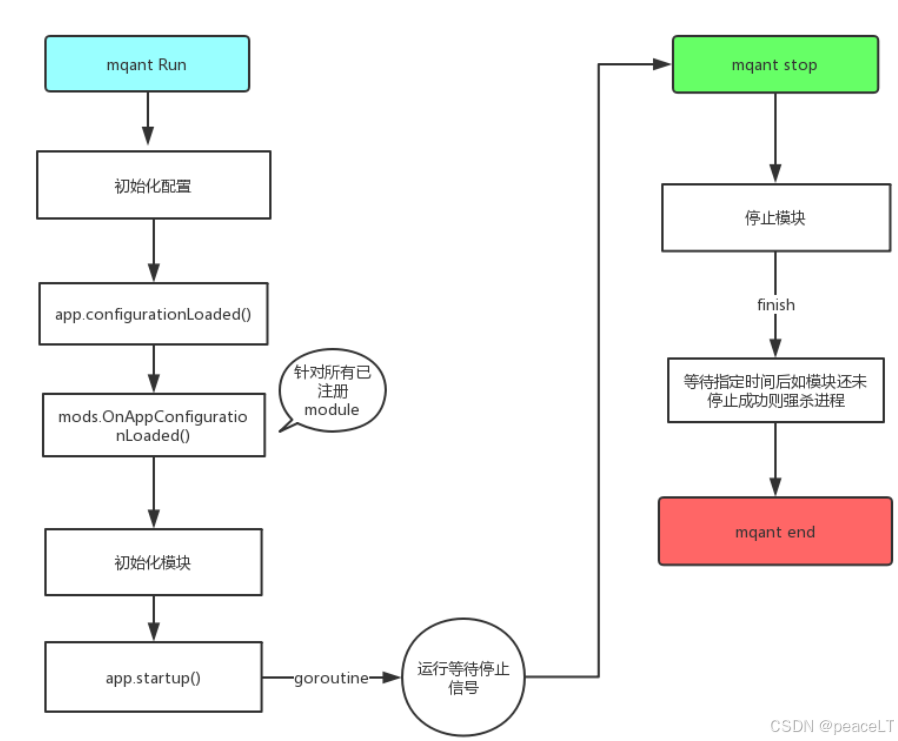
1.1.2 流程
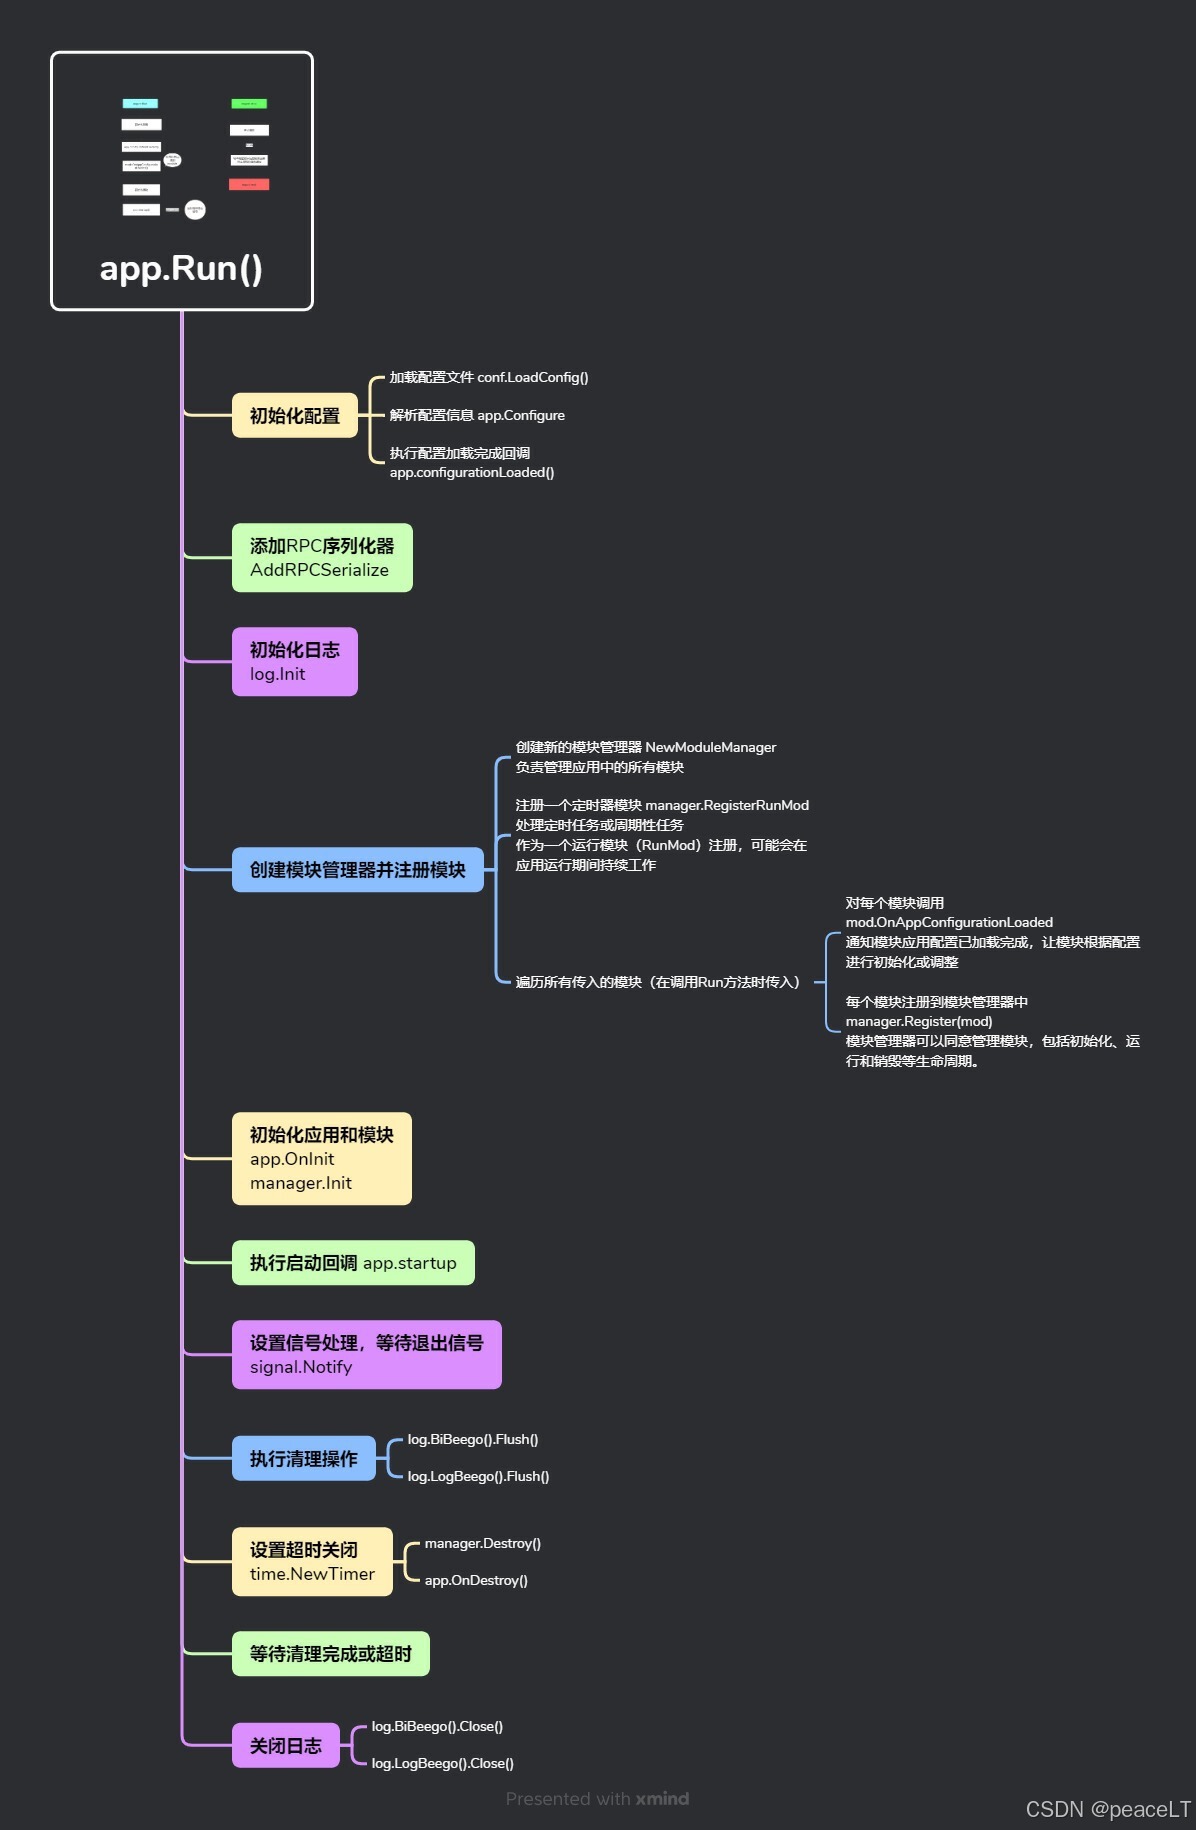
1.2 模块
mqant以模块化来组织代码模块,模块概念在框架中非常重要。
1.2.1 模块定义
结构体只要实现了以下几个函数就被认为是一个模块
//指定一个模块的名称,非常重要,在配置文件和RPC路由中会频繁使用 func GetType() string //指定模块的版本 func Version() string //模块的初始化函数,当框架初始化模块是会主动调用该方法 func OnInit(app module.App, settings *conf.ModuleSettings) //当App解析配置后调用,这个接口不管这个模块是否在这个进程的模块分组中都会调用 func OnAppConfigurationLoaded(app module.App) //模块独立运行函数,框架初始化模块以后会以单独goroutine运行该函数,并且提供一个关闭信号,以再框架要停止模块时通知 func Run(closeSig chan bool) //当模块停止运行后框架会调用该方法,让模块做一些回收操作 func OnDestroy()1.2.2 模块声明周期
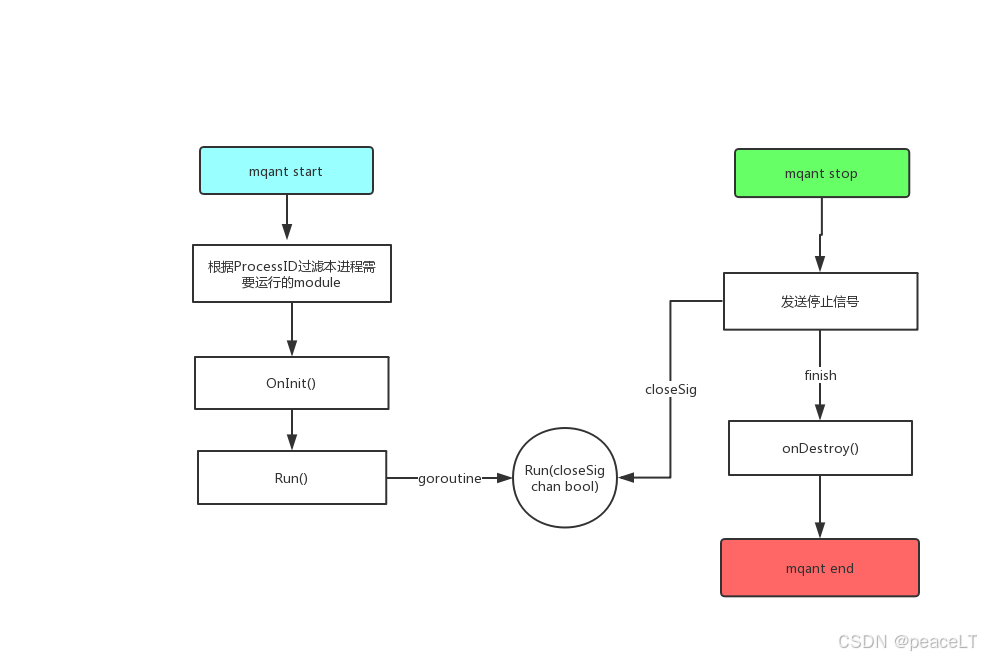
1.2.3 模块使用
通常我们不止是实现一个简单模块,还需要利用框架的其他高级特性,因此我们通常会继承框架封装好的一些基础模块
- RPCModule
继承 basemodule.BaseModule该模块封装了mqant的RPC通信相关方法- GateModule
继承 basegate.Gate该模块封装了tcp/websocket+mqtt协议的长连接网关
1.2.4 不在进程分组中的模块如何初始化
func (self *HellWorld) OnAppConfigurationLoaded(app module.App) { //当App初始化时调用,这个接口不管这个模块是否在这个进程运行都会调用 self.BaseModule.OnAppConfigurationLoaded(app) }1.3 编写第一个模块
1.3.1 代码组织结构
新增了一个helloworld目录用来存放模块代码
工程目录 |-bin |-conf |-server.conf |-helloworld //新建模块 |-module.go |-xxx.go |-main.go
1.3.2 编写第一个模块
实现module.Module定义的所有方法接口
1.3.2.1 helloworld/module.go
package helloworld import ( "github.com/liangdas/mqant/conf" "github.com/liangdas/mqant/log" "github.com/liangdas/mqant/module" basemodule "github.com/liangdas/mqant/module/base" ) var Module = func() module.Module { this := new(HelloWorld) return this } type HelloWorld struct { basemodule.BaseModule } func (self *HelloWorld) GetType() string { // 很关键,需要与配置文件中的Module配置对应 return "helloworld" } func (self *HelloWorld) Version() string { // 可以在监控时了解代码版本 return "1.0.0" } func (self *HelloWorld) OnInit(app module.App, settings *conf.ModuleSettings) { self.BaseModule.OnInit(self, app, settings) log.Info("%v模块初始化完成...", self.GetType()) } func (self *HelloWorld) OnDestroy() { // 不能忘记继承 self.BaseModule.OnDestroy() log.Info("%v模块已回收...", self.GetType()) } func (self *HelloWorld) GetApp() module.App { return self.BaseModule.GetApp() } func (self *HelloWorld) Run(closeSig chan bool) { } 1.3.2.2 将模块加入main.go入口函数
import ( "github.com/liangdas/mqant/helloworld" "github.com/liangdas/mqant/log" "github.com/liangdas/mqant/module" "net/http" ) func main() { go func() { http.ListenAndServe("o.o.o.o:6060", nil) }() app := CreateApp( module.Debug(true), //只有是在调试模式下才会在控制台打印日志,非调试模式下只在日志文件中输出日志 ) err := app.Run( helloworld.Module(), ) if err != nil { log.Error(err.Error()) } }1.3.2.3 在配置文件中加入模块配置 bin/conf/server.conf
配置说明 Module |-moduleType 与func GetType() string 值保持一致 |- ProcessID 模块分组,在今后分布式部署时非常有用,默认分组为development
{ "Settings":{ }, "Module":{ "greeter":[ { //Id在整个Module中必须唯一,不能重复 "Id":"greeter", //这个模块所属进程,非常重要,进程会根据该参数来判断是否需要运行该模块 [development]为默认值代表开发环境 "ProcessID":"development", "Settings":{ "Port": 7370 } } ], "helloword": [ { //Id在整个Module中必须唯一,不能重复 "Id": "helloworld", //这个模块所属进程,非常重要,进程会根据该参数来判断是否需要运行该模块 [development]为默认值代表开发环境 "ProcessID": "development" } ], "client":[ { //Id在整个Module中必须唯一,不能重复 "Id":"client", //这个模块所属进程,非常重要,进程会根据该参数来判断是否需要运行该模块 [development]为默认值代表开发环境 "ProcessID":"development", "Settings":{ } } ] }, "Log": { "contenttype":"application/json", "multifile": { "maxLines": 0, "maxsize": 0, "daily": true, "rotate": true, "perm": "0600", "prefix":"a", "separate": [ "error" ] }, "file": { "maxLines": 0, "maxsize": 0, "daily": true, "prefix":"n", "rotate": true, "perm": "0600" } }, "Mqtt":{ // 最大写入包队列缓存 "WirteLoopChanNum": 10, // 最大读取包队列缓存 "ReadPackLoop": 1, // 读取超时 "ReadTimeout": 10, // 写入超时 "WriteTimeout": 10 }, "Rpc":{ "MaxCoroutine":100, // 远程访问最后期限值 单位秒 这个值指定了在客户端可以等待服务端多长时间来应答 "RpcExpired": 3, //默认是 false 不打印 "LogSuccess":true } }1.4 编写第一个handler
1.3章节实现了一个helloworld模块,但是模块并没有真正的功能,仅仅进行声明周期的日志输出。实际上真正的模块应该有自身功能的核心实现。
- 作为一个网关模块
- 作为一个后端模块提供核心功能的handler给其他模块调用
此章节介绍一个后端模块如何实现一个handler并且能被其他模块调用。
1.4.1 代码组织结构
重新组织了一下代码目录结构,新增了一个web目录用来存放http网关模块代码
工程目录 |-bin |-conf |-server.conf |-helloworld |-module.go |-web |-module.go |-main.go
1.4.2 依赖
1.4.2.1 服务发现
需要服务发现,所以启动Consul(默认),或者通过go-plugins替换。
mqant的服务发现模块是从go-mirco移植而来的,因此基本可以完全复用go-mirco服务发现相关插件和功能
启动consul
consul agent --dev
1.4.2.2 RPC调用
nats作为RPC的消息投递通道,mqant默认只内置了nats一种通道。
1.4.3 mqant加入consul和nats
import ( "github.com/liangdas/mqant" "github.com/liangdas/mqant/log" "github.com/liangdas/mqant/module" "github.com/liangdas/mqant/registry" "github.com/liangdas/mqant/registry/consul" "github.com/nats-io/nats.go" "mqant-helloworld/helloworld" ) func main() { rs := consul.NewRegistry(func(options *registry.Options) { options.Addrs = []string{"127.0.0.1:8500"} }) nc, err := nats.Connect("nats://127.0.0.1:4222", nats.MaxReconnects(10000)) if err != nil { log.Error("nats error %v", err) return } app := mqant.CreateApp( module.Debug(true),//只有是在调试模式下才会在控制台打印日志, 非调试模式下只在日志文件中输出日志 module.Nats(nc), //指定nats rpc module.Registry(rs), //指定服务发现 ) err= app.Run( //模块都需要加到入口列表中传入框架 helloworld.Module(), ) if err!=nil{ log.Error(err.Error()) } }1.4.4 编写第一个handler
package helloworld import ( "fmt" "github.com/liangdas/mqant/conf" "github.com/liangdas/mqant/log" "github.com/liangdas/mqant/module" basemodule "github.com/liangdas/mqant/module/base" ) // Module 是一个工厂函数,返回HelloWorld模块的实例 var Module = func() module.Module { this := new(HelloWorld) return this } // HelloWorld 结构体,继承自basemodule.BaseModule type HelloWorld struct { basemodule.BaseModule } // GetType 返回模块类型,用于与配置文件中的Module配置对应 func (self *HelloWorld) GetType() string { return "helloworld" } // Version 返回模块版本,用于监控时了解代码版本 func (self *HelloWorld) Version() string { return "1.0.0" } // OnInit 模块初始化函数 func (self *HelloWorld) OnInit(app module.App, settings *conf.ModuleSettings) { // 调用基础模块的初始化方法 self.BaseModule.OnInit(self, app, settings) // 注册RPC处理函数 self.GetServer().RegisterGO("/say/hi", self.say) log.Info("%v模块初始化完成...", self.GetType()) } // OnDestroy 模块销毁函数 func (self *HelloWorld) OnDestroy() { // 调用基础模块的销毁方法 self.BaseModule.OnDestroy() log.Info("%v模块已回收...", self.GetType()) } // GetApp 返回应用实例 func (self *HelloWorld) GetApp() module.App { return self.BaseModule.GetApp() } // Run 模块运行函数 func (self *HelloWorld) Run(closeSig chan bool) { log.Info("%v模块运行中...", self.GetType()) log.Info("%v say hello world...", self.GetType()) <-closeSig // 等待关闭信号 log.Info("%v模块已停止...", self.GetType()) } // say 是一个RPC处理函数 func (self *HelloWorld) say(name string) (r string, err error) { return fmt.Sprintf("hi %v", name), nil }
- 新增handler函数 func say(name string) (r string, err error)
- name:传入值
- r:函数正常处理err情况下的返回内容
- err:函数一场处理情况下的返回内容
- 将handler注册到模块中 self.GetServer().RegisterGO("/say/hi", self.say)
- /say/hi :访问地址
1.4.5 创建一个web模块
在helloworld模块中实现了第一个handler,但是没有地方在使用它,因此编写一个web模块尝试通过http能调用这个handler
package web import ( "context" "github.com/liangdas/mqant/conf" "github.com/liangdas/mqant/log" "github.com/liangdas/mqant/module" basemodule "github.com/liangdas/mqant/module/base" mqrpc "github.com/liangdas/mqant/rpc" "io" "net/http" ) // Module 函数返回一个新的 Web 模块实例 var Module = func() module.Module { this := new(Web) return this } // Web 结构体嵌入了 BaseModule type Web struct { basemodule.BaseModule } // GetType 返回模块类型 func (self *Web) GetType() string { return "Web" } // Version 返回模块版本 func (self *Web) Version() string { return "1.0.0" } // OnInit 初始化模块 func (self *Web) OnInit(app module.App, settings *conf.ModuleSettings) { self.BaseModule.OnInit(self, app, settings) } // startHttpServer 启动 HTTP 服务器 func (self *Web) startHttpServer() *http.Server { // 创建一个新的 HTTP 服务器,监听 8080 端口 srv := &http.Server{Addr: "8080"} // 设置根路由处理函数 http.HandleFunc("/", func(w http.ResponseWriter, r *http.Request) { // 解析表单数据 _ = r.ParseForm() // 调用 RPC 方法 "helloword" 的 "/say/hi" 函数,传入 name 参数 rstr, err := mqrpc.String( self.Call( context.Background(), "helloword", "/say/hi", mqrpc.Param(r.Form.Get("name")), ), ) // 记录 RPC 调用结果 log.Info("RpcCall %v, err %v", rstr, err) // 将结果写入 HTTP 响应 _, _ = io.WriteString(w, rstr) }) // 在新的 goroutine 中启动 HTTP 服务器 go func() { if err := srv.ListenAndServe(); err != nil { log.Info("Httpserver: ListenAndServer() error: %s", err) } }() return srv } // Run 运行 Web 模块 func (self *Web) Run(closeSig chan bool) { log.Info("web: starting http server: 8080") srv := self.startHttpServer() <-closeSig // 等待关闭信号 log.Info("web: stroppting http server") if err := srv.Shutdown(nil); err != nil { panic(err) } log.Info("web: done.exiting") } // OnDestroy 销毁模块 func (self *Web) OnDestroy() { self.BaseModule.OnDestroy() }1.4.5.1 特性
1. web模块对外监听8080端口
http://127.0.0.1:8080/say?name=mqant
2. web模块收到请求后,通过rpc调用helloworld模块提供的handler,并将结果返回客户端。
http.HandleFunc("/", func(w http.ResponseWriter, r *http.Request) {
_ = r.ParseForm()
rstr,err:=mqrpc.String(
self.Call(
context.Background(),
"helloworld",
"/say/hi",
mqrpc.Param(r.Form.Get("name")),
),
)
log.Info("RpcCall %v , err %v",rstr,err)
_, _ = io.WriteString(w, rstr)
})
1.4.5.2 注意事项
1. web模块需要加入main.go 函数入口中
err= app.Run( //模块都需要加到入口列表中传入框架
helloworld.Module(),
web.Module(),
)
2. web模块需要在mqant配置文件中添加配置
"Module":{ "helloworld":[ { "Id":"helloworld", "ProcessID":"development" } ], "Web":[ { "Id":"Web001", "ProcessID":"development" } ] },2. 模块间通信
2.1 RPC介绍
mqant RPC本身是一个相对独立的功能,RPC有以下的几个特点:
1. 目前支持nats作为服务发现通道,理论上可以扩展其他通信方式
2.支持服务之策发现,是一个相对完善的微服务框架
2.1.1 在模块中使用RPC
module.BaseModule中一种继承了RPC,使用方法如下
2.1.1.1 服务提供者
注册handler
//注册服务函数 module.GetServer().RegisterGO(_func string, fn interface{}) //注册服务函数 module.GetServer().Register(_func string, fn interface{})RegisterGO与Register的区别是前者为每一条消息创建一个单独的协程来处理,后者注册的函数共用一个协程来处理所有消息,具体使用哪一种方式可以根据实际情况来定,但Register方式的函数请一定注意不要执行耗时功能,以免引起消息阻塞。
Register 和 RegisterGO 都用于注册RPC处理函数,但它们在处理请求的方式上有重要的区别: Register(id string, f interface{}) 功能:注册一个同步的RPC处理函数。 实现:当收到RPC请求时,直接在当前goroutine中执行注册的函数。 特点: 按顺序处理请求,一次只处理一个请求。 适合短时间内能完成的操作。 如果处理时间较长,可能会阻塞其他请求。 不需要考虑并发安全问题,因为请求是顺序处理的。 RegisterGO(id string, f interface{}) 功能:注册一个异步的RPC处理函数。 实现:当收到RPC请求时,会创建一个新的goroutine来执行注册的函数。 特点: 并发处理请求,可以同时处理多个请求。 适合可能需要长时间处理的操作。 不会阻塞其他请求的处理。 需要考虑并发安全问题,因为多个goroutine可能同时访问共享资源。 选择使用哪个方法取决于你的具体需求: 如果你的RPC处理函数是快速的、无状态的,或者需要严格的顺序执行,使用 Register。 如果你的RPC处理函数可能耗时较长,或者你希望能并发处理多个请求,使用 RegisterGO。 在实际应用中,RegisterGO 通常更常用,因为它能更好地利用Go语言的并发特性,提高服务器的吞吐量。但是使用 RegisterGO 时,你需要确保你的处理函数是并发安全的。 2.1.1.2 服务调用者
在开发过程中,模块A可能需要用到模块B的服务,这是模块A就成了服务调用方。mqant提供了很多RPC调用方法,也支持高级扩展(服务发现)
2.2 RPC调用方式
2.2.1 RPC路由规则
mqant每一类模块可以部署到多台服务器中,因此需要一个nodeId对同一类模块进行区分。在框架中加入服务注册和发现功能后,nodeId通过服务发现模块在服务启动时自动生成,无法提前编码指定。
2.2.2 RPC调用方法1——通过Call函数调度(推荐)
/* 通用RPC调度函数 ctx context.Context 上下文,可以设置这次请求的超时时间 moduleType string 服务名称 serverId 或 serverId@nodeId _func string 需要调度的服务方法 param mqrpc.ParamOption 方法传参 opts ...selector.SelectOption 服务发现模块过滤,可以用来选择调用哪个服务节点 */ Call(ctx context.Context, moduleType, _func string, param mqrpc.ParamOption, opts ...selector.SelectOption) (interface{}, string)2.2.2.1 特点
- 支持设置调用超时时间
- 支持自定义的服务节点选择过滤器
2.2.2.2 超时时间设置
ctx, _ := context.WithTimeout(context.TODO(), time.Second*3) //3s后超时 rstr,err:=mqrpc.String( self.Call( ctx, "helloworld", //要访问的moduleType "/say/hi", //访问模块中handler路径 mqrpc.Param(r.Form.Get("name")), ), )超时时间仅是调用方有效,超时后无法取消被调用方正在执行的任务。
2.2.2.3 服务节点选择过滤器
ctx, _ := context.WithTimeout(context.TODO(), time.Second*3) rstr,err:=mqrpc.String( self.Call( ctx, "helloworld", //要访问的moduleType "/say/hi", //访问模块中handler路径 mqrpc.Param(r.Form.Get("name")), selector.WithStrategy(func(services []*registry.Service) selector.Next { var nodes []*registry.Node // Filter the nodes for datacenter for _, service := range services { for _, node := range service.Nodes { if node.Metadata["version"] == "1.0.0" { nodes = append(nodes, node) } } } var mtx sync.Mutex //log.Info("services[0] $v",services[0].Nodes[0]) return func() (*registry.Node, error) { mtx.Lock() defer mtx.Unlock() if len(nodes) == 0 { return nil, fmt.Errorf("no node") } index := rand.Intn(int(len(nodes))) return nodes[index], nil } }), ), )2.2.2.4 module Type格式
- 指定到模块级别
当module Type为模块名时func GetType()值一样,rpc将查找模块已启用的所有节点,然后根据【节点选择过滤器】选择一个节点发起调用。
- 指定到节点级别
格式为module Type@moduleID 例如
helloworld@1b0073cbbab33247,rpc将直接选择节点1b0073cbbab33247发起调用。
2.2.3 RPC调用方法2——通过RpcInvoke函数调度
module.Invoke(moduleType string, _func string, params ...interface{})2.2.3.1 特点
- 不支持设置调用超时时间(只能通过配置文件设置全局RPC超时时间)
- 不支持自定义的服务节点选择过滤器
- 支持module Type过滤
2.2.4 RPC调用方法3——InvokeNR函数调度
module.InvokeNR(moduleType string, _func string, params ...interface{})2.2.4.1 特点
- 包含Invoke所有特点
- 本函数无需等待返回结果(不会阻塞),仅投递RPC消息
2.2.5 RPC调用方法4——指定节点调用
查找到节点(module.ServerSession),通过节点结构体提供的方法调用
moduleType 模块名称(类型) opts 服务节点选择过滤器 func GetRouteServer(moduleType string, opts ...selector.SelectOption) (s module.ServerSession, err error)
// DefaultRoute 默认路由规则 var DefaultRoute = func(app module.App, r *http.Request) (*Service, error) { // 检查URL路径是否为空 if r.URL.Path == "" { return nil, errors.New("path is nil") } // 将URL路径按"/"分割 handers := strings.Split(r.URL.Path, "/") // 检查路径段数是否至少为2 if len(handers) < 2 { return nil, errors.New("path is not /[server]/path") } // 获取服务器名称(路径的第二段) server := handers[1] // 检查服务器名称是否为空 if server == "" { return nil, errors.New("server is nil") } // 获取路由服务器会话 session, err := app.GetRouteServer(server, // 使用自定义的选择策略 selector.WithStrategy(func(services []*registry.Service) selector.Next { var nodes []*registry.Node // 从所有服务中收集节点 for _, service := range services { for _, node := range service.Nodes { nodes = append(nodes, node) } } var mtx sync.Mutex // 返回一个函数,该函数在每次调用时随机选择一个节点 return func() (*registry.Node, error) { mtx.Lock() defer mtx.Unlock() if len(nodes) == 0 { return nil, fmt.Errorf("no node") } // 随机选择一个节点 index := rand.Intn(int(len(nodes))) return nodes[index], nil } }), )以上的调用方法在module级别和app级别都有对应实现,可灵活选择。
2.3 RPC传参数据结构
2.3.1 RPC可传参数据类型
1-9为基础数据类型,可直接使用。10、11为自定义结构体,需要单独定义(章节后续会单独讲解)
- bool
- int32
- int64
- long64
- float32
- float64
- []byte
- string
- map[string]interface{}
- protocol buffer结构体
- 自定义结构体
注意调用参数不能为nil 如: result,err:=module.Invoke(“user”,"login","mqant",nil) 会出现异常无法调用
2.3.2 返回值可使用的参数类型
hander的返回值固定为两个,其中result表示正常业务返回值,err表示异常业务返回值
2.3.2.1 result:
- bool
- int32
- int64
- long64
- float32
- float64
- []byte
- string
- map[string]interface{}
- protocol buffer结构体
- 自定义结构体
2.3.2.2 err:
- string
- error
func (self *HellWorld)say(name string) (result string,err error) { return fmt.Sprintf("hi %v",name), nil }result,err:=mqrpc.String( self.Call( ctx, "helloworld", //要访问的moduleType "/say/hi", //访问模块中handler路径 mqrpc.Param(r.Form.Get("name")), ))2.4 protocolbuffer
2.4.1 注意事项
1. proto.Message是protocol buffer约定的数据结构,因此需要双方都能够明确数据结构的类型(可以直接断言的)
2. 服务函数返回结构一定要用指针(例如 *rpcpb.ResultInfo),否则mqant无法识别。
2.4.2 代码组织结构
新增了一个rpctest目录用来存放rpctest模块代码
工程目录
|-bin |-conf |-server.conf |-helloworld |-module.go |-web |-module.go |-rpctest |-module.go |-main.go
2.4.3 编写支持pb传参的handler
为了简化操作,我们直接使用mqant内部的protocolbuffer结构体rpcpb.ResultInfo
var Module = func() module.Module { this := new(rpctest) return this } type rpctest struct { basemodule.BaseModule } func (self *rpctest) GetType() string { //很关键,需要与配置文件中的Module配置对应 return "rpctest" } func (self *rpctest) Version() string { //可以在监控时了解代码版本 return "1.0.0" } func (self *rpctest) OnInit(app module.App, settings *conf.ModuleSettings) { self.BaseModule.OnInit(self, app, settings) self.GetServer().RegisterGO("/test/proto", self.testProto) } func (self *rpctest) Run(closeSig chan bool) { log.Info("%v模块运行中...",self.GetType()) <-closeSig } func (self *rpctest) OnDestroy() { //一定别忘了继承 self.BaseModule.OnDestroy() } func (self *rpctest) testProto(req *rpcpb.ResultInfo) (*rpcpb.ResultInfo, error) { r := &rpcpb.ResultInfo{Error: *proto.String(fmt.Sprintf("你说: %v",req.Error))} return r, nil }2.4.4 调用pb的hander
http.HandleFunc("/test/proto", func(w http.ResponseWriter, r *http.Request) { _ = r.ParseForm() ctx, _ := context.WithTimeout(context.TODO(), time.Second*3) protobean := new(rpcpb.ResultInfo) err:=mqrpc.Proto(protobean,func() (reply interface{}, errstr interface{}) { return self.RpcCall( ctx, "rpctest", //要访问的moduleType "/test/proto", //访问模块中handler路径 mqrpc.Param(&rpcpb.ResultInfo{Error: *proto.String(r.Form.Get("message"))}), ) }) log.Info("RpcCall %v , err %v",protobean,err) if err!=nil{ _, _ = io.WriteString(w, err.Error()) } _, _ = io.WriteString(w, protobean.Error) })2.5 自定义数据结构
和protocolbuffer类似,mqant也识别目前mqrpc.Marshaler接口实现的数据结构,开发者只需要自己实现序列化和反序列化即可。
2.5.1 Marshaler接口定义
序列化 func (this *mystruct)Marshal() ([]byte, error) 反序列化 func (this *mystruct)Unmarshal(data []byte) error 数据结构名称 func (this *mystruct)String() string1. mqrpc.Marshaler是请求方和服务方约定的数据结构,因此需要双方都能够明确数据结构的类型(可以直接断言的)
2. 服务函数返回结构一定要用指针(例如*rsp)否则mqant无法识别 (见下文)
2.5.2 编写支持Marshaler传参的handler
重新组织了一下代码目录结构,新增了一个marshaler.go用来存放自定义数据结构代码
工程目录 |-bin |-conf |-server.conf |-helloworld |-module.go |-web |-module.go |-rpctest |-module.go |-marshaler.go |-main.go
2.5.3 定义数据结构
package rpctest type Req struct { Id string } func (this *Req) Marshal() ([]byte, error) { return []byte(this.Id), nill } func (this *Req) Unmarshal(data []byte) error { this.Id = string(data) return nil } func (this *Req) String() string { return "req" } type Rsp struct { Msg string } func (this *Rsp) Marshal() ([]byte, error) { return []byte(this.Msg), nil } func (this *Rsp) Unmarshal(data []byte) error { this.Msg = string(data) return nil } func (this *Rsp) String() string { return "rsp" }2.5.4 在rpctest/marshaler.go中新增handler函数testMarshal
func (self *rpctest) testMarshal(req Req) (*Rsp, error) { r := &Rsp{Msg: fmt.Sprintf("%v", req.Id)} return r, nil }2.5.5 在rpctest/module.go中将testMarshal注册到模块中
func (self *rpctest) OnInit(app module.App, settings *conf.ModuleSettings) { self.BaseModule.OnInit(self, app, settings) self.GetServer().RegisterGO("/test/proto", self.testProto) self.GetServer().RegisterGO("/test/marshal", self.testMarshal) //注册testMarshal方法 }2.5.6 在web/moduler.go中新增api进行测试
// startHttpServer 启动 HTTP 服务器 func (self *Web) startHttpServer() *http.Server { // 创建一个新的 HTTP 服务器,监听 8080 端口 srv := &http.Server{Addr: ":8080"} // 设置根路由("/")的处理函数 http.HandleFunc("/", func(w http.ResponseWriter, r *http.Request) { // 解析表单数据 _ = r.ParseForm() // 调用 RPC 方法 "helloword" 的 "/say/hi" 函数,传入 name 参数 rstr, err := mqrpc.String( self.Call( context.Background(), "helloword", // 模块名 "/say/hi", // 方法名 mqrpc.Param(r.Form.Get("name")), // 参数 ), ) // 记录 RPC 调用结果 log.Info("RpcCall %v, err %v", rstr, err) // 将结果写入 HTTP 响应 _, _ = io.WriteString(w, rstr) }) // 设置 "/test/proto" 路由的处理函数 http.HandleFunc("/test/proto", func(w http.ResponseWriter, r *http.Request) { // 解析表单数据 _ = r.ParseForm() // 创建一个带3秒超时的上下文 ctx, _ := context.WithTimeout(context.TODO(), time.Second*3) // 创建一个新的 rpcpb.ResultInfo 对象 protobean := new(rpcpb.ResultInfo) // 调用 RPC 方法并将结果解析到 protobean err := mqrpc.Proto(protobean, func() (reply interface{}, errstr interface{}) { return self.Call( ctx, "rpctest", // 模块名 "/test/proto", // 方法名 mqrpc.Param(&rpcpb.ResultInfo{Error: *proto.String(r.Form.Get("message"))}), // 参数 ) }) // 记录 RPC 调用结果 log.Info("RpcCall %v , err %v", protobean, err) // 如果有错误,将错误信息写入响应 if err != nil { _, _ = io.WriteString(w, err.Error()) } // 将 protobean 的 Error 字段写入响应 _, _ = io.WriteString(w, protobean.Error) }) http.HandleFunc("/test/marshal", func(w http.ResponseWriter, r *http.Request) { // 解析表单数据 _ = r.ParseForm() // 创建一个带3秒超时的上下文 ctx, _ := context.WithTimeout(context.TODO(), time.Second*3) // 创建一个新的 rpctest.Rsp 对象 rspbean := new(rpctest.Rsp) // 调用 RPC 方法并将结果解析到 rspbean err := mqrpc.Proto(rspbean, func() (reply interface{}, errstr interface{}) { return self.Call( ctx, "rpctest", // 模块名 "/test/marshal", // 方法名 mqrpc.Param(&rpctest.Req{Id: r.Form.Get("mid")}), // 参数 ) }) // 记录 RPC 调用结果 log.Info("RpcCall %v , err %v", rspbean, err) // 如果有错误,将错误信息写入响应 if err != nil { _, _ = io.WriteString(w, err.Error()) } // 将 rspbean 的 Error 字段写入响应 _, _ = io.WriteString(w, rspbean.Msg) }) // 在新的 goroutine 中启动 HTTP 服务器 go func() { if err := srv.ListenAndServe(); err != nil { log.Info("Httpserver: ListenAndServer() error: %s", err) } }() return srv }2.6 RPC返回结果断言
由于RpcCall是一个通用函数,无法对其返回值指定类型,为简化代码,mqant参考了redis封装了RPC返回类型断言函数,方便使用。
2.6.1 protocolbuffer断言
protobean := new(rpcpb.ResultInfo) err:=mqrpc.Proto(protobean,func() (reply interface{}, errstr interface{}) { return self.Call( ctx, "rpctest", //要访问的moduleType "/test/proto", //访问模块中handler路径 mqrpc.Param(&rpcpb.ResultInfo{Error: *proto.String(r.Form.Get("message"))}), ) }) log.Info("RpcCall %v , err %v",protobean,err)2.6.2 自定义结构断言
rspbean := new(rpctest.Rsp) err:=mqrpc.Marshal(rspbean,func() (reply interface{}, errstr interface{}) { return self.Call( ctx, "rpctest", //要访问的moduleType "/test/marshal", //访问模块中handler路径 mqrpc.Param(&rpctest.Req{Id: "hello 我是RpcInvoke"}), ) }) log.Info("RpcCall %v , err %v",rspbean,err)这段代码中确实使用了类型断言,但它是隐式的,发生在 mqrpc.Proto 函数内部。让我详细解释一下这个过程:
- rspbean := new(rpctest.Rsp)
创建了一个新的 rpctest.Rsp 类型的指针。
- err := mqrpc.Proto(protobean, func() (reply interface{}, errstr interface{}) { ... })
这里调用了 mqrpc.Proto 函数,它接受两个参数:
- 第一个参数 rspbean是用来存储结果的。
- 第二个参数是一个匿名函数,这个函数执行实际的 RPC 调用。
- 在 mqrpc.Proto 函数内部(虽然我们看不到其实现),很可能发生了以下过程:
- 调用传入的匿名函数获取 RPC 调用的结果。
- 使用类型断言将返回的 reply interface{} 转换为具体的 Protocol Buffers 类型。
- 将转换后的结果复制或解析到传入的rspbean中。
- 类型断言的过程大概是这样的:
if protoReply, ok := reply.(* rpctest.Rsp); ok {
// 复制 protoReply 到 rspbean
} else {
// 处理类型不匹配的情况
}
5. self.Call(...) 函数返回的结果被 mqrpc.Proto 函数处理,然后填充到 rspbean 中。
2.6.3 字符串断言
rstr,err:=mqrpc.String( self.Call( context.Background(), "helloworld", "/say/hi", mqrpc.Param(r.Form.Get("name")), ), ) log.Info("RpcCall %v , err %v",rstr,err)3. 服务发现
3.1 服务续约
3.1.1 基本原理
服务在启动时注册服务发现,并在关闭时取消注册。有时这些服务可能会意外死亡,被强行杀死或面临临时的网络问题。在这些情况下,遗留的节点将存在服务发现中。
3.1.2 解决方法
服务发现支持注册的TTL选项和间隔。TTL指定在发现之后注册的信息存在多长时间,然后国企呗删除。时间间隔是服务应该重新注册的时间,以保留其在服务发现中的注册信息。
3.1.3 设置
mqant默认的ttl=20,重新注册间隔为10秒
func (self *rpctest) OnInit(app module.App, settings *conf.ModuleSettings) { self.BaseModule.OnInit(self, app, settings, server.RegisterInterval(15*time.Second), server.RegisterTTL(30*time.Second), ) } 设置了一个30秒的ttl,重新注册间隔为15秒。如果应用进程被强杀,服务未取消注册,则30秒内其他服务节点无法感知改节点已失效。3.2 服务元数据
服务还支持元数据,即服务的自身属性,通过这些属性我们可以定制服务发现策略。
3.2.1 节点ID
一般情况下节点ID在模块初始化时由系统自动生成一个不重复的随机数,但也可以指定节点ID
func (self *rpctest) OnInit(app module.App, settings *conf.ModuleSettings) { self.BaseModule.OnInit(self, app, settings, server.RegisterInterval(15*time.Second), server.RegisterTTL(30*time.Second), server.Id("mynode001"), ) }3.2.2 调用
如果明确知道节点ID,那你可以直接找到,虽然通常不这样用
err:=mqrpc.Marshal(rspbean,func() (reply interface{}, errstr interface{}) { return self.Call( ctx, "rpctest@mynode001", //要访问的moduleType "/test/marshal", //访问模块中handler路径 mqrpc.Param(&rpctest.Req{Id: r.Form.Get("mid")}), ) })3.2.3 服务版本(Version)
模块(服务)启动时,会自动注册模块func Version() string 的返回值作为服务的版本。
可以利用服务版本过滤节点
rstr,err:=mqrpc.String( self.Call( ctx, "helloworld", //要访问的moduleType "/say/hi", //访问模块中handler路径 mqrpc.Param(r.Form.Get("name")), selector.WithStrategy(func(services []*registry.Service) selector.Next { var nodes []*registry.Node // Filter the nodes for datacenter for _, service := range services { if service.Version!= "1.0.0"{ continue } for _, node := range service.Nodes { nodes = append(nodes, node) } } var mtx sync.Mutex //log.Info("services[0] $v",services[0].Nodes[0]) return func() (*registry.Node, error) { mtx.Lock() defer mtx.Unlock() if len(nodes) == 0 { return nil, fmt.Errorf("no node") } index := rand.Intn(int(len(nodes))) return nodes[index], nil } }), ), )3.2.4 元数据(Metadata)
可以为服务节点指定设置元数据,元数据时节点级别,且可以随时修改,利用好它可以灵活的实现定制化的服务发现,比如实现灰度发布,熔断策略等等
3.2.4.1 设置元数据
self.GetServer().Options().Metadata["state"]="alive"3.2.4.2 立即刷新
设置好的元数据会等到下一次重新注册时更新配置中心并同步至其他节点,想立即生效的话可以这样做
_ := self.GetServer().ServiceRegister()rstr,err:=mqrpc.String( self.Call( ctx, "helloworld", //要访问的moduleType "/say/hi", //访问模块中handler路径 mqrpc.Param(r.Form.Get("name")), selector.WithStrategy(func(services []*registry.Service) selector.Next { var nodes []*registry.Node // Filter the nodes for datacenter for _, service := range services { if service.Version!= "1.0.0"{ continue } for _, node := range service.Nodes { nodes = append(nodes, node) if node.Metadata["state"] == "alive" || node.Metadata["state"] == "" { nodes = append(nodes, node) } } } var mtx sync.Mutex //log.Info("services[0] $v",services[0].Nodes[0]) return func() (*registry.Node, error) { mtx.Lock() defer mtx.Unlock() if len(nodes) == 0 { return nil, fmt.Errorf("no node") } index := rand.Intn(int(len(nodes))) return nodes[index], nil } }), ), )3.3 服务选择
微服务中每一个服务都会部署多个节点,并且根据实际情况可能面临新增或摘除节点,通常选择节点是结合业务而定的,因此灵活的节点选择器是框架必备的功能。
3.3.1 用法
mqant的节点选择器(selector)是从go-mirco移植来的,其使用规则可参考go-mirco实现
3.3.2 默认选择
mqant默认的选择器是一个随机负责均衡选择器
3.3.3 RPC级别
如果需要针对某一个RPC调用定制选择器可以这样做,RpcCall 函数可选参数中支持设置选择器
rstr,err:=mqrpc.String( self.RpcCall( ctx, "helloworld", //要访问的moduleType "/say/hi", //访问模块中handler路径 mqrpc.Param(r.Form.Get("name")), selector.WithStrategy(func(services []*registry.Service) selector.Next { var nodes []*registry.Node // Filter the nodes for datacenter for _, service := range services { if service.Version!= "1.0.0"{ continue } for _, node := range service.Nodes { nodes = append(nodes, node) if node.Metadata["state"] == "alive" || node.Metadata["state"] == "" { nodes = append(nodes, node) } } } var mtx sync.Mutex //log.Info("services[0] $v",services[0].Nodes[0]) return func() (*registry.Node, error) { mtx.Lock() defer mtx.Unlock() if len(nodes) == 0 { return nil, fmt.Errorf("no node") } index := rand.Intn(int(len(nodes))) return nodes[index], nil } }), ), )3.3.4 应用级别
大部分情况下,我们只需要定制一个全局统一的通用选择器,那么可以在应用(app)级别设置
app := mqant.CreateApp( module.Debug(false), ) _ = app.Options().Selector.Init(selector.SetStrategy(func(services []*registry.Service) selector.Next { var nodes []WeightNode // Filter the nodes for datacenter for _, service := range services { for _, node := range service.Nodes { weight := 100 if w, ok := node.Metadata["weight"]; ok { wint, err := strconv.Atoi(w) if err == nil { weight = wint } } if state, ok := node.Metadata["state"]; ok { if state != "forbidden" { nodes = append(nodes, WeightNode{ Node: node, Weight: weight, }) } } else { nodes = append(nodes, WeightNode{ Node: node, Weight: weight, }) } } } //log.Info("services[0] $v",services[0].Nodes[0]) return func() (*registry.Node, error) { if len(nodes) == 0 { return nil, fmt.Errorf("no node") } rand.Seed(time.Now().UnixNano()) //按权重选 total := 0 for _, n := range nodes { total += n.Weight } if total > 0 { weight := rand.Intn(total) togo := 0 for _, a := range nodes { if (togo <= weight) && (weight < (togo + a.Weight)) { return a.Node, nil } else { togo += a.Weight } } } //降级为随机 index := rand.Intn(int(len(nodes))) return nodes[index].Node, nil } }))以上的选择器利用节点元数据(Metadata)定制了一个节点选择规则
- 按权重(weight)
- 按节点当前状态(forbidden)
- 最后降级为随机
4. 配置
4.1 配置文件结构
配置文件可分为五大块
- 应用级别配置
- 模块(服务)配置
- 日志配置
4.1.1 结构
配置文件是json格式
{ "Settings":{ }, "Module":{ "moduletype":[ { "Id":"moduletype", "ProcessID":"development", "Settings":{ } } ], }, "Log": { } }4.2 应用级别配置
应用级别配置可以设置应用全局所要用到的配置,例如数据库连接地址等等
{ "Settings":{ "MongodbURL": "mongodb://xx:xx@xx:8015", "MongodbDB": "xx-server" } }4.2.1 在应用中获取
_ = app.OnConfigurationLoaded(func(app module.App) { tools.MongodbUrl = app.GetSettings().Settings["MongodbURL"].(string) tools.MongodbDB = app.GetSettings().Settings["MongodbDB"].(string) }4.2.2 在模块中获取
func (self *admin_web) OnInit(app module.App, settings *conf.ModuleSettings) { self.BaseModule.OnInit(self, app, settings) tools.MongodbUrl = app.GetSettings().Settings["MongodbURL"].(string) tools.MongodbDB = app.GetSettings().Settings["MongodbDB"].(string) }4.3 模块级别配置
模块配置分两大部分
- 模块的启动分组ProcessID
- 模块级别的自定义配置
4.3.1 分组ID(ProcessID)
分组ID在分布式部署中非常重要,mqant 的默认分组为development
4.3.2 模块自定义配置
"Module":{ "moduletype":[ { "Settings":{ "StaticPath": "static", "Port": 6010 } } ], }4.3.3 使用
func (self *admin_web) OnInit(app module.App, settings *conf.ModuleSettings) { self.BaseModule.OnInit(self, app, settings) self.StaticPath = self.GetModuleSettings().Settings["StaticPath"].(string) self.Port = int(self.GetModuleSettings().Settings["Port"].(float64)) }4.5 日志配置
mqant使用beego/logs日志模块
4.5.1 特性
4.5.1.1 输出引擎
支持的引擎有 file、console、net、smtp、dingtalk(钉钉) 、es(ElasticSearch)、jianliao(简聊)、slack4.5.1.2 文件输出
1. 按照每天输出文件
2. 可限制每个文件最大写入行
3. 可限制每个文件最大文件大小
4. error,access类日志分文件输出
4.5.2 使用方法
4.5.2.1 配置方式
mqant的日志配置选项基本与beego的日志配置字段保持一致,可参考
在mqant的配置文件server.json中的Log字段内配置。
server.json { "Log":{ "dingtalk":{ "webhookurl":"https://oapi.dingtalk.com/robot/send?access_token=xxx", // RFC5424 log message levels. "level":3 }, "file":{ //是否按照每天 logrotate,默认是 true "daily":true, "level":7 } } }配置与beego的一些区别
- 每一种引擎都需要在Log中配置才能生效(file引擎除外)
- file是默认引擎,Log不配置的话会使用默认配置
- file引擎的filename字段无法设置,mqant会默认为access级别和error级别的日志分文件输出到约定的日志目录中
4.5.2.2 引擎字段映射
文件输出 file
邮件输出 smtp
简聊 jianliao
slack slack
钉钉 dingtalk
网络 conn
ElasticSearch es
4.5.2.3 关闭控制台打印
在正式环境中我们只需要在file中输出日志,不需要再控制台输出日志了,因此我们需要关闭控制台日志输出。
app := mqant.CreateApp( module.Debug(false), //只有是在调试模式下才会在控制台打印日志, 非调试模式下只在日志文件中输出日志 )5. 部署
5.1 部署概述
mqant部署分为单机部署和分布式部署,通常情况下,项目的所有模块代码都被编译到一个可执行文件中。 在分布式部署时,我们通常想将网关模块跟后端服务模块分服务器部署,即:
- 网关服务器仅启用网关模块
- 后端服务器仅启用后端模块
5.1.1 模块分组(ProcessID)
模块分组便是为了实现上面的功能而设计的,如果要不同的模块分开部署可以按如下步骤操作
- 在配置文件中将模块的ProcessID分开
- 在启动应用进程时指定进程ProcessID
5.1.2 单机部署
mqant默认的模块分组值约定为development
在调试期间可以将所有模块的分组ID都设置为development,这样一个进程就可以启用所有已实现的模块
5.1.2.1 模块ProcessID设置
"Module":{ "moduletype":[ { "Id":"moduletype", "ProcessID":"development" } ] }5.1.2.2 指定进程ProcessID
pid := flag.String("pid", "", "Server work directory") flag.Parse() //解析输入的参数 app := mqant.CreateApp( module.Debug(true), //只有是在调试模式下才会在控制台打印日志, 非调试模式下只在日志文件中输出日志 module.Parse(false), module.ProcessID(*pid), )5.2 启动参数
mqant默认会解析启动环境变量,即调用flag.Parse(),如不想mqant解析可通过启动方法module.Parse(false)关闭
5.2.1 mqant解析字段
wdPath = *flag.String("wd", "", "Server work directory") confPath = *flag.String("conf", "", "Server configuration file path") ProcessID = *flag.String("pid", "development", "Server ProcessID?") Logdir = *flag.String("log", "", "Log file directory?") BIdir = *flag.String("bi", "", "bi file directory?")5.2.2 关闭mqant解析
app := mqant.CreateApp( module.Parse(false), #关闭后mqant所需参数需设置 )5.2.3 指定进程工作路径
5.2.3.1 启动命令设置
- module.Parse(true)
- 命令 wd
mqant-example -wd /my/workdir
5.2.3.2 初始化设置
- module.Parse(false)
app := mqant.CreateApp( module.Parse(false), module.WorkDir("/my/workdir"), )
5.2.3.3 工作路径
mqant会在工作路径下初始化未指定的设置
- 配置文件 {workdir}/bin/conf/server.json
- 日志文件目录 {workdir}/bin/logs
- BI日志文件目录 {workdir}/bin/bi
5.2.4 指定配置文件
5.2.4.1 启动命令设置
- module.Parse(true)
- 命令 conf
mqant-example -conf /my/config.json
5.2.4.2 初始化设置
app := mqant.CreateApp( module.Parse(false), module.Configure("/my/config.json"), )5.2.5 指定模块分组ID
5.2.5.1 启动命令设置
- module.Parse(true)
- 命令 pid
mqant-example -pid myPid
5.2.5.2 初始化配置
- module.Parse(false)
app := mqant.CreateApp( module.Parse(false), module.ProcessID("myPid"), )
5.3 服务发现设置
服务发现配置只能通过启动代码设置,包涵
- nats配置
- 注册中心配置(consul,etcd)
- 服务发现TTL和注册间隔
app := mqant.CreateApp( module.Debug(true), //只有是在调试模式下才会在控制台打印日志, 非调试模式下只在日志文件中输出日志 module.Nats(nc), //指定nats rpc module.Registry(rs), //指定服务发现 module.RegisterTTL(20*time.Second), module.RegisterInterval(10*time.Second), )