一、为什么用haproxy
在这样的环境中:如图所示
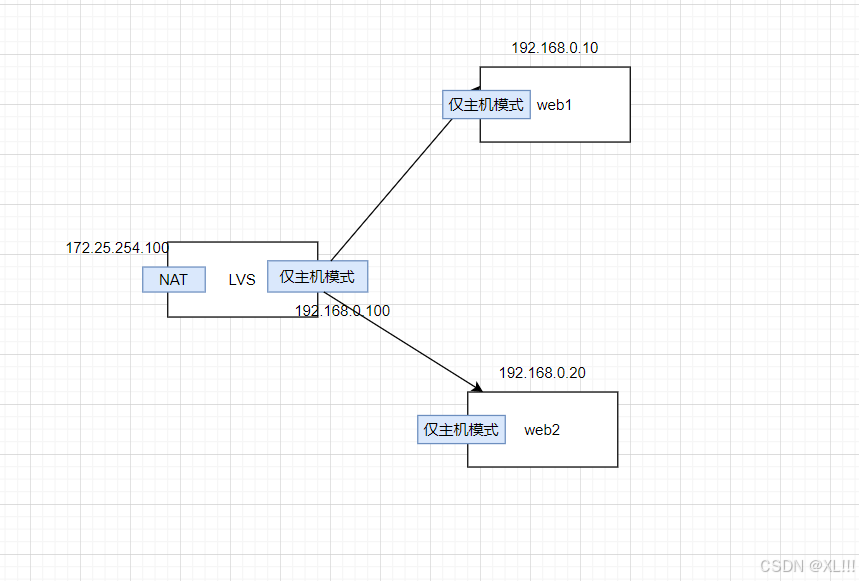
当一台web1主机挂掉 当后端出现问题的时候应该把流量达到正常工作web2的服务器上
此时LVS是不能满足这个功能的
所以此时就需要用到haproxy
二、haproxy-七层负载和四层复杂及正反向代理的含义
四层:
1.通过ip+port决定负载均衡的去向。
2.对流量请求进行NAT处理,转发至后台服务器。
3.记录tcp、udp流量分别是由哪台服务器处理,后续该请求连接的流量都通过该服务器处理。
4.支持四层的软件
●Ivs: 重量级四层负载均衡器。
●Nginx:轻量级四层负载均衡器,可缓存。(nginx四层 是通过upstream模块)
. Haproxy: 模拟四层转发。
七层:
代理功能
1.通过虚拟ur |或主机ip进行流量识别,根据应用层信息进行解析,决定是否需要进行负载均衡。
2.代理后台服务器与客户端建立连接,如nginx可代理前后端,与前端客户端tcp连接,与后端服务器建
立tcp连接,
3.支持7层代理的软件:
●Nginx:基于http协议(nginx七层是通过proxy_ pass)
●< Haproxy:七层代理,会话保持、标记、路径转移等。
四层和七层的区别
所谓的四到七层负载均衡,就是在对后台的服务器进行负载均衡时,依据四层的信息或七层的信息来决定怎么样转发流量四层的负载均衡,就是通过发布三层的IP地址(VIP) ,然后加四层的端口号,来决定哪些流量需要做负载均衡,对需要处理的流量进行NAT处理,转发至后台服务器,并记录下这个TCP或者UDP的流量是由哪台服务器处理的,后续这个连接的所有流量都同样转发到同一台服务器处理七层的负载均衡,就是在四层的基础。上(没有四层是绝对不可能有七层的),再考虑应用层的特征,比如同一-个Web服务器的负载均衡,除了根据VIP加80端口辨别是否需要处理的流量,还可根据七层的URL、浏览器类别、语言来决定是否要进行负载均衡。
1.分层位置:四层负载均衡在传输层及以下,七层负载均衡在应用层及以下
2.性能:四层负载均衡架构无需解析报文消息内容,在网络吞吐量与处理能力上较高:七层可支持解析应用层报文消息内容,识别URL、Cookie、 HTTP header等信息。
3.原理:四层负载均衡是基于ip+port;七层是基于虚拟的URL或主机IP等。
4.功能类比:四层负载均衡类似于路由器七层类似于代理服务器。
5.安全性:四层负载均衡无法识别DDoS攻击;七层可防御SYN Cookie/Flood攻击
三、haproxy-haproxy简介
HAProxy是法国开发者 威利塔罗(Willy Tarreau)在2000年使用C语言开发的一个开源软件是一款具备高并发(万级以上)、高性能的TCP和HTTP负载均衡器支持基于cookie的持久性,自动故障切换,支持正则表达式及web状态统计企业版网站:https://www.haproxy.com
社区版网站:http://www.haproxy.org
github: https://github.com/haprox
haproxy的基本配置信息
HAProxy 的配置文件haproxy.cfg由两大部分组成,分别是:
global:全局配置段
进程及安全配置相关的参数
·性能调整相关参数
Debug参数
proxies:代理配置段
defaults:为frontend,backend,listen提供默认配置
frontend:前端,相当于nginx中的server{}
backend:后端,相当于nginx中的upstream0
listen:同时拥有前端和后端配置,配置简单,生产推荐使用
四、haproxy-实验环境的部署方法
haproxy

websever1
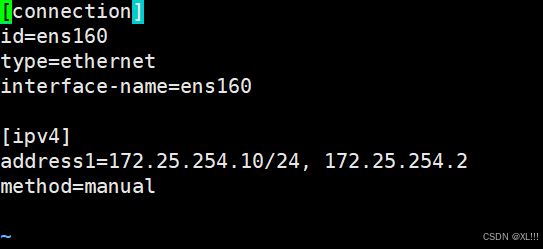
dnf install nginx -y 下载服务!
echo webserver -172.25.254.10 > /usr/share/nginx/html/index.html
systemctl enable --now nginx
webserver2

dnf install nginx -y
echo webserver -172.25.254.20 > /usr/share/nginx/html/index.html
systemctl enable --now nginx
(2)所有主机关闭防火墙 将selinux设置为宽容模式
关闭防火墙
systemctl stop firewalld
systemctl mask firewalld
配置selinux
setenforce 0
以上环境就配置完成啦!
五、haproxy-haproxy的基本部署方法及负载均衡的实现
准备三台主机
dnf install haproxy -y
rpm -qc haproxy 查找配置文件

vim /etc/haproxy/haproxy.cfg 编辑配置文件
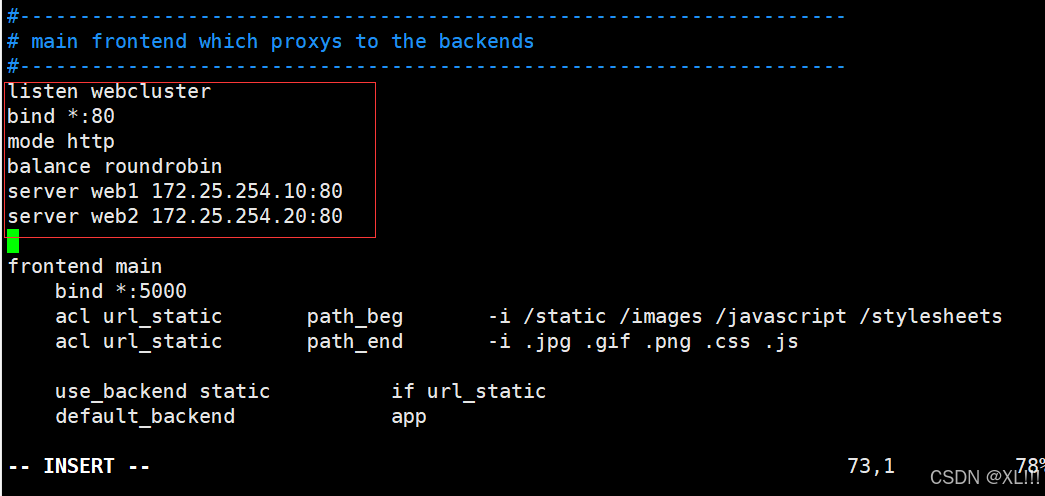
此时可以将web1的ngnix的服务停掉
systemctl stop ngnix
访问172.25.254.100
可以发现流量都到web2的主机上
六、haproxy-haproxy的全局配置参数及日志分离
设置多进程
pstree -p |grep haproxy

vim /etc/haproxy/haproxy.cfg 编辑配置文件

systemctl restart haproxy 重启服务
pstree -p |grep haproxy
vim /etc/haproxy/haproxy.cfg 编辑配置文件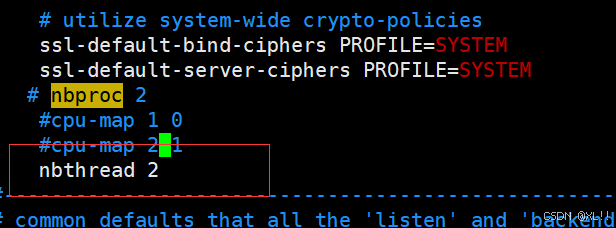
systemctl restart haproxy
查看多线程
cat /proc/3112/status |grep -i thread
注意这里只能多线程跟多进程只能开启一个 不能同时启动
vim /etc/haproxy/haproxy.cfg 编辑配置文件
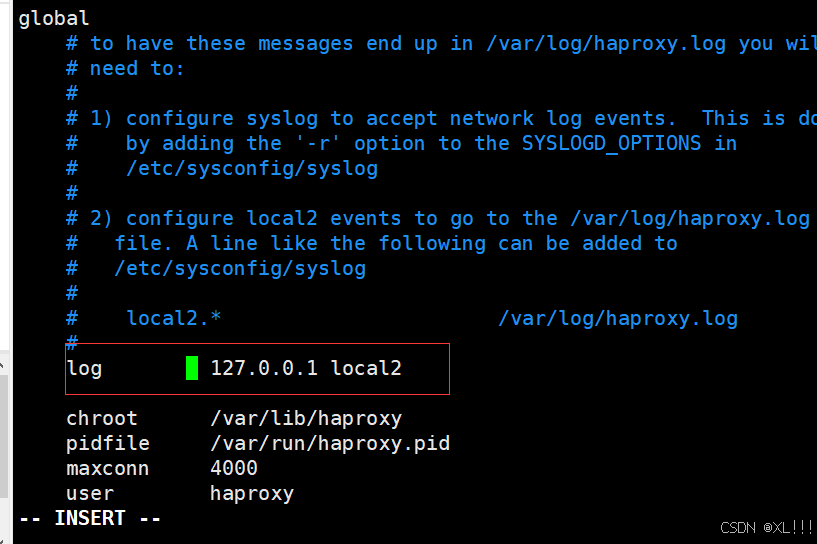
systemctl restart haproxy 重启服务
vim /etc/rsyslog.conf
systemctl restart rsyslog.service
七、haproxy-haproxy中的常用配置参数
haproxy主机:
vim /etc/haproxy/haproxy.cfg 编辑配置文件

下载httpd服务
dnf install httpd -y
此时先不要启动httpd服务!
先进入/etc/hhtpd/conf/httpd.conf 文件中 将80端口改为8080

此时就可以重启httpd 服务啦
systemctl restart httpd
结果:

下线指定realserver
vim /etc/haproxy/haproxy.cfg 编辑配置文件

结果;

访问重定向
vim /etc/haproxy/haproxy.cfg 编辑配置文件

systemctl restart haproxy


八、haproxy-haproxy热更新方法
dnf install socat -y
vim /etc/haproxy/haproxy.cfg 编辑配置文件

echo get weight webcluster/web1 | socat stdio /var/lib/haproxy/stats 看当前状态的权重
echo "set weight webcluster/web1 1" | socat stdio /var/lib/haproxy/stats 更改web1的权重为1
echo get weight webcluster/web1 | socat stdio /var/lib/haproxy/stats 再查看当前的权重

echo 'get servers state' | socat stdio /var/lib/haproxy/stats
echo 'show servers state' | socat stdio /var/lib/haproxy/stats
让web1下线
echo "disable server webcluster/web1" | socat stdio /var/lib/haproxy/stats
多进程如何热处理
vim /etc/haproxy/haproxy.cfg 编辑配置文件

echo 'show info ' | socat stdio /var/lib/haproxy/stats1
echo 'show info ' | socat stdio /var/lib/haproxy/stats2
九、haproxy-haproxy的算法
uri
1.基于对用户请求的URI的左半部分或整个uri做hash,再将hash结果对总权重进行取模后
2.根据最终结果将请求转发到后端指定服务器
3.适用于后端是缓存服务器场景 4.默认是静态算法,也可以通过hash-type指定map-based和consistent,来定义使用取模法还是一致性hash
source
源地址hash,基于用户源地址hash并将请求转发到后端服务器,后续同一个源地址请求将被转发至同-个后端web服务器。此方式当后端服务器数据量发生变化时,会导致很多用户的请求转发至新的后端服务器,默认为静态方式,但是可以通过hash-type支持的选项更改这个算法一般是在不插入Cookie的TCP模式下使用,也可给拒绝会话cookie的客户提供最好的会话粘性,适用于session会话保持但不支持cookie和缓存的场景源地址有两种转发客户端请求到后端服务器的服务器选取计算方式,分别是取模法和一致性hash
leastconn:#数据库
1.leastconn加权的最少连接的动态 2.支持权重的运行时调整和慢启动,即:根据当前连接最少的后端服务器而非权重进行优先调度(新客户端连接) 3.比较适合长连接的场景使用,比如:MySQL等场景
roundrobin
1.基于权重的轮询动态调度算法 2.支持权重的运行时调整,不同于Ivs中的rr轮训模式
3.HAProxy中的roundrobin支持慢启动(新加的服务器会逐渐增加转发数)
4.其每个后端backend中最多支持4095个real server, 5.支持对real server权重动态调整, 6.roundrobin为默认调度算法,此算法使用广泛
static-rr:#适用于做了session共享的web集群
不支持慢启动(开启之后流量慢慢给) 支持权重 不支持修改权重 balance static-rr
first:#使用较少
balance first 自上而下进行调用 当一台的服务器达到了上限 才会给下一台 不支持修改权重
不支持socat工具进行显示 比如get set disable enable
实验:
static-rr
vim /etc/haproxy/haproxy.cfg 编辑配置文件

vim /etc/haproxy/haproxy.cfg 编辑配置文件

echo "set weight webcluster/web1 1" | socat stdio /var/lib/haproxy/stats.
此时不能更改权重
first
vim /etc/haproxy/haproxy.cfg 编辑配置文件

在多台主机中执行死循环测试效果
利用命令 while ture;do curl 172.25.254.100;sleep 0.1;done
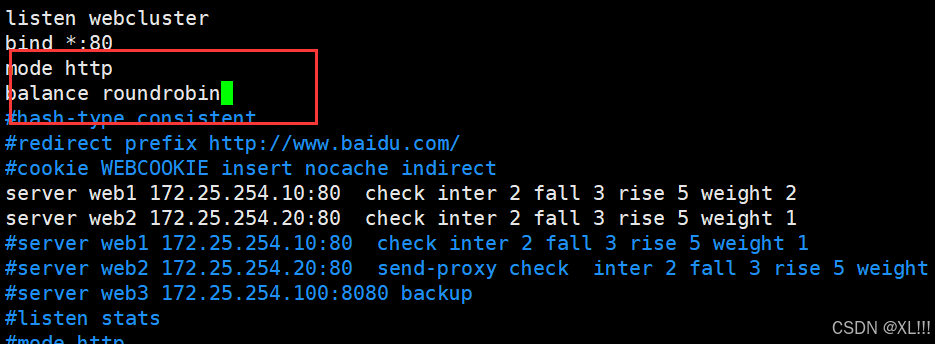
vim /etc/haproxy/haproxy.cfg 编辑配置文件

vim /etc/haproxy/haproxy.cfg 编辑配置文件
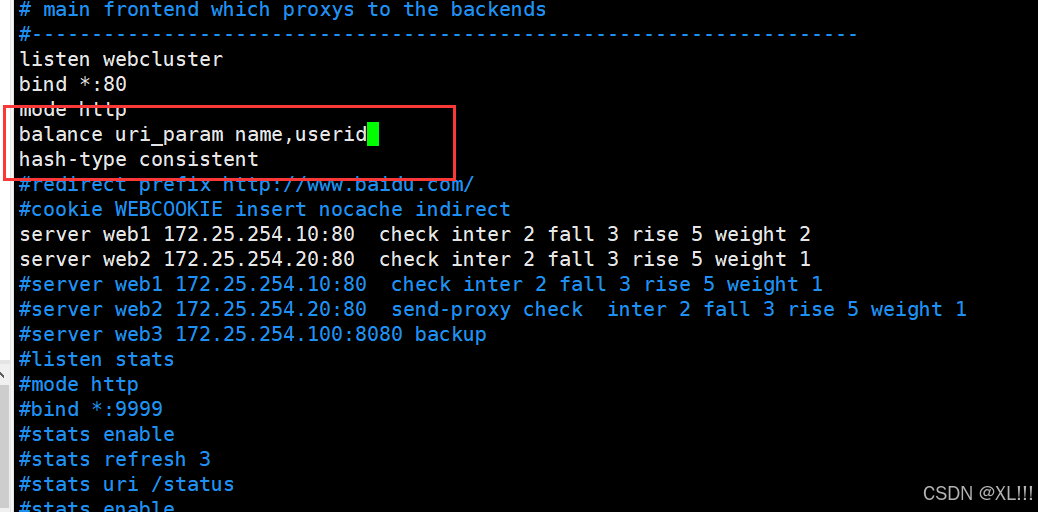
vim /etc/haproxy/haproxy.cfg 编辑配置文件

十、haproxy-haproxy的状态页面监控
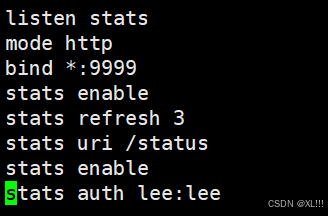
systemctl restart haproxy
记住关闭selinux!! 不然haproxy服务启动不了
访问 172.25.254.100:9999
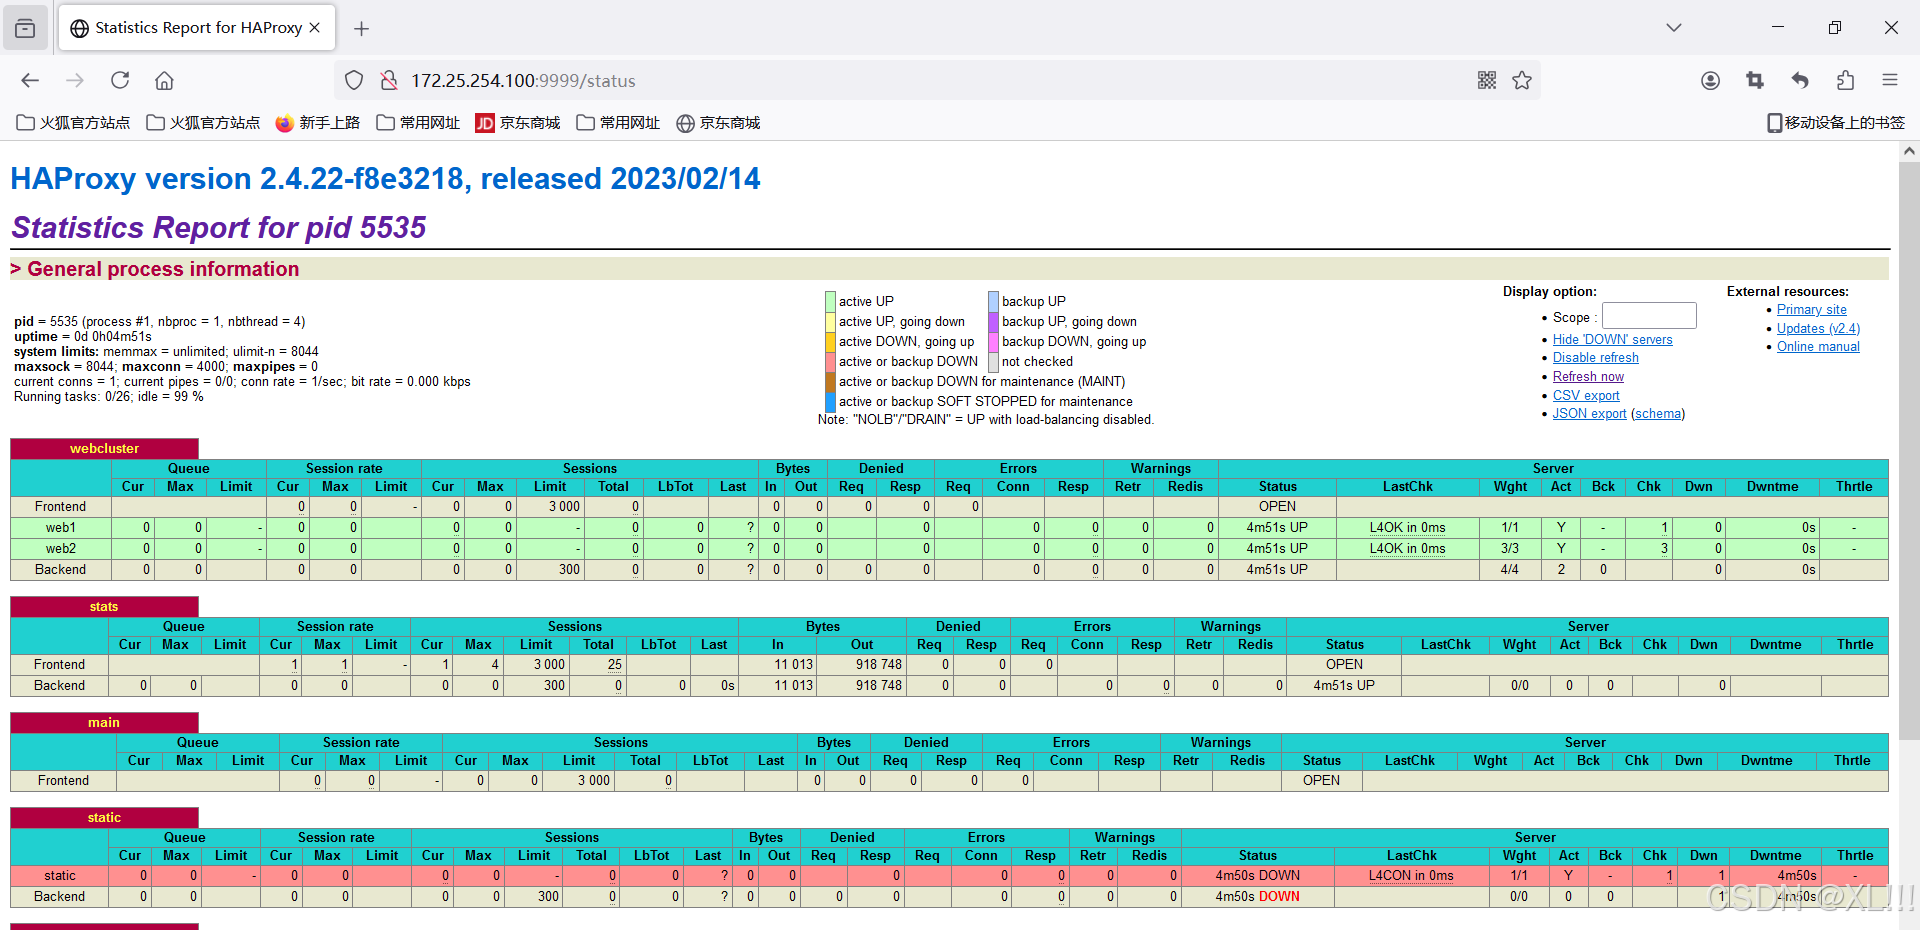
十 一、haproxy-基于cookie的会话保持

curl -b WEBCOOKIE=lee1 172.25.254.100
curl -b WEBCOOKIE=lee1 172.25.254.100
来进行测试
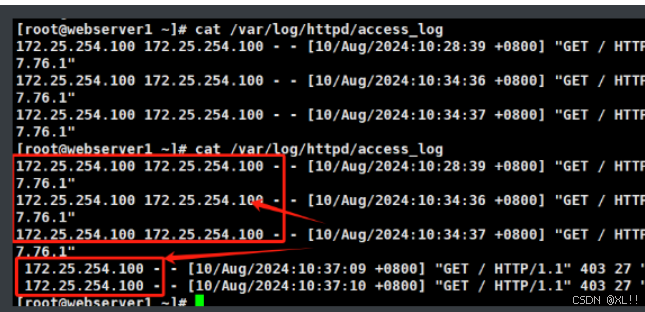
十 二、haproxy-ip透传技术
在web1中下载httpd服务
dnf insatll httpd -y
vim /etc/httpd/conf/httpd.conf

vim /etc/haproxy/haproxy.cfg 编辑配置文件

其中web1为httpd服务 web2为ngnix服务
结果:

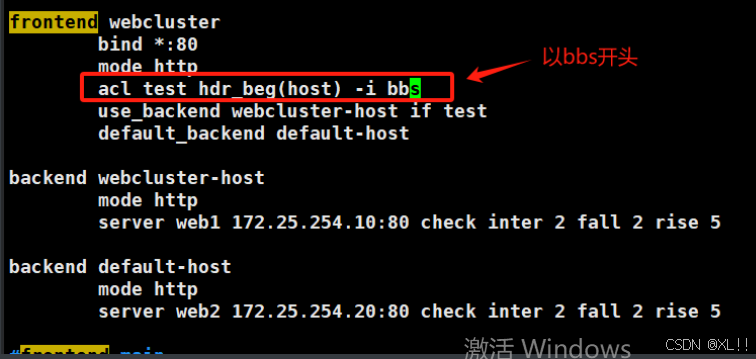
十 三、 haproxy-haproxy的访问控制列表以及利用acl做动静分离等访问控制
以bbs开头:
vim /etc/haproxy/haproxy.cfg 编辑配置文件
在windows中做域名解析
C:\Windows\System32\drivers\etc 的hosts文件中进行更改

测试一下结果:
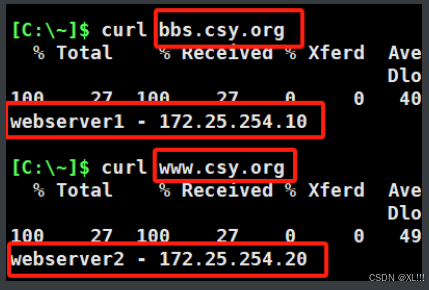
其中web1为httpd服务 web2为ngnix服务
基于域名访问:
vim /etc/haproxy/haproxy.cfg 编辑配置文件
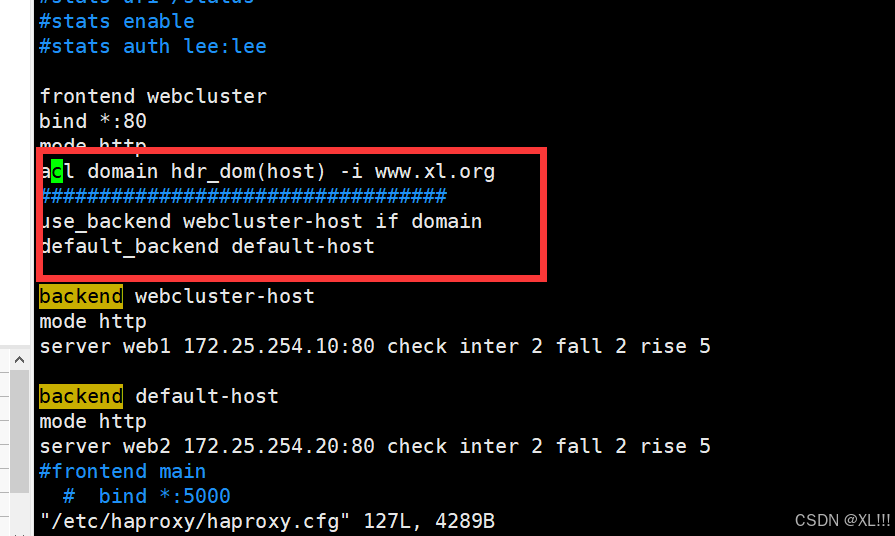
在windows中做域名解析
C:\Windows\System32\drivers\etc 的hosts文件中进行更改

基于ip
vim /etc/haproxy/haproxy.cfg 编辑配置文件

vim /etc/haproxy/haproxy.cfg 编辑配置文件
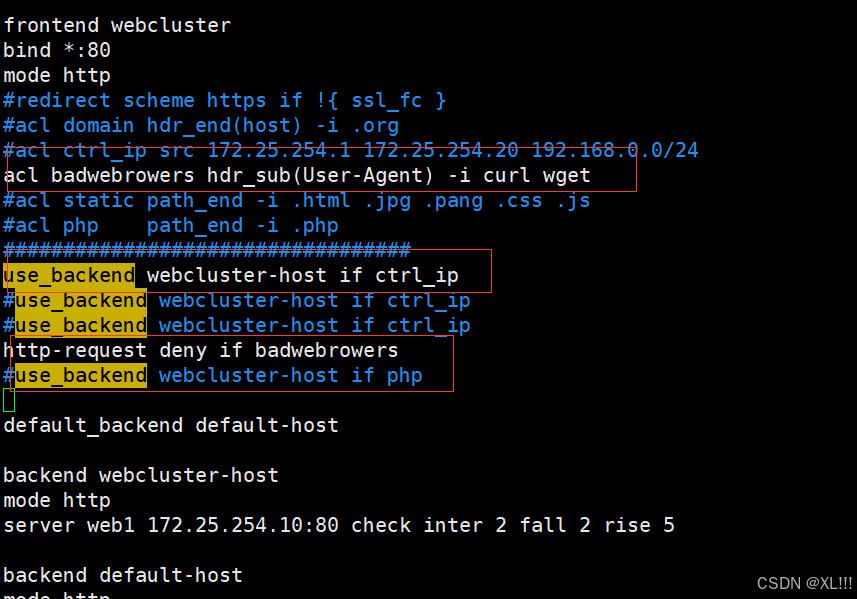
webserver1 中下载php服务
vim /var/www/html/index.php
动静分离:
vim /etc/haproxy/haproxy.cfg 编辑配置文件
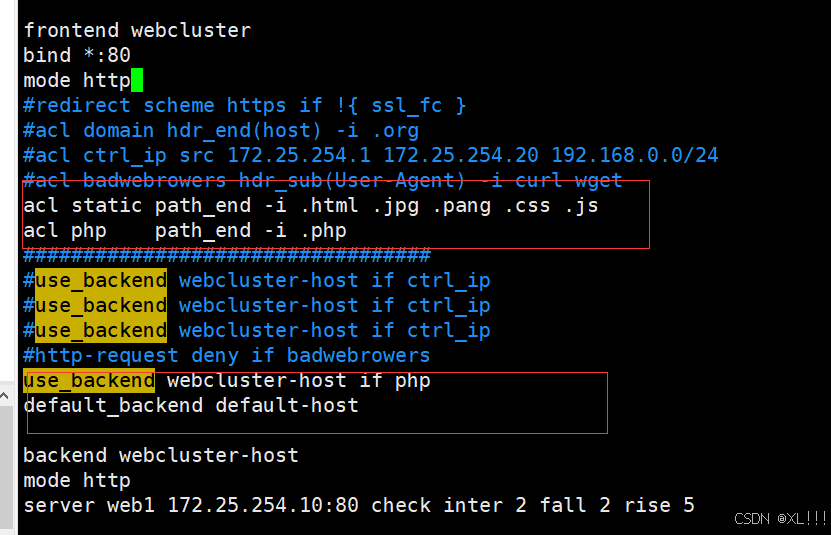
vim /etc/haproxy/haproxy.cfg 编辑配置文件
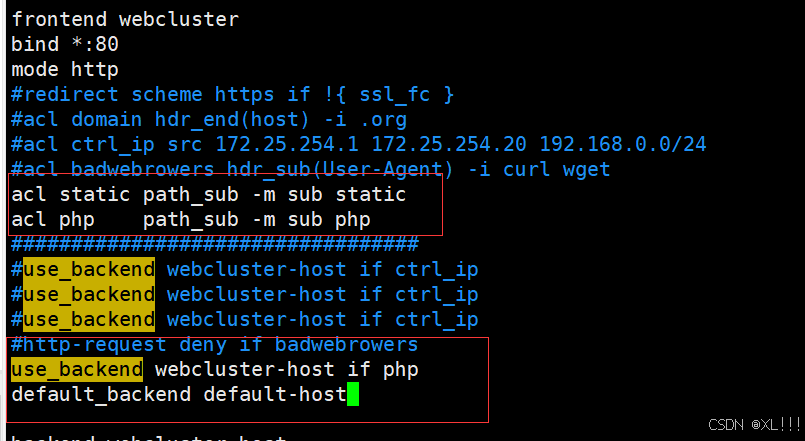
编辑完配置文件后记得重启haproxy服务
十 四、自动错误页面内容
实验思路;
查找一下错误文件在哪里
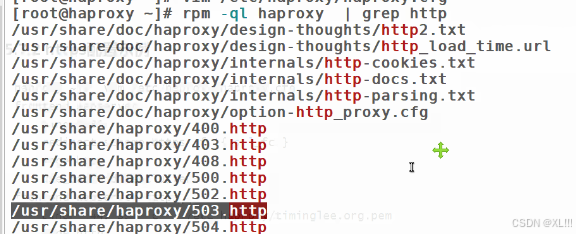
创建一个目录为 /etc/haproxy/errorpage/503.http
mkdir -p /etc/haproxy/errorpage/503.http
然后将/usr/share/haproxy/503.http 中的内容复制在创建的目录中
cp /usr/share/haproxy/503.http /etc/haproxy/errorpage/503.http
vim /etc/haproxy/errorpage/503.http 编辑内容
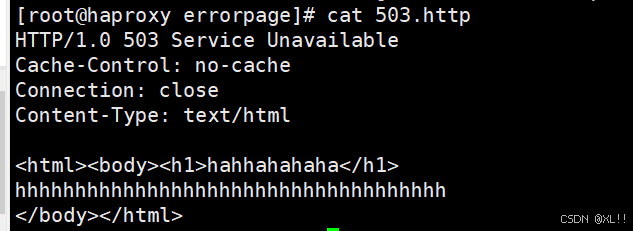
vim /etc/haproxy/haproxy.cfg 编辑配置文件

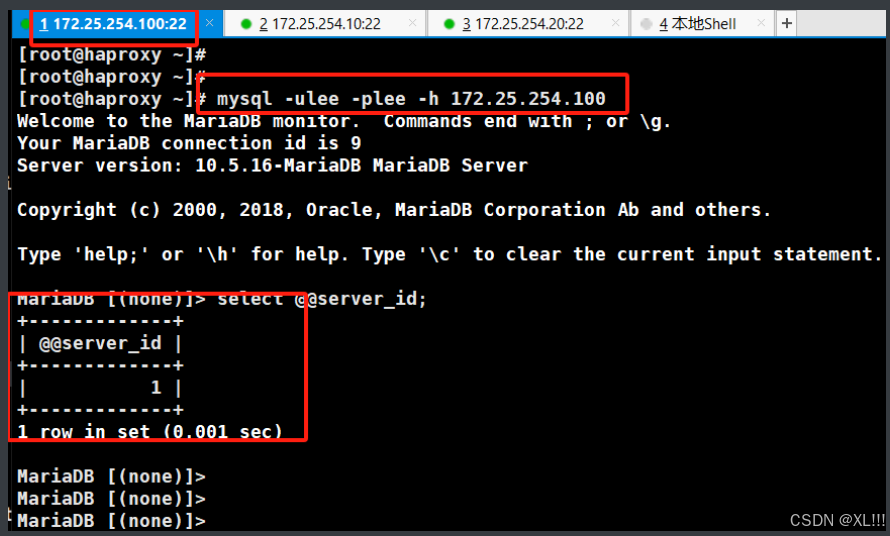
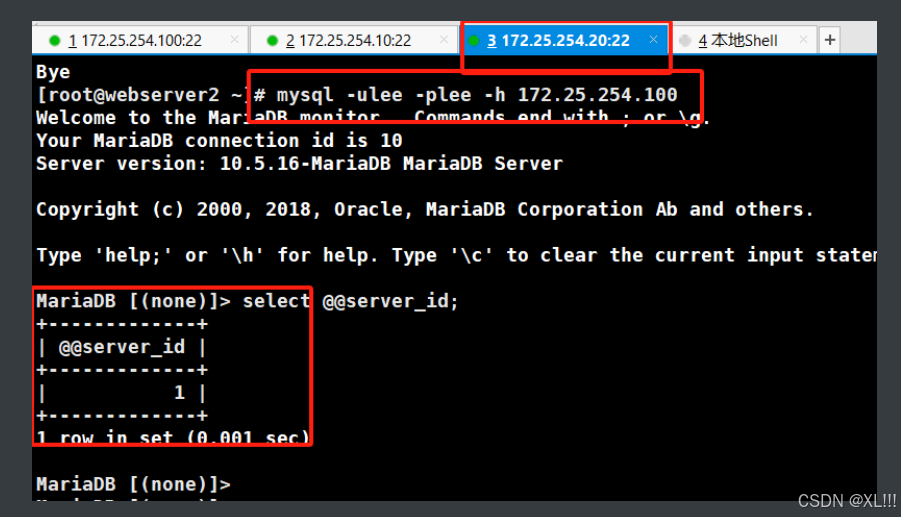
十 五、haproxy-haproxy的四层负载示例
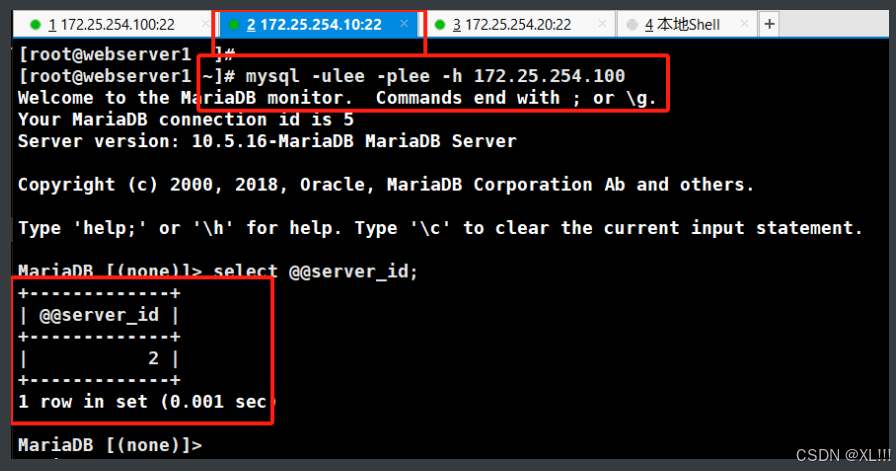
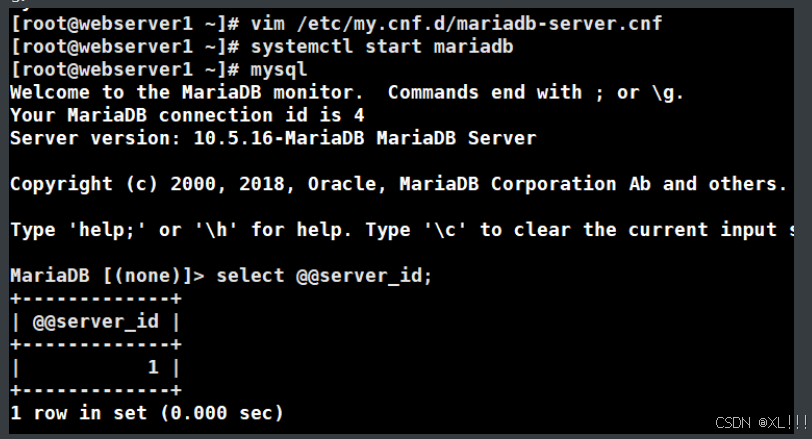
在web1.2分别下载mysql服务:dnf install mariadb -y
dnf install mariadb-server -y
(内包含一个mariadb-server 要存在这个包才可以启动服务)
webserver1:
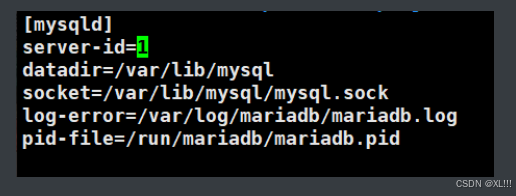
webserver2:
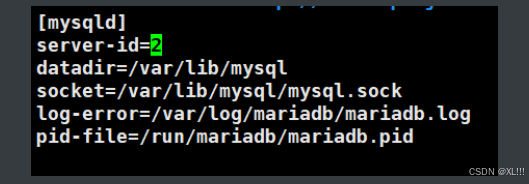
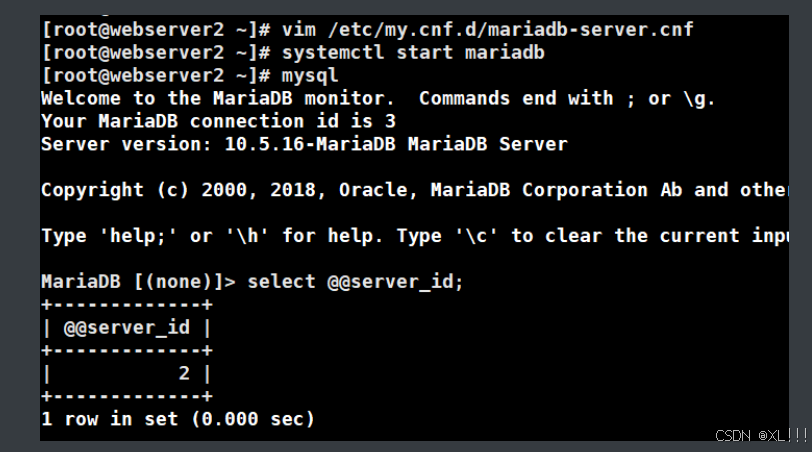
haproxy连接10主机的mysql:

说明没有设置10主机可以远程登录
进行172.25.254.10与172.25.254.20主机远程登录:


vim /etc/haproxy/haproxy.cfg
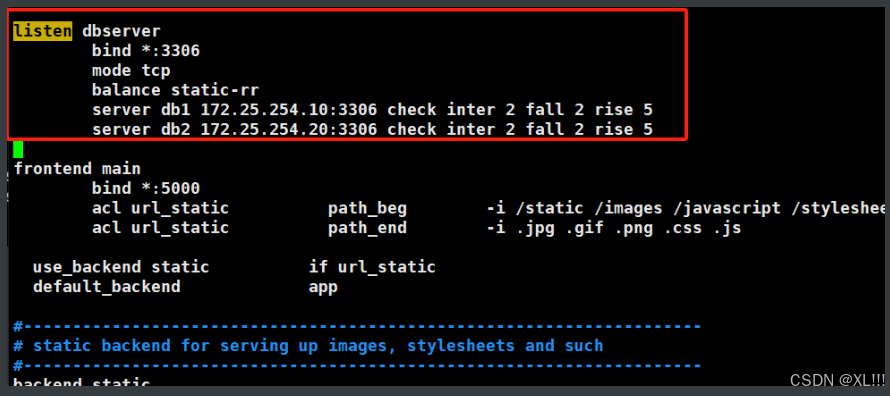

进行依次查看三台主机 会显示rr轮询状态
十 六、haproxy-https加密
1.制作证书
先创建一个目录
mkdir -p /etc/haproxy/certs
制作证书
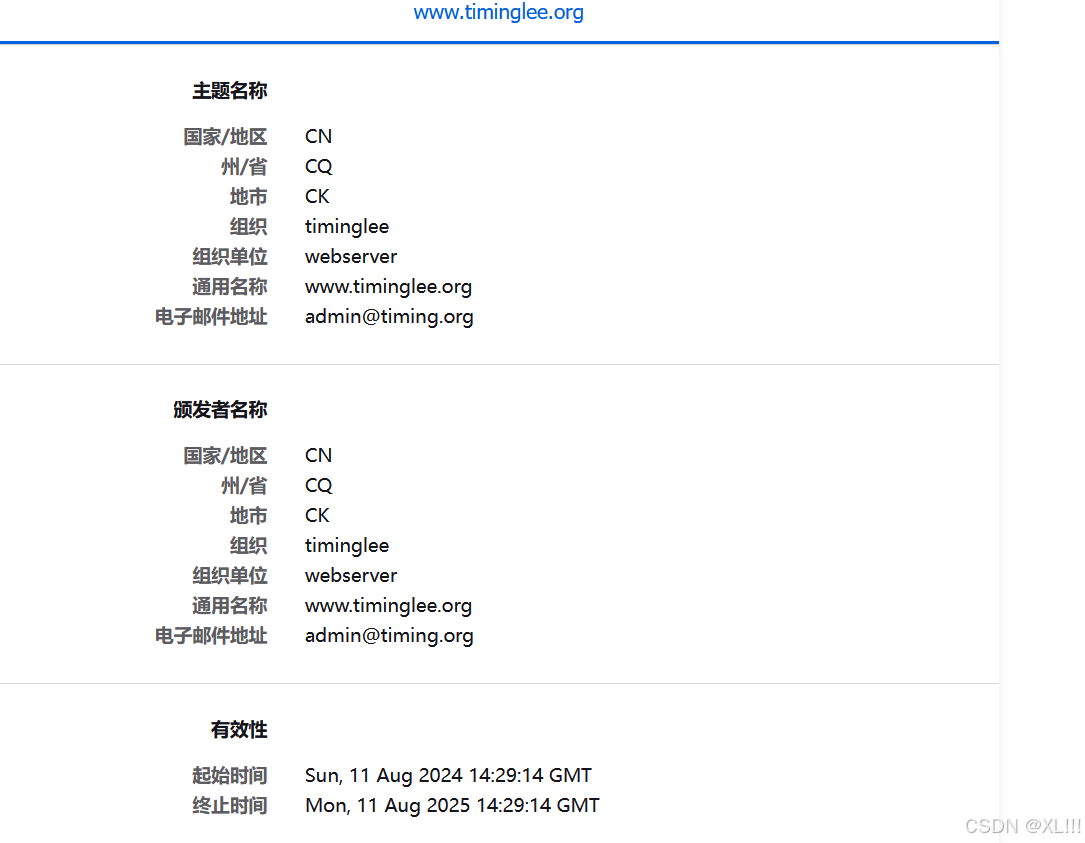
openssl req -newkey rsa:2048 -nodes -sha256 -keyout /etc/haproxy/certs/timinglee.org.key -x509 -days 365 -out /etc/haproxy/certs/timinglee.org.crt
将密钥放在/etc/haproxy/certs/timinglee.pem这个目录下
cat /etc/haproxy/certs/timinglee.org.key /etc/haproxy/certs/timinglee.org.crt > /etc/haproxy/certs/timinglee.pem
编辑配置文件编辑配置文件vim /etc/haproxy/haproxy.cfg :

查看端口:
netstat -antlupe |grep haproxy

重启web1 与web2 的服务
systemctl restart httpd systemctl restart ngnix
访问https://172.25.254.100


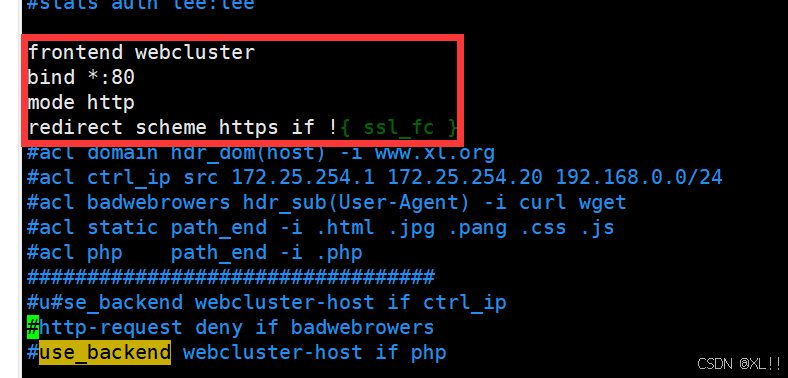
全站加密:
vim /etc/haproxy/haproxy.cfg
systemctl restart haproxy.service
通过http的方式进行访问

会自动跳转到https 这就是全站加密

到这里分享就结束啦!!!

