简介:
小李哥将继续每天介绍一个基于亚马逊云科技AWS云计算平台的全球前沿AI技术解决方案,帮助大家快速了解国际上最热门的云计算平台亚马逊云科技AWS AI最佳实践,并应用到自己的日常工作里。
本次介绍用当下热门的RAG和大语言模型,结合亚马逊云科技热门AI模型管理服务Amazon SageMaker,手把手开发一个用户的个性化推荐系统。本文将通过利用Bloom-7B向量化模型将用户数据文档生成向量,并保存到向量数据库ElasticSearch中,最后利用RAG和部署在SageMaker上的Falcon-7B大语言模型在ElasticSearch中进行语义搜索生成用户个性化建议。我将带领大家编写一步一步的细节代码和展示实际的生成式AI实操项目,0基础学会AI核心技能。本架构设计全部采用了云原生Serverless架构,提供可扩展和安全的AI应用解决方案。本方案架构图如下:

方案实操背景知识
Amazon SageMaker
Amazon SageMaker 是一款亚马逊云科技AWS上的机器学习模型托管服务,旨在帮助开发者和数据科学家快速构建、训练和部署机器学习模型。SageMaker 提供了丰富的工具和功能,如内置的 Jupyter Notebook、自动模型调优和托管训练环境,使整个机器学习工作流程更加简化和高效。
特别值得一提的是 SageMaker 的 JumpStart 功能。JumpStart 提供了一系列预训练模型和机器学习解决方案,用户可以通过简单的界面快速部署这些模型,大大缩短了从实验到生产的时间。这对于那些需要快速验证模型效果或不具备大量机器学习知识的开发者来说尤为有用。
Amazon OpenSearch Service
Amazon OpenSearch Service 是一个亚马逊云科技托管的搜索和分析引擎,基于开源的 Elasticsearch 和 Kibana 构建。OpenSearch Service 提供了强大的数据索引和搜索能力,适用于日志分析、实时应用监控和复杂数据分析等场景。
此外,OpenSearch Service 还支持向量化数据库功能。通过将嵌入的向量数据存储在 OpenSearch Service 中,开发者可以实现高效的相似性搜索和推荐系统。向量化数据库能够处理高维度的数据查询,特别适合需要处理自然语言处理(NLP)和图像识别等任务的应用。
本方案包括的内容:
使用 Amazon SageMaker JumpStart 快速部署向量化模型
在 SageMaker Studio 中使用 Jupyter notebook 处理原始数据
在 Amazon OpenSearch Service 中创建索引并存储向量化数据
使用 OpenSearch Service 探索数据
多场景测试利用检索增强生成(RAG)构建的个性化推荐应用
项目搭建具体步骤:
1. 首先我们进入亚马逊云科技控制台,点击OpenSearch服务

2. 创建一个OpenSeach实例,点击左侧的domain查看创建好的实例

3. 查看OpenSearch实例登录界面的URL

4. 接下来我们进入SageMaker服务,点击Studio ,并打开Studio

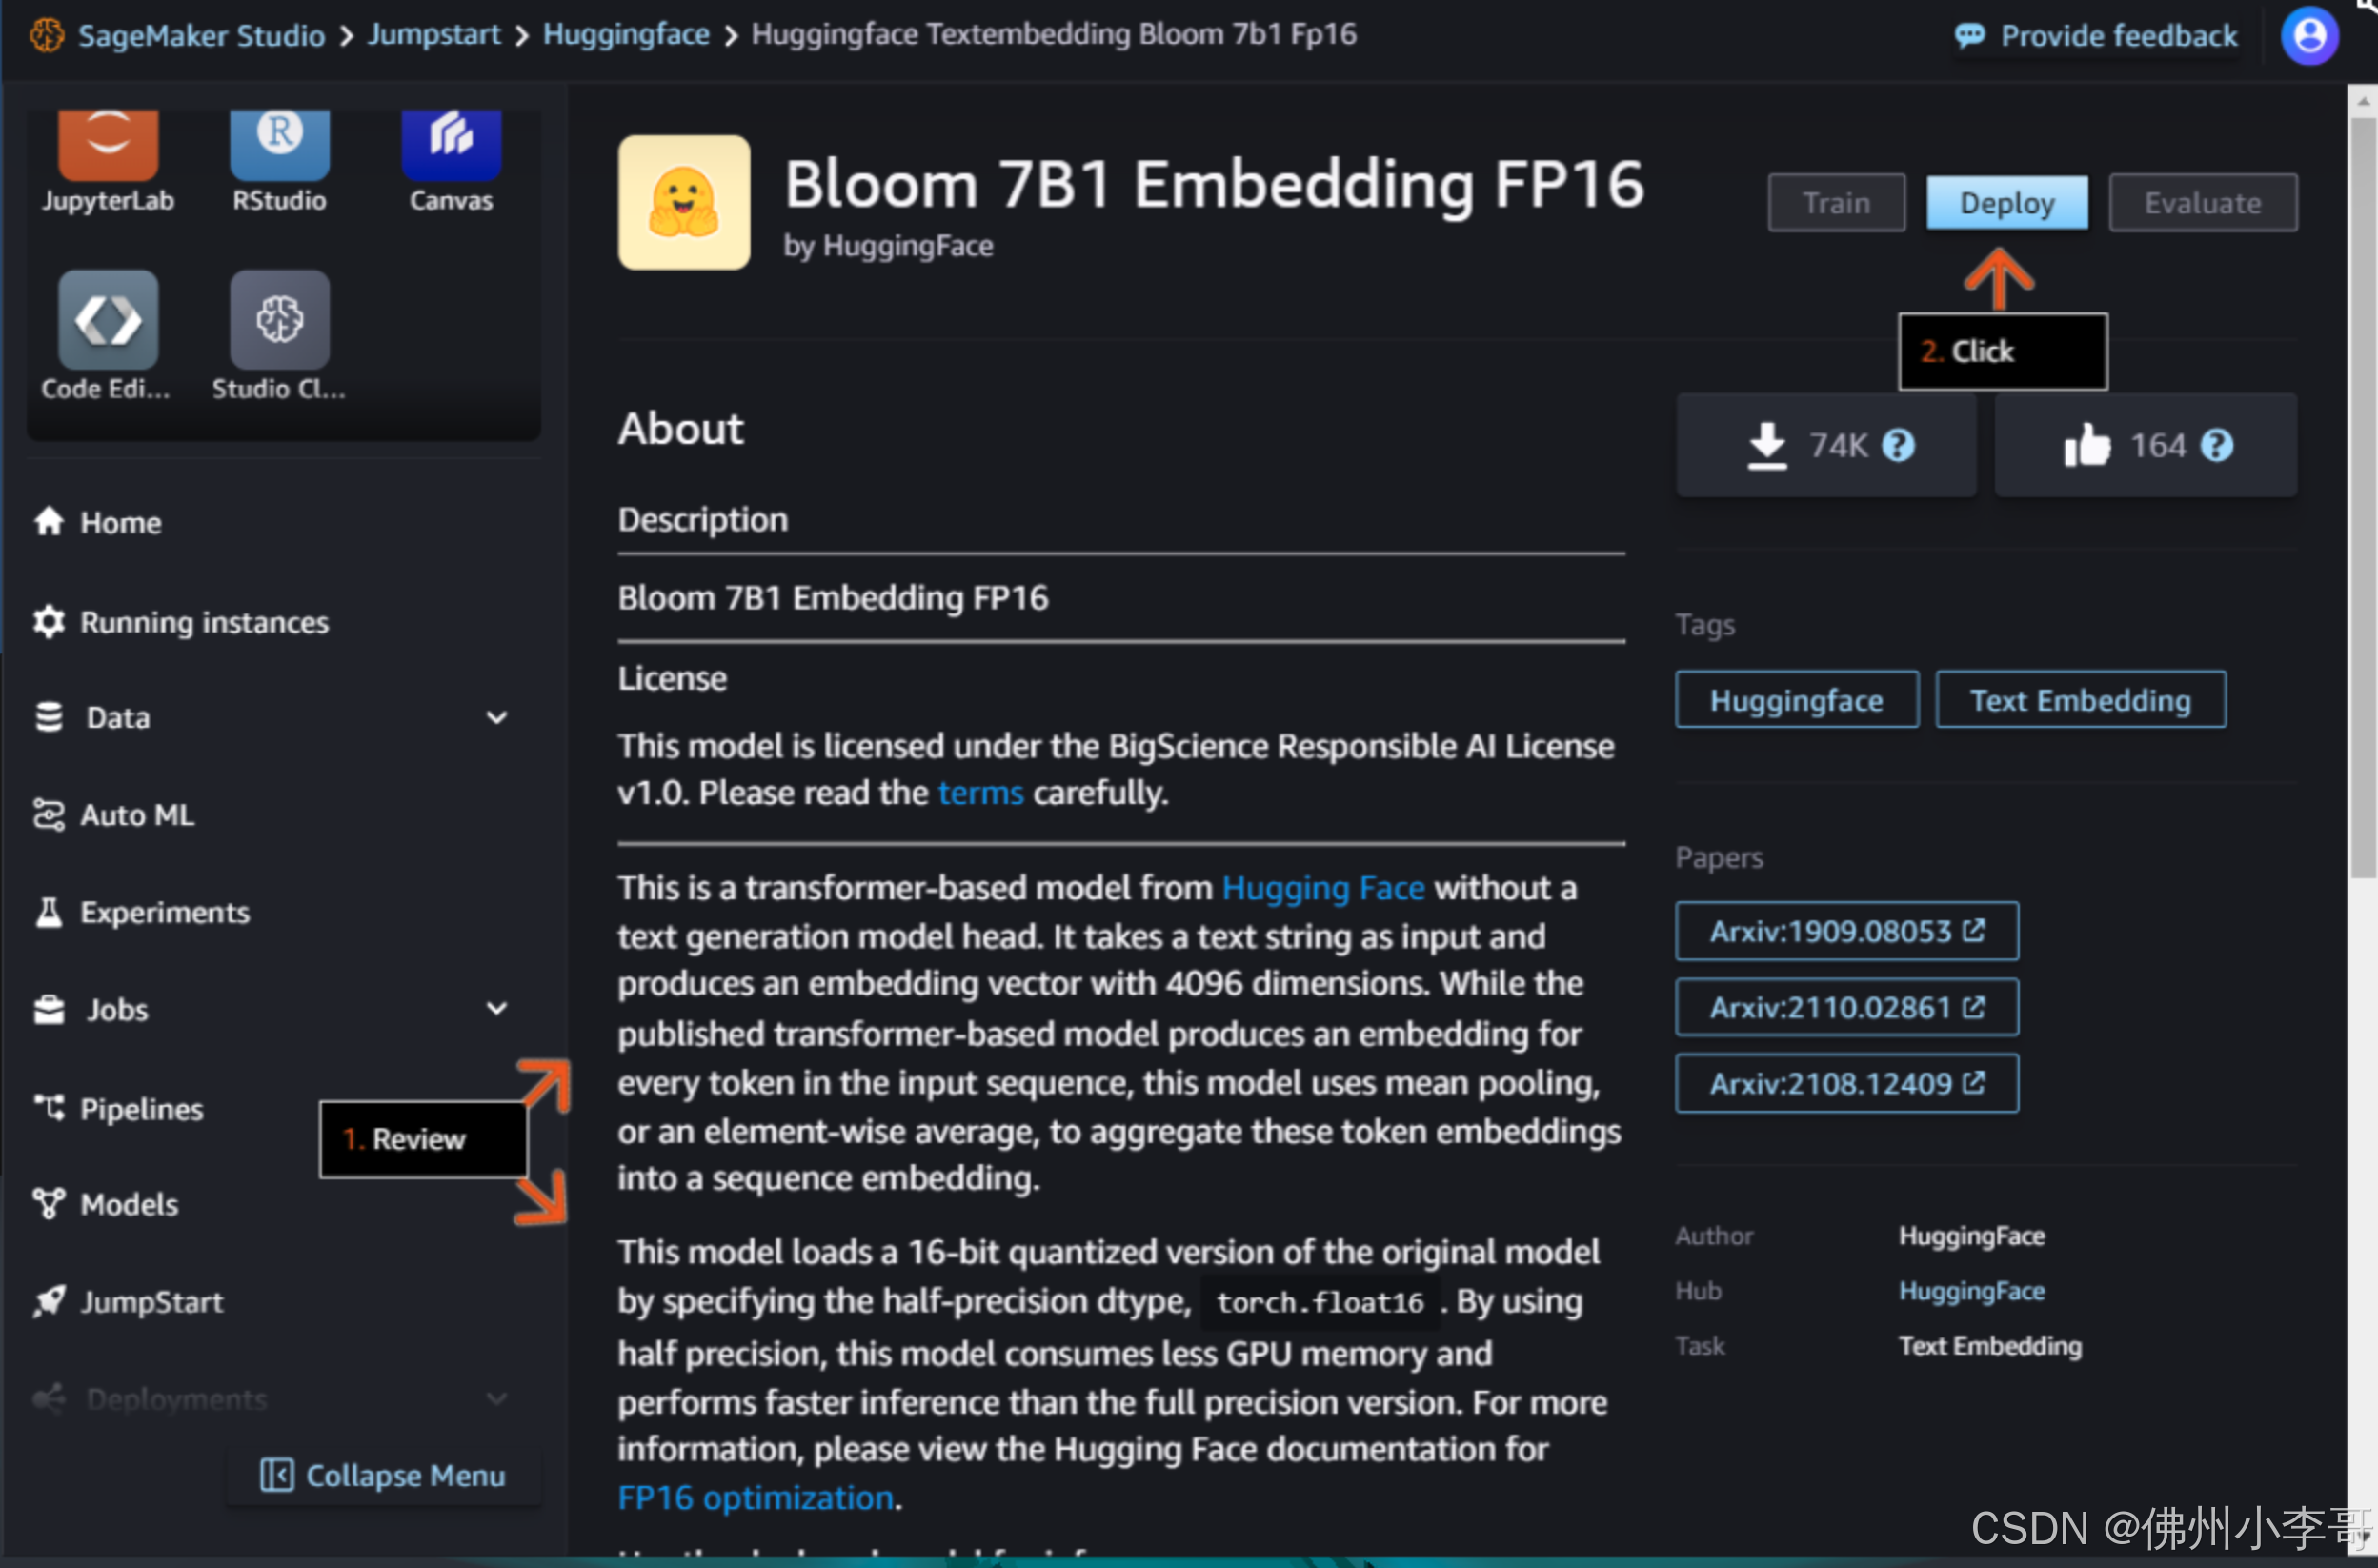
5. 接下来我们进入JumpStart功能,点击HuggingFace,在这里我们可以直接在服务器上部署HuggingFace上的开源大模型

6. 我们点击模型“Bloom 7B1 Embedding FP16”向量模型

7. 点击Deploy部署向量模型

8. 配置参数后部署
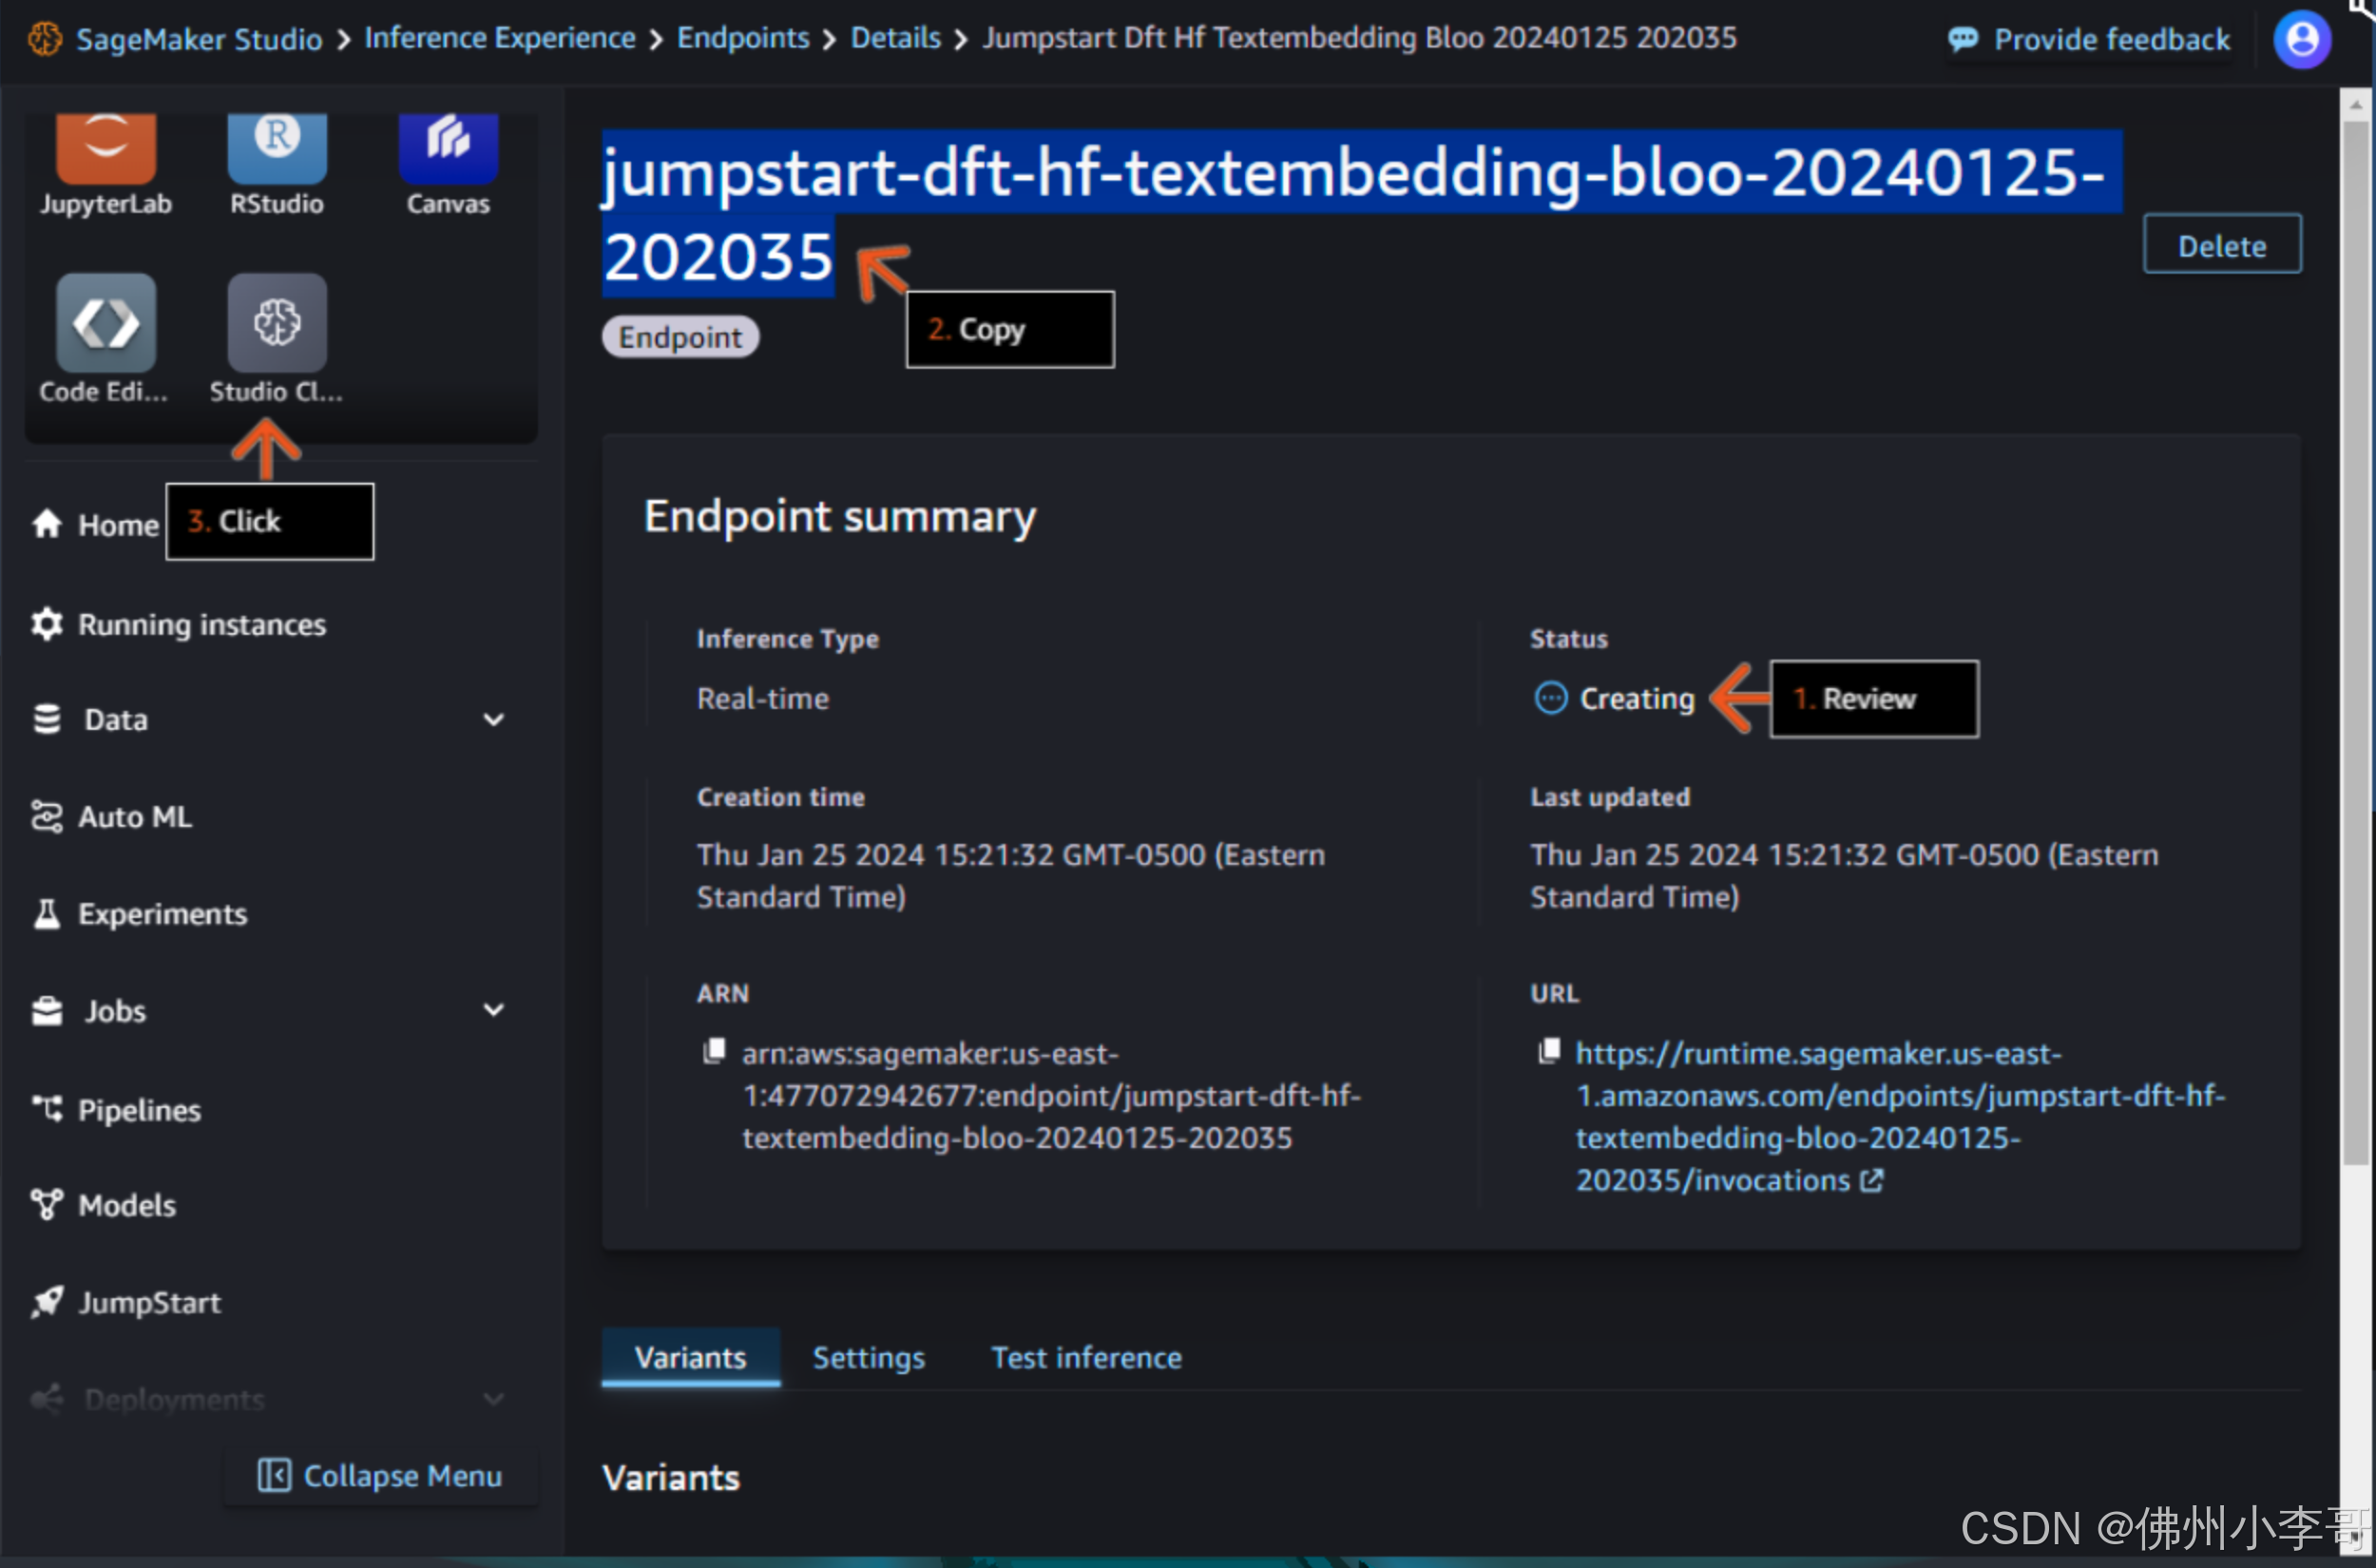
 9. 模型部署时间约为5分钟,这时我们点击Studio Classic进入Jupyter Notebook

10. 点击Open打开Notebook

11. 我们打开一个新的Notebook,开始编写我们的RAG个性化推荐系统服务,首先我们安装并导入必要模块
%%capture ## Code Cell 1 ## !pip install opensearch-py-ml accelerate tqdm --quiet !pip install sagemaker --upgrade --quiet ## Code Cell 3 ## import boto3 import os import time import json import pandas as pd from tqdm import tqdm import sagemaker from opensearchpy import OpenSearch, RequestsHttpConnection from sagemaker import get_execution_role 12. 接下来我们从文件中导入我们推荐系统的源数据文件
## Code Cell 4 ## # Read in the Tab delimited data file and print the shape of the resulting data frame. pd.options.mode.chained_assignment = None df = pd.read_csv('booksummaries.txt',sep='\t') print(df.shape) # Add columns headers to the data frame to be able to analyze. df.columns = ['WikiPediaId','FreeBaseId','title','author','pub_date','genres','plot_summary'] # Display entries with null data in any column (NaN). df[df.isnull().any(axis=1)] 13. 接下来我们运行下面的代码对数据进行处理,删除不需要的列、字符,并丢弃确实数据的行
## Code Cell 5 ## # Let's drop any rows that contain null values in any column. In a real production application you would want to replace NaN values with correct data. df_1 = df.dropna() # clean-up Freebase markup and other unwanted characters in the Genres columm. df_1.genres.replace(to_replace='\"\/m\/.{4,7}\"\:', value='', regex=True,inplace=True) # remove Freebase markup df_1.genres.replace(to_replace='\\\\u00e0\sclef', value='', regex=True,inplace=True) # remove utf-8 special characters df_1.genres.replace(to_replace='\{\s"|"\}', value='', regex=True,inplace=True) # Remove {" or "} df_1.genres.replace(to_replace='"', value='', regex=True,inplace=True) # Remove double quotes # Only use the first value as the genre df_2 = df_1['genres'].str.split(',', expand=True, n=1) df_2.rename( columns={0:'genre'}, inplace=True ) df_2.drop(columns=[1],inplace=True) df_3 = pd.concat([df_1, df_2], axis=1) # Trim the size of the plot summary to 500 characters. df_3['plot_summary'] = df_3['plot_summary'].apply(lambda x: ' '.join(x[:500].split(' ')[:-1]) if len(x) > 500 else x) df_3['book_summary'] = df_3[['title','author','genre','plot_summary']].agg(' '.join, axis=1) # Sort by the author column, and to keep the lab within a reasonable time-frame drop the last 5000 rows of data. # Drop other columns not needed. df_3.sort_values(by=['author'],inplace = True) df_3.drop(df_3.tail(5000).index,inplace = True) df_3.drop(columns=['genres','WikiPediaId','FreeBaseId','plot_summary'],inplace=True) # Create a dictionary of the remaining data to be used for further processing. wm_list = df_3.to_dict('records') # Let's look at the data now that it has been cleansed and trimmed. df_314. 接下来我们通过授权,建立和OpenSearch集群的连接
## Update the below <StackName> placeholder with the value from your Lab you copied in an earlier step. cloudformation_stack_name = 'LabStack-be9ce4b8-cc71-4dda-bfee-6024c60bb194-udbRjk1euELCeKsbKMeE2y-0' region = 'us-east-1' cfn = boto3.client('cloudformation') def get_cfn_outputs(stackname): outputs = {} for output in cfn.describe_stacks(StackName=stackname)['Stacks'][0]['Outputs']: outputs[output['OutputKey']] = output['OutputValue'] return outputs outputs = get_cfn_outputs(cloudformation_stack_name) aos_host = outputs['OSDomainEndpoint'] outputs ## To authenticate to the OpenSearch domain we need to retrieve username and password stored in Secrets Manager. secrets = boto3.client('secretsmanager') os_domain_secret = secrets.list_secrets( Filters=[ { 'Key':'name', 'Values': ['DomainMasterUser'] } ] )['SecretList'][0]['Name'] aos_credentials = json.loads(secrets.get_secret_value(SecretId=os_domain_secret)['SecretString']) auth = (aos_credentials['username'], aos_credentials['password']) print(auth) ## The below client will be used in a later step below. aos_client = OpenSearch( hosts = [{'host': aos_host, 'port': 443}], http_auth = auth, use_ssl = True, verify_certs = True, connection_class = RequestsHttpConnection )15. 下面我们定义调用SageMaker将文字转化为向量的函数"query_endpoint_with_json_payload"
## Code Cell 8 ## embedding_endpoint_name = 'jumpstart-dft-hf-textembedding-bloo-20240804-035651' def query_endpoint_with_json_payload(encoded_json, endpoint_name, content_type="application/json"): client = boto3.client("runtime.sagemaker") response = client.invoke_endpoint( EndpointName=endpoint_name, ContentType=content_type, Body=encoded_json ) response_json = json.loads(response['Body'].read().decode("utf-8")) embeddings = response_json["embedding"] if len(embeddings) == 1: return [embeddings[0]] return embeddings 16. 接下来我们定义OpenSearch中的索引,用于更精准的搜索文档里的内容,这里我们定义了保存字段的类型,以及索引算法k-NN
## Code Cell 11 ## knn_index = { "settings": { "index.knn": True, "index.knn.space_type": "cosinesimil", "analysis": { "analyzer": { "default": { "type": "standard", "stopwords": "_english_" } } } }, "mappings": { "properties": { "booksummary_vector": { "type": "knn_vector", "dimension": 4096, "store": True }, "book_summary": { "type": "text", "store": True }, "author": { "type": "text", "store": True }, "title": { "type": "text", "store": True }, "pub_date": { "type": "text", "store": True }, "genre": { "type": "text", "store": True }, } } } 17. 我们可以用如下代码,验证和获取我们之前定义的索引
## Code Cell 13 ## aos_client.indices.get(index=index_name)18. 接下来我们把之前处理过的文档内的数据导入到OpenSearch索引当中
## Code Cell 14 ## def os_import(record, aos_client, index_name): book_summary = record["book_summary"] search_vector = embed_phrase(book_summary) aos_client.index(index=index_name, body={"booksummary_vector": search_vector[0], "book_summary": record["book_summary"], "author":record["author"], "genre":record["genre"], "pub_date":record["pub_date"], "title":record["title"] } ) print("Loading records...") for record in tqdm(wm_list): os_import(record, aos_client, index_name) print("Records loaded.")19. 打开我们之前在第3步获取的OpenSearch URL,并输入用户名和密码
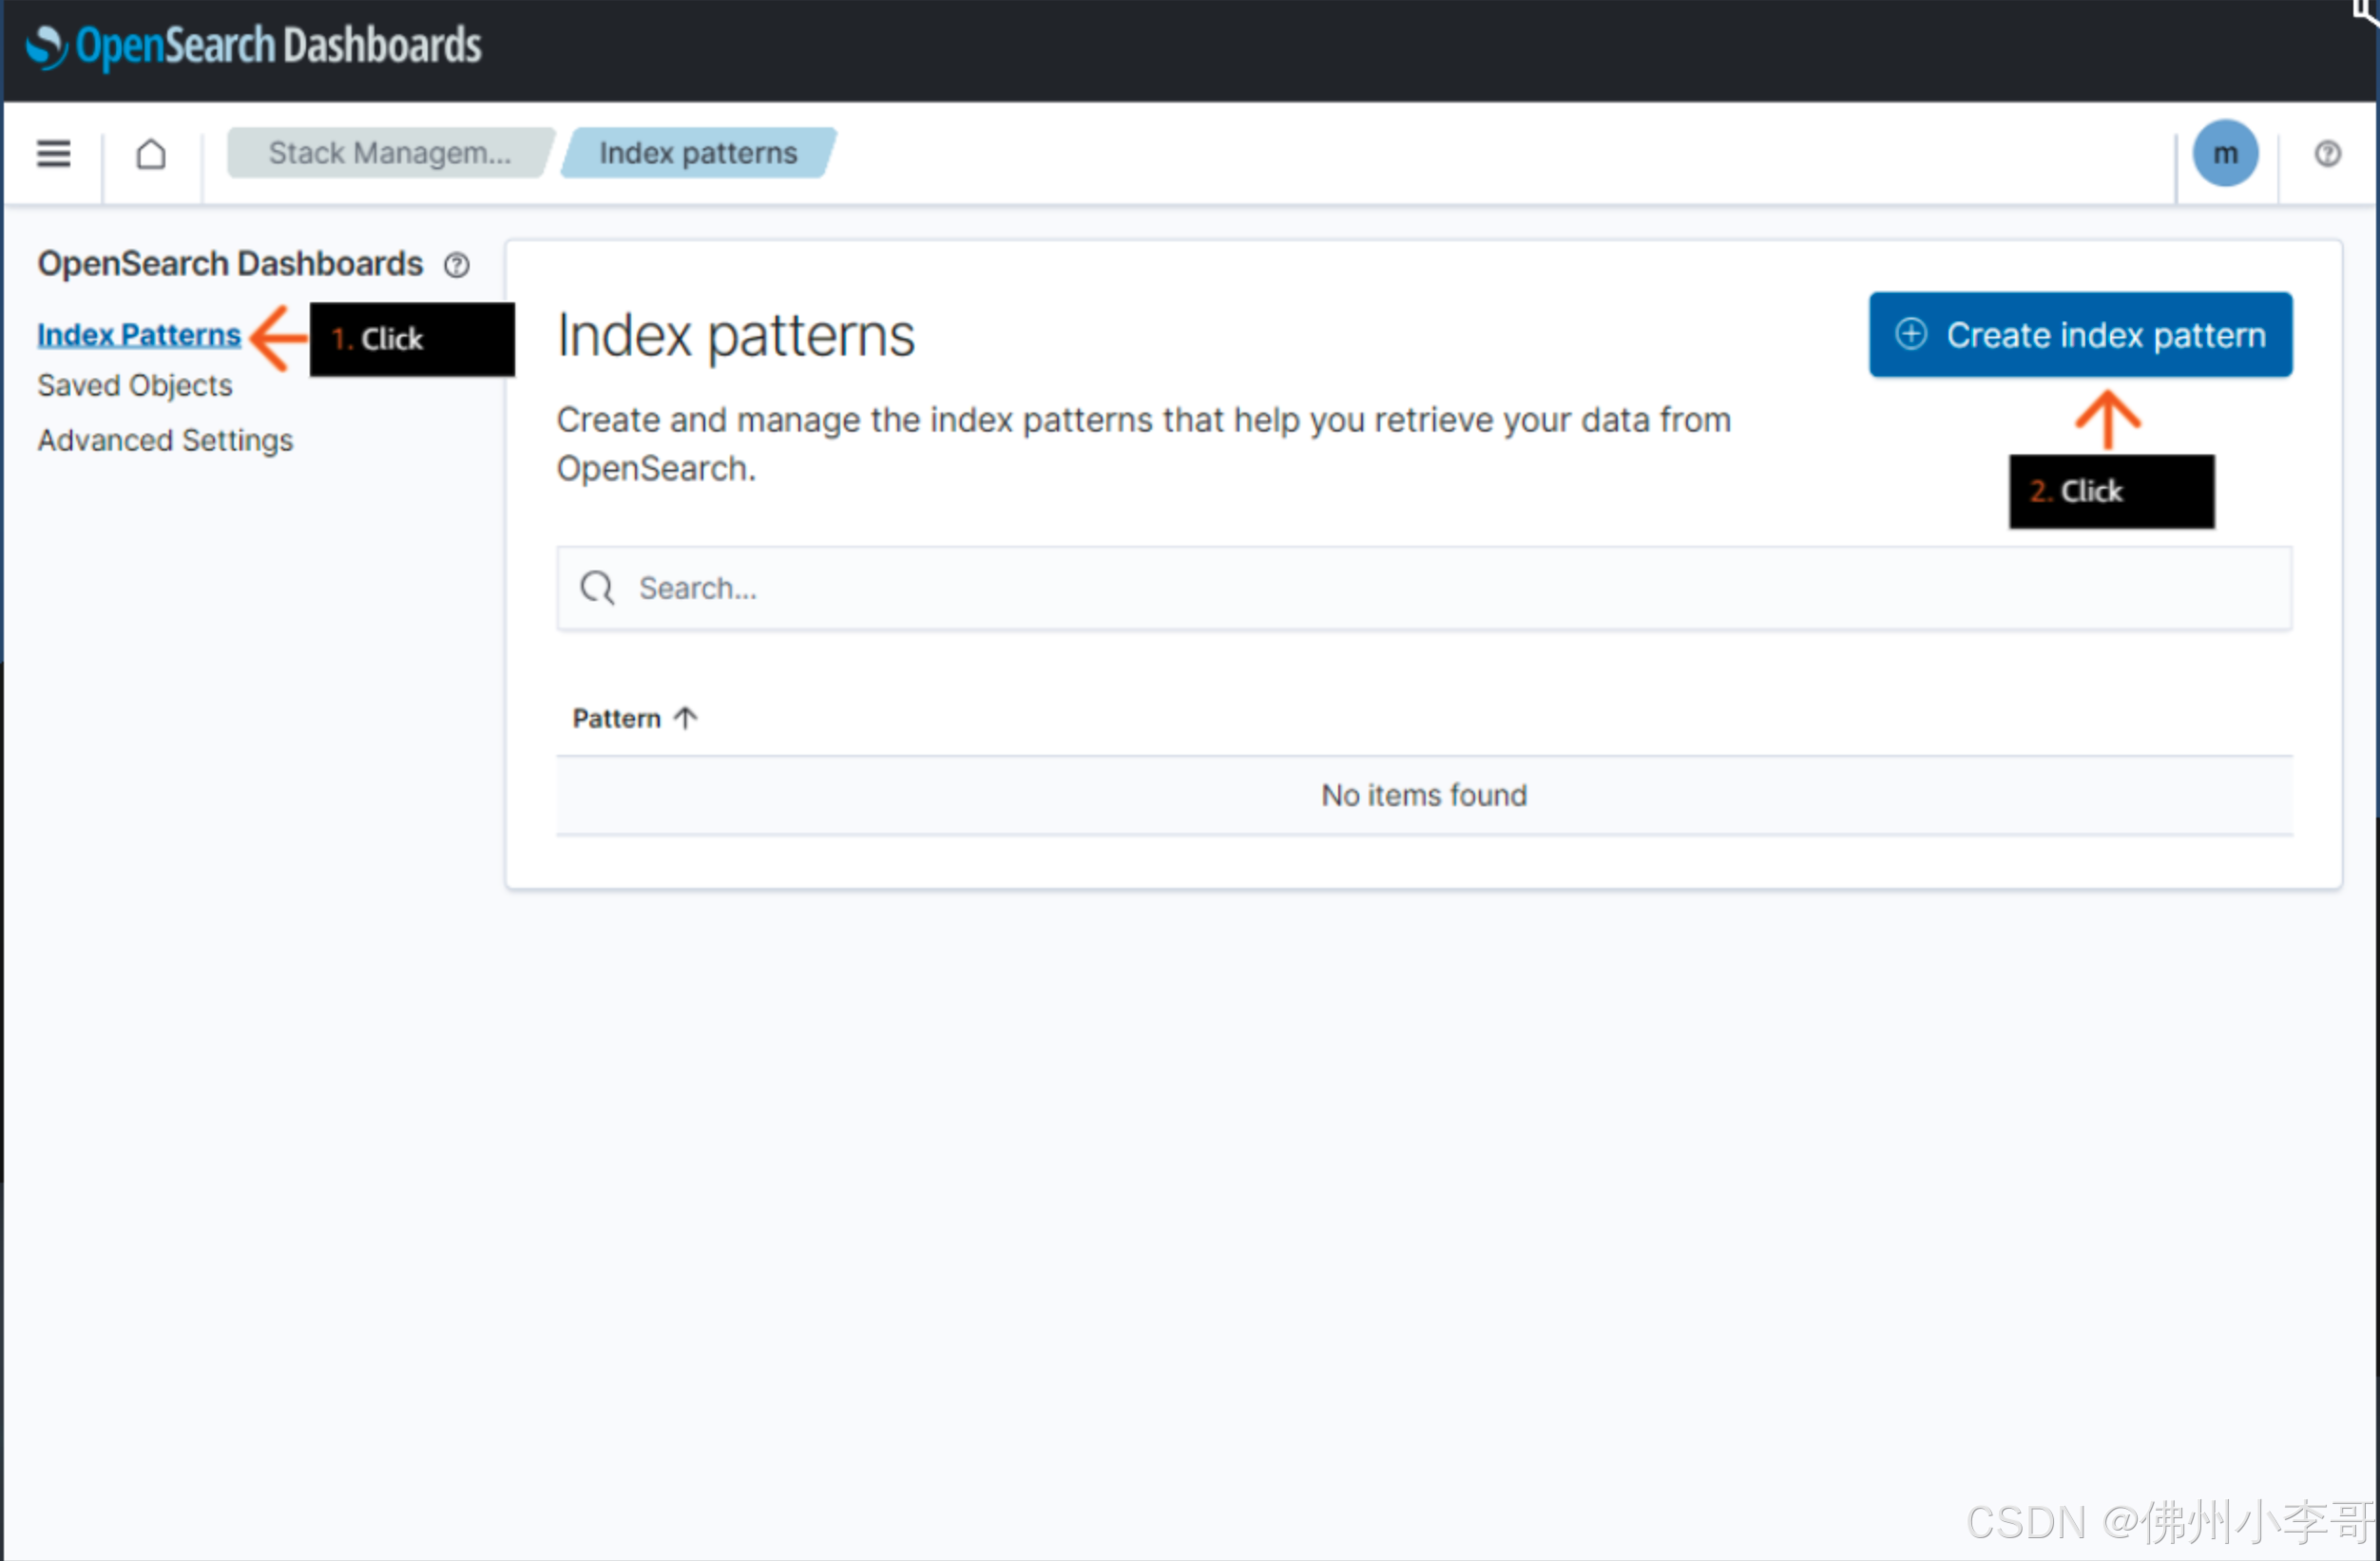
 20. 进入OpenSearch界面中的Stack Management,点击创建索引类型
 21. 为索引类型起一个名字“book_knowledge_base”

22. 点击创建

23. 在OpenSearch中点击Discover即可看到我们导入的文档数据

24. 接下来我们定义在OpenSearch中进行近似语义搜索的函数“retrieve_opensearch_with_semantic_search”
## Code Cell 16 ## def retrieve_opensearch_with_semantic_search(phrase, n=2): search_vector = embed_phrase(phrase)[0] osquery={ "_source": { "exclude": [ "booksummary_vector" ] }, "size": n, "query": { "knn": { "booksummary_vector": { "vector":search_vector, "k":n } } } } res = aos_client.search(index=index_name, body=osquery, stored_fields=["title","author","pub_date", "genre", "book_summary"], explain = True) top_result = res['hits']['hits'][1] result = { "title":top_result['_source']['title'], "author":top_result['_source']['author'], "pub_date":top_result['_source']['pub_date'], "genre":top_result['_source']['genre'], "book_summary":top_result['_source']['book_summary'], } return result 25. 接下来我们运行该函数进行测试,搜索我们输入的内容在文档数据源中进行语义搜索,找到推荐的书籍。我们的问题是:“一本由埃德加·赖斯·巴勒斯(Edgar Rice Burroughs)撰写的、属于科幻类型且涉及人猿泰山的书。”
## Code Cell 17 ## example_request = retrieve_opensearch_with_semantic_search(question_on_book) print(question_on_book) print(example_request)26. 接下来我们定义函数,利用RAG在OpenSearch中进行语义搜索找到相关结果,在用大模型生成最终回复
## Code Cell 21 ## def generate_prompt_to_llm(original_question_on_book): retrieved_documents = retrieve_opensearch_with_semantic_search(original_question_on_book) print("retrieved relevant book per your query is : \n" + str(retrieved_documents)) print("------------") one_shot_description_example = "{'book_summary': 'Tarzan tracks down a man who has been mistaken for him. The man is under the delusion that he is Tarzan, and he is living in a lost city inhabited by people descended from early Portuguese explorers. The plot devices of a lost city and a Tarzan double or impostor had been used by Burroughs in some previous Tarzan novels.', 'author': 'Edgar Rice Burroughs', 'title': 'Tarzan and the Madman', 'genre': 'Science fiction', 'pub_date': '1964'}" one_shot_response_example = "It's a real page turning story about Tarzan and how a madman has been impersonating him. The author is Edgar Rice Burroughs and it's a science fiction book with adventure and lots of fun. It was published in the year 1964." prompt = ( f" Make a book recommendation that is similar to the {original_question_on_book} The recommendation must include the title of the book, the author and genre: \n" f"Data: {one_shot_description_example} \n Recommendation: {one_shot_response_example} \n" f"Data: {retrieved_documents} \n Recommendation:" ) return prompt27. 最后我们定义函数设计大模型输入和输出的格式,得到最终的推荐结果。
## Code Cell 22 ## def generate_llm_input(data, **kwargs): default_kwargs = { "num_beams": 5, "no_repeat_ngram_size": 3, "do_sample": True, "max_new_tokens": 100, "temperature": 0.9, "watermark": True, "top_k": 200, "max_length": 200, "early_stopping": True } default_kwargs = {**default_kwargs, **kwargs} input_data = { "inputs": data, "parameters": default_kwargs } return input_data def query_llm_with_rag(description, **kwargs): prompt = generate_prompt_to_llm(description) query_payload = generate_llm_input(prompt, **kwargs) response = query_llm_endpoint_with_json_payload(json.dumps(query_payload).encode("utf-8"), endpoint_name=llm_endpoint_name) return response ## Code Cell 23 ## recommendation = query_llm_with_rag(question_on_book) print(question_on_book) print(recommendation)以上就是在亚马逊云科技上使用RAG和部署在SageMaker上大语言模型构建个性化推荐服务系统的步骤。欢迎大家关注小李哥,未来获取更多国际前沿的生成式AI开发方案!
