Kickstart自动安装脚本制作
环境安装
企业7.9 图形界面 后续高版本需要收费,没有装图形 可以用 yum group install "Sever with GUI" -y
1.确定实验环境
# 主机 rhel7.9版本 主机名 node1
# IP 172.25.254.113
# 没有开图形界面可以使用 init 5命令
0-6表示级别
0 表示关机 6表示关机
1表示单用户 2表示无网络的多用户模式
3、4表示有网络的多用户模式 5表示图形模式
#查看自己的版本
[root@pex ~]# hostnamectl
Static hostname: pex
Icon name: computer-vm
Chassis: vm
Machine ID: 4aec85ebcdca4b7eb42aaf51aae72957
Boot ID: 298879e8617a4cd2ab95eced7389b4ac
Virtualization: vmware
Operating System: Red Hat Enterprise Linux Server 7.9 (Maipo)
CPE OS Name: cpe:/o:redhat:enterprise_linux:7.9:GA:server
Kernel: Linux 3.10.0-1160.el7.x86_64
Architecture: x86-64
2.#关闭VMware dhcp功能,后续搭建dhcp服务器测试自动安装写的脚本,确保自动安装得到的IP从我们采用kickstart编写的脚本中获取
3.# 检查网络的可用性
4.# 确保火墙关闭,httpd服务开启,软件仓库正常运行
在rhel7系统中提供图形的kickstart制作方式
安装步骤
# 安装图形化生成Kickstart自动安装脚本的工具
[root@pex ~]# yum install system-config-kickstart#启动该工具
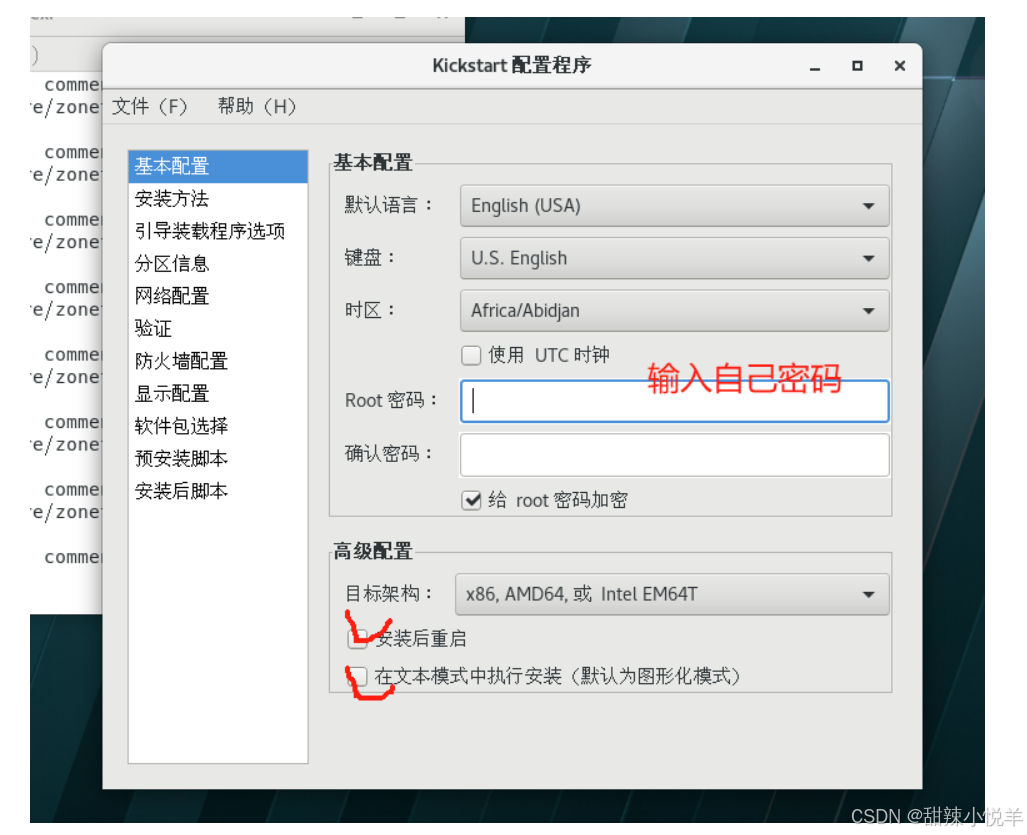
[root@pex ~]# system-config-kickstart
接着进行以下操作:

# 启动apache
[root@pex ~]#sysstemctl enable --now httpd
# 看挂在文件
[root@pex ~]#df -h# 实现资源共享 软连接到/var/www/html上
[root@pex ~]# ln -s /rhel7/ /var/www/html
此时可以通过网络访问/rhel7下的资源


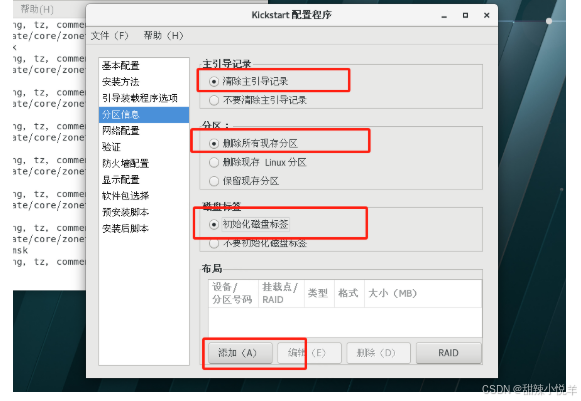

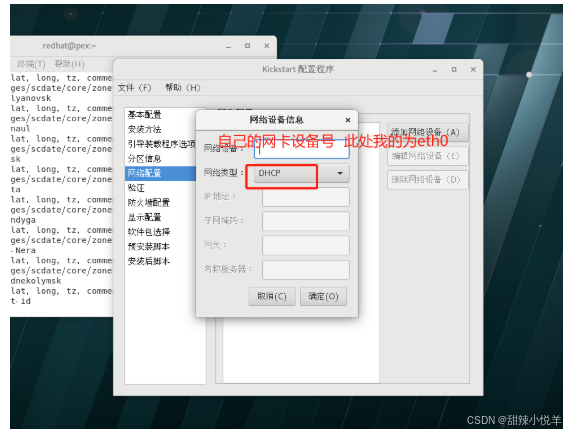


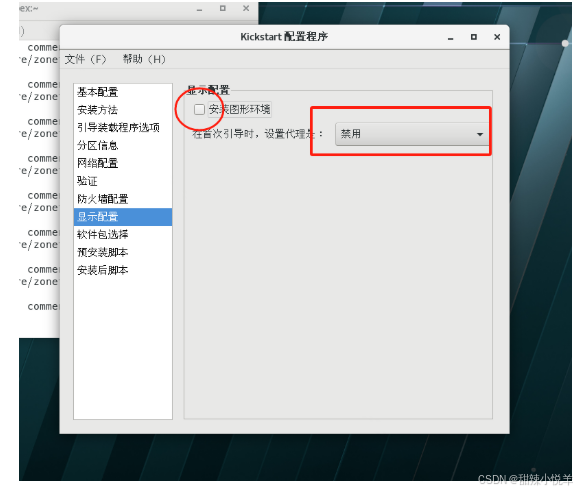

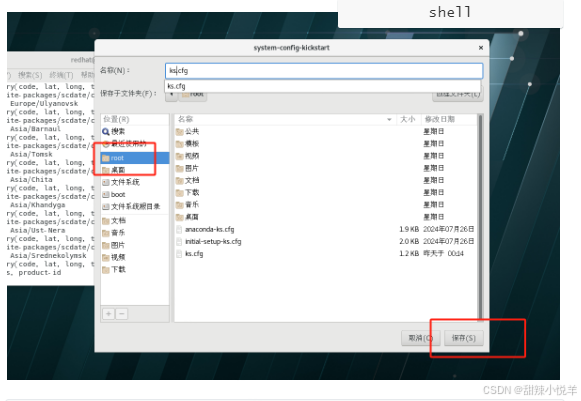
# 查看图形配置的脚本情况
[root@pex ~]# vim ks.cfg#补充软件包
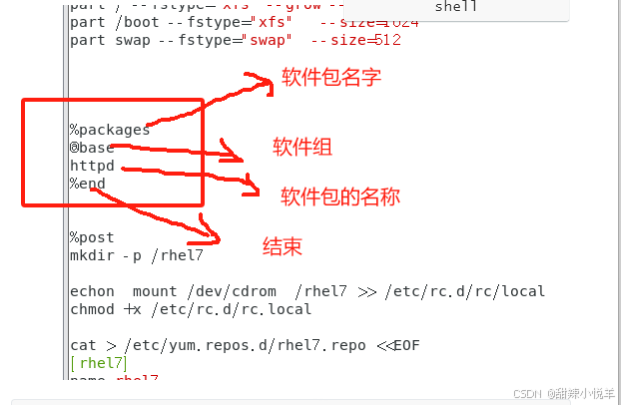
#启动
[root@pex ~]# ksvalidator ks.cfg
测试
新建一个7.9虚拟机在下面页面时候,按Tab键输入面命令: ks=//http:/172.25.254.113/ks.cfg
dhcp服务为其他服务器分配Ip
#安装dhcp
[root@pex ~]# yum install dhcp -y# 查看文件
[root@pex ~]# rpm -qc dhcp
/etc/dhcp/dhcpd.conf
/etc/dhcp/dhcpd6.conf
/etc/openldap/schema/dhcp.schema
/etc/sysconfig/dhcpd
/var/lib/dhcpd/dhcpd.leases
/var/lib/dhcpd/dhcpd6.leases#用自带模板写配置文件
[root@pex ~]# \cp -f /usr/share/doc/dhcp*/dhcpd.conf.example /etc/dhcp/dhcpd.conf#编辑配置文件 删除文件里的,只留下排序后的前35行
[root@pex ~]# vim /etc/dhcp/dhcpd.conf

# 启动dhcp服务
[root@pex ~]# systemctl enable --now dhcpd
最后安装一个虚拟机进行测试
PXE 网络安装实现服务器自动部署
思路: pex网络体系

# 查看有没有 pxe
[root@pex ~]# yum search pxelinux
#安装
[root@pex ~]# yum install syslinux.x86_64
#查找pxelinux.0文件
[root@pex ~]# rpm -ql syslinux.x86_64 | less#查找有无tftpboot服务
[root@pex ~]# yum search tftpboot[root@pex ~]# yum install tftp-server.x86_64
[root@pex ~]# systemctl enable --now tftp
[root@pex ~]# rpm -ql tftp-server #查看共享的目录
[root@pex ~]# cp /rhel7/isolinux/* /var/lib/tftpboot/
[root@pex ~]# cp /usr/share/syslinux/pxelinux.0 /var/lib/tftpboot/#创建pxelinux.cfg文件
[root@pex ~]# mkdir -p pxelinux.cfg[root@pex ~]# cp isolinux.cfg pxelinux.cfg /default
# 修改dhcp文件
[root@pex ~]# vim /etc/dhcp/dhcpd.conf

# 修改default文件
[root@pex ~]# vim /var/lib/tftpboot/pxelinux.cfg/default

强制退出
测试:选择一台虚拟机

然后选择exit 回车 即可
