阅读量:0
elk + filebeat + kafka实验和RSync同步
elk + filebeat + kafka实验

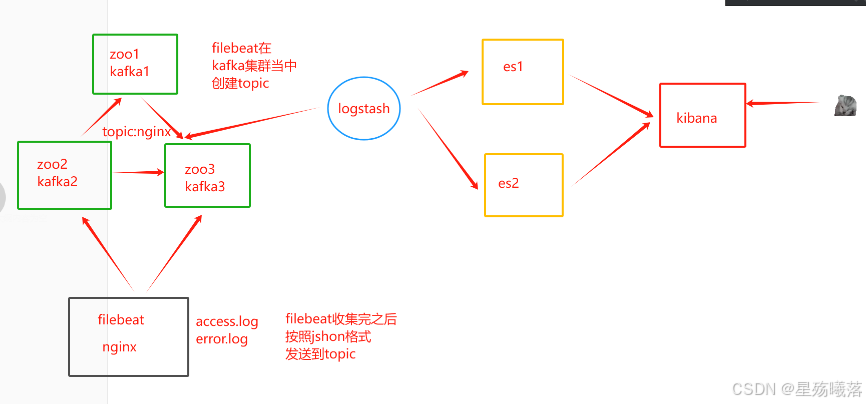
filebeat+kafka+ELK实验的操作步骤:
#在装有nginx的主机上解压filebeat压缩包 [root@test4 opt]# tar -xf filebeat-6.7.2-linux-x86_64.tar.gz #将解压后的压缩包更改名字 [root@test4 opt]# mv filebeat-6.7.2-linux-x86_64 filebeat #进入filebeat目录下,将filebeat.yml配置文件备份 [root@test4 opt]# cd filebeat/ [root@test4 filebeat]# cp filebeat.yml filebeat.yml.bak #进入filebeat.yml配置文件并更改 [root@test4 filebeat]# vim filebeat.yml filebeat.prospectors: - type: log enabled: true paths: - /usr/local/nginx/logs/access.log tags: ["access"] - type: log enabled: true paths: - /usr/local/nginx/logs/error.log tags: ["error"] #将下面两行注释 144 #output.elasticsearch: 146 # hosts: ["localhost:9200"] #将157行,160行取消注释并修改 157 output.kafka: 158 enabled: true 159 # The Logstash hosts 160 hosts: ["192.168.60.91:9092","192.168.60.92:9092","192.168.60.93:9092"] #指定kafka集群配置 161 topic: "nginx" #指定kafka的topic #启动filebeat [root@test4 filebeat]# ./filebeat -e -c filebeat.yml
#在ELK的主上配置 [root@apache ~]# cd /etc/logstash/conf.d/ [root@apache conf.d]# vim kafka.conf input { kafka { bootstrap_servers => "192.168.60.91:9092,192.168.60.92:9092,192.168.60.93:9092" topics => "nginx" type => "nginx_kafka" codec => "json" auto_offset_reset => "latest" #拉取最近数据,earliest为从头开始拉取 decorate_events => true #传递给elasticsearch的数据额外增加kafka的属性数据 } } output { if "access" in [tags] { elasticsearch { hosts => ["192.168.60.82:9200","192.168.60.83:9200"] index => "nginx_access-%{+YYYY.MM.dd}" } } if "error" in [tags] { elasticsearch { hosts => ["192.168.60.82:9200","192.168.60.83:9200"] index => "nginx_error-%{+YYYY.MM.dd}" } } } #启动logstash [root@apache conf.d]# logstash -f kafka.conf RSYNC:远程同步
上行 客户端同步到服务端
下行 服务端同步到客户端
开源的快速备份的工具,一般是系统自带的。
可以在不同主机之间同步整个目录树(目录)
在远程同步的任务中,负责发起rsync的叫做发起端,也就是服务端,负责响应的同步请求的,就是客户端。
rsync的特点:
1、支持拷贝文件,链接文件等等
2、可以同步整个目录
3、可以支持保留源文件或者目录的权限等等
4、可以实现增量同步
rsync的同步方式:
1、完整备份
2、增量备份
常用的选项:
1、-a 归档模式(保留权限)
2、-v 显示同步的详细过程
3、-z 压缩,在传输的过程中对文件进行压缩。
4、-H 同步硬连接
5、--delete 同步删除文件
6、-l 同步连接文件
7、-r 递归(所有)
192.168.60.80 服务端
192.168.60.90 客户端
客户端同步服务端的目录操作步骤:
服务端的配置文件
[root@test8 ~]# vim /etc/rsyncd.conf # /etc/rsyncd: configuration file for rsync daemon mode # See rsyncd.conf man page for more options. # configuration example: uid = root gid = root use chroot = yes #是否禁锢在源目录 address = 192.168.60.80 #监听地址 port 873 # max connections = 4 pid file = /var/run/rsyncd.pid log file = /var/log/rsyncd.log hosts allow = 192.168.60.0/24 #允许访问的客户端IP地址 dont compress = *.gz *.bz2 *.tgz *.zip *.rar *.z #在传输过程中不再进行压缩的文件类型 [test] #共享模块的名称,后续通过模块的名称来进行同步 path = /opt/test #源目录,就是同步的目录 #comment = test #备注信息,可以不加 read only = no #源目录,客户端可以读,也可以写 auth users = backuper #授权登录的账户名称 secrets file = /etc/rsyncd_users.db #授权登录用户的密码文件 ~ [root@test8 ~]# chmod 600 /etc/rsyncd_users.db [root@test8 ~]# mkdir /opt/test mkdir: 无法创建目录"/opt/test": 文件已存在 [root@test8 ~]# chmod 777 /opt/test/ [root@test8 ~]# netstat -antp | grep 873 [root@test8 ~]# systemctl restart rsyncd [root@test8 ~]# netstat -antp | grep 873 tcp 0 0 192.168.60.80:873 0.0.0.0:* LISTEN 10611/rsync
#设置用户登录的密码 [root@test8 test]# vim /etc/rsyncd_users.db backuper:123456 [root@test8 ~]# chmod 600 /etc/rsyncd_users.db [root@test8 ~]# mkdir /opt/test [root@test8 ~]# chmod 777 /opt/test/ [root@test8 ~]# netstat -antp | grep 873 [root@test8 ~]# systemctl restart rsyncd [root@test8 ~]# netstat -antp | grep 873 tcp 0 0 192.168.60.80:873 0.0.0.0:* LISTEN 10611/rsync
#在客户端的主机上将服务端的模块名称为test复制到客户端的opt目录下 [root@test9 opt]# rsync -avz backuper@192.168.60.80::test /opt #写一个密码的文件 [root@test9 xy102]# vim /etc/server.pass 123456 #下面的代码是实现免密登录 [root@test9 opt]# rsync -avz --password-file=/etc/server.pass backuper@192.168.60.80::test /opt
客户端监控文件系统的变化:
inotify-tools
inotify 实现监控
inotify watch 监控文件系统的变化
inotify wait 监控修改,创建,移动,删除,属性修改(权限修改、所有者、所在组)如果发生变动,立即输出结果。
inotifywait -mrq -e modify,create,move,delete /opt/xy102
m 持续监控
r 递归整个目录,只要有变化包含子目录的变化全部记录
q 简化输出的信息
e 指定监控的时间
attrib 属性修改 inotifywait -mrq -e modify,create,move,delete,attrib /opt/xy102
将客户端的变化同步到服务端中去(下行同步):
#在客户端上写一个脚本文件 [root@test9 opt]# vim inotify.sh #!/bin/bash inotify_cmd="inotifywait -mrq -e modify,create,move,delete,attrib /opt/xy102" rsync_cmd="rsync -azH --delete --password-file=/etc/server.pass /opt/xy102 backuper@192.168.60.80::test/" $inotify_cmd | while read DIRECTORY EVENT FILE do if [ $(pgrep rsync | wc -l ) -le 0 ] then $rsync_cmd fi done #给脚本文件赋权并执行脚本文件 [root@test9 opt]# chmod 777 inotify.sh [root@test9 opt]# ./inotify.sh
attrib 属性修改
--delete
A
/opt/test 1 2 3
B
/opt/xy102 4 5 6
--delete 全同步(两边的内容完全一致)
