阅读量:0
自用笔记,如果能帮到你可以直接拿来用
一、安装
npm install --save qrcode 二、引入
import QRCode from 'qrcode'; 三、封装成组件进行使用
<template> <div class="QRCode" :style="{'width':width, 'height':height}"> <canvas :id="canvasId" ref="canvas" :style="{'width':width, 'height':height}"></canvas> </div> </template>四、js部分
<script> import QRCode from "qrcode"; export default { name: "QRCode", props: { content: { type: String, default: "测试二维码" }, width: { type: String, default: "100" }, height: { type: String, default: "100" }, codeName: { type: String, default: "二维码" }, load: { type: Boolean, default: true }, view: { type: Boolean, default: true } }, data() { return { canvasId: "", }; }, computed: {}, created() { this.canvasId = this.getUUID(); this.$nextTick(() => { this.init(); }); }, mounted: function () { }, methods: { // handlePrintText() { // this.$print(this.$refs.print) // }, // // 打印二维码 // getPrinting() { // let employeeName = "溯源信息"; // let printContent = '' // document.getElementById("qrcode").innerHTML = printContent; // let new_str = document.getElementById("qrcode").innerHTML; //获取指定打印区域 // //构建新网页(关键步骤,必须先构建新网页,在生成二维码,否则不能显示二维码) // document.body.innerHTML = new_str; // for (let j = 0; j < 1; j++) { // document.getElementById("XQ").innerHTML = ""; //置空 // new QRCode(document.getElementById("XQ"), { // text: "dfjkdjdfjak123456789", // width: 250, // height: 250, // colorDark: "#000000", // colorLight: "#ffffff", // }); // } // window.print(); //打印刚才新建的网页 // window.location.reload(); // return false; // }, saveCode() { //下载二维码 console.log('二维码', this.$refs.canvas); let base64Img = this.$refs.canvas.toDataURL('image/jpg'); //创建下载标签,然后设置链接和图片名称 let a = document.createElement('a') a.href = base64Img a.download = '二维码' + Date.now() a.click() //销毁元素 a.remove() }, init() { let width = this.width, height = this.height; QRCode.toCanvas( document.getElementById(this.canvasId), this.content, { width, height, toSJISFunc: QRCode.toSJIS }, ); }, getUUID() { let d = new Date().getTime(); let uuid = "xxxxxxxx-xxxx-4xxx-yxxx-xxxxxxxxxxxx".replace( /[xy]/g, function (c) { let r = (d + Math.random() * 16) % 16 | 0; d = Math.floor(d / 16); return (c == "x" ? r : (r & 0x7) | 0x8).toString(16); } ); return uuid; } }, watch: { content() { this.init(); } } }; </script>五、css样式
<style lang="scss" scoped> .QRCode { display: inline-block; position: relative; overflow: hidden; .QQMode { position: absolute; left: 0; bottom: 100%; right: 0; height: 0; background-color: rgba(0, 0, 0, 0.45); transition: all 200ms ease-in-out; cursor: pointer; color: #fff; display: flex; justify-content: space-around; align-items: center; font-size: 20px; font-weight: bolder; box-sizing: border-box; padding: 10px; } } .QRCode:hover .QQMode { bottom: 0; height: 100%; } </style>六、父组件使用
1.引入
import QRCode from "./QRCode.vue"; 2.注册
components: { QRCode },3.页面使用(表格中使用案例)
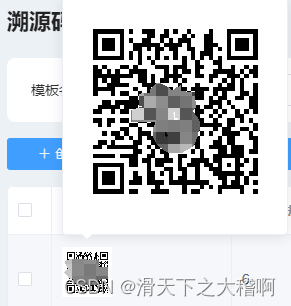
把对应的网址链接传入codeContent中就可以显示二维码
<el-table-column label="溯源码" prop="codeContent" width="180" height="94"> <template slot-scope="scope"> <div> <el-popover placement="top-start" title="" trigger="hover"> <QRCode alt="" :content="scope.row.codeContent" id="printTest" :width="'200'" :height="'200'"></QRCode> <QRCode slot="reference" :content="scope.row.codeContent" :width="'50'" :height="'50'" ref="refserence"> </QRCode> </el-popover> </div> </template> </el-table-column>七、效果图

