
阅读量:0
目录
比赛经历以及思路
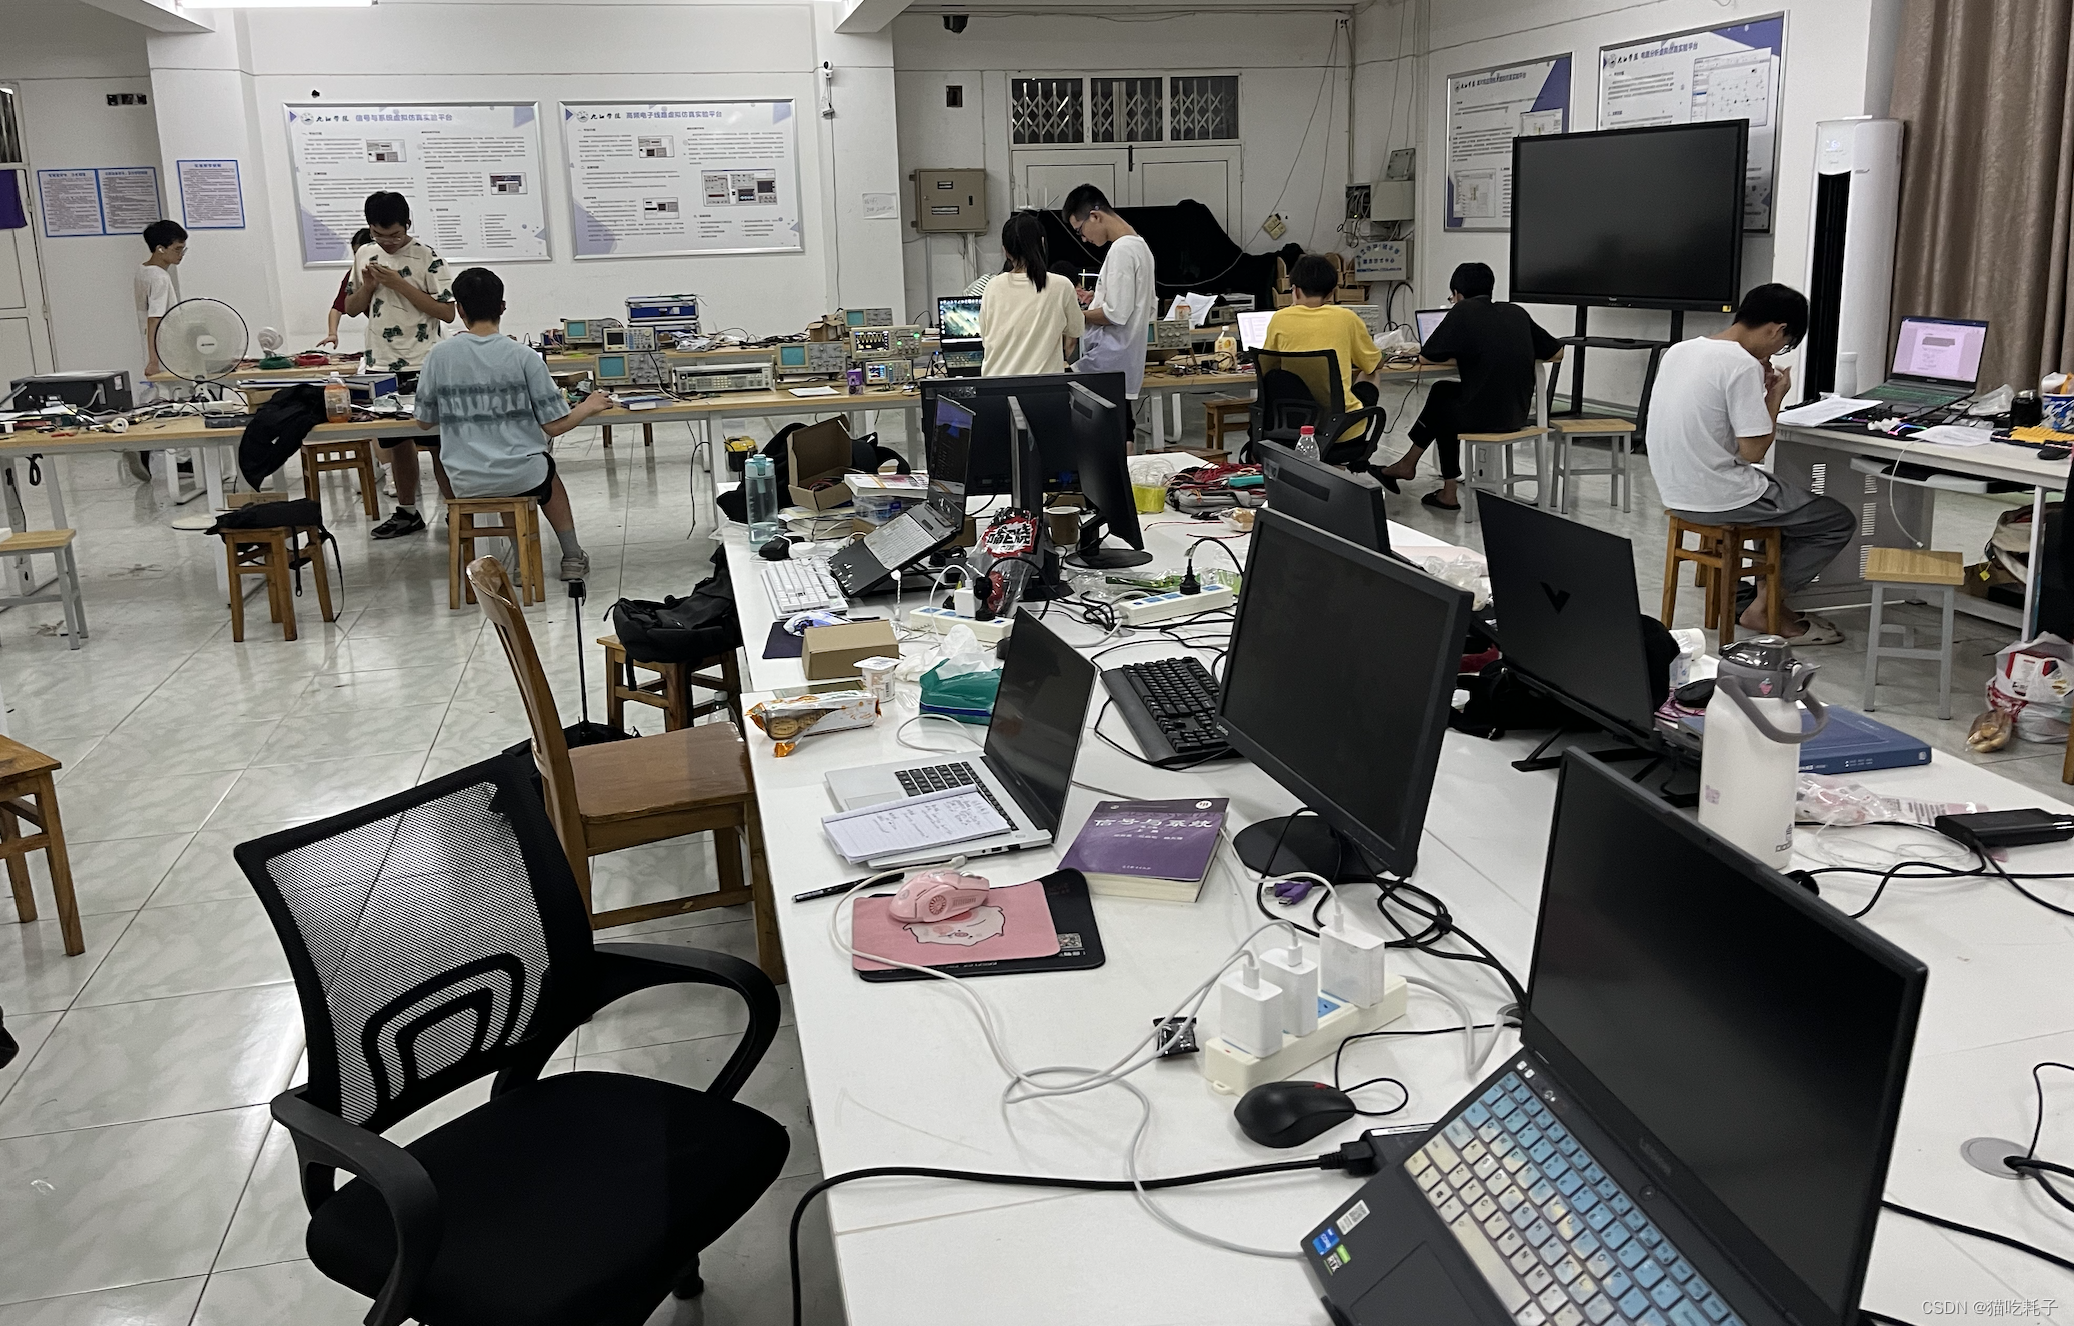
在导师分配完参赛成员后,我被分到了和大三的学长学姐一队。我主要是负责软件部分,学长主要负责硬件部分,学姐则是负责论文的撰写。虽然我们队伍的分工已经很明确了,但是到硬件部分,该帮忙的地方还是要一起完成,这才是一个团队该有的样子。
第一天题目刚发下来,我们就懵了。本来是想做小车的题目,没想到陆空合体了,所以只能换题目做,之前我把2022年省赛的声源定位做过一遍,今年本来想选F题声传播的定位系统,但是好像这个E题更简单些,所以果断选择E题(专挑软柿子捏),我的队友也表示认同。
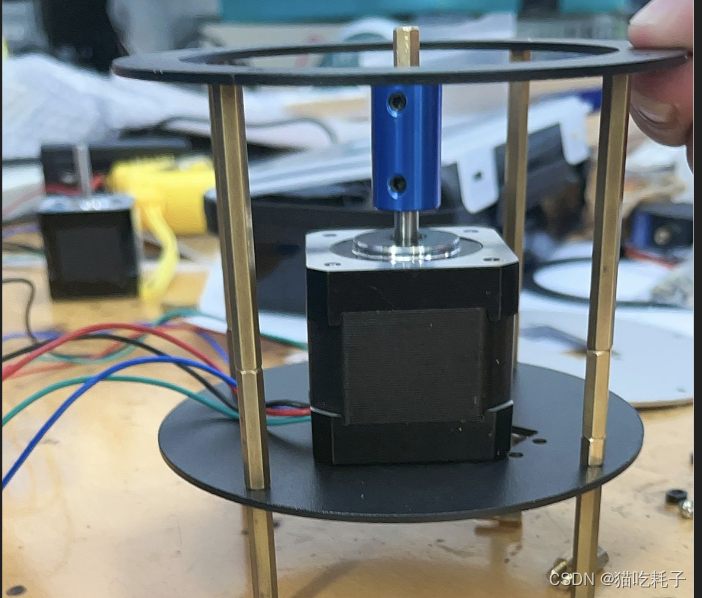
第一天上午确认完题目后,我们就猜到今年肯定超级多人选择E题,我们用的是树莓派,毕竟要实现起来相对比较简单,所以要比拼的一定是精度!第一天上午到下午这段时间我一直在调舵机,但是我们的舵机性能比较差,运动起来不是那么的平稳,毕竟是老舵机了。网上新买的装备也一时没有到货,我们决定还是要用步进电机来做。一开始不确定能不能用步进电机,但是组委会是说不让用打字机那样的步进电机,也就是步进电机不能控制平移,我们是用步进电机模拟二维舵机云台,只是用于旋转是可以的。
第一天下午,我是想把激光笔回归中心点的坐标给写死,但是感觉换个环境后回归中心点时的误差会比较大。经过仔细读题后,我们是可以用铅笔画一个黑框(width<1mm)出来的。到晚上我就准备用OpenCv去识别那个黑框,然后把中心点拟合出来。
第一天晚上,我以为识别铅笔黑框不会太难,但是我开始写代码的时候发现,这个铅笔框也太细了吧,根本识别不出来,一个小小的阴影可能都比黑色边框更明显!经过我一番猛调阈值后,那个轮廓终于有了一丁点样子。但是边框不是连续的,一个边可能就几个像素点经过筛选后被保留下来。不过对于我这种机器视觉大师来说,识别这种小黑框根本不在话下(bushi)。
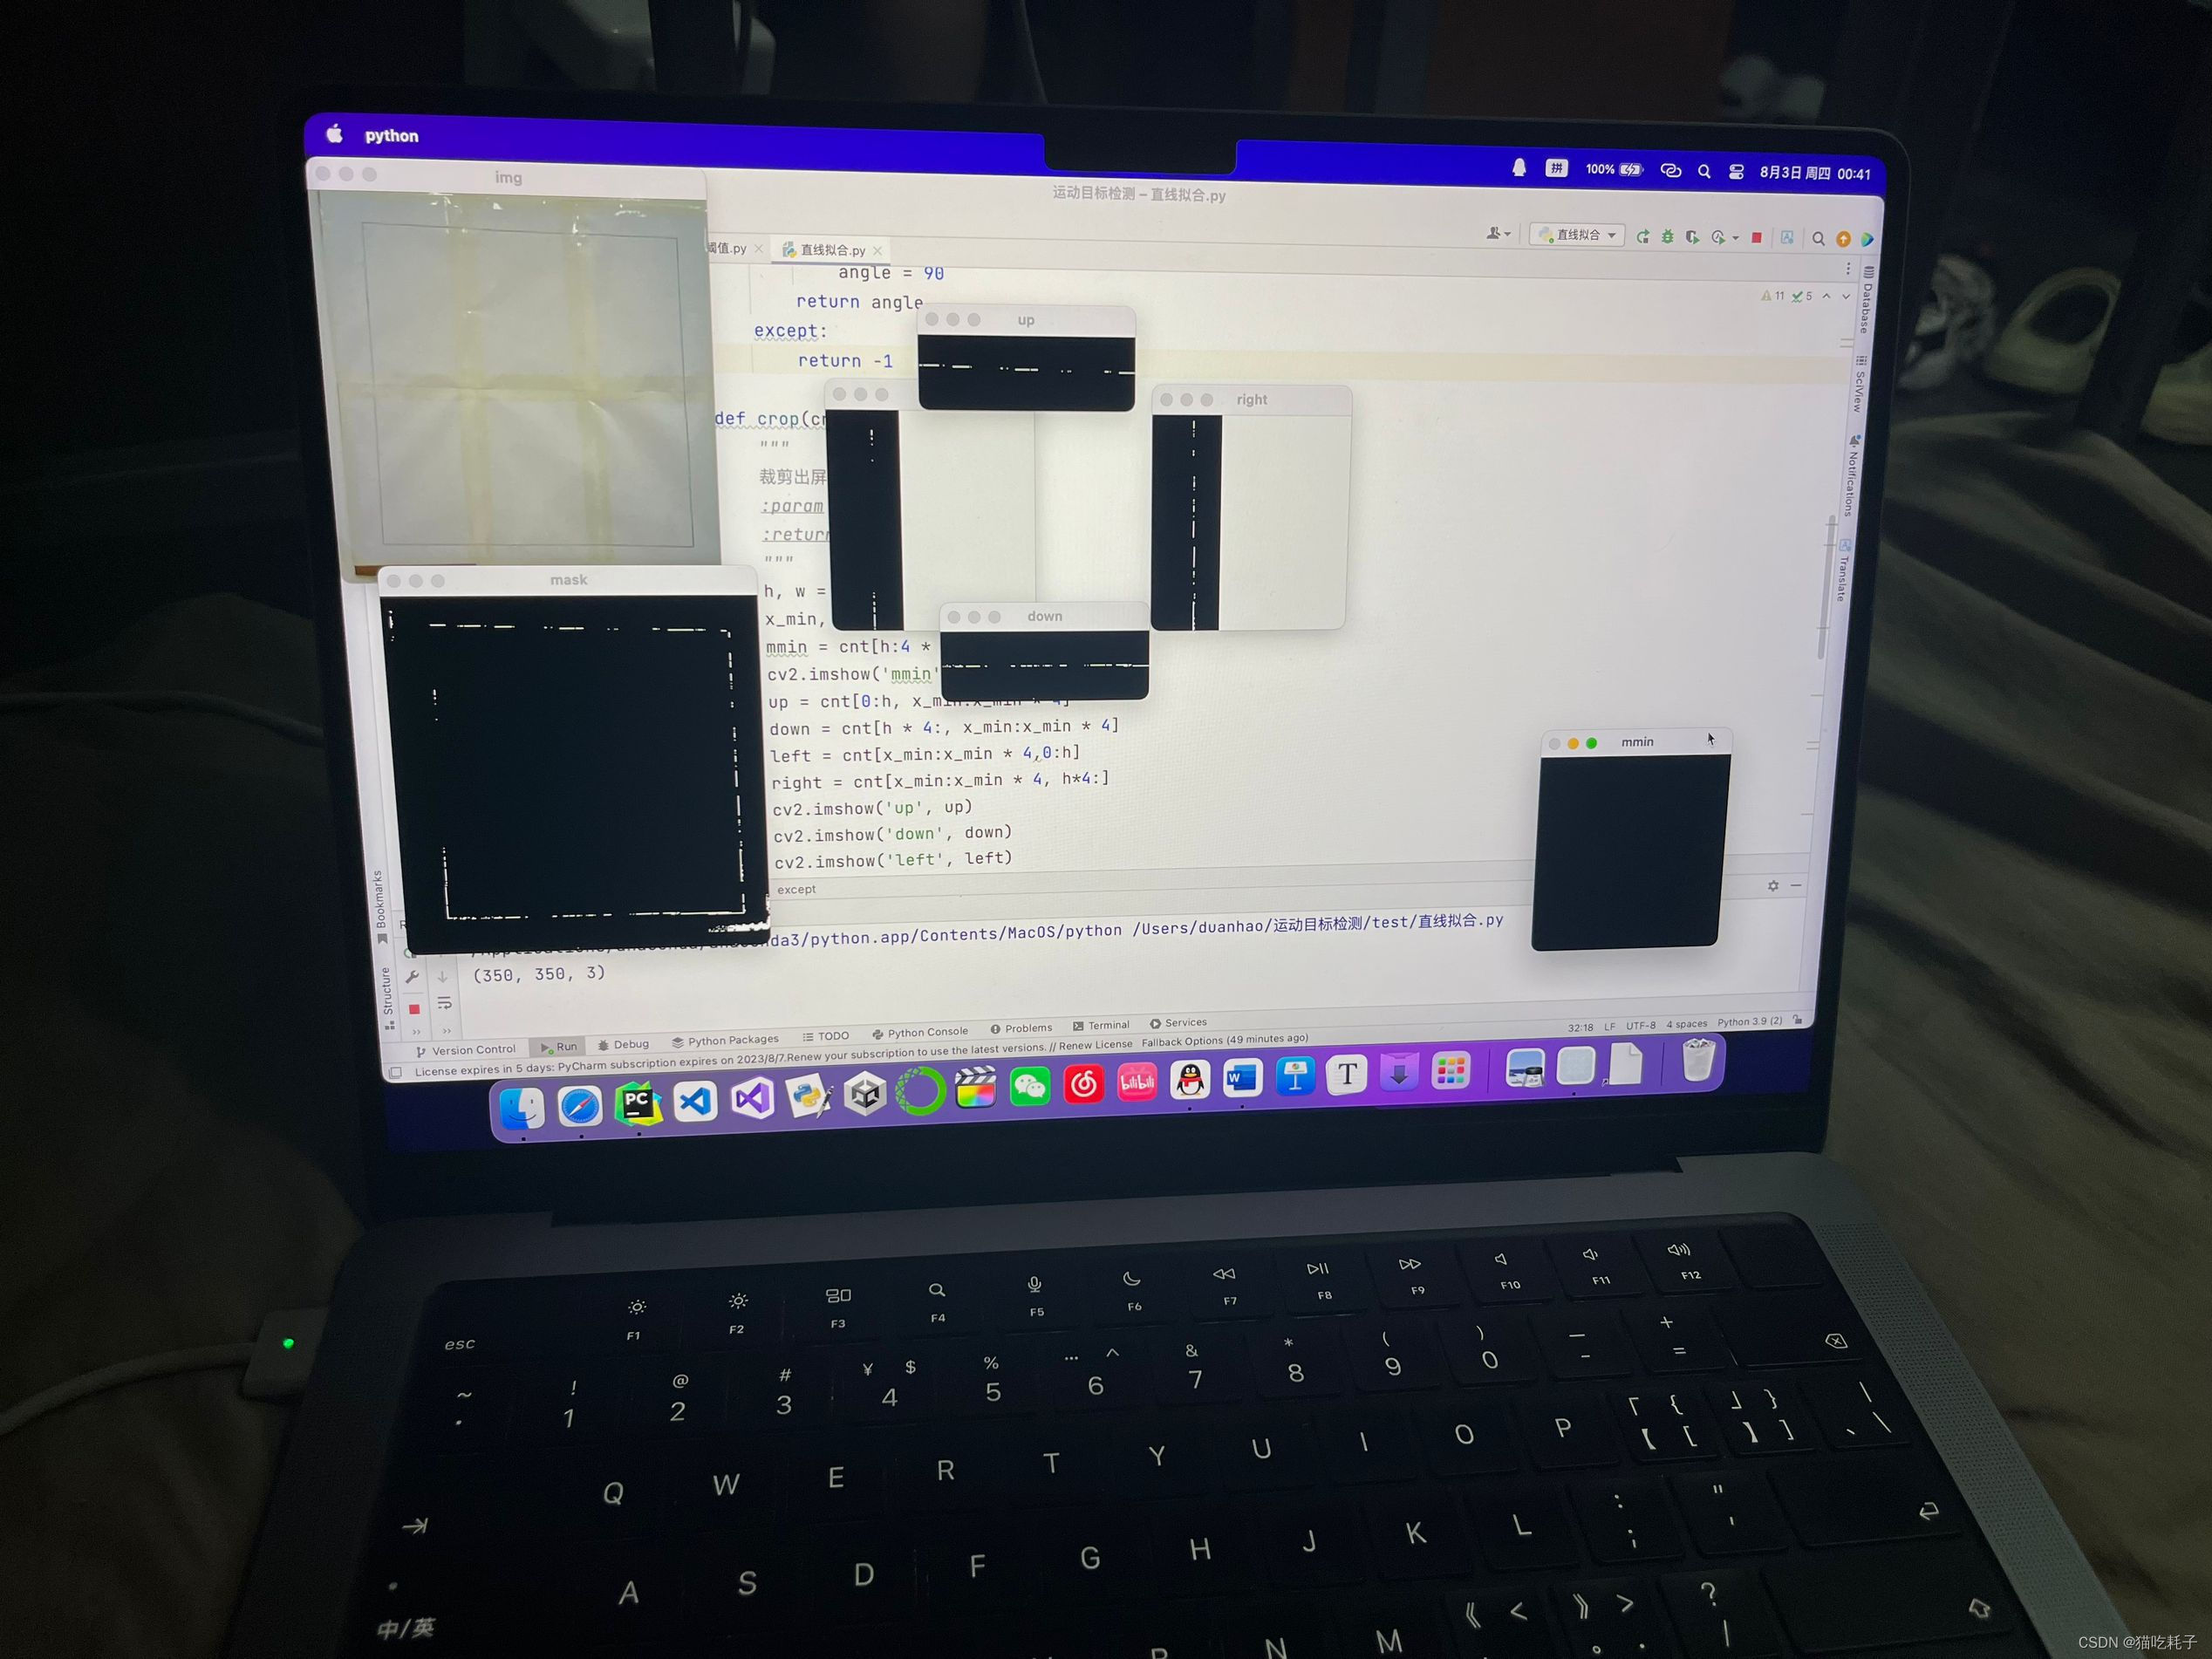
小学我们就学过,两点确定一条直线,虽然一条边上的黑色像素点不连续,但是我可以根据这些像素点fitLine拟合出一条直线来。四条边拟合出四条直线,然后直线两两相交就可以把四个边长的交点坐标算出来,那么中心点的坐标不就手到擒来🚀!
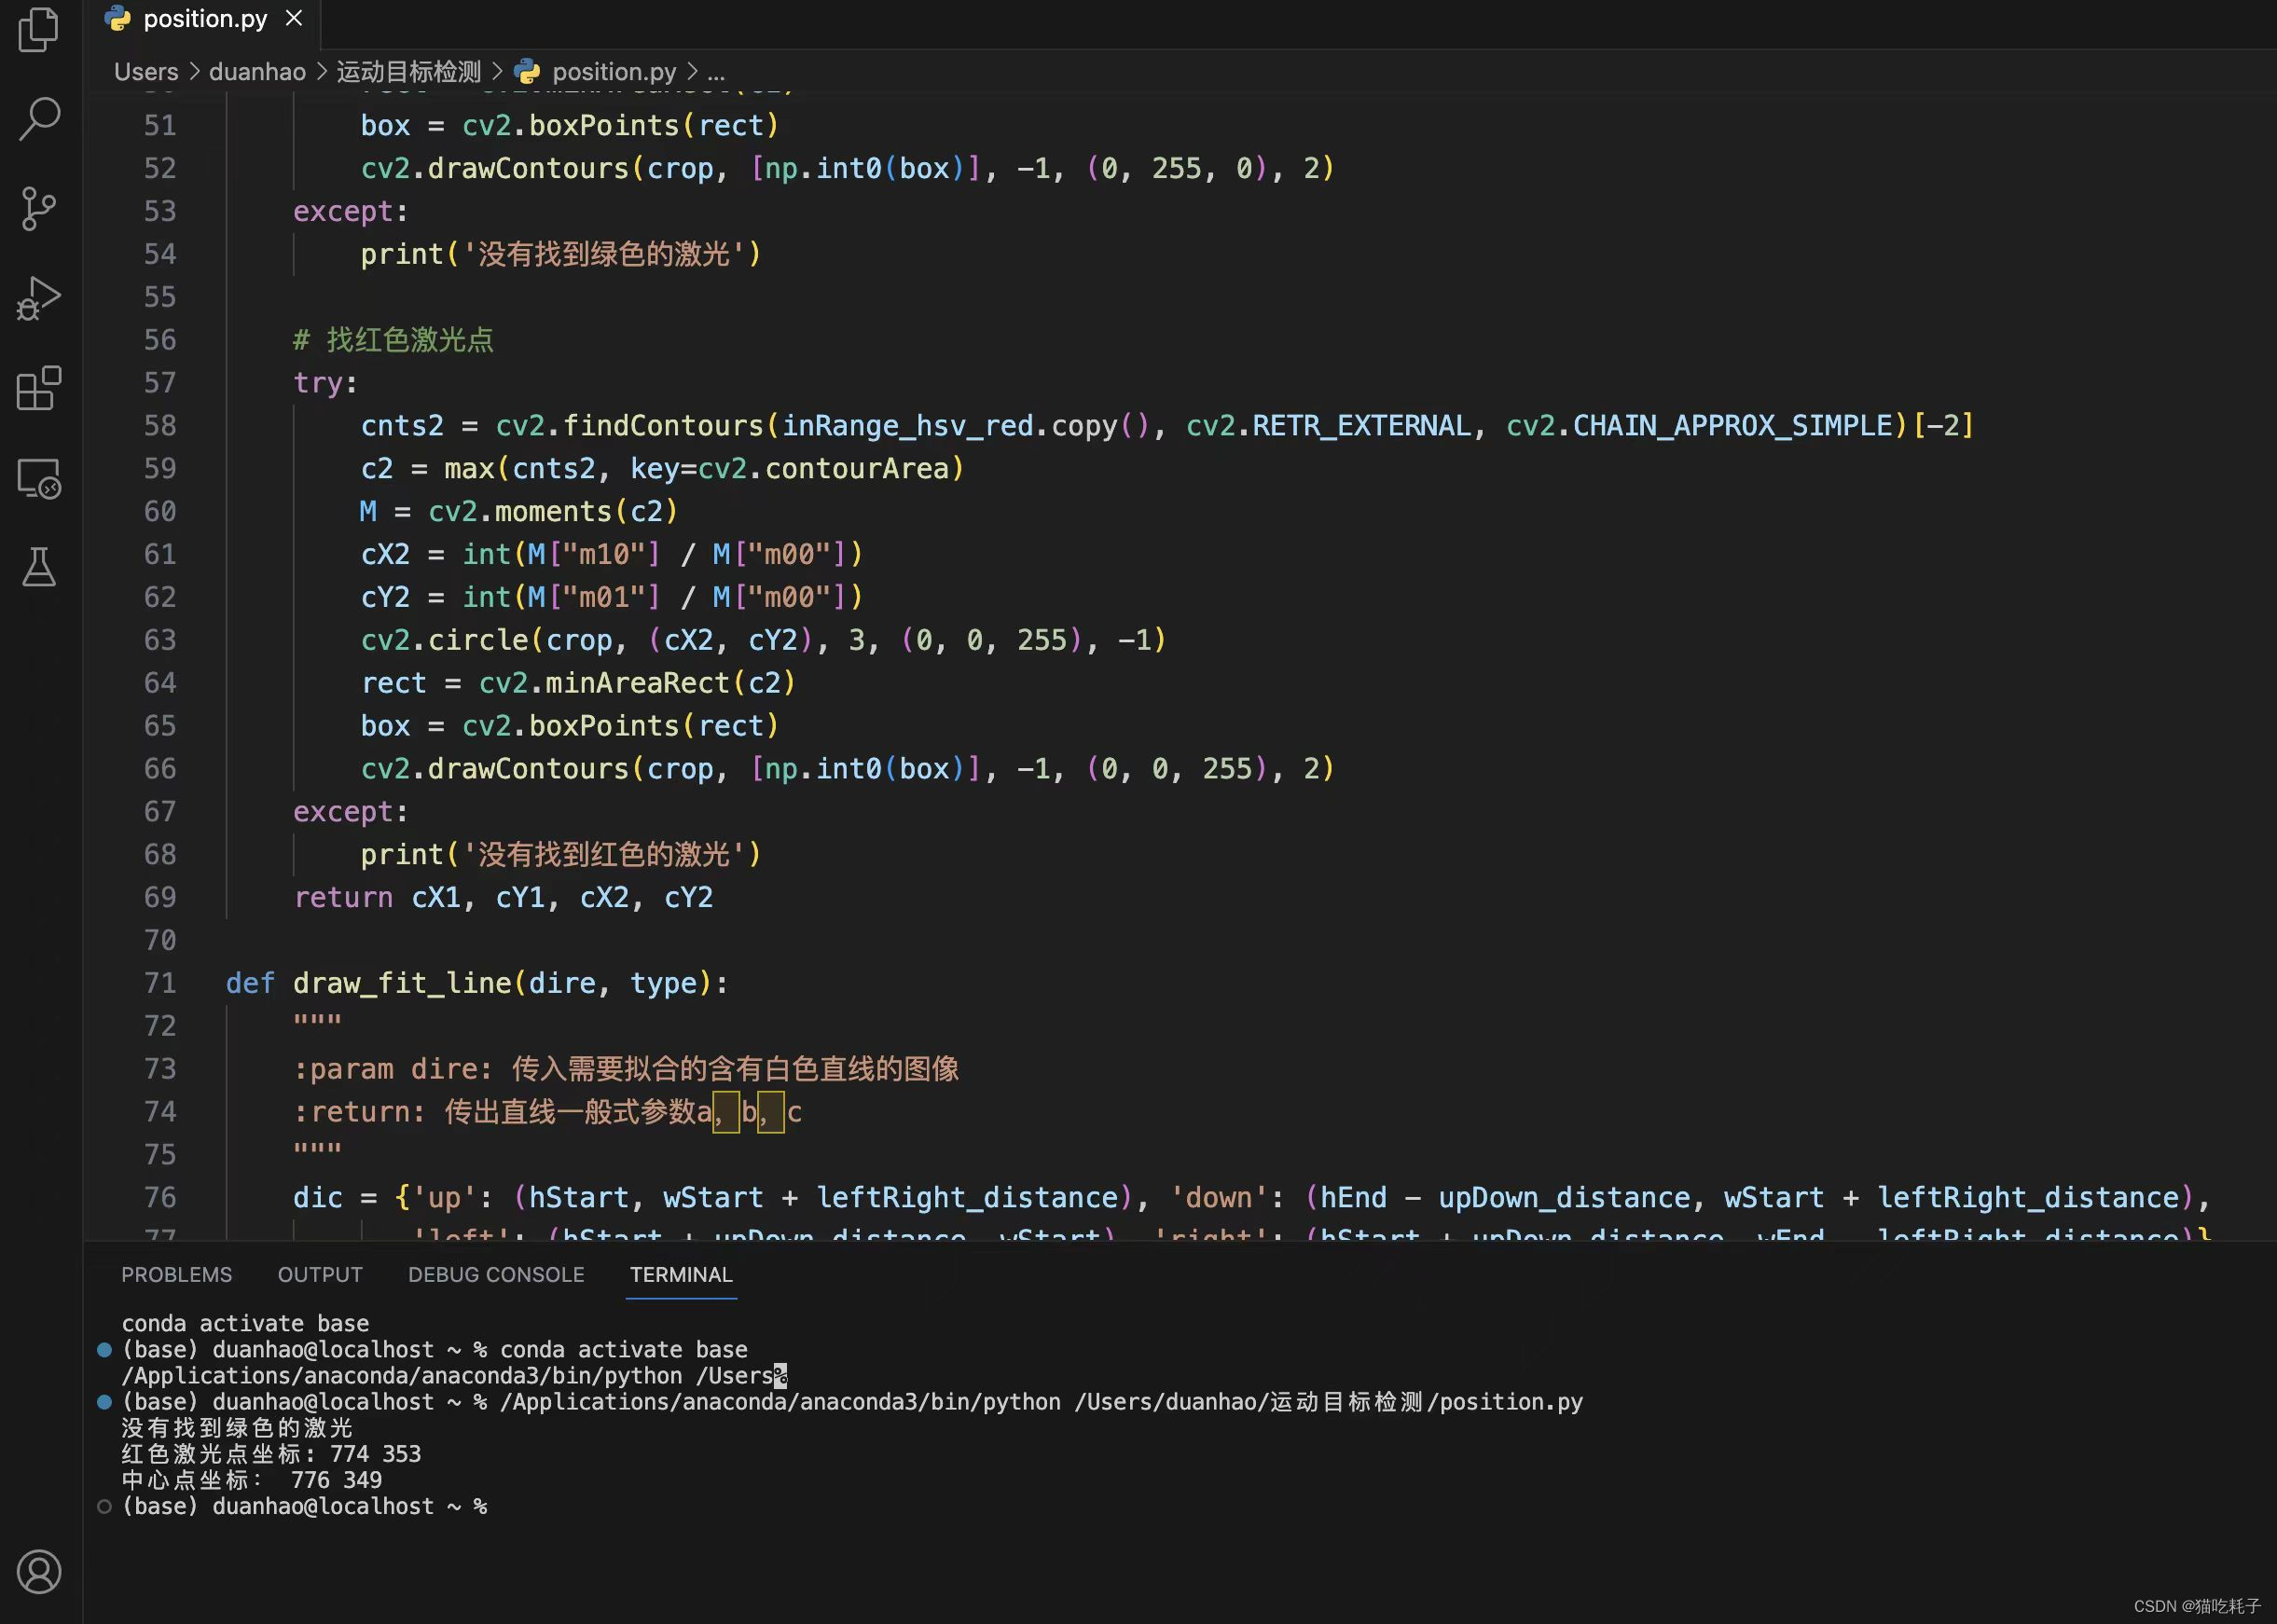
至于识别红色激光笔的坐标,相较于拟合铅笔黑色边框,识别红色激光笔就太简单了,先一个hsv变换,再做一个开运算,设置一下红色的阈值,最后用inRange函数二值化处理一下,就能把激光笔的颜色筛选出来。

写完这些代码已经到了第二天凌晨2点,第一天就选择熬夜显然不是明智之举,所以我小睡了一会。大概在早上七点,我就起床去实验室了,去到实验室后突然感觉时间还很充足。我就在帮忙搭硬件,最后测试的时候,能不能拿奖拼的还是硬件够不够硬朗。去年学长学姐好像就是因为电机临时坏掉了,错失省奖!
第二天早上,我就在用A4白纸去贴一个60cm * 60cm的屏幕,A4纸太小了,贴起来一定要严丝合缝,不然出现褶皱,识别黑框就会有问题(虽然经过我的代码优化后,没有多大问题,但是做事还是要做细致点😃),因此我做一块新的白色屏幕花了好久。
第二天下午,我们就开始搭铁架台,这个铁架台后续测试的时候把我们害惨了!铁甲台的主要作用就是放我们的一些装置,一开始以为测试的地方是一片空地,装置随便摆放肯定不好。没想到全省也就我们学校几个组有个台子,其他的组都是用测试地点的凳子(不是不能用封箱以外的东西吗?有点想吐槽!)
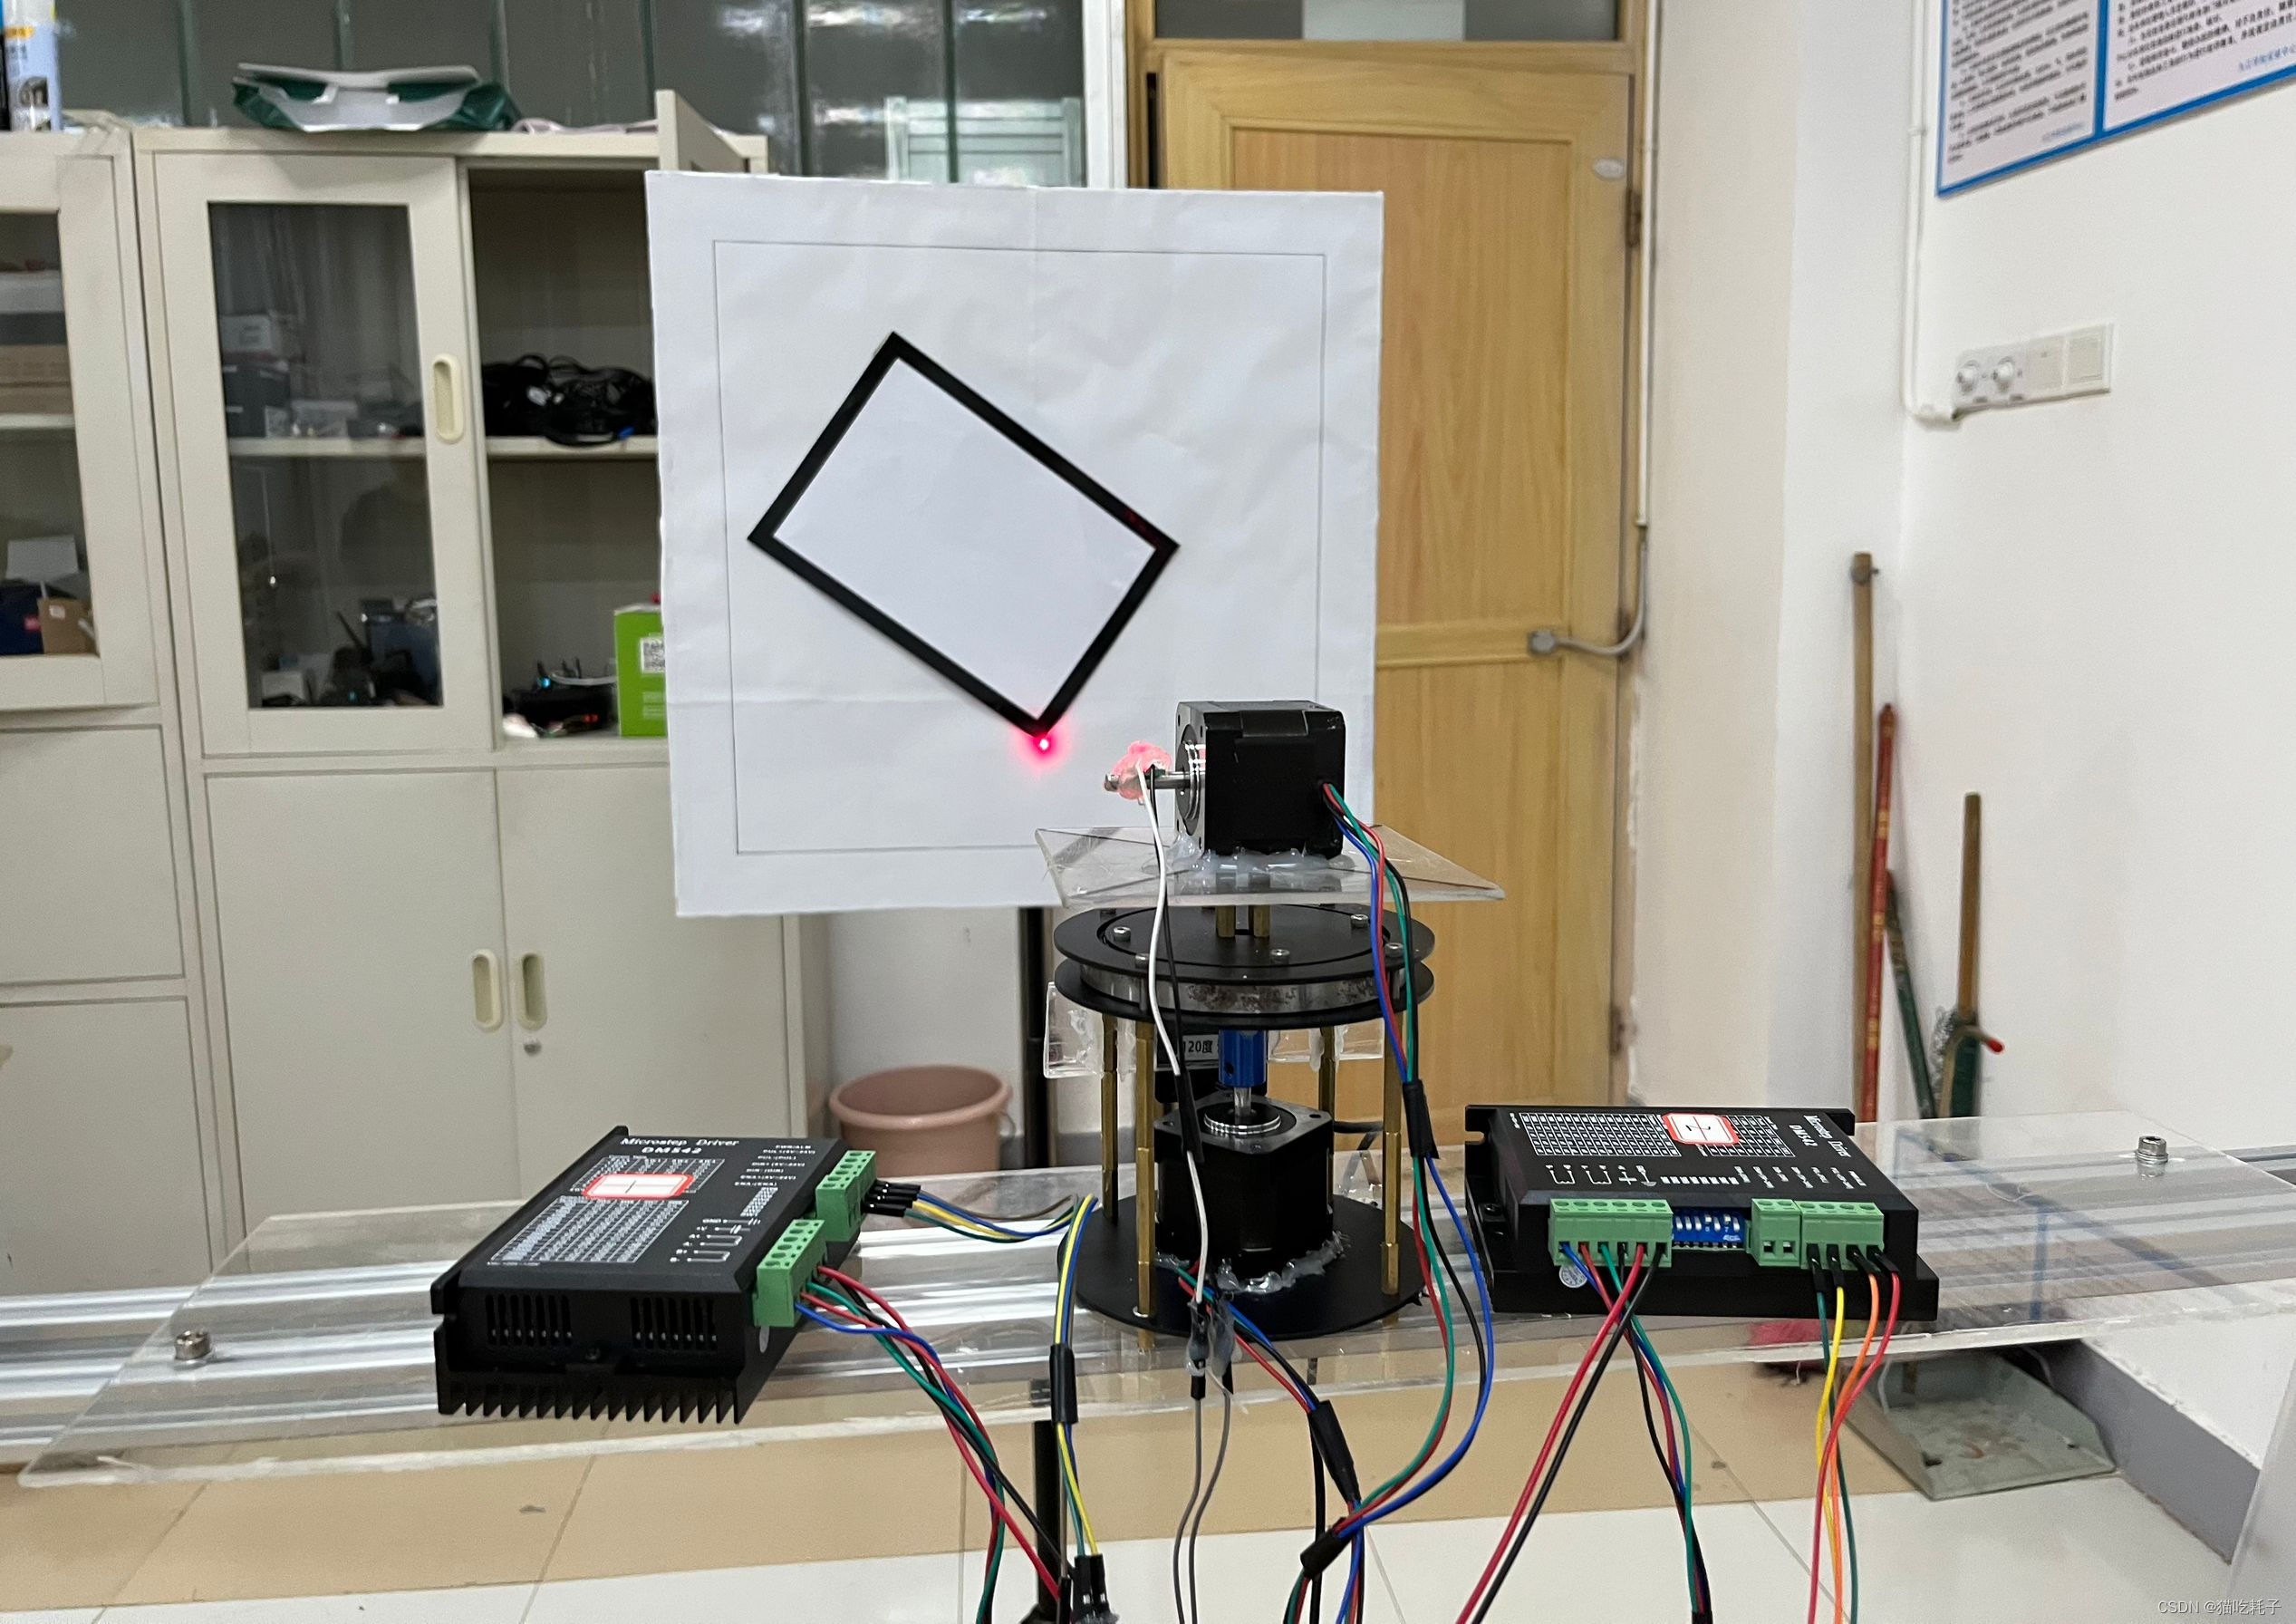
第二天晚上熬了一整夜(非明智之举)。激光云台装置离屏幕装置是固定1m的距离,摄像头拍到的像素坐标和实际距离需要进行换算,最后通过arctan数学换算得到二维云台需要运动的角度。写完这个函数,就可以让红色激光笔在白色屏幕上“指哪打哪”!当时经过换算好像是1个像素点对应实际距离1.355mm。
第三天凌晨3点多就把要求1部分做完了,测试了一遍,回归中心点非常完美。进度虽然有点慢。但是我已经把最艰难的地方给攻克了,说实话这个进度还是有点慌的!
一开始学长和我说,第四天八点就要封箱了。我以为是第四天早上八点就封箱,第三天我就开始猛肝了,所以很多实验结果的图和视频都没来得及拍😭。要求2部分就是红色激光笔绕着黑色边框走一圈,第一天我就把黑色边框给拟合出来了,而且“指哪打哪”的代码也写好了,因此要求2一下子就被解决了。
题目是说循黑色边框不能超出边框2cm,所以每次绕边长走的时候要矫正一下累计误差。本来是想在边长里面分400个点出来,让红色激光笔走的更丝滑一点,由于时间问题,最后就是每四个点矫正一次,走黑框走的也是非常完美!
这可能就是搞科研和比赛的差别吧,搞科研就是要做到精益求精,比赛则是要在短时间内把事情做好。所以不能花太多时间来做到绝对完美,但也要尽量做到比别人更好!
其实要求3和要求4本质上是一样的,一个是平着放一个是要旋转一定的角度放,但是我是用机器视觉来做,所以怎么样放都无所谓。我们要让红色激光笔在粘了1.8cm宽电工胶带的A4纸上走一圈。一开始我觉得我这个题目是不是太弱智了,1mm的黑色边框我都能走,1.8cm的电工胶带我还走不了?还放在要求3和要求4,瞧不起谁呢!
没想到是我肤浅了!激光笔打在电工胶带上就被吞噬了🤯,电工胶带会吸收激光,导致红色激光笔的坐标识别不到。一个比较好的处理结果就是膨胀!膨胀!膨胀!(机器视觉里的专业名词:膨胀,大致的意思就是让细的东西变粗)如果不知道红色激光笔在黑色电工胶带上的坐标,那么就没办法消除累计误差。出一次黑色电工胶带就扣2分!
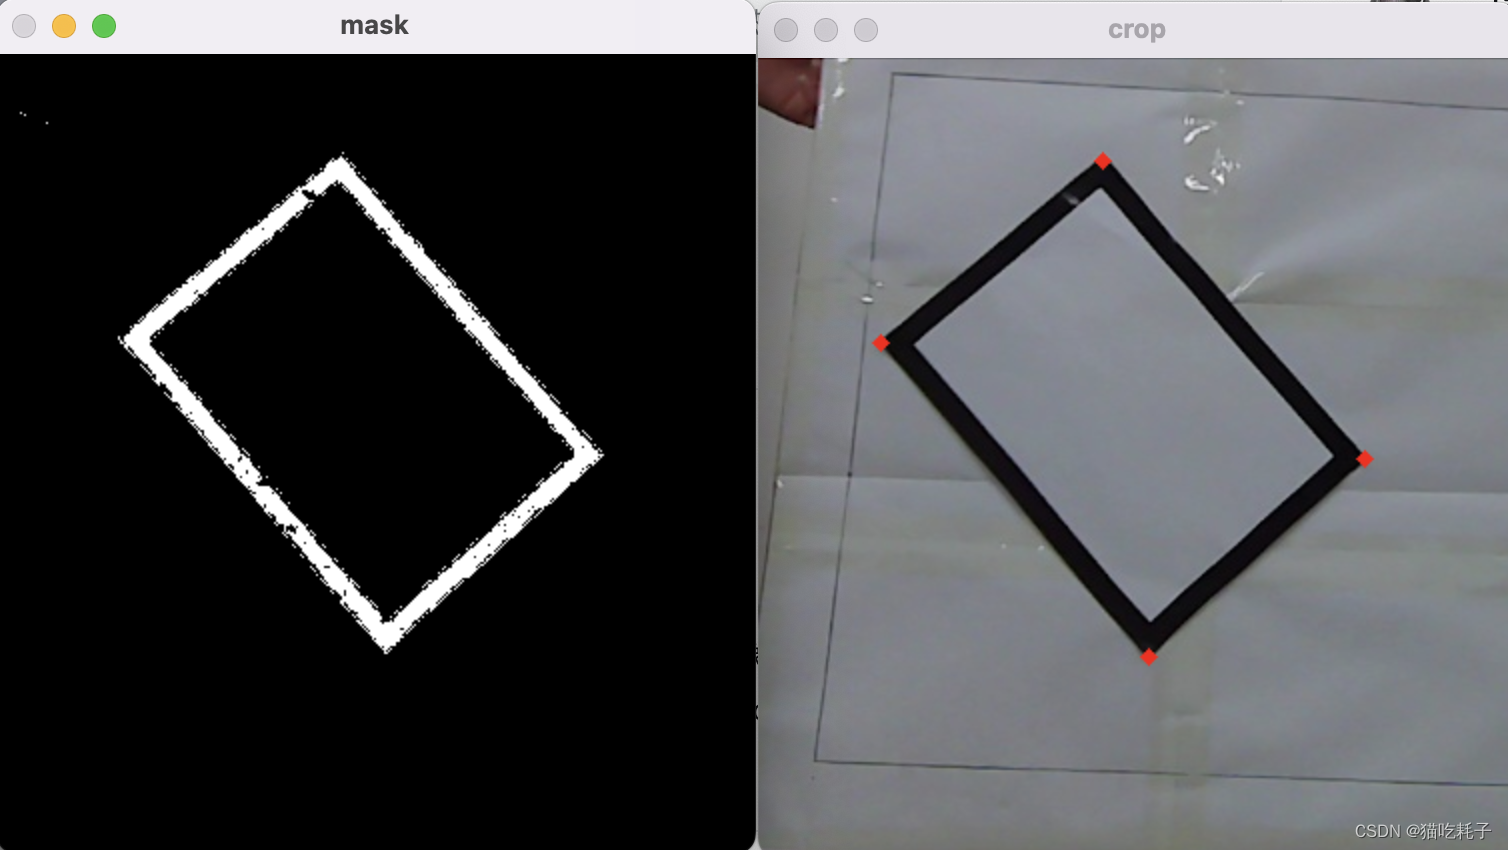
要想激光笔在黑色电工胶正中间走(红色激光点不出黑色电工胶),就要找到外轮廓线以及内轮廓线,算出黑色电工胶带的中间框线。找轮廓真是OpenCv的一个必修课啊!
第三天晚上到第四天凌晨,把基础部分做完感觉舒畅多了。差不多连续工作72小时,有点累啊,虽然有时候在摸鱼🦑。然后我去给学姐讲了下基本思路,让她好写论文。
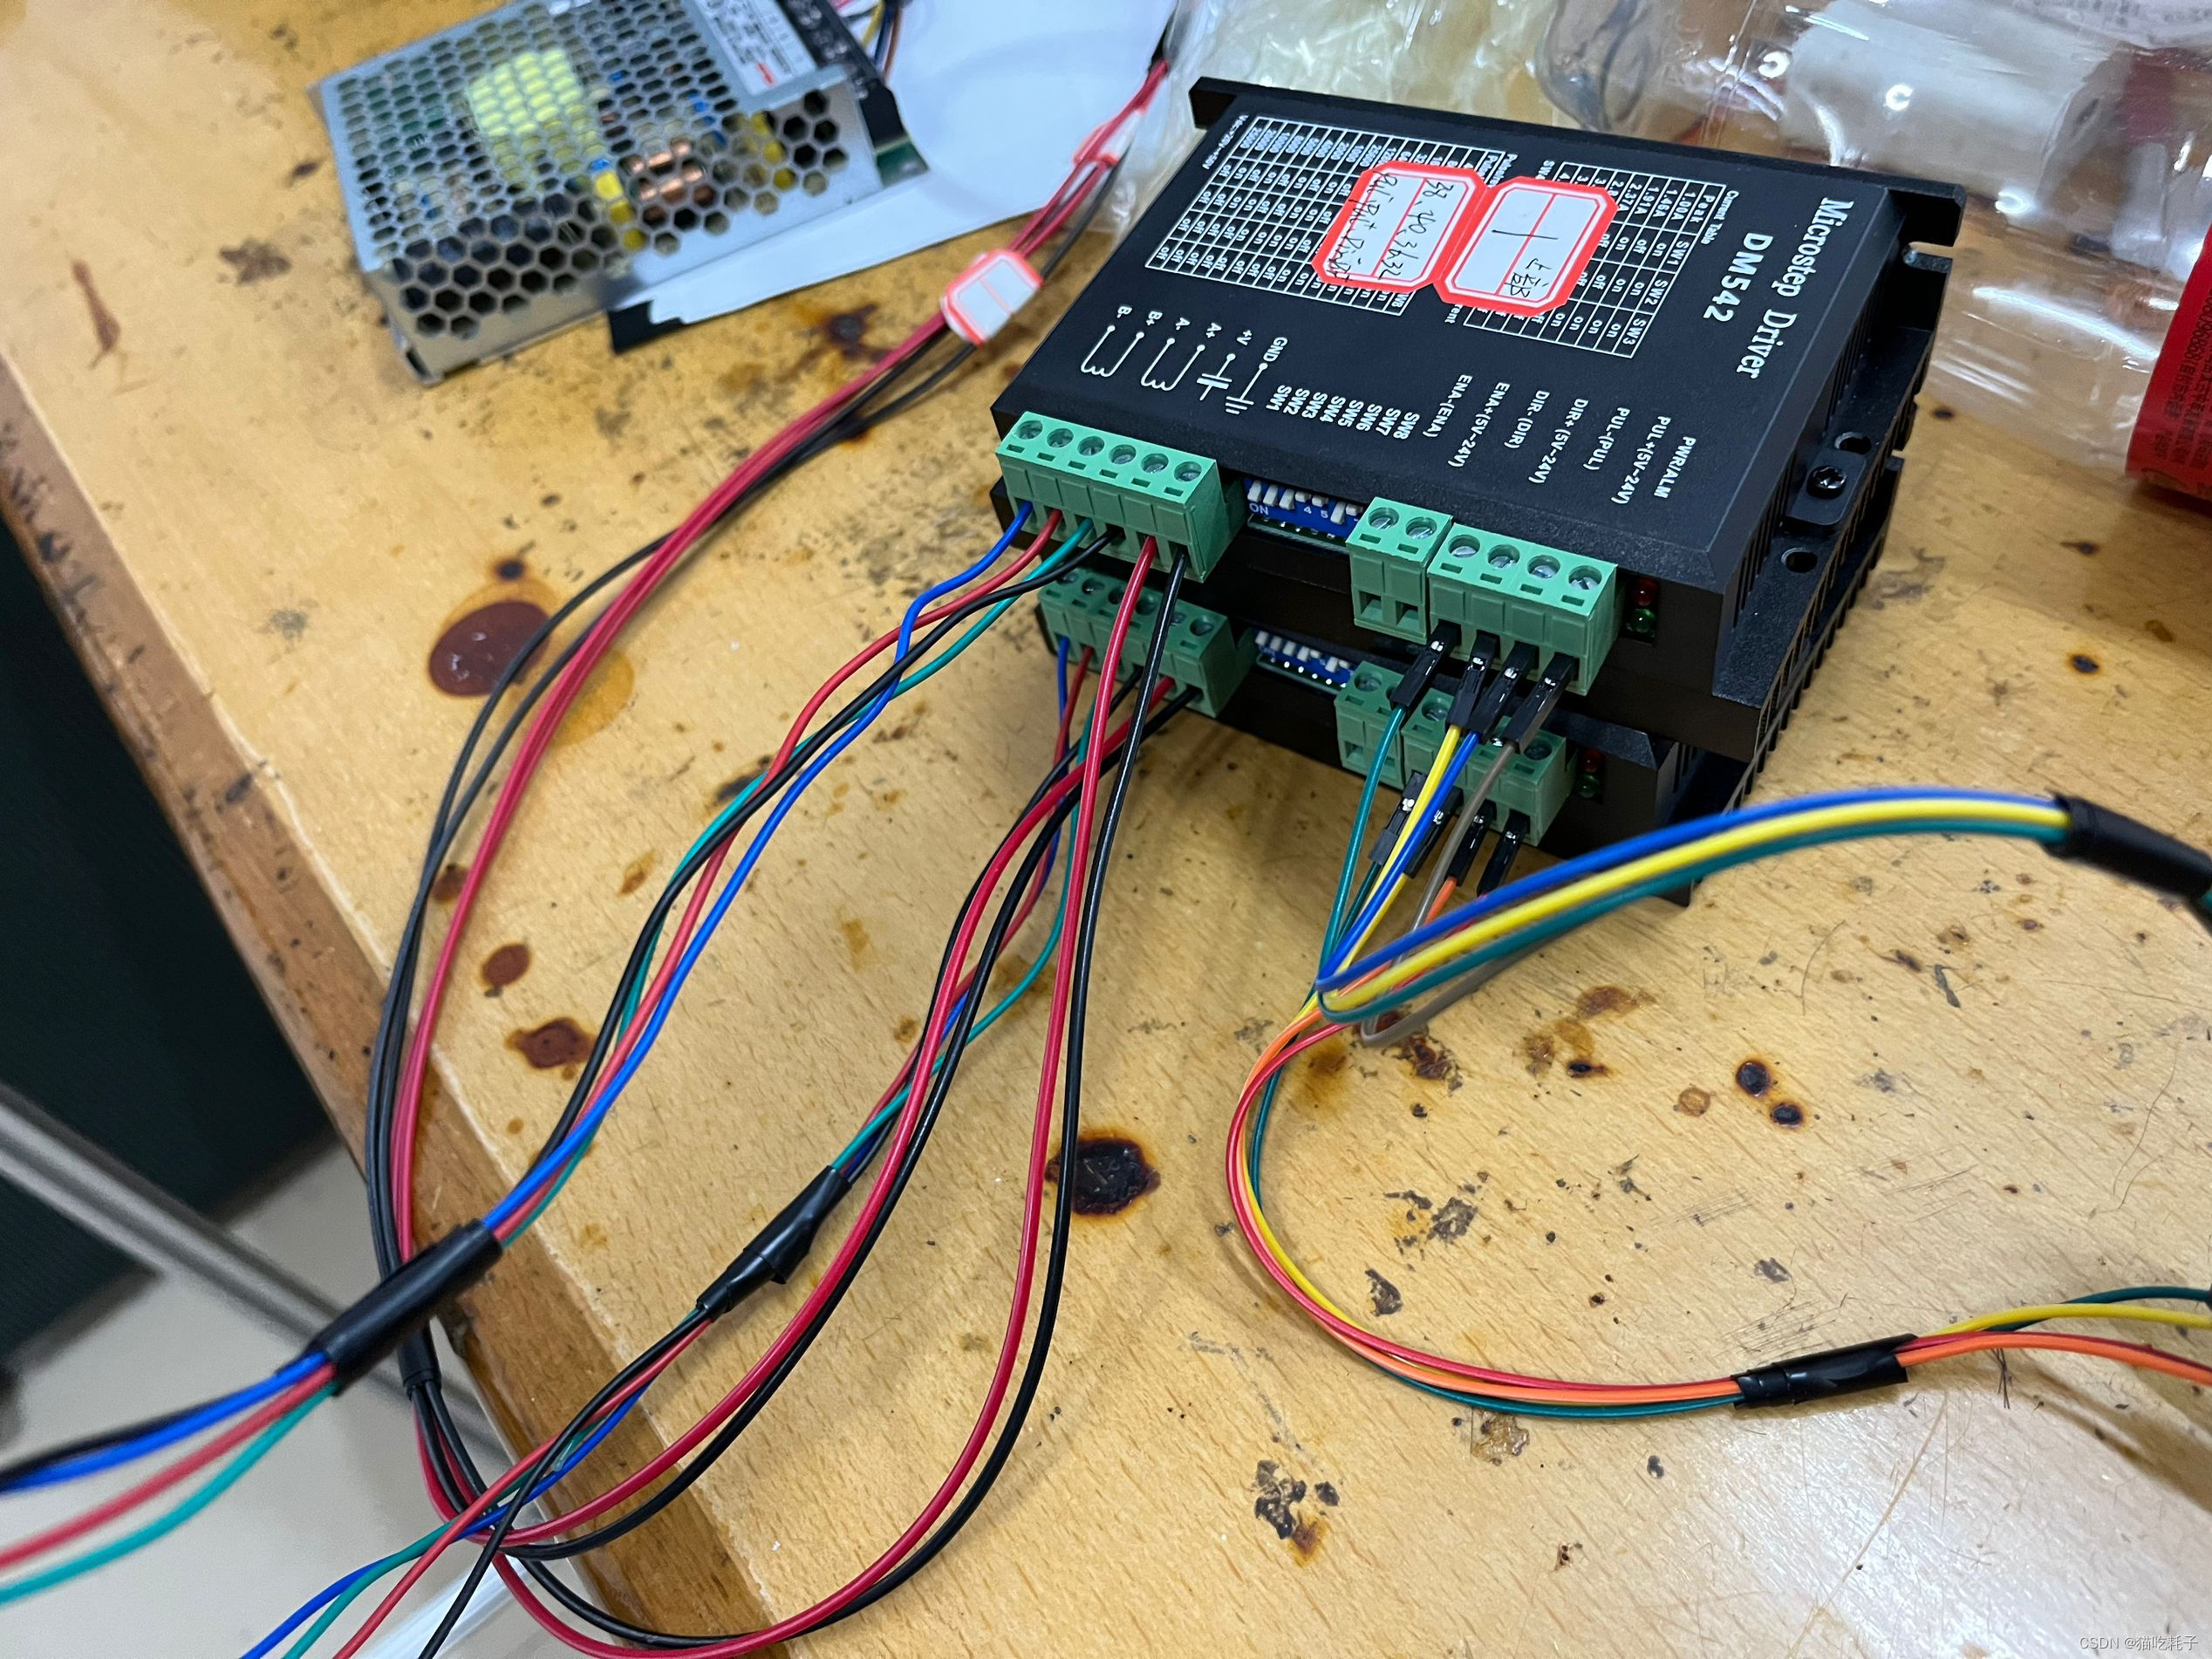
学长做事也非常认真!他把需要用到的杜邦线全都归类整理好了,对此我赞不绝口!到时候测试的时候就不怕线突然掉了不知道接哪里了。
第四天早上,要解决掉发挥部分的第一问,绿色激光追踪红色激光。直接把“指哪打哪”云台的代码和检测红色激光笔以及绿色激光笔坐标的代码结合起来就可以了。
最难的是发挥部分2,核心代码依旧是检测到红绿激光的坐标,“指哪打哪”云台代码,追踪。但是我测试出来效果不是很稳定,这里就不分享具体思路了。由于时间有限以及能力有限,我也没具体优化,主要是太困了没精力肝了,果然前期熬夜是不明智的抉择。之后的时间就去封箱了!原来学长的意思是第四天晚上8点封箱。
封完箱,把作品放到车上后,终于体会到了什么是“轻舟已过万重山”!电赛四天三夜,我三夜未睡,两天没吃,不过感觉非常充实,我真的太喜欢这个团队了!可惜学长学姐大三了,之后要准备考研了,而我才大一,以后见面的机会就几乎没有啦😭!
步进电机云台代码
import RPi.GPIO as GPIO import time import numpy as np import math # 规定GPIO引脚 IN1 = 18 # 接PUL- IN2 = 16 # 接PUL+ IN3 = 15 # 接DIR- IN4 = 13 # 接DIR+ # 云台上面的电机驱动器,物理引脚 IN12 = 38 # 接PUL- IN22 = 40 # 接PUL+ IN32 = 36 # 接DIR- IN42 = 32 # 接DIR+ delay = 0.0001 def setup(): GPIO.setwarnings(False) GPIO.setmode(GPIO.BOARD) # Numbers GPIOs by physical location GPIO.setup(IN1, GPIO.OUT) # Set pin's mode is output GPIO.setup(IN2, GPIO.OUT) GPIO.setup(IN3, GPIO.OUT) GPIO.setup(IN4, GPIO.OUT) def setup2(): GPIO.setwarnings(False) GPIO.setmode(GPIO.BOARD) # Numbers GPIOs by physical location GPIO.setup(IN12, GPIO.OUT) # Set pin's mode is output GPIO.setup(IN22, GPIO.OUT) GPIO.setup(IN32, GPIO.OUT) GPIO.setup(IN42, GPIO.OUT) def setStep(w1, w2, w3, w4): GPIO.output(IN1, w1) GPIO.output(IN2, w2) GPIO.output(IN3, w3) GPIO.output(IN4, w4) def setStep2(w1, w2, w3, w4): GPIO.output(IN12, w1) GPIO.output(IN22, w2) GPIO.output(IN32, w3) GPIO.output(IN42, w4) def stop(): setStep(0, 0, 0, 0) def stop2(): setStep2(0, 0, 0, 0) def rightward(steps): global delay for i in range(0, steps): setStep(1, 0, 1, 0) time.sleep(delay) setStep(0, 1, 1, 0) time.sleep(delay) setStep(0, 1, 0, 1) time.sleep(delay) setStep(1, 0, 0, 1) time.sleep(delay) stop() def rightward2(steps): global delay for i in range(0, steps): setStep2(1, 0, 1, 0) time.sleep(delay) setStep2(0, 1, 1, 0) time.sleep(delay) setStep2(0, 1, 0, 1) time.sleep(delay) setStep2(1, 0, 0, 1) time.sleep(delay) stop2() def leftward(steps): global delay for i in range(0, steps): setStep(1, 0, 0, 1) time.sleep(delay) setStep(0, 1, 0, 1) time.sleep(delay) setStep(0, 1, 1, 0) time.sleep(delay) setStep(1, 0, 1, 0) time.sleep(delay) stop() def leftward2(steps): global delay for i in range(0, steps): setStep2(1, 0, 0, 1) time.sleep(delay) setStep2(0, 1, 0, 1) time.sleep(delay) setStep2(0, 1, 1, 0) time.sleep(delay) setStep2(1, 0, 1, 0) time.sleep(delay) stop2() def downward(steps): global delay for i in range(0, steps): setStep(1, 0, 0, 1) time.sleep(delay) setStep(0, 1, 0, 1) time.sleep(delay) setStep(0, 1, 1, 0) time.sleep(delay) setStep(1, 0, 1, 0) time.sleep(delay) stop() def downward2(steps): global delay for i in range(0, steps): setStep2(1, 0, 0, 1) time.sleep(delay) setStep2(0, 1, 0, 1) time.sleep(delay) setStep2(0, 1, 1, 0) time.sleep(delay) setStep2(1, 0, 1, 0) time.sleep(delay) stop2() def upward(steps): global delay for i in range(0, steps): setStep(1, 0, 1, 0) time.sleep(delay) setStep(0, 1, 1, 0) time.sleep(delay) setStep(0, 1, 0, 1) time.sleep(delay) setStep(1, 0, 0, 1) time.sleep(delay) stop() def upward2(steps): global delay for i in range(0, steps): setStep2(1, 0, 1, 0) time.sleep(delay) setStep2(0, 1, 1, 0) time.sleep(delay) setStep2(0, 1, 0, 1) time.sleep(delay) setStep2(1, 0, 0, 1) time.sleep(delay) stop2() # 测试函数 # angle单位:度 0.036= 360/10000 def loop(angle): print ("rightward--->leftward:") rightward(int(angle/360*6400)) # 发射脉冲时间间隔0.0001(单位秒) 脉冲个数angle/0.036 leftward(int(angle/360*6400)) print ("stop...") time.sleep(1) # sleep 1s def loop2(angle): print ("upward--->downward:") upward2(int(angle/360*6400)) # 发射脉冲时间间隔0.0001(单位秒) 脉冲个数angle/0.036 stop2() downward2(int(angle/360*6400)) print ("stop...") stop2() # stop time.sleep(1) # sleep 3s def destroy(): GPIO.cleanup() # 释放数据 if __name__ == '__main__': # Program start from here setup() setup2() while True: try: # 测试1:loop是下面的电机测试,loop2是上面的电机测试,若两者同时测试,要注意电机被线绕住。 # 左转是leftward()函数,右转是rightward()函数 # 上转是upward()函数,下转是downward()函数 a = input("please input angle:") t0 = time.time() # loop(float(a)) # 下面的电机可0~360度测试, loop2(float(a)) # 由于位置限制,上面电机的角度不能大,可输入0~30度测试 print(time.time() - t0) except KeyboardInterrupt: # When 'Ctrl+C' is pressed, the child function destroy() will be executed. destroy()找激光坐标代码
import cv2 import numpy as np def findLaser(img): """ 找到图片中点绿色激光点与红色激光点并定位中心 :param img: 需要处理点图片 :return: 绿色激光点中心(x1, y1);红色激光点中心(x2, y2) """ cX1, cY1, cX2, cY2 = None, None, None, None greenLaser = 'green' redLaser = 'red' # 色系下限上限表 color_dist = {'red': {'Lower': np.array([0, 60, 60]), 'Upper': np.array([6, 255, 255])}, 'green': {'Lower': np.array([35, 43, 35]), 'Upper': np.array([90, 255, 255])}, } # 灰度图像处理 # gray = cv2.cvtColor(img, cv2.COLOR_BGR2GRAY)#灰度图 # cv2.imshow('gray', gray) # 高斯滤波 blurred = cv2.GaussianBlur(img, (11, 11), 0) # cv2.imshow('blurred', blurred) # 创建运算核 kernel = np.ones((1, 1), np.uint8) # 腐蚀 # erode = cv2.erode(img, kernel, iterations=1) # 膨胀 # img_dilate = cv2.dilate(blurred, kernel, iterations = 5) # 开运算 opening = cv2.morphologyEx(blurred, cv2.MORPH_OPEN, kernel) # 二值化处理 thresh = cv2.threshold(opening, 230, 255, cv2.THRESH_BINARY)[1] cv2.imshow('thresh', thresh) hsv = cv2.cvtColor(thresh, cv2.COLOR_BGR2HSV) # 转化成HSV图像 # 颜色二值化筛选处理 inRange_hsv_green = cv2.inRange(hsv, color_dist[greenLaser]['Lower'], color_dist[greenLaser]['Upper']) inRange_hsv_red = cv2.inRange(hsv, color_dist[redLaser]['Lower'], color_dist[redLaser]['Upper']) cv2.imshow('inrange_hsv_green', inRange_hsv_green) cv2.imshow('inrange_hsv_red', inRange_hsv_red) # 找绿色激光点 try: cnts1 = cv2.findContours(inRange_hsv_green.copy(), cv2.RETR_EXTERNAL, cv2.CHAIN_APPROX_SIMPLE)[-2] c1 = max(cnts1, key=cv2.contourArea) M = cv2.moments(c1) cX1 = int(M["m10"] / M["m00"]) cY1 = int(M["m01"] / M["m00"]) cv2.circle(img, (cX1, cY1), 3, (0, 255, 0), -1) rect = cv2.minAreaRect(c1) box = cv2.boxPoints(rect) cv2.drawContours(img, [np.int0(box)], -1, (0, 255, 0), 2) except: print('没有找到绿色的激光') # 找红色激光点 try: cnts2 = cv2.findContours(inRange_hsv_red.copy(), cv2.RETR_EXTERNAL, cv2.CHAIN_APPROX_SIMPLE)[-2] c2 = max(cnts2, key=cv2.contourArea) M = cv2.moments(c2) cX2 = int(M["m10"] / M["m00"]) cY2 = int(M["m01"] / M["m00"]) cv2.circle(img, (cX2, cY2), 3, (0, 0, 255), -1) rect = cv2.minAreaRect(c2) box = cv2.boxPoints(rect) cv2.drawContours(img, [np.int0(box)], -1, (0, 0, 255), 2) except: print('没有找到红色的激光') return cX1, cY1, cX2, cY2 if __name__ == '__main__': img = cv2.imread('/Users/duanhao/Desktop/Electronic Design Competion/2023电子设计大赛/laser/15.jpg') x1, y1, x2, y2 = findLaser(img) print(f'绿色激光点坐标点({x1}, {y1})') print(f'红色激光点坐标点({x2}, {y2})') cv2.imshow('camera', img) cv2.waitKey() cv2.destroyAllWindows()找轮廓形状代码
import cv2 import numpy as np #定义形状检测函数 def ShapeDetection(img): contours,hierarchy = cv2.findContours(img,cv2.RETR_EXTERNAL,cv2.CHAIN_APPROX_NONE) #寻找轮廓点 for obj in contours: area = cv2.contourArea(obj) #计算轮廓内区域的面积 cv2.drawContours(imgContour, obj, -1, (255, 0, 0), 4) #绘制轮廓线 perimeter = cv2.arcLength(obj,True) #计算轮廓周长 approx = cv2.approxPolyDP(obj,0.02*perimeter,True) #获取轮廓角点坐标 CornerNum = len(approx) #轮廓角点的数量 x, y, w, h = cv2.boundingRect(approx) #获取坐标值和宽度、高度 #轮廓对象分类 if CornerNum ==3: objType ="triangle" elif CornerNum == 4: for i in range(0,4): print("矩形角坐标%d:"%(i+1),approx[i][0][0], approx[i][0][1]) cv2.circle(imgContour, (approx[i][0][0], approx[i][0][1]), 5, (0,255,255), 3) if w==h: objType= "Square" else:objType="Rectangle " elif CornerNum>4: objType= " red" else:objType="N" cv2.rectangle(imgContour,(x,y),(x+w,y+h),(0,0,255),2) #绘制边界框 cv2.putText(imgContour,objType,(x+(w//2),y+(h//2)),cv2.FONT_HERSHEY_COMPLEX,0.6,(0,0,0),1) #绘制文字 path = '/Users/duanhao/Desktop/black/2.jpg' img = cv2.imread(path) imgContour = img.copy() imgGray = cv2.cvtColor(img,cv2.COLOR_RGB2GRAY) #转灰度图 imgBlur = cv2.GaussianBlur(imgGray,(5,5),1) #高斯模糊 imgCanny = cv2.Canny(imgBlur,60,60) #Canny算子边缘检测 ShapeDetection(imgCanny) #形状检测 cv2.imshow("Original img", img) cv2.imshow("imgGray", imgGray) cv2.imshow("imgBlur", imgBlur) cv2.imshow("imgCanny", imgCanny) cv2.imshow("shape Detection", imgContour) cv2.waitKey(0)找黑色电工胶带代码
import cv2 import numpy as np #定义形状检测函数 def ShapeDetection(img): contours,hierarchy = cv2.findContours(img,cv2.RETR_EXTERNAL,cv2.CHAIN_APPROX_NONE) #寻找轮廓点 for obj in contours: area = cv2.contourArea(obj) #计算轮廓内区域的面积 # cv2.drawContours(imgContour, obj, -1, (255, 0, 0), 4) #绘制轮廓线 perimeter = cv2.arcLength(obj,True) #计算轮廓周长 approx = cv2.approxPolyDP(obj,0.02*perimeter,True) #获取轮廓角点坐标 CornerNum = len(approx) #轮廓角点的数量 x, y, w, h = cv2.boundingRect(approx) #获取坐标值和宽度、高度 if CornerNum == 4: for i in range(0,4): cv2.circle(imgContour, (approx[i][0][0], approx[i][0][1]), 2, (0,0,255), 3) axis.append([approx[i][0][0], approx[i][0][1]]) # cv2.rectangle(imgContour,(x, y),(x+w, y+h),(0,0,255),2) #绘制边界框 if __name__ == '__main__': axis = [] # 导入图片img img = cv2.imread('/Users/duanhao/Desktop/Electronic Design Competion/2023电子设计大赛/black/5.jpg') # 需要裁剪的区域################################### hStart, hEnd, wStart, wEnd = 250, 650, 320, 700 ################################################ cropImg = img[hStart:hEnd, wStart:wEnd] cv2.imshow('cropImg', cropImg) # 灰度图像处理 gray = cv2.cvtColor(cropImg, cv2.COLOR_BGR2GRAY)#灰度图 cv2.imshow('gray', gray) imgContour = cropImg.copy() # 图像inRange二值化处理 hsv = cv2.cvtColor(cropImg, cv2.COLOR_BGR2HSV) l_g = np.array([0, 0, 0]) # 阈值下限 u_g = np.array([255, 113, 46]) # 阈值上限 mask = cv2.inRange(hsv, l_g, u_g) cv2.imshow('mask', mask) ShapeDetection(mask) # 从逆时针改为顺时针 axis[0], axis[2] = axis[2], axis[0] print(axis) cv2.imshow("crop", imgContour) cv2.waitKey(0) cv2.destroyAllWindows()“指哪打哪”云台运动代码
import cv2 import math import numpy as np import RPi.GPIO as GPIO import time # 规定GPIO引脚 IN1 = 18 # 接PUL- IN2 = 16 # 接PUL+ IN3 = 15 # 接DIR- IN4 = 13 # 接DIR+ # 云台上面的电机驱动器,物理引脚 IN12 = 38 # 接PUL- IN22 = 40 # 接PUL+ IN32 = 36 # 接DIR- IN42 = 32 # 接DIR+ delay = 0.0001 def downsetup(): GPIO.setwarnings(False) GPIO.setmode(GPIO.BOARD) # Numbers GPIOs by physical location GPIO.setup(IN1, GPIO.OUT) # Set pin's mode is output GPIO.setup(IN2, GPIO.OUT) GPIO.setup(IN3, GPIO.OUT) GPIO.setup(IN4, GPIO.OUT) def upsetup(): GPIO.setwarnings(False) GPIO.setmode(GPIO.BOARD) # Numbers GPIOs by physical location GPIO.setup(IN12, GPIO.OUT) # Set pin's mode is output GPIO.setup(IN22, GPIO.OUT) GPIO.setup(IN32, GPIO.OUT) GPIO.setup(IN42, GPIO.OUT) def downsetStep(w1, w2, w3, w4): GPIO.output(IN1, w1) GPIO.output(IN2, w2) GPIO.output(IN3, w3) GPIO.output(IN4, w4) def upsetStep(w1, w2, w3, w4): GPIO.output(IN12, w1) GPIO.output(IN22, w2) GPIO.output(IN32, w3) GPIO.output(IN42, w4) def downstop(): # 下面的电机停止 downsetStep(0, 0, 0, 0) def upstop(): # 上面的电机停止 upsetStep(0, 0, 0, 0) def rightward(steps): # 下面的电机向右转动 global delay for i in range(0, steps): downsetStep(1, 0, 1, 0) time.sleep(delay) downsetStep(0, 1, 1, 0) time.sleep(delay) downsetStep(0, 1, 0, 1) time.sleep(delay) downsetStep(1, 0, 0, 1) time.sleep(delay) downstop() # def rightward2(steps): # global delay # for i in range(0, steps): # upsetStep(1, 0, 1, 0) # time.sleep(delay) # upsetStep(0, 1, 1, 0) # time.sleep(delay) # upsetStep(0, 1, 0, 1) # time.sleep(delay) # upsetStep(1, 0, 0, 1) # time.sleep(delay) # upstop() def leftward(steps): # 下面的电机向左转动 global delay for i in range(0, steps): downsetStep(1, 0, 0, 1) time.sleep(delay) downsetStep(0, 1, 0, 1) time.sleep(delay) downsetStep(0, 1, 1, 0) time.sleep(delay) downsetStep(1, 0, 1, 0) time.sleep(delay) downstop() # def leftward2(steps): # global delay # for i in range(0, steps): # upsetStep(1, 0, 0, 1) # time.sleep(delay) # upsetStep(0, 1, 0, 1) # time.sleep(delay) # upsetStep(0, 1, 1, 0) # time.sleep(delay) # upsetStep(1, 0, 1, 0) # time.sleep(delay) # upstop() # def downward(steps): # global delay # for i in range(0, steps): # downsetStep(1, 0, 0, 1) # time.sleep(delay) # downsetStep(0, 1, 0, 1) # time.sleep(delay) # downsetStep(0, 1, 1, 0) # time.sleep(delay) # downsetStep(1, 0, 1, 0) # time.sleep(delay) # downstop() def downward2(steps): # 上面的电机向下转动 global delay for i in range(0, steps): upsetStep(1, 0, 0, 1) time.sleep(delay) upsetStep(0, 1, 0, 1) time.sleep(delay) upsetStep(0, 1, 1, 0) time.sleep(delay) upsetStep(1, 0, 1, 0) time.sleep(delay) upstop() # def upward(steps): # global delay # for i in range(0, steps): # downsetStep(1, 0, 1, 0) # time.sleep(delay) # downsetStep(0, 1, 1, 0) # time.sleep(delay) # downsetStep(0, 1, 0, 1) # time.sleep(delay) # downsetStep(1, 0, 0, 1) # time.sleep(delay) # downstop() def upward2(steps): # 上面的电机向上转动 global delay for i in range(0, steps): upsetStep(1, 0, 1, 0) time.sleep(delay) upsetStep(0, 1, 1, 0) time.sleep(delay) upsetStep(0, 1, 0, 1) time.sleep(delay) upsetStep(1, 0, 0, 1) time.sleep(delay) upstop() # 测试函数 # angle单位:度 0.036= 360/10000 # def loop(angle): # print ("rightward--->leftward:") # rightward(int(angle/360*6400)) # 发射脉冲时间间隔0.0001(单位秒) 脉冲个数angle/0.036 # leftward(int(angle/360*6400)) # print ("downstop...") # time.sleep(1) # sleep 1s # def loop2(angle): # print ("upward--->downward:") # upward2(int(angle/360*6400)) # 发射脉冲时间间隔0.0001(单位秒) 脉冲个数angle/0.036 # upstop() # downward2(int(angle/360*6400)) # print ("downstop...") # upstop() # downstop # time.sleep(1) # sleep 3s def destroy(): GPIO.cleanup() # 释放数据 curpos = np.array([-1000, 1000]) # mm,mm pi = 3.14159 # 坐标原点在左上角,向左为x轴,向下为y轴。坐标单位像素个数 # x轴移动距离:dx:移动的距离 # 转换:1像素=1.75mm #################测试程序 def xrunpixel(dxpixel): # 下面的电机转动多少像素的位置 xangle = math.atan(dxpixel / 1000 / 1.75) * 180 / pi # 单位:度,1000mm需转换为像素个数单位 if xangle > 0: rightward(int(xangle / 360 * 6400)) else: xangle = -xangle leftward(int(xangle / 360 * 6400)) # y轴移动距离:dy:移动的距离(像素=mm/1.75) def yrunpixel(dypixel): # 上面的电机转动多少像素的位置 yangle = math.atan(dypixel / 1000 / 1.75) * 180 / pi if yangle > 0: upward(int(yangle / 360 * 6400)) else: yangle = -yangle downward(int(yangle / 360 * 6400)) ##################### # dxstep:x移动的距离(step,int,步进电机步数) def xrunstep(dxstep): # 下面的电机转动的步数 if dxstep > 0: rightward(dxstep) else: dxstep = -dxstep leftward(dxstep) # dystep:x移动的距离(步长数,int) def yrunstep(dystep): # 上面的电机转动的步数 if dystep > 0: downward2(dystep) else: dystep = -dystep upward2(dystep) # linepos = np.array([[1,2],[3,4],[5,6]]) # 像素单位 # def runline(linepos): # points = linepos.shape[0] # 总点数 # xcumsum = np.cumsum(linepos[:,0]) # ycumsum = np.cumsum(linepos[:,1]) # xcumsum = int(math.atan(ycumsum/1374)*1018.591636) # 1374=1000*1.374,1018.591636 = 1/math.pi*180/360*6400 # ycumsum = int(math.atan(ycumsum/1374)*1018.591636) # for i in range(1,points): # xrunstep(xcumsum[i] - xcumsum[i-1]) # yrunstep(ycumsum[i] - ycumsum[i-1]) # points[0,:] 起点位置,points[1,:] 目标位置,# 像素单位 points = np.array([[1, 2], [3, 4]]) def runtwopoints(points): # 从第一个点的位置移动到第二点的位置 temp = points[1, 0] - points[0, 0] xstep = int(math.atan(temp / 738) * 1018.591636) # int((points[1,0]-points[0,0])*0.57142857) temp = points[1, 1] - points[0, 1] ystep = int(math.atan(temp / 738) * 1018.591636) print('xstep = ', xstep) print('ystep = ', ystep) xrunstep(xstep) yrunstep(ystep) #########测试程序 # x坐标max: 570,1个像素0.738mm,对应距离1000mm zeropos = np.array([100, 100]) # 像素 curpos = np.array([500, 350]) # 像素 def returnZero(): # 从当前位置curpos回到原点zeropos global curpos global zeropos global points points[0, :] = curpos points[1, :] = zeropos runtwopoints(points) # boundary = np.array([[300, 300], [295, 295], [290, 290], [285, 285], [280, 280], [275, 275], [270, 271], [265, 266], [260, 261], [255, 256], [250, 251], [245, 246], [240, 242], [235, 237], [230, 232], [225, 227], [220, 222], [215, 218], [210, 213], [205, 208], [200, 203], [195, 198], [190, 193], [185, 189], [180, 184], [175, 179], [170, 174], [165, 169], [160, 165], [155, 160], # [150, 155], [145, 150], [140, 145], [135, 140], [130, 136], [125, 131], [120, 126], [115, 121], [110, 116], [105, 111], [100, 107], [95, 102], [90, 97], [85, 92], [80, 87], [75, 83], [70, 78], [65, 73], [60, 68], [55, 63], [50, 58], [45, 54], [40, 49], [35, 44], [30, 39], [25, 34], [20, 30], [25, 29], [30, 29], [35, 29], [40, 29], [45, 29], # [50, 29], [55, 29], [60, 29], [65, 29], [70, 28], [75, 28], [80, 28], [85, 28], [90, 28], [95, 28], [100, 28], [105, 28], [110, 28], [115, 28], [120, 27], [125, 27], [130, 27], [135, 27], [140, 27], [145, 27], [150, 27], [155, 27], [160, 27], [165, 26], [170, 26], [175, 26], [180, 26], [185, 26], [190, 26], [195, 26], [200, 26], [205, 26], [210, 26], # [215, 25], [220, 25], [225, 25], [230, 25], [235, 25], [240, 25], [245, 25], [250, 25], [255, 25], [260, 25], [265, 24], [270, 24], [275, 24], [280, 24], [285, 24], [290, 24], [295, 24], [300, 24], [305, 24], [310, 23], [315, 23], [320, 23], [325, 23], [330, 23], [335, 23], [340, 23], [345, 23], [350, 23], [355, 23], [360, 22], [365, 22], [370, 22], [375, 22], # [380, 22], [385, 22], [390, 22], [395, 22], [400, 22], [405, 21], [410, 21], [415, 21], [420, 21], [425, 21], [430, 21], [435, 21], [440, 21], [445, 21], [450, 21], [455, 20], [460, 20], [465, 20], [470, 20], [475, 20], [480, 20], [485, 20], [490, 20], [495, 20], [500, 20], [500, 20], [499, 24], [498, 29], [497, 34], [496, 39], [495, 44], # [494, 48], [493, 53], [492, 58], [491, 63], [490, 68], [489, 72], [488, 77], [487, 82], [486, 87], [485, 92], [484, 96], [483, 101], [482, 106], [481, 111], [480, 116], [479, 120], [478, 125], [477, 130], [476, 135], [475, 140], [474, 144], [473, 149], [472, 154], [471, 159], [470, 164], [469, 168], [468, 173], [467, 178], [466, 183], [465, 188], [464, 192], # [463, 197], [462, 202], [461, 207], [460, 212], [459, 216], [458, 221], [457, 226], [456, 231], [455, 236], [454, 240], [453, 245], [452, 250], [451, 255], [450, 260], [449, 264], [448, 269], [447, 274], [446, 279], [445, 284], [444, 288], [443, 293], [442, 298], [441, 303], [440, 308], [439, 312], [438, 317], [437, 322], [436, 327], [435, 332], # [434, 336], [433, 341], [432, 346], [431, 351], [430, 356], [429, 360], [428, 365], [427, 370], [426, 375], [425, 380], [424, 384], [423, 389], [422, 394], [421, 399], [420, 404], [419, 408], [418, 413], [417, 418], [416, 423], [415, 428], [414, 432], [413, 437], [412, 442], [411, 447], [410, 452], [409, 456], [408, 461], [407, 466], [406, 471], [405, 476], # [404, 480], [403, 485], [402, 490], [400, 500], [395, 497], [390, 494], [385, 491], [380, 489], [375, 486], [370, 483], [365, 481], [360, 478], [355, 475], [350, 472], [345, 470], [340, 467], [335, 464], [330, 462], [325, 459], [320, 456], [315, 454], [310, 451], [305, 448], [300, 445], [295, 443], [290, 440], [285, 437], [280, 435], [275, 432], # [270, 429], [265, 427], [260, 424], [255, 421], [250, 418], [245, 416], [240, 413], [235, 410], [230, 408], [225, 405], [220, 402], [215, 400], [210, 397], [205, 394], [200, 391], [195, 389], [190, 386], [185, 383], [180, 381], [175, 378], [170, 375], [165, 372], [160, 370], [155, 367], [150, 364], [145, 362], [140, 359], [135, 356], [130, 354], [125, 351], # [120, 348], [115, 345], [110, 343], [105, 340], [100, 337], [95, 335], [90, 332], [85, 329], [80, 327], [75, 324], [70, 321], [65, 318], [60, 316], [55, 313], [50, 310], [45, 308], [40, 305], [35, 302], [30, 300], [29, 273], [28, 246], [27, 219], [26, 192], [25, 165], [24, 138], [23, 111], [22, 84]]) # def runboundary(): # global boundary # num = boundary.shape[0] # #print('num = ',num) # for i in range(0,num-1): # #print('i = ',i) # temp = boundary[i:i+2,:] # #print('temp = ',temp) # runtwopoints(temp) def runMotor(x1, y1, x2, y2): x1, y1, x2, y2 = int(x1), int(y1), int(x2), int(y2) # 从(x1, y1) -> (x2, y2) points = np.array([[x1, y1], [x2, y2]]) print(points) runtwopoints(points)直线拟合找黑框中心点代码
import cv2 import numpy as np def findLaser(crop): """ 找到图片中点绿色激光点与红色激光点并定位中心 :param crop: 需要处理点图片 :return: 绿色激光点中心(x1, y1);红色激光点中心(x2, y2) """ cX1, cY1, cX2, cY2 = None, None, None, None greenLaser = 'green' redLaser = 'red' # 色系下限上限表 color_dist = {'red': {'Lower': np.array([0, 60, 60]), 'Upper': np.array([6, 255, 255])}, 'green': {'Lower': np.array([35, 43, 35]), 'Upper': np.array([90, 255, 255])}, } # 灰度图像处理 # gray = cv2.cvtColor(crop, cv2.COLOR_BGR2GRAY)#灰度图 # cv2.imshow('gray', gray) # 高斯滤波 blurred = cv2.GaussianBlur(crop, (11, 11), 0) # cv2.imshow('blurred', blurred) # 创建运算核 kernel = np.ones((1, 1), np.uint8) # 腐蚀 # erode = cv2.erode(crop, kernel, iterations=1) # 膨胀 # crop_dilate = cv2.dilate(blurred, kernel, iterations = 5) # 开运算 opening = cv2.morphologyEx(blurred, cv2.MORPH_OPEN, kernel) # 二值化处理 thresh = cv2.threshold(opening, 230, 255, cv2.THRESH_BINARY)[1] # cv2.imshow('thresh', thresh) hsv = cv2.cvtColor(thresh, cv2.COLOR_BGR2HSV) # 转化成HSV图像 # 颜色二值化筛选处理 inRange_hsv_green = cv2.inRange(hsv, color_dist[greenLaser]['Lower'], color_dist[greenLaser]['Upper']) inRange_hsv_red = cv2.inRange(hsv, color_dist[redLaser]['Lower'], color_dist[redLaser]['Upper']) # cv2.imshow('inrange_hsv_green', inRange_hsv_green) # cv2.imshow('inrange_hsv_red', inRange_hsv_red) # 找绿色激光点 try: cnts1 = cv2.findContours(inRange_hsv_green.copy(), cv2.RETR_EXTERNAL, cv2.CHAIN_APPROX_SIMPLE)[-2] c1 = max(cnts1, key=cv2.contourArea) M = cv2.moments(c1) cX1 = int(M["m10"] / M["m00"]) cY1 = int(M["m01"] / M["m00"]) cv2.circle(crop, (cX1, cY1), 3, (0, 255, 0), -1) rect = cv2.minAreaRect(c1) box = cv2.boxPoints(rect) cv2.drawContours(crop, [np.int0(box)], -1, (0, 255, 0), 2) except: print('没有找到绿色的激光') # 找红色激光点 try: cnts2 = cv2.findContours(inRange_hsv_red.copy(), cv2.RETR_EXTERNAL, cv2.CHAIN_APPROX_SIMPLE)[-2] c2 = max(cnts2, key=cv2.contourArea) M = cv2.moments(c2) cX2 = int(M["m10"] / M["m00"]) cY2 = int(M["m01"] / M["m00"]) cv2.circle(crop, (cX2, cY2), 3, (0, 0, 255), -1) rect = cv2.minAreaRect(c2) box = cv2.boxPoints(rect) cv2.drawContours(crop, [np.int0(box)], -1, (0, 0, 255), 2) except: print('没有找到红色的激光') return cX1, cY1, cX2, cY2 def draw_fit_line(dire, type): """ :param dire: 传入需要拟合的含有白色直线的图像 :return: 传出直线一般式参数a,b,c """ dic = {'up': (hStart, wStart + leftRight_distance), 'down': (hEnd - upDown_distance, wStart + leftRight_distance), 'left': (hStart + upDown_distance, wStart), 'right': (hStart + upDown_distance, wEnd - leftRight_distance)} # 存放直线的像素点坐标 axis = [] for i in range(len(dire)): for j in range(len(dire[i])): if dire[i][j] == 255: # 判断为白色像素 # 对应在原图中的高宽坐标 h = i + dic[type][0] w = j + dic[type][1] axis.append([w, h]) data_np = np.array(axis) # 坐标矩阵化 output = cv2.fitLine(data_np, cv2.DIST_L2, 0, 0.01, 0.01) # 直线拟合 k = output[1] / output[0] b = output[3] - k * output[2] return k, b def crop(h, w, cnt): ''' 将图形裁剪出上下左右四个部分的中间位置 :param cnt: 需要裁剪的图片 :return: ''' global upDown_distance, leftRight_distance # 上下部分裁剪的宽度 upDown_distance = h # 左右部分裁剪的宽度 leftRight_distance = w up = cnt[0:upDown_distance, leftRight_distance:wEnd - wStart - leftRight_distance] down = cnt[hEnd - hStart - upDown_distance:hEnd - hStart, leftRight_distance:wEnd - wStart - leftRight_distance] left = cnt[upDown_distance:hEnd - hStart - upDown_distance, 0:leftRight_distance] right = cnt[upDown_distance:hEnd - hStart - upDown_distance, wEnd -wStart - leftRight_distance:wEnd - wStart] # 显示四个边长裁剪过后的图片 cv2.imshow('up', up) cv2.imshow('down', down) cv2.imshow('left', left) cv2.imshow('right', right) return up, down, left, right def getCoordinate(k1, b1, k2, b2): x = (b2 - b1) / (k1 - k2) y = k1 * x + b1 return int(x), int(y) def drawCenter(a, b, c, d): # 显示边长交点 cv2.circle(img, (a[0], a[1]), 3, (0, 0, 255), -1) cv2.circle(img, (b[0], b[1]), 3, (0, 0, 255), -1) cv2.circle(img, (c[0], c[1]), 3, (0, 0, 255), -1) cv2.circle(img, (d[0], d[1]), 3, (0, 0, 255), -1) # 画边界线 cv2.line(img, (a[0], a[1]), (b[0], b[1]), (0, 255, 0), 1) cv2.line(img, (b[0], b[1]), (c[0], c[1]), (0, 255, 0), 1) cv2.line(img, (a[0], a[1]), (d[0], d[1]), (0, 255, 0), 1) cv2.line(img, (c[0], c[1]), (d[0], d[1]), (0, 255, 0), 1) xCenter = (a[0] + b[0] + c[0] + d[0])//4 yCenter = (a[1] + b[1] + c[1] + d[1])//4 cv2.circle(img, (xCenter, yCenter), 4, (0, 0, 255), -1) return xCenter, yCenter if __name__ == "__main__": # 导入图片img img = cv2.imread('/Users/duanhao/Desktop/Electronic Design Competion/2023电子设计大赛/laser/2.jpg') # 需要裁剪的区域################################### hStart, hEnd, wStart, wEnd = 50, 650, 450, 1100 ################################################ cropImg = img[hStart:hEnd, wStart:wEnd] cv2.imshow('cropImg', cropImg) # 找激光点 -> xc1, yc1, xc2, yc2 = findLaser(cropImg) # 对应到原点中的激光坐标 try: xc2, yc2 = xc2 + wStart, yc2 + hStart print('红色激光点坐标:', xc2, yc2) except: print('无法返回对应原图中激光笔坐标') # 图像inRange二值化处理 hsv = cv2.cvtColor(cropImg, cv2.COLOR_BGR2HSV) l_g = np.array([0, 0, 0]) # 阈值下限 u_g = np.array([255, 255, 116]) # 阈值上限 mask = cv2.inRange(hsv, l_g, u_g) cv2.imshow('mask', mask) # 传入二值化后的图片返回裁剪出来的四个边长举行 # 上下部分裁剪的宽度 upDown_distance = 150 # 左右部分裁剪的宽度 leftRight_distance = 150 try: # 传入参数1:上下部分裁剪宽度; 参数2:左右部分裁剪宽度 up, down, left, right = crop(upDown_distance, leftRight_distance, mask) # 在img原图中拟合四条直线 -> 得到拟合直线的k,b up_k, up_b = draw_fit_line(up, 'up') down_k, down_b = draw_fit_line(down, 'down') left_k, left_b = draw_fit_line(left, 'left') right_k, right_b = draw_fit_line(right, 'right') # 求出A,B, C, D四个边长交点坐标 -> 顺时针方向定义ABCD点 A = getCoordinate(up_k, up_b, left_k, left_b) B = getCoordinate(up_k, up_b, right_k, right_b) C = getCoordinate(down_k, down_b, right_k, right_b) D = getCoordinate(down_k, down_b, left_k, left_b) # 画出边界线以及中心点 xCenter, yCenter = drawCenter(A, B, C, D) print('中心点坐标:', xCenter, yCenter) except: print('没有裁剪好图片,识别不到黑色方框!') print(f'原来图形尺寸为{img.shape[0:1]}') cv2.imshow('img', img) cv2.waitKey(0) cv2.destroyAllWindows()完整代码
要求1:
import cv2 import math import numpy as np import RPi.GPIO as GPIO import time # 坐标方向:水平向右为x正向, left-----right,垂直向下为y正方向,向下为up,向上为down # 像素间隔:0.738mm/每像素 # 规定GPIO引脚 IN1 = 18 # 接PUL- IN2 = 16 # 接PUL+ IN3 = 15 # 接DIR- IN4 = 13 # 接DIR+ # 云台上面的电机驱动器,物理引脚 IN12 = 38 # 接PUL- IN22 = 40 # 接PUL+ IN32 = 36 # 接DIR- IN42 = 32 # 接DIR+ delay = 0.0001 def downsetup(): GPIO.setwarnings(False) GPIO.setmode(GPIO.BOARD) # Numbers GPIOs by physical location GPIO.setup(IN1, GPIO.OUT) # Set pin's mode is output GPIO.setup(IN2, GPIO.OUT) GPIO.setup(IN3, GPIO.OUT) GPIO.setup(IN4, GPIO.OUT) def upsetup(): GPIO.setwarnings(False) GPIO.setmode(GPIO.BOARD) # Numbers GPIOs by physical location GPIO.setup(IN12, GPIO.OUT) # Set pin's mode is output GPIO.setup(IN22, GPIO.OUT) GPIO.setup(IN32, GPIO.OUT) GPIO.setup(IN42, GPIO.OUT) def downsetStep(w1, w2, w3, w4): GPIO.output(IN1, w1) GPIO.output(IN2, w2) GPIO.output(IN3, w3) GPIO.output(IN4, w4) def upsetStep(w1, w2, w3, w4): GPIO.output(IN12, w1) GPIO.output(IN22, w2) GPIO.output(IN32, w3) GPIO.output(IN42, w4) def downstop(): # 下面的电机停止 downsetStep(0, 0, 0, 0) def upstop(): # 上面的电机停止 upsetStep(0, 0, 0, 0) def rightward(steps): # 下面的电机向右转动 global delay for i in range(0, steps): downsetStep(1, 0, 1, 0) time.sleep(delay) downsetStep(0, 1, 1, 0) time.sleep(delay) downsetStep(0, 1, 0, 1) time.sleep(delay) downsetStep(1, 0, 0, 1) time.sleep(delay) downstop() def leftward(steps): # 下面的电机向左转动 global delay for i in range(0, steps): downsetStep(1, 0, 0, 1) time.sleep(delay) downsetStep(0, 1, 0, 1) time.sleep(delay) downsetStep(0, 1, 1, 0) time.sleep(delay) downsetStep(1, 0, 1, 0) time.sleep(delay) downstop() def upward2(steps): # 上面的电机向下转动 global delay for i in range(0, steps): upsetStep(1, 0, 0, 1) time.sleep(delay) upsetStep(0, 1, 0, 1) time.sleep(delay) upsetStep(0, 1, 1, 0) time.sleep(delay) upsetStep(1, 0, 1, 0) time.sleep(delay) upstop() def downward2(steps): # 上面的电机向上转动 global delay for i in range(0, steps): upsetStep(1, 0, 1, 0) time.sleep(delay) upsetStep(0, 1, 1, 0) time.sleep(delay) upsetStep(0, 1, 0, 1) time.sleep(delay) upsetStep(1, 0, 0, 1) time.sleep(delay) upstop() def destroy(): GPIO.cleanup() # 释放数据 curpos = np.array([-1000,1000]) # mm,mm pi = 3.14159 # 坐标原点在左上角,向左为x轴,向下为y轴。坐标单位像素个数 # x轴移动距离:dx:移动的距离 # 转换:1像素=1.75mm def xrunpixel(dxpixel): # 下面的电机转动多少像素的位置 xangle = math.atan(dxpixel/1000/1.75)*180/pi # 单位:度,1000mm需转换为像素个数单位 if xangle > 0: rightward(int(xangle/360*6400)) else: xangle = -xangle leftward(int(xangle/360*6400)) # y轴移动距离:dy:移动的距离(像素=mm/1.75) def yrunpixel(dypixel): # 上面的电机转动多少像素的位置 yangle = math.atan(dypixel/1000/1.75)*180/pi if yangle > 0: upward(int(yangle/360*6400)) else: yangle = -yangle downward(int(yangle/360*6400)) # dxstep:x移动的距离(step,int,步进电机步数) def xrunstep(dxstep): # 下面的电机转动的步数 if dxstep > 0: rightward(dxstep) else: dxstep = -dxstep leftward(dxstep) # dystep:x移动的距离(步长数,int) def yrunstep(dystep): # 上面的电机转动的步数 if dystep > 0: upward2(dystep) else: dystep = -dystep downward2(dystep) #points[0,:] 起点位置,points[1,:] 目标位置,# 像素单位 points = np.array([[1,2],[3,4]]) def runtwopoints(points): points = np.array(points) steps = [] dstep = 2 temp = points[1,0]-points[0,0] xstep = int(math.atan(temp/732)*1018.591636) #int((points[1,0]-points[0,0])*0.57142857) # xstep = int(math.atan(temp/890)*1018.591636) #int((points[1,0]-points[0,0])*0.57142857) temp = points[1,1]-points[0,1] ystep = int(math.atan(temp/740)*1018.591636) # ystep = int(math.atan(temp/974)*1018.591636) if xstep >= 0: absxstep = xstep xdir = 1 else: absxstep = -xstep xdir = 0 if ystep >= 0: absystep = ystep ydir = 1 else: absystep = -ystep ydir = 0 # 得到xstep和ystep的最大值 if absxstep >= absystep: # 说明较长边在x轴 maxdir = 'x' absmaxstep = absxstep maxstep = xstep minstep = ystep else: maxdir = 'y' absmaxstep = absystep maxstep = ystep minstep = xstep # 分段运行节数 sections = int(absmaxstep/dstep)+1 dstepmin = minstep/sections dstepmax = maxstep/sections for i in range(1,sections+1): if maxdir == 'x': # 沿x边走,先算累计步长 steps.append([round(i * dstepmax),round(i * dstepmin)]) else: # 沿y边走,先算累计步长 steps.append([round(i * dstepmin),round(i * dstepmax)]) if steps[sections-1][0] != xstep: steps[sections-1][0] == xstep if steps[sections-1][1] != ystep: steps[sections-1][1] == ystep #print('steps=', steps) #print() for i in range(sections-1,0,-1): steps[i][0] -= steps[i-1][0] steps[i][1] -= steps[i-1][1] #print('steps=', steps) points = len(steps) # 总点数 for i in range(points): xrunstep(steps[i][0]) yrunstep(steps[i][1]) upstop() downstop() # x坐标max: 570,1个像素0.738mm,对应距离1000mm zeropos = np.array([100,100]) # 像素 curpos = np.array([500,350]) # 像素 def returnZero(): # 从当前位置curpos回到原点zeropos global curpos global zeropos global points points[0,:] = curpos points[1,:] = zeropos runtwopoints(points) def findLaser(crop): """ 找到图片中点绿色激光点与红色激光点并定位中心 :param crop: 需要处理点图片 :return: 绿色激光点中心(x1, y1);红色激光点中心(x2, y2) """ cX1, cY1, cX2, cY2 = None, None, None, None greenLaser = 'green' redLaser = 'red' # 色系下限上限表 color_dist = {'red': {'Lower': np.array([0, 60, 60]), 'Upper': np.array([6, 255, 255])}, 'green': {'Lower': np.array([35, 43, 35]), 'Upper': np.array([90, 255, 255])}, } # 高斯滤波 blurred = cv2.GaussianBlur(crop, (11, 11), 0) # cv2.imshow('blurred', blurred) # 创建运算核 kernel = np.ones((1, 1), np.uint8) # 开运算 opening = cv2.morphologyEx(blurred, cv2.MORPH_OPEN, kernel) # 二值化处理 thresh = cv2.threshold(opening, 230, 255, cv2.THRESH_BINARY)[1] # cv2.imshow('thresh', thresh) hsv = cv2.cvtColor(thresh, cv2.COLOR_BGR2HSV) # 转化成HSV图像 # 颜色二值化筛选处理 inRange_hsv_green = cv2.inRange(hsv, color_dist[greenLaser]['Lower'], color_dist[greenLaser]['Upper']) inRange_hsv_red = cv2.inRange(hsv, color_dist[redLaser]['Lower'], color_dist[redLaser]['Upper']) # # 找绿色激光点 # try: # cnts1 = cv2.findContours(inRange_hsv_green.copy(), cv2.RETR_EXTERNAL, cv2.CHAIN_APPROX_SIMPLE)[-2] # c1 = max(cnts1, key=cv2.contourArea) # M = cv2.moments(c1) # cX1 = int(M["m10"] / M["m00"]) # cY1 = int(M["m01"] / M["m00"]) # cv2.circle(crop, (cX1, cY1), 3, (0, 255, 0), -1) # rect = cv2.minAreaRect(c1) # box = cv2.boxPoints(rect) # # cv2.drawContours(crop, [np.int0(box)], -1, (0, 255, 0), 2) # except: # print('没有找到绿色的激光') # 找红色激光点 try: cnts2 = cv2.findContours(inRange_hsv_red.copy(), cv2.RETR_EXTERNAL, cv2.CHAIN_APPROX_SIMPLE)[-2] c2 = max(cnts2, key=cv2.contourArea) M = cv2.moments(c2) cX2 = int(M["m10"] / M["m00"]) cY2 = int(M["m01"] / M["m00"]) cv2.circle(crop, (cX2, cY2), 3, (0, 0, 255), -1) rect = cv2.minAreaRect(c2) box = cv2.boxPoints(rect) # cv2.drawContours(crop, [np.int0(box)], -1, (0, 0, 255), 2) except: print('没有找到红色的激光') return cX1, cY1, cX2, cY2 def draw_fit_line(dire, type): """ :param dire: 传入需要拟合的含有白色直线的图像 :return: 传出直线一般式参数a,b,c """ dic = {'up': (hStart, wStart + leftRight_distance), 'down': (hEnd - upDown_distance, wStart + leftRight_distance), 'left': (hStart + upDown_distance, wStart), 'right': (hStart + upDown_distance, wEnd - leftRight_distance)} # 存放直线的像素点坐标 axis = [] for i in range(len(dire)): for j in range(len(dire[i])): if dire[i][j] == 255: # 判断为白色像素 # 对应在原图中的高宽坐标 h = i + dic[type][0] w = j + dic[type][1] axis.append([w, h]) data_np = np.array(axis) # 坐标矩阵化 output = cv2.fitLine(data_np, cv2.DIST_L2, 0, 0.01, 0.01) # 直线拟合 # print(output) k = output[1] / output[0] b = output[3] - k * output[2] return k, b def crop(h, w, cnt): ''' 将图形裁剪出上下左右四个部分的中间位置 :param cnt: 需要裁剪的图片 :return: ''' global upDown_distance, leftRight_distance # 上下部分裁剪的宽度 upDown_distance = h # 左右部分裁剪的宽度 leftRight_distance = w up = cnt[0:upDown_distance, leftRight_distance:wEnd - wStart - leftRight_distance] down = cnt[hEnd - hStart - upDown_distance:hEnd - hStart, leftRight_distance:wEnd - wStart - leftRight_distance] left = cnt[upDown_distance:hEnd - hStart - upDown_distance, 0:leftRight_distance] right = cnt[upDown_distance:hEnd - hStart - upDown_distance, wEnd -wStart - leftRight_distance:wEnd - wStart] # 显示四个边长裁剪过后的图片 # cv2.imshow('up', up) # cv2.imshow('down', down) # cv2.imshow('left', left) # cv2.imshow('right', right) return up, down, left, right def getCoordinate(k1, b1, k2, b2): x = (b2 - b1) / (k1 - k2) y = k1 * x + b1 return int(x), int(y) def drawCenter(a, b, c, d): # 显示边长交点 cv2.circle(img, (a[0], a[1]), 3, (0, 0, 255), -1) cv2.circle(img, (b[0], b[1]), 3, (0, 0, 255), -1) cv2.circle(img, (c[0], c[1]), 3, (0, 0, 255), -1) cv2.circle(img, (d[0], d[1]), 3, (0, 0, 255), -1) # 画边界线 cv2.line(img, (a[0], a[1]), (b[0], b[1]), (0, 255, 0), 1) cv2.line(img, (b[0], b[1]), (c[0], c[1]), (0, 255, 0), 1) cv2.line(img, (a[0], a[1]), (d[0], d[1]), (0, 255, 0), 1) cv2.line(img, (c[0], c[1]), (d[0], d[1]), (0, 255, 0), 1) xCenter = (a[0] + b[0] + c[0] + d[0])//4 yCenter = (a[1] + b[1] + c[1] + d[1])//4 cv2.circle(img, (xCenter, yCenter), 4, (0, 0, 255), -1) return xCenter, yCenter if __name__ == "__main__": downsetup() upsetup() upstop() downstop() cap = cv2.VideoCapture(0) cap.set(3,1280) cap.set(4,720) #设置窗口的大小 for i in range(4): for j in range(6): ret, img = cap.read() # 需要裁剪的区域################################### hStart, hEnd, wStart, wEnd = 200, 640, 320, 760 ################################################ cropImg = img[hStart:hEnd, wStart:wEnd] # 找激光点 -> xc1, yc1, xc2, yc2 = findLaser(cropImg) # 对应到原点中的激光坐标 xc2, yc2 = xc2 + wStart, yc2 + hStart print('红色激光点坐标:', xc2, yc2) # 图像inRange二值化处理 hsv = cv2.cvtColor(cropImg, cv2.COLOR_BGR2HSV) l_g = np.array([0, 0, 0]) # 阈值下限 u_g = np.array([255, 255, 110]) # 阈值上限 90-120 mask = cv2.inRange(hsv, l_g, u_g) # cv2.imshow('cropImg', cropImg) # cv2.imshow('mask', mask) # cv2.waitKey(0) # cv2.destroyAllWindows() # 传入二值化后的图片返回裁剪出来的四个边长举行 # 上下部分裁剪的宽度 upDown_distance = 80 # 左右部分裁剪的宽度 leftRight_distance = 80 try: # 传入参数1:上下部分裁剪宽度; 参数2:左右部分裁剪宽度 up, down, left, right = crop(upDown_distance, leftRight_distance, mask) # 在img原图中拟合四条直线 -> 得到拟合直线的k,b up_k, up_b = draw_fit_line(up, 'up') down_k, down_b = draw_fit_line(down, 'down') left_k, left_b = draw_fit_line(left, 'left') right_k, right_b = draw_fit_line(right, 'right') # 求出A,B, C, D四个边长交点坐标 -> 顺时针方向定义ABCD点 A = getCoordinate(up_k, up_b, left_k, left_b) B = getCoordinate(up_k, up_b, right_k, right_b) C = getCoordinate(down_k, down_b, right_k, right_b) D = getCoordinate(down_k, down_b, left_k, left_b) # 画出边界线以及中心点 xCenter, yCenter = drawCenter(A, B, C, D) print('四个顶点坐标', A, B, C, D) print('中心点坐标:', xCenter, yCenter) except: print('没有裁剪好图片,识别不到黑色方框!') print(f'原来图形尺寸为{img.shape[0:1]}') xCenter, yCenter = 545, 420 points = np.array([[xc2, yc2],[xCenter,yCenter]]) print('points', points) runtwopoints(points)要求2:
import cv2 import math import numpy as np import RPi.GPIO as GPIO import time # 坐标方向:水平向右为x正向, left-----right,垂直向下为y正方向,向下为up,向上为down # 像素间隔:0.738mm/每像素 # 规定GPIO引脚 IN1 = 18 # 接PUL- IN2 = 16 # 接PUL+ IN3 = 15 # 接DIR- IN4 = 13 # 接DIR+ # 云台上面的电机驱动器,物理引脚 IN12 = 38 # 接PUL- IN22 = 40 # 接PUL+ IN32 = 36 # 接DIR- IN42 = 32 # 接DIR+ delay = 0.0001 def downsetup(): GPIO.setwarnings(False) GPIO.setmode(GPIO.BOARD) # Numbers GPIOs by physical location GPIO.setup(IN1, GPIO.OUT) # Set pin's mode is output GPIO.setup(IN2, GPIO.OUT) GPIO.setup(IN3, GPIO.OUT) GPIO.setup(IN4, GPIO.OUT) def upsetup(): GPIO.setwarnings(False) GPIO.setmode(GPIO.BOARD) # Numbers GPIOs by physical location GPIO.setup(IN12, GPIO.OUT) # Set pin's mode is output GPIO.setup(IN22, GPIO.OUT) GPIO.setup(IN32, GPIO.OUT) GPIO.setup(IN42, GPIO.OUT) def downsetStep(w1, w2, w3, w4): GPIO.output(IN1, w1) GPIO.output(IN2, w2) GPIO.output(IN3, w3) GPIO.output(IN4, w4) def upsetStep(w1, w2, w3, w4): GPIO.output(IN12, w1) GPIO.output(IN22, w2) GPIO.output(IN32, w3) GPIO.output(IN42, w4) def downstop(): # 下面的电机停止 downsetStep(0, 0, 0, 0) def upstop(): # 上面的电机停止 upsetStep(0, 0, 0, 0) def rightward(steps): # 下面的电机向右转动 global delay for i in range(0, steps): downsetStep(1, 0, 1, 0) time.sleep(delay) downsetStep(0, 1, 1, 0) time.sleep(delay) downsetStep(0, 1, 0, 1) time.sleep(delay) downsetStep(1, 0, 0, 1) time.sleep(delay) downstop() def leftward(steps): # 下面的电机向左转动 global delay for i in range(0, steps): downsetStep(1, 0, 0, 1) time.sleep(delay) downsetStep(0, 1, 0, 1) time.sleep(delay) downsetStep(0, 1, 1, 0) time.sleep(delay) downsetStep(1, 0, 1, 0) time.sleep(delay) downstop() def upward2(steps): # 上面的电机向下转动 global delay for i in range(0, steps): upsetStep(1, 0, 0, 1) time.sleep(delay) upsetStep(0, 1, 0, 1) time.sleep(delay) upsetStep(0, 1, 1, 0) time.sleep(delay) upsetStep(1, 0, 1, 0) time.sleep(delay) upstop() def downward2(steps): # 上面的电机向上转动 global delay for i in range(0, steps): upsetStep(1, 0, 1, 0) time.sleep(delay) upsetStep(0, 1, 1, 0) time.sleep(delay) upsetStep(0, 1, 0, 1) time.sleep(delay) upsetStep(1, 0, 0, 1) time.sleep(delay) upstop() def destroy(): GPIO.cleanup() # 释放数据 curpos = np.array([-1000,1000]) # mm,mm pi = 3.14159 # 坐标原点在左上角,向左为x轴,向下为y轴。坐标单位像素个数 # x轴移动距离:dx:移动的距离 # 转换:1像素=1.75mm def xrunpixel(dxpixel): # 下面的电机转动多少像素的位置 xangle = math.atan(dxpixel/1000/1.75)*180/pi # 单位:度,1000mm需转换为像素个数单位 if xangle > 0: rightward(int(xangle/360*6400)) else: xangle = -xangle leftward(int(xangle/360*6400)) # y轴移动距离:dy:移动的距离(像素=mm/1.75) def yrunpixel(dypixel): # 上面的电机转动多少像素的位置 yangle = math.atan(dypixel/1000/1.75)*180/pi if yangle > 0: upward(int(yangle/360*6400)) else: yangle = -yangle downward(int(yangle/360*6400)) # dxstep:x移动的距离(step,int,步进电机步数) def xrunstep(dxstep): # 下面的电机转动的步数 if dxstep > 0: rightward(dxstep) else: dxstep = -dxstep leftward(dxstep) # dystep:x移动的距离(步长数,int) def yrunstep(dystep): # 上面的电机转动的步数 if dystep > 0: upward2(dystep) else: dystep = -dystep downward2(dystep) #points[0,:] 起点位置,points[1,:] 目标位置,# 像素单位 points = np.array([[1,2],[3,4]]) def runtwopoints(points): points = np.array(points) steps = [] dstep = 2 temp = points[1,0]-points[0,0] xstep = int(math.atan(temp/732)*1018.591636) #int((points[1,0]-points[0,0])*0.57142857) # xstep = int(math.atan(temp/890)*1018.591636) #int((points[1,0]-points[0,0])*0.57142857) temp = points[1,1]-points[0,1] ystep = int(math.atan(temp/740)*1018.591636) # ystep = int(math.atan(temp/974)*1018.591636) if xstep >= 0: absxstep = xstep xdir = 1 else: absxstep = -xstep xdir = 0 if ystep >= 0: absystep = ystep ydir = 1 else: absystep = -ystep ydir = 0 # 得到xstep和ystep的最大值 if absxstep >= absystep: # 说明较长边在x轴 maxdir = 'x' absmaxstep = absxstep maxstep = xstep minstep = ystep else: maxdir = 'y' absmaxstep = absystep maxstep = ystep minstep = xstep # 分段运行节数 sections = int(absmaxstep/dstep)+1 dstepmin = minstep/sections dstepmax = maxstep/sections for i in range(1,sections+1): if maxdir == 'x': # 沿x边走,先算累计步长 steps.append([round(i * dstepmax),round(i * dstepmin)]) else: # 沿y边走,先算累计步长 steps.append([round(i * dstepmin),round(i * dstepmax)]) if steps[sections-1][0] != xstep: steps[sections-1][0] == xstep if steps[sections-1][1] != ystep: steps[sections-1][1] == ystep #print('steps=', steps) #print() for i in range(sections-1,0,-1): steps[i][0] -= steps[i-1][0] steps[i][1] -= steps[i-1][1] #print('steps=', steps) points = len(steps) # 总点数 for i in range(points): xrunstep(steps[i][0]) yrunstep(steps[i][1]) upstop() downstop() # x坐标max: 570,1个像素0.738mm,对应距离1000mm zeropos = np.array([100,100]) # 像素 curpos = np.array([500,350]) # 像素 def returnZero(): # 从当前位置curpos回到原点zeropos global curpos global zeropos global points points[0,:] = curpos points[1,:] = zeropos runtwopoints(points) def findLaser(crop): """ 找到图片中点绿色激光点与红色激光点并定位中心 :param crop: 需要处理点图片 :return: 绿色激光点中心(x1, y1);红色激光点中心(x2, y2) """ cX1, cY1, cX2, cY2 = None, None, None, None greenLaser = 'green' redLaser = 'red' # 色系下限上限表 color_dist = {'red': {'Lower': np.array([0, 60, 60]), 'Upper': np.array([6, 255, 255])}, 'green': {'Lower': np.array([35, 43, 35]), 'Upper': np.array([90, 255, 255])}, } # 灰度图像处理 # gray = cv2.cvtColor(crop, cv2.COLOR_BGR2GRAY)#灰度图 # cv2.imshow('gray', gray) # 高斯滤波 blurred = cv2.GaussianBlur(crop, (11, 11), 0) # cv2.imshow('blurred', blurred) # 创建运算核 kernel = np.ones((1, 1), np.uint8) # 腐蚀 # erode = cv2.erode(crop, kernel, iterations=1) # 膨胀 # crop_dilate = cv2.dilate(blurred, kernel, iterations = 5) # 开运算 opening = cv2.morphologyEx(blurred, cv2.MORPH_OPEN, kernel) # 二值化处理 thresh = cv2.threshold(opening, 230, 255, cv2.THRESH_BINARY)[1] # cv2.imshow('thresh', thresh) hsv = cv2.cvtColor(thresh, cv2.COLOR_BGR2HSV) # 转化成HSV图像 # 颜色二值化筛选处理 inRange_hsv_green = cv2.inRange(hsv, color_dist[greenLaser]['Lower'], color_dist[greenLaser]['Upper']) inRange_hsv_red = cv2.inRange(hsv, color_dist[redLaser]['Lower'], color_dist[redLaser]['Upper']) # cv2.imshow('inrange_hsv_green', inRange_hsv_green) # cv2.imshow('inrange_hsv_red', inRange_hsv_red) # # 找绿色激光点 # try: # cnts1 = cv2.findContours(inRange_hsv_green.copy(), cv2.RETR_EXTERNAL, cv2.CHAIN_APPROX_SIMPLE)[-2] # c1 = max(cnts1, key=cv2.contourArea) # M = cv2.moments(c1) # cX1 = int(M["m10"] / M["m00"]) # cY1 = int(M["m01"] / M["m00"]) # cv2.circle(crop, (cX1, cY1), 3, (0, 255, 0), -1) # rect = cv2.minAreaRect(c1) # box = cv2.boxPoints(rect) # # cv2.drawContours(crop, [np.int0(box)], -1, (0, 255, 0), 2) # except: # print('没有找到绿色的激光') # 找红色激光点 try: cnts2 = cv2.findContours(inRange_hsv_red.copy(), cv2.RETR_EXTERNAL, cv2.CHAIN_APPROX_SIMPLE)[-2] c2 = max(cnts2, key=cv2.contourArea) M = cv2.moments(c2) cX2 = int(M["m10"] / M["m00"]) cY2 = int(M["m01"] / M["m00"]) cv2.circle(crop, (cX2, cY2), 3, (0, 0, 255), -1) rect = cv2.minAreaRect(c2) box = cv2.boxPoints(rect) # cv2.drawContours(crop, [np.int0(box)], -1, (0, 0, 255), 2) except: print('没有找到红色的激光') return cX1, cY1, cX2, cY2 def draw_fit_line(dire, type): """ :param dire: 传入需要拟合的含有白色直线的图像 :return: 传出直线一般式参数a,b,c """ dic = {'up': (hStart, wStart + leftRight_distance), 'down': (hEnd - upDown_distance, wStart + leftRight_distance), 'left': (hStart + upDown_distance, wStart), 'right': (hStart + upDown_distance, wEnd - leftRight_distance)} # 存放直线的像素点坐标 axis = [] for i in range(len(dire)): for j in range(len(dire[i])): if dire[i][j] == 255: # 判断为白色像素 # 对应在原图中的高宽坐标 h = i + dic[type][0] w = j + dic[type][1] axis.append([w, h]) data_np = np.array(axis) # 坐标矩阵化 output = cv2.fitLine(data_np, cv2.DIST_L2, 0, 0.01, 0.01) # 直线拟合 k = output[1] / output[0] b = output[3] - k * output[2] return k, b def crop(h, w, cnt): ''' 将图形裁剪出上下左右四个部分的中间位置 :param cnt: 需要裁剪的图片 :return: ''' global upDown_distance, leftRight_distance # 上下部分裁剪的宽度 upDown_distance = h # 左右部分裁剪的宽度 leftRight_distance = w up = cnt[0:upDown_distance, leftRight_distance:wEnd - wStart - leftRight_distance] down = cnt[hEnd - hStart - upDown_distance:hEnd - hStart, leftRight_distance:wEnd - wStart - leftRight_distance] left = cnt[upDown_distance:hEnd - hStart - upDown_distance, 0:leftRight_distance] right = cnt[upDown_distance:hEnd - hStart - upDown_distance, wEnd -wStart - leftRight_distance:wEnd - wStart] # 显示四个边长裁剪过后的图片 # cv2.imshow('up', up) # cv2.imshow('down', down) # cv2.imshow('left', left) # cv2.imshow('right', right) return up, down, left, right def getCoordinate(k1, b1, k2, b2): x = (b2 - b1) / (k1 - k2) y = k1 * x + b1 return [int(x), int(y)] def drawCenter(a, b, c, d): # 显示边长交点 cv2.circle(img, (a[0], a[1]), 3, (0, 0, 255), -1) cv2.circle(img, (b[0], b[1]), 3, (0, 0, 255), -1) cv2.circle(img, (c[0], c[1]), 3, (0, 0, 255), -1) cv2.circle(img, (d[0], d[1]), 3, (0, 0, 255), -1) # 画边界线 cv2.line(img, (a[0], a[1]), (b[0], b[1]), (0, 255, 0), 1) cv2.line(img, (b[0], b[1]), (c[0], c[1]), (0, 255, 0), 1) cv2.line(img, (a[0], a[1]), (d[0], d[1]), (0, 255, 0), 1) cv2.line(img, (c[0], c[1]), (d[0], d[1]), (0, 255, 0), 1) xCenter = (a[0] + b[0] + c[0] + d[0])//4 yCenter = (a[1] + b[1] + c[1] + d[1])//4 cv2.circle(img, (xCenter, yCenter), 4, (0, 0, 255), -1) return xCenter, yCenter if __name__ == "__main__": downsetup() upsetup() upstop() downstop() cap = cv2.VideoCapture(0) cap.set(3,1280) cap.set(4,720) #设置窗口的大小 ret, img = cap.read() # 需要裁剪的区域################################### hStart, hEnd, wStart, wEnd = 200, 640, 320, 760 ################################################ cropImg = img[hStart:hEnd, wStart:wEnd] # 找激光点 -> xc1, yc1, xc2, yc2 = findLaser(cropImg) # 对应到原点中的激光坐标 xc2, yc2 = xc2 + wStart, yc2 + hStart print('红色激光点坐标:', xc2, yc2) # 图像inRange二值化处理 hsv = cv2.cvtColor(cropImg, cv2.COLOR_BGR2HSV) l_g = np.array([0, 0, 0]) # 阈值下限 u_g = np.array([255, 255, 100]) # 阈值上限 90-120 mask = cv2.inRange(hsv, l_g, u_g) # cv2.imshow('cropImg', cropImg) # cv2.imshow('mask', mask) # cv2.waitKey(0) # cv2.destroyAllWindows() # 传入二值化后的图片返回裁剪出来的四个边长举行 # 上下部分裁剪的宽度 upDown_distance = 80 # 左右部分裁剪的宽度 leftRight_distance = 80 try: # 传入参数1:上下部分裁剪宽度; 参数2:左右部分裁剪宽度 up, down, left, right = crop(upDown_distance, leftRight_distance, mask) # 在img原图中拟合四条直线 -> 得到拟合直线的k,b up_k, up_b = draw_fit_line(up, 'up') down_k, down_b = draw_fit_line(down, 'down') left_k, left_b = draw_fit_line(left, 'left') right_k, right_b = draw_fit_line(right, 'right') # 求出A,B, C, D四个边长交点坐标 -> 顺时针方向定义ABCD点 A = getCoordinate(up_k, up_b, left_k, left_b) B = getCoordinate(up_k, up_b, right_k, right_b) C = getCoordinate(down_k, down_b, right_k, right_b) D = getCoordinate(down_k, down_b, left_k, left_b) # 画出边界线以及中心点 xCenter, yCenter = drawCenter(A, B, C, D) print('四个顶点坐标', A, B, C, D) print('中心点坐标:', xCenter, yCenter) except: print('没有裁剪好图片,识别不到黑色方框!') print(f'原来图形尺寸为{img.shape[0:1]}') xCenter, yCenter = 545, 420 allpoint = np.array([A,B,C,D,A]) print(allpoint) for i in range(len(allpoint)): for kk in range(3): for j in range(6): ret, img = cap.read() # 需要裁剪的区域################################### hStart, hEnd, wStart, wEnd = 200, 630, 320, 750 ################################################ cropImg = img[hStart:hEnd, wStart:wEnd] # 找激光点 -> xc1, yc1, xc2, yc2 = findLaser(cropImg) # 对应到原点中的激光坐标 xc2, yc2 = xc2 + wStart, yc2 + hStart print('红色激光点坐标:', xc2, yc2) points = np.array([[xc2, yc2],allpoint[i,:]]) print('points', points) runtwopoints(points)要求3和要求4:
import cv2 import math import numpy as np import RPi.GPIO as GPIO import time # 坐标方向:水平向右为x正向, left-----right,垂直向下为y正方向,向下为up,向上为down # 像素间隔:0.738mm/每像素 # 规定GPIO引脚 IN1 = 18 # 接PUL- IN2 = 16 # 接PUL+ IN3 = 15 # 接DIR- IN4 = 13 # 接DIR+ # 云台上面的电机驱动器,物理引脚 IN12 = 38 # 接PUL- IN22 = 40 # 接PUL+ IN32 = 36 # 接DIR- IN42 = 32 # 接DIR+ delay = 0.0001 def downsetup(): GPIO.setwarnings(False) GPIO.setmode(GPIO.BOARD) # Numbers GPIOs by physical location GPIO.setup(IN1, GPIO.OUT) # Set pin's mode is output GPIO.setup(IN2, GPIO.OUT) GPIO.setup(IN3, GPIO.OUT) GPIO.setup(IN4, GPIO.OUT) def upsetup(): GPIO.setwarnings(False) GPIO.setmode(GPIO.BOARD) # Numbers GPIOs by physical location GPIO.setup(IN12, GPIO.OUT) # Set pin's mode is output GPIO.setup(IN22, GPIO.OUT) GPIO.setup(IN32, GPIO.OUT) GPIO.setup(IN42, GPIO.OUT) def downsetStep(w1, w2, w3, w4): GPIO.output(IN1, w1) GPIO.output(IN2, w2) GPIO.output(IN3, w3) GPIO.output(IN4, w4) def upsetStep(w1, w2, w3, w4): GPIO.output(IN12, w1) GPIO.output(IN22, w2) GPIO.output(IN32, w3) GPIO.output(IN42, w4) def downstop(): # 下面的电机停止 downsetStep(0, 0, 0, 0) def upstop(): # 上面的电机停止 upsetStep(0, 0, 0, 0) def rightward(steps): # 下面的电机向右转动 global delay for i in range(0, steps): downsetStep(1, 0, 1, 0) time.sleep(delay) downsetStep(0, 1, 1, 0) time.sleep(delay) downsetStep(0, 1, 0, 1) time.sleep(delay) downsetStep(1, 0, 0, 1) time.sleep(delay) downstop() def leftward(steps): # 下面的电机向左转动 global delay for i in range(0, steps): downsetStep(1, 0, 0, 1) time.sleep(delay) downsetStep(0, 1, 0, 1) time.sleep(delay) downsetStep(0, 1, 1, 0) time.sleep(delay) downsetStep(1, 0, 1, 0) time.sleep(delay) downstop() def upward2(steps): # 上面的电机向下转动 global delay for i in range(0, steps): upsetStep(1, 0, 0, 1) time.sleep(delay) upsetStep(0, 1, 0, 1) time.sleep(delay) upsetStep(0, 1, 1, 0) time.sleep(delay) upsetStep(1, 0, 1, 0) time.sleep(delay) upstop() def downward2(steps): # 上面的电机向上转动 global delay for i in range(0, steps): upsetStep(1, 0, 1, 0) time.sleep(delay) upsetStep(0, 1, 1, 0) time.sleep(delay) upsetStep(0, 1, 0, 1) time.sleep(delay) upsetStep(1, 0, 0, 1) time.sleep(delay) upstop() def destroy(): GPIO.cleanup() # 释放数据 curpos = np.array([-1000,1000]) # mm,mm pi = 3.14159 # 坐标原点在左上角,向左为x轴,向下为y轴。坐标单位像素个数 # x轴移动距离:dx:移动的距离 # 转换:1像素=1.75mm def xrunpixel(dxpixel): # 下面的电机转动多少像素的位置 xangle = math.atan(dxpixel/1000/1.75)*180/pi # 单位:度,1000mm需转换为像素个数单位 if xangle > 0: rightward(int(xangle/360*6400)) else: xangle = -xangle leftward(int(xangle/360*6400)) # y轴移动距离:dy:移动的距离(像素=mm/1.75) def yrunpixel(dypixel): # 上面的电机转动多少像素的位置 yangle = math.atan(dypixel/1000/1.75)*180/pi if yangle > 0: upward(int(yangle/360*6400)) else: yangle = -yangle downward(int(yangle/360*6400)) # dxstep:x移动的距离(step,int,步进电机步数) def xrunstep(dxstep): # 下面的电机转动的步数 if dxstep > 0: rightward(dxstep) else: dxstep = -dxstep leftward(dxstep) # dystep:x移动的距离(步长数,int) def yrunstep(dystep): # 上面的电机转动的步数 if dystep > 0: upward2(dystep) else: dystep = -dystep downward2(dystep) #points[0,:] 起点位置,points[1,:] 目标位置,# 像素单位 # points = np.array([[1,2],[3,4]]) def runtwopoints(points): points = np.array(points) steps = [] dstep = 2 temp = points[1,0]-points[0,0] xstep = int(math.atan(temp/732)*1018.591636) #int((points[1,0]-points[0,0])*0.57142857) # xstep = int(math.atan(temp/890)*1018.591636) #int((points[1,0]-points[0,0])*0.57142857) temp = points[1,1]-points[0,1] ystep = int(math.atan(temp/740)*1018.591636) # ystep = int(math.atan(temp/974)*1018.591636) #print('xstep =',xstep,'ystep =',ystep) #print() if xstep >= 0: absxstep = xstep xdir = 1 else: absxstep = -xstep xdir = 0 if ystep >= 0: absystep = ystep ydir = 1 else: absystep = -ystep ydir = 0 # 得到xstep和ystep的最大值 if absxstep >= absystep: # 说明较长边在x轴 maxdir = 'x' absmaxstep = absxstep maxstep = xstep minstep = ystep else: maxdir = 'y' absmaxstep = absystep maxstep = ystep minstep = xstep # 分段运行节数 sections = int(absmaxstep/dstep)+1 dstepmin = minstep/sections dstepmax = maxstep/sections for i in range(1,sections+1): if maxdir == 'x': # 沿x边走,先算累计步长 steps.append([round(i * dstepmax),round(i * dstepmin)]) else: # 沿y边走,先算累计步长 steps.append([round(i * dstepmin),round(i * dstepmax)]) if steps[sections-1][0] != xstep: steps[sections-1][0] == xstep if steps[sections-1][1] != ystep: steps[sections-1][1] == ystep #print('steps=', steps) #print() for i in range(sections-1,0,-1): steps[i][0] -= steps[i-1][0] steps[i][1] -= steps[i-1][1] #print('steps=', steps) points = len(steps) # 总点数 for i in range(points): xrunstep(steps[i][0]) yrunstep(steps[i][1]) upstop() downstop() def findRedBlackLaser(crop): """ 找到图片中点绿色激光点与红色激光点并定位中心 :param crop: 需要处理点图片 :return: 绿色激光点中心(x1, y1);红色激光点中心(x2, y2) """ cX1, cY1, cX2, cY2 = None, None, None, None # Get HSV values from the GUI sliders. # lowHue = 170 # lowSat = 81 # lowVal = 0 # highHue = 255 # highSat = 255 # highVal = 67 lowHue = 173 lowSat = 36 lowVal = 175 highHue = 200 highSat = 79 highVal = 175 frame = crop # Show the original image. # cv2.imshow('frame', frame) # Blur methods available, comment or uncomment to try different blur methods. # frameBGR = cv2.GaussianBlur(frame, (7, 7), 0) #frameBGR = cv2.medianBlur(frameBGR, 7) #frameBGR = cv2.bilateralFilter(frameBGR, 15 ,75, 75) frameBGR = frame # Show blurRed image. # HSV (Hue, Saturation, Value). # Convert the frame to HSV colour model. hsv = cv2.cvtColor(frameBGR, cv2.COLOR_BGR2HSV) # HSV values to define a colour range. colorLow = np.array([lowHue, lowSat, lowVal]) colorHigh = np.array([highHue, highSat, highVal]) mask = cv2.inRange(hsv, colorLow, colorHigh) # Show the first mask # cv2.imshow('mask-plain', mask) kernal = cv2.getStructuringElement(cv2.MORPH_ELLIPSE, (7, 7)) mask = cv2.morphologyEx(mask, cv2.MORPH_CLOSE, kernal) mask = cv2.morphologyEx(mask, cv2.MORPH_OPEN, kernal) # Show morphological transformation mask # cv2.imshow('mask', mask) # 找红色激光点 try: cnts2 = cv2.findContours(mask.copy(), cv2.RETR_EXTERNAL, cv2.CHAIN_APPROX_SIMPLE)[-2] c2 = max(cnts2, key=cv2.contourArea) M = cv2.moments(c2) cX2 = int(M["m10"] / M["m00"]) cY2 = int(M["m01"] / M["m00"]) cv2.circle(frame, (cX2, cY2), 3, (0, 0, 255), -1) rect = cv2.minAreaRect(c2) box = cv2.boxPoints(rect) # cv2.drawContours(crop, [np.int0(box)], -1, (0, 0, 255), 2) except: print('Blackline没有找到红色的激光') return cX1, cY1, cX2, cY2 def findLaser(crop): """ 找到图片中点绿色激光点与红色激光点并定位中心 :param crop: 需要处理点图片 :return: 绿色激光点中心(x1, y1);红色激光点中心(x2, y2) """ cX1, cY1, cX2, cY2 = None, None, None, None greenLaser = 'green' redLaser = 'red' # 色系下限上限表 color_dist = {'red': {'Lower': np.array([0, 60, 60]), 'Upper': np.array([6, 255, 255])}, 'green': {'Lower': np.array([35, 43, 35]), 'Upper': np.array([90, 255, 255])}, } # 灰度图像处理 # gray = cv2.cvtColor(crop, cv2.COLOR_BGR2GRAY)#灰度图 # cv2.imshow('gray', gray) # 高斯滤波 blurred = cv2.GaussianBlur(crop, (11, 11), 0) # cv2.imshow('blurred', blurred) # 创建运算核 kernel = np.ones((1, 1), np.uint8) # 腐蚀 # erode = cv2.erode(crop, kernel, iterations=1) # 膨胀 # crop_dilate = cv2.dilate(blurred, kernel, iterations = 5) # 开运算 opening = cv2.morphologyEx(blurred, cv2.MORPH_OPEN, kernel) # 二值化处理 thresh = cv2.threshold(opening, 230, 255, cv2.THRESH_BINARY)[1] # cv2.imshow('thresh', thresh) hsv = cv2.cvtColor(thresh, cv2.COLOR_BGR2HSV) # 转化成HSV图像 # 颜色二值化筛选处理 inRange_hsv_green = cv2.inRange(hsv, color_dist[greenLaser]['Lower'], color_dist[greenLaser]['Upper']) inRange_hsv_red = cv2.inRange(hsv, color_dist[redLaser]['Lower'], color_dist[redLaser]['Upper']) # cv2.imshow('inrange_hsv_green', inRange_hsv_green) # cv2.imshow('inrange_hsv_red', inRange_hsv_red) # # 找绿色激光点 # try: # cnts1 = cv2.findContours(inRange_hsv_green.copy(), cv2.RETR_EXTERNAL, cv2.CHAIN_APPROX_SIMPLE)[-2] # c1 = max(cnts1, key=cv2.contourArea) # M = cv2.moments(c1) # cX1 = int(M["m10"] / M["m00"]) # cY1 = int(M["m01"] / M["m00"]) # cv2.circle(crop, (cX1, cY1), 3, (0, 255, 0), -1) # rect = cv2.minAreaRect(c1) # box = cv2.boxPoints(rect) # # cv2.drawContours(crop, [np.int0(box)], -1, (0, 255, 0), 2) # except: # print('没有找到绿色的激光') # 找红色激光点 try: cnts2 = cv2.findContours(inRange_hsv_red.copy(), cv2.RETR_EXTERNAL, cv2.CHAIN_APPROX_SIMPLE)[-2] c2 = max(cnts2, key=cv2.contourArea) M = cv2.moments(c2) cX2 = int(M["m10"] / M["m00"]) cY2 = int(M["m01"] / M["m00"]) cv2.circle(crop, (cX2, cY2), 3, (0, 0, 255), -1) rect = cv2.minAreaRect(c2) box = cv2.boxPoints(rect) # cv2.drawContours(crop, [np.int0(box)], -1, (0, 0, 255), 2) except: print('没有找到红色的激光') return cX1, cY1, cX2, cY2 def draw_fit_line(dire, type): """ :param dire: 传入需要拟合的含有白色直线的图像 :return: 传出直线一般式参数a,b,c """ dic = {'up': (hStart, wStart + leftRight_distance), 'down': (hEnd - upDown_distance, wStart + leftRight_distance), 'left': (hStart + upDown_distance, wStart), 'right': (hStart + upDown_distance, wEnd - leftRight_distance)} # 存放直线的像素点坐标 axis = [] for i in range(len(dire)): for j in range(len(dire[i])): if dire[i][j] == 255: # 判断为白色像素 # 对应在原图中的高宽坐标 h = i + dic[type][0] w = j + dic[type][1] axis.append([w, h]) data_np = np.array(axis) # 坐标矩阵化 output = cv2.fitLine(data_np, cv2.DIST_L2, 0, 0.01, 0.01) # 直线拟合 # print(output) k = output[1] / output[0] b = output[3] - k * output[2] return k, b def crop(h, w, cnt): ''' 将图形裁剪出上下左右四个部分的中间位置 :param cnt: 需要裁剪的图片 :return: ''' global upDown_distance, leftRight_distance # 上下部分裁剪的宽度 upDown_distance = h # 左右部分裁剪的宽度 leftRight_distance = w up = cnt[0:upDown_distance, leftRight_distance:wEnd - wStart - leftRight_distance] down = cnt[hEnd - hStart - upDown_distance:hEnd - hStart, leftRight_distance:wEnd - wStart - leftRight_distance] left = cnt[upDown_distance:hEnd - hStart - upDown_distance, 0:leftRight_distance] right = cnt[upDown_distance:hEnd - hStart - upDown_distance, wEnd -wStart - leftRight_distance:wEnd - wStart] # 显示四个边长裁剪过后的图片 # cv2.imshow('up', up) # cv2.imshow('down', down) # cv2.imshow('left', left) # cv2.imshow('right', right) return up, down, left, right def getCoordinate(k1, b1, k2, b2): x = (b2 - b1) / (k1 - k2) y = k1 * x + b1 return [int(x), int(y)] def drawCenter(a, b, c, d): # 显示边长交点 cv2.circle(img, (a[0], a[1]), 3, (0, 0, 255), -1) cv2.circle(img, (b[0], b[1]), 3, (0, 0, 255), -1) cv2.circle(img, (c[0], c[1]), 3, (0, 0, 255), -1) cv2.circle(img, (d[0], d[1]), 3, (0, 0, 255), -1) # 画边界线 cv2.line(img, (a[0], a[1]), (b[0], b[1]), (0, 255, 0), 1) cv2.line(img, (b[0], b[1]), (c[0], c[1]), (0, 255, 0), 1) cv2.line(img, (a[0], a[1]), (d[0], d[1]), (0, 255, 0), 1) cv2.line(img, (c[0], c[1]), (d[0], d[1]), (0, 255, 0), 1) xCenter = (a[0] + b[0] + c[0] + d[0])//4 yCenter = (a[1] + b[1] + c[1] + d[1])//4 cv2.circle(img, (xCenter, yCenter), 4, (0, 0, 255), -1) return xCenter, yCenter #定义形状检测函数 def ShapeDetection(img): axis = [] contours,hierarchy = cv2.findContours(img,cv2.RETR_EXTERNAL,cv2.CHAIN_APPROX_NONE) #寻找轮廓点 contour = max(contours, key = cv2.contourArea) area = cv2.contourArea(contour) #计算轮廓内区域的面积 # cv2.drawContours(imgContour, obj, -1, (255, 0, 0), 4) #绘制轮廓线 perimeter = cv2.arcLength(contour,True) #计算轮廓周长 approx = cv2.approxPolyDP(contour,0.02*perimeter,True) #获取轮廓角点坐标 CornerNum = len(approx) #轮廓角点的数量 x, y, w, h = cv2.boundingRect(approx) #获取坐标值和宽度、高度 print(x, y, w, h) print(CornerNum) if CornerNum >= 4: for i in range(0,4): cv2.circle(imgContour, (approx[i][0][0], approx[i][0][1]), 2, (0,0,255), 3) approx[i][0][0] += wStart approx[i][0][1] += hStart axis.append([approx[i][0][0], approx[i][0][1]]) # 从逆时针改为顺时针 if axis != []: axis[0], axis[2] = axis[2], axis[0] axis.append(axis[0]) return axis if __name__ == "__main__": downsetup() upsetup() upstop() downstop() cap = cv2.VideoCapture(0) cap.set(3,1280) cap.set(4,720) #设置窗口的大小 ret, img = cap.read() # 需要裁剪的区域################################### hStart, hEnd, wStart, wEnd = 200, 640, 320, 760 ################################################ cropImg = img[hStart:hEnd, wStart:wEnd] xc1, yc1, xc2, yc2 = 427, 432, 427, 432 xc1b, yc1b, xc2b, yc2b = xc1, yc1, xc2, yc2 # 找激光点 -> xc1, yc1, xc2, yc2 = findLaser(cropImg) if xc2 == None: xc1, yc1, xc2, yc2 = findRedBlackLaser(cropImg) if xc2 == None: xc1, yc1, xc2, yc2 = xc1b, yc1b, xc2b, yc2b # 对应到原点中的激光坐标 xc2, yc2 = xc2 + wStart, yc2 + hStart print('红色激光点坐标:', xc2, yc2) # 灰度图像处理 gray = cv2.cvtColor(cropImg, cv2.COLOR_BGR2GRAY)#灰度图 imgContour = cropImg.copy() # 图像inRange二值化处理 hsv = cv2.cvtColor(cropImg, cv2.COLOR_BGR2HSV) l_g = np.array([0, 0, 0]) # 阈值下限 u_g = np.array([255, 255, 46]) # 阈值上限 mask = cv2.inRange(hsv, l_g, u_g) axis = ShapeDetection(mask) print('axis=', axis) # cv2.imshow('img', img) cv2.imshow('cropImg', cropImg) cv2.imshow('mask', mask) cv2.imshow("crop", imgContour) cv2.waitKey(0) cv2.destroyAllWindows() runpoint = np.zeros((6,2)) allpoint = np.array(axis) runpoint[0,:] = np.array([xc2, yc2]) runpoint[1:6,:] = allpoint print(runpoint) for i in range(len(runpoint)-1): points = np.array([runpoint[i,:],runpoint[i+1,:]]) print('points', points) runtwopoints(points) # for i in range(len(allpoint)): # for kk in range(3): # for j in range(6): # ret, img = cap.read() # # # 需要裁剪的区域################################### # hStart, hEnd, wStart, wEnd = 200, 640, 320, 760 # ################################################ # cropImg = img[hStart:hEnd, wStart:wEnd] # # # 找激光点 -> # xc1, yc1, xc2, yc2 = findLaser(cropImg) # if xc2 == None: # xc1, yc1, xc2, yc2 = findRedBlackLaser(cropImg) # if xc2 == None: # xc1, yc1, xc2, yc2 = xc1b, yc1b, xc2b, yc2b # # 对应到原点中的激光坐标 # xc2, yc2 = xc2 + wStart, yc2 + hStart # print('Now红色激光点坐标:', xc2, yc2) # # points = np.array([[xc2, yc2],allpoint[i,:]]) # print('points', points) # runtwopoints(points)发挥1:
import cv2 import math import numpy as np import RPi.GPIO as GPIO import time # 坐标方向:水平向右为x正向, left-----right,垂直向下为y正方向,向下为up,向上为down # 像素间隔:0.738mm/每像素 # 规定GPIO引脚 IN1 = 18 # 接PUL- IN2 = 16 # 接PUL+ IN3 = 15 # 接DIR- IN4 = 13 # 接DIR+ # 云台上面的电机驱动器,物理引脚 IN12 = 38 # 接PUL- IN22 = 40 # 接PUL+ IN32 = 36 # 接DIR- IN42 = 32 # 接DIR+ delay = 0.0001 Buzzer = 12 # pin22 Light = 11 # pin12 def lightBuzerSetup(): GPIO.setwarnings(False) GPIO.setmode(GPIO.BOARD) # Numbers GPIOs by physical location GPIO.setup(Buzzer, GPIO.OUT) GPIO.setup(Light, GPIO.OUT) #GPIO.PWM(Buzzer, 440) def on(): GPIO.output(Buzzer, GPIO.HIGH) # 低电平是响 GPIO.output(Light, GPIO.LOW) # 高电平是亮 def off(): GPIO.output(Buzzer, GPIO.LOW) # 高电平停止 GPIO.output(Light, GPIO.HIGH) #低电平是暗 def beep(x): #响1秒后停止1秒 for i in range(5): on() time.sleep(x) off() time.sleep(x) # 关闭程序,释放接口 def beepdestroy(): GPIO.output(Buzzer, GPIO.HIGH) GPIO.output(Light, GPIO.LOW) GPIO.cleanup() # Release resource def downsetup(): GPIO.setwarnings(False) GPIO.setmode(GPIO.BOARD) # Numbers GPIOs by physical location GPIO.setup(IN1, GPIO.OUT) # Set pin's mode is output GPIO.setup(IN2, GPIO.OUT) GPIO.setup(IN3, GPIO.OUT) GPIO.setup(IN4, GPIO.OUT) def upsetup(): GPIO.setwarnings(False) GPIO.setmode(GPIO.BOARD) # Numbers GPIOs by physical location GPIO.setup(IN12, GPIO.OUT) # Set pin's mode is output GPIO.setup(IN22, GPIO.OUT) GPIO.setup(IN32, GPIO.OUT) GPIO.setup(IN42, GPIO.OUT) def downsetStep(w1, w2, w3, w4): GPIO.output(IN1, w1) GPIO.output(IN2, w2) GPIO.output(IN3, w3) GPIO.output(IN4, w4) def upsetStep(w1, w2, w3, w4): GPIO.output(IN12, w1) GPIO.output(IN22, w2) GPIO.output(IN32, w3) GPIO.output(IN42, w4) def downstop(): # 下面的电机停止 downsetStep(0, 0, 0, 0) def upstop(): # 上面的电机停止 upsetStep(0, 0, 0, 0) def rightward(steps): # 下面的电机向右转动 global delay for i in range(0, steps): downsetStep(1, 0, 1, 0) time.sleep(delay) downsetStep(0, 1, 1, 0) time.sleep(delay) downsetStep(0, 1, 0, 1) time.sleep(delay) downsetStep(1, 0, 0, 1) time.sleep(delay) downstop() def leftward(steps): # 下面的电机向左转动 global delay for i in range(0, steps): downsetStep(1, 0, 0, 1) time.sleep(delay) downsetStep(0, 1, 0, 1) time.sleep(delay) downsetStep(0, 1, 1, 0) time.sleep(delay) downsetStep(1, 0, 1, 0) time.sleep(delay) downstop() def upward2(steps): # 上面的电机向下转动 global delay for i in range(0, steps): upsetStep(1, 0, 0, 1) time.sleep(delay) upsetStep(0, 1, 0, 1) time.sleep(delay) upsetStep(0, 1, 1, 0) time.sleep(delay) upsetStep(1, 0, 1, 0) time.sleep(delay) upstop() def downward2(steps): # 上面的电机向上转动 global delay for i in range(0, steps): upsetStep(1, 0, 1, 0) time.sleep(delay) upsetStep(0, 1, 1, 0) time.sleep(delay) upsetStep(0, 1, 0, 1) time.sleep(delay) upsetStep(1, 0, 0, 1) time.sleep(delay) upstop() def destroy(): GPIO.cleanup() # 释放数据 curpos = np.array([-1000,1000]) # mm,mm pi = 3.14159 # 坐标原点在左上角,向左为x轴,向下为y轴。坐标单位像素个数 # x轴移动距离:dx:移动的距离 # 转换:1像素=1.75mm def xrunpixel(dxpixel): # 下面的电机转动多少像素的位置 xangle = math.atan(dxpixel/1000/1.75)*180/pi # 单位:度,1000mm需转换为像素个数单位 if xangle > 0: rightward(int(xangle/360*6400)) else: xangle = -xangle leftward(int(xangle/360*6400)) # y轴移动距离:dy:移动的距离(像素=mm/1.75) def yrunpixel(dypixel): # 上面的电机转动多少像素的位置 yangle = math.atan(dypixel/1000/1.75)*180/pi if yangle > 0: upward(int(yangle/360*6400)) else: yangle = -yangle downward(int(yangle/360*6400)) # dxstep:x移动的距离(step,int,步进电机步数) def xrunstep(dxstep): # 下面的电机转动的步数 if dxstep > 0: rightward(dxstep) else: dxstep = -dxstep leftward(dxstep) # dystep:x移动的距离(步长数,int) def yrunstep(dystep): # 上面的电机转动的步数 if dystep > 0: upward2(dystep) else: dystep = -dystep downward2(dystep) #points[0,:] 起点位置,points[1,:] 目标位置,# 像素单位 points = np.array([[1,2],[3,4]]) def runtwopoints(points): points = np.array(points) steps = [] dstep = 2 temp = points[1,0]-points[0,0] xstep = int(math.atan(temp/732)*1018.591636) #int((points[1,0]-points[0,0])*0.57142857) # xstep = int(math.atan(temp/890)*1018.591636) #int((points[1,0]-points[0,0])*0.57142857) temp = points[1,1]-points[0,1] ystep = int(math.atan(temp/740)*1018.591636) # ystep = int(math.atan(temp/974)*1018.591636) #print('xstep =',xstep,'ystep =',ystep) #print() if xstep >= 0: absxstep = xstep xdir = 1 else: absxstep = -xstep xdir = 0 if ystep >= 0: absystep = ystep ydir = 1 else: absystep = -ystep ydir = 0 # 得到xstep和ystep的最大值 if absxstep >= absystep: # 说明较长边在x轴 maxdir = 'x' absmaxstep = absxstep maxstep = xstep minstep = ystep else: maxdir = 'y' absmaxstep = absystep maxstep = ystep minstep = xstep # 分段运行节数 sections = int(absmaxstep/dstep)+1 dstepmin = minstep/sections dstepmax = maxstep/sections for i in range(1,sections+1): if maxdir == 'x': # 沿x边走,先算累计步长 steps.append([round(i * dstepmax),round(i * dstepmin)]) else: # 沿y边走,先算累计步长 steps.append([round(i * dstepmin),round(i * dstepmax)]) if steps[sections-1][0] != xstep: steps[sections-1][0] == xstep if steps[sections-1][1] != ystep: steps[sections-1][1] == ystep #print('steps=', steps) #print() for i in range(sections-1,0,-1): steps[i][0] -= steps[i-1][0] steps[i][1] -= steps[i-1][1] #print('steps=', steps) points = len(steps) # 总点数 for i in range(points): xrunstep(steps[i][0]) yrunstep(steps[i][1]) upstop() downstop() def findLaser(crop): """ 找到图片中点绿色激光点与红色激光点并定位中心 :param crop: 需要处理点图片 :return: 绿色激光点中心(x1, y1);红色激光点中心(x2, y2) """ cX1, cY1, cX2, cY2 = None, None, None, None greenLaser = 'green' redLaser = 'red' # 色系下限上限表 color_dist = {'red': {'Lower': np.array([0, 60, 60]), 'Upper': np.array([6, 255, 255])}, 'green': {'Lower': np.array([35, 43, 35]), 'Upper': np.array([90, 255, 255])}, } # 灰度图像处理 # gray = cv2.cvtColor(crop, cv2.COLOR_BGR2GRAY)#灰度图 # cv2.imshow('gray', gray) # 高斯滤波 blurred = cv2.GaussianBlur(crop, (11, 11), 0) # cv2.imshow('blurred', blurred) # 创建运算核 kernel = np.ones((1, 1), np.uint8) # 腐蚀 # erode = cv2.erode(crop, kernel, iterations=1) # 膨胀 # crop_dilate = cv2.dilate(blurred, kernel, iterations = 5) # 开运算 opening = cv2.morphologyEx(blurred, cv2.MORPH_OPEN, kernel) # 二值化处理 thresh = cv2.threshold(opening, 230, 255, cv2.THRESH_BINARY)[1] # cv2.imshow('thresh', thresh) hsv = cv2.cvtColor(thresh, cv2.COLOR_BGR2HSV) # 转化成HSV图像 # 颜色二值化筛选处理 inRange_hsv_green = cv2.inRange(hsv, color_dist[greenLaser]['Lower'], color_dist[greenLaser]['Upper']) inRange_hsv_red = cv2.inRange(hsv, color_dist[redLaser]['Lower'], color_dist[redLaser]['Upper']) # cv2.imshow('inrange_hsv_green', inRange_hsv_green) # cv2.imshow('inrange_hsv_red', inRange_hsv_red) # 找绿色激光点 try: cnts1 = cv2.findContours(inRange_hsv_green.copy(), cv2.RETR_EXTERNAL, cv2.CHAIN_APPROX_SIMPLE)[-2] c1 = max(cnts1, key=cv2.contourArea) M = cv2.moments(c1) cX1 = int(M["m10"] / M["m00"]) cY1 = int(M["m01"] / M["m00"]) cv2.circle(crop, (cX1, cY1), 3, (0, 255, 0), -1) rect = cv2.minAreaRect(c1) box = cv2.boxPoints(rect) # cv2.drawContours(crop, [np.int0(box)], -1, (0, 255, 0), 2) except: print('没有找到绿色的激光') # 找红色激光点 try: cnts2 = cv2.findContours(inRange_hsv_red.copy(), cv2.RETR_EXTERNAL, cv2.CHAIN_APPROX_SIMPLE)[-2] c2 = max(cnts2, key=cv2.contourArea) M = cv2.moments(c2) cX2 = int(M["m10"] / M["m00"]) cY2 = int(M["m01"] / M["m00"]) cv2.circle(crop, (cX2, cY2), 3, (0, 0, 255), -1) rect = cv2.minAreaRect(c2) box = cv2.boxPoints(rect) # cv2.drawContours(crop, [np.int0(box)], -1, (0, 0, 255), 2) except: print('没有找到红色的激光') return cX1, cY1, cX2, cY2 def draw_fit_line(dire, type): """ :param dire: 传入需要拟合的含有白色直线的图像 :return: 传出直线一般式参数a,b,c """ dic = {'up': (hStart, wStart + leftRight_distance), 'down': (hEnd - upDown_distance, wStart + leftRight_distance), 'left': (hStart + upDown_distance, wStart), 'right': (hStart + upDown_distance, wEnd - leftRight_distance)} # 存放直线的像素点坐标 axis = [] for i in range(len(dire)): for j in range(len(dire[i])): if dire[i][j] == 255: # 判断为白色像素 # 对应在原图中的高宽坐标 h = i + dic[type][0] w = j + dic[type][1] axis.append([w, h]) data_np = np.array(axis) # 坐标矩阵化 output = cv2.fitLine(data_np, cv2.DIST_L2, 0, 0.01, 0.01) # 直线拟合 # print(output) k = output[1] / output[0] b = output[3] - k * output[2] return k, b def crop(h, w, cnt): ''' 将图形裁剪出上下左右四个部分的中间位置 :param cnt: 需要裁剪的图片 :return: ''' global upDown_distance, leftRight_distance # 上下部分裁剪的宽度 upDown_distance = h # 左右部分裁剪的宽度 leftRight_distance = w up = cnt[0:upDown_distance, leftRight_distance:wEnd - wStart - leftRight_distance] down = cnt[hEnd - hStart - upDown_distance:hEnd - hStart, leftRight_distance:wEnd - wStart - leftRight_distance] left = cnt[upDown_distance:hEnd - hStart - upDown_distance, 0:leftRight_distance] right = cnt[upDown_distance:hEnd - hStart - upDown_distance, wEnd -wStart - leftRight_distance:wEnd - wStart] # 显示四个边长裁剪过后的图片 # cv2.imshow('up', up) # cv2.imshow('down', down) # cv2.imshow('left', left) # cv2.imshow('right', right) return up, down, left, right def getCoordinate(k1, b1, k2, b2): x = (b2 - b1) / (k1 - k2) y = k1 * x + b1 return int(x), int(y) def drawCenter(a, b, c, d): # 显示边长交点 cv2.circle(img, (a[0], a[1]), 3, (0, 0, 255), -1) cv2.circle(img, (b[0], b[1]), 3, (0, 0, 255), -1) cv2.circle(img, (c[0], c[1]), 3, (0, 0, 255), -1) cv2.circle(img, (d[0], d[1]), 3, (0, 0, 255), -1) # 画边界线 cv2.line(img, (a[0], a[1]), (b[0], b[1]), (0, 255, 0), 1) cv2.line(img, (b[0], b[1]), (c[0], c[1]), (0, 255, 0), 1) cv2.line(img, (a[0], a[1]), (d[0], d[1]), (0, 255, 0), 1) cv2.line(img, (c[0], c[1]), (d[0], d[1]), (0, 255, 0), 1) xCenter = (a[0] + b[0] + c[0] + d[0])//4 yCenter = (a[1] + b[1] + c[1] + d[1])//4 cv2.circle(img, (xCenter, yCenter), 4, (0, 0, 255), -1) return xCenter, yCenter def dengfen(point, k): dfpoint = np.zeros((k+1,2)) dfpoint[0,:] = point[0,:] for i in range(k): dfpoint[i+1,0] = point[0,0] + int((i+1)*(point[1,0]-point[0,0])/k) dfpoint[i+1,1] = point[0,1] + int((i+1)*(point[1,1]-point[0,1])/k) return dfpoint if __name__ == "__main__": downsetup() upsetup() upstop() downstop() lightBuzerSetup() off() cap = cv2.VideoCapture(0) cap.set(3,1280) cap.set(4,720) #设置窗口的大小 for i in range(6): for j in range(6): ret, img = cap.read() # 需要裁剪的区域################################### hStart, hEnd, wStart, wEnd = 180, 630, 300, 900 ################################################ cropImg = img[hStart:hEnd, wStart:wEnd] # 找激光点 -> xc1, yc1, xc2, yc2 = findLaser(cropImg) xc1b, yc1b, xc2b, yc2b = xc1, yc1, xc2, yc2 if xc1 != None or xc2 != None: # 对应到原点中的激光坐标 xc1, yc1 = xc1 + wStart, yc1 + hStart print('绿色激光点坐标:', xc1, yc1) xc2, yc2 = xc2 + wStart, yc2 + hStart print('红色激光点坐标:', xc2, yc2) # cv2.imshow('cropImg', cropImg) # cv2.waitKey(0) # cv2.destroyAllWindows() points = np.array([[xc1, yc1],[xc2, yc2]]) print('points', points) runtwopoints(points) beep(0.2) beepdestroy()发挥2部分代码不稳定,就不拿出来丢人了哈!
祝大家学业有成,在竞赛都能拿个好奖项!最重要的一点是祝我的学姐学长,考研顺利!🚀
个人思路或者代码有问题,欢迎大家指正!
