一、课程目标
课程目标
系统了解Spring Batch批处理
项目中能熟练使用Spring Batch批处理
课程内容
前置知识
- Java基础
- Maven
- Spring SpringMVC SpringBoot
- MyBatis
适合人群
- 想学习的所有人
二、Spring Batch简介
2.1 何为批处理?
何为批处理,大白话:就是将数据分批次进行处理的过程。比如:银行对账逻辑,跨系统数据同步等。
常规的批处理操作步骤:系统A从数据库中导出数据到文件,系统B读取文件数据并写入到数据库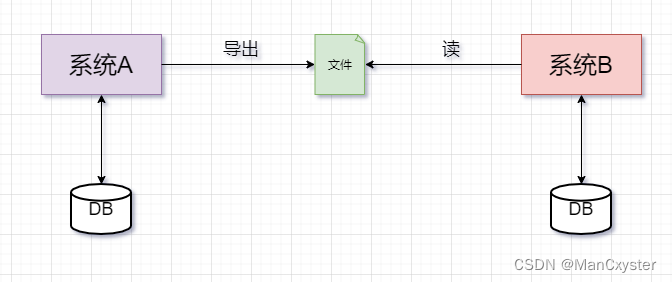
典型批处理特点:
自动执行,根据系统设定的工作步骤自动完成
数据量大,少则百万,多则上千万甚至上亿。(如果是10亿,100亿那只能上大数据了)
定时执行,比如:每天,每周,每月执行。
2.2 Spring Batch了解
官网介绍:https://docs.spring.io/spring-batch/docs/current/reference/html/spring-batch-intro.html#spring-batch-intro
这里挑重点讲下:
- Sping Batch 是一个轻量级的、完善的的批处理框架,旨在帮助企业建立健壮、高效的批处理应用。
- Spring Batch 是Spring的一个子项目,基于Spring框架为基础的开发的框架
- Spring Batch 提供大量可重用的组件,比如:日志,追踪,事务,任务作业统计,任务重启,跳过,重复,资源管理等
- Spring Batch 是一个批处理应用框架,不提供调度框架,如果需要定时处理需要额外引入-调度框架,比如: Quartz
2.3 Spring Batch 优势
Spring Batch 框架通过提供丰富的开箱即用的组件和高可靠性、高扩展性的能力,使得开发批处理应用的人员专注于业务处理,提高处理应用的开发能力。下面就是使用Spring Batch后能获取到优势:
丰富的开箱即用组件
面向Chunk的处理
事务管理能力
元数据管理
易监控的批处理应用
丰富的流程定义
健壮的批处理应用
易扩展的批处理应用
复用企业现有的IT代码
2.4 Spring Batch 架构
Spring Batch 核心架构分三层:应用层,核心层,基础架构层。
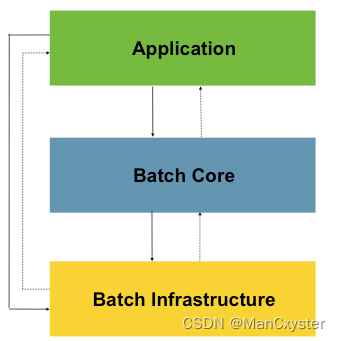
Application:应用层,包含所有的批处理作业,程序员自定义代码实现逻辑。
Batch Core:核心层,包含Spring Batch启动和控制所需要的核心类,比如:JobLauncher, Job,Step等。
Batch Infrastructure:基础架构层,提供通用的读,写与服务处理。
三层体系使得Spring Batch 架构可以在不同层面进行扩展,避免影响,实现高内聚低耦合设计。
三、入门案例
3.1 批量处理流程
前面对Spring Batch 有大体了解之后,那么开始写个案例玩一下。
开始前,先了解一下Spring Batch程序运行大纲:
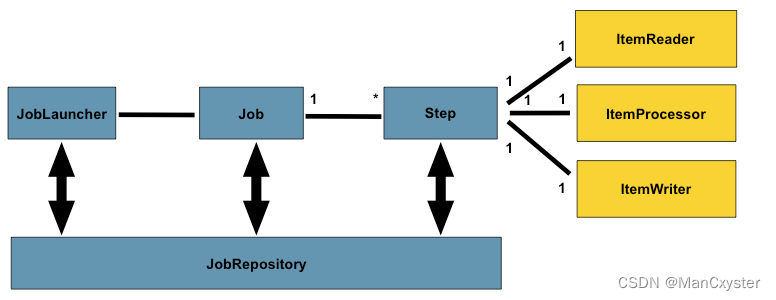
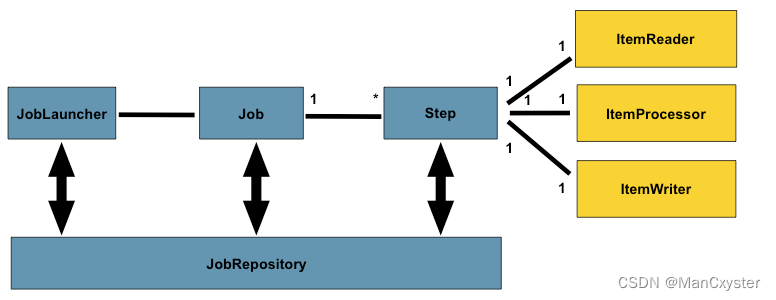
JobLauncher:作业调度器,作业启动主要入口。
Job:作业,需要执行的任务逻辑,
Step:作业步骤,一个Job作业由1个或者多个Step组成,完成所有Step操作,一个完整Job才算执行结束。
ItemReader:Step步骤执行过程中数据输入。可以从数据源(文件系统,数据库,队列等)中读取Item(数据记录)。
ItemWriter:Step步骤执行过程中数据输出,将Item(数据记录)写入数据源(文件系统,数据库,队列等)。
ItemProcessor:Item数据加工逻辑(输入),比如:数据清洗,数据转换,数据过滤,数据校验等
JobRepository: 保存Job或者检索Job的信息。SpringBatch需要持久化Job(可以选择数据库/内存),JobRepository就是持久化的接口
3.2 入门案例-H2版(内存)
需求:打印一个hello spring batch!不带读/写/处理
步骤1:导入依赖
<parent> <groupId>org.springframework.boot</groupId> <artifactId>spring-boot-starter-parent</artifactId> <version>2.7.3</version> <relativePath/> </parent> <dependencies> <dependency> <groupId>org.springframework.boot</groupId> <artifactId>spring-boot-starter-batch</artifactId> </dependency> <dependency> <groupId>org.projectlombok</groupId> <artifactId>lombok</artifactId> </dependency> <!--内存版--> <dependency> <groupId>com.h2database</groupId> <artifactId>h2</artifactId> <scope>runtime</scope> </dependency> <dependency> <groupId>org.springframework.boot</groupId> <artifactId>spring-boot-starter-test</artifactId> </dependency> </dependencies> 其中的h2是一个嵌入式内存数据库,后续可以使用MySQL替换
步骤2:创建测试方法
package com.langfeiyes.batch._01_hello; import org.springframework.batch.core.Job; import org.springframework.batch.core.Step; import org.springframework.batch.core.StepContribution; import org.springframework.batch.core.configuration.annotation.EnableBatchProcessing; import org.springframework.batch.core.configuration.annotation.JobBuilderFactory; import org.springframework.batch.core.configuration.annotation.StepBuilderFactory; import org.springframework.batch.core.launch.JobLauncher; import org.springframework.batch.core.scope.context.ChunkContext; import org.springframework.batch.core.step.tasklet.Tasklet; import org.springframework.batch.repeat.RepeatStatus; import org.springframework.beans.factory.annotation.Autowired; import org.springframework.boot.SpringApplication; import org.springframework.boot.autoconfigure.SpringBootApplication; import org.springframework.context.annotation.Bean; @SpringBootApplication @EnableBatchProcessing public class HelloJob { //job调度器 @Autowired private JobLauncher jobLauncher; //job构造器工厂 @Autowired private JobBuilderFactory jobBuilderFactory; //step构造器工厂 @Autowired private StepBuilderFactory stepBuilderFactory; //任务-step执行逻辑由tasklet完成 @Bean public Tasklet tasklet(){ return new Tasklet() { @Override public RepeatStatus execute(StepContribution contribution, ChunkContext chunkContext) throws Exception { System.out.println("Hello SpringBatch...."); return RepeatStatus.FINISHED; } }; } //作业步骤-不带读/写/处理 @Bean public Step step1(){ return stepBuilderFactory.get("step1") .tasklet(tasklet()) .build(); } //定义作业 @Bean public Job job(){ return jobBuilderFactory.get("hello-job") .start(step1()) .build(); } public static void main(String[] args) { SpringApplication.run(HelloJob.class, args); } } 步骤3:分析
例子是一个简单的SpringBatch 入门案例,使用了最简单的一种步骤处理模型:Tasklet模型,step1中没有带上读/写/处理逻辑,只有简单打印操作,后续随学习深入,我们再讲解更复杂化模型。
3.3 入门案例-MySQL版
MySQL跟上面的h2一样,区别在连接数据库不一致。
步骤1:在H2版本基础上导入MySQL依赖
<!-- <dependency> <groupId>com.h2database</groupId> <artifactId>h2</artifactId> <scope>runtime</scope> </dependency> --> <dependency> <groupId>mysql</groupId> <artifactId>mysql-connector-java</artifactId> <version>8.0.12</version> </dependency> 步骤2:配置数据库四要素与初始化SQL脚本
spring: datasource: username: root password: admin url: jdbc:mysql://127.0.0.1:3306/springbatch?serverTimezone=GMT%2B8&useSSL=false&allowPublicKeyRetrieval=true driver-class-name: com.mysql.cj.jdbc.Driver # 初始化数据库,文件在依赖jar包中 sql: init: schema-locations: classpath:org/springframework/batch/core/schema-mysql.sql mode: always #mode: never 这里要注意, sql.init.model 第一次启动为always, 后面启动需要改为never,否则每次执行SQL都会异常。
第一次启动会自动执行指定的脚本,后续不需要再初始化
步骤3:测试
跟H2版一样。
四、入门案例解析
1>@EnableBatchProcessing
批处理启动注解,要求贴配置类或者启动类上
@SpringBootApplication @EnableBatchProcessing public class HelloJob { ... } 贴上@EnableBatchProcessing注解后,SpringBoot会自动加载JobLauncher JobBuilderFactory StepBuilderFactory 类并创建对象交给容器管理,要使用时,直接@Autowired即可
//job调度器 @Autowired private JobLauncher jobLauncher; //job构造器工厂 @Autowired private JobBuilderFactory jobBuilderFactory; //step构造器工厂 @Autowired private StepBuilderFactory stepBuilderFactory; 2>配置数据库四要素
批处理允许重复执行,异常重试,此时需要保存批处理状态与数据,Spring Batch 将数据缓存在H2内存中或者缓存在指定数据库中。入门案例如果要保存在MySQL中,所以需要配置数据库四要素。
3>创建Tasklet对象
//任务-step执行逻辑由tasklet完成 @Bean public Tasklet tasklet(){ return new Tasklet() { @Override public RepeatStatus execute(StepContribution contribution, ChunkContext chunkContext) throws Exception { System.out.println("Hello SpringBatch...."); return RepeatStatus.FINISHED; } }; } Tasklet负责批处理step步骤中具体业务执行,它是一个接口,有且只有一个execute方法,用于定制step执行逻辑。
public interface Tasklet { RepeatStatus execute(StepContribution contribution, ChunkContext chunkContext) throws Exception; } execute方法返回值是一个状态枚举类:RepeatStatus,里面有可继续执行态与已经完成态
public enum RepeatStatus { /** * 可继续执行的-tasklet返回这个状态会进入死循环 */ CONTINUABLE(true), /** * 已经完成态 */ FINISHED(false); .... } 4>创建Step对象
//作业步骤-不带读/写/处理 @Bean public Step step1(){ return stepBuilderFactory.get("step1") .tasklet(tasklet()) .build(); } Job作业执行靠Step步骤执行,入门案例选用最简单的Tasklet模式,后续再讲Chunk块处理模式。
5>创建Job并执行Job
//定义作业 @Bean public Job job(){ return jobBuilderFactory.get("hello-job") .start(step1()) .build(); } 创建Job对象交给容器管理,当springboot启动之后,会自动去从容器中加载Job对象,并将Job对象交给JobLauncherApplicationRunner类,再借助JobLauncher类实现job执行。
验证过程;
打断点,debug模式启动

SpringApplication类run方法


JobLauncherApplicationRunner类


JobLauncher接口–实现类:SimpleJobLauncher

五、作业对象 Job
5.1 作业介绍
5.1.1 作业定义
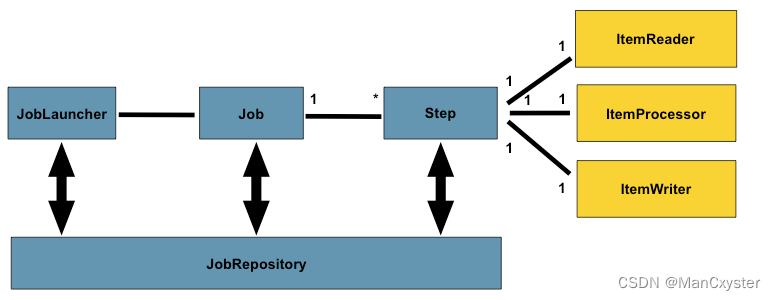
Job作业可以简单理解为一段业务流程的实现,可以根据业务逻辑拆分一个或者多个逻辑块(step),然后业务逻辑顺序,逐一执行。
所以作业可以定义为:能从头到尾独立执行的有序的步骤(Step)列表。
有序的步骤列表
一次作业由不同的步骤组成,这些步骤顺序是有意义的,如果不按照顺序执行,会引起逻辑混乱,比如购物结算,先点结算,再支付,最后物流,如果反过来那就乱套了,作业也是这么一回事。
从头到尾
一次作业步骤固定了,在没有外部交互情况下,会从头到尾执行,前一个步骤做完才会到后一个步骤执行,不允许随意跳转,但是可以按照一定逻辑跳转。
独立
每一个批处理作业都应该不受外部依赖影响情况下执行。
看回这幅图,批处理作业Job是由一组步骤Step对象组成,每一个作业都有自己名称,可以定义Step执行顺序。
5.1.2 作业代码设计
前面定义讲了作业执行是相互独立的,代码该怎么设计才能保证每次作业独立的性呢?
答案是:Job instance(作业实例) 与 Job Execution(作业执行对象)
Job instance(作业实例)
当作业运行时,会创建一个Job Instance(作业实例),它代表作业的一次逻辑运行,可通过作业名称与作业标识参数进行区分。
比如一个业务需求: 每天定期数据同步,作业名称-daily-sync-job作业标记参数-当天时间
Job Execution(作业执行对象)
当作业运行时,也会创建一个Job Execution(作业执行器),负责记录Job执行情况(比如:开始执行时间,结束时间,处理状态等)。
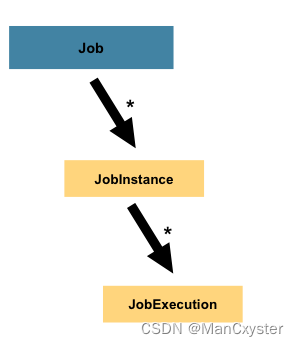
那为啥会出现上面架构设计呢?原因:批处理执行过程中可能出现两种情况:
一种是一次成功
仅一次就成从头到尾正常执行完毕,在数据库中会记录一条Job Instance 信息, 跟一条 Job Execution 信息
另外一种异常执行
在执行过程因异常导致作业结束,在数据库中会记录一条Job Instance 信息, 跟一条Job Execution 信息。如果此时使用相同识别参数再次启动作业,那么数据库中不会多一条Job Instance 信息, 但是会多了一条Job Execution 信息,这就意味中任务重复执行了。刚刚说每天批处理任务案例,如果当天执行出异常,那么人工干预修复之后,可以再次执行。
最后来个总结:
Job Instance = Job名称 + 识别参数
Job Instance 一次执行创建一个 Job Execution对象
完整的一次Job Instance 执行可能创建一个Job Execution对象,也可能创建多个Job Execution对象
5.2 作业配置
再看回入门案例
package com.langfeiyes.batch._01_hello; import org.springframework.batch.core.Job; import org.springframework.batch.core.Step; import org.springframework.batch.core.StepContribution; import org.springframework.batch.core.configuration.annotation.EnableBatchProcessing; import org.springframework.batch.core.configuration.annotation.JobBuilderFactory; import org.springframework.batch.core.configuration.annotation.StepBuilderFactory; import org.springframework.batch.core.launch.JobLauncher; import org.springframework.batch.core.scope.context.ChunkContext; import org.springframework.batch.core.step.tasklet.Tasklet; import org.springframework.batch.repeat.RepeatStatus; import org.springframework.beans.factory.annotation.Autowired; import org.springframework.boot.SpringApplication; import org.springframework.boot.autoconfigure.SpringBootApplication; import org.springframework.context.annotation.Bean; @SpringBootApplication @EnableBatchProcessing public class HelloJob { //job构造器工厂 @Autowired private JobBuilderFactory jobBuilderFactory; //step构造器工厂 @Autowired private StepBuilderFactory stepBuilderFactory; //任务-step执行逻辑由tasklet完成 @Bean public Tasklet tasklet(){ return new Tasklet() { @Override public RepeatStatus execute(StepContribution contribution, ChunkContext chunkContext) throws Exception { System.out.println("Hello SpringBatch...."); return RepeatStatus.FINISHED; } }; } //作业步骤-不带读/写/处理 @Bean public Step step1(){ return stepBuilderFactory.get("step1") .tasklet(tasklet()) .build(); } //定义作业 @Bean public Job job(){ return jobBuilderFactory.get("hello-job") .start(step1()) .build(); } public static void main(String[] args) { SpringApplication.run(HelloJob.class, args); } } 在启动类中贴上@EnableBatchProcessing注解,SpringBoot会自动听JobLauncher JobBuilderFactory StepBuilderFactory 对象,分别用于执行Jog,创建Job,创建Step逻辑。有了这些逻辑,Job批处理就剩下组装了。
5.3 作业参数
5.3.1 JobParameters
前面提到,作业的启动条件是作业名称 + 识别参数,Spring Batch使用JobParameters类来封装了所有传给作业参数。
我们看下JobParameters 源码
public class JobParameters implements Serializable { private final Map<String,JobParameter> parameters; public JobParameters() { this.parameters = new LinkedHashMap<>(); } public JobParameters(Map<String,JobParameter> parameters) { this.parameters = new LinkedHashMap<>(parameters); } ..... } 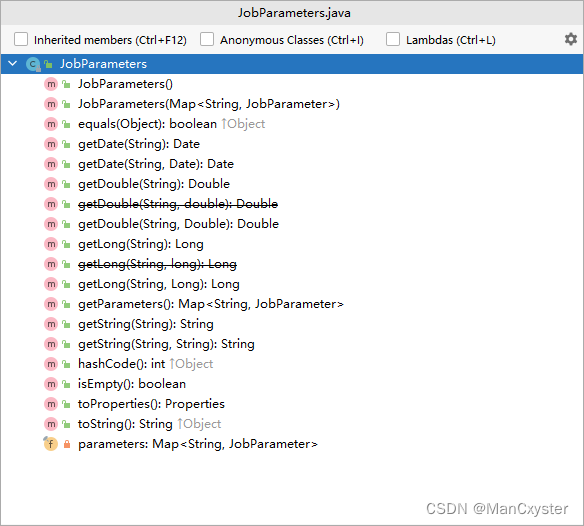
从上面代码/截图来看,JobParameters 类底层维护了Map<String,JobParameter>,是一个Map集合的封装器,提供了不同类型的get操作。
5.3.2 作业参数设置
还记得Spring Batch 入门案例吗,当初debug时候看到Job作业最终是调用时 **JobLauncher **(job启动器)接口run方法启动。
看下源码:JobLauncher
public interface JobLauncher { public JobExecution run(Job job, JobParameters jobParameters) throws JobExecutionAlreadyRunningException, JobRestartException, JobInstanceAlreadyCompleteException, JobParametersInvalidException; } 在JobLauncher 启动器执行run方法时,直接传入即可。
jobLauncher.run(job, params); 那我们使用SpringBoot 方式启动Spring Batch该怎么传值呢?
1>定义ParamJob类,准备好要执行的job
package com.langfeiyes.batch._02_params; import org.springframework.batch.core.*; import org.springframework.batch.core.configuration.annotation.EnableBatchProcessing; import org.springframework.batch.core.configuration.annotation.JobBuilderFactory; import org.springframework.batch.core.configuration.annotation.StepBuilderFactory; import org.springframework.batch.core.configuration.annotation.StepScope; import org.springframework.batch.core.scope.context.ChunkContext; import org.springframework.batch.core.step.tasklet.Tasklet; import org.springframework.batch.repeat.RepeatStatus; import org.springframework.beans.factory.annotation.Autowired; import org.springframework.beans.factory.annotation.Value; import org.springframework.boot.SpringApplication; import org.springframework.boot.autoconfigure.SpringBootApplication; import org.springframework.context.annotation.Bean; @SpringBootApplication @EnableBatchProcessing public class ParamJob { //job构造器工厂 @Autowired private JobBuilderFactory jobBuilderFactory; //step构造器工厂 @Autowired private StepBuilderFactory stepBuilderFactory; @Bean public Tasklet tasklet(){ return new Tasklet() { @Override public RepeatStatus execute(StepContribution contribution, ChunkContext chunkContext) throws Exception { System.out.println("param SpringBatch...."); return RepeatStatus.FINISHED; } }; } @Bean public Step step1(){ return stepBuilderFactory.get("step1") .tasklet(tasklet()) .build(); } @Bean public Job job(){ return jobBuilderFactory.get("param-job") .start(step1()) .build(); } public static void main(String[] args) { SpringApplication.run(HelloJob.class, args); } } 2>使用idea的命令传值的方式设置job作业参数
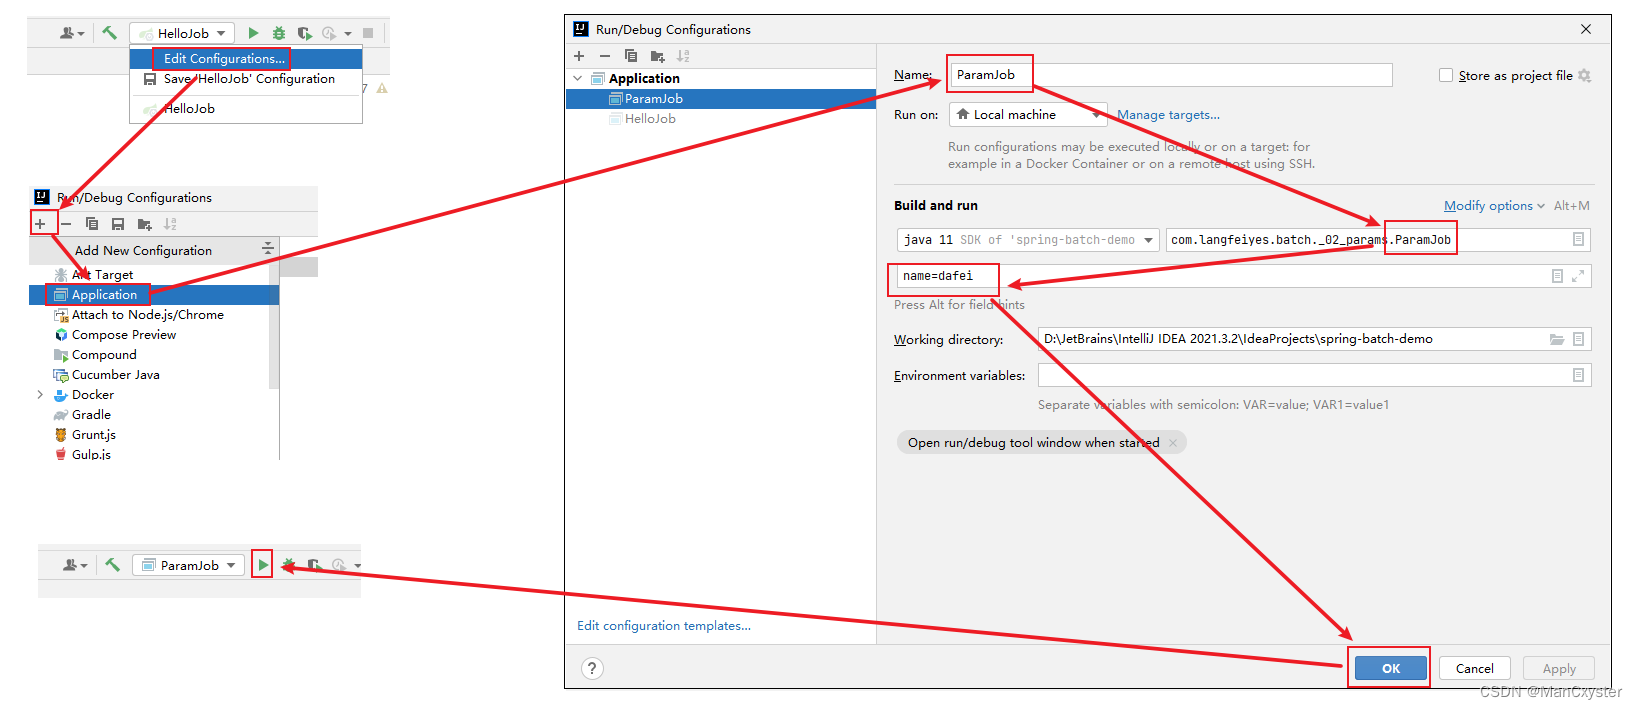
注意:如果不想这么麻烦,其实也可以,先空参数执行一次,然后指定参数后再执行。
点击绿色按钮,启动SpringBoot程序,作业运行之后,会在batch_job_execution_params 增加一条记录,用于区分唯一的Job Instance实例

注意:如果不改动JobParameters 参数内容,再执行一次批处理,会直接报错。

原因:Spring Batch 相同Job名与相同标识参数只能成功执行一次。
5.3.3 作业参数获取
当将作业参数传入到作业流程,该如何获取呢?

Spring Batch 提供了2种方案:
方案1:使用ChunkContext类
ParamJob类中tasklet写法
@Bean public Tasklet tasklet(){ return new Tasklet() { @Override public RepeatStatus execute(StepContribution contribution, ChunkContext chunkContext) throws Exception { Map<String, Object> parameters = chunkContext.getStepContext().getJobParameters(); System.out.println("params---name:" + parameters.get("name")); return RepeatStatus.FINISHED; } }; } 注意:job名:param-job job参数:name=dafei 已经执行了,再执行会报错
所以要么改名字,要么改参数,这里选择改job名字(拷贝一份job实例方法,然后注释掉,修改Job名称)
// @Bean // public Job job(){ // return jobBuilderFactory.get("param-job") // .start(step1()) // .build(); // } @Bean public Job job(){ return jobBuilderFactory.get("param-chunk-job") .start(step1()) .build(); } 方案2:使用@Value 延时获取
@StepScope @Bean public Tasklet tasklet(@Value("#{jobParameters['name']}")String name){ return new Tasklet() { @Override public RepeatStatus execute(StepContribution contribution, ChunkContext chunkContext) throws Exception { System.out.println("params---name:" + name); return RepeatStatus.FINISHED; } }; } @Bean public Step step1(){ return stepBuilderFactory.get("step1") .tasklet(tasklet(null)) .build(); } step1调用tasklet实例方法时不需要传任何参数,Spring Boot 在加载Tasklet Bean实例时会自动注入。
// @Bean // public Job job(){ // return jobBuilderFactory.get("param-chunk-job") // .start(step1()) // .build(); // } @Bean public Job job(){ return jobBuilderFactory.get("param-value-job") .start(step1()) .build(); } 这里要注意,必须贴上@StepScope ,表示在启动项目的时候,不加载该Step步骤bean,等step1()被调用时才加载。这就是所谓延时获取。
5.3.4 作业参数校验
当外部传入的参数进入作业时,如何确保参数符合期望呢?使用Spring Batch 的参数校验器:JobParametersValidator 接口。
先来看下JobParametersValidator 接口源码:
public interface JobParametersValidator { void validate(@Nullable JobParameters parameters) throws JobParametersInvalidException; } JobParametersValidator 接口有且仅有唯一的validate方法,参数为JobParameters,没有返回值。这就意味着不符合参数要求,需要抛出异常来结束步骤。
定制参数校验器
Spring Batch 提供JobParametersValidator参数校验接口,其目的就是让我们通过实现接口方式定制参数校验逻辑。
需求:如果传入作业的参数name值 为null 或者 “” 时报错
public class NameParamValidator implements JobParametersValidator { @Override public void validate(JobParameters parameters) throws JobParametersInvalidException { String name = parameters.getString("name"); if(!StringUtils.hasText(name)){ throw new JobParametersInvalidException("name 参数不能为空"); } } } 其中的JobParametersInvalidException 异常是Spring Batch 专门提供参数校验失败异常,当然我们也可以自定义或使用其他异常。
package com.langfeiyes.batch._03_param_validator; import org.springframework.batch.core.Job; import org.springframework.batch.core.Step; import org.springframework.batch.core.StepContribution; import org.springframework.batch.core.configuration.annotation.EnableBatchProcessing; import org.springframework.batch.core.configuration.annotation.JobBuilderFactory; import org.springframework.batch.core.configuration.annotation.StepBuilderFactory; import org.springframework.batch.core.configuration.annotation.StepScope; import org.springframework.batch.core.scope.context.ChunkContext; import org.springframework.batch.core.step.tasklet.Tasklet; import org.springframework.batch.repeat.RepeatStatus; import org.springframework.beans.factory.annotation.Autowired; import org.springframework.beans.factory.annotation.Value; import org.springframework.boot.SpringApplication; import org.springframework.boot.autoconfigure.SpringBootApplication; import org.springframework.context.annotation.Bean; import java.util.Map; @SpringBootApplication @EnableBatchProcessing public class ParamValidatorJob { @Autowired private JobBuilderFactory jobBuilderFactory; @Autowired private StepBuilderFactory stepBuilderFactory; @Bean public Tasklet tasklet(){ return new Tasklet() { @Override public RepeatStatus execute(StepContribution contribution, ChunkContext chunkContext) throws Exception { Map<String, Object> parameters = chunkContext.getStepContext().getJobParameters(); System.out.println("params---name:" + parameters.get("name")); return RepeatStatus.FINISHED; } }; } @Bean public Step step1(){ return stepBuilderFactory.get("step1") .tasklet(tasklet()) .build(); } //配置name参数校验器 @Bean public NameParamValidator validator(){ return new NameParamValidator(); } @Bean public Job job(){ return jobBuilderFactory.get("name-param-validator-job") .start(step1()) .validator(validator()) //参数校验器 .build(); } public static void main(String[] args) { SpringApplication.run(ParamValidatorJob.class, args); } } 新定义validator()实例方法,将定制的参数解析器加到Spring容器中,修改job()实例方法,加上.validator(validator()) 校验逻辑。
第一次启动时,没有传任何参数
String name = parameters.getString("name"); name为null,直接报错

加上name=dafei参数之后,正常执行

默认参数校验器
除去上面的定制参数校验器外,Spring Batch 也提供2个默认参数校验器:DefaultJobParametersValidator(默认参数校验器) 跟 CompositeJobParametersValidator(组合参数校验器)。
DefaultJobParametersValidator参数校验器
public class DefaultJobParametersValidator implements JobParametersValidator, InitializingBean { private Collection<String> requiredKeys; private Collection<String> optionalKeys; .... } 默认的参数校验器它功能相对简单,维护2个key集合requiredKeys 跟 optionalKeys
- requiredKeys 是一个集合,表示作业参数jobParameters中必须包含集合中指定的keys
- optionalKeys 也是一个集合,该集合中的key 是可选参数
需求:如果作业参数没有name参数报错,age参数可有可无
package com.langfeiyes.batch._03_param_validator; import org.springframework.batch.core.Job; import org.springframework.batch.core.Step; import org.springframework.batch.core.StepContribution; import org.springframework.batch.core.configuration.annotation.EnableBatchProcessing; import org.springframework.batch.core.configuration.annotation.JobBuilderFactory; import org.springframework.batch.core.configuration.annotation.StepBuilderFactory; import org.springframework.batch.core.configuration.annotation.StepScope; import org.springframework.batch.core.job.DefaultJobParametersValidator; import org.springframework.batch.core.scope.context.ChunkContext; import org.springframework.batch.core.step.tasklet.Tasklet; import org.springframework.batch.repeat.RepeatStatus; import org.springframework.beans.factory.annotation.Autowired; import org.springframework.beans.factory.annotation.Value; import org.springframework.boot.SpringApplication; import org.springframework.boot.autoconfigure.SpringBootApplication; import org.springframework.context.annotation.Bean; import java.util.Map; @SpringBootApplication @EnableBatchProcessing public class ParamValidatorJob { @Autowired private JobBuilderFactory jobBuilderFactory; @Autowired private StepBuilderFactory stepBuilderFactory; @Bean public Tasklet tasklet(){ return new Tasklet() { @Override public RepeatStatus execute(StepContribution contribution, ChunkContext chunkContext) throws Exception { Map<String, Object> parameters = chunkContext.getStepContext().getJobParameters(); System.out.println("params---name:" + parameters.get("name")); System.out.println("params---age:" + parameters.get("age")); return RepeatStatus.FINISHED; } }; } @Bean public Step step1(){ return stepBuilderFactory.get("step1") .tasklet(tasklet()) .build(); } //配置name参数校验器 @Bean public NameParamValidator validator(){ return new NameParamValidator(); } //配置默认参数校验器 @Bean public DefaultJobParametersValidator defaultValidator(){ DefaultJobParametersValidator defaultValidator = new DefaultJobParametersValidator(); defaultValidator.setRequiredKeys(new String[]{"name"}); //必填 defaultValidator.setOptionalKeys(new String[]{"age"}); //可选 return defaultValidator; } @Bean public Job job(){ return jobBuilderFactory.get("default-param-validator-job") .start(step1()) //.validator(validator()) //参数校验器 .validator(defaultValidator()) //默认参数校验器 .build(); } public static void main(String[] args) { SpringApplication.run(ParamValidatorJob.class, args); } } 新定义defaultValidator() 实例方法,将默认参数解析器加到Spring容器中,修改job实例方法,加上**.validator(defaultValidator())。**
右键启动,不填name 跟 age 参数,直接报错

如果填上name参数,即使不填age参数,可以通过,原因是age是可选的。

组合参数校验器
CompositeJobParametersValidator 组合参数校验器,顾名思义就是将多个参数校验器组合在一起。
看源码,大体能看出该校验器逻辑
public class CompositeJobParametersValidator implements JobParametersValidator, InitializingBean { private List<JobParametersValidator> validators; @Override public void validate(@Nullable JobParameters parameters) throws JobParametersInvalidException { for (JobParametersValidator validator : validators) { validator.validate(parameters); } } public void setValidators(List<JobParametersValidator> validators) { this.validators = validators; } @Override public void afterPropertiesSet() throws Exception { Assert.notNull(validators, "The 'validators' may not be null"); Assert.notEmpty(validators, "The 'validators' may not be empty"); } } 底层维护一个validators 集合,校验时调用validate 方法,依次执行校验器集合中校验器方法。另外,多了一个afterPropertiesSet方法,用于校验validators 集合中的校验器是否为null。
需求:要求步骤中必须有name属性,并且不能为空
分析:必须有,使用DefaultJobParametersValidator 参数校验器, 不能为null,使用指定定义的NameParamValidator参数校验器
package com.langfeiyes.batch._03_param_validator; import org.springframework.batch.core.Job; import org.springframework.batch.core.Step; import org.springframework.batch.core.StepContribution; import org.springframework.batch.core.configuration.annotation.EnableBatchProcessing; import org.springframework.batch.core.configuration.annotation.JobBuilderFactory; import org.springframework.batch.core.configuration.annotation.StepBuilderFactory; import org.springframework.batch.core.configuration.annotation.StepScope; import org.springframework.batch.core.job.CompositeJobParametersValidator; import org.springframework.batch.core.job.DefaultJobParametersValidator; import org.springframework.batch.core.scope.context.ChunkContext; import org.springframework.batch.core.step.tasklet.Tasklet; import org.springframework.batch.repeat.RepeatStatus; import org.springframework.beans.factory.annotation.Autowired; import org.springframework.beans.factory.annotation.Value; import org.springframework.boot.SpringApplication; import org.springframework.boot.autoconfigure.SpringBootApplication; import org.springframework.context.annotation.Bean; import java.util.Arrays; import java.util.Map; @SpringBootApplication @EnableBatchProcessing public class ParamValidatorJob { @Autowired private JobBuilderFactory jobBuilderFactory; @Autowired private StepBuilderFactory stepBuilderFactory; @Bean public Tasklet tasklet(){ return new Tasklet() { @Override public RepeatStatus execute(StepContribution contribution, ChunkContext chunkContext) throws Exception { Map<String, Object> parameters = chunkContext.getStepContext().getJobParameters(); System.out.println("params---name:" + parameters.get("name")); System.out.println("params---age:" + parameters.get("age")); return RepeatStatus.FINISHED; } }; } @Bean public Step step1(){ return stepBuilderFactory.get("step1") .tasklet(tasklet()) .build(); } //配置name参数校验器 @Bean public NameParamValidator validator(){ return new NameParamValidator(); } //配置默认参数校验器 @Bean public DefaultJobParametersValidator defaultValidator(){ DefaultJobParametersValidator defaultValidator = new DefaultJobParametersValidator(); defaultValidator.setRequiredKeys(new String[]{"name"}); //必填 defaultValidator.setOptionalKeys(new String[]{"age"}); //可选 return defaultValidator; } //配置组合参数校验器 @Bean public CompositeJobParametersValidator compositeValidator(){ DefaultJobParametersValidator defaultValidator = new DefaultJobParametersValidator(); defaultValidator.setRequiredKeys(new String[]{"name"}); //name必填 defaultValidator.setOptionalKeys(new String[]{"age"}); //age可选 NameParamValidator nameParamValidator = new NameParamValidator(); //name 不能为空 CompositeJobParametersValidator compositeValidator = new CompositeJobParametersValidator(); //按照传入的顺序,先执行defaultValidator 后执行nameParamValidator compositeValidator.setValidators(Arrays.asList(defaultValidator, nameParamValidator)); try { compositeValidator.afterPropertiesSet(); //判断校验器是否为null } catch (Exception e) { e.printStackTrace(); } return compositeValidator; } @Bean public Job job(){ return jobBuilderFactory.get("composite-param-validator-job") .start(step1()) //.validator(validator()) //参数校验器 //.validator(defaultValidator()) //默认参数校验器 .validator(compositeValidator()) //组合参数校验器 .build(); } public static void main(String[] args) { SpringApplication.run(ParamValidatorJob.class, args); } } 新定义compositeValidator() 实例方法,将组合参数解析器加到spring容器中,修改job()实例方法,加上**.validator(compositeValidator())。**
右键启动,不填name参数,测试报错。如果放开name参数,传null值,一样报错。
5.3.5 作业增量参数
不知道大家发现了没有,每次运行作业时,都改动作业名字,或者改动作业的参数,原因是作业启动有限制:相同标识参数与相同作业名的作业,只能成功运行一次。那如果想每次启动,又不想改动标识参数跟作业名怎么办呢?答案是:使用JobParametersIncrementer (作业参数增量器)
看下源码,了解一下原理
public interface JobParametersIncrementer { JobParameters getNext(@Nullable JobParameters parameters); } JobParametersIncrementer 增量器是一个接口,里面只有getNext方法,参数是JobParameters 返回值也是JobParameters。通过这个getNext方法,在作业启动时我们可以给JobParameters 添加或者修改参数。简单理解就是让标识参数每次都变动
作业递增run.id参数
Spring Batch 提供一个run.id自增参数增量器:RunIdIncrementer,每次启动时,里面维护名为run.id 标识参数,每次启动让其自增 1。
看下源码:
public class RunIdIncrementer implements JobParametersIncrementer { private static String RUN_ID_KEY = "run.id"; private String key = RUN_ID_KEY; public void setKey(String key) { this.key = key; } @Override public JobParameters getNext(@Nullable JobParameters parameters) { JobParameters params = (parameters == null) ? new JobParameters() : parameters; JobParameter runIdParameter = params.getParameters().get(this.key); long id = 1; if (runIdParameter != null) { try { id = Long.parseLong(runIdParameter.getValue().toString()) + 1; } catch (NumberFormatException exception) { throw new IllegalArgumentException("Invalid value for parameter " + this.key, exception); } } return new JobParametersBuilder(params).addLong(this.key, id).toJobParameters(); } } 核心getNext方法,在JobParameters 对象维护一个run.id,每次作业启动时,都调用getNext方法获取JobParameters,保证其 run.id 参数能自增1
具体用法:
package com.langfeiyes.batch._04_param_incr; import com.langfeiyes.batch._03_param_validator.NameParamValidator; import org.springframework.batch.core.Job; import org.springframework.batch.core.Step; import org.springframework.batch.core.StepContribution; import org.springframework.batch.core.configuration.annotation.EnableBatchProcessing; import org.springframework.batch.core.configuration.annotation.JobBuilderFactory; import org.springframework.batch.core.configuration.annotation.StepBuilderFactory; import org.springframework.batch.core.configuration.annotation.StepScope; import org.springframework.batch.core.job.CompositeJobParametersValidator; import org.springframework.batch.core.job.DefaultJobParametersValidator; import org.springframework.batch.core.launch.support.RunIdIncrementer; import org.springframework.batch.core.scope.context.ChunkContext; import org.springframework.batch.core.step.tasklet.Tasklet; import org.springframework.batch.repeat.RepeatStatus; import org.springframework.beans.factory.annotation.Autowired; import org.springframework.boot.SpringApplication; import org.springframework.boot.autoconfigure.SpringBootApplication; import org.springframework.context.annotation.Bean; import java.util.Arrays; import java.util.Map; @SpringBootApplication @EnableBatchProcessing public class IncrementParamJob { @Autowired private JobBuilderFactory jobBuilderFactory; @Autowired private StepBuilderFactory stepBuilderFactory; @Bean public Tasklet tasklet(){ return new Tasklet() { @Override public RepeatStatus execute(StepContribution contribution, ChunkContext chunkContext) throws Exception { Map<String, Object> parameters = chunkContext.getStepContext().getJobParameters(); System.out.println("params---run.id:" + parameters.get("run.id")); return RepeatStatus.FINISHED; } }; } @Bean public Step step1(){ return stepBuilderFactory.get("step1") .tasklet(tasklet()) .build(); } @Bean public Job job(){ return jobBuilderFactory.get("incr-params-job") .start(step1()) .incrementer(new RunIdIncrementer()) //参数增量器(run.id自增) .build(); } public static void main(String[] args) { SpringApplication.run(IncrementParamJob.class, args); } } 修改tasklet()方法,获取run.id参数,修改job实例方法,加上**.incrementer(new RunIdIncrementer())** ,保证参数能自增。
连续执行3次,观察:batch_job_execution_params 表

其中的run.id参数值一直增加,其中再多遍也没啥问题。
作业时间戳参数
run.id 作为标识参数貌似没有具体业务意义,如果将时间戳作为标识参数那就不一样了,比如这种运用场景:每日任务批处理,这时就需要记录每天的执行时间了。那该怎么实现呢?
Spring Batch 中没有现成时间戳增量器,需要自己定义
//时间戳作业参数增量器 public class DailyTimestampParamIncrementer implements JobParametersIncrementer { @Override public JobParameters getNext(JobParameters parameters) { return new JobParametersBuilder(parameters) .addLong("daily", new Date().getTime()) //添加时间戳 .toJobParameters(); } } 定义一个标识参数:daily,记录当前时间戳
package com.langfeiyes.batch._04_param_incr; import com.langfeiyes.batch._03_param_validator.NameParamValidator; import org.springframework.batch.core.Job; import org.springframework.batch.core.Step; import org.springframework.batch.core.StepContribution; import org.springframework.batch.core.configuration.annotation.EnableBatchProcessing; import org.springframework.batch.core.configuration.annotation.JobBuilderFactory; import org.springframework.batch.core.configuration.annotation.StepBuilderFactory; import org.springframework.batch.core.configuration.annotation.StepScope; import org.springframework.batch.core.job.CompositeJobParametersValidator; import org.springframework.batch.core.job.DefaultJobParametersValidator; import org.springframework.batch.core.launch.support.RunIdIncrementer; import org.springframework.batch.core.scope.context.ChunkContext; import org.springframework.batch.core.step.tasklet.Tasklet; import org.springframework.batch.repeat.RepeatStatus; import org.springframework.beans.factory.annotation.Autowired; import org.springframework.boot.SpringApplication; import org.springframework.boot.autoconfigure.SpringBootApplication; import org.springframework.context.annotation.Bean; import java.util.Arrays; import java.util.Map; @SpringBootApplication @EnableBatchProcessing public class IncrementParamJob { @Autowired private JobBuilderFactory jobBuilderFactory; @Autowired private StepBuilderFactory stepBuilderFactory; @Bean public Tasklet tasklet(){ return new Tasklet() { @Override public RepeatStatus execute(StepContribution contribution, ChunkContext chunkContext) throws Exception { Map<String, Object> parameters = chunkContext.getStepContext().getJobParameters(); System.out.println("params---daily:" + parameters.get("daily")); return RepeatStatus.FINISHED; } }; } //时间戳增量器 @Bean public DailyTimestampParamIncrementer dailyTimestampParamIncrementer(){ return new DailyTimestampParamIncrementer(); } @Bean public Step step1(){ return stepBuilderFactory.get("step1") .tasklet(tasklet()) .build(); } @Bean public Job job(){ return jobBuilderFactory.get("incr-params-job") .start(step1()) //.incrementer(new RunIdIncrementer()) //参数增量器(run.id自增) .incrementer(dailyTimestampParamIncrementer()) //时间戳增量器 .build(); } public static void main(String[] args) { SpringApplication.run(IncrementParamJob.class, args); } } 定义实例方法dailyTimestampParamIncrementer()将自定义时间戳增量器添加Spring容器中,修改job()实例方法,添加.incrementer(dailyTimestampParamIncrementer()) 增量器,修改tasklet() 方法,获取 daily参数。
连续执行3次,查看batch_job_execution_params 表

很明显可以看出daily在变化,而run.id 没有动,是3,为啥?因为**.incrementer(new RunIdIncrementer())** 被注释掉了。
5.4 作业监听器
作业监听器:用于监听作业的执行过程逻辑。在作业执行前,执行后2个时间点嵌入业务逻辑。
- 执行前:一般用于初始化操作, 作业执行前需要着手准备工作,比如:各种连接建立,线程池初始化等。
- 执行后:业务执行完后,需要做各种清理动作,比如释放资源等。
Spring Batch 使用JobExecutionListener 接口 实现作业监听。
public interface JobExecutionListener { //作业执行前 void beforeJob(JobExecution jobExecution); //作业执行后 void afterJob(JobExecution jobExecution); } 需求:记录作业执行前,执行中,与执行后的状态
方式一:接口方式
//作业状态--接口方式 public class JobStateListener implements JobExecutionListener { //作业执行前 @Override public void beforeJob(JobExecution jobExecution) { System.err.println("执行前-status:" + jobExecution.getStatus()); } //作业执行后 @Override public void afterJob(JobExecution jobExecution) { System.err.println("执行后-status:" + jobExecution.getStatus()); } } 定义JobStateListener 实现JobExecutionListener 接口,重写beforeJob,afterJob 2个方法。
import org.springframework.batch.core.Job; import org.springframework.batch.core.JobExecution; import org.springframework.batch.core.Step; import org.springframework.batch.core.StepContribution; import org.springframework.batch.core.configuration.annotation.EnableBatchProcessing; import org.springframework.batch.core.configuration.annotation.JobBuilderFactory; import org.springframework.batch.core.configuration.annotation.StepBuilderFactory; import org.springframework.batch.core.scope.context.ChunkContext; import org.springframework.batch.core.step.tasklet.Tasklet; import org.springframework.batch.repeat.RepeatStatus; import org.springframework.beans.factory.annotation.Autowired; import org.springframework.boot.SpringApplication; import org.springframework.boot.autoconfigure.SpringBootApplication; import org.springframework.context.annotation.Bean; @SpringBootApplication @EnableBatchProcessing public class StatusListenerJob { @Autowired private JobBuilderFactory jobBuilderFactory; @Autowired private StepBuilderFactory stepBuilderFactory; @Bean public Tasklet tasklet(){ return new Tasklet() { @Override public RepeatStatus execute(StepContribution contribution, ChunkContext chunkContext) throws Exception { JobExecution jobExecution = contribution.getStepExecution().getJobExecution(); System.err.println("执行中-status:" + jobExecution.getStatus()); return RepeatStatus.FINISHED; } }; } //状态监听器 @Bean public JobStateListener jobStateListener(){ return new JobStateListener(); } @Bean public Step step1(){ return stepBuilderFactory.get("step1") .tasklet(tasklet()) .build(); } @Bean public Job job(){ return jobBuilderFactory.get("status-listener-job") .start(step1()) .listener(jobStateListener()) //设置状态监听器 .build(); } public static void main(String[] args) { SpringApplication.run(StatusListenerJob.class, args); } } 新加jobStateListener()实例方法创建对象交个Spring容器管理,修改job()方法,添加.listener(jobStateListener()) 状态监听器,直接执行,观察结果
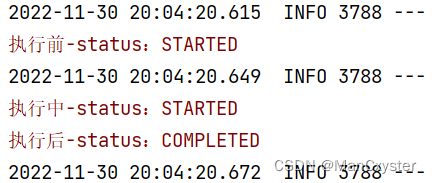
方式二:注解方式
除去上面通过实现接口方式实现监听之外,也可以使用**@BeforeJob @AfterJob** 2个注解实现
//作业状态--注解方式 public class JobStateAnnoListener { @BeforeJob public void beforeJob(JobExecution jobExecution) { System.err.println("执行前-anno-status:" + jobExecution.getStatus()); } @AfterJob public void afterJob(JobExecution jobExecution) { System.err.println("执行后-anno-status:" + jobExecution.getStatus()); } } import org.springframework.batch.core.Job; import org.springframework.batch.core.JobExecution; import org.springframework.batch.core.Step; import org.springframework.batch.core.StepContribution; import org.springframework.batch.core.configuration.annotation.EnableBatchProcessing; import org.springframework.batch.core.configuration.annotation.JobBuilderFactory; import org.springframework.batch.core.configuration.annotation.StepBuilderFactory; import org.springframework.batch.core.launch.support.RunIdIncrementer; import org.springframework.batch.core.listener.JobListenerFactoryBean; import org.springframework.batch.core.scope.context.ChunkContext; import org.springframework.batch.core.step.tasklet.Tasklet; import org.springframework.batch.repeat.RepeatStatus; import org.springframework.beans.factory.annotation.Autowired; import org.springframework.boot.SpringApplication; import org.springframework.boot.autoconfigure.SpringBootApplication; import org.springframework.context.annotation.Bean; @SpringBootApplication @EnableBatchProcessing public class StatusListenerJob { @Autowired private JobBuilderFactory jobBuilderFactory; @Autowired private StepBuilderFactory stepBuilderFactory; @Bean public Tasklet tasklet(){ return new Tasklet() { @Override public RepeatStatus execute(StepContribution contribution, ChunkContext chunkContext) throws Exception { JobExecution jobExecution = contribution.getStepExecution().getJobExecution(); System.err.println("执行中-anno-status:" + jobExecution.getStatus()); return RepeatStatus.FINISHED; } }; } //状态监听器 /* @Bean public JobStateListener jobStateListener(){ return new JobStateListener(); }*/ @Bean public Step step1(){ return stepBuilderFactory.get("step1") .tasklet(tasklet()) .build(); } @Bean public Job job(){ return jobBuilderFactory.get("status-listener-job1") .start(step1()) .incrementer(new RunIdIncrementer()) //.listener(jobStateListener()) //设置状态监听器 .listener(JobListenerFactoryBean.getListener(new JobStateAnnoListener())) .build(); } public static void main(String[] args) { SpringApplication.run(StatusListenerJob.class, args); } } 修改job()方法,添加**.listener(JobListenerFactoryBean.getListener(new JobStateAnnoListener()))**状态监听器,直接执行,观察结果
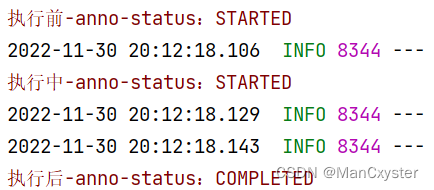
不需要纠结那一长串方法是啥逻辑,只需要知道它能将指定监听器对象加载到spring容器中。
5.5 执行上下文
5.5.1 作业与步骤上下文
语文中有个词叫上下文,比如:联系上下文解读一下作者所有表达意思。从这看上下文有环境,语境,氛围的意思。类比到编程,业内也喜欢使用Context表示上下文。比如Spring容器: SpringApplicationContext 。有上下文这个铺垫之后,我们来看下Spring Batch的上下文。
Spring Batch 有2个比较重要的上下文:
JobContext
JobContext 绑定 JobExecution 执行对象为Job作业执行提供执行环境(上下文)。
作用:维护JobExecution 对象,实现作业收尾工作,与处理各种作业回调逻辑
StepContext
StepContext 绑定 StepExecution 执行对象为Step步骤执行提供执行环境(上下文)。
作用:维护StepExecution 对象,实现步骤收尾工作,与处理各种步骤回调逻辑
5.5.2 执行上下文
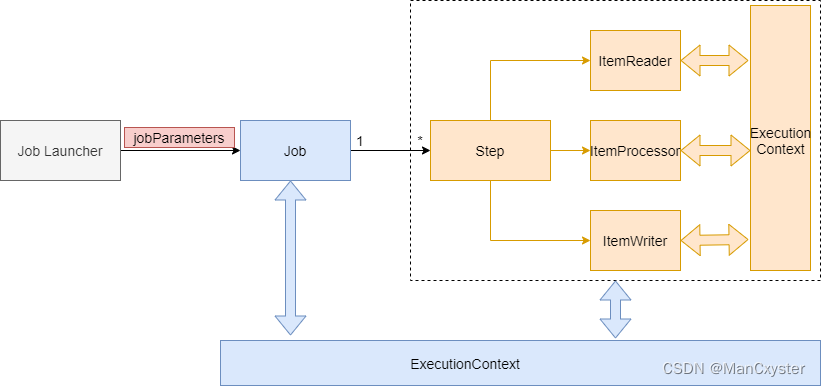
除了上面讲的JobContext 作业上下文, StepContext 步骤上线下文外,还有Spring Batch还维护另外一个上下文:ExecutionContext 执行上下文,作用是:数据共享
Spring Batch 中 ExecutionContext 分2大类
Job ExecutionContext
作用域:一次作业运行,所有Step步骤间数据共享。
Step ExecutionContext:
作用域:一次步骤运行,单个Step步骤间(ItemReader/ItemProcessor/ItemWrite组件间)数据共享。
5.5.3 作业与步骤执行链
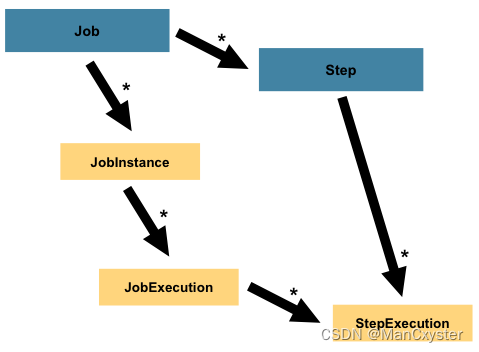
5.5.4 作业与步骤引用链
作业线
Job—JobInstance—JobContext—JobExecution–ExecutionContext
步骤线
Step–StepContext –StepExecution–ExecutionContext
5.5.5 作业上下文API
JobContext context = JobSynchronizationManager.getContext(); JobExecution jobExecution = context.getJobExecution(); Map<String, Object> jobParameters = context.getJobParameters(); Map<String, Object> jobExecutionContext = context.getJobExecutionContext(); 5.5.6 步骤上下文API
ChunkContext chunkContext = xxx; StepContext stepContext = chunkContext.getStepContext(); StepExecution stepExecution = stepContext.getStepExecution(); Map<String, Object> stepExecutionContext = stepContext.getStepExecutionContext(); Map<String, Object> jobExecutionContext = stepContext.getJobExecutionContext(); 5.5.7 执行上下文API
ChunkContext chunkContext = xxx; //步骤 StepContext stepContext = chunkContext.getStepContext(); StepExecution stepExecution = stepContext.getStepExecution(); ExecutionContext executionContext = stepExecution.getExecutionContext(); executionContext.put("key", "value"); //------------------------------------------------------------------------- //作业 JobExecution jobExecution = stepExecution.getJobExecution(); ExecutionContext executionContext = jobExecution.getExecutionContext(); executionContext.put("key", "value"); 5.5.8 API综合小案例
需求:观察作业ExecutionContext与 步骤ExecutionContext数据共享
分析:
1>定义step1 与step2 2个步骤
2>在step1中设置数据
作业-ExecutionContext 添加: key-step1-job value-step1-job
步骤-ExecutionContext 添加: key-step1-step value-step1-step
3>在step2中打印观察
作业-ExecutionContext 步骤-ExecutionContext
package com.langfeiyes.batch._06_context; import com.langfeiyes.batch._04_param_incr.DailyTimestampParamIncrementer; import org.springframework.batch.core.*; import org.springframework.batch.core.configuration.annotation.EnableBatchProcessing; import org.springframework.batch.core.configuration.annotation.JobBuilderFactory; import org.springframework.batch.core.configuration.annotation.StepBuilderFactory; import org.springframework.batch.core.launch.JobLauncher; import org.springframework.batch.core.launch.support.RunIdIncrementer; import org.springframework.batch.core.listener.JobListenerFactoryBean; import org.springframework.batch.core.scope.context.ChunkContext; import org.springframework.batch.core.scope.context.JobContext; import org.springframework.batch.core.scope.context.JobSynchronizationManager; import org.springframework.batch.core.scope.context.StepContext; import org.springframework.batch.core.step.tasklet.Tasklet; import org.springframework.batch.item.ExecutionContext; import org.springframework.batch.repeat.RepeatStatus; import org.springframework.beans.factory.annotation.Autowired; import org.springframework.boot.SpringApplication; import org.springframework.boot.autoconfigure.SpringBootApplication; import org.springframework.context.annotation.Bean; @SpringBootApplication @EnableBatchProcessing public class ExecutionContextJob { @Autowired private JobBuilderFactory jobBuilderFactory; @Autowired private StepBuilderFactory stepBuilderFactory; @Bean public Tasklet tasklet1(){ return new Tasklet() { @Override public RepeatStatus execute(StepContribution contribution, ChunkContext chunkContext) throws Exception { //步骤 ExecutionContext stepEC = chunkContext.getStepContext().getStepExecution().getExecutionContext(); stepEC.put("key-step1-step","value-step1-step"); System.out.println("------------------1---------------------------"); //作业 ExecutionContext jobEC = chunkContext.getStepContext().getStepExecution().getJobExecution().getExecutionContext(); jobEC.put("key-step1-job","value-step1-job"); return RepeatStatus.FINISHED; } }; } @Bean public Tasklet tasklet2(){ return new Tasklet() { @Override public RepeatStatus execute(StepContribution contribution, ChunkContext chunkContext) throws Exception { //步骤 ExecutionContext stepEC = chunkContext.getStepContext().getStepExecution().getExecutionContext(); System.err.println(stepEC.get("key-step1-step")); System.out.println("------------------2---------------------------"); //作业 ExecutionContext jobEC = chunkContext.getStepContext().getStepExecution().getJobExecution().getExecutionContext(); System.err.println(jobEC.get("key-step1-job")); return RepeatStatus.FINISHED; } }; } @Bean public Step step1(){ return stepBuilderFactory.get("step1") .tasklet(tasklet1()) .build(); } @Bean public Step step2(){ return stepBuilderFactory.get("step2") .tasklet(tasklet2()) .build(); } @Bean public Job job(){ return jobBuilderFactory.get("execution-context-job") .start(step1()) .next(step2()) .incrementer(new RunIdIncrementer()) .build(); } public static void main(String[] args) { SpringApplication.run(ExecutionContextJob.class, args); } } 运行结果:
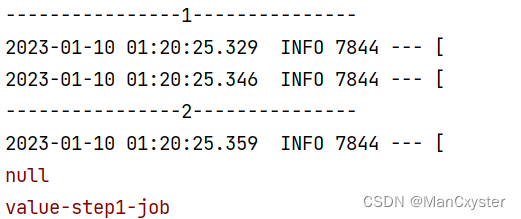
可以看出,在stepContext 设置的参数作用域仅在StepExecution 执行范围有效,而JobContext 设置参数作用与在所有StepExcution 有效,有点局部与全局 的意思。
打开数据库观察表:batch_job_execution_context 跟 batch_step_execution_context 表
JobContext数据保存到:batch_job_execution_context
StepContext数据保存到:batch_step_execution_context
总结:
步骤数据保存在Step ExecutionContext,只能在Step中使用,作业数据保存在Job ExecutionContext,可以在所有Step中共享
六、步骤对象 Step
前面一章节讲完了作业的相关介绍,本章节重点讲解步骤。
6.1 步骤介绍
一般认为步骤是一个独立功能组件,因为它包含了一个工作单元需要的所有内容,比如:输入模块,输出模块,数据处理模块等。这种设计好处在哪?给开发者带来更自由的操作空间。
目前Spring Batch 支持2种步骤处理模式:
简单具于Tasklet 处理模式
这种模式相对简单,前面讲的都是居于这个模式批处理
@Bean public Tasklet tasklet(){ return new Tasklet() { @Override public RepeatStatus execute(StepContribution contribution, ChunkContext chunkContext) throws Exception { System.out.println("Hello SpringBatch...."); return RepeatStatus.FINISHED; } }; }只需要实现Tasklet接口,就可以构建一个step代码块。循环执行step逻辑,直到tasklet.execute方法返回RepeatStatus.FINISHED
居于块(chunk)的处理模式
居于块的步骤一般包含2个或者3个组件:1>ItemReader 2>ItemProcessor(可选) 3>ItemWriter 。 当用上这些组件之后,Spring Batch 会按块处理数据。
6.2 简单Tasklet
学到这,我们写过很多简单Tasklet模式步骤,但是都没有深入了解过,这节就细致分析一下具有Tasklet 步骤使用。
先看下Tasklet源码
public interface Tasklet { @Nullable RepeatStatus execute(StepContribution contribution, ChunkContext chunkContext) throws Exception; } Tasklet 接口有且仅有一个方法:execute,
参数有2个:
StepContribution:步骤信息对象,用于保存当前步骤执行情况信息,核心用法:设置步骤结果状态contribution.setExitStatus(ExitStatus status)
contribution.setExitStatus(ExitStatus.COMPLETED); ChunkContext:chuck上下文,跟之前学的StepContext JobContext一样,区别是它用于记录chunk块执行场景。通过它可以获取前面2个对象。
返回值1个:
RepeatStatus:当前步骤状态, 它是枚举类,有2个值,一个表示execute方法可以循环执行,一个表示已经执行结束。
public enum RepeatStatus { /** * 当前步骤依然可以执行,如果步骤返回该值,会一直循环执行 */ CONTINUABLE(true), /** * 当前步骤结束,可以为成功也可以表示不成,仅代表当前step执行结束了 */ FINISHED(false); } 需求:练习上面RepeatStatus状态
@SpringBootApplication @EnableBatchProcessing public class SimpleTaskletJob { @Autowired private JobLauncher jobLauncher; @Autowired private JobBuilderFactory jobBuilderFactory; @Autowired private StepBuilderFactory stepBuilderFactory; @Bean public Tasklet tasklet(){ return new Tasklet() { @Override public RepeatStatus execute(StepContribution contribution, ChunkContext chunkContext) throws Exception { System.out.println("------>" + System.currentTimeMillis()); //return RepeatStatus.CONTINUABLE; //循环执行 return RepeatStatus.FINISHED; } }; } @Bean public Step step1(){ return stepBuilderFactory.get("step1") .tasklet(tasklet()) .build(); } //定义作业 @Bean public Job job(){ return jobBuilderFactory.get("step-simple-tasklet-job") .start(step1()) .build(); } public static void main(String[] args) { SpringApplication.run(SimpleTaskletJob.class, args); } } 6.3 居于块Tasklet
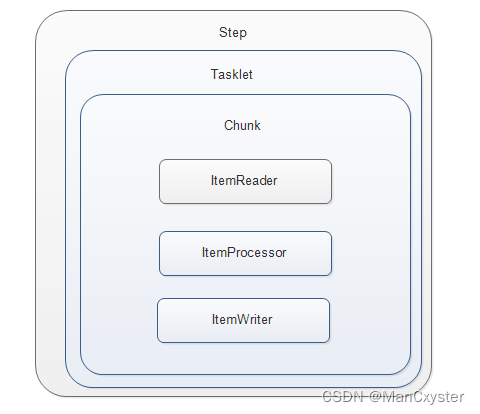
居于块的Tasklet相对简单Tasklet来说,多了3个模块:ItemReader( 读模块), ItemProcessor(处理模块),ItemWriter(写模块), 跟它们名字一样, 一个负责数据读, 一个负责数据加工,一个负责数据写。
结构图:
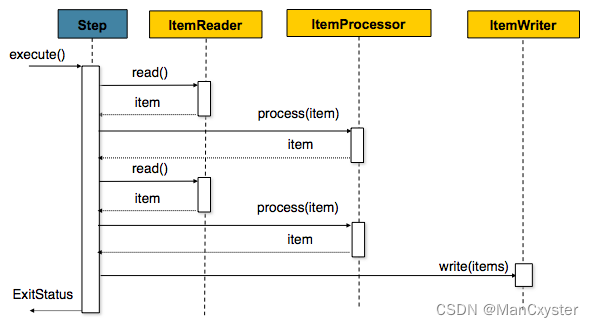
时序图:
需求:简单演示chunk Tasklet使用
ItemReader ItemProcessor ItemWriter 都接口,直接使用匿名内部类方式方便创建
package com.langfeiyes.batch._08_step_chunk_tasklet; import org.springframework.batch.core.Job; import org.springframework.batch.core.Step; import org.springframework.batch.core.StepContribution; import org.springframework.batch.core.configuration.annotation.EnableBatchProcessing; import org.springframework.batch.core.configuration.annotation.JobBuilderFactory; import org.springframework.batch.core.configuration.annotation.StepBuilderFactory; import org.springframework.batch.core.launch.JobLauncher; import org.springframework.batch.core.launch.support.RunIdIncrementer; import org.springframework.batch.core.scope.context.ChunkContext; import org.springframework.batch.core.step.tasklet.Tasklet; import org.springframework.batch.item.*; import org.springframework.batch.repeat.RepeatStatus; import org.springframework.beans.factory.annotation.Autowired; import org.springframework.boot.SpringApplication; import org.springframework.boot.autoconfigure.SpringBootApplication; import org.springframework.context.annotation.Bean; import java.util.Arrays; import java.util.List; @SpringBootApplication @EnableBatchProcessing public class ChunkTaskletJob { @Autowired private JobLauncher jobLauncher; @Autowired private JobBuilderFactory jobBuilderFactory; @Autowired private StepBuilderFactory stepBuilderFactory; @Bean public ItemReader itemReader(){ return new ItemReader() { @Override public Object read() throws Exception, UnexpectedInputException, ParseException, NonTransientResourceException { System.out.println("-------------read------------"); return "read-ret"; } }; } @Bean public ItemProcessor itemProcessor(){ return new ItemProcessor() { @Override public Object process(Object item) throws Exception { System.out.println("-------------process------------>" + item); return "process-ret->" + item; } }; } @Bean public ItemWriter itemWriter(){ return new ItemWriter() { @Override public void write(List items) throws Exception { System.out.println(items); } }; } @Bean public Step step1(){ return stepBuilderFactory.get("step1") .chunk(3) //设置块的size为3次 .reader(itemReader()) .processor(itemProcessor()) .writer(itemWriter()) .build(); } //定义作业 @Bean public Job job(){ return jobBuilderFactory.get("step-chunk-tasklet-job") .start(step1()) .incrementer(new RunIdIncrementer()) .build(); } public static void main(String[] args) { SpringApplication.run(ChunkTaskletJob.class, args); } } 执行完了之后结果
-------------read------------ -------------read------------ -------------read------------ -------------process------------>read-ret -------------process------------>read-ret -------------process------------>read-ret [process-ret->read-ret, process-ret->read-ret, process-ret->read-ret] -------------read------------ -------------read------------ -------------read------------ -------------process------------>read-ret -------------process------------>read-ret -------------process------------>read-ret [process-ret->read-ret, process-ret->read-ret, process-ret->read-ret] -------------read------------ -------------read------------ -------------read------------ -------------process------------>read-ret -------------process------------>read-ret -------------process------------>read-ret [process-ret->read-ret, process-ret->read-ret, process-ret->read-ret] .... 观察上面打印结果,得出2个得出。
1>程序一直在循环打印,先循环打印3次reader, 再循环打印3次processor,最后一次性输出3个值。
2>死循环重复上面步骤
问题来了,为啥会出现这种效果,该怎么改进?
其实这个是ChunkTasklet 执行特点,ItemReader会一直循环读,直到返回null,才停止。而processor也是一样,itemReader读多少次,它处理多少次, itemWriter 一次性输出当前次输入的所有数据。
我们改进一下上面案例,要求只读3次, 只需要改动itemReader方法就行
int timer = 3; @Bean public ItemReader itemReader(){ return new ItemReader() { @Override public Object read() throws Exception, UnexpectedInputException, ParseException, NonTransientResourceException { if(timer > 0){ System.out.println("-------------read------------"); return "read-ret-" + timer--; }else{ return null; } } }; } 结果不在死循环了
-------------read------------ -------------read------------ -------------read------------ -------------process------------>read-ret-3 -------------process------------>read-ret-2 -------------process------------>read-ret-1 [process-ret->read-ret-3, process-ret->read-ret-2, process-ret->read-ret-1] 思考一个问题, 如果将timer改为 10,而 .chunk(3) 不变结果会怎样?
-------------read------------ -------------read------------ -------------read------------ -------------process------------>read-ret-10 -------------process------------>read-ret-9 -------------process------------>read-ret-8 [process-ret->read-ret-10, process-ret->read-ret-9, process-ret->read-ret-8] -------------read------------ -------------read------------ -------------read------------ -------------process------------>read-ret-7 -------------process------------>read-ret-6 -------------process------------>read-ret-5 [process-ret->read-ret-7, process-ret->read-ret-6, process-ret->read-ret-5] -------------read------------ -------------read------------ -------------read------------ -------------process------------>read-ret-4 -------------process------------>read-ret-3 -------------process------------>read-ret-2 [process-ret->read-ret-4, process-ret->read-ret-3, process-ret->read-ret-2] -------------read------------ -------------process------------>read-ret-1 [process-ret->read-ret-1] 找出规律了嘛?
当chunkSize = 3 表示 reader 先读3次,提交给processor处理3次,最后由writer输出3个值
timer =10, 表示数据有10条,一个批次(趟)只能处理3条数据,需要4个批次(趟)来处理。
是不是有批处理味道出来
结论:chunkSize 表示: 一趟需要ItemReader读多少次,ItemProcessor要处理多少次。
ChunkTasklet 泛型
上面案例默认的是使用Object类型读、写、处理数据,如果明确了Item的数据类型,可以明确指定具体操作泛型。
import org.springframework.batch.core.Job; import org.springframework.batch.core.Step; import org.springframework.batch.core.StepContribution; import org.springframework.batch.core.configuration.annotation.EnableBatchProcessing; import org.springframework.batch.core.configuration.annotation.JobBuilderFactory; import org.springframework.batch.core.configuration.annotation.StepBuilderFactory; import org.springframework.batch.core.launch.JobLauncher; import org.springframework.batch.core.launch.support.RunIdIncrementer; import org.springframework.batch.core.scope.context.ChunkContext; import org.springframework.batch.core.step.tasklet.Tasklet; import org.springframework.batch.item.*; import org.springframework.batch.repeat.RepeatStatus; import org.springframework.beans.factory.annotation.Autowired; import org.springframework.boot.SpringApplication; import org.springframework.boot.autoconfigure.SpringBootApplication; import org.springframework.context.annotation.Bean; import java.util.List; //开启 spring batch 注解--可以让spring容器创建springbatch操作相关类对象 @EnableBatchProcessing //springboot 项目,启动注解, 保证当前为为启动类 @SpringBootApplication public class ChunkTaskletJob { //作业启动器 @Autowired private JobLauncher jobLauncher; //job构造工厂---用于构建job对象 @Autowired private JobBuilderFactory jobBuilderFactory; //step 构造工厂--用于构造step对象 @Autowired private StepBuilderFactory stepBuilderFactory; int timer = 10; //读操作 @Bean public ItemReader<String> itemReader(){ return new ItemReader<String>() { @Override public String read() throws Exception, UnexpectedInputException, ParseException, NonTransientResourceException { if(timer > 0){ System.out.println("-------------read------------"); return "read-ret-->" + timer--; }else{ return null; } } }; } //处理操作 @Bean public ItemProcessor<String, String> itemProcessor(){ return new ItemProcessor<String, String>() { @Override public String process(String item) throws Exception { System.out.println("-------------process------------>" + item); return "process-ret->" + item; } }; } //写操作 @Bean public ItemWriter<String> itemWriter(){ return new ItemWriter<String>() { @Override public void write(List<? extends String> items) throws Exception { System.out.println(items); } }; } //构造一个step对象--chunk @Bean public Step step1(){ //tasklet 执行step逻辑, 类似 Thread()--->可以执行runable接口 return stepBuilderFactory.get("step1") .<String, String>chunk(3) //暂时为3 .reader(itemReader()) .processor(itemProcessor()) .writer(itemWriter()) .build(); } @Bean public Job job(){ return jobBuilderFactory.get("chunk-tasklet-job") .start(step1()) .incrementer(new RunIdIncrementer()) .build(); } public static void main(String[] args) { SpringApplication.run(ChunkTaskletJob.class, args); } } 6.4 步骤监听器
前面我们讲了作业的监听器,步骤也有监听器,也是执行步骤执行前监听,步骤执行后监听。
步骤监听器有2个分别是:StepExecutionListener ChunkListener 意义很明显,就是step前后,chunk块执行前后监听。
先看下StepExecutionListener接口
public interface StepExecutionListener extends StepListener { void beforeStep(StepExecution stepExecution); @Nullable ExitStatus afterStep(StepExecution stepExecution); } 需求:演示StepExecutionListener 用法
自定义监听接口
public class MyStepListener implements StepExecutionListener { @Override public void beforeStep(StepExecution stepExecution) { System.out.println("-----------beforeStep--------->"); } @Override public ExitStatus afterStep(StepExecution stepExecution) { System.out.println("-----------afterStep--------->"); return stepExecution.getExitStatus(); //不改动返回状态 } } package com.langfeiyes.batch._09_step_listener; import org.springframework.batch.core.Job; import org.springframework.batch.core.Step; import org.springframework.batch.core.StepContribution; import org.springframework.batch.core.configuration.annotation.EnableBatchProcessing; import org.springframework.batch.core.configuration.annotation.JobBuilderFactory; import org.springframework.batch.core.configuration.annotation.StepBuilderFactory; import org.springframework.batch.core.launch.JobLauncher; import org.springframework.batch.core.launch.support.RunIdIncrementer; import org.springframework.batch.core.scope.context.ChunkContext; import org.springframework.batch.core.step.tasklet.Tasklet; import org.springframework.batch.repeat.RepeatStatus; import org.springframework.beans.factory.annotation.Autowired; import org.springframework.boot.SpringApplication; import org.springframework.boot.autoconfigure.SpringBootApplication; import org.springframework.context.annotation.Bean; @SpringBootApplication @EnableBatchProcessing public class StepListenerJob { @Autowired private JobLauncher jobLauncher; @Autowired private JobBuilderFactory jobBuilderFactory; @Autowired private StepBuilderFactory stepBuilderFactory; @Bean public Tasklet tasklet(){ return new Tasklet() { @Override public RepeatStatus execute(StepContribution contribution, ChunkContext chunkContext) throws Exception { System.out.println("------>" + System.currentTimeMillis()); return RepeatStatus.FINISHED; } }; } @Bean public MyStepListener stepListener(){ return new MyStepListener(); } @Bean public Step step1(){ return stepBuilderFactory.get("step1") .tasklet(tasklet()) .listener(stepListener()) .build(); } //定义作业 @Bean public Job job(){ return jobBuilderFactory.get("step-listener-job1") .start(step1()) .incrementer(new RunIdIncrementer()) .build(); } public static void main(String[] args) { SpringApplication.run(StepListenerJob.class, args); } } 在step1方法中,加入:.listener(stepListener()) 即可
同理ChunkListener 操作跟上面一样
public interface ChunkListener extends StepListener { static final String ROLLBACK_EXCEPTION_KEY = "sb_rollback_exception"; void beforeChunk(ChunkContext context); void afterChunk(ChunkContext context); void afterChunkError(ChunkContext context); } 唯一的区别是多了一个afterChunkError 方法,表示当chunk执行失败后回调。
6.5 多步骤执行
到目前为止,我们演示的案例基本上都是一个作业, 一个步骤,那如果有多个步骤会怎样?Spring Batch 支持多步骤执行,以应对复杂业务需要多步骤配合执行的场景。
需求:定义2个步骤,然后依次执行
package com.langfeiyes.batch._10_step_multi; import com.langfeiyes.batch._09_step_listener.MyChunkListener; import org.springframework.batch.core.Job; import org.springframework.batch.core.Step; import org.springframework.batch.core.StepContribution; import org.springframework.batch.core.configuration.annotation.EnableBatchProcessing; import org.springframework.batch.core.configuration.annotation.JobBuilderFactory; import org.springframework.batch.core.configuration.annotation.StepBuilderFactory; import org.springframework.batch.core.launch.JobLauncher; import org.springframework.batch.core.launch.support.RunIdIncrementer; import org.springframework.batch.core.scope.context.ChunkContext; import org.springframework.batch.core.step.tasklet.Tasklet; import org.springframework.batch.repeat.RepeatStatus; import org.springframework.beans.factory.annotation.Autowired; import org.springframework.boot.SpringApplication; import org.springframework.boot.autoconfigure.SpringBootApplication; import org.springframework.context.annotation.Bean; @SpringBootApplication @EnableBatchProcessing public class MultiStepJob { @Autowired private JobLauncher jobLauncher; @Autowired private JobBuilderFactory jobBuilderFactory; @Autowired private StepBuilderFactory stepBuilderFactory; @Bean public Tasklet tasklet1(){ return new Tasklet() { @Override public RepeatStatus execute(StepContribution contribution, ChunkContext chunkContext) throws Exception { System.out.println("--------------tasklet1---------------"); return RepeatStatus.FINISHED; } }; } @Bean public Tasklet tasklet2(){ return new Tasklet() { @Override public RepeatStatus execute(StepContribution contribution, ChunkContext chunkContext) throws Exception { System.out.println("--------------tasklet2---------------"); return RepeatStatus.FINISHED; } }; } @Bean public Step step1(){ return stepBuilderFactory.get("step1") .tasklet(tasklet1()) .build(); } @Bean public Step step2(){ return stepBuilderFactory.get("step2") .tasklet(tasklet2()) .build(); } //定义作业 @Bean public Job job(){ return jobBuilderFactory.get("step-multi-job1") .start(step1()) .next(step2()) //job 使用next 执行下一步骤 .incrementer(new RunIdIncrementer()) .build(); } public static void main(String[] args) { SpringApplication.run(MultiStepJob.class, args); } } 定义2个tasklet: tasklet1 tasklet2, 定义2个step: step1 step2 修改 job方法,从.start(step1()) 然后执行到 .next(step2())
Spring Batch 使用next 执行下一步步骤,如果还有第三个step,再加一个next(step3)即可
6.6 步骤控制
上面多个步骤操作,先执行step1 然后是step2,如果有step3, step4,那执行顺序也是从step1到step4。此时爱思考的小伙伴肯定会想,步骤的执行能不能进行条件控制呢?比如:step1执行结束根据业务条件选择执行step2或者执行step3,亦或者直接结束呢?答案是yes:设置步骤执行条件即可
Spring Batch 使用 startnextonfromtoend 不同的api 改变步骤执行顺序。
6.6.1 条件分支控制-使用默认返回状态
需求:作业执行firstStep步骤,如果处理成功执行sucessStep,如果处理失败执行failStep
package com.langfeiyes.batch._11_step_condition; import org.springframework.batch.core.Job; import org.springframework.batch.core.Step; import org.springframework.batch.core.StepContribution; import org.springframework.batch.core.configuration.annotation.EnableBatchProcessing; import org.springframework.batch.core.configuration.annotation.JobBuilderFactory; import org.springframework.batch.core.configuration.annotation.StepBuilderFactory; import org.springframework.batch.core.launch.JobLauncher; import org.springframework.batch.core.launch.support.RunIdIncrementer; import org.springframework.batch.core.scope.context.ChunkContext; import org.springframework.batch.core.step.tasklet.Tasklet; import org.springframework.batch.repeat.RepeatStatus; import org.springframework.beans.factory.annotation.Autowired; import org.springframework.boot.SpringApplication; import org.springframework.boot.autoconfigure.SpringBootApplication; import org.springframework.context.annotation.Bean; @SpringBootApplication @EnableBatchProcessing public class ConditionStepJob { @Autowired private JobLauncher jobLauncher; @Autowired private JobBuilderFactory jobBuilderFactory; @Autowired private StepBuilderFactory stepBuilderFactory; @Bean public Tasklet firstTasklet(){ return new Tasklet() { @Override public RepeatStatus execute(StepContribution contribution, ChunkContext chunkContext) throws Exception { System.out.println("--------------firstTasklet---------------"); return RepeatStatus.FINISHED; //throw new RuntimeException("测试fail结果"); } }; } @Bean public Tasklet successTasklet(){ return new Tasklet() { @Override public RepeatStatus execute(StepContribution contribution, ChunkContext chunkContext) throws Exception { System.out.println("--------------successTasklet---------------"); return RepeatStatus.FINISHED; } }; } @Bean public Tasklet failTasklet(){ return new Tasklet() { @Override public RepeatStatus execute(StepContribution contribution, ChunkContext chunkContext) throws Exception { System.out.println("--------------failTasklet---------------"); return RepeatStatus.FINISHED; } }; } @Bean public Step firstStep(){ return stepBuilderFactory.get("step1") .tasklet(firstTasklet()) .build(); } @Bean public Step successStep(){ return stepBuilderFactory.get("successStep") .tasklet(successTasklet()) .build(); } @Bean public Step failStep(){ return stepBuilderFactory.get("failStep") .tasklet(failTasklet()) .build(); } //定义作业 @Bean public Job job(){ return jobBuilderFactory.get("condition-multi-job") .start(firstStep()) .on("FAILED").to(failStep()) .from(firstStep()).on("*").to(successStep()) .end() .incrementer(new RunIdIncrementer()) .build(); } public static void main(String[] args) { SpringApplication.run(ConditionStepJob.class, args); } } 观察给出的案例,job方法以 .start(firstStep()) 开始作业,执行完成之后, 使用on 与from 2个方法实现流程转向。
.on(“FAILED”).to(failStep()) 表示当**firstStep()**返回FAILED时执行。
.from(firstStep()).on(“*”).to(successStep()) 另外一个分支,表示当**firstStep()**返回 * 时执行。
上面逻辑有点像 if / else 语法
if("FAILED".equals(firstStep())){ failStep(); }else{ successStep(); } 几个注意点:
1> on 方法表示条件, 上一个步骤返回值,匹配指定的字符串,满足后执行后续 to 步骤
2> * 为通配符,表示能匹配任意返回值
3> from 表示从某个步骤开始进行条件判断
4> 分支判断结束,流程以end方法结束,表示if/else逻辑结束
5> on 方法中字符串取值于 ExitStatus 类常量,当然也可以自定义。
6.6.2 条件分支控制-使用自定义状态值
前面也说了,on条件的值取值于ExitStatus 类常量,具体值有:UNKNOWN,EXECUTING,COMPLETED,NOOP,FAILED,STOPPED等,如果此时我想自定义返回值呢,是否可行?答案还是yes:Spring Batch 提供JobExecutionDecider 接口实现状态值定制。
需求:先执行firstStep,如果返回值为A,执行stepA, 返回值为B,执行stepB, 其他执行defaultStep
分析:先定义一个决策器,随机决定返回A / B / C
public class MyStatusDecider implements JobExecutionDecider { @Override public FlowExecutionStatus decide(JobExecution jobExecution, StepExecution stepExecution) { long ret = new Random().nextInt(3); if(ret == 0){ return new FlowExecutionStatus("A"); }else if(ret == 1){ return new FlowExecutionStatus("B"); }else{ return new FlowExecutionStatus("C"); } } } package com.langfeiyes.batch._11_step_condition_decider; import org.springframework.batch.core.Job; import org.springframework.batch.core.Step; import org.springframework.batch.core.StepContribution; import org.springframework.batch.core.configuration.annotation.EnableBatchProcessing; import org.springframework.batch.core.configuration.annotation.JobBuilderFactory; import org.springframework.batch.core.configuration.annotation.StepBuilderFactory; import org.springframework.batch.core.launch.JobLauncher; import org.springframework.batch.core.launch.support.RunIdIncrementer; import org.springframework.batch.core.scope.context.ChunkContext; import org.springframework.batch.core.step.tasklet.Tasklet; import org.springframework.batch.repeat.RepeatStatus; import org.springframework.beans.factory.annotation.Autowired; import org.springframework.boot.SpringApplication; import org.springframework.boot.autoconfigure.SpringBootApplication; import org.springframework.context.annotation.Bean; @SpringBootApplication @EnableBatchProcessing public class CustomizeStatusStepJob { @Autowired private JobBuilderFactory jobBuilderFactory; @Autowired private StepBuilderFactory stepBuilderFactory; @Bean public Tasklet taskletFirst(){ return new Tasklet() { @Override public RepeatStatus execute(StepContribution contribution, ChunkContext chunkContext) throws Exception { System.out.println("--------------taskletFirst---------------"); return RepeatStatus.FINISHED; } }; } @Bean public Tasklet taskletA(){ return new Tasklet() { @Override public RepeatStatus execute(StepContribution contribution, ChunkContext chunkContext) throws Exception { System.out.println("--------------taskletA---------------"); return RepeatStatus.FINISHED; } }; } @Bean public Tasklet taskletB(){ return new Tasklet() { @Override public RepeatStatus execute(StepContribution contribution, ChunkContext chunkContext) throws Exception { System.out.println("--------------taskletB---------------"); return RepeatStatus.FINISHED; } }; } @Bean public Tasklet taskletDefault(){ return new Tasklet() { @Override public RepeatStatus execute(StepContribution contribution, ChunkContext chunkContext) throws Exception { System.out.println("--------------taskletDefault---------------"); return RepeatStatus.FINISHED; } }; } @Bean public Step firstStep(){ return stepBuilderFactory.get("firstStep") .tasklet(taskletFirst()) .build(); } @Bean public Step stepA(){ return stepBuilderFactory.get("stepA") .tasklet(taskletA()) .build(); } @Bean public Step stepB(){ return stepBuilderFactory.get("stepB") .tasklet(taskletB()) .build(); } @Bean public Step defaultStep(){ return stepBuilderFactory.get("defaultStep") .tasklet(taskletDefault()) .build(); } //决策器 @Bean public MyStatusDecider statusDecider(){ return new MyStatusDecider(); } //定义作业 @Bean public Job job(){ return jobBuilderFactory.get("customize-step-job") .start(firstStep()) .next(statusDecider()) .from(statusDecider()).on("A").to(stepA()) .from(statusDecider()).on("B").to(stepB()) .from(statusDecider()).on("*").to(defaultStep()) .end() .incrementer(new RunIdIncrementer()) .build(); } public static void main(String[] args) { SpringApplication.run(CustomizeStepJob.class, args); } } 反复执行,会返回打印的值有
--------------taskletA--------------- --------------taskletB--------------- --------------taskletDefault--------------- 它们随机切换,为啥能做到这样?注意,并不是firstStep() 执行返回值为A/B/C控制流程跳转,而是由后面**.next(statusDecider())** 决策器。
6.7 步骤状态
Spring Batch 使用ExitStatus 类表示步骤、块、作业执行状态,大体上有以下几种:
public class ExitStatus implements Serializable, Comparable<ExitStatus> { //未知状态 public static final ExitStatus UNKNOWN = new ExitStatus("UNKNOWN"); //执行中 public static final ExitStatus EXECUTING = new ExitStatus("EXECUTING"); //执行完成 public static final ExitStatus COMPLETED = new ExitStatus("COMPLETED"); //无效执行 public static final ExitStatus NOOP = new ExitStatus("NOOP"); //执行失败 public static final ExitStatus FAILED = new ExitStatus("FAILED"); //执行中断 public static final ExitStatus STOPPED = new ExitStatus("STOPPED"); ... } 一般来说,作业启动之后,这些状态皆为流程自行控制。顺利结束返回:COMPLETED, 异常结束返回:FAILED,无效执行返回:NOOP, 这是肯定有小伙伴说,能不能编程控制呢?答案是可以的。
Spring Batch 提供 3个方法决定作业流程走向:
end():作业流程直接成功结束,返回状态为:COMPLETED
fail():作业流程直接失败结束,返回状态为:FAILED
stopAndRestart(step) :作业流程中断结束,返回状态:STOPPED 再次启动时,从step位置开始执行 (注意:前提是参数与Job Name一样)
**需求:当步骤firstStep执行抛出异常时,通过end, fail,stopAndRestart改变步骤执行状态 **
package com.langfeiyes.batch._12_step_status; import org.springframework.batch.core.Job; import org.springframework.batch.core.Step; import org.springframework.batch.core.StepContribution; import org.springframework.batch.core.configuration.annotation.EnableBatchProcessing; import org.springframework.batch.core.configuration.annotation.JobBuilderFactory; import org.springframework.batch.core.configuration.annotation.StepBuilderFactory; import org.springframework.batch.core.launch.JobLauncher; import org.springframework.batch.core.launch.support.RunIdIncrementer; import org.springframework.batch.core.scope.context.ChunkContext; import org.springframework.batch.core.step.tasklet.Tasklet; import org.springframework.batch.repeat.RepeatStatus; import org.springframework.beans.factory.annotation.Autowired; import org.springframework.boot.SpringApplication; import org.springframework.boot.autoconfigure.SpringBootApplication; import org.springframework.context.annotation.Bean; //开启 spring batch 注解--可以让spring容器创建springbatch操作相关类对象 @EnableBatchProcessing //springboot 项目,启动注解, 保证当前为为启动类 @SpringBootApplication public class StatusStepJob { //作业启动器 @Autowired private JobLauncher jobLauncher; //job构造工厂---用于构建job对象 @Autowired private JobBuilderFactory jobBuilderFactory; //step 构造工厂--用于构造step对象 @Autowired private StepBuilderFactory stepBuilderFactory; //构造一个step对象执行的任务(逻辑对象) @Bean public Tasklet firstTasklet(){ return new Tasklet() { @Override public RepeatStatus execute(StepContribution contribution, ChunkContext chunkContext) throws Exception { System.out.println("----------------firstTasklet---------------"); throw new RuntimeException("假装失败了"); //return RepeatStatus.FINISHED; //执行完了 } }; } @Bean public Tasklet successTasklet(){ return new Tasklet() { @Override public RepeatStatus execute(StepContribution contribution, ChunkContext chunkContext) throws Exception { System.out.println("----------------successTasklet--------------"); return RepeatStatus.FINISHED; //执行完了 } }; } @Bean public Tasklet failTasklet(){ return new Tasklet() { @Override public RepeatStatus execute(StepContribution contribution, ChunkContext chunkContext) throws Exception { System.out.println("----------------failTasklet---------------"); return RepeatStatus.FINISHED; //执行完了 } }; } //构造一个step对象 @Bean public Step firstStep(){ //tasklet 执行step逻辑, 类似 Thread()--->可以执行runable接口 return stepBuilderFactory.get("firstStep") .tasklet(firstTasklet()) .build(); } //构造一个step对象 @Bean public Step successStep(){ //tasklet 执行step逻辑, 类似 Thread()--->可以执行runable接口 return stepBuilderFactory.get("successStep") .tasklet(successTasklet()) .build(); } //构造一个step对象 @Bean public Step failStep(){ //tasklet 执行step逻辑, 类似 Thread()--->可以执行runable接口 return stepBuilderFactory.get("failStep") .tasklet(failTasklet()) .build(); } //如果firstStep 执行成功:下一步执行successStep 否则是failStep @Bean public Job job(){ return jobBuilderFactory.get("status-step-job") .start(firstStep()) //表示将当前本应该是失败结束的步骤直接转成正常结束--COMPLETED //.on("FAILED").end() //表示将当前本应该是失败结束的步骤直接转成失败结束:FAILED //.on("FAILED").fail() //表示将当前本应该是失败结束的步骤直接转成停止结束:STOPPED 里面参数表示后续要重启时, 从successStep位置开始 .on("FAILED").stopAndRestart(successStep()) .from(firstStep()).on("*").to(successStep()) .end() .incrementer(new RunIdIncrementer()) .build(); } public static void main(String[] args) { SpringApplication.run(StatusStepJob.class, args); } } 6.8 流式步骤
FlowStep 流式步骤,也可以理解为步骤集合,由多个子步骤组成。作业执行时,将它当做一个普通步骤执行。一般用于较为复杂的业务,比如:一个业务逻辑需要拆分成按顺序执行的子步骤。
需求:先后执行stepA,stepB,stepC, 其中stepB中包含stepB1, stepB2,stepB3。
package com.langfeiyes.batch._13_flow_step; import org.springframework.batch.core.Job; import org.springframework.batch.core.Step; import org.springframework.batch.core.StepContribution; import org.springframework.batch.core.configuration.annotation.EnableBatchProcessing; import org.springframework.batch.core.configuration.annotation.JobBuilderFactory; import org.springframework.batch.core.configuration.annotation.StepBuilderFactory; import org.springframework.batch.core.job.builder.FlowBuilder; import org.springframework.batch.core.job.builder.JobBuilder; import org.springframework.batch.core.job.builder.SimpleJobBuilder; import org.springframework.batch.core.job.flow.Flow; import org.springframework.batch.core.launch.support.RunIdIncrementer; import org.springframework.batch.core.scope.context.ChunkContext; import org.springframework.batch.core.step.tasklet.Tasklet; import org.springframework.batch.repeat.RepeatStatus; import org.springframework.beans.factory.annotation.Autowired; import org.springframework.boot.SpringApplication; import org.springframework.boot.autoconfigure.SpringBootApplication; import org.springframework.context.annotation.Bean; @SpringBootApplication @EnableBatchProcessing public class FlowStepJob { @Autowired private JobBuilderFactory jobBuilderFactory; @Autowired private StepBuilderFactory stepBuilderFactory; @Bean public Tasklet taskletA(){ return new Tasklet() { @Override public RepeatStatus execute(StepContribution contribution, ChunkContext chunkContext) throws Exception { System.out.println("------------stepA--taskletA---------------"); return RepeatStatus.FINISHED; } }; } @Bean public Tasklet taskletB1(){ return new Tasklet() { @Override public RepeatStatus execute(StepContribution contribution, ChunkContext chunkContext) throws Exception { System.out.println("------------stepB--taskletB1---------------"); return RepeatStatus.FINISHED; } }; } @Bean public Tasklet taskletB2(){ return new Tasklet() { @Override public RepeatStatus execute(StepContribution contribution, ChunkContext chunkContext) throws Exception { System.out.println("------------stepB--taskletB2---------------"); return RepeatStatus.FINISHED; } }; } @Bean public Tasklet taskletB3(){ return new Tasklet() { @Override public RepeatStatus execute(StepContribution contribution, ChunkContext chunkContext) throws Exception { System.out.println("------------stepB--taskletB3---------------"); return RepeatStatus.FINISHED; } }; } @Bean public Tasklet taskletC(){ return new Tasklet() { @Override public RepeatStatus execute(StepContribution contribution, ChunkContext chunkContext) throws Exception { System.out.println("------------stepC--taskletC---------------"); return RepeatStatus.FINISHED; } }; } @Bean public Step stepA(){ return stepBuilderFactory.get("stepA") .tasklet(taskletA()) .build(); } @Bean public Step stepB1(){ return stepBuilderFactory.get("stepB1") .tasklet(taskletB1()) .build(); } @Bean public Step stepB2(){ return stepBuilderFactory.get("stepB2") .tasklet(taskletB2()) .build(); } @Bean public Step stepB3(){ return stepBuilderFactory.get("stepB3") .tasklet(taskletB3()) .build(); } @Bean public Flow flowB(){ return new FlowBuilder<Flow>("flowB") .start(stepB1()) .next(stepB2()) .next(stepB3()) .build(); } @Bean public Step stepB(){ return stepBuilderFactory.get("stepB") .flow(flowB()) .build(); } @Bean public Step stepC(){ return stepBuilderFactory.get("stepC") .tasklet(taskletC()) .build(); } //定义作业 @Bean public Job job(){ return jobBuilderFactory.get("flow-step-job") .start(stepA()) .next(stepB()) .next(stepC()) .incrementer(new RunIdIncrementer()) .build(); } public static void main(String[] args) { SpringApplication.run(FlowStepJob.class, args); } } 此时的flowB()就是一个FlowStep,包含了stepB1, stepB2, stepB3 3个子step,他们全部执行完后, stepB才能算执行完成。下面执行结果也验证了这点。
2022-12-03 14:54:16.644 INFO 19116 --- [ main] o.s.batch.core.job.SimpleStepHandler : Executing step: [stepA] ------------stepA--taskletA--------------- 2022-12-03 14:54:16.699 INFO 19116 --- [ main] o.s.batch.core.step.AbstractStep : Step: [stepA] executed in 55ms 2022-12-03 14:54:16.738 INFO 19116 --- [ main] o.s.batch.core.job.SimpleStepHandler : Executing step: [stepB] 2022-12-03 14:54:16.788 INFO 19116 --- [ main] o.s.batch.core.job.SimpleStepHandler : Executing step: [stepB1] ------------stepB--taskletB1--------------- 2022-12-03 14:54:16.844 INFO 19116 --- [ main] o.s.batch.core.step.AbstractStep : Step: [stepB1] executed in 56ms 2022-12-03 14:54:16.922 INFO 19116 --- [ main] o.s.batch.core.job.SimpleStepHandler : Executing step: [stepB2] ------------stepB--taskletB2--------------- 2022-12-03 14:54:16.952 INFO 19116 --- [ main] o.s.batch.core.step.AbstractStep : Step: [stepB2] executed in 30ms 2022-12-03 14:54:16.996 INFO 19116 --- [ main] o.s.batch.core.job.SimpleStepHandler : Executing step: [stepB3] ------------stepB--taskletB3--------------- 2022-12-03 14:54:17.032 INFO 19116 --- [ main] o.s.batch.core.step.AbstractStep : Step: [stepB3] executed in 36ms 2022-12-03 14:54:17.057 INFO 19116 --- [ main] o.s.batch.core.step.AbstractStep : Step: [stepB] executed in 318ms 2022-12-03 14:54:17.165 INFO 19116 --- [ main] o.s.batch.core.job.SimpleStepHandler : Executing step: [stepC] ------------stepC--taskletC--------------- 2022-12-03 14:54:17.215 INFO 19116 --- [ main] o.s.batch.core.step.AbstractStep : Step: [stepC] executed in 50ms 使用FlowStep的好处在于,在处理复杂额批处理逻辑中,flowStep可以单独实现一个子步骤流程,为批处理提供更高的灵活性。
七、批处理数据表
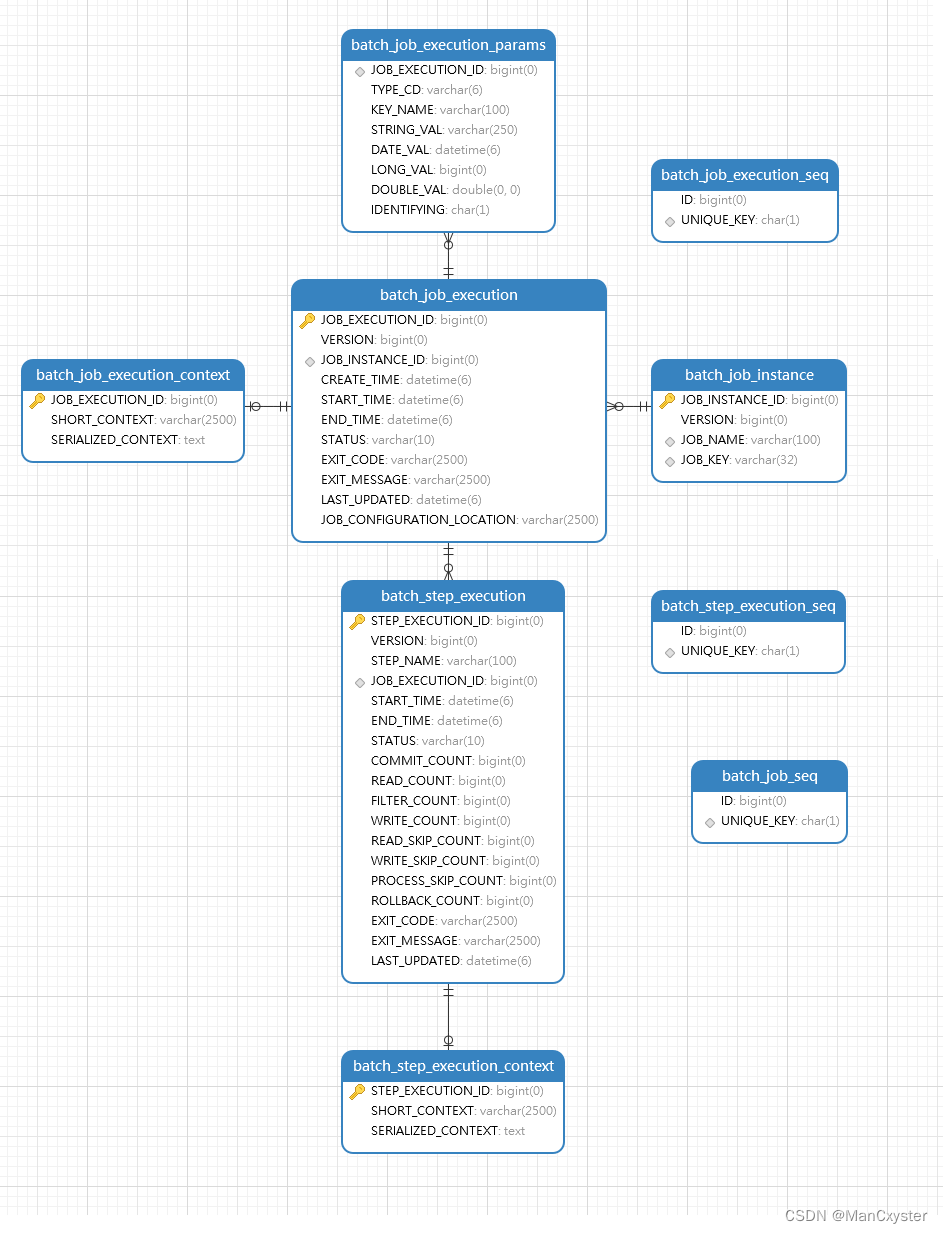
如果选择数据库方式存储批处理数据,Spring Batch 在启动时会自动创建9张表,分别存储: JobExecution、JobContext、JobParameters、JobInstance、JobExecution id序列、Job id序列、StepExecution、StepContext/ChunkContext、StepExecution id序列 等对象。Spring Batch 提供 JobRepository 组件来实现这些表的CRUD操作,并且这些操作基本上封装在步骤,块,作业api操作中,并不需要我们太多干预,所以这章内容了解即可。
7.1 batch_job_instance表
当作业第一次执行时,会根据作业名,标识参数生成一个唯一JobInstance对象,batch_job_instance表会记录一条信息代表这个作业实例。

| 字段 | 描述 |
|---|---|
| JOB_INSTANCE_ID | 作业实例主键 |
| VERSION | 乐观锁控制的版本号 |
| JOB_NAME | 作业名称 |
| JOB_KEY | 作业名与标识性参数的哈希值,能唯一标识一个job实例 |
7.2 batch_job_execution表
每次启动作业时,都会创建一个JobExecution对象,代表一次作业执行,该对象记录存放于batch_job_execution 表。

| 字段 | 描述 |
|---|---|
| JOB_EXECUTION_ID | job执行对象主键 |
| VERSION | 乐观锁控制的版本号 |
| JOB_INSTANCE_ID | JobInstanceId(归属于哪个JobInstance) |
| CREATE_TIME | 记录创建时间 |
| START_TIME | 作业执行开始时间 |
| END_TIME | 作业执行结束时间 |
| STATUS | 作业执行的批处理状态 |
| EXIT_CODE | 作业执行的退出码 |
| EXIT_MESSAGE | 作业执行的退出信息 |
| LAST_UPDATED | 最后一次更新记录的时间 |
7.3 batch_job_execution_context表
batch_job_execution_context用于保存JobContext对应的ExecutionContext对象数据。

| 字段 | 描述 |
|---|---|
| JOB_EXECUTION_ID | job执行对象主键 |
| SHORT_CONTEXT | ExecutionContext系列化后字符串缩减版 |
| SERIALIZED_CONTEXT | ExecutionContext系列化后字符串 |
7.4 batch_job_execution_params表
作业启动时使用标识性参数保存的位置:batch_job_execution_params, 一个参数一个记录

| 字段 | 描述 |
|---|---|
| JOB_EXECUTION_ID | job执行对象主键 |
| TYPE_CODE | 标记参数类型 |
| KEY_NAME | 参数名 |
| STRING_VALUE | 当参数类型为String时有值 |
| DATE_VALUE | 当参数类型为Date时有值 |
| LONG_VAL | 当参数类型为LONG时有值 |
| DOUBLE_VAL | 当参数类型为DOUBLE时有值 |
| IDENTIFYING | 用于标记该参数是否为标识性参数 |
7.5 btch_step_execution表
作业启动,执行步骤,每个步骤执行信息保存在tch_step_execution表中

| 字段 | 描述 |
|---|---|
| STEP_EXECUTION_ID | 步骤执行对象id |
| VERSION | 乐观锁控制版本号 |
| STEP_NAME | 步骤名称 |
| JOB_EXECUTION_ID | 作业执行对象id |
| START_TIME | 步骤执行的开始时间 |
| END_TIME | 步骤执行的结束时间 |
| STATUS | 步骤批处理状态 |
| COMMIT_COUNT | 在步骤执行中提交的事务次数 |
| READ_COUNT | 读入的条目数量 |
| FILTER_COUNT | 由于ItemProcessor返回null而过滤掉的条目数 |
| WRITE_COUNT | 写入条目数量 |
| READ_SKIP_COUNT | 由于ItemReader中抛出异常而跳过的条目数量 |
| PROCESS_SKIP_COUNT | 由于ItemProcessor中抛出异常而跳过的条目数量 |
| WRITE_SKIP_COUNT | 由于ItemWriter中抛出异常而跳过的条目数量 |
| ROLLBACK_COUNT | 在步骤执行中被回滚的事务数量 |
| EXIT_CODE | 步骤的退出码 |
| EXT_MESSAGE | 步骤执行返回的信息 |
| LAST_UPDATE | 最后一次更新记录时间 |
7.6 batch_step_execution_context表
StepContext对象对应的ExecutionContext 保存的数据表:batch_step_execution_context

| 字段 | 描述 |
|---|---|
| STEP_EXECUTION_ID | 步骤执行对象id |
| SHORT_CONTEXT | ExecutionContext系列化后字符串缩减版 |
| SERIALIZED_CONTEXT | ExecutionContext系列化后字符串 |
7.7 H2内存数据库
除了关系型数据库保存的数据外,Spring Batch 也执行内存数据库,比如H2,HSQLDB,这些数据库将数据缓存在内存中,当批处理结束后,数据会被清除,一般用于进行单元测试,不建议在生产环境中使用。
Spring Batch[第二章节]↓↓↓
ps:
一. 需要文档的同学点击获取↓↓↓:
Spring Batch批处理详解资料
二.视频学习Spring Batch批处理↓↓↓:
SpringBatch高效批处理框架详解及实战演练(深入浅出,全程干货)
三. 进学习交流群,免费领取学习文档,扫码或搜索:May793518,添加wx:
