阅读量:0
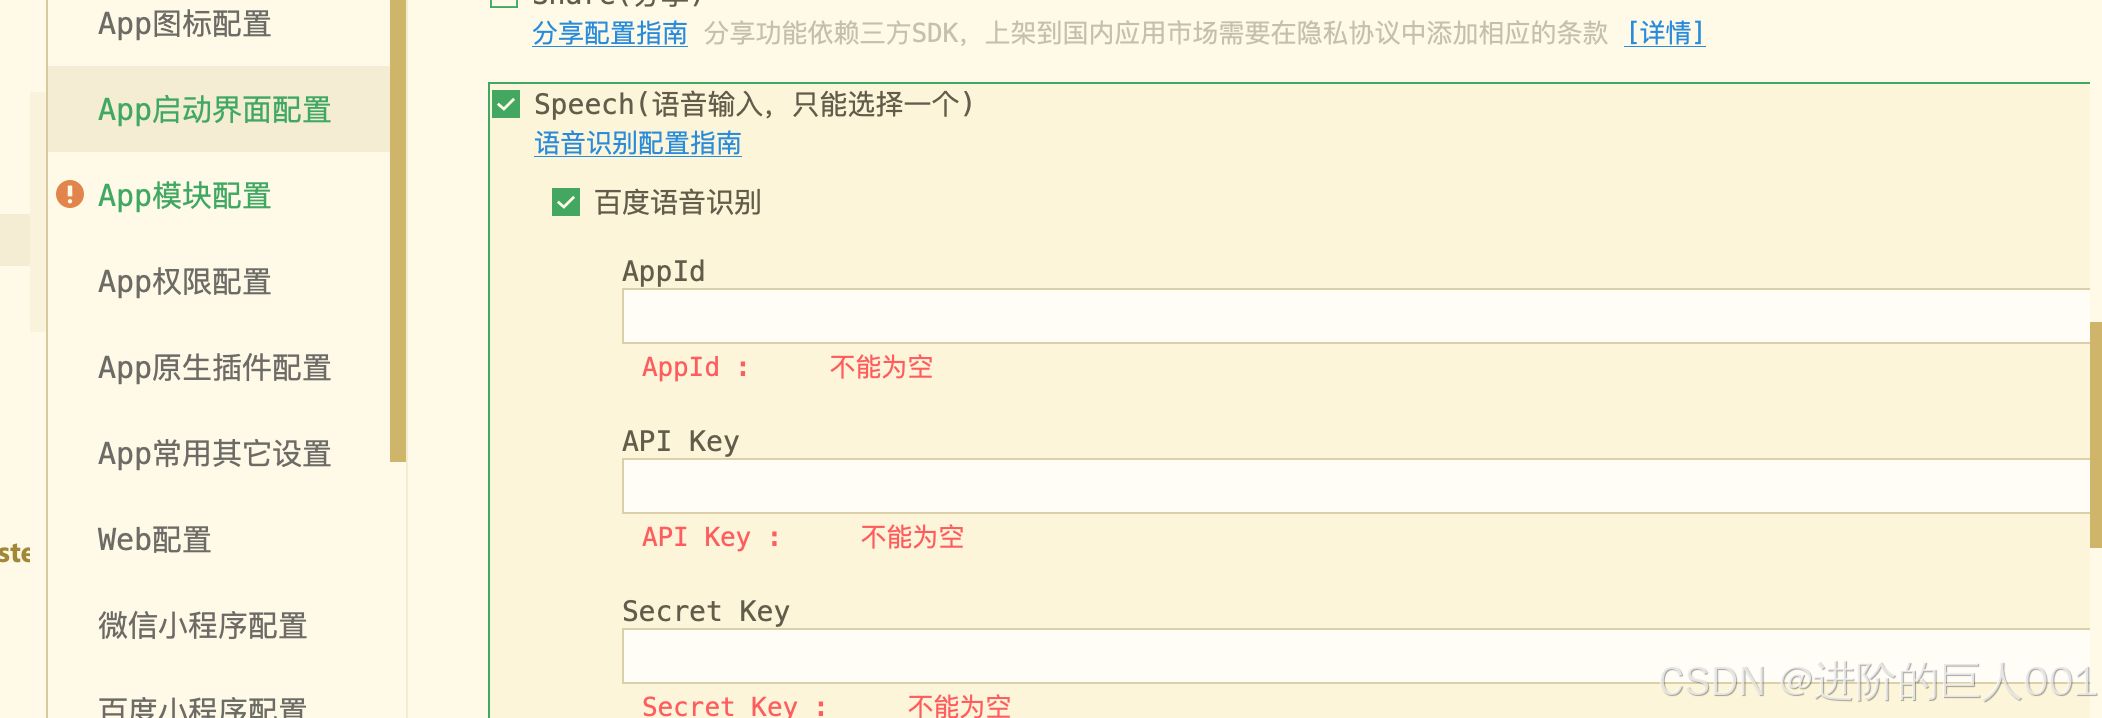
一.app版本需要先去百度智能云申请
注意填写完,需要打包成自定义基座或者安装rpk包,本地是无效的 封装recording-popup.vue组件
<template> <up-popup round="16" closeable :show="recordShow" :close-on-click-overlay="false" :safe-area-inset-bottom="false" @close="close" @open="open"> <view class="tag-popup-box"> <view class="title"> <text>{{ tips }}</text> <image src="https://observe-oss.oss-cn-shanghai.aliyuncs.com/wisdom-bay-vue/home/home-icon-close-gray-20.075vw%402x.png" @click="close" /> </view> <view class="voice-box"> <image src="https://observe-oss.oss-cn-shanghai.aliyuncs.com/wisdom-bay-vue/home/home-release-recording-blue-90px%402x.png" class="voice-icon" @click="startRecord" /> </view> </view> </up-popup> </template> <script setup> import { onBeforeUnmount, onMounted, ref, watch } from "vue"; const recordShow = ref(false) const tips = ref('点击开始录音') const emits = defineEmits(['micInput']) const startRecord = async () => { // #ifdef H5 uni.showToast({ title: '浏览器暂不支持该功能,请前往APP体验', icon: 'none', duration: 2000 }) // #endif // #ifdef APP-PLUS let options = { engine: 'baidu', timeout: 10 * 1000, //超时时间 punctuation: true, //是否需要标点符号 continue: true, //语音识别是否采用持续模式 userInterface: true, //安卓手机为true时会影响@touchend触摸结束事件,暂未发现好的解决方法 }; plus.speech.startRecognize(options, (s) => { emits('micInput', s) }, (errMsg) => { console.log('语音识别失败:' + JSON.stringify(errMsg)); }); // #endif } const onEnd = () => { close() } const open = () => { // #ifdef H5 uni.showToast({ title: '浏览器暂不支持该功能,请前往APP体验', icon: 'none', duration: 2000 }) // #endif // #ifdef APP-PLUS const info = uni.getAppAuthorizeSetting(); if(info.microphoneAuthorized !== 'authorized') { plus.nativeUI.toast('请打开麦克风权限,再重启应用'); return false; } plus.speech.addEventListener('end', onEnd, false); // #endif } const close = () => { recordShow.value = false // #ifdef APP-PLUS plus.speech.stopRecognize(); // #endif } onBeforeUnmount(() => { // #ifdef APP-PLUS plus.speech.stopRecognize(); // #endif }) defineExpose({ recordShow }) </script> <style scoped lang="scss"> .tag-popup-box { height: 19.655vw; background: #FFFFFF; width: 100%; padding: 1.5vw 1.5vw 0; box-sizing: border-box; border-radius: 1.2vw 1.2vw 0vw 0vw; .voice-box { width: 100%; display: flex; justify-content: center; margin-top: 2.251vw; .voice-icon { width: 6.752vw; height: 6.752vw; } } .title { display: flex; justify-content: space-between; align-items: center; margin-bottom: 2.251vw; &>text { font-size: 1.125vw; font-family: PingFangSC-Medium, PingFang SC; font-weight: 500; color: #333333; line-height: 1.65vw; } &>image { width: 1.65vw; height: 1.65vw; } } .content { width: 100%; height: 3.601vw; background: rgba(153, 153, 153, 0.08); border-radius: 0.45vw; padding: 0 0.975vw; box-sizing: border-box; } .confirm-btn { margin-top: 5.176vw; width: 100%; height: 3vw; text-align: center; background: #07B780; border-radius: 0.3vw; font-size: 1.05vw; font-family: PingFangSC-Regular, PingFang SC; font-weight: 400; color: #FFFFFF; line-height: 3vw; } } </style> 使用recording-popup
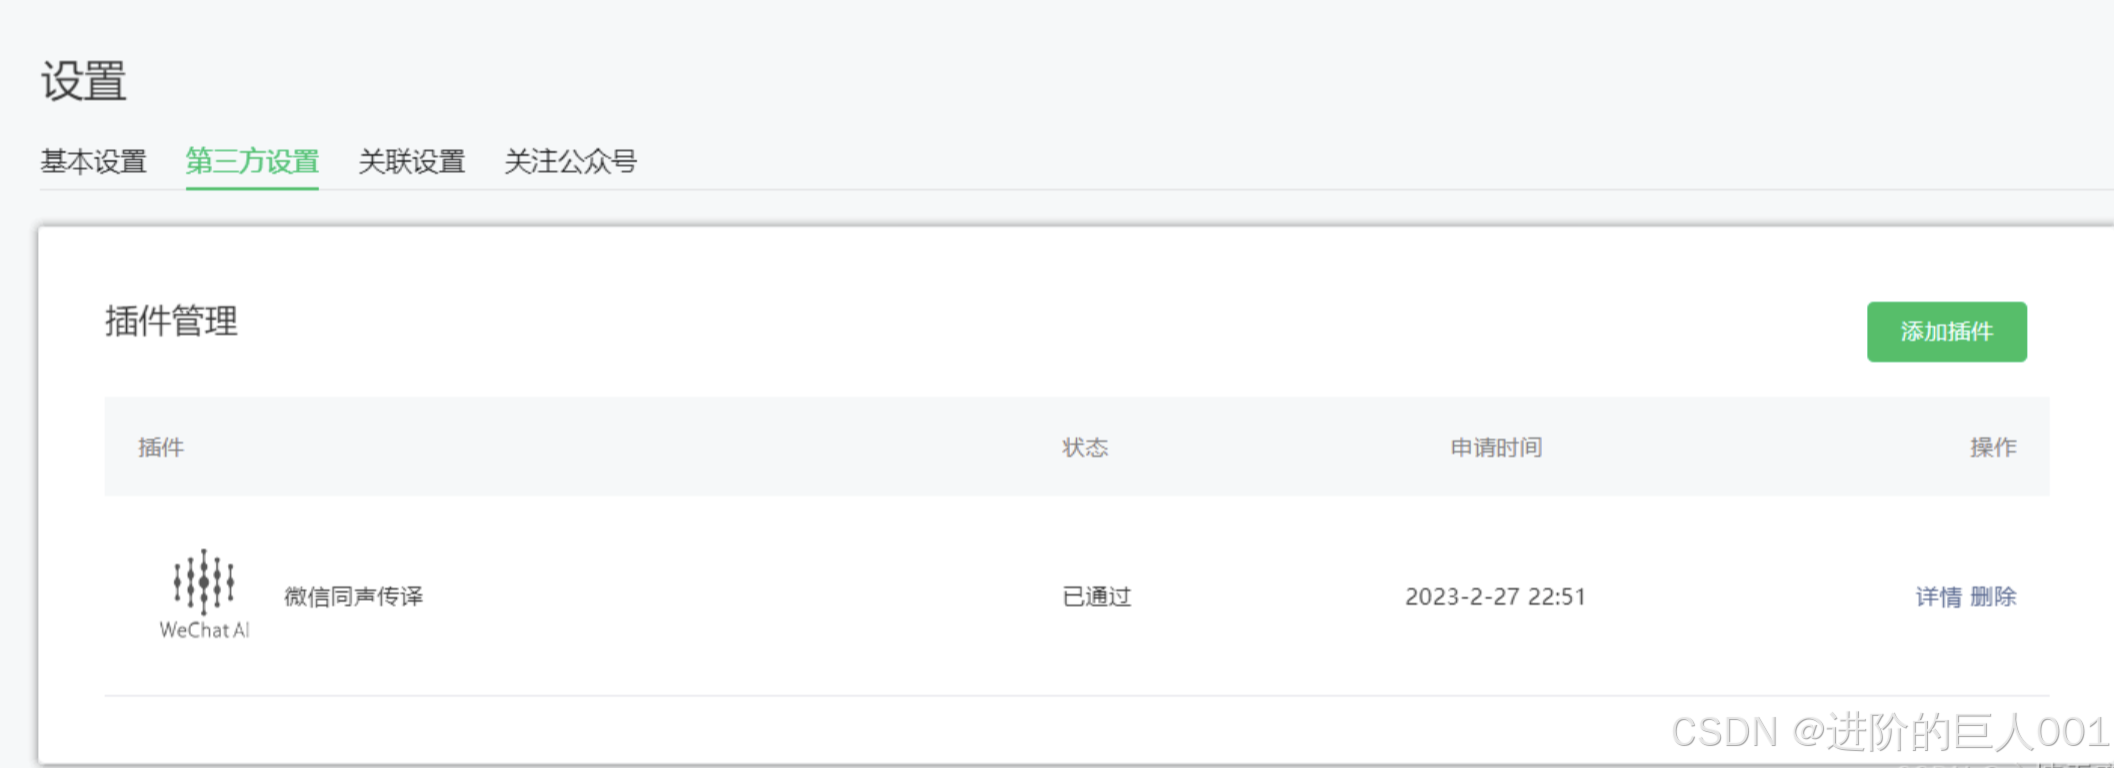
<recording-popup ref="recordingPopupRef" @mic-input="micInput" /> const recordingPopupRef = ref('') const text = ref('') const openRecord = () => { recordingPopupRef.value.recordShow = true }, const micInput = (str) => { //如果你知道输入框的cursor,就可以像我这样写,要是不知道就写成text.value += str了 if (cursor === 0) { text.value += str } else { text.value = text.value.slice(0, cursor) + str + text.value.slice(cursor); } } 二.小程序版本,进入微信小程序后台-->进入设置-->第三方设置-->添加插件->搜索同声传译-->完成添加。
在manifest.json文件中增加插件版本等信息
"mp-weixin" : { "plugins" : { "WechatSI" : { "version" : "0.3.5", "provider" : "" } }, } 封装recording-popup.vue组件
<template> <view> <u-popup round="16" :show="recordShow" :close-on-click-overlay="false" :safe-area-inset-bottom="false" @close="close" @open="open" > <view class="tag-popup-box"> <view class="title"> <text>{{ tips }}</text> <image src="" @click="close" /> </view> <view class="voice-box" @touchstart="startRecord" @touchend="stopRecord" @touchcancel="stopRecord"> <image src="" class="voice-icon" /> </view> </view> </u-popup> </view> </template> <script setup lang="ts"> import {onMounted, ref, watch} from "vue"; let start = false const tips = ref<string>('按住开始录音') const props = defineProps({ show: { type: Boolean, default: false } }) const manager = ref<any>() const emits = defineEmits(['update:show','startRecord','textChange','micInput']) const startRecord = async () => { if (start) return // 防止还在识别中时又触发录音 console.log('touch started') tips.value = '准备中...' try { await checkPermission() } catch (e) { tips.value = '需要授权' return } manager.value.start() emits("startRecord") } const stopRecord = () => { if (!start) return // 触发极短时间,stop会在还未start的情况下触发 console.log('touch ended or canceled') manager.value.stop() } watch(() => props.show, (value) => { recordShow.value = value }) const recordShow = ref<boolean>(props.show) const open = () => { manager.value = requirePlugin("WechatSI").getRecordRecognitionManager() // recordShow.value = true manager.value.onStart = (e:any) => { console.log('on-start') console.log(e) start = true tips.value = '正在识别...' } manager.value.onStop = (e:any) => { console.log('on-stop') console.log(e) start = false if (e.result){ tips.value = '按住开始录音' emits("micInput", e.result) } else { tips.value = '识别失败,请重试' } } manager.value.onRecognize = (e:any) => { console.log('on-recognize') console.log(e) } manager.value.onError = (e:any) => { console.log('on-error') console.log(e) start = false tips.value = '识别失败,请重试' } } const close = () => { recordShow.value = false emits('update:show', recordShow.value) } const checkPermission = async () => { const sRes = await uni.getSetting() if (sRes.authSetting['scope.record']) return try { const aRes = await uni.authorize({ scope: 'scope.record' }) } catch (e) { const mRes = await uni.showModal({ title: '授权', content: '请打开 录音功能 权限以便进行语音识别', showCancel: true, }) if (mRes.cancel) throw new Error('授权失败') const sRes = await uni.openSetting() if (sRes.authSetting['scope.record']) { uni.showModal({ title: '授权成功', content: '请继续点击下方按钮 进行语音输入', showCancel: false }) throw new Error('授权成功') } throw new Error('授权失败') } } </script> <style scoped lang="scss"> .tag-popup-box{ height: 524rpx; background: #FFFFFF; width: 100%; padding: 40rpx 40rpx 0 ; box-sizing: border-box; border-radius: 32rpx 32rpx 0rpx 0rpx; .voice-box{ width: 100%; display: flex; justify-content: center; margin-top: 60rpx; .voice-icon{ width: 180rpx; height: 180rpx; } } .title{ display: flex; justify-content: space-between; align-items: center; margin-bottom: 60rpx; &>text{ font-size: 30rpx; font-family: PingFangSC-Medium, PingFang SC; font-weight: 500; color: #333333; line-height: 44rpx; } &>image{ width: 44rpx; height: 44rpx; } } .content{ width: 100%; height: 96rpx; background: rgba(153, 153, 153, 0.08); border-radius: 12rpx; padding: 0 26rpx; box-sizing: border-box; } .confirm-btn{ margin-top: 138rpx; width: 100%; height: 80rpx; text-align: center; background: #07B780; border-radius: 8rpx; font-size: 28rpx; font-family: PingFangSC-Regular, PingFang SC; font-weight: 400; color: #FFFFFF; line-height: 80rpx; } } </style> 使用recording-popup
<recording-popup :show="recordShow" @mic-input="micInput" /> const recordShow = ref<boolean>(false) const text = ref('') const open = () => { recordShow.value = true } const micInput = (str) => { //如果你知道输入框的cursor,就可以像我这样写,要是不知道就写成text.value += str了 if (cursor === 0) { text.value += str } else { text.value = text.value.slice(0, cursor) + str + text.value.slice(cursor); } } 