
阅读量:0
}
}
* 当装饰的变量是Map时,可以观察到Map整体的赋值,同时可通过调用Map的接口`set`, `clear`, `delete` 更新Map的值。 * 当装饰的变量是Set时,可以观察到Set整体的赋值,同时可通过调用Set的接口`add`, `clear`, `delete` 更新Set的值。 #### 框架行为 要理解@Prop变量值初始化和更新机制,有必要了解父组件和拥有@Prop变量的子组件初始渲染和更新流程。 1. 初始渲染: 1. 执行父组件的build()函数将创建子组件的新实例,将数据源传递给子组件; 2. 初始化子组件@Prop装饰的变量。 2. 更新: 1. 子组件@Prop更新时,更新仅停留在当前子组件,不会同步回父组件; 2. 当父组件的数据源更新时,子组件的@Prop装饰的变量将被来自父组件的数据源重置,所有@Prop装饰的本地的修改将被父组件的更新覆盖。 > > **说明:** > @Prop装饰的数据更新依赖其所属自定义组件的重新渲染,所以在应用进入后台后,@Prop无法刷新,推荐使用@Link代替。 > > > ### 使用场景 #### 父组件@State到子组件@Prop简单数据类型同步 以下示例是@State到子组件@Prop简单数据同步,父组件ParentComponent的状态变量countDownStartValue初始化子组件CountDownComponent中@Prop装饰的count,点击“Try again”,count的修改仅保留在CountDownComponent 不会同步给父组件ParentComponent。 ParentComponent的状态变量countDownStartValue的变化将重置CountDownComponent的count。 @Component
struct CountDownComponent {
@Prop count: number = 0;
costOfOneAttempt: number = 1;
build() {
Column() {
if (this.count > 0) {
Text(You have ${this.count} Nuggets left)
} else {
Text(‘Game over!’)
}
// @Prop装饰的变量不会同步给父组件
Button(Try again).onClick(() => {
this.count -= this.costOfOneAttempt;
})
}
}
}
@Entry
@Component
struct ParentComponent {
@State countDownStartValue: number = 10;
build() {
Column() {
Text(Grant ${this.countDownStartValue} nuggets to play.)
// 父组件的数据源的修改会同步给子组件
Button(+1 - Nuggets in New Game).onClick(() => {
this.countDownStartValue += 1;
})
// 父组件的修改会同步给子组件
Button(-1 - Nuggets in New Game).onClick(() => {
this.countDownStartValue -= 1;
})
CountDownComponent({ count: this.countDownStartValue, costOfOneAttempt: 2 }) } }
}
在上面的示例中: 1. CountDownComponent子组件首次创建时其@Prop装饰的count变量将从父组件@State装饰的countDownStartValue变量初始化; 2. 按“+1”或“-1”按钮时,父组件的@State装饰的countDownStartValue值会变化,这将触发父组件重新渲染,在父组件重新渲染过程中会刷新使用countDownStartValue状态变量的UI组件并单向同步更新CountDownComponent子组件中的count值; 3. 更新count状态变量值也会触发CountDownComponent的重新渲染,在重新渲染过程中,评估使用count状态变量的if语句条件(this.count > 0),并执行true分支中的使用count状态变量的UI组件相关描述来更新Text组件的UI显示; 4. 当按下子组件CountDownComponent的“Try again”按钮时,其@Prop变量count将被更改,但是count值的更改不会影响父组件的countDownStartValue值; 5. 父组件的countDownStartValue值会变化时,父组件的修改将覆盖掉子组件CountDownComponent中count本地的修改。 #### 父组件@State数组项到子组件@Prop简单数据类型同步 父组件中@State如果装饰的数组,其数组项也可以初始化@Prop。以下示例中父组件Index中@State装饰的数组arr,将其数组项初始化子组件Child中@Prop装饰的value。 @Component
struct Child {
@Prop value: number = 0;
build() {
Text(${this.value})
.fontSize(50)
.onClick(() => {
this.value++
})
}
}
@Entry
@Component
struct Index {
@State arr: number[] = [1, 2, 3];
build() {
Row() {
Column() {
Child({ value: this.arr[0] })
Child({ value: this.arr[1] })
Child({ value: this.arr[2] })
Divider().height(5) ForEach(this.arr, (item: number) => { Child({ value: item }) }, (item: string) => item.toString() ) Text('replace entire arr') .fontSize(50) .onClick(() => { // 两个数组都包含项“3”。 this.arr = this.arr[0] == 1 ? [3, 4, 5] : [1, 2, 3]; }) } } }
}
初始渲染创建6个子组件实例,每个@Prop装饰的变量初始化都在本地拷贝了一份数组项。子组件onclick事件处理程序会更改局部变量值。 如果点击界面上的“1”六下,“2”五下、“3”四下,将所有变量的本地取值都变为“7”。 7
7
7
7
7
7
单击replace entire arr后,屏幕将显示以下信息。 3
4
5
7
4
5
* 在子组件Child中做的所有的修改都不会同步回父组件Index组件,所以即使6个组件显示都为7,但在父组件Index中,this.arr保存的值依旧是[1,2,3]。 * 点击replace entire arr,this.arr[0] == 1成立,将this.arr赋值为[3, 4, 5]; * 因为this.arr[0]已更改,Child({value: this.arr[0]})组件将this.arr[0]更新同步到实例@Prop装饰的变量。Child({value: this.arr[1]})和Child({value: this.arr[2]})的情况也类似。 * this.arr的更改触发ForEach更新,this.arr更新的前后都有数值为3的数组项:[3, 4, 5] 和[1, 2, 3]。根据diff算法,数组项“3”将被保留,删除“1”和“2”的数组项,添加为“4”和“5”的数组项。这就意味着,数组项“3”的组件不会重新生成,而是将其移动到第一位。所以“3”对应的组件不会更新,此时“3”对应的组件数值为“7”,ForEach最终的渲染结果是“7”,“4”,“5”。 #### 从父组件中的@State类对象属性到@Prop简单类型的同步 如果图书馆有一本图书和两位用户,每位用户都可以将图书标记为已读,此标记行为不会影响其它读者用户。从代码角度讲,对@Prop图书对象的本地更改不会同步给图书馆组件中的@State图书对象。 在此示例中,图书类可以使用@Observed装饰器,但不是必须的,只有在嵌套结构时需要此装饰器。这一点我们会在 从父组件中的@State数组项到@Prop class类型的同步 说明。 class Book {
public title: string;
public pages: number;
public readIt: boolean = false;
constructor(title: string, pages: number) {
this.title = title;
this.pages = pages;
}
}
@Component
struct ReaderComp {
@Prop book: Book = new Book(“”, 0);
build() {
Row() {
Text(this.book.title)
Text(...has${this.book.pages} pages!)
Text(...${this.book.readIt ? "I have read" : 'I have not read it'})
.onClick(() => this.book.readIt = true)
}
}
}
@Entry
@Component
struct Library {
@State book: Book = new Book(‘100 secrets of C++’, 765);
build() {
Column() {
ReaderComp({ book: this.book })
ReaderComp({ book: this.book })
}
}
}
#### 从父组件中的@State数组项到@Prop class类型的同步 在下面的示例中,更改了@State 装饰的allBooks数组中Book对象上的属性,但点击“Mark read for everyone”无反应。这是因为该属性是第二层的嵌套属性,@State装饰器只能观察到第一层属性,不会观察到此属性更改,所以框架不会更新ReaderComp。 let nextId: number = 1;
// @Observed
class Book {
public id: number;
public title: string;
public pages: number;
public readIt: boolean = false;
constructor(title: string, pages: number) {
this.id = nextId++;
this.title = title;
this.pages = pages;
}
}
@Component
struct ReaderComp {
@Prop book: Book = new Book(“”, 1);
build() {
Row() {
Text( ${this.book ? this.book.title : "Book is undefined"}).fontColor(‘#e6000000’)
Text( has ${this.book ? this.book.pages : "Book is undefined"} pages!).fontColor(‘#e6000000’)
Text( ${this.book ? this.book.readIt ? "I have read" : 'I have not read it' : "Book is undefined"}).fontColor(‘#e6000000’)
.onClick(() => this.book.readIt = true)
}
}
}
@Entry
@Component
struct Library {
@State allBooks: Book[] = [new Book(“C#”, 765), new Book(“JS”, 652), new Book(“TS”, 765)];
build() {
Column() {
Text(‘library`s all time favorite’)
.width(312)
.height(40)
.backgroundColor(‘#0d000000’)
.borderRadius(20)
.margin(12)
.padding({ left: 20 })
.fontColor(‘#e6000000’)
ReaderComp({ book: this.allBooks[2] })
.backgroundColor(‘#0d000000’)
.width(312)
.height(40)
.padding({ left: 20, top: 10 })
.borderRadius(20)
.colorBlend(‘#e6000000’)
Divider()
Text(‘Books on loaan to a reader’)
.width(312)
.height(40)
.backgroundColor(‘#0d000000’)
.borderRadius(20)
.margin(12)
.padding({ left: 20 })
.fontColor(‘#e6000000’)
ForEach(this.allBooks, (book: Book) => {
ReaderComp({ book: book })
.margin(12)
.width(312)
.height(40)
.padding({ left: 20, top: 10 })
.backgroundColor(‘#0d000000’)
.borderRadius(20)
},
(book: Book) => book.id.toString())
Button(‘Add new’)
.width(312)
.height(40)
.margin(12)
.fontColor(‘#FFFFFF 90%’)
.onClick(() => {
this.allBooks.push(new Book(“JA”, 512));
})
Button(‘Remove first book’)
.width(312)
.height(40)
.margin(12)
.fontColor(‘#FFFFFF 90%’)
.onClick(() => {
if (this.allBooks.length > 0){
this.allBooks.shift();
} else {
console.log(“length <= 0”)
}
})
Button(“Mark read for everyone”)
.width(312)
.height(40)
.margin(12)
.fontColor(‘#FFFFFF 90%’)
.onClick(() => {
this.allBooks.forEach((book) => book.readIt = true)
})
}
}
}
需要使用@Observed装饰class Book,Book的属性将被观察。 需要注意的是,@Prop在子组件装饰的状态变量和父组件的数据源是单向同步关系,即ReaderComp中的@Prop book的修改不会同步给父组件Library。而父组件只会在数值有更新的时候(和上一次状态的对比),才会触发UI的重新渲染。 @Observed
class Book {
public id: number;
public title: string;
public pages: number;
public readIt: boolean = false;
constructor(title: string, pages: number) {
this.id = nextId++;
this.title = title;
this.pages = pages;
}
}
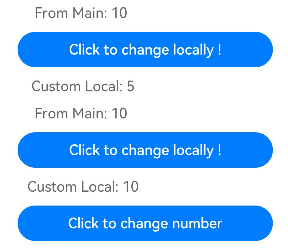
@Observed装饰的类的实例会被不透明的代理对象包装,此代理可以检测到包装对象内的所有属性更改。如果发生这种情况,此时,代理通知@Prop,@Prop对象值被更新。 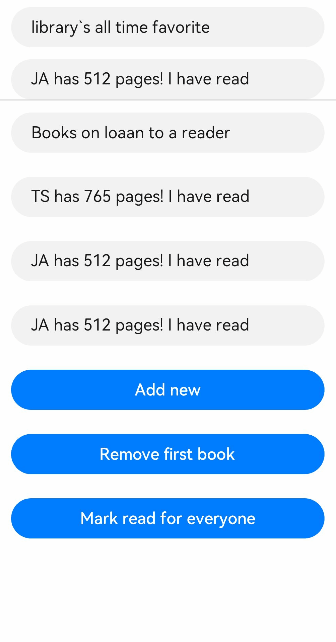 #### @Prop本地初始化不和父组件同步 为了支持@Component装饰的组件复用场景,@Prop支持本地初始化,这样可以让@Prop是否与父组件建立同步关系变得可选。当且仅当@Prop有本地初始化时,从父组件向子组件传递@Prop的数据源才是可选的。 下面的示例中,子组件包含两个@Prop变量: * @Prop customCounter没有本地初始化,所以需要父组件提供数据源去初始化@Prop,并当父组件的数据源变化时,@Prop也将被更新; * @Prop customCounter2有本地初始化,在这种情况下,@Prop依旧允许但非强制父组件同步数据源给@Prop。 @Component
struct MyComponent {
@Prop customCounter: number;
@Prop customCounter2: number = 5;
build() {
Column() {
Row() {
Text(From Main: ${this.customCounter}).fontColor(‘#ff6b6565’).margin({ left: -110, top: 12 })
}
Row() { Button('Click to change locally !') .width(288) .height(40) .margin({ left: 30, top: 12 }) .fontColor('#FFFFFF,90%') .onClick(() => { this.customCounter2++ }) } Row() { Text(`Custom Local: ${this.customCounter2}`).fontColor('#ff6b6565').margin({ left: -110, top: 12 }) } } }
}
@Entry
@Component
struct MainProgram {
@State mainCounter: number = 10;
build() {
Column() {
Row() {
Column() {
// customCounter必须从父组件初始化,因为MyComponent的customCounter成员变量缺少本地初始化;此处,customCounter2可以不做初始化。
MyComponent({ customCounter: this.mainCounter })
// customCounter2也可以从父组件初始化,父组件初始化的值会覆盖子组件customCounter2的本地初始化的值
MyComponent({ customCounter: this.mainCounter, customCounter2: this.mainCounter })
}
}
Row() { Column() { Button('Click to change number') .width(288) .height(40) .margin({ left: 30, top: 12 }) .fontColor('#FFFFFF,90%') .onClick(() => { this.mainCounter++ }) } } } }
}
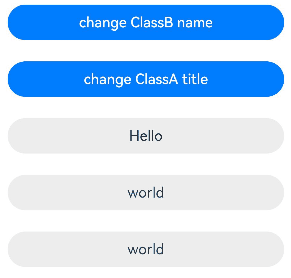
 #### @Prop嵌套场景 在嵌套场景下,每一层都要用@Observed装饰,且每一层都要被@Prop接收,这样才能观察到嵌套场景。 // 以下是嵌套类对象的数据结构。
@Observed
class ClassA {
public title: string;
constructor(title: string) {
this.title = title;
}
}
@Observed
class ClassB {
public name: string;
public a: ClassA;
constructor(name: string, a: ClassA) {
this.name = name;
this.a = a;
}
}
以下组件层次结构呈现的是@Prop嵌套场景的数据结构。 @Entry
@Component
struct Parent {
@State votes: ClassB = new ClassB(‘Hello’, new ClassA(‘world’))
build() {
Column() {
Flex({ direction: FlexDirection.Column, alignItems: ItemAlign.Center }) {
Button(‘change ClassB name’)
.width(312)
.height(40)
.margin(12)
.fontColor(‘#FFFFFF,90%’)
.onClick(() => {
this.votes.name = “aaaaa”
})
Button(‘change ClassA title’)
.width(312)
.height(40)
.margin(12)
.fontColor(‘#FFFFFF,90%’)
.onClick(() => {
this.votes.a.title = “wwwww”
})
Text(this.votes.name)
.fontSize(16)
.margin(12)
.width(312)
.height(40)
.backgroundColor(‘#ededed’)
.borderRadius(20)
.textAlign(TextAlign.Center)
.fontColor(‘#e6000000’)
.onClick(() => {
this.votes.name = ‘Bye’
})
Text(this.votes.a.title)
.fontSize(16)
.margin(12)
.width(312)
.height(40)
.backgroundColor(‘#ededed’)
.borderRadius(20)
.textAlign(TextAlign.Center)
.onClick(() => {
this.votes.a.title = “openHarmony”
})
Child1({ vote1: this.votes.a })
}
} }
}
@Component
struct Child1 {
@Prop vote1: ClassA = new ClassA(‘’);
build() {
Column() {
Text(this.vote1.title)
.fontSize(16)
.margin(12)
.width(312)
.height(40)
.backgroundColor(‘#ededed’)
.borderRadius(20)
.textAlign(TextAlign.Center)
.onClick(() => {
this.vote1.title = ‘Bye Bye’
})
}
}
}
 #### 装饰Map类型变量 > > **说明:** > > > 从API version 11开始,@Prop支持Map类型。 > > > 在下面的示例中,value类型为Map<number, string>,点击Button改变message的值,视图会随之刷新。 @Component
struct Child {
@Prop value: Map<number, string> = new Map([[0, “a”], [1, “b”], [3, “c”]])
build() {
Column() {
ForEach(Array.from(this.value.entries()), (item: [number, string]) => {
Text(${item[0]}).fontSize(30)
Text(${item[1]}).fontSize(30)
Divider()
})
Button(‘child init map’).onClick(() => {
this.value = new Map([[0, “a”], [1, “b”], [3, “c”]])
})
Button(‘child set new one’).onClick(() => {
this.value.set(4, “d”)
})
Button(‘child clear’).onClick(() => {
this.value.clear()
})
Button(‘child replace the first one’).onClick(() => {
this.value.set(0, “aa”)
})
Button(‘child delete the first one’).onClick(() => {
this.value.delete(0)
})
}
}
}
@Entry
@Component
struct MapSample2 {
@State message: Map<number, string> = new Map([[0, “a”], [1, “b”], [3, “c”]])
build() {
Row() {
Column() {
Child({ value: this.message })
}
.width(‘100%’)
}
.height(‘100%’)
}
}
#### 装饰Set类型变量 > > **说明:** > 从API version 11开始,@Prop支持Set类型。 > > > 在下面的示例中,message类型为Set<number>,点击Button改变message的值,视图会随之刷新。 @Component
struct Child {
@Prop message: Set = new Set([0, 1, 2, 3, 4])
build() {
Column() {
ForEach(Array.from(this.message.entries()), (item: [number, string]) => {
Text(${item[0]}).fontSize(30)
Divider()
})
Button(‘init set’).onClick(() => {
this.message = new Set([0, 1, 2, 3, 4])
})
Button(‘set new one’).onClick(() => {
this.message.add(5)
})
Button(‘clear’).onClick(() => {
this.message.clear()
})
Button(‘delete the first one’).onClick(() => {
this.message.delete(0)
})
}
.width(‘100%’)
}
}
@Entry
@Component
struct SetSample11 {
@State message: Set = new Set([0, 1, 2, 3, 4])
build() {
Row() {
Column() {
Child({ message: this.message })
}
.width(‘100%’)
}
.height(‘100%’)
}
}
### Prop支持联合类型实例 @Prop支持联合类型和undefined和null,在下面的示例中,animal类型为Animals | undefined,点击父组件Zoo中的Button改变animal的属性或者类型,Child中也会对应刷新。 class Animals {
public name: string;
constructor(name: string) {
this.name = name;
}
}
@Component
struct Child {
@Prop animal: Animals | undefined;
build() {
Column() {
Text(Child's animal is ${this.animal instanceof Animals ? this.animal.name : 'undefined'}).fontSize(30)
Button('Child change animals into tigers') .onClick(() => { // 赋值为Animals的实例 this.animal = new Animals("Tiger") }) Button('Child change animal to undefined') .onClick(() => { // 赋值为undefined this.animal = undefined }) }.width('100%') }
}
@Entry
@Component
struct Zoo {
@State animal: Animals | undefined = new Animals(“lion”);
build() {
Column() {
Text(Parents' animals are ${this.animal instanceof Animals ? this.animal.name : 'undefined'}).fontSize(30)
Child({animal: this.animal}) Button('Parents change animals into dogs') .onClick(() => { // 判断animal的类型,做属性的更新 if (this.animal instanceof Animals) { this.animal.name = "Dog" } else { console.info('num is undefined, cannot change property') } }) Button('Parents change animal to undefined') .onClick(() => { // 赋值为undefined this.animal = undefined }) } }
}
### 常见问题 #### @Prop装饰状态变量未初始化错误 @Prop需要被初始化,如果没有进行本地初始化的,则必须通过父组件进行初始化。如果进行了本地初始化,那么是可以不通过父组件进行初始化的。 【反例】 @Observed
class Commodity {
public price: number = 0;
constructor(price: number) {
this.price = price;
}
}
@Component
struct PropChild {
@Prop fruit: Commodity; // 未进行本地初始化
build() {
Text(PropChild fruit ${this.fruit.price})
.onClick(() => {
this.fruit.price += 1;
})
}
}
@Entry
@Component
struct Parent {
@State fruit: Commodity[] = [new Commodity(1)];
build() {
Column() {
自我介绍一下,小编13年上海交大毕业,曾经在小公司待过,也去过华为、OPPO等大厂,18年进入阿里一直到现在。
深知大多数HarmonyOS鸿蒙开发工程师,想要提升技能,往往是自己摸索成长或者是报班学习,但对于培训机构动则几千的学费,着实压力不小。自己不成体系的自学效果低效又漫长,而且极易碰到天花板技术停滞不前!
因此收集整理了一份《2024年HarmonyOS鸿蒙开发全套学习资料》,初衷也很简单,就是希望能够帮助到想自学提升又不知道该从何学起的朋友,同时减轻大家的负担。

既有适合小白学习的零基础资料,也有适合3年以上经验的小伙伴深入学习提升的进阶课程,基本涵盖了95%以上HarmonyOS鸿蒙开发知识点,真正体系化!
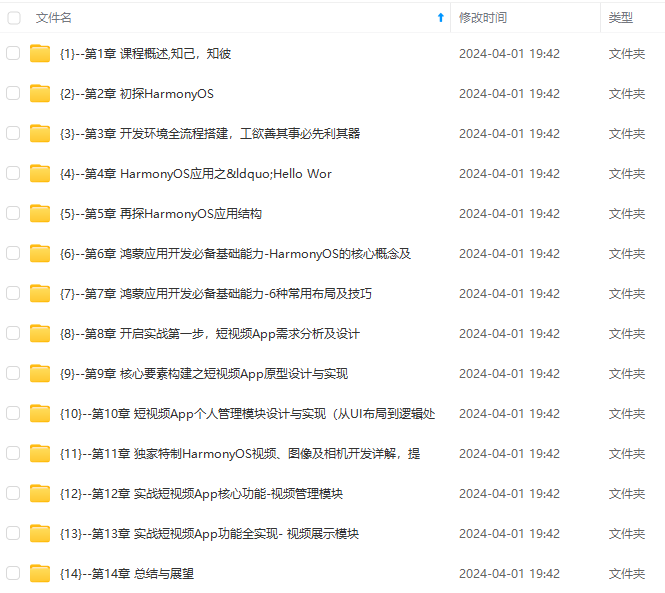
由于文件比较大,这里只是将部分目录大纲截图出来,每个节点里面都包含大厂面经、学习笔记、源码讲义、实战项目、讲解视频,并且会持续更新
如果你觉得这些内容对你有帮助,可以添加VX:vip204888 (备注鸿蒙获取)
一个人可以走的很快,但一群人才能走的更远。不论你是正从事IT行业的老鸟或是对IT行业感兴趣的新人,都欢迎扫码加入我们的的圈子(技术交流、学习资源、职场吐槽、大厂内推、面试辅导),让我们一起学习成长!
@Component
struct Parent {
@State fruit: Commodity[] = [new Commodity(1)];
build() {
Column() {
自我介绍一下,小编13年上海交大毕业,曾经在小公司待过,也去过华为、OPPO等大厂,18年进入阿里一直到现在。
深知大多数HarmonyOS鸿蒙开发工程师,想要提升技能,往往是自己摸索成长或者是报班学习,但对于培训机构动则几千的学费,着实压力不小。自己不成体系的自学效果低效又漫长,而且极易碰到天花板技术停滞不前!
因此收集整理了一份《2024年HarmonyOS鸿蒙开发全套学习资料》,初衷也很简单,就是希望能够帮助到想自学提升又不知道该从何学起的朋友,同时减轻大家的负担。
[外链图片转存中…(img-0s8jNwxk-1712842432415)]
[外链图片转存中…(img-7IJSuw23-1712842432415)]
[外链图片转存中…(img-bYiH0o1H-1712842432415)]
既有适合小白学习的零基础资料,也有适合3年以上经验的小伙伴深入学习提升的进阶课程,基本涵盖了95%以上HarmonyOS鸿蒙开发知识点,真正体系化!
由于文件比较大,这里只是将部分目录大纲截图出来,每个节点里面都包含大厂面经、学习笔记、源码讲义、实战项目、讲解视频,并且会持续更新
如果你觉得这些内容对你有帮助,可以添加VX:vip204888 (备注鸿蒙获取)
[外链图片转存中…(img-I9bUV1VO-1712842432416)]
一个人可以走的很快,但一群人才能走的更远。不论你是正从事IT行业的老鸟或是对IT行业感兴趣的新人,都欢迎扫码加入我们的的圈子(技术交流、学习资源、职场吐槽、大厂内推、面试辅导),让我们一起学习成长!
