天行健,君子以自强不息;地势坤,君子以厚德载物。
每个人都有惰性,但不断学习是好好生活的根本,共勉!
文章均为学习整理笔记,分享记录为主,如有错误请指正,共同学习进步。
文章目录
写在前面:
网上看了很多关于WebSocket的文章,大多都是服务端的实现,然后用在线工具测试。 现在遇到的需求是客户端和服务端都要用Java实现,所以就有了这篇文章。 大多数文章的服务端实现都相当的精细,各种细节的处理,但很多都是代码不全。 对于刚接触WebSocket然后只想简单实现的人来说,着实有些吃力。 所以想把最简单的实现写出来分享,希望对大家有些帮助。 一、WebSocket简介
1. 介绍
- WebSocket是一种在单个TCP连接上进行全双工通信的协议。
- WebSocket通信协议于2011年被IETF定为标准RFC 6455,并由RFC7936补充规范。
- WebSocket API也被W3C定为标准。
- WebSocket使得客户端和服务器之间的数据交换变得更加简单,允许服务端主动向客户端推送数据。在WebSocket API中,浏览器和服务器只需要完成一次握手,两者之间就直接可以创建持久性的连接,并进行双向数据传输。
2. 定义
- WebSocket 是独立的、创建在 TCP 上的协议。
- WebSocket 通过HTTP/1.1 协议的101状态码进行握手。
- 为了创建WebSocket连接,需要通过浏览器发出请求,之后服务器进行回应,这个过程通常称为“握手”(handshaking)。
二、开发环境
JDK版本:1.8
maven版本:3.9.4
开发工具:IDEA 2023.2.1
项目框架:spring boot 版本为 2.7.3 springboot搭建传送门
三、功能实现
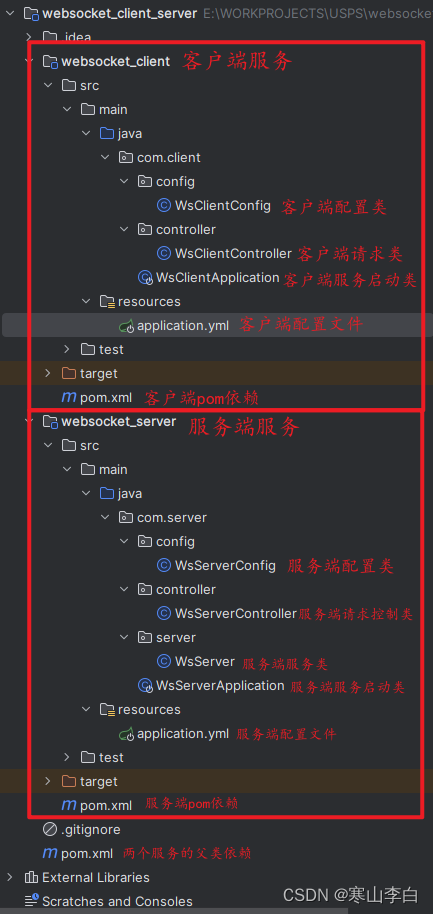
1. 项目包结构

2.项目创建
为了更方便操作,将两个服务放在一个项目里
首先创建父类项目websocket_client_server
项目创建可参考springboot搭建传送门
然后可以把src包删了
父类项目所需依赖
<parent> <groupId>org.springframework.boot</groupId> <artifactId>spring-boot-starter-parent</artifactId> <version>2.7.3</version> </parent> <dependencyManagement> <dependencies> <dependency> <groupId>org.projectlombok</groupId> <artifactId>lombok</artifactId> <version>1.18.24</version> </dependency> <dependency> <groupId>com.alibaba.fastjson2</groupId> <artifactId>fastjson2</artifactId> <version>2.0.33</version> </dependency> </dependencies> </dependencyManagement> 完整pom.xml
<?xml version="1.0" encoding="UTF-8"?> <project xmlns="http://maven.apache.org/POM/4.0.0" xmlns:xsi="http://www.w3.org/2001/XMLSchema-instance" xsi:schemaLocation="http://maven.apache.org/POM/4.0.0 http://maven.apache.org/xsd/maven-4.0.0.xsd"> <modelVersion>4.0.0</modelVersion> <groupId>com.websocket</groupId> <artifactId>websocket_client_server</artifactId> <version>1.0-SNAPSHOT</version> <packaging>pom</packaging> <modules> <module>websocket_client</module> <module>websocket_server</module> </modules> <properties> <maven.compiler.source>8</maven.compiler.source> <maven.compiler.target>8</maven.compiler.target> <project.build.sourceEncoding>UTF-8</project.build.sourceEncoding> </properties> <parent> <groupId>org.springframework.boot</groupId> <artifactId>spring-boot-starter-parent</artifactId> <version>2.7.3</version> </parent> <dependencyManagement> <dependencies> <dependency> <groupId>org.projectlombok</groupId> <artifactId>lombok</artifactId> <version>1.18.24</version> </dependency> <dependency> <groupId>com.alibaba.fastjson2</groupId> <artifactId>fastjson2</artifactId> <version>2.0.33</version> </dependency> </dependencies> </dependencyManagement> </project> 接下来在这个父项目中创还能两个Module服务,分别对应服务端和客户端
3. WebSocket服务端创建
3.1 依赖引入
服务端所需依赖
<dependency> <groupId>org.springframework.boot</groupId> <artifactId>spring-boot-starter-websocket</artifactId> <version>3.0.9</version> </dependency> <dependency> <groupId>org.projectlombok</groupId> <artifactId>lombok</artifactId> </dependency> <dependency> <groupId>com.alibaba.fastjson2</groupId> <artifactId>fastjson2</artifactId> </dependency> 完整pom.xml
<?xml version="1.0" encoding="UTF-8"?> <project xmlns="http://maven.apache.org/POM/4.0.0" xmlns:xsi="http://www.w3.org/2001/XMLSchema-instance" xsi:schemaLocation="http://maven.apache.org/POM/4.0.0 http://maven.apache.org/xsd/maven-4.0.0.xsd"> <modelVersion>4.0.0</modelVersion> <parent> <groupId>com.websocket</groupId> <artifactId>websocket_client_server</artifactId> <version>1.0-SNAPSHOT</version> </parent> <artifactId>websocket_server</artifactId> <properties> <maven.compiler.source>8</maven.compiler.source> <maven.compiler.target>8</maven.compiler.target> <project.build.sourceEncoding>UTF-8</project.build.sourceEncoding> </properties> <dependencies> <dependency> <groupId>org.springframework.boot</groupId> <artifactId>spring-boot-starter-websocket</artifactId> <version>3.0.9</version> </dependency> <dependency> <groupId>org.projectlombok</groupId> <artifactId>lombok</artifactId> </dependency> <dependency> <groupId>com.alibaba.fastjson2</groupId> <artifactId>fastjson2</artifactId> </dependency> </dependencies> </project> 3.2 配置文件
application.yml
server: port: 8001 3.3 项目启动类
WsServerApplication.java
package com.server; import org.springframework.boot.SpringApplication; import org.springframework.boot.autoconfigure.SpringBootApplication; import org.springframework.web.socket.config.annotation.EnableWebSocket; /** * @ClassDescription: websocket服务端 * EnableWebSocket注解用于开启websocket服务 * @JdkVersion: 1.8 * @Author: 李白 * @Created: 2023/8/31 14:53 */ @EnableWebSocket @SpringBootApplication public class WsServerApplication { public static void main(String[] args) { SpringApplication.run(WsServerApplication.class, args); } } 3.4 配置类
WsServerConfig.java
package com.server.config; import org.springframework.context.annotation.Bean; import org.springframework.context.annotation.Configuration; import org.springframework.web.socket.server.standard.ServerEndpointExporter; /** * @ClassDescription: websocket配置类 * 该配置类用于创建ServerEndpoint注解,此注解用在类上,使得此类成为服务端websocket * @JdkVersion: 1.8 * @Author: 李白 * @Created: 2023/8/31 14:56 */ @Configuration public class WsServerConfig { @Bean public ServerEndpointExporter serverEndpointExporter(){ return new ServerEndpointExporter(); } } 3.5 服务端服务类
WsServer.java
package com.server.server; import lombok.NonNull; import lombok.extern.slf4j.Slf4j; import org.springframework.stereotype.Component; import org.springframework.web.bind.annotation.PostMapping; import org.springframework.web.bind.annotation.RequestBody; import org.springframework.web.bind.annotation.RestController; import javax.websocket.*; import javax.websocket.server.ServerEndpoint; import java.io.IOException; import java.util.concurrent.CopyOnWriteArrayList; import java.util.concurrent.atomic.AtomicInteger; /** * @ClassDescription: websocket服务端 * @JdkVersion: 1.8 * @Author: 李白 * @Created: 2023/8/31 14:59 */ @Slf4j @Component //@RestController @ServerEndpoint("/websocket-server") //@ServerEndpoint("/") public class WsServer { private Session session; /** * 记录在线连接客户端数量 */ private static AtomicInteger onlineCount = new AtomicInteger(0); /** * 存放每个连接进来的客户端对应的websocketServer对象,用于后面群发消息 */ private static CopyOnWriteArrayList<WsServer> wsServers = new CopyOnWriteArrayList<>(); /** * 服务端与客户端连接成功时执行 * @param session 会话 */ @OnOpen public void onOpen(Session session){ this.session = session; //接入的客户端+1 int count = onlineCount.incrementAndGet(); //集合中存入客户端对象+1 wsServers.add(this); log.info("与客户端连接成功,当前连接的客户端数量为:{}", count); } /** * 收到客户端的消息时执行 * @param message 消息 * @param session 会话 */ @OnMessage public void onMessage(String message, Session session){ log.info("收到来自客户端的消息,客户端地址:{},消息内容:{}", session.getMessageHandlers(), message); //业务逻辑,对消息的处理 // sendMessageToAll("群发消息的内容"); } /** * 连接发生报错时执行 * @param session 会话 * @param throwable 报错 */ @OnError public void onError(Session session, @NonNull Throwable throwable){ log.error("连接发生报错"); throwable.printStackTrace(); } /** * 连接断开时执行 */ @OnClose public void onClose(){ //接入客户端连接数-1 int count = onlineCount.decrementAndGet(); //集合中的客户端对象-1 wsServers.remove(this); log.info("服务端断开连接,当前连接的客户端数量为:{}", count); } /** * 向客户端推送消息 * @param message 消息 */ public void sendMessage(String message){ this.session.getAsyncRemote().sendText(message); log.info("推送消息给客户端:{},消息内容为:{}", this.session.getMessageHandlers(), message); } // @PostMapping("/send2c") // public void sendMessage1(@RequestBody String message){ this.session.getAsyncRemote().sendText(message); // try { // this.session.getBasicRemote().sendText(message); // } catch (IOException e) { // throw new RuntimeException(e); // } // log.info("推送消息给客户端,消息内容为:{}", message); // } /** * 群发消息 * @param message 消息 */ public void sendMessageToAll(String message){ CopyOnWriteArrayList<WsServer> ws = wsServers; for (WsServer wsServer : ws){ wsServer.sendMessage(message); } } // @PostMapping("/send2AllC") // public void sendMessageToAll1(@RequestBody String message){ // CopyOnWriteArrayList<WsServer> ws = wsServers; // for (WsServer wsServer : ws){ // wsServer.sendMessage(message); // } // } } 3.6 请求类
WsServerController.java
package com.server.controller; import com.server.server.WsServer; import org.springframework.beans.factory.annotation.Autowired; import org.springframework.web.bind.annotation.PostMapping; import org.springframework.web.bind.annotation.RequestBody; import org.springframework.web.bind.annotation.RestController; /** * @ClassDescription: 服务端请求类 * @JdkVersion: 1.8 * @Author: 李白 * @Created: 2023/8/31 16:51 */ @RestController public class WsServerController { @Autowired WsServer wsServer; /** * 服务端发消息给客户端 * @param message 消息 */ @PostMapping("/send2client") public void send2Client(@RequestBody String message){ // wsServer.sendMessageToAll("this is a test for server to client"); wsServer.sendMessageToAll(message); } } 3.7 测试服务
测试WebSocket服务端服务是否可用
先启动服务
登录在线工具网站WebSocket服务端测试工具
输入访问路由
ws://localhost:8001/websocket-server (webscocket-server是服务类WsServer.java中注解@ServerEndpoint的参数值,可自定义)
建立连接
输入消息,发送消息
然后可在服务的控制台打印如下
即表示服务端可用
4. WebSocket客户端创建
4.1 依赖引入
服务端所需依赖
<dependency> <groupId>org.springframework.boot</groupId> <artifactId>spring-boot-starter-web</artifactId> </dependency> <dependency> <groupId>org.java-websocket</groupId> <artifactId>Java-WebSocket</artifactId> <version>1.5.3</version> </dependency> <dependency> <groupId>com.alibaba.fastjson2</groupId> <artifactId>fastjson2</artifactId> </dependency> <dependency> <groupId>org.projectlombok</groupId> <artifactId>lombok</artifactId> </dependency> 完整pom.xml
<?xml version="1.0" encoding="UTF-8"?> <project xmlns="http://maven.apache.org/POM/4.0.0" xmlns:xsi="http://www.w3.org/2001/XMLSchema-instance" xsi:schemaLocation="http://maven.apache.org/POM/4.0.0 http://maven.apache.org/xsd/maven-4.0.0.xsd"> <modelVersion>4.0.0</modelVersion> <parent> <groupId>com.websocket</groupId> <artifactId>websocket_client_server</artifactId> <version>1.0-SNAPSHOT</version> </parent> <artifactId>websocket_client</artifactId> <properties> <maven.compiler.source>8</maven.compiler.source> <maven.compiler.target>8</maven.compiler.target> <project.build.sourceEncoding>UTF-8</project.build.sourceEncoding> </properties> <dependencies> <dependency> <groupId>org.springframework.boot</groupId> <artifactId>spring-boot-starter-web</artifactId> </dependency> <dependency> <groupId>org.java-websocket</groupId> <artifactId>Java-WebSocket</artifactId> <version>1.5.4</version> </dependency> <dependency> <groupId>com.alibaba.fastjson2</groupId> <artifactId>fastjson2</artifactId> </dependency> <dependency> <groupId>org.projectlombok</groupId> <artifactId>lombok</artifactId> </dependency> </dependencies> </project> 4.2 配置文件
application.yml
server: port: 8002 4.3 项目启动类
WsClientApplication.java
package com.client; import org.springframework.boot.SpringApplication; import org.springframework.boot.autoconfigure.SpringBootApplication; /** * @ClassDescription: * @JdkVersion: 1.8 * @Author: 李白 * @Created: 2023/8/31 16:09 */ @SpringBootApplication public class WsClientApplication { public static void main(String[] args) { SpringApplication.run(WsClientApplication.class, args); } } 4.4 配置类
WsClientConfig.java
package com.client.config; import lombok.extern.slf4j.Slf4j; import org.java_websocket.client.WebSocketClient; import org.java_websocket.handshake.ServerHandshake; import org.springframework.context.annotation.Bean; import org.springframework.context.annotation.Configuration; import java.net.URI; import java.net.URISyntaxException; /** * @ClassDescription: 客户端配置类 * 可以通过这里配置服务端的连接 * @JdkVersion: 1.8 * @Author: 李白 * @Created: 2023/8/31 16:21 */ @Slf4j @Configuration public class WsClientConfig { @Bean public WebSocketClient webSocketClient(){ WebSocketClient wsc = null; try { wsc = new WebSocketClient(new URI("ws://localhost:8001/websocket-server")) { @Override public void onOpen(ServerHandshake serverHandshake) { log.info("与服务端建立连接"); } @Override public void onMessage(String s) { log.info("收到服务端的消息:{}", s); } @Override public void onClose(int i, String s, boolean b) { log.info("与服务端的连接断开 code:{} reason:{} {}", i, s, b); } @Override public void onError(Exception e) { log.info("连接报错"); } }; wsc.connect(); return wsc; }catch (URISyntaxException e){ e.printStackTrace(); } return wsc; } } 4.5 请求类
WsClientController.java
package com.client.controller; import org.java_websocket.client.WebSocketClient; import org.springframework.beans.factory.annotation.Autowired; import org.springframework.web.bind.annotation.PostMapping; import org.springframework.web.bind.annotation.RequestBody; import org.springframework.web.bind.annotation.RestController; /** * @ClassDescription: 客户端请求类 * @JdkVersion: 1.8 * @Author: 李白 * @Created: 2023/8/31 16:13 */ @RestController public class WsClientController { @Autowired WebSocketClient wsClient; /** * 客户端发消息给服务端 * @param message */ @PostMapping("/send2server") public void websocket(@RequestBody String message){ // wsClient.send("test for client to server"); wsClient.send(message); } } 5. 服务端和客户端交互测试
此时两个服务均已创建好,可以进行服务端和客户端的连接和发消息
5.1 启动服务
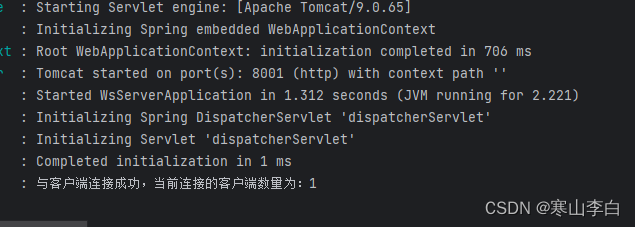
先启动服务端
再启动客户端
此时客户端打印如下
服务端打印如下
5.2 客户端向服务端发送消息
postman测试
url
127.0.0.1:8002/send2server 请求参数内容为文本格式
发送后服务端会收到消息,服务端打印如下
5.3 服务端向客户端推送消息
postman测试
url
127.0.0.1:8001/send2Client 
服务端发送后,服务端的控制台会打印如下,表示推送了消息给客户端
客户端打印如下,表示收到了服务端的消息
四、 项目的Github地址
该内容已经上传到了Github中,可自取
https://github.com/hanshanlibai/websocket_client_server
以上就是WebSocket服务端和客户端的简单实现
感谢阅读,祝君暴富!
