
阅读量:0
目录
1. 仿射变换
仿射变换是一种可以表达为乘以一个矩阵(线性变换)再加上一个向量(平移)的变换。在几何中,就是将一个向量空间进行一次线性变化并接上一个平移。
因此我们可以用仿射变化表达如下内容:
- 旋转Rotations(线性变换,linear transformation);
- 平移Translations(矢量加,vector addition);
- 缩放操作Scale operations(线性变换)。
由此可见,在图像处理当中,仿射变换本质上反映了两个图像之间的关系。
我们通常使用2×3矩阵来表示仿射变换。
对于“乘以一个矩阵”的线性变换,我们引入矩阵A:
![A=\left[\begin{matrix}a_{00}&a_{01}\\a_{10}&a_{11}\\\end{matrix}\right]](/zb_users/upload/2024/csdn/eq.png)
对于加法部分(平移),我们引入矩阵B:
设待转换的二维列向量为X,转换后的向量为T,则:
考虑齐次坐标和齐次矩阵更易于进行仿射几何变换,令:
二维向量X视作一个点,其齐次坐标表示为这样的列向量:
这样,我们可以借助齐次坐标,把平移变量也通过一个矩阵表示,则有:
可见矩阵M就是我们所需要的仿射变换矩阵。
2. 仿射变换的求解
参考内容通过几何方式(三角形三个顶点的映射)描述仿射变换的求解过程,我们也可以用代数知识表达,对于不共线的三点,令:
方程
其方程组形式为:
有唯一解,从而可以求出仿射矩阵M。
在OpenCV中,我们可以通过cv::getAffineTransform函数求解仿射矩阵或cv::getRotationMatrix2D,求解二维旋转矩阵。
Mat cv::getAffineTransform | ( | src, | |
dst | |||
) |
Python: | |||||||||||||||||||||||||||||||||||||||||||||||||||||||||||||
cv.getAffineTransform( | src, dst | ) -> | retval | ||||||||||||||||||||||||||||||||||||||||||||||||||||||||||
getRotationMatrix2D()
| inline |
Python: | |||||||||||||||||||||||||||||||||||||||||||||||||||||||||||||
cv.getRotationMatrix2D( | center, angle, scale | ) -> | retval | ||||||||||||||||||||||||||||||||||||||||||||||||||||||||||
3. 代码实现
3.1 图像扭曲
#include "opencv2/imgcodecs.hpp" #include "opencv2/highgui.hpp" #include "opencv2/imgproc.hpp" #include <iostream> using namespace cv; int main() { // 读取图像 Mat src = imread("park.jpg"); if (src.empty()) { std::cout << "Could not open or find the image!\n" << std::endl; return -1; } // 选定三角形三个顶点 Point2f srcTri[3]; srcTri[0] = Point2f(0.f, 0.f); srcTri[1] = Point2f(src.cols - 1.f, 0.f); srcTri[2] = Point2f(0.f, src.rows - 1.f); // 假定转换后的三个顶点坐标 Point2f dstTri[3]; dstTri[0] = Point2f(0.f, src.rows * 0.33f); dstTri[1] = Point2f(src.cols * 0.55f, src.rows * 0.25f); dstTri[2] = Point2f(src.cols * 0.35f, src.rows * 0.7f); // 求解仿射矩阵 Mat warp_mat = getAffineTransform(srcTri, dstTri); // 求解扭曲后的图像 Mat warp_dst; warpAffine(src, warp_dst, warp_mat, src.size()); imshow("Warped Image", warp_dst); waitKey(0); return 0; }# 图像扭曲 import cv2 import numpy as np # 读取图像 img = cv2.imread('park.jpg') # 图像扭曲 (rows, cols) = img.shape[:2] srcTri = np.array( [[0, 0], [img.shape[1] - 1, 0], [0, img.shape[0] - 1]] ).astype(np.float32) dstTri = np.array( [[0, img.shape[0]*0.33], [img.shape[1]*0.55, img.shape[0]*0.25], [img.shape[1]*0.35, img.shape[0]*0.7]] ).astype(np.float32) M = cv2.getAffineTransform(srcTri, dstTri) warped_img = cv2.warpAffine(img, M, (cols, rows)) # 显示旋转后的图像 cv2.imshow('Warped Image', warped_img) # 等待用户输入并关闭窗口 cv2.waitKey(0) cv2.destroyAllWindows()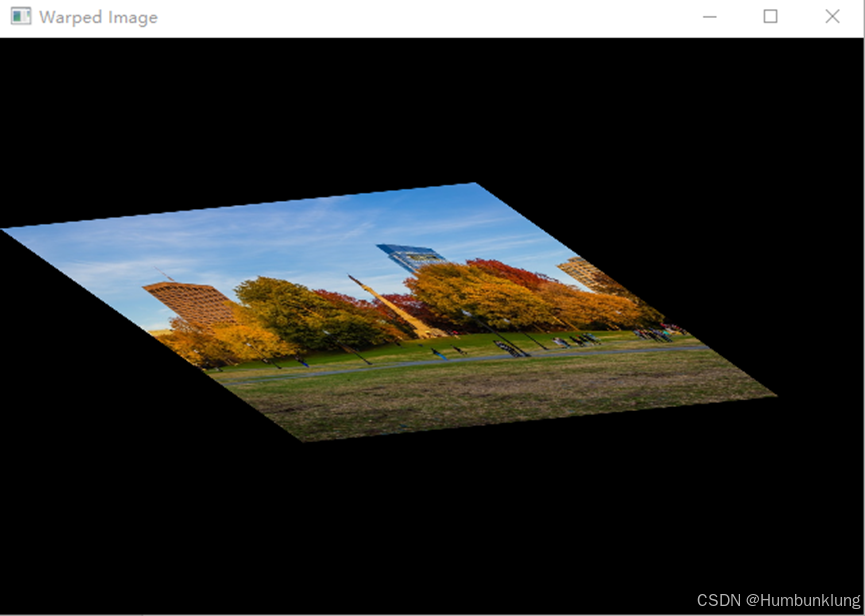
3.2 图像旋转
#include "opencv2/imgcodecs.hpp" #include "opencv2/highgui.hpp" #include "opencv2/imgproc.hpp" #include <iostream> using namespace cv; int main() { // 读取图像 Mat src = imread("park.jpg"); if (src.empty()) { std::cout << "Could not open or find the image!\n" << std::endl; return -1; } // 设置旋转中心、旋转角度和缩放比例 Point center = Point(src.cols / 2, src.rows / 2); double angle = 35; double scale = 0.5; // 获取旋转矩阵 Mat rot_mat = getRotationMatrix2D(center, angle, scale); // 旋转后的图像 Mat rotated_dst; warpAffine(src, rotated_dst, rot_mat, src.size()); // 显示图像 imshow("Rotated Image", rotated_dst); waitKey(0); return 0; }# 图像旋转 import cv2 # 读取图像 img = cv2.imread('park.jpg') # 旋转图像 (rows, cols) = img.shape[:2] M = cv2.getRotationMatrix2D((cols/2, rows/2), 35, 0.5) rotated_img = cv2.warpAffine(img, M, (cols, rows)) # 显示旋转后的图像 cv2.imshow('Rotated Image', rotated_img) # 等待用户输入并关闭窗口 cv2.waitKey(0) cv2.destroyAllWindows()
参考内容
OpenCV: Affine Transformations
注:OpenCV这个文档的示例代码中,C++代码和Python代码并不匹配,Python代码中的dstTri第一个点的y坐标,shape[1]应为shape[0](见本文示例代码)。
