
阅读量:0
回调函数基本知识回顾
回调函数是什么
- 函数指针或者函数对象作为参数传递给另一个函数的机制,当某个事件发生的时候,系统会自动的调用这些函数进行处理
- 事件驱动模型中作用,回调函数则被用于处理I/O事件,通常用来读写异常等事件
bind 基本用法
- 参数分析
- function:绑定的函数或者成员函数
- arg1\arg2等:绑定到函数的参数,同时也可以是具体的数值
- 总结:调用bound_function的时候,bound_function会调用function,然后传递给function中arg1\arg2等对应参数
- 占位符
- 首先占位符可以给具体参数,也就是向function函数中绑定具体的参数,同样也可以使用占位符,等待用户来传入数据
- 注意,占位符是可以交换位置的,第二个事例可以说明该问题

#include <functional> #include <iostream> void print(int a, int b) { std::cout << "a: " << a << ", b: " << b << std::endl; } int main() { // 绑定 print 函数,第一个参数固定为 10,第二个参数使用占位符 auto bound_print = std::bind(print, 10, std::placeholders::_1); bound_print(20); // 输出: a: 10, b: 20 // 绑定 print 函数,交换参数位置 auto bound_print_swap = std::bind(print, std::placeholders::_2, std::placeholders::_1); bound_print_swap(10, 20); // 输出: a: 20, b: 10 return 0; } 类的成员函数作为回调函数
使用lambada表达式,通过lambada表达式捕获当前对象的this指针,将该对象的成员函数进行封装。
#include <iostream> #include <functional> class CallbackHandler { public: void myCallback(int result) { std::cout << "Callback called with result: " << result << std::endl; } }; // 一个执行回调函数的函数 void performOperation(int x, std::function<void(int)> callback) { // 模拟某种操作 int result = x * 2; // 调用回调函数 callback(result); } int main() { CallbackHandler handler; // 使用 lambda 捕获 this 指针,绑定成员函数 performOperation(5, [&handler](int result) { handler.myCallback(result); }); return 0; } std::function 封装可调用对象
利用std::function通用多态的函数封装器特性
#include <iostream> #include <functional> // 一个执行回调函数的函数 void performOperation(int x, std::function<void(int)> callback) { // 模拟某种操作 int result = x * 2; // 调用回调函数 callback(result); } // 一个回调函数 void myCallback(int result) { std::cout << "Callback called with result: " << result << std::endl; } int main() { // 调用 performOperation 并传递 myCallback 作为回调函数 performOperation(5, myCallback); return 0; } using与回调函数
using关键字用来定义类型,在回调函数的使用上,用来定义回调函数类型的别名,代码更好懂些
#include <iostream> #include <functional> // 使用 using 关键字定义一个回调函数类型别名 using func_t = std::function<void(int)>; // 一个执行回调函数的函数 void performOperation(int x, func_t callback) { // 模拟某种操作 int result = x * 2; // 调用回调函数 callback(result); } // 一个回调函数 void myCallback(int result) { std::cout << "Callback called with result: " << result << std::endl; } int main() { // 调用 performOperation 并传递 myCallback 作为回调函数 performOperation(5, myCallback); return 0; } bind绑定
bind绑定成员函数
- 含义理解
- 成员函数与对象实例绑定在一起,也就是将成员函数与this指针绑定在一起,从而确保回调函数可以访问到该对象的成员变量和其他成员函数
- 简单理解,一个成员函数可能调用了该类中的其他函数或者成员变量,bind的时候如果仅仅绑定了一个函数,那么它是无法访问类中的其他变量和函数,所以也就无法执行。就像学校通知你录取了(你与学校进行了绑定)但是学校门禁以及宿舍门禁不录入你的信息,那么你就没有权限在学校畅行。

#include <functional> #include <iostream> class MyClass { public: void print(int a, int b) const { std::cout << "a: " << a << ", b: " << b << std::endl; } }; int main() { MyClass obj; // 绑定成员函数 auto bound_print = std::bind(&MyClass::print, &obj, std::placeholders::_1, std::placeholders::_2); bound_print(10, 20); // 输出: a: 10, b: 20 return 0; }绑定成员变量
- 用法:使用bind绑定成员变量,返回的函数可以访问该成员变量
#include <functional> #include <iostream> class MyClass { public: int value; MyClass(int v) : value(v) {} }; int main() { MyClass obj(42); // 绑定成员变量 auto bound_value = std::bind(&MyClass::value, &obj); std::cout << "Value: " << bound_value() << std::endl; // 输出: Value: 42 return 0; }bind 和 function结合使用
bind和function结合使用,在代码中能够实现逻辑更加清晰,可以更好的分辨回调函数模块。
绑定普通函数(简单了解其使用方法)
#include <functional> #include <iostream> // 普通函数 void print(int a, int b) { std::cout << "a: " << a << ", b: " << b << std::endl; } int main() { // 使用 std::bind 绑定普通函数,固定第一个参数为 10 auto bound_print = std::bind(print, 10, std::placeholders::_1); // 使用 std::function 存储绑定后的函数 std::function<void(int)> func = bound_print; func(20); // 输出: a: 10, b: 20 return 0; }绑定成员函数及其参数
#include <functional> #include <iostream> class MyClass { public: void print(int a, int b) const { std::cout << "a: " << a << ", b: " << b << std::endl; } }; int main() { MyClass obj; // 绑定成员函数,绑定对象为 obj,并固定第一个参数为 10 auto bound_print = std::bind(&MyClass::print, &obj, 10, std::placeholders::_1); // 使用 std::function 存储绑定后的成员函数 std::function<void(int)> func = bound_print; func(20); // 输出: a: 10, b: 20 return 0; }复杂回调案例分析
定时器任务调度
(注意:该事例的分析是基于C++线程库进行举例,下文中有使用Linux中POSIX编程)
理解:给任务设定了一个定时回调,(该线程)到时间后就执行对应的函数。类似于绑定一个定时炸弹(任务+定时器)交给线程,这个定时炸弹到时间就爆炸。
详细分析
- TimerScheduler类负责管理定时任务,到达指定时间就执行任务
- MyServer则使用bind将task_callback成员函数绑定到this指针和占位符_1上,传递给TimerScheduler
- 执行步骤分析
- 使用TimerScheduler创建scheduler对象,然后利用scheduler对象构造一个MyService对象
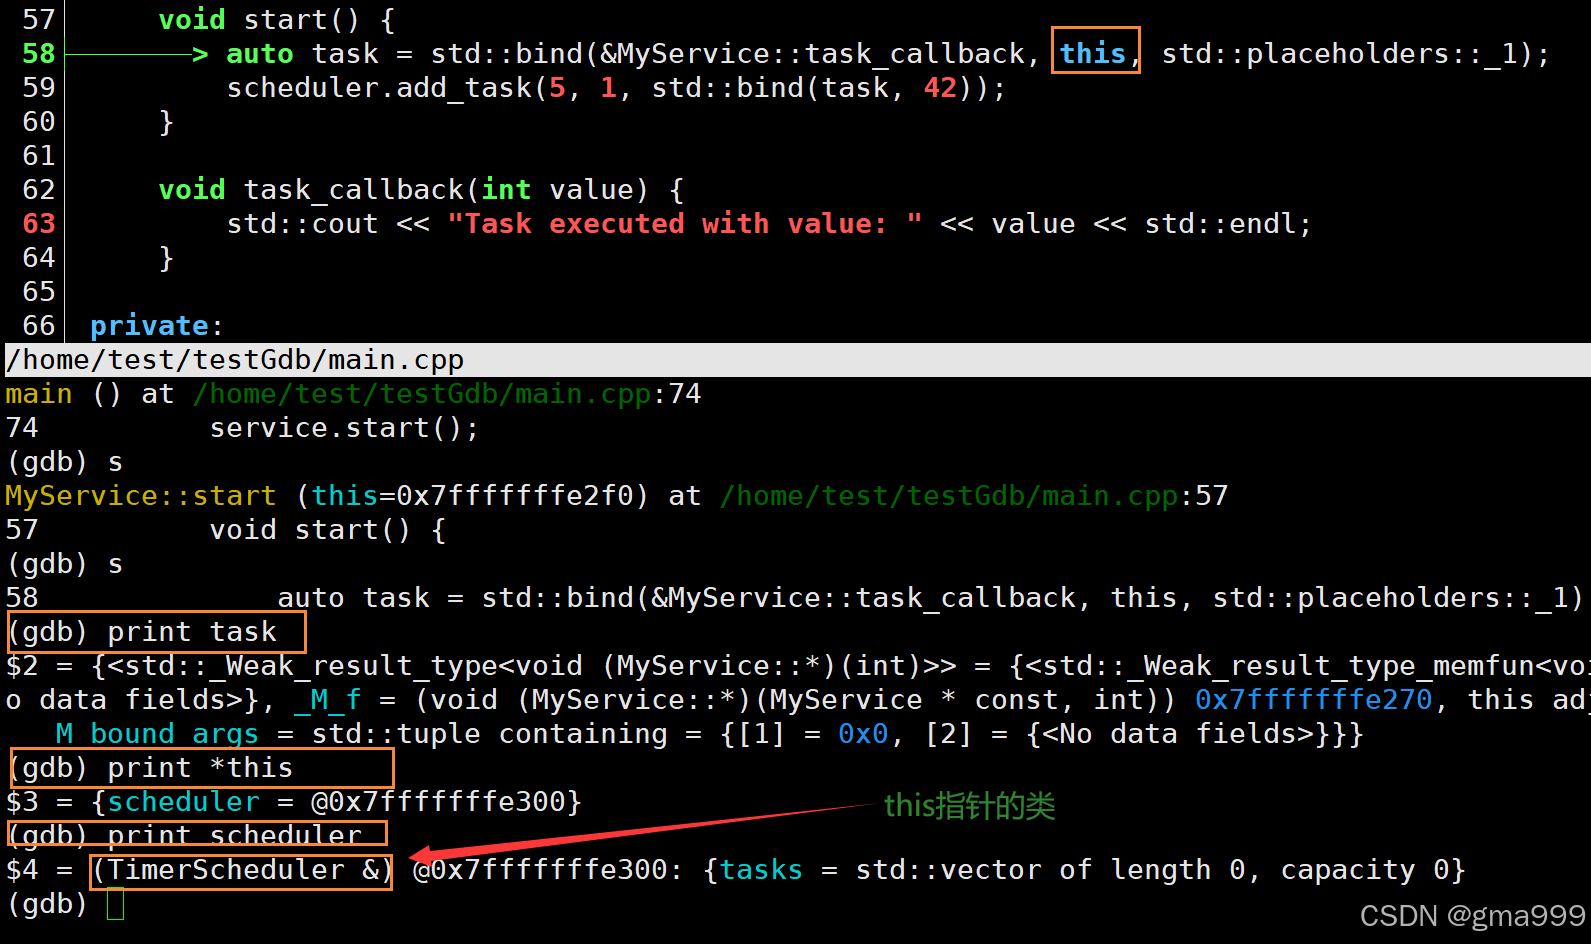
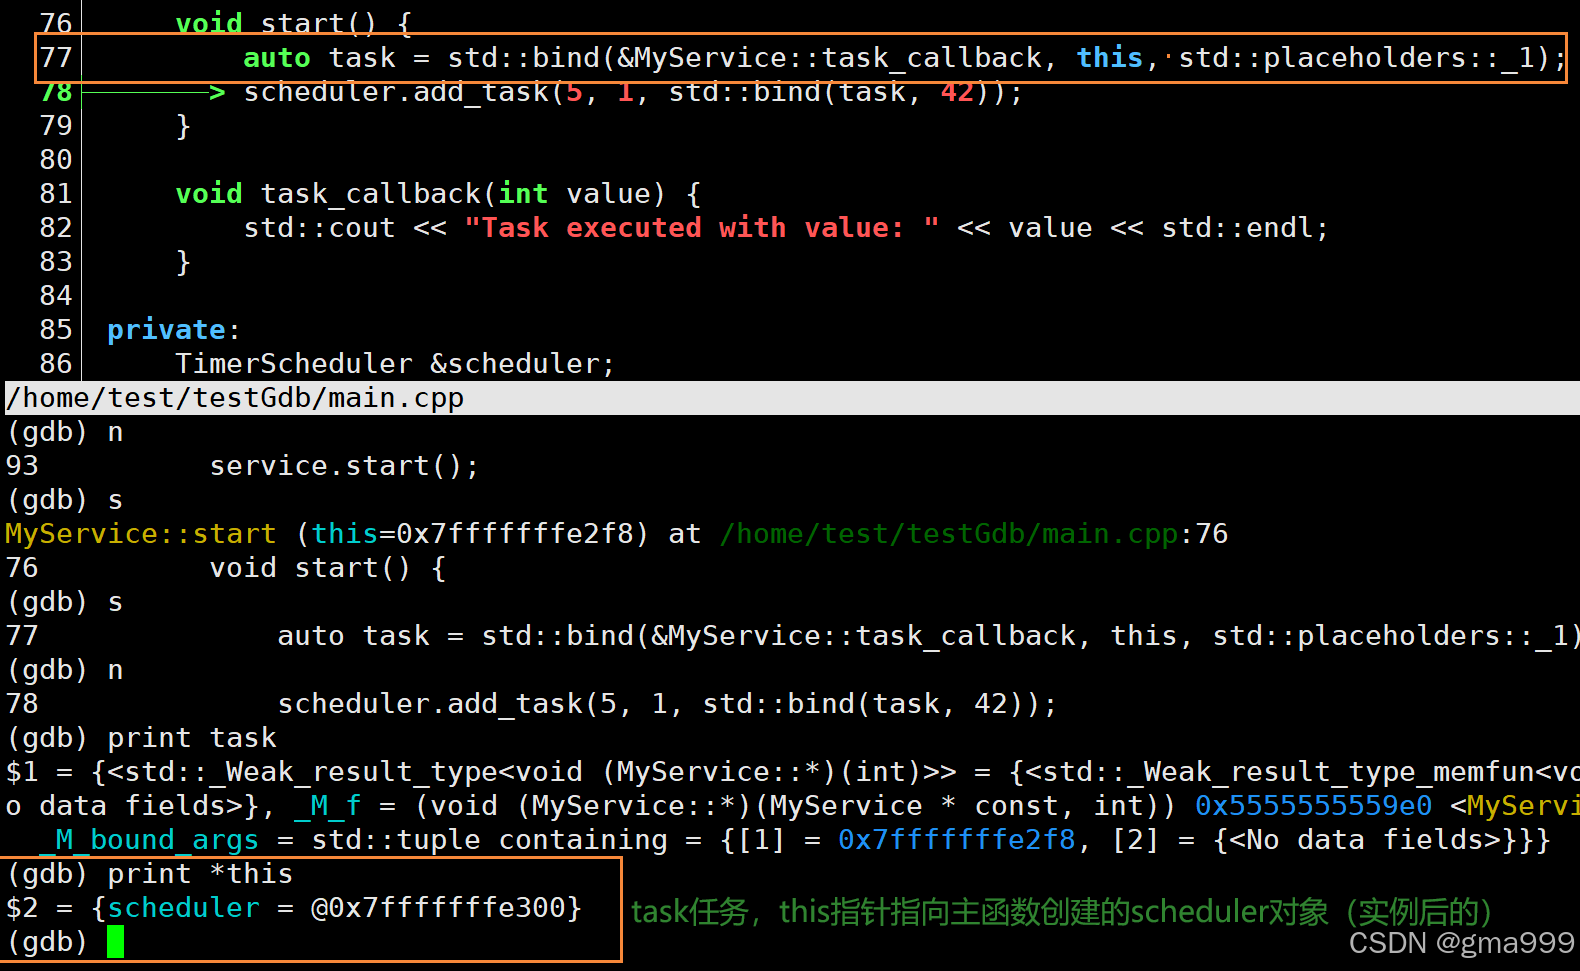
- 通过service对象(属于MyService类)的start方法,绑定回调函数task_callback(后面调试会验证此处的this指针就是service--通过this指针从而实现调用该类的成员函数)
- bind在该处作用分析:bind生成了一个可调用对象task,然后将调用MyService对象的task_callback方法,然后后面留出了一个参数占位符,等待传递参数
- 将绑定的task再次传递给scheduler中的add_task函数(第二次bind)
- scheduler.add_task(5, 1, std::bind(task, 42));
- 该处bind创建了一个可调用对象,该对象使用的是task_callback函数,向该函数传入了一个42的参数,也就是该函数的task_callback的形参value是42
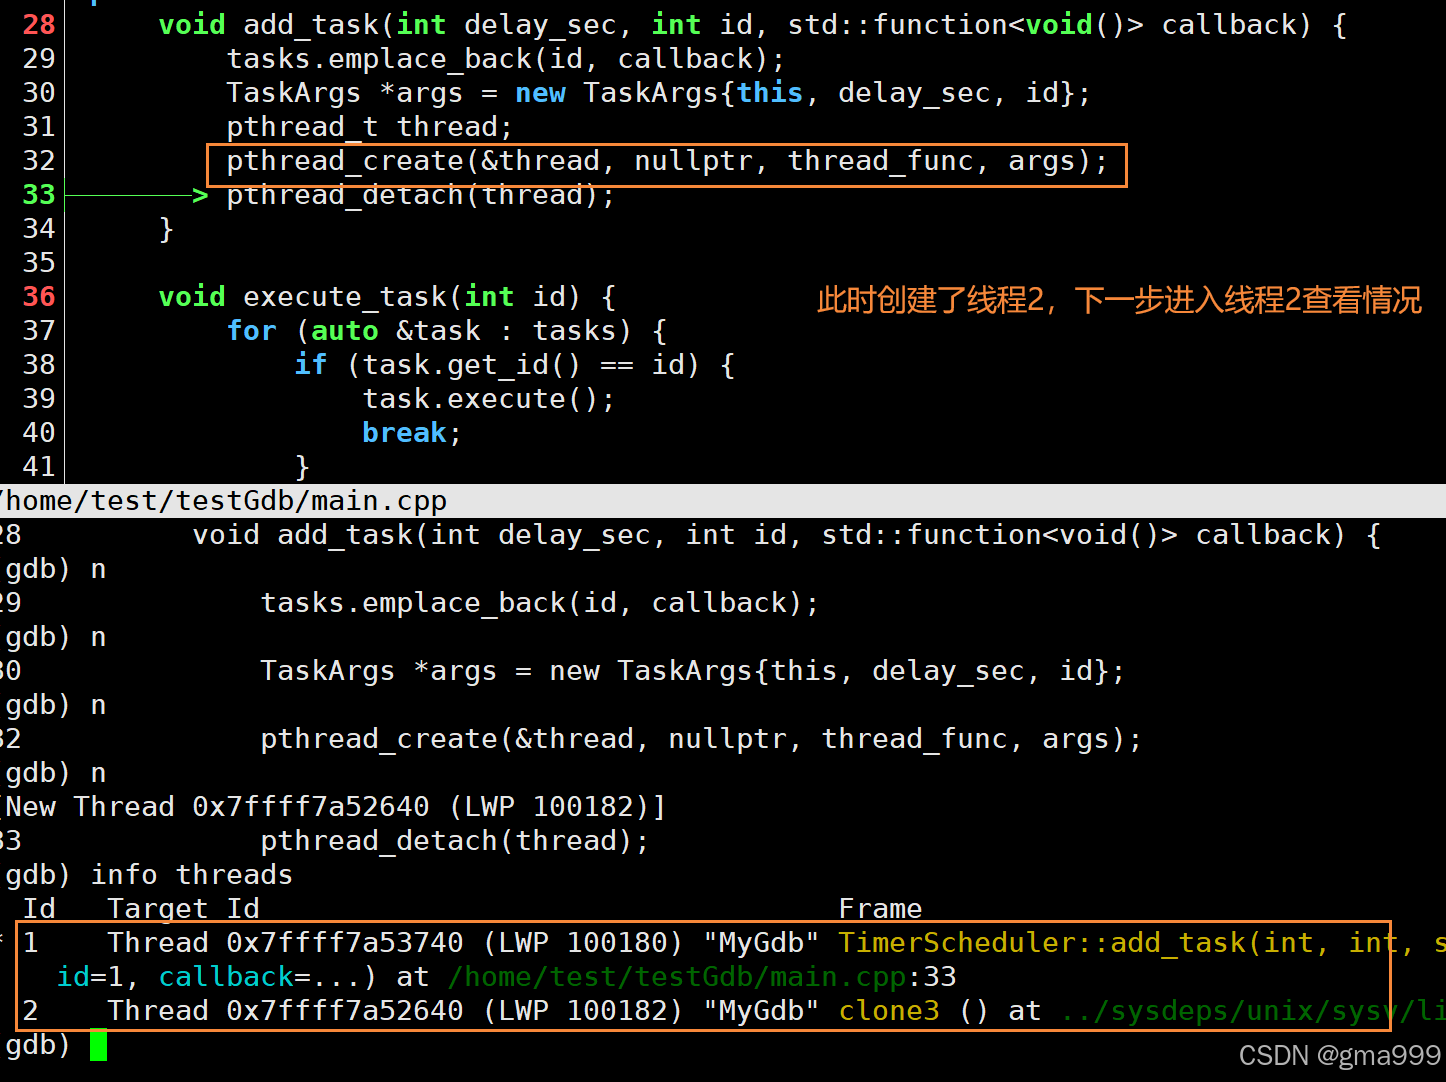
- 然后利用service(MyService创建)对象传入的scheduler中的add_task方法,创建一个新的TimerTask对象
- tasks.emplace_back(id, callback);(创建了一个新的对象,注意该任务的回调函数就是上面传入的bind(task,42)
- TimerTask类中,有对应的ID和回调函数管理
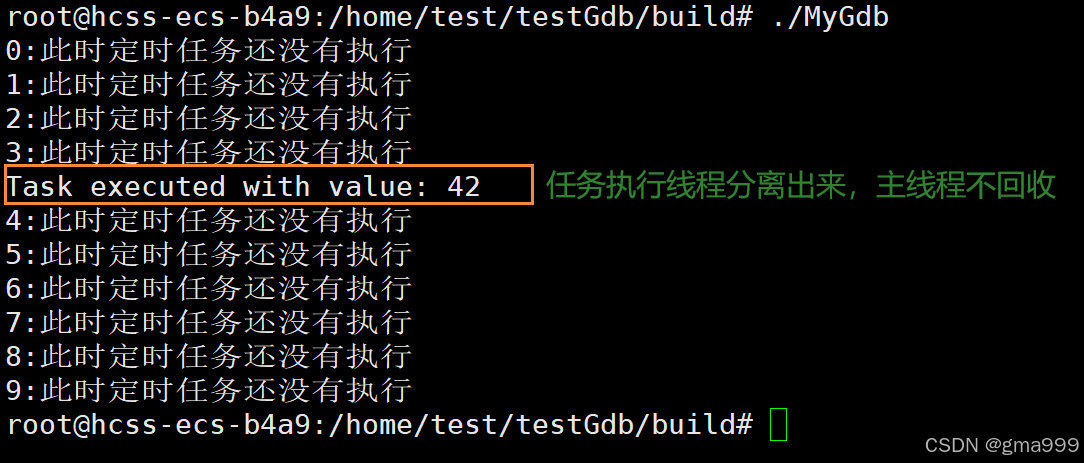
- 五秒后,调用之前设置的回调函数
重点步骤模块汇总

事例源代码
#include <functional> #include <iostream> #include <thread> #include <chrono> #include <vector> class TimerTask { public: TimerTask(int id, std::function<void()> callback) : task_id(id), task_callback(callback) {} void execute() { if (task_callback) { task_callback(); } } int get_id() const { return task_id; } private: int task_id; std::function<void()> task_callback; }; class TimerScheduler { public: void add_task(int delay_sec, int id, std::function<void()> callback) { tasks.emplace_back(id, callback); std::thread([this, delay_sec, id]() { std::this_thread::sleep_for(std::chrono::seconds(delay_sec)); this->execute_task(id); }).detach(); } void execute_task(int id) { for (auto &task : tasks) { if (task.get_id() == id) { task.execute(); break; } } } void run() { // Simulate running scheduler } private: std::vector<TimerTask> tasks; }; class MyService { public: MyService(TimerScheduler &scheduler) : scheduler(scheduler) {} void start() { auto task = std::bind(&MyService::task_callback, this, std::placeholders::_1); scheduler.add_task(5, 1, std::bind(task, 42)); } void task_callback(int value) { std::cout << "Task executed with value: " << value << std::endl; } private: TimerScheduler &scheduler; }; int main() { TimerScheduler scheduler; MyService service(scheduler); service.start(); scheduler.run(); std::this_thread::sleep_for(std::chrono::seconds(10)); // Simulate running return 0; } this指针所指向对象分析
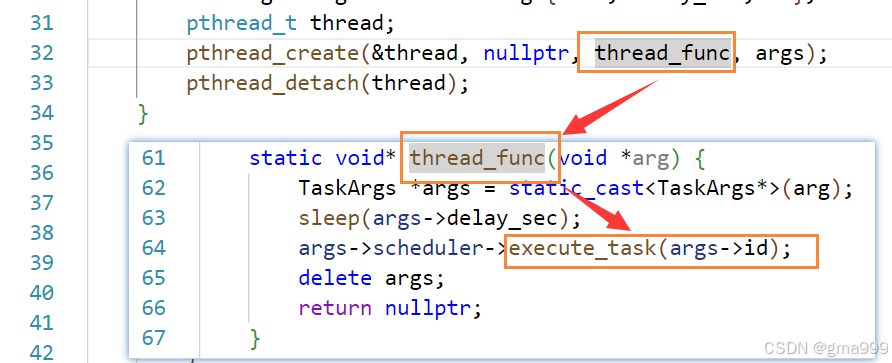
LinuxPOSIX库实现定时器任务调度
#include <iostream> #include <pthread.h> #include <unistd.h> #include <vector> #include <functional> class TimerTask { public: TimerTask(int id, std::function<void()> callback) : task_id(id), task_callback(callback) {} void execute() { if (task_callback) { task_callback(); } } int get_id() const { return task_id; } private: int task_id; std::function<void()> task_callback; }; class TimerScheduler { public: void add_task(int delay_sec, int id, std::function<void()> callback) { tasks.emplace_back(id, callback); TaskArgs *args = new TaskArgs{this, delay_sec, id}; pthread_t thread; pthread_create(&thread, nullptr, thread_func, args); pthread_detach(thread); } void execute_task(int id) { for (auto &task : tasks) { if (task.get_id() == id) { task.execute(); break; } } } void run() { for(int i = 0;i<10;i++) { sleep(1); std::cout<<i<<":此时定时任务还没有执行"<<std::endl; } // Simulate running scheduler } private: struct TaskArgs { TimerScheduler *scheduler; int delay_sec; int id; }; static void* thread_func(void *arg) { TaskArgs *args = static_cast<TaskArgs*>(arg); sleep(args->delay_sec); args->scheduler->execute_task(args->id); delete args; return nullptr; } std::vector<TimerTask> tasks; }; class MyService { public: MyService(TimerScheduler &scheduler) : scheduler(scheduler) {} void start() { auto task = std::bind(&MyService::task_callback, this, std::placeholders::_1); scheduler.add_task(5, 1, std::bind(task, 42)); } void task_callback(int value) { std::cout << "Task executed with value: " << value << std::endl; } private: TimerScheduler &scheduler; }; int main() { TimerScheduler scheduler; MyService service(scheduler); service.start(); scheduler.run(); sleep(10); // Simulate running return 0; }重要内容调试分析
分析新线程创建后,该线程调用回调函数的具体逻辑(回调函数绑定不再叙述,参考上文内容)


异步任务处理器
逻辑:与定时器的任务管理相似,任务管理器管理任务,任务绑定回调函数,任务添加到任务管理器后线程分离自己独自执行预先设置好的线程处理函数。(简单理解:公交车首先需要绑定自己是哪一个公交车调用中心的,公交车调度中心,给每一辆公交车都绑定一个具体的路线,然后让公交车自己去完成任务)
主要步骤总结(下文详细进行流程分析)
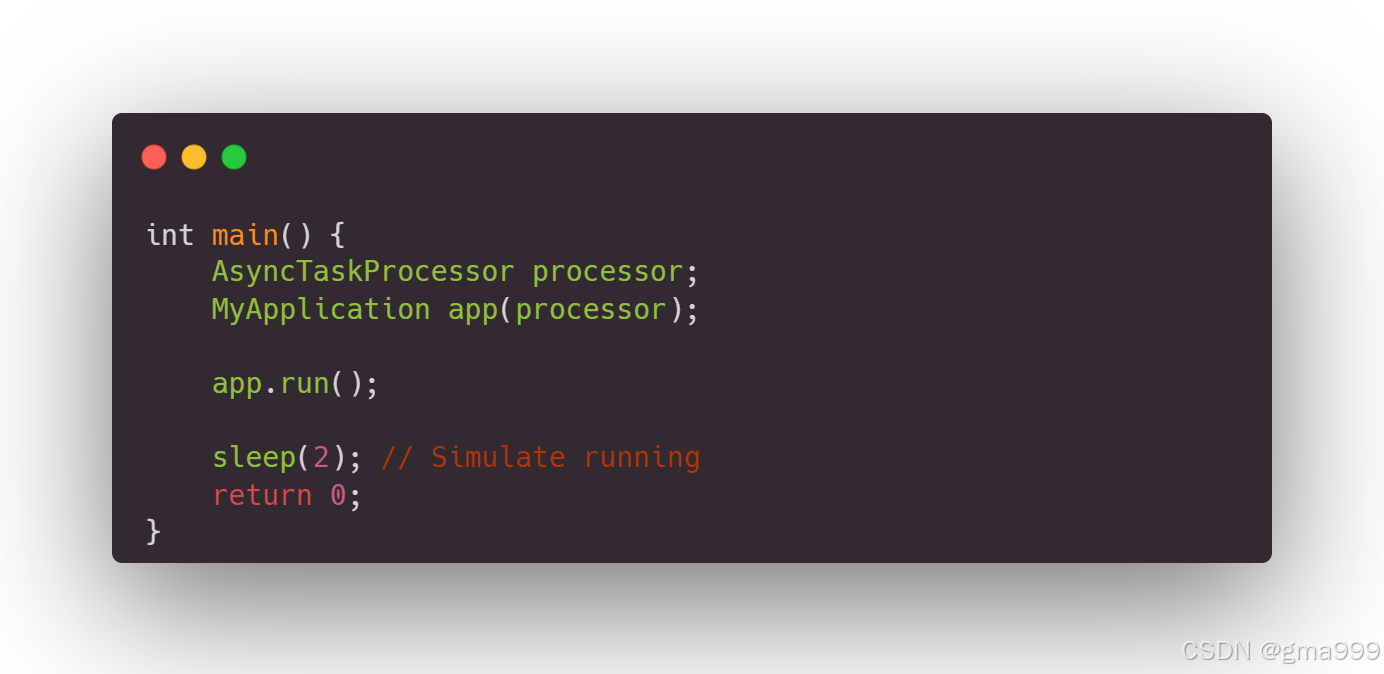
- 主函数 创建
AsyncTaskProcessor和MyApplication对象,启动应用程序,并添加两个任务。- AsyncTaskProcessor 创建工作线程,并在析构时确保线程安全退出。
- 任务处理线程 等待任务队列中的新任务,处理任务,并执行任务回调。
- 任务执行 打印任务完成消息
#include <iostream> #include <pthread.h> #include <unistd.h> #include <queue> #include <mutex> #include <condition_variable> #include <functional> class AsyncTask { public: AsyncTask(int id, std::function<void()> callback) : task_id(id), task_callback(callback) {} void execute() { if (task_callback) { task_callback(); } } int get_id() const { return task_id; } private: int task_id; std::function<void()> task_callback; }; class AsyncTaskProcessor { public: AsyncTaskProcessor() : stop(false) { pthread_create(&worker_thread, nullptr, process_tasks, this); } ~AsyncTaskProcessor() { { std::unique_lock<std::mutex> lock(mutex); stop = true; } cond_var.notify_all(); pthread_join(worker_thread, nullptr); } void add_task(int id, std::function<void()> callback) { { std::unique_lock<std::mutex> lock(mutex); tasks.emplace(id, callback); } cond_var.notify_all(); } private: static void* process_tasks(void* arg) { AsyncTaskProcessor* self = static_cast<AsyncTaskProcessor*>(arg); while (true) { AsyncTask task(0, nullptr); { std::unique_lock<std::mutex> lock(self->mutex); self->cond_var.wait(lock, [self] { return !self->tasks.empty() || self->stop; }); if (self->stop && self->tasks.empty()) { break; } task = std::move(self->tasks.front()); self->tasks.pop(); } task.execute(); } return nullptr; } pthread_t worker_thread; std::queue<AsyncTask> tasks; std::mutex mutex; std::condition_variable cond_var; bool stop; }; class MyApplication { public: MyApplication(AsyncTaskProcessor &processor) : processor(processor) {} void run() { auto task = std::bind(&MyApplication::task_done_callback, this, std::placeholders::_1); processor.add_task(1, std::bind(task, "Task 1 completed")); processor.add_task(2, std::bind(task, "Task 2 completed")); } void task_done_callback(const std::string &message) { std::cout << message << std::endl; } private: AsyncTaskProcessor &processor; }; int main() { AsyncTaskProcessor processor; MyApplication app(processor); app.run(); sleep(2); // Simulate running return 0; } 执行流程详细分析
- 主函数启动逻辑
- 创建processor和app对象,构造即可
- 调用run启动程序,让主线程睡眠2秒,从而模拟程序运行,确保后续的线程完成任务
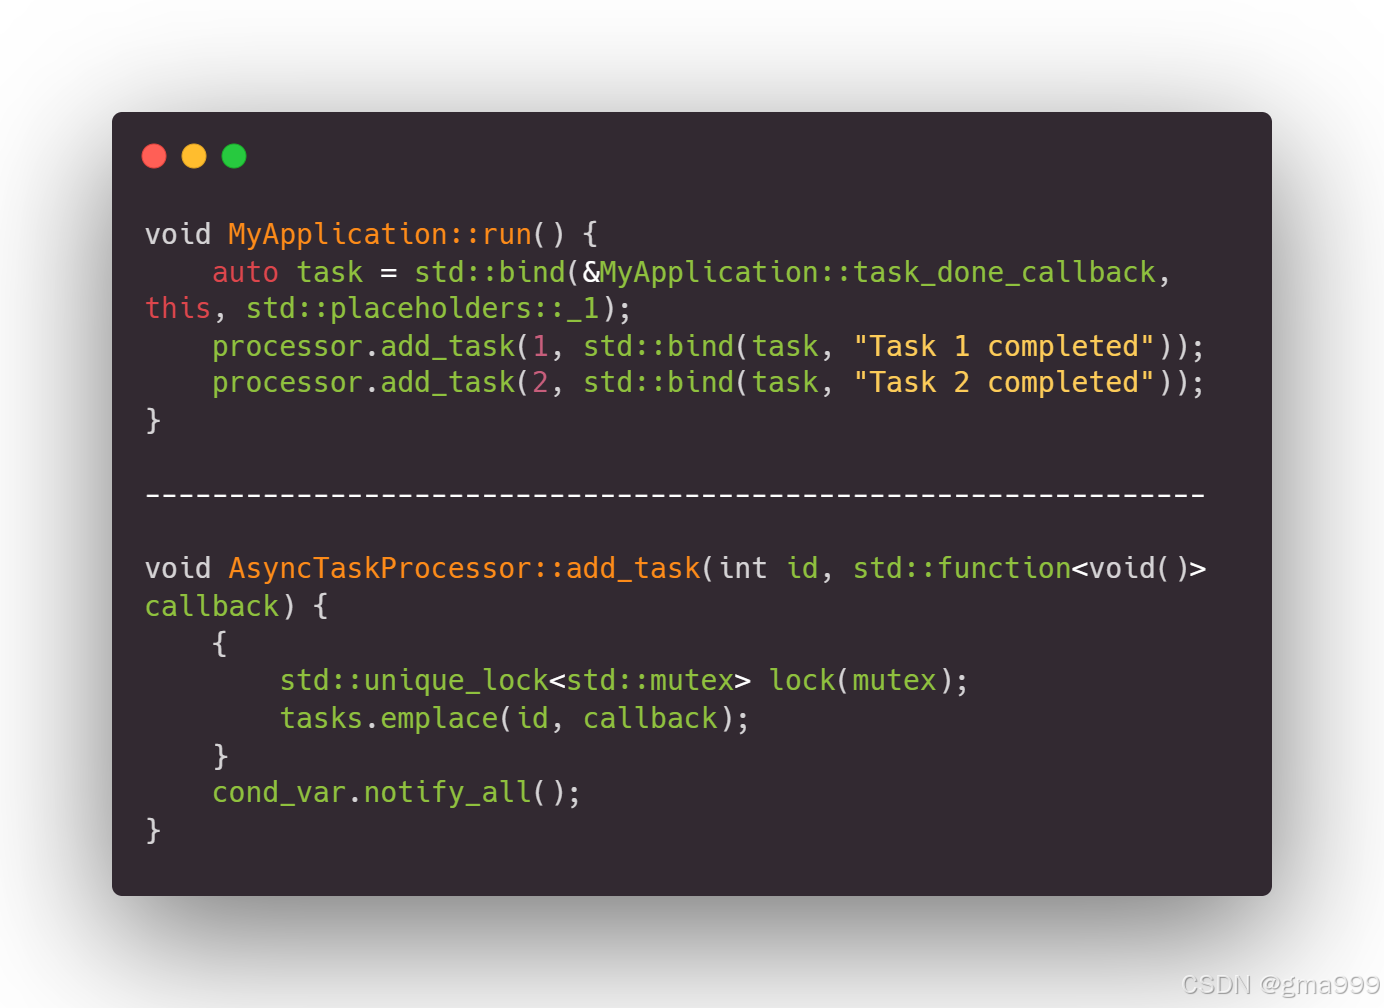
创建和处理任务逻辑
- 绑定task_done_callback方法,创建一个任务回调
- 向processor添加两个任务,同时给task绑定一个字符串(也就是给回调函数绑定了对应的参数,只是封装了而已)
任务处理线程
- 创建一个空的
AsyncTask对象task。- 锁定互斥量
self->mutex。- 调用
self->cond_var.wait(lock, [self] { return !self->tasks.empty() || self->stop; }):
- 如果任务队列
tasks为空且stop标志为false,线程将等待条件变量cond_var的通知。- 一旦有新任务加入队列或
stop标志为true,条件满足,线程继续执行。- 检查
stop标志和任务队列是否为空:
- 如果
stop为true且任务队列为空,跳出循环,线程结束。- 将任务队列中的第一个任务移动到
task,并从任务队列中移除它- 解锁互斥量。
- 调用
task.execute()执行任务回调函数

最后执行任务回调函数(预先设置好的) ,执行处理器析构等待线程退出,避免僵尸线程

