阅读量:0
目录
一、WebSocket简介
WebSocket建立在TCP协议上,是一种在单个TCP连接上进行全双工通信的协议。
HTML5里面提出了WebSocket标准,目的是让服务器具有“主送”向浏览器推送信息的能力,它允许客户端和服务器之间建立持久连接,实现实时的数据传输功能。
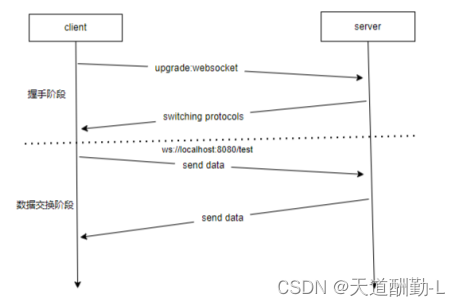
WebSocket通讯分为两个阶段:
1.握手阶段
客户端通过HTTP请求发起握手请求,请求头包含一些特殊字段,如pgrade:websocket和Connection:Upgrade以及其他的WebSocket相关字段。
服务器收到客户端的WebSocket握手请求后,进行协议升级,将HTTP升级为WebSocket连接。服务器返回一个WebSocket握手响应,相应头中包如:Upgrade:websocket和Connection:Upgrade等WebSocket相关字段。
客户端收到服务器的WebSocket握手响应后,WebSocket连接就建立成功,客户端和服务端都可以发送和接收WebSocket消息。
2.数据交换阶段
WebSocket建立成功后,客户端和服务器都可以通过WebSocket会话进行实时的双向数据交换。同时,客户端和服务端可以通过发送心跳数据帧来维持连接,如果在一段时间内没有收到心跳响应,则断开WebSocket连接。
二、WebSocket优缺点
1.优点
支持双向通讯,实时性比较高,更加灵活。
开销少,ws建立成功后,客户端、服务端进行数据交换,协议控制的数据包头部较小。http需要完整的头部信息。
可扩展,WebSocket协议定义了扩展,用户可以扩展协议。
2.缺点
服务端需要支持WebSocket协议。
客户端连接数多,服务端压力大。
三、spring boot集成webSocket
1.新建spring boot项目,再pom.xml加入以下配置
<parent> <groupId>org.springframework.boot</groupId> <artifactId>spring-boot-starter-parent</artifactId> <version>2.1.18.RELEASE</version> <relativePath/> <!-- lookup parent from repository --> </parent> <dependencies> <dependency> <groupId>org.springframework.boot</groupId> <artifactId>spring-boot-starter-web</artifactId> </dependency> <!-- webSocket依赖包 --> <dependency> <groupId>org.springframework.boot</groupId> <artifactId>spring-boot-starter-websocket</artifactId> </dependency> </dependencies>2.再spring boot启动类开启websocket功能
package com.example.demo; import org.springframework.boot.SpringApplication; import org.springframework.boot.autoconfigure.SpringBootApplication; import org.springframework.web.socket.config.annotation.EnableWebSocket; //开启WebSocket @EnableWebSocket @SpringBootApplication public class DemoApplication { public static void main(String[] args) { SpringApplication.run(DemoApplication.class, args); } }3.新建WebSoketConfig配置类
package com.example.demo.common.config.websocket; import org.springframework.context.annotation.Bean; import org.springframework.context.annotation.Configuration; import org.springframework.web.socket.server.standard.ServerEndpointExporter; /** * WebSocket配置类 */ @Configuration public class WebSocketConfig { @Bean public ServerEndpointExporter serverEndpointExporter() { return new ServerEndpointExporter(); } }4.新建WebSocketServer服务类
package com.example.demo.common.config.websocket; import org.springframework.stereotype.Component; import javax.websocket.*; import javax.websocket.server.PathParam; import javax.websocket.server.ServerEndpoint; import java.io.IOException; import java.util.concurrent.ConcurrentHashMap; /** * @ServerEndpoint:该注解用于暴漏外部ws的路径,类似@RequestMapping注解。例如服务端口8080,请求地址:ws://localhost:8080/myWs * 路径上{userId} 可在onOpen连接成功方法使用@PathParam("userId") String userId接收数据 */ @ServerEndpoint("/myWs/{userId}") @Component public class WebSocketServer { //线程安全的map,用来保存每个客户端对应的WebSocket对象 private static ConcurrentHashMap<String, WebSocketServer> webSocketMap = new ConcurrentHashMap<>(); //单个客户端的session,通过session与对应客户端通讯 private Session session; //用户id private String userId; /** * 连接成功 * @OnOpen注解:websocket 连接成功后,触发该注解修饰的方法 * @param session */ @OnOpen public void onOpen(Session session, @PathParam("userId") String userId) { this.session = session; this.userId = userId; if (webSocketMap.containsKey(userId)) { webSocketMap.remove(userId); webSocketMap.put(userId, this); } else { webSocketMap.put(userId, this); } System.out.println("连接成功"); } /** * 连接关闭 * @OnClose注解:websocket断开连接后,触发该注解修饰的方法 * @param session */ @OnClose public void onCLose(Session session) { if (webSocketMap.containsKey(userId)) { webSocketMap.remove(userId); } System.out.println("关闭连接"); } /** * 接收消息 * @OnMessage注解:客户端发送消息时,触发该注解声明的方法 * @param text * @return */ @OnMessage public void onMessage(String text) { System.out.println("后端接收前端web发送数据userId:" + userId + ",接收信息:" + text); if (webSocketMap.containsKey(userId)) { try { webSocketMap.get(userId).session.getBasicRemote().sendText("返回web数据userId:" + userId + ",返回消息:" + text); } catch (IOException e) { e.printStackTrace(); } } } /** * 连接异常 * @OnError注解:当建立的连接出现异常后,触发该注解修饰的方法 * @param session * @param throwable */ @OnError public void onError(Session session, Throwable throwable) { System.out.println("websocket连接异常:" + throwable.getMessage()); } /** * 服务器给指定WebSocket客户端发送信息 * @param userId * @param message */ public static void sendInfo(String userId, String message) { System.out.println("后端发送前端web数据userId:" + userId + "发送消息:" + message); if (webSocketMap.containsKey(userId)) { try { webSocketMap.get(userId).session.getBasicRemote().sendText("后端发送前端web数据userId" + userId + ",内容:" + message); } catch (IOException e) { e.printStackTrace(); } } } }5.新建DemoController测试类,增加接口通过webSocket给客户端发信信息
package com.example.demo.controller; import com.example.demo.common.config.websocket.WebSocketServer; import org.springframework.web.bind.annotation.RequestMapping; import org.springframework.web.bind.annotation.RequestParam; import org.springframework.web.bind.annotation.RestController; @RestController public class DemoController { @RequestMapping("/demo") public boolean demo(@RequestParam("userId") String userId, @RequestParam("message") String mesage) { //给前端web推送数据 WebSocketServer.sendInfo(userId, mesage); return true; } }四、验证
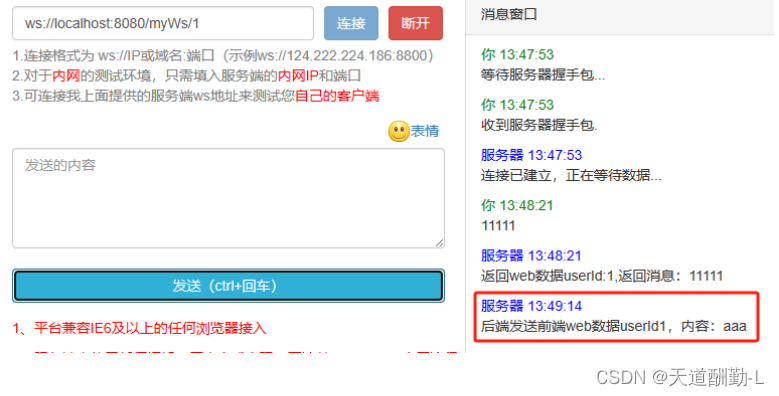
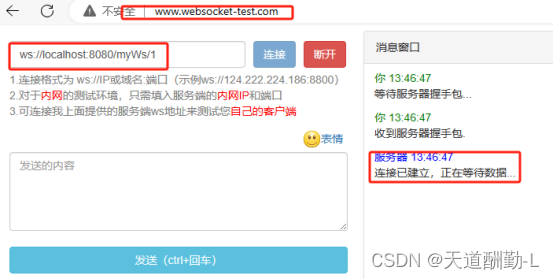
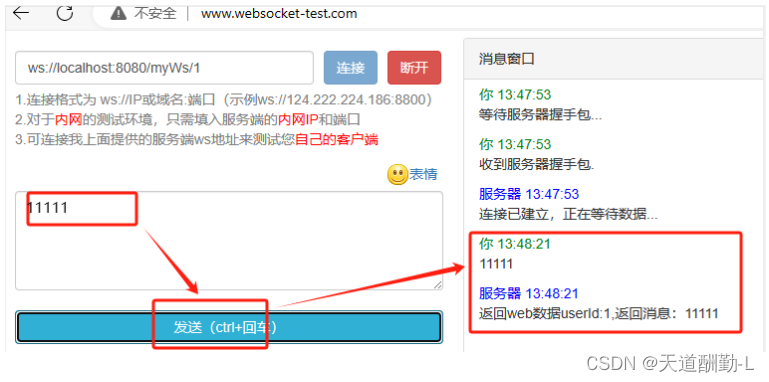
1.启动服务,访问websocket在线测试页面,与后端建立连接
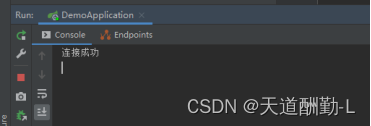
2.后端显示连接成功
3.通过websocket给后端发送数据
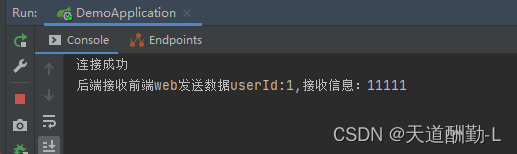
4.后端打印接收到的数据
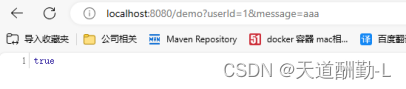
5.调用后端接口,通过websocket给前端推送数据
6.websocket在线测试页面收到数据