
阅读量:0
第一步:引入依赖
<dependency> <groupId>com.github.xiaoymin</groupId> <artifactId>knife4j-openapi2-spring-boot-starter</artifactId> <version>4.4.0</version> </dependency>第二步:写入配置
方法一:编写一个工具类
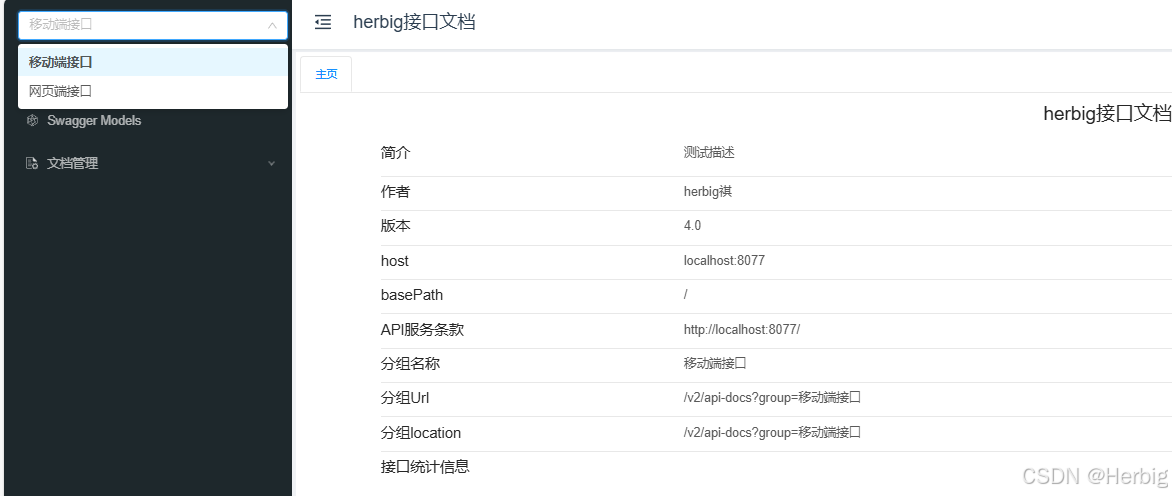
import org.springframework.context.annotation.Bean; import org.springframework.context.annotation.Configuration; import springfox.documentation.builders.ApiInfoBuilder; import springfox.documentation.builders.PathSelectors; import springfox.documentation.builders.RequestHandlerSelectors; import springfox.documentation.service.ApiInfo; import springfox.documentation.service.Contact; import springfox.documentation.spi.DocumentationType; import springfox.documentation.spring.web.plugins.Docket; import springfox.documentation.swagger2.annotations.EnableSwagger2WebMvc; @Configuration @EnableSwagger2WebMvc public class Knife4jConfiguration { private ApiInfo groupApiInfo(){ return new ApiInfoBuilder() .title("herbig接口文档") .description("Smart Claims RESTful APIs") .termsOfServiceUrl("http://localhost:8077/") .contact(new Contact("herbig祺","","邮箱")) .description("测试描述") .version("4.0") .build(); } @Bean public Docket appApi() { return new Docket(DocumentationType.SWAGGER_2) .apiInfo(groupApiInfo()) .groupName("移动端接口") .select() .apis(RequestHandlerSelectors.basePackage("com.herbig.app")) .paths(PathSelectors.any()) .build(); } @Bean public Docket pcApi() { return new Docket(DocumentationType.SWAGGER_2) .apiInfo(groupApiInfo()) .groupName("网页端接口") .select() .apis(RequestHandlerSelectors.basePackage("com.herbig.pc")) .paths(PathSelectors.any()) .build(); } } 方法二:在yml里面配置
knife4j: enable: true openapi: title: herbig接口文档 description: 测试描述 email: 邮箱 concat: herbig祺 url: http://localhost:8077/ version: v4.0 license: Apache 2.0 license-url: http://localhost:8077/ terms-of-service-url: http://localhost:8077/ group: test1: group-name: 移动端接口 api-rule: package api-rule-resources: - com.knife4j.demo.new3 test2: group-name: 网页端接口 api-rule: package api-rule-resources: - com.knife4j.demo.new3第三步:启动项目——访问地址 http://ip:端口号/doc.html#/
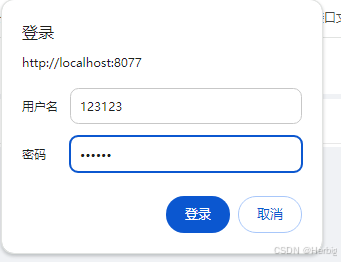
番外:如果提供给别人接口API时不希望所有人都能看到可以加一些登录限制 在yml文件中
knife4j: enable: true basic: enable: true password: 123123 username: 123123这样访问地址就会出现登录提示,出入用户名和密码即可查看
测试用例:
@RestController @RequestMapping("/one") @Api(value = "测试接口",tags = "测试接口")//接口文档的api组名 public class Knife4jController { @ApiOperation(value = "接口释义", notes = "接口释义")//接口释义 @RequestMapping(value = "/two", method = RequestMethod.POST) @ApiImplicitParams({ @ApiImplicitParam(name = "canshu", value = "参数", required = false)//参数 required是否必填 }) public String doGetStudyFileDataList() { return "啦啦啦,成功了"; } }结果

