
阅读量:0
本项目框架是基于vue3 + vite + TypeScript, 对vite 快速创建的框架做出的二次封装。
一、创建基础框架
npm init vite@latest
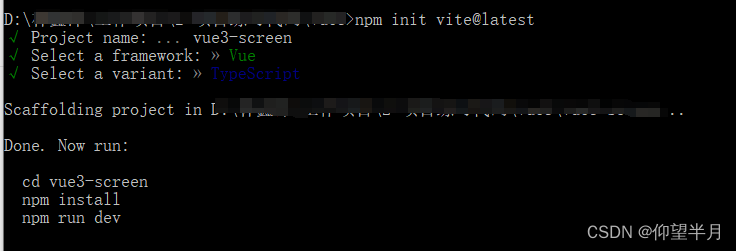

项目框架初步创建成功,下面是进行二次的封装
二、配置文件引用别名
vite.config.ts: import { defineConfig } from 'vite' import vue from '@vitejs/plugin-vue' import path from "path"; // https://vitejs.dev/config/ export default defineConfig({ plugins: [vue()], resolve: { alias: { "@": path.resolve(__dirname, "src"), } }, })tsconfig.json: { "compilerOptions": { ...... "baseUrl": ".", "paths": { "@/*":["src/*"] } }, }如果编辑器中 path、__dirname上面显示红色波浪线,说找不到path,那就安装下:
cnpm install --save-dev @types/node
三、安装vue-router并配置路由
1、命令行安装
cnpm install vue-router --save
2、修改文件
在 src 文件下新增 router 文件夹 => index.ts 文件和routes.ts文件,src文件夹下新建pages文件夹,pages文件夹下新建home.vue

routes.ts: import { RouteRecordRaw } from 'vue-router'; //对外暴露配置路由 export const routes: Array<RouteRecordRaw> = [ { path: '/', name: 'home', component: () => import('@/pages/home.vue'), // 注意这里要带上 文件后缀.vue meta: {} }, ]路由这里要注意:
1、引入的文件后缀名 .vue不能省掉,vue2是可以,vue3不行
2、其余找不到的路由去404页面,vue2与vue3写法也有区别:
//vue2写法: { path: '*', redirect: '/404' } //vue3写法 { path: '/:catchAll(.*)*', // 匹配所有路径 vue2使用* vue3使用/: pathMatch(.*)* 或 /: pathMatch(.*) 或 /: catchAll(.*) redirect: '/404', },index.ts: //通过vue-router插件实现模板路由配置 import { createRouter, createWebHashHistory } from 'vue-router' import { routes } from './routes' //创建路由器 const router = createRouter({ //路由模式根据需求选择 history: createWebHashHistory(), routes: routes, }) export default routerApp.vue: <script setup lang="ts"> </script> <template> <router-view/> </template> <style scoped> </style>home.vue: <script setup lang="ts"> </script> <template> <h1>home</h1> </template> <style scoped> </style>main.ts: import { createApp } from 'vue' import './style.css' import App from './App.vue' import router from './router/index' const app = createApp(App) app.use(router) app.mount('#app')四、引入sass
1、命令行安装
cnpm install sass --save-dev
2、修改文件
src文件夹下的asstes文件下新建css、img、js三个文件夹,到时候css就作为整体存放样式的文件


两个文件夹,分别作为公共样式和页面样式:公共样式里分为全局变量及全局样式

sass全局变量为方便使用可以在vite.config.ts中做引入:

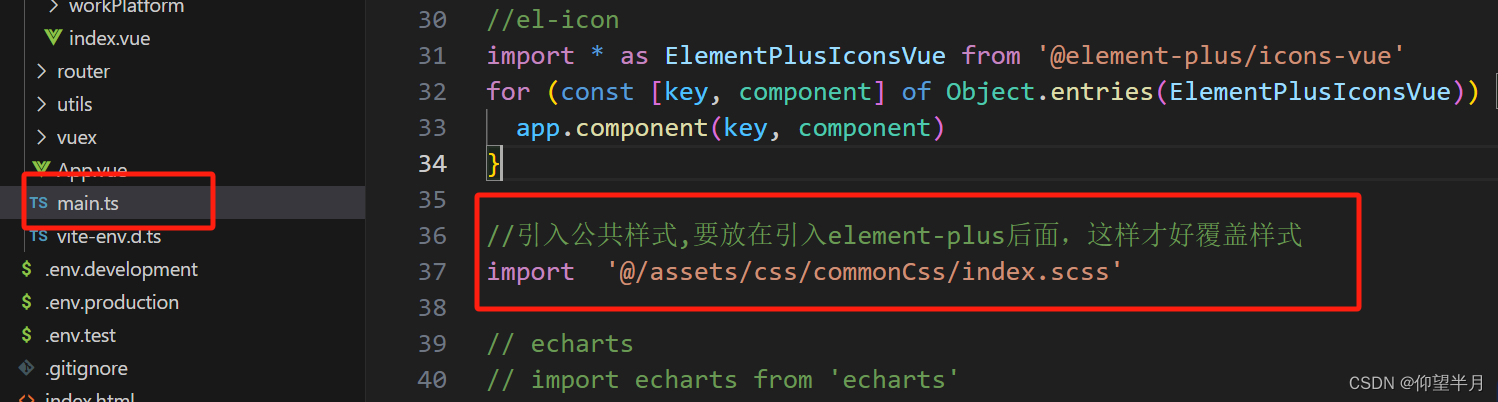
css:{ preprocessorOptions: { // 全局sass变量引入 scss:{ additionalData: '@use "./src/assets/css/commonCss/globalVariate/index.scss" as *;', } }, },main.ts中引入公共样式:
五、安装axios
1、命令行安装
cnpm install axios --save
2、修改文件
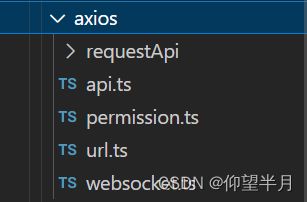
src文件夹下新建axios文件,做axios的二次封装
六、安装vuex
1、命令行安装
cnpm install vuex --save
2、修改文件
src文件夹下新建vuex文件

七、引入element-plus组件库
1、命令行安装
cnpm install element-plus @element-plus/icons-vue --save
八、安装初始化样式、页面进度条、时间处理器
1、命令行安装
cnpm install normalize.css nprogress moment --save
cnpm install qs @vueuse/core --save
九、安装echarts
1、命令行安装
cnpm install echarts --save
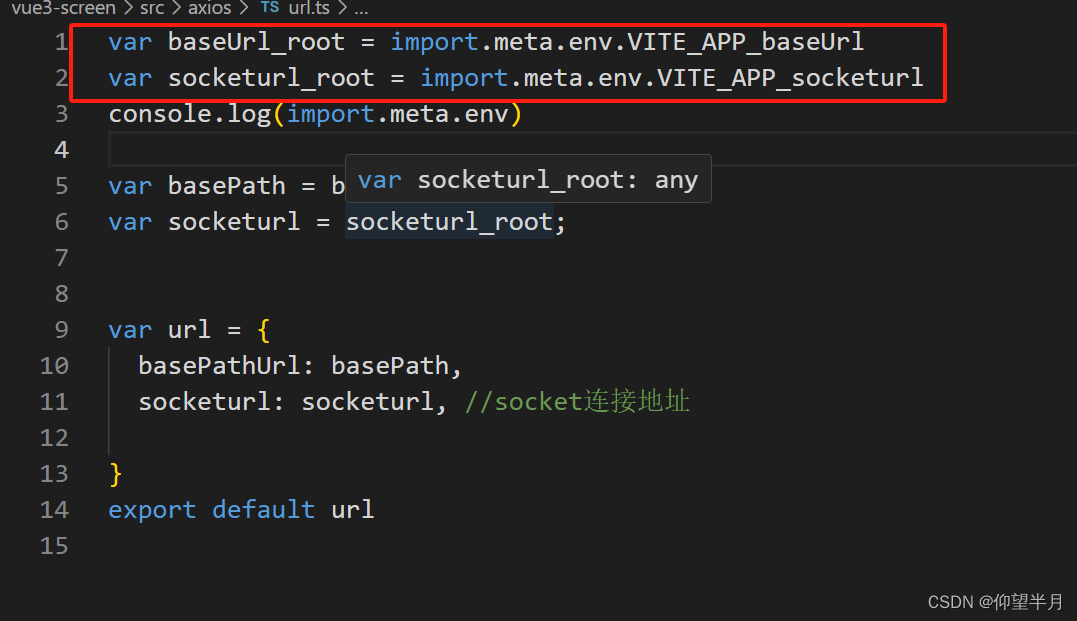
十、配置打包变量
分为三个环境:开发、测试、生产

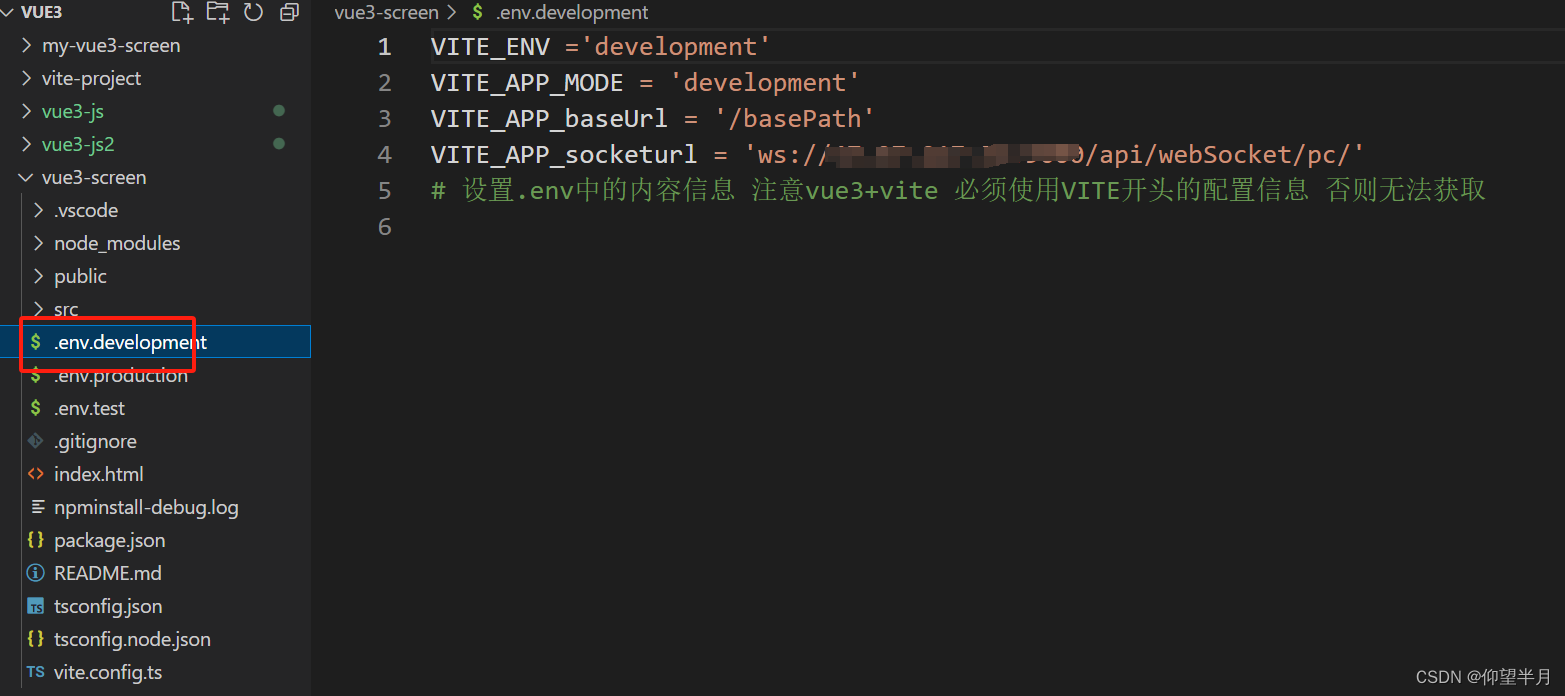
获取变量
所有安装已经结束啦,看下最终安装的:
"dependencies": { "@element-plus/icons-vue": "^2.3.1", "@vueuse/core": "^10.9.0", "axios": "^1.6.8", "echarts": "^5.5.0", "element-plus": "^2.7.1", "moment": "^2.30.1", "normalize.css": "^8.0.1", "nprogress": "^0.2.0", "qs": "^6.12.1", "vue": "^3.4.21", "vue-router": "^4.3.2", "vuex": "^4.1.0" }, "devDependencies": { "@types/node": "^20.12.7", "@vitejs/plugin-vue": "^5.0.4", "rollup-plugin-visualizer": "^5.12.0", "sass": "^1.75.0", "terser": "^5.30.4", "typescript": "^5.2.2", "vite": "^5.2.0", "vite-plugin-compression": "^0.5.1", "vue-tsc": "^2.0.6" }十一、vite.config.ts配置文件修改,做打包各项优化
1、分析打包后各个的大小体积
1.1、命令行安装
cnpm install rollup-plugin-visualizer --save-dev
1.2、修改代码
import { visualizer } from 'rollup-plugin-visualizer' export default defineConfig({ plugins: [ // 打包体积分析 visualizer({ open: true, filename: 'visualizer.html' //分析图生成的文件名 }), ], }) 打包完成会生成一个html文件,就可以看到各个包的体积大小
2、配置打包文件分类输出
build: { rollupOptions: { output: { chunkFileNames: 'js/[name]-[hash].js', // 引入文件名的名称 entryFileNames: 'js/[name]-[hash].js', // 包的入口文件名称 assetFileNames: '[ext]/[name]-[hash].[ext]', // 资源文件像 字体,图片等 // 最小化拆分包 node_modules的包逐个打包 将需要分离的包单独的打包出来 manualChunks(id) { if (id.includes('node_modules')) { return id.toString().split('node_modules/')[1].split('/')[0].toString(); } } } } } 3、开启Gzip文件压缩
3.1命令行安装
cnpm install vite-plugin-compression --save-dev
3.2修改文件
//Gzip文件压缩 import viteCompression from 'vite-plugin-compression' export default defineConfig({ plugins: [ //开启Gzip压缩 viteCompression({ verbose: true, // 是否在控制台中输出压缩结果 disable: false, threshold: 1024, // 如果体积大于阈值,将被压缩,单位为b,体积过小时请不要压缩,以免适得其反 algorithm: 'gzip', // 压缩算法,可选['gzip',' brotliccompress ','deflate ','deflateRaw'] ext: '.gz', deleteOriginFile: true // 源文件压缩后是否删除(我为了看压缩后的效果,先选择了true) }) ], })4、开启图片压缩
4.1、命令行安装
cnpm install vite-plugin-imagemin --save-dev
4.2、修改文件
// 图片压缩 import viteImagemin from 'vite-plugin-imagemin' export default defineConfig({ plugins: [ // 图片资源压缩 viteImagemin({ gifsicle: { // gif图片压缩 optimizationLevel: 3, // 选择1到3之间的优化级别 interlaced: false // 隔行扫描gif进行渐进式渲染 }, optipng: { // png optimizationLevel: 7 // 选择0到7之间的优化级别 }, mozjpeg: {// jpeg quality: 20 // 压缩质量,范围从0(最差)到100(最佳)。 }, pngquant: {// png quality: [0.8, 0.9], // Min和max是介于0(最差)到1(最佳)之间的数字,类似于JPEG。达到或超过最高质量所需的最少量的颜色。如果转换导致质量低于最低质量,图像将不会被保存。 speed: 4 // 压缩速度,1(强力)到11(最快) }, svgo: { plugins: [ // svg压缩 { name: 'removeViewBox' }, { name: 'removeEmptyAttrs', active: false } ] } }), ], }) 5、terser 压缩和去除console+debugger
5.1、命令行安装
cnpm install terser --save-dev
5.2、修改文件
export default defineConfig({ build: { minify: 'terser', // 清除所有console和debugger terserOptions: { compress: { drop_console: true, drop_debugger: true } } } })打包优化借鉴于此处,大家可以去看看:基于vite对vue3项目打包优化经验 【前端性能优化】 - 掘金
最终,图片压缩安装时报错了,后面再看看原因吧,呜呜呜~~~

十二、安装 eslint+Prettier做代码校验和代码格式化
1、安装
//安装 cnpm install eslint eslint-plugin-vue prettier eslint-plugin-prettier eslint-config-prettier -D这里注意个问题:安装最新的可能导致与nodejs版本不兼容报错,所以我直接写进package.json,安装固定版本的
"devDependencies": { // typescript eslint 解析相关的包 "@typescript-eslint/eslint-plugin": "^7.9.0", "@typescript-eslint/parser": "^7.9.0", // eslint相关的包 "eslint": "^8.17.0", "eslint-plugin-vue": "^9.1.0", "vue-eslint-parser": "^9.0.2", // prettier相关的包 "prettier": "^2.6.2", "eslint-config-prettier": "^8.5.0", "eslint-plugin-prettier": "4.1.0", } 2、根目录下创建.eslintrc.js
// `eslint`: EsLint的核心代码 // `eslint-plugin-vue`:[为Vue使用Eslint的插件](https://eslint.vuejs.org/) // `@typescript-eslint/parser`:ESLint的解析器,用于解析typescript,从而检查和规范Typescript代码 // `@typescript-eslint/eslint-plugin`:这是一个ESLint插件,包含了各类定义好的检测Typescript代码的规范 // "eslint": "^8.17.0", // "eslint-plugin-vue": "^9.1.0", // "vue-eslint-parser": "^9.0.2", // "@typescript-eslint/eslint-plugin": "5.30.0", // "@typescript-eslint/parser": "5.30.0", module.exports = { env: { browser: true, es2021: true, node: true, }, parser: "vue-eslint-parser", //这个不能少,要不然检测无效 //优先级低于parse的语法解析配置 parserOptions: { parser: "@typescript-eslint/parser", sourceType: "module", ecmaVersion: 2020, ecmaFeatures: { jsx: true, }, }, // 继承已有的规则 extends: [ "eslint:recommended", // 使用推荐的eslint "plugin:vue/vue3-recommended", // 使用插件支持vue3 //使用ts eslint "plugin:@typescript-eslint/recommended", // "prettier", ], // eslint-plugin-vue plugins: [ "vue", // 引入vue的插件 vue <==> eslint-plugin-vue // 这个包需要安装了第7步的三个包再引入 "prettier", // 引入规范插件 prettier "@typescript-eslint", ], overrides: [ { files: [ "*.js", "*.jsx", "*.vue", "src/**/*.js", "src/**/*.vue", "src/*.js", "src/*.vue", ], rules: { "no-undef": "off", }, }, ], globals: { defineProps: "readonly", defineEmits: "readonly", defineExpose: "readonly", withDefaults: "readonly", }, // 这里时配置规则的,自己看情况配置 rules: { // js/ts // camelcase: ["error", { properties: "never" }], // 要求使用骆驼拼写法命名约定,不检查属性名称 // camelcase: "warn", // 要求使用骆驼拼写法命名约定 // "no-console": "warn", // 禁止出现console "no-debugger": "warn", // 禁止出现debugger "no-duplicate-case": "warn", // 禁止出现重复case // "no-empty": "warn", // 禁止出现空语句块 // "no-extra-parens": "warn", // 禁止不必要的括号 "no-func-assign": "warn", // 禁止对Function声明重新赋值 "no-unreachable": "warn", // 禁止出现[return|throw]之后的代码块 // "no-else-return": "warn", // 禁止if语句中return语句之后有else块 // "no-empty-function": "warn", // 禁止出现空的函数块 "no-lone-blocks": "warn", // 禁用不必要的嵌套块 // "no-multi-spaces": "warn", // 禁止使用多个空格 "no-redeclare": "warn", // 禁止多次声明同一变量 "no-return-assign": "warn", // 禁止在return语句中使用赋值语句 "no-return-await": "warn", // 禁用不必要的[return/await] "no-self-compare": "warn", // 禁止自身比较表达式 // "no-useless-catch": "warn", // 禁止不必要的catch子句 // "no-useless-return": "warn", // 禁止不必要的return语句 "no-multiple-empty-lines": "warn", // 禁止出现多行空行 "no-useless-call": "warn", // 禁止不必要的.call()和.apply() "no-var": "warn", // 禁止出现var用let和const代替 "no-delete-var": "off", // 允许出现delete变量的使用 "no-shadow": "off", // 允许变量声明与外层作用域的变量同名 "dot-notation": "warn", // 要求尽可能地使用点号 "default-case": "warn", // 要求switch语句中有default分支 // eqeqeq: "warn", // 要求使用 === 和 !== // curly: "warn", // 要求所有控制语句使用一致的括号风格 // "space-before-blocks": "warn", // 要求在块之前使用一致的空格 // "space-in-parens": "warn", // 要求在圆括号内使用一致的空格 // "space-infix-ops": "warn", // 要求操作符周围有空格 // "space-unary-ops": "warn", // 要求在一元操作符前后使用一致的空格 // "switch-colon-spacing": "warn", // 要求在switch的冒号左右有空格 // "arrow-spacing": "warn", // 要求箭头函数的箭头前后使用一致的空格 // "array-bracket-spacing": "warn", // 要求数组方括号中使用一致的空格 // "brace-style": "warn", // 要求在代码块中使用一致的大括号风格 indent: ["warn", 2], // 要求使用JS一致缩进2个空格 // "max-depth": ["warn", 4], // 要求可嵌套的块的最大深度4 // "max-statements": ["warn", 100], // 要求函数块最多允许的的语句数量20 // "max-nested-callbacks": ["warn", 3], // 要求回调函数最大嵌套深度3 // "max-statements-per-line": ["warn", { max: 1 }], // 要求每一行中所允许的最大语句数量 // quotes: ["warn", "single", "avoid-escape"], // 要求统一使用单引号符号 //prettier "prettier/prettier": ["error", { endOfLine: "auto" }], //结尾处空格自动 // vue "vue/no-v-html": "off", "vue/require-default-prop": "off", "vue/require-explicit-emits": "off", "vue/multi-word-component-names": "off", "vue/prefer-import-from-vue": "off", "vue/no-v-text-v-html-on-component": "off", // 取消关闭标签不能自闭合的限制设置 "vue/html-self-closing": [ "error", { html: { void: "always", normal: "always", component: "always", }, svg: "always", math: "always", }, ], // "vue/require-default-prop": 0, // 关闭属性参数必须默认值 // "vue/singleline-html-element-content-newline": 0, // 关闭单行元素必须换行符 // "vue/multiline-html-element-content-newline": 0, // 关闭多行元素必须换行符 // 要求每一行标签的最大属性不超五个 // "vue/max-attributes-per-line": ["warn", { singleline: 5 }], // 要求html标签的缩进为需要2个空格 // "vue/html-indent": [ // "warn", // 2, // { // attribute: 1, // baseIndent: 1, // closeBracket: 0, // alignAttributesVertically: true, // ignores: [], // }, // ], // ts "@typescript-eslint/no-explicit-any": "off", // 关闭定义any的错误 "@typescript-eslint/explicit-module-boundary-types": "off", "@typescript-eslint/no-non-null-assertion": "off", "@typescript-eslint/no-non-null-asserted-optional-chain": "off", "@typescript-eslint/consistent-type-imports": [ "error", { disallowTypeAnnotations: false }, ], "@typescript-eslint/ban-ts-comment": ["off", { "ts-ignore": false }], "@typescript-eslint/no-empty-function": "off", }, }; 打开vscode-setting.json:
{ "workbench.colorTheme": "Default Dark Modern", "editor.fontSize": 18, "security.workspace.trust.untrustedFiles": "open", //自动保存 "editor.formatOnSave": true, //配置路径文件名 "prettier.configPath": ".prettierrc.json", //默认格式化为prettier "editor.defaultFormatter": "esbenp.prettier-vscode", // 添加vue支持 "eslint.validate": ["javascript", "javascriptreact", "vue", "html"], // #让prettier使用eslint的代码格式进行校验 "prettier.eslintIntegration": true, "editor.codeActionsOnSave": {}, "prettier.endOfLine": "auto", "editor.indentSize": "tabSize" }3、根目录下创建.prettierrc.json
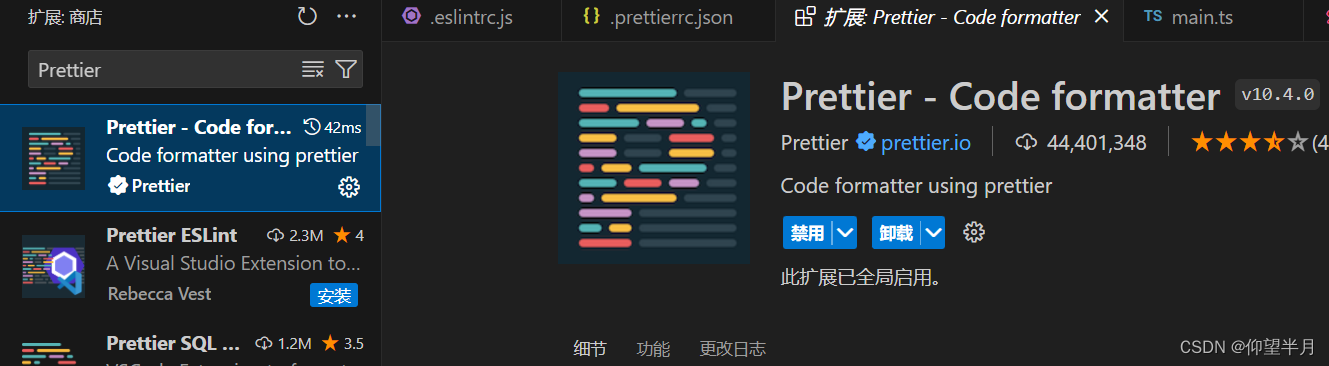
{ "useTabs": false, "tabWidth": 2, "jsxSingleQuote": false, "singleQuote": false, "endOfLine": "lf", "semi": true, "trailingComma": "es5" } 4、安装Prettier插件
找到扩展程序,安装一下:
点设置图标-扩展设置-输入 .prettierrc.json 路径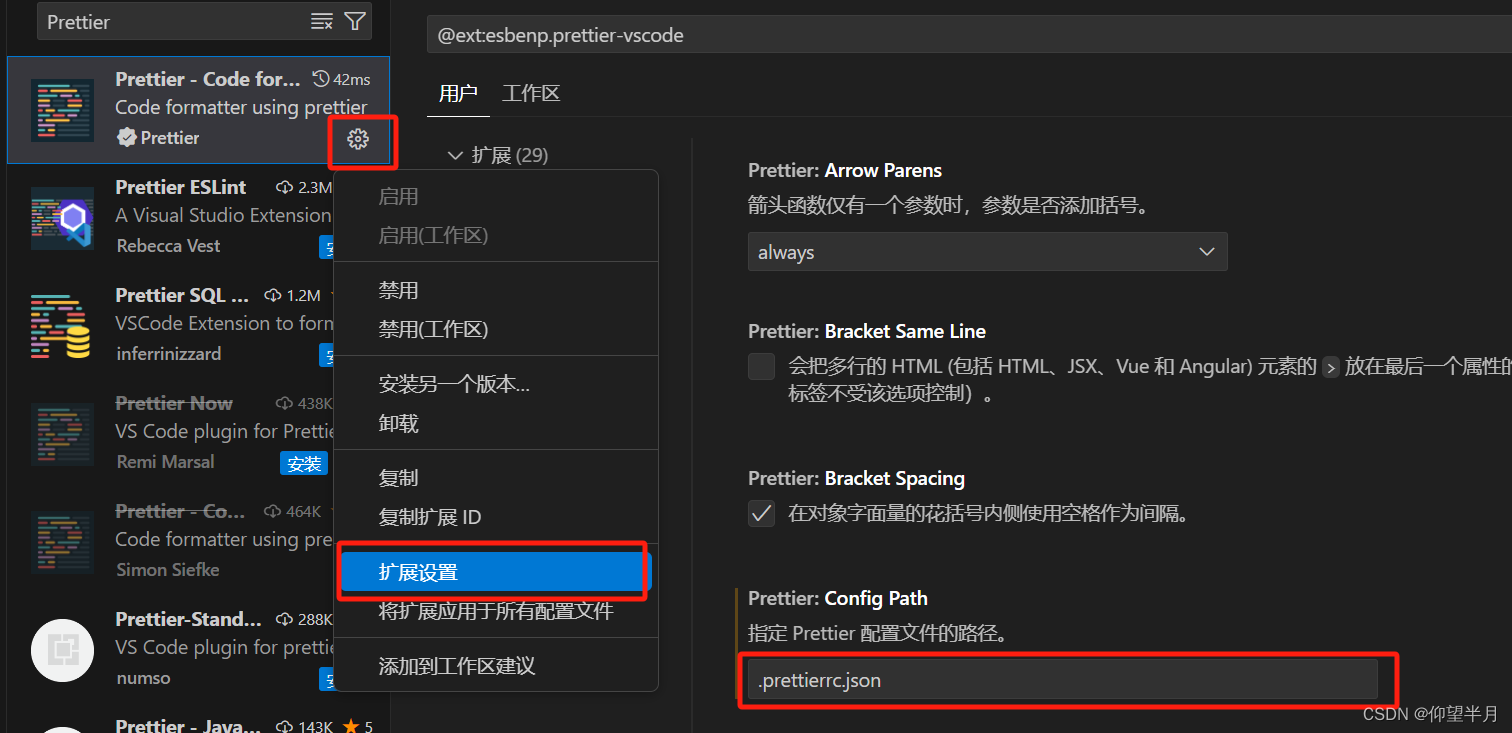
点设置-扩展-输入框输入 Default Formatter ,选择 prettier 设置为默认的格式化程序

输入框再输入 Format On Save, 勾选 在保存时格式化文件

十三、项目中遇到的问题
1、无法找到模块“xxxxxx”的声明文件
![]()
找到vite-env.d.ts 文件,添加声明:
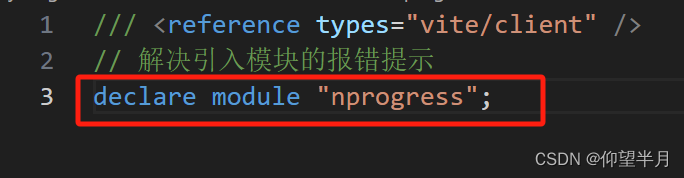
// 解决引入模块的报错提示 declare module "nprogress";2、无法找到模块“xxx.vue”的声明文件

找到vite-env.d.ts 文件,添加声明:
// 解决引入.vue模块的报错提示 declare module "*.vue" { import { DefineComponent } from "vue"; const component: DefineComponent<{}, {}, any>; export default component; }3、无法找到模块“xxx.js”的声明文件

找到vite-env.d.ts 文件,添加声明:
// 解决引入.js模块的报错提示 declare module '*.js'4、无法找到模块“vuex”的声明文件

找到tsconfig.json 文件,添加:
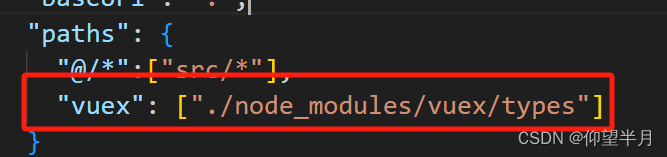
{ "compilerOptions": { ... "paths": { "vuex": ["./node_modules/vuex/types"] } ... } }使用 “paths” 映射,在找不到模块的默认路径时,将其映射到类型定义文件
好了,后面再更新吧,有用的点个赞啦~~~
关于vue2升级vue3也有一篇,都没有很全,后面再学习补充,这里放个链接:
