
阅读量:0
引言
在实际的APP开发中,我们通常会首先根据设计团队提供的视觉设计UI来构建我们的应用页面。这些设计通常是最全面和理想化的状态,因为设计师并不需要考虑用户的实际操作和交互。然而,如果我们仅仅根据这些设计进行硬编码,会在应用上线后发现许多难以处理的问题。
例如,有些功能会根据用户的身份选择性地显示或隐藏,有些功能会根据审核状态展示不同的样式,还有一些功能可能会根据运营活动来展示或撤销。如果我们通过硬编码来实现这些需求,那么在隐藏和显示某个功能时,可能需要修改大量代码来重新布局,这将极大地增加开发和维护的复杂度。
数据驱动页面布局
我们可以采用数据驱动页面布局的方案,让页面中的元素更加灵活可控,同时也使页面功能更易于扩展和维护。
案例
“Me”页是一个非常典型的案例。通常,这个页面功能复杂,元素类型多样。当我们看到这个设计时,脑海中应该已经有了大概的布局方案。接下来,我们将分别使用硬编码和数据驱动布局来实现这个页面,并分析它们之间的区别。
硬编码 - 直观布局

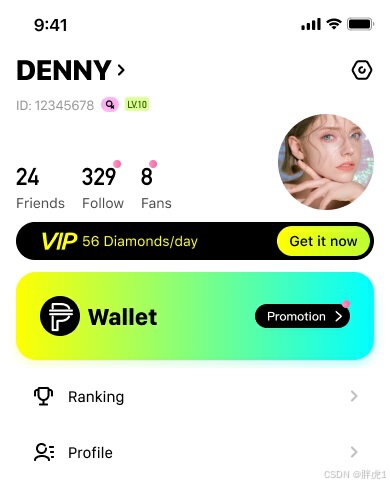
首先我们来分析一下页面结构,由于下面是重复的列表,那么很自然的我们就想到使用UITableView来实现的它,那么页面页面大致可以分为三个部分:
- 导航栏:绿色区域,这里包括了用户昵称和设置按钮。
- 列表头:红色区域,这里面包括了用户基本信息,VIP标记,钱包入口。
- 列表:蓝色区域,这里包括了Me页的所有小功能入口,比如等级,成就,榜单等等。
这么划分看起来合情合理,结构也很清晰,那我们接下来就来实现它,代码如下:
/// 列表 let tableView = UITableView(frame: .zero, style: .plain) override func viewDidLoad() { super.viewDidLoad() addNavigationBar() addTableView() addTableHeaderView() } // 设置导航栏 func addNavigationBar() { addCustomNavigationBar() } // 设置列表 func addTableView() { tableView.frame = CGRect(x: 0, y: cs_navigationBarHeight, width: CS_SCREENWIDTH, height: CS_SCREENHIGHT - cs_navigationBarHeight) tableView.delegate = self tableView.dataSource = self tableView.backgroundColor = .white tableView.separatorStyle = .none self.view.addSubview(tableView) } // 设置列表头 func addTableHeaderView() { let headerView = PHMeHeaderView() headerView.frame = CGRect(x: 0, y: 0, width: CS_SCREENWIDTH, height: 450.0) tableView.tableHeaderView = headerView } 由于我们的重点在于页面的布局方案,这里面就不展示每个元素的具体实现细节了。
总之我们已经按照设计图高度还原了UI,接下来我们来处理一下点击事件:
func tableView(_ tableView: UITableView, didSelectRowAt indexPath: IndexPath) { if indexPath.row == 0 { print("排行榜") } else if indexPath.row == 1 { print("个人资料") } else if indexPath.row == 2 { print("等级") } else if indexPath.row == 3 { print("邀请奖励") } ..... } 好万事大吉了,看起来已经可以提测验收了,这时候产品突然告诉你,我们要在加一个“任务”到列表里面的第2个位置,这时候该怎么做呢?
似乎也还好,单就点击事件来说,我们只需要以此往下移动就可以了,修改后代码如下:
func tableView(_ tableView: UITableView, didSelectRowAt indexPath: IndexPath) { if indexPath.row == 0 { print("排行榜") } else if indexPath.row == 1 { print("任务") } else if indexPath.row == 2 { print("个人资料") } else if indexPath.row == 3 { print("等级") } else if indexPath.row == 4 { print("邀请奖励") } ... } 这时候运营又要插个“活动”在第3个位置,但是只有VIP用户才显示,那我们又需要修改渲染部分和点击部分,还是单就点击事件来说,修改后代码如下:
func tableView(_ tableView: UITableView, didSelectRowAt indexPath: IndexPath) { if indexPath.row == 0 { print("排行榜") } else if indexPath.row == 1 { print("任务") } else { if isVip { if indexPath.row == 2 { print("活动列表") } else if indexPath.row == 3 { print("个人资料") } else if indexPath.row == 4 { print("等级") } else if indexPath.row == 5{ print("邀请奖励") } } else { if indexPath.row == 2 { print("个人资料") } else if indexPath.row == 3 { print("等级") } else if indexPath.row == 4{ print("邀请奖励") } } } } 哇,看起来有一点乱了,况且这还是只有一个条件,如果有多个元素需要多个条件来控制,那每次需要修改的代码可就有点吓人了。
同样地,如果红色区域的部分需要调整,那么列表头内部的元素布局也需要修改大量代码。显然,硬编码的方式虽然直观,但在面对复杂多变的需求时显得有些捉襟见肘。
数据驱动 - 灵活布局

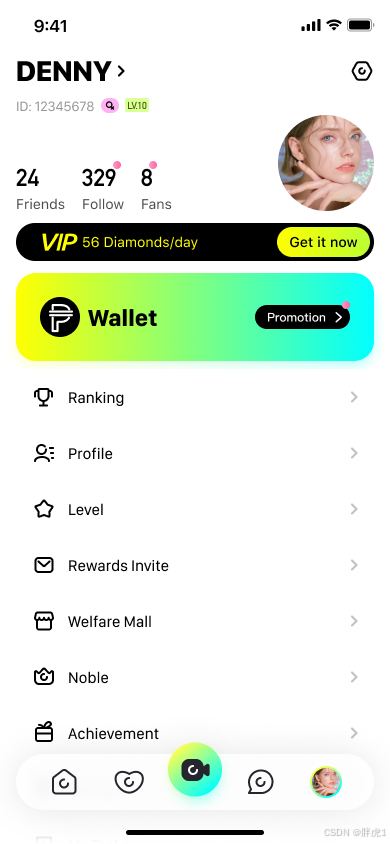
下面我们就使用数据驱动页面布局的方式再来实现这个页面。首先我们把页面的结构重新分割一下,将它们分割成更多更小的元素。
- 导航栏:蓝色区域部分,这里仍然是导航栏的保留区域。
- 用户信息:绿色部分,这里面包含了用户的基本信息。
- VIP:紫色部分,VIP入口。
- 钱包:橙色部分,钱包入口。
- 其它列表:红色部分,其它样式相同但功能不同的入口。
这样分割之后呢,我们就只需要关注导航栏和列表就可以了,导航栏的UI已经固定且已经是最小元素,应该没有不会有什么变化,那么我们就把重点放到列表上。
每一个不同的区域都是一种类型的列表元素,那我们需要提前将所有的列表类型进行注册,代码如下:
// 设置列表 func addTableView() { tableView.frame = CGRect(x: 0, y: cs_navigationBarHeight, width: CS_SCREENWIDTH, height: CS_SCREENHIGHT - cs_navigationBarHeight) tableView.delegate = self tableView.dataSource = self tableView.backgroundColor = .white tableView.separatorStyle = .none self.view.addSubview(tableView) // 注册个人信息 tableView.register(CSMeUserInfoCell.self, forCellReuseIdentifier: MeCellType.userInfo.rawValue) // 注册vip tableView.register(CSMeVipCell.self, forCellReuseIdentifier: MeCellType.vip.rawValue) // 注册钱包 tableView.register(CSMeWalletCell.self, forCellReuseIdentifier: MeCellType.wallet.rawValue) // 普通列表 tableView.register(CSMeNormalCell.self, forCellReuseIdentifier: MeCellType.normal.rawValue) } 这样列表内所有元素的样式就都已经注册完成了,接下来我们开始处理数据。
首先继承自NSObject创建一个数据模型CSMeRowItemModel,代码如下:
class CSMeRowItemModel: NSObject { /// 标题 var title:String? /// 图标 var icon:UIImage? /// cell var reuseIdentifier:String? /// 点击回调 var clickBlock:(()->Void)? } 该类里面有两个重要的数据 reuseIdentifier,列表cell的标识符,以及clickBlock一个闭包。
为了一步到位的介绍数据驱动布局的方式,我这里直接采用了分组的方式,因此还需要创建一个名为CSMeSectionItemModel的类,表示每组的数据,代码如下:
class CSMeSectionItemModel: NSObject { /// 子数据 var subArray:[CSMeRowItemModel] = [] /// 是否显示组标题 var showSectionHeader:Bool = false } 该类里面有一个主要数据就是subArray,里面保存了该组的item数据。
有了数据模型之后我们就可以开始构建数据列表了,为此我专门创建了一个CSMeConfigBuilder用来生成列表的页面数据。
生成Me页配置代码如下:
/// 生成me页配置 func buildMeConfig() -> [CSMeSectionItemModel] { var meConfig = [CSMeSectionItemModel]() // 个人信息 let profileItem = buildProfileItem() meConfig.append(profileItem) // vip let vipItem = buildVipItem() meConfig.append(vipItem) // 钱包 let walletItem = buildWalletItem() meConfig.append(walletItem) // 第一组 let oneSectionItem = buildNormalOneSectionItem() meConfig.append(oneSectionItem) // 第二组 // let twoSectionItem = buildNormalTwoSectionItem() // meConfig.append(twoSectionItem) // return meConfig }而构建item列表的方法都大同小异,我就来列举两个吧,
构建钱包item,代码如下:
// 生成钱包 func buildWalletItem() -> CSMeSectionItemModel { let sectionItemModel = CSMeSectionItemModel() let walletItemModel = CSMeRowItemModel() walletItemModel.reuseIdentifier = MeCellType.wallet.rawValue walletItemModel.clickBlock = { // 钱包 CSRouter.shared.route(path: CSRouterUrlMeWalletRecharge) // CSRouter.shared.route(path: CSRouterUrlShortVideoWallet) } sectionItemModel.subArray.append(walletItemModel) return sectionItemModel } 构建通用样式item,代码如下:
// 第一组 func buildNormalOneSectionItem() -> CSMeSectionItemModel { let sectionItemModel = CSMeSectionItemModel() // 排行榜 let rankItemModel = CSMeRowItemModel() rankItemModel.reuseIdentifier = MeCellType.normal.rawValue rankItemModel.title = "Ranking" rankItemModel.icon = UIImage(named: "me_item_ranking_icon") rankItemModel.clickBlock = { // 检查 是否是游客登录 if CSTouristHelper.shared.checkTouristLogin(loginSuccess: nil) { return } // 跳转排行榜 CSRouter.shared.route(path: CSRouterUrlHomeRank) } sectionItemModel.subArray.append(rankItemModel) // 个人信息 let personalInfoItemModel = CSMeRowItemModel() personalInfoItemModel.reuseIdentifier = MeCellType.normal.rawValue personalInfoItemModel.title = "Personal Information" personalInfoItemModel.icon = UIImage(named: "me_item_personal_info_icon") personalInfoItemModel.clickBlock = { // 个人页 guard let uid = CSAccountManager.shared.account?.user?.id else { return } var params = [String:Any]() params["uid"] = uid CSRouter.shared.route(path: CSRouterUrlMeProfile,params: params) } sectionItemModel.subArray.append(personalInfoItemModel) // 等级 let levelItemModel = CSMeRowItemModel() levelItemModel.reuseIdentifier = MeCellType.normal.rawValue levelItemModel.title = "Level" levelItemModel.icon = UIImage(named: "me_item_level_icon") levelItemModel.clickBlock = { //等级 CSRouter.shared.route(path: CSRouterUrlMeLevel) } sectionItemModel.subArray.append(levelItemModel) // 邀请奖励 let inviteItemModel = CSMeRowItemModel() inviteItemModel.reuseIdentifier = MeCellType.normal.rawValue inviteItemModel.title = "Rewards Invite" inviteItemModel.icon = UIImage(named: "me_item_invite_icon") inviteItemModel.clickBlock = { //邀请 CSRouter.shared.route(path: CSRouterUrlMeInvite) } sectionItemModel.subArray.append(inviteItemModel) .... return sectionItemModel }接下来在页面控制器内我们只需要读取配置列表,使用列表数据直接渲染列表。
读取配置列表:
/// 配置 let configBuiler = CSMeConfigBuilder() /// 配置列表 var configList = [CSMeSectionItemModel]() func initData() { configList = configBuiler.buildMeConfig() } 使用列表数据渲染UI:
func numberOfSections(in tableView: UITableView) -> Int { return configList.count } func tableView(_ tableView: UITableView, numberOfRowsInSection section: Int) -> Int { if section >= configList.count { CSAssert(false, "CSMeViewController section >= configList.count") return 0 } let sectionItemModel = configList[section] return sectionItemModel.subArray.count } func tableView(_ tableView: UITableView, cellForRowAt indexPath: IndexPath) -> UITableViewCell { let sectionItemModel = configList[indexPath.section] let itemModel = sectionItemModel.subArray[indexPath.row] let cell = tableView.dequeueReusableCell(withIdentifier: itemModel.reuseIdentifier!, for: indexPath) cell.selectionStyle = .none // 个人信息 if let userInfoCell = cell as? CSMeUserInfoCell { userInfoCell.renderUserInfo() } // 普通cell if let normalCell = cell as? CSMeNormalCell { normalCell.renderData(itemModel) } return cell } 只需要这样做,页面就会根据我们配置好的数据渲染出来了。接下来就是处理点击事件,这就更容易了,因为我们已经把事件和数据绑定到了一起,我们只需要获取对应的数据,然后来调用它的闭包,代码如下:
func tableView(_ tableView: UITableView, didSelectRowAt indexPath: IndexPath) { let sectionItemModel = configList[indexPath.section] let itemModel = sectionItemModel.subArray[indexPath.row] itemModel.clickBlock?() } 我们不需要添加任何判断,就可以把点击事件对应到我们想要的功能。
而且当页面需要添加元素,或者隐藏元素,哪怕是动态的显示和隐藏元素,我们都只需要操作CSMeConfigBuilder里面构建生成页面数据的方法,而不需要修改任何UI,除非是增加新的样式。
结语
通过这个典型的“Me”页案例,我们分别使用硬编码和数据驱动布局来实现页面构建。通过对比可以发现,在实际开发过程中,使用数据驱动页面布局的方式更加灵活且更容易扩展。每一个小元素都拥有完整的功能,在添加或删除时,我们只需要对数据略微进行修改,而不需要大幅度修改约束代码或添加大量的条件判断。这不仅提高了开发效率,也增强了代码的可维护性。
