
阅读量:0
文章目录
一,引入Mybatis Plus分页插件
基于代码生成工具生成的代码,有最基本的增删改查功能,但有很多功能待完善。
打开品牌管理界面,页面底部的分页就有问题,后端没有返回正确的分页数据。
在product模块下增加MybatisPlus分页配置。

@Configuration @EnableTransactionManagement //开启事务 @MapperScan("com.atguigu.gulimall.product.dao") public class MyBatisConfig { //引入分页插件 @Bean public PaginationInterceptor paginationInterceptor() { PaginationInterceptor paginationInterceptor = new PaginationInterceptor(); // 设置请求的页面大于最大页后操作, true调回到首页,false 继续请求 默认false paginationInterceptor.setOverflow(true); // 设置最大单页限制数量,默认 500 条,-1 不受限制 paginationInterceptor.setLimit(1000); return paginationInterceptor; } } 二,品牌列表的模糊查询
@Override public PageUtils queryPage(Map<String, Object> params) { //1、获取key String key = (String) params.get("key"); QueryWrapper<BrandEntity> queryWrapper = new QueryWrapper<>(); if(StrUtil.isNotEmpty(key)){ queryWrapper.eq("brand_id",key).or().like("name",key); } IPage<BrandEntity> page = this.page( new Query<BrandEntity>().getPage(params), queryWrapper ); return new PageUtils(page); } 三,增加品牌测试数据
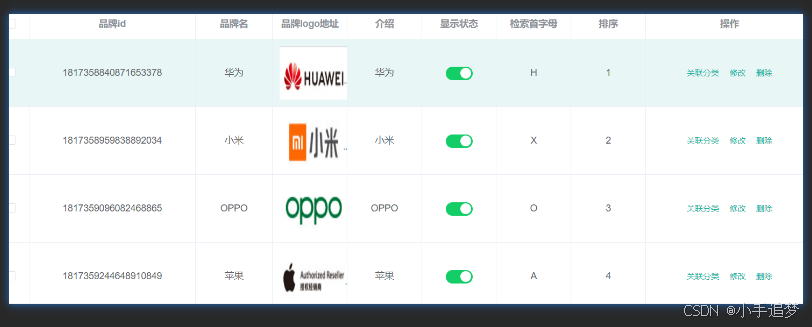
把之前的品牌数据删除,新增4条数据。
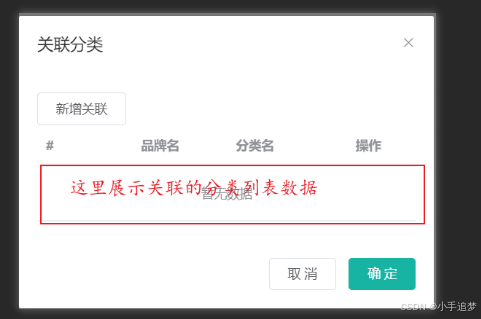
四,开发后台品牌关联分类接口
前端已经开发后,直接copy代码即可。
用课程资料中的文件替换掉工程中下图两个文件夹中的所有内容。
1,接口product/categorybrandrelation/catelog/list
这个接口的功能是根据brandId查询其关联的所有分类,结果用于在列表中展示。
接口代码如下。
@RequestMapping("catelog/list") public R list(@RequestParam Map<String, Object> params){ List<CategoryBrandRelationEntity> list = categoryBrandRelationService .list(new QueryWrapper<CategoryBrandRelationEntity>() .eq("brand_id", params.get("brandId")) ); return R.ok().put("data", list); } 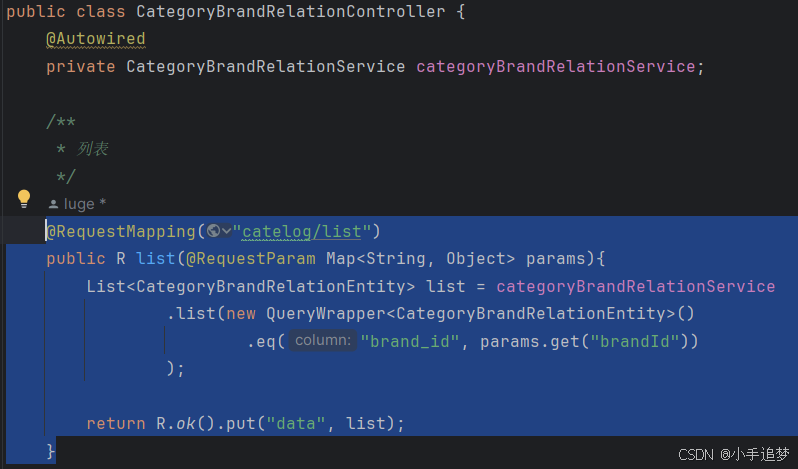
2,接口product/categorybrandrelation/save
这个接口用来保存品牌和分类的关系。
@RequestMapping("/save") public R save(@RequestBody CategoryBrandRelationEntity categoryBrandRelation){ categoryBrandRelationService.saveDetail(categoryBrandRelation); return R.ok(); } 接口调用CategoryBrandRelationService的新方法saveDetail,具体实现如下。
@Override public void saveDetail(CategoryBrandRelationEntity categoryBrandRelation) { Long brandId = categoryBrandRelation.getBrandId(); Long catelogId = categoryBrandRelation.getCatelogId(); //1、查询详细名字 BrandEntity brandEntity = brandDao.selectById(brandId); CategoryEntity categoryEntity = categoryDao.selectById(catelogId); categoryBrandRelation.setBrandName(brandEntity.getName()); categoryBrandRelation.setCatelogName(categoryEntity.getName()); this.save(categoryBrandRelation); } 在这里,我们冗余了分类和品牌的名称,为的查询时不用管理品牌表和分类表就能查询到品牌名称和分类名称。这是一种在实际工作中常用的性能优化手段,查询时尽量避免表的join。
当然,这样做也是有风险的,如果品牌表的品牌名称更新,但关联表的品牌名称没有及时可惜,就会出现数据不一致。
针对这个问题,可以采取一些手段来保持数据的一致性。比如在分类和品牌的更新接口中,增加更新关联表的冗余字段的逻辑。
品牌更新: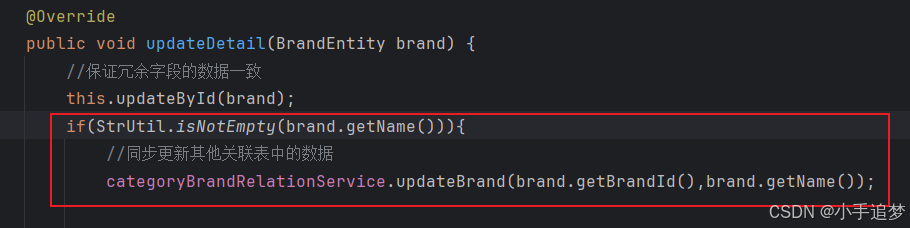
分类更新: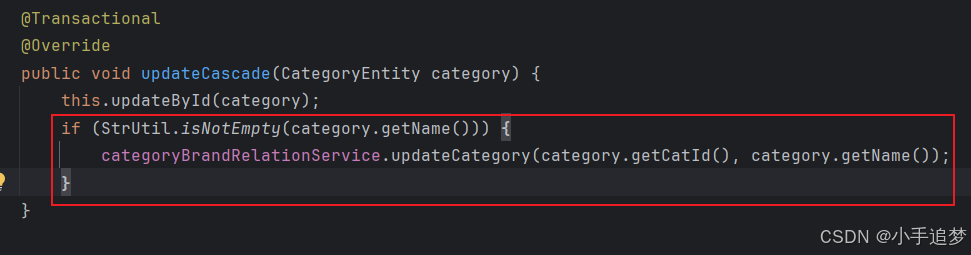
前端丢失Long类型精度问题
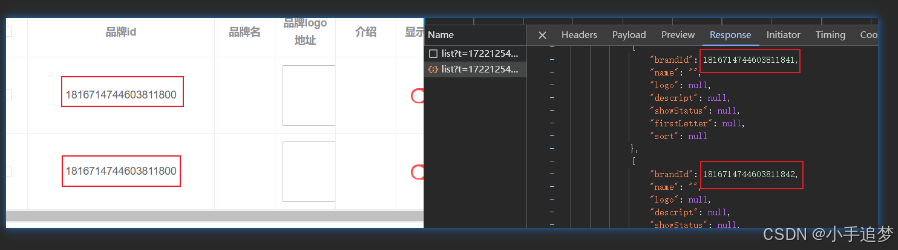
开发商城管理系统的品牌管理界面时,发现一个问题,接口返回品牌Id和页面展示的品牌Id不一致,如接口返回的是1816714744603811841,前端展示的是1816714744603811800。
前端出现Long类型的精度丢失。
精度丢失的具体原因:
JavaScript的Number类型用于表示浮点数,它遵循IEEE 754标准中的64位浮点数格式。这意味着它能够准确表示从(-2{53})到(2{53}-1)之间的所有整数。超出这个范围的整数值在转换为Number类型时可能会发生精度丢失,即原本不同的长整数会被转换成相同的浮点数值,从而导致数据失真。
解决办法:
后端将Long类型转换为String类型。
为此,后端可以增加一个全局配置,在序列化时完成这个任务。
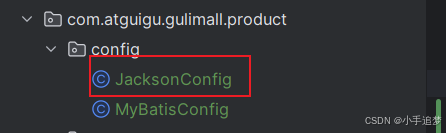
import com.fasterxml.jackson.databind.ObjectMapper; import com.fasterxml.jackson.databind.module.SimpleModule; import com.fasterxml.jackson.databind.ser.std.ToStringSerializer; import org.springframework.boot.autoconfigure.condition.ConditionalOnMissingBean; import org.springframework.context.annotation.Bean; import org.springframework.context.annotation.Configuration; import org.springframework.context.annotation.Primary; import org.springframework.http.converter.json.Jackson2ObjectMapperBuilder; @Configuration public class JacksonConfig { @Bean @Primary @ConditionalOnMissingBean(ObjectMapper.class) public ObjectMapper jacksonObjectMapper(Jackson2ObjectMapperBuilder builder) { ObjectMapper objectMapper = builder.createXmlMapper(false).build(); SimpleModule simpleModule = new SimpleModule(); // 将Long类型序列化为String类型 simpleModule.addSerializer(Long.class, ToStringSerializer.instance); objectMapper.registerModule(simpleModule); return objectMapper; } } 