
阅读量:0
1 GPIO 操作回顾
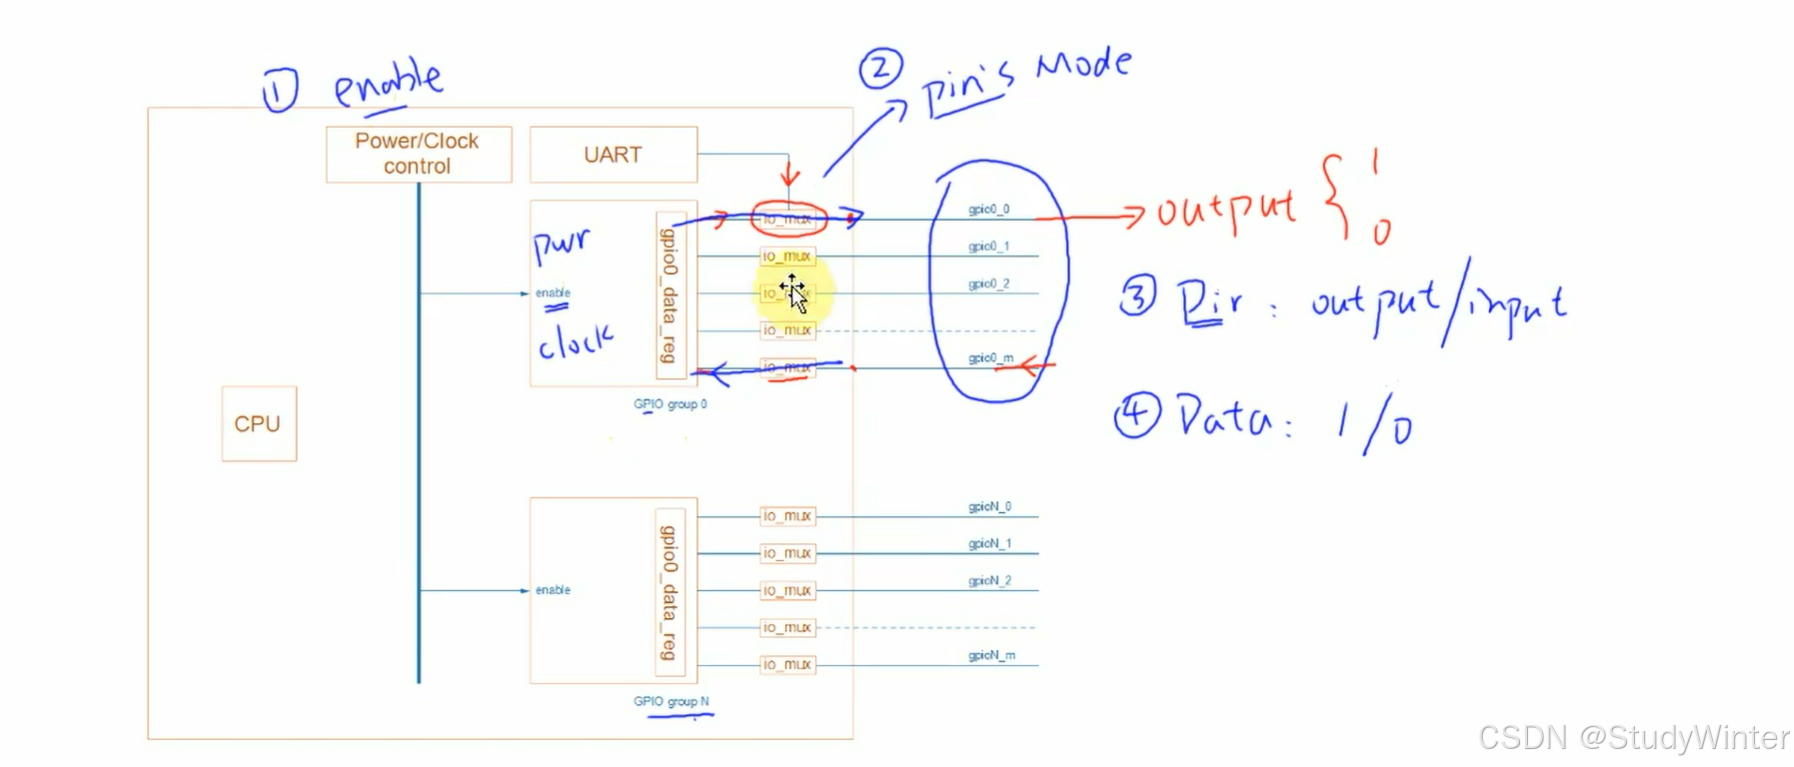
(1)使能模块;
(2)设置引脚的模式(工作于GPIO模式);
(3)设置GPIO本身(输入/输出);
(4)GPIO作为输入引脚时,读某个data寄存器获得引脚的电平。
2 百问网 STM32MP157 的按键驱动程序(查询方式)
在 STM32MP157 开发板上,我们为它设计了 2 个按键。
2.1 先看原理图确定引脚及操作方法
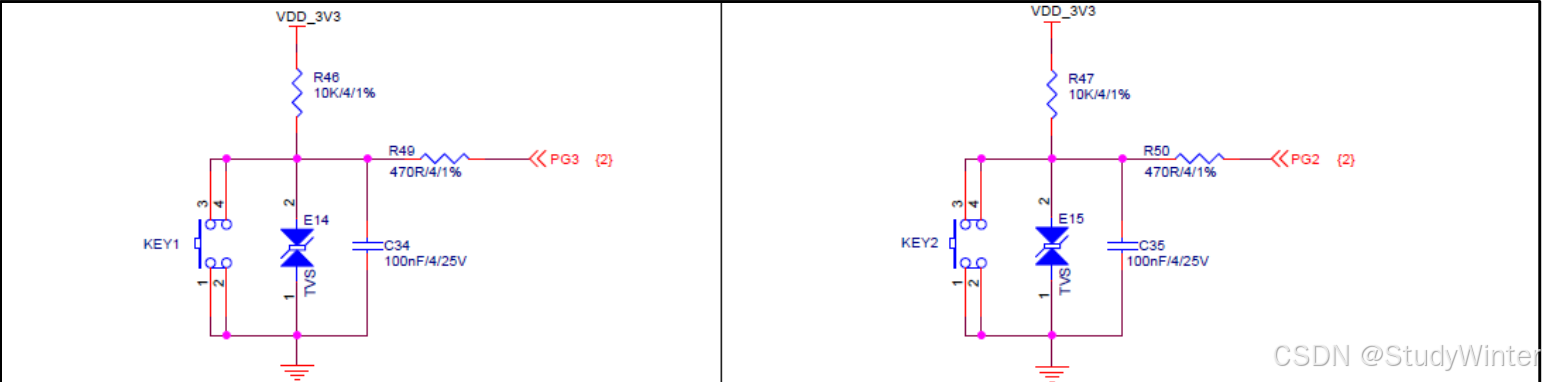
平时按键电平为低,按下按键后电平为高。
按键引脚为 GPIOG_IO03、 GPIOG_IO02。
2.2 再看芯片手册确定寄存器及操作方法
步骤1:使能GPIOG
下图为针对 APU 的 GPIOA 至 K 的时钟使能寄存器,低11位有效。为了使用GPIOG,我们需要将对应的 b[6]位设置为 1
英文明明写的是MPU
MPU/MCU -- Microprocessor/Micro controller Unit, 微处理器/微控制器,一般用于低计算应用的RISC计算机体系架构产品,如ARM-M系列处理器。
APU、BPU、CPU、DPU、FPU、GPU、HPU、IPU、MPU、NPU、RPU、TPU、VPU、WPU、XPU、ZPU 都是什么? - 一杯清酒邀明月 - 博客园 (cnblogs.com)
地址偏移量:0xA28
复位值:0x0000 0000该寄存器用于将相应外设的外设时钟使能位设置为“1”。它将用于为MPU分配外设。写“0”没有作用,读有作用,返回相应位的有效值。写入'1'将相应的位设置为'1'
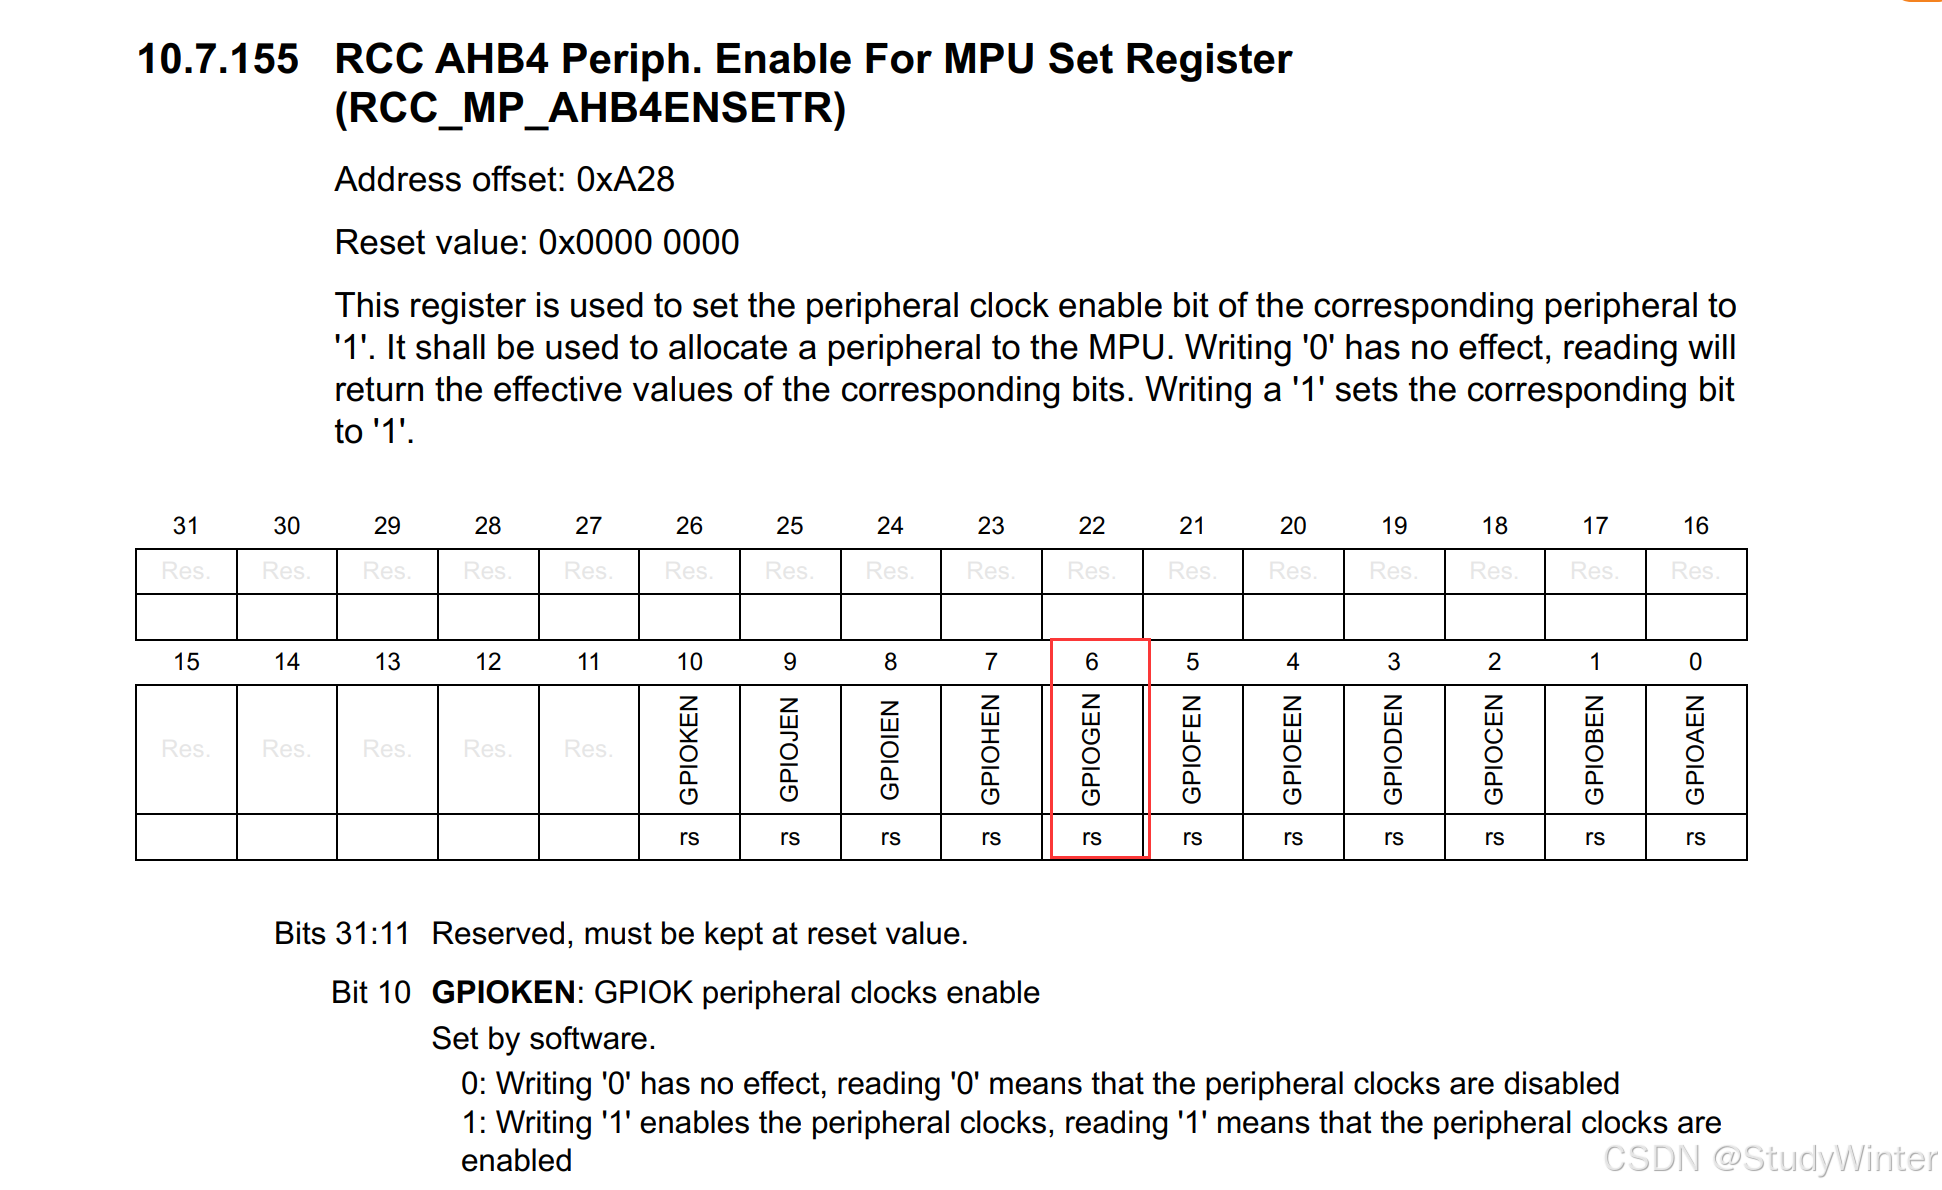
Bits 31:11保留,必须保持在复位值。
bit10 GPIOKEN: GPIOK外设时钟使能软件设置。
0:写“0”无效,读“0”表示禁用外设时钟
1:写“1”使能外设时钟,读“1”使能外设时钟其他位一样
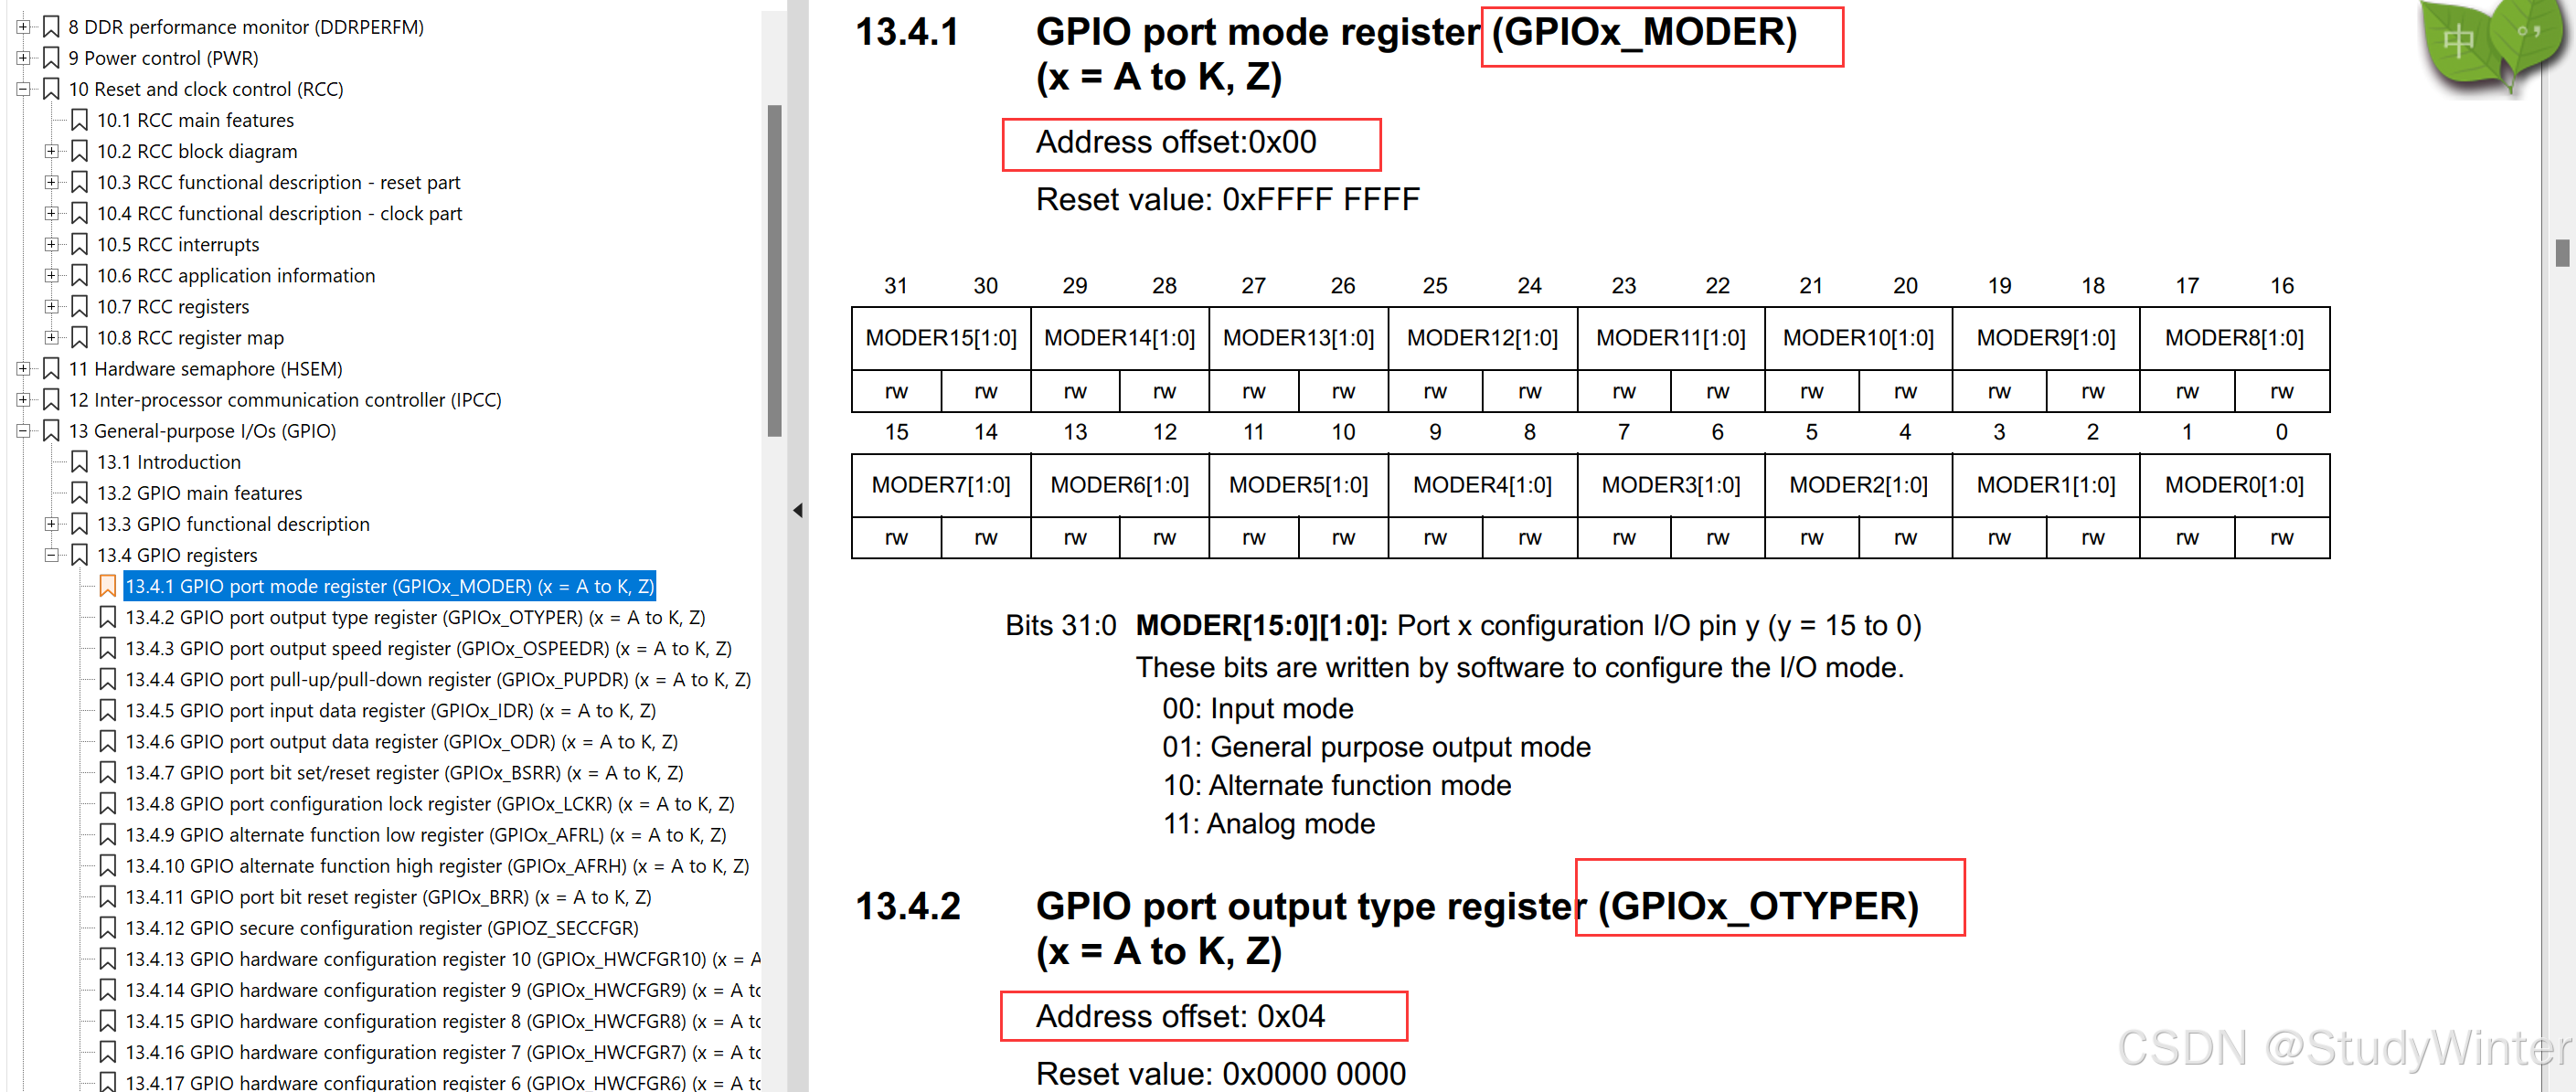
步骤2:设置GPIOG_IO03、 GPIOG_IO02为GPIO输入模式
GPIOx_MODER用于配置GPIO的模式,包括输入、通用输出、多功能和模拟共四种模式。该寄存器共32位,涉及16个GPIO,每个GPIO对应 2 位。GPIOx_MODER 的各位定义如下,在这里分别选择00和01两种,各自对应输入和输出模式。(上电默认为输入悬空模式)。其中 00 对应输入功能, 01 对应输出功能
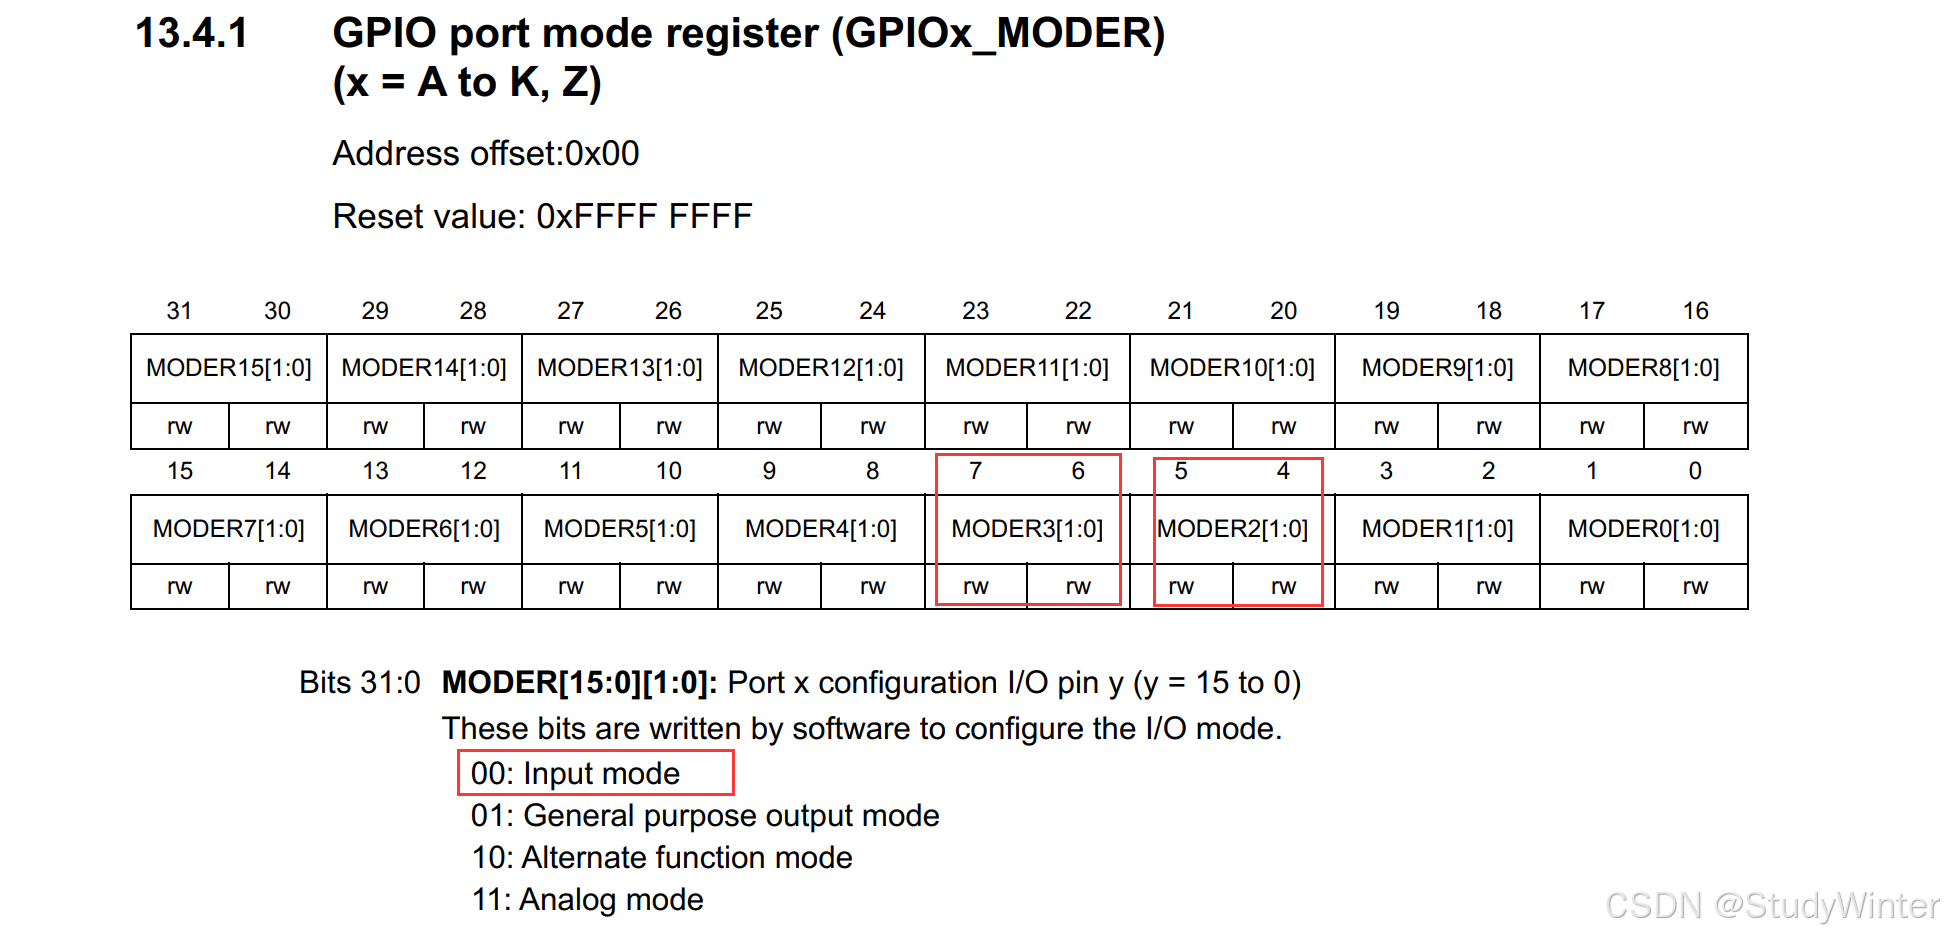
设置 b[7:6]为00就可以配置GPIOG_IO03为输入模式,
配置 b[5:4]为00就可以配置GPIOG_IO02为输入模式。
步骤 3:读取GPIOG_IO02、GPIOG_IO03引脚电平
寄存器地址为:

在参考手册搜关键字gpio
读取 IDR 寄存器获取引脚状态寄存器,得到引脚电平

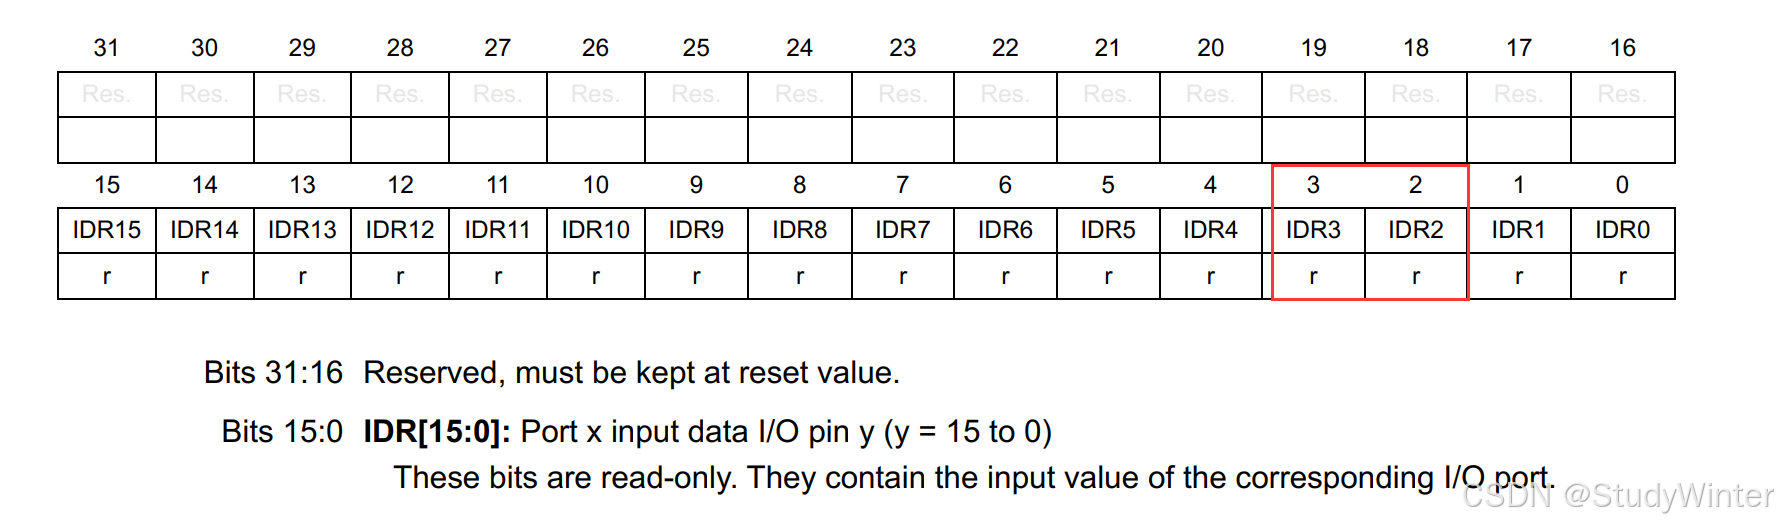
Bits 31:16保留,必须保持复位值。
bit 15:0 IDR[15:0]:端口x输入数据I/O引脚y (y = 15 ~ 0),这些位是只读的。它们包含相应I/O端口的输入值。
3 代码
board_drv.c
#include <linux/module.h> #include <linux/errno.h> #include <linux/kernel.h> #include <linux/major.h> #include <linux/sched.h> #include <linux/slab.h> #include <linux/fcntl.h> #include <linux/fs.h> #include <linux/signal.h> #include <linux/mutex.h> #include <linux/mm.h> #include <linux/timer.h> #include <linux/wait.h> #include <linux/skbuff.h> #include <linux/proc_fs.h> #include <linux/poll.h> #include <linux/capi.h> #include <linux/kernelcapi.h> #include <linux/init.h> #include <linux/device.h> #include <linux/moduleparam.h> #include "button_drv.h" // 1主设备号 static int major = 0; static struct class* button_class; static struct button_operations *p_button_operations; void register_button_operations(struct button_operations *opr) { int i; p_button_operations = opr; for (i = 0; i < opr->count; i++) { device_create(button_class, NULL, MKDEV(major, i), NULL, "winter_button@%d", i); } } void unregister_button_operations(void) { int i; for (i = 0; i < p_button_operations->count; i++) { device_destroy(button_class, MKDEV(major, i)); } } EXPORT_SYMBOL(register_button_operations); EXPORT_SYMBOL(unregister_button_operations); // 3实现open/read函数 static int button_open (struct inode *inode, struct file *file) { int minor = iminor(inode); // 利用此设备号初始化 p_button_operations->init(minor); return 0; } static ssize_t button_read (struct file *file, char __user *buf, size_t size, loff_t *off) { unsigned int minor = iminor(file_inode(file)); char level; int err; level = p_button_operations->read(minor); // 将内核数据拷贝到用户空间,也就是读数据 err = copy_to_user(buf, &level, 1); return 1; } // 2file_operations结构体 static struct file_operations button_operations = { .open = button_open, .read = button_read, }; // 4在入口函数中注册file_operations结构体 int button_init(void) { // 注册file_operations结构体 major = register_chrdev(0, "winter_button", &button_operations); // 注册结点 button_class = class_create(THIS_MODULE, "winter_button"); if (IS_ERR(button_class)) return -1; return 0; } // 出口函数 void button_exit(void) { class_destroy(button_class); unregister_chrdev(major, "winter_button"); } module_init(button_init); module_exit(button_exit); MODULE_LICENSE("GPL"); board_drv.h
#ifndef BUTTON_DRV_H #define BUTTON_DRV_H struct button_operations { int count; void (*init) (int which); int (*read) (int which); }; void register_button_operations(struct button_operations *opr); void unregister_button_operations(void); #endif board_xxx.c
#include <linux/module.h> #include <linux/errno.h> #include <linux/kernel.h> #include <linux/major.h> #include <linux/sched.h> #include <linux/slab.h> #include <linux/fcntl.h> #include <linux/fs.h> #include <linux/signal.h> #include <linux/mutex.h> #include <linux/mm.h> #include <linux/timer.h> #include <linux/wait.h> #include <linux/skbuff.h> #include <linux/proc_fs.h> #include <linux/poll.h> #include <linux/capi.h> #include <linux/kernelcapi.h> #include <linux/init.h> #include <linux/device.h> #include <linux/moduleparam.h> #include "button_drv.h" static void board_xxx_button_init_gpio (int which) { printk("%s %s %d, init gpio for button %d\n", __FILE__, __FUNCTION__, __LINE__, which); } static int board_xxx_button_read_gpio (int which) { printk("%s %s %d, read gpio for button %d\n", __FILE__, __FUNCTION__, __LINE__, which); return 1; } static struct button_operations my_buttons_ops ={ .count = 2, .init = board_xxx_button_init_gpio, .read = board_xxx_button_read_gpio, }; int board_xxx_button_init(void) { register_button_operations(&my_buttons_ops); return 0; } void board_xxx_button_exit(void) { unregister_button_operations(); } module_init(board_xxx_button_init); module_exit(board_xxx_button_exit); MODULE_LICENSE("GPL"); board_test.c
#include <sys/types.h> #include <sys/stat.h> #include <fcntl.h> #include <unistd.h> #include <stdio.h> #include <string.h> /* * ./button_test /dev/100ask_button0 * */ int main(int argc, char **argv) { int fd; char val; /* 1. 判断参数 */ if (argc != 2) { printf("Usage: %s <dev>\n", argv[0]); return -1; } /* 2. 打开文件 */ fd = open(argv[1], O_RDWR); if (fd == -1) { printf("can not open file %s\n", argv[1]); return -1; } /* 3. 写文件 */ read(fd, &val, 1); printf("get button : %d\n", val); close(fd); return 0; } 上面4个和之前的都一样,主要不同在board_100ask_stm32mp157.c
主要看 board_100ask_stm32mp157-pro.c。涉及的寄存器挺多,一个一个去执行 ioremap 效率太低。先定义结构体,然后对结构体指针进行 ioremap。对于 GPIO,可以如下定义:
struct stm32mp157_gpio { volatile unsigned int MODER; /*!< GPIO port mode register, Address offset: 0x00 */ volatile unsigned int OTYPER; /*!< GPIO port output type register, Address offset: 0x04 */ volatile unsigned int OSPEEDR; /*!< GPIO port output speed register, Address offset: 0x08 */ volatile unsigned int PUPDR; /*!< GPIO port pull-up/pull-down register, Address offset: 0x0C */ volatile unsigned int IDR; /*!< GPIO port input data register, Address offset: 0x10 */ volatile unsigned int ODR; /*!< GPIO port output data register, Address offset: 0x14 */ volatile unsigned int BSRR; /*!< GPIO port bit set/reset, Address offset: 0x18 */ volatile unsigned int LCKR; /*!< GPIO port configuration lock register, Address offset: 0x1C */ volatile unsigned int AFR[2]; /*!< GPIO alternate function registers, Address offset: 0x20-0x24 */ } ;这个顺序是按照偏移量列出的
看一个驱动程序,先看它的入口函数, 下列代码向上层驱动注册一个button_operations 结构体,代码如下。
static struct button_operations my_buttons_ops = { .count = 2, .init = board_stm32mp157_button_init, .read = board_stm32mp157_button_read, }; // 入口函数 int board_stm32mp157_button_drv_init(void) { register_button_operations(&my_buttons_ops); return 0; } void board_stm32mp157_button_drv_exit(void) { unregister_button_operations(); }button_operations 结 构 体 中 有 init 函 数 指 针 , 它 指 向board_stm32mp157_button_init 函数,在里面将会初始化 LED 引脚:使能、设置为 GPIO 模式、设置为输出引脚。代码如下。
值得关注的下列代码中对 ioremap 函数的使用,它们是得到寄存器的虚拟地址,以后使用虚拟地址访问寄存器。
/* RCC_PLL4CR */ static volatile unsigned int *RCC_PLL4CR; /* RCC_MP_AHB4ENSETR */ static volatile unsigned int *RCC_MP_AHB4ENSETR; /* KEY1: PG3, KEY2: PG2 */ static struct stm32mp157_gpio *gpiog; /* 初始化button, which-哪个button */ static void board_stm32mp157_button_init (int which) { // 没有使能 if (!RCC_PLL4CR) { RCC_PLL4CR = ioremap(0x50000000 + 0x894, 4); RCC_MP_AHB4ENSETR = ioremap(0x50000000 + 0xA28, 4); gpiog = ioremap(0x50008000, sizeof(struct stm32mp157_gpio)); } if (which == 0) { /* 1. enable PLL4 * CG15, b[31:30] = 0b11 */ *RCC_PLL4CR |= (1<<0); while((*RCC_PLL4CR & (1<<1)) == 0); /* 2. enable GPIOG */ *RCC_MP_AHB4ENSETR |= (1<<6); /* 3. 设置PG3为GPIO模式, 输入模式 */ gpiog->MODER &= ~(3<<6); } else if(which == 1) { /* 1. enable PLL4 * CG15, b[31:30] = 0b11 */ *RCC_PLL4CR |= (1<<0); while((*RCC_PLL4CR & (1<<1)) == 0); /* 2. enable GPIOG */ *RCC_MP_AHB4ENSETR |= (1<<6); /* 3. 设置PG2为GPIO模式, 输入模式 */ gpiog->MODER &= ~(3<<4); } }button_operations 结 构 体 中 还 有 有 read 函 数 指 针 , 它 指 向board_stm32mp157_button_read 函数,在里面将会读取并返回按键引脚的电平。代码如下
static int board_stm32mp157_button_read (int which) /* 读button, which-哪个 */ { //printk("%s %s line %d, button %d, 0x%x\n", __FILE__, __FUNCTION__, __LINE__, which, *GPIO1_DATAIN); if (which == 0) return (gpiog->IDR & (1<<3)) ? 1 : 0; else return (gpiog->IDR & (1<<2)) ? 1 : 0; }参考:韦东山嵌入式linux系列-LED驱动程序-CSDN博客
board_100ask_stm32mp157.c
#include <linux/module.h> #include <linux/fs.h> #include <linux/io.h> #include <linux/errno.h> #include <linux/miscdevice.h> #include <linux/kernel.h> #include <linux/major.h> #include <linux/mutex.h> #include <linux/proc_fs.h> #include <linux/seq_file.h> #include <linux/stat.h> #include <linux/init.h> #include <linux/device.h> #include <linux/tty.h> #include <linux/kmod.h> #include <linux/gfp.h> #include <asm/io.h> #include "button_drv.h" /* RCC_PLL4CR */ static volatile unsigned int* RCC_PLL4CR; /* RCC_MP_AHB4ENSETR */ static volatile unsigned int* RCC_MP_AHB4ENSETR; /* KEY1: PG3, KEY2: PG2 */ static struct stm32mp157_gpio* gpiog; struct stm32mp157_gpio { volatile unsigned int MODER; /*!< GPIO port mode register, Address offset: 0x00 */ volatile unsigned int OTYPER; /*!< GPIO port output type register, Address offset: 0x04 */ volatile unsigned int OSPEEDR; /*!< GPIO port output speed register, Address offset: 0x08 */ volatile unsigned int PUPDR; /*!< GPIO port pull-up/pull-down register, Address offset: 0x0C */ volatile unsigned int IDR; /*!< GPIO port input data register, Address offset: 0x10 */ volatile unsigned int ODR; /*!< GPIO port output data register, Address offset: 0x14 */ volatile unsigned int BSRR; /*!< GPIO port bit set/reset, Address offset: 0x18 */ volatile unsigned int LCKR; /*!< GPIO port configuration lock register, Address offset: 0x1C */ volatile unsigned int AFR[2]; /*!< GPIO alternate function registers, Address offset: 0x20-0x24 */ }; /* 初始化button, which-哪个button */ static void board_stm32mp157_button_init (int which) { if (!RCC_PLL4CR) { RCC_PLL4CR = ioremap(0x50000000 + 0x894, 4); RCC_MP_AHB4ENSETR = ioremap(0x50000000 + 0xA28, 4); gpiog = ioremap(0x50008000, sizeof(struct stm32mp157_gpio)); } if (which == 0) { /* 1. enable PLL4 * CG15, b[31:30] = 0b11 */ *RCC_PLL4CR |= (1<<0); while((*RCC_PLL4CR & (1<<1)) == 0); /* 2. enable GPIOG */ *RCC_MP_AHB4ENSETR |= (1<<6); /* 3. 设置PG3为GPIO模式, 输入模式 */ gpiog->MODER &= ~(3<<6); } else if(which == 1) { /* 1. enable PLL4 * CG15, b[31:30] = 0b11 */ *RCC_PLL4CR |= (1<<0); while((*RCC_PLL4CR & (1<<1)) == 0); /* 2. enable GPIOG */ *RCC_MP_AHB4ENSETR |= (1<<6); /* 3. 设置PG2为GPIO模式, 输入模式 */ gpiog->MODER &= ~(3<<4); } } /* 读button, which-哪个 */ static int board_stm32mp157_button_read (int which) { //printk("%s %s line %d, button %d, 0x%x\n", __FILE__, __FUNCTION__, __LINE__, which, *GPIO1_DATAIN); if (which == 0) { return (gpiog->IDR & (1<<3)) ? 1 : 0; } else { return (gpiog->IDR & (1<<2)) ? 1 : 0; } } static struct button_operations my_buttons_ops = { .count = 2, .init = board_stm32mp157_button_init, .read = board_stm32mp157_button_read, }; int board_stm32mp157_button_drv_init(void) { register_button_operations(&my_buttons_ops); return 0; } void board_stm32mp157_button_drv_exit(void) { unregister_button_operations(); } module_init(board_stm32mp157_button_drv_init); module_exit(board_stm32mp157_button_drv_exit); MODULE_LICENSE("GPL"); 编译
4 测试
在开发板挂载 Ubuntu 的NFS目录
mount -t nfs -o nolock,vers=3 192.168.5.11:/home/book/nfs_rootfs/ /mnt将ko文件和测试代码拷贝到挂载目录,安装驱动
insmod button_drv.ko insmod board_100ask_stm32mp157.ko 
执行测试程序观察它的返回值(执行测试程序的同时操作按键):
./button_test /dev/winter_button@0 ./button_test /dev/winter_button@1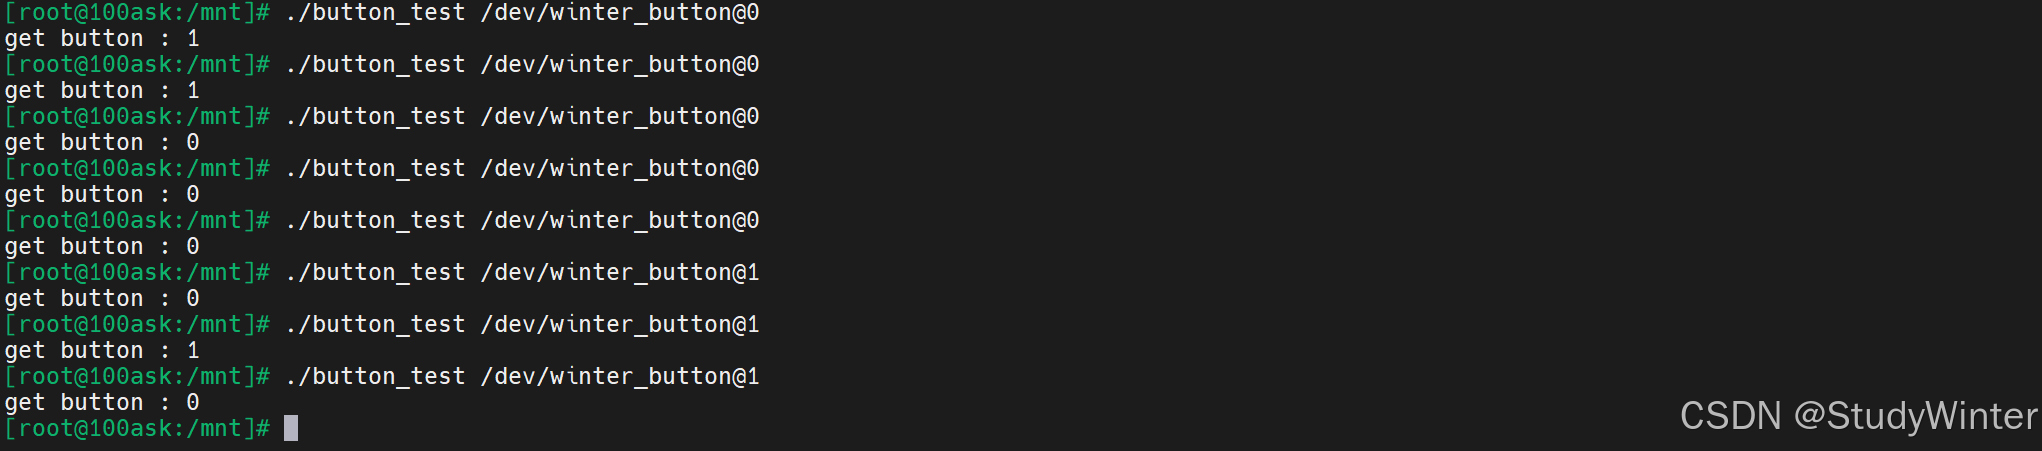
执行程序的同时,按下按键,输出是0
