
阅读量:0
为RTEMS Raspberrypi4 BSP添加SPI支持
主要参考了dev/bsps/shared/dev/spi/cadence-spi.c
RTEMS 使用了基于linux的SPI框架,SPI总线驱动已经在内核中实现。在这个项目中我需要实习的是 RPI4的SPI主机控制器驱动
SPI在RTEMS中的实现如图: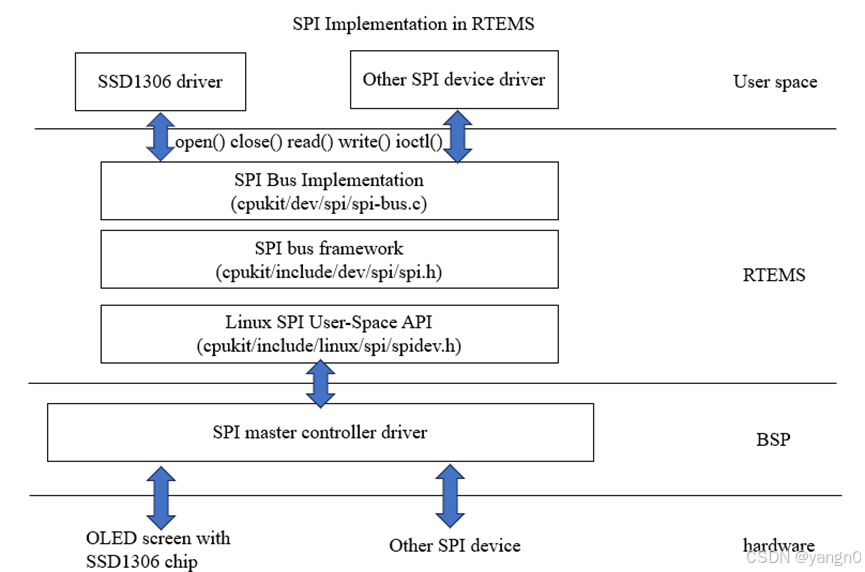
首先需要将SPI主机控制器设备在总线上注册,注册函数如下:
rtems_status_code raspberrypi_spi_init(raspberrypi_spi_device device) { raspberrypi_spi_bus *bus; int eno; volatile raspberrypi_spi *regs; const char *bus_path; bus = (raspberrypi_spi_bus *) spi_bus_alloc_and_init(sizeof(*bus)); if (bus == NULL) { return RTEMS_UNSATISFIED; } switch (device) { case raspberrypi_SPI0: regs = (volatile raspberrypi_spi *) BCM2711_SPI0_BASE; bus_path = "/dev/spidev0"; break; case raspberrypi_SPI3: regs = (volatile raspberrypi_spi *) BCM2711_SPI3_BASE; bus_path = "/dev/spidev3"; break; case raspberrypi_SPI4: regs = (volatile raspberrypi_spi *) BCM2711_SPI4_BASE; bus_path = "/dev/spidev4"; break; case raspberrypi_SPI5: regs = (volatile raspberrypi_spi *) BCM2711_SPI5_BASE; bus_path = "/dev/spidev5"; break; case raspberrypi_SPI6: regs = (volatile raspberrypi_spi *) BCM2711_SPI6_BASE; bus_path = "/dev/spidev6"; break; default: spi_bus_destroy_and_free(&bus->base); return RTEMS_INVALID_NUMBER; break; } eno = spi_bus_register(&bus->base, bus_path); if (eno != 0) { spi_bus_destroy_and_free(&bus->base); return RTEMS_UNSATISFIED; } eno = raspberrypi_spi_init_gpio(device); if (eno != 0) { spi_bus_destroy_and_free(&bus->base); return RTEMS_INVALID_NUMBER; } bus->regs = regs; bus->num_cs = 2; bus->base.transfer = raspberrypi_spi_transfer; bus->base.destroy = raspberrypi_spi_destroy; bus->base.setup = raspberrypi_spi_setup; bus->base.bits_per_word = 8; bus->base.max_speed_hz = 250000000; bus->base.cs = 0; #ifdef BSP_SPI_USE_INTERRUPTS bus->irq = BCM2711_IRQ_SPI; eno = rtems_interrupt_handler_install( bus->irq, "SPI", RTEMS_INTERRUPT_SHARED, raspberrypi_spi_interrupt, bus ); if (eno != RTEMS_SUCCESSFUL) { return EAGAIN; } #endif return RTEMS_SUCCESSFUL; } 调用 spi_bus_alloc_and_init ,此为SPI总线驱动实现的函数,位于RTEMS内核 dev/cpukit/dev/spi/spi-bus.c。
Allocates a bus control from the heap and initializes it. After a sucessful allocation and initialization the bus control must be destroyed via spi_bus_destroy_and_free(). A registered bus control will be automatically destroyed in case the device file is unlinked. Make sure to call spi_bus_destroy_and_free() in a custom destruction handler. 参数: size – The size of the bus control. This enables the addition of bus controller specific data to the base bus control. The bus control is zero initialized. 返回值: non-NULL The new bus control. NULL An error occurred. The errno is set to indicate the error. 在switch结构中根据枚举变量raspberrypi_spi_device 的值分别选择 SPI寄存器地址 和 dev目录下的路径名称。寄存器地址定义在 raspberrypi.h 文件中。
设置bus的各种参数和接口函数。
使用宏定义BSP_SPI_USE_INTERRUPTS选择驱动使用中断模式或轮询模式。
中端句柄的安装,考虑到同时启用多个SPI的情况,使用RTEMS_INTERRUPT_SHARED。
eno = rtems_interrupt_handler_install( bus->irq, "SPI", RTEMS_INTERRUPT_SHARED, raspberrypi_spi_interrupt, bus ); 调用spi_bus_register,将设备注册进总线。此函数为SPI总线驱动中实现的函数。
调用raspberrypi_spi_init_gpio,初始化gpio,将gpio设置为正确的功能。将此函数后置的原因:总线注册失败时,避免对gpio进行复原。
接下来介绍transfer函数,用于处理SPI读写。
static int raspberrypi_spi_transfer( spi_bus *base, const spi_ioc_transfer *msgs, uint32_t msg_count ) { int rv = 0; raspberrypi_spi_bus *bus; bus = (raspberrypi_spi_bus *) base; rv = raspberrypi_spi_check_msg(bus, msgs, msg_count); if (rv == 0) { bus->msg_todo = msg_count; bus->msg = msgs; #ifdef BSP_SPI_USE_INTERRUPTS bus->task_id = rtems_task_self(); raspberrypi_spi_start(bus); rtems_event_transient_receive(RTEMS_WAIT, RTEMS_NO_TIMEOUT); #else raspberrypi_spi_transfer_msg(bus); #endif } return rv; } 调用raspberrypi_spi_check_msg函数,对msg进行检查,主要检查是否使用了驱动不支持的模式,cs是否超过cs的总数。
这里需要传入msg_count,因为msgs是地址连续的一个队列,可能包含多个msg。
检查通过则将数据的信息结构体的部分变量赋值给bus结构体中的相应变量。
如果使用中断模式则进入raspberrypi_spi_start,轮询模式则进入raspberrypi_spi_transfer_msg。
本文主要介绍中断模式。
raspberrypi_spi_start只需要将传输启动,对于RPI4的SPI控制器,将TA=1,就会立即触发第一个中断,我认为这是与其他BSP不同的点。
static void raspberrypi_spi_start(raspberrypi_spi_bus *bus) { volatile raspberrypi_spi *regs; regs = bus->regs; regs->spics = regs->spics | RPI_SPICS_INTR | RPI_SPICS_INTD; /* * Set TA = 1. This will immediately trigger a first interrupt with * DONE = 1. */ regs->spics = regs->spics | RPI_SPICS_TA; } 中断处理函数如下:
static void raspberrypi_spi_interrupt(void *arg) { raspberrypi_spi_bus *bus; volatile raspberrypi_spi *regs; uint32_t val; bus = arg; regs = bus->regs; if (raspberrypi_spi_irq(regs)) { if (bus->todo > 0) { raspberrypi_spi_push(bus, regs); } else { --bus->msg_todo; ++bus->msg; raspberrypi_spi_next_msg(bus); } while (regs->spics & RPI_SPICS_RXD && bus->in_transfer > 0) { /* RX FIFO contains at least 1 byte. */ val = regs->spififo; if (bus->rx_buf != NULL) { *bus->rx_buf = (uint8_t)val; ++bus->rx_buf; } --bus->in_transfer; } } } 函数 raspberrypi_spi_irq 用于判断中断是否是由当前SPI设备产生。这使得多个SPI设备可以同时使用。
函数raspberrypi_spi_next_msg用于切换到下一个msg,并将msg结构体中的剩余变量赋值给bus结构体。
rtems_event_transient_receive 和 rtems_event_transient_send 至关重要
传输开始时调用rtems_event_transient_receive。
bus->task_id = rtems_task_self(); rtems_event_transient_receive(RTEMS_WAIT, RTEMS_NO_TIMEOUT); 传输结束时调用rtems_event_transient_send。
rtems_event_transient_send(bus->task_id); 保证一条传输命令在传输结束前阻塞。
