
阅读量:0
一、问题展示
在若依的 Vue 前端分离版中登录密码和修改密码时可以发现密码是明文传输的,超管重置用户密码时同样如此,如下图所示:
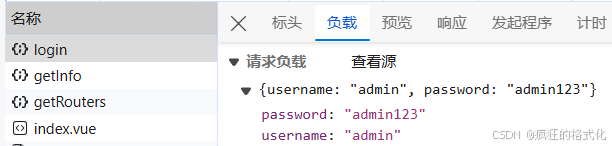
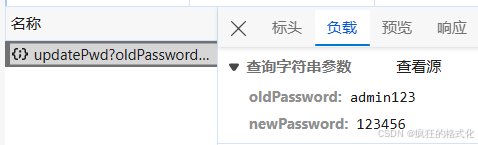
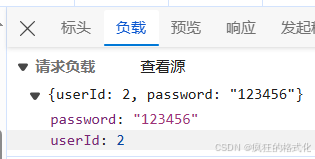
可以发现密码全部都是明文传输,十分不安全,必须对传输的密码进行加密传输。
二、解决方法
在项目中集成 jsencrypt 实现密码加密传输方式。
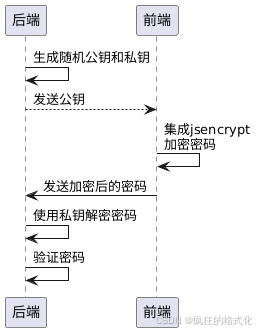
2.1 jsencrypt 实现密码加密传输流程
- 后端生成随机公钥和私钥
- 前端拿到公钥,集成 jsencrypt 实现密码加密
- 前端传输加密后的密码给后端
- 后端通过私钥对加密后的密码进行解密,然后验证密码
2.2 若依官网文档
若依的官网有集成 jsencrypt 实现密码加密传输的相关文档,可以参考:
2.3 添加后端代码
2.3.1 创建RsaUtils类
在 common 模块下面 utils 包下的 sign 包中添加 RsaUtils.java,用于 RSA 加密解密。
package com.uam.common.utils.sign; import org.apache.commons.codec.binary.Base64; import org.springframework.context.annotation.Bean; import org.springframework.stereotype.Component; import javax.crypto.Cipher; import java.security.*; import java.security.interfaces.RSAPrivateKey; import java.security.interfaces.RSAPublicKey; import java.security.spec.PKCS8EncodedKeySpec; import java.security.spec.X509EncodedKeySpec; /** * @Project: * @Package: com.uam.common.utils.sign * @Author: * @CreateTime: * @Version: 1.0 * @Description: RSA加密解密 */ @Component public class RsaUtils { private static final RsaKeyPair rsaKeyPair = new RsaKeyPair(); public static RsaKeyPair getRsaKeyPair() { return rsaKeyPair; } /** * 私钥解密 * * @param text 待解密的文本 * @return 解密后的文本 */ public static String decryptByPrivateKey(String text) throws Exception { return decryptByPrivateKey(rsaKeyPair.getPrivateKey(), text); } /** * 公钥解密 * * @param publicKeyString 公钥 * @param text 待解密的信息 * @return 解密后的文本 */ public static String decryptByPublicKey(String publicKeyString, String text) throws Exception { X509EncodedKeySpec x509EncodedKeySpec = new X509EncodedKeySpec(Base64.decodeBase64(publicKeyString)); KeyFactory keyFactory = KeyFactory.getInstance("RSA"); PublicKey publicKey = keyFactory.generatePublic(x509EncodedKeySpec); Cipher cipher = Cipher.getInstance("RSA"); cipher.init(Cipher.DECRYPT_MODE, publicKey); byte[] result = cipher.doFinal(Base64.decodeBase64(text)); return new String(result); } /** * 私钥加密 * * @param privateKeyString 私钥 * @param text 待加密的信息 * @return 加密后的文本 */ public static String encryptByPrivateKey(String privateKeyString, String text) throws Exception { PKCS8EncodedKeySpec pkcs8EncodedKeySpec = new PKCS8EncodedKeySpec(Base64.decodeBase64(privateKeyString)); KeyFactory keyFactory = KeyFactory.getInstance("RSA"); PrivateKey privateKey = keyFactory.generatePrivate(pkcs8EncodedKeySpec); Cipher cipher = Cipher.getInstance("RSA"); cipher.init(Cipher.ENCRYPT_MODE, privateKey); byte[] result = cipher.doFinal(text.getBytes()); return Base64.encodeBase64String(result); } /** * 私钥解密 * * @param privateKeyString 私钥 * @param text 待解密的文本 * @return 解密后的文本 */ public static String decryptByPrivateKey(String privateKeyString, String text) throws Exception { PKCS8EncodedKeySpec pkcs8EncodedKeySpec5 = new PKCS8EncodedKeySpec(Base64.decodeBase64(privateKeyString)); KeyFactory keyFactory = KeyFactory.getInstance("RSA"); PrivateKey privateKey = keyFactory.generatePrivate(pkcs8EncodedKeySpec5); Cipher cipher = Cipher.getInstance("RSA"); cipher.init(Cipher.DECRYPT_MODE, privateKey); byte[] result = cipher.doFinal(Base64.decodeBase64(text)); return new String(result); } /** * 公钥加密 * * @param publicKeyString 公钥 * @param text 待加密的文本 * @return 加密后的文本 */ public static String encryptByPublicKey(String publicKeyString, String text) throws Exception { X509EncodedKeySpec x509EncodedKeySpec2 = new X509EncodedKeySpec(Base64.decodeBase64(publicKeyString)); KeyFactory keyFactory = KeyFactory.getInstance("RSA"); PublicKey publicKey = keyFactory.generatePublic(x509EncodedKeySpec2); Cipher cipher = Cipher.getInstance("RSA"); cipher.init(Cipher.ENCRYPT_MODE, publicKey); byte[] result = cipher.doFinal(text.getBytes()); return Base64.encodeBase64String(result); } /** * 构建RSA密钥对 * * @return 生成后的公私钥信息 */ @Bean public void generateKeyPair() throws NoSuchAlgorithmException { KeyPairGenerator keyPairGenerator = KeyPairGenerator.getInstance("RSA"); keyPairGenerator.initialize(1024); KeyPair keyPair = keyPairGenerator.generateKeyPair(); RSAPublicKey rsaPublicKey = (RSAPublicKey) keyPair.getPublic(); RSAPrivateKey rsaPrivateKey = (RSAPrivateKey) keyPair.getPrivate(); String publicKeyString = Base64.encodeBase64String(rsaPublicKey.getEncoded()); String privateKeyString = Base64.encodeBase64String(rsaPrivateKey.getEncoded()); rsaKeyPair.setPrivateKey(privateKeyString); rsaKeyPair.setPublicKey(publicKeyString); } /** * RSA密钥对对象 */ public static class RsaKeyPair { private String publicKey; private String privateKey; public RsaKeyPair() { } public RsaKeyPair(String publicKey, String privateKey) { this.publicKey = publicKey; this.privateKey = privateKey; } public void setPrivateKey(String privateKey) { this.privateKey = privateKey; } public void setPublicKey(String publicKey) { this.publicKey = publicKey; } public String getPublicKey() { return publicKey; } public String getPrivateKey() { return privateKey; } } }在项目中,
RsaUtils类通过使用@Component注解被注册为 Spring 容器中的一个组件。该类中的generateKeyPair()方法利用@Bean注解被标记为一个需要由 Spring 容器管理的 Bean。因此,当应用程序启动时,Spring 容器会自动调用generateKeyPair()方法,确保每次启动时都能生成一对唯一的 RSA 密钥。这一机制保证了应用在其生命周期内使用的 RSA 密钥对是一致的,无需重复生成。然而,一旦应用程序重启,generateKeyPair()方法将再次被调用,从而生成新的密钥对,确保密钥的安全性和唯一性。
2.3.2 添加前端获取公钥的接口
在 admin 模块下的 com.uam.web.controller.system 包中 SysLoginController 类中添加 RESTful API 接口 publicKey(),用于当客户端通过 GET 请求访问 publicKey 路径时,服务器会返回一个包含公钥的 RsaUtils.RsaKeyPair 对象。这个对象中的公钥可以被前端用来对密码进行加密。
/** * 前端获取公钥,用来给密码加密 * * @return 秘钥对象 */ @GetMapping("/publicKey") public RsaUtils.RsaKeyPair publicKey() throws NoSuchAlgorithmException { RsaUtils.RsaKeyPair rsaKeyPair = new RsaUtils.RsaKeyPair(); rsaKeyPair.setPublicKey(RsaUtils.getRsaKeyPair().getPublicKey()); return rsaKeyPair; }2.3.3 登录方法进行rsa解密
在 2.3.2 中同样的类中,对 login() 方法进行修改,提前对前端传过来的加密密码进行解密,避免影响后面程序运行。
/** * 登录方法 * * @param loginBody 登录信息 * @return 结果 */ @PostMapping("/login") public AjaxResult login(@RequestBody LoginBody loginBody) throws Exception { AjaxResult ajax = AjaxResult.success(); // 生成令牌 String token = loginService.login(loginBody.getUsername(), RsaUtils.decryptByPrivateKey(loginBody.getPassword()), // loginBody.getPassword(), loginBody.getCode(), loginBody.getUuid()); ajax.put(Constants.TOKEN, token); return ajax; }2.3.4 重置密码方法进行rsa解密
在 admin 模块下的 com.uam.web.controller.system 包中 SysProfileController 类中的 updatePwd 方法中添加下面两行代码,对前端传过来的加密密码进行解密。
// 密码解密 oldPassword = RsaUtils.decryptByPrivateKey(oldPassword); newPassword = RsaUtils.decryptByPrivateKey(newPassword);
2.3.5 超管重置用户密码方法进行rsa解密
在 admin 模块下的 com.uam.web.controller.system 包中 SysUserController 类中的 resetPwd 方法中添加下面一行代码,对前端传过来的加密密码进行解密。
user.setPassword(RsaUtils.decryptByPrivateKey(user.getPassword()));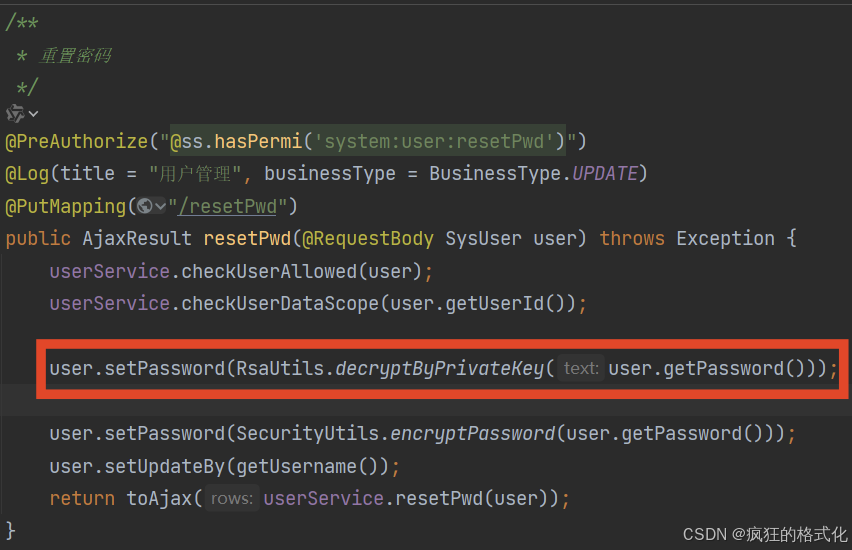
2.3.6 配置白名单
在 framework 模块下的 com.uam.framework.config 包中 SecurityConfig 类中的第 114 行原有的 "/login", "/register", "/captchaImage" 后面添加 "/publicKey" ,这样可以确保任何用户都可以获取用于加密的公钥,而不需要进行身份验证。
// 对于登录login 注册register 验证码captchaImage 允许匿名访问 requests.antMatchers("/login", "/register", "/captchaImage","/publicKey").permitAll()2.3.7 测试接口
可以使用 Postman 来测试刚刚的 publicKey 接口能否成功被调用。端口号如果没有进行修改默认为 8080。
http://localhost:8080/publicKey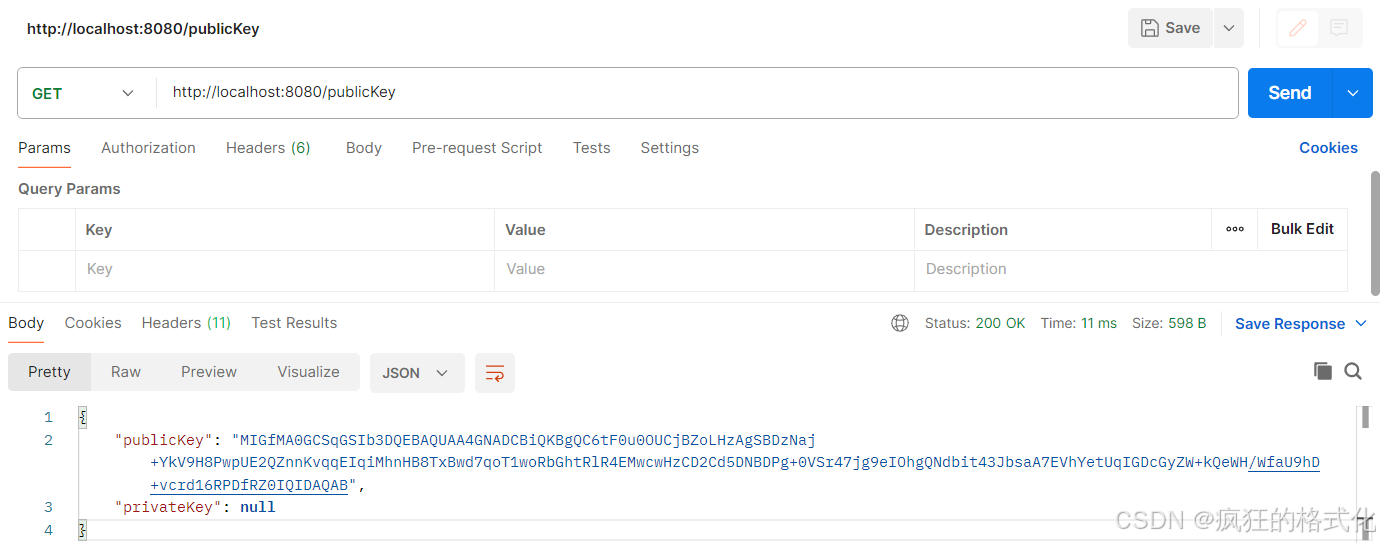
可以发现,公钥获取成功,但私钥是空的。前端只需要使用公钥来加密密码,而无需私钥。因此,发送给前端的密钥对对象仅包含公钥,不包含私钥。这样,即使公钥被公开,也不会影响系统的安全性,因为只有私钥才能解密数据。
2.4 添加前端代码
2.4.1 添加获取公钥接口路径
在 src\api\login.js 中添加获取公钥接口路径代码。
// 获取公钥 export function getPublicKey() { return request({ url: '/publicKey', method: 'get', }) }2.4.2 更改加密方法
在 src\utils\jsencrypt.js 中修改 encrypt 方法如下:
// 加密 export function encrypt(txt, RsaKeyPair) { const encryptor = new JSEncrypt() encryptor.setPublicKey(RsaKeyPair.publicKey) // 设置公钥 return encryptor.encrypt(txt) // 对数据进行加密 }可以将若依自带的公钥和私钥注释掉。
2.4.3 登录时对密码加密
在 src\store\modules\user.js 中的 actions: {} 中添加下面的代码,可以将原来的 login 方法注释掉。
async getPublicKey() { try { const response = await getPublicKey(); return response; // 返回获取到的秘钥对象 } catch (error) { throw error; // 如果获取秘钥对象失败,则抛出错误 } }, async login(userInfo) { try { const username = userInfo.username.trim(); const code = userInfo.code; const uuid = userInfo.uuid; // 获取秘钥对象 const rsaKeyPair = await this.getPublicKey(); // console.log('Public Key:', rsaKeyPair.publicKey); // 使用公钥加密密码 const encryptedPassword = encrypt(userInfo.password, rsaKeyPair); // 使用加密后的密码登录 const res = await login(username, encryptedPassword, code, uuid); setToken(res.token); this.token = res.token; return res; // 可以返回res以便进一步处理或捕获错误 } catch (error) { throw error; // 抛出错误以便外部捕获 } },一定要添加引用:
import { login, logout, getInfo, getPublicKey } from '@/api/login' // 在原来的基础上加上 getPublicKey import { encrypt } from '@/utils/jsencrypt' // 额外添加 2.4.4 重置密码时对密码加密
在 src\views\system\user\profile\resetPwd.vue 中添加下面的代码,可以将原来的 submit、close 方法注释掉。
const getPublicKeyWrapper = () => { return new Promise((resolve, reject) => { getPublicKey() .then(res => { resolve(res); }) .catch(error => { reject(error); }); }); }; const submit = () => { proxy.$refs.pwdRef.validate(valid => { if (valid) { getPublicKeyWrapper().then(res => { const rsaKeyPair = res; const oldPassword = encrypt(user.oldPassword, rsaKeyPair); const newPassword = encrypt(user.newPassword, rsaKeyPair); updateUserPwd(oldPassword, newPassword).then(response => { proxy.$modal.msgSuccess("修改成功"); }); }); } }); }; const close = () => { proxy.$tab.closePage(); };一定要添加引用:
import { getPublicKey } from '@/api/login' import { encrypt } from '@/utils/jsencrypt'2.4.5 超管重置用户密码时对密码加密
在 src\views\system\user\index.vue 中添加 getPublicKeyWrapper 并修改 handleResetPwd。
const getPublicKeyWrapper = () => { return new Promise((resolve, reject) => { getPublicKey() .then(res => { resolve(res); }) .catch(error => { reject(error); }); }); }; /** 重置密码按钮操作 */ // function handleResetPwd(row) { const handleResetPwd = (row) => { proxy.$prompt('请输入"' + row.userName + '"的新密码', "提示", { confirmButtonText: "确定", cancelButtonText: "取消", closeOnClickModal: false, inputPattern: /^.{5,20}$/, inputErrorMessage: "用户密码长度必须介于 5 和 20 之间", }).then(({ value }) => { getPublicKeyWrapper().then(res => { const rsaKeyPair = res; resetUserPwd(row.userId, encrypt(value, rsaKeyPair)).then(response => { proxy.$modal.msgSuccess("修改成功,新密码是:" + value); }); }); }).catch(() => {}); };一定要添加引用:
import { getPublicKey } from '@/api/login' import { encrypt } from '@/utils/jsencrypt'三、修改结果


可以发现所有密码均已加密。
四、参考
https://blog.csdn.net/weixin_56567361/article/details/124961493 https://blog.csdn.net/HelloWorld20161112/article/details/130906994 https://doc.ruoyi.vip/ruoyi-vue/document/cjjc.html