阅读量:0
文章目录

本文介绍了如何在SpringBoot项目中使用RabbitMQ的TopicExchange实现动态路由消息,通过通配符规则将消息发送到不同队列,如business.test.topic.queue1和queue2,并展示了生产者和消费者的具体实现。

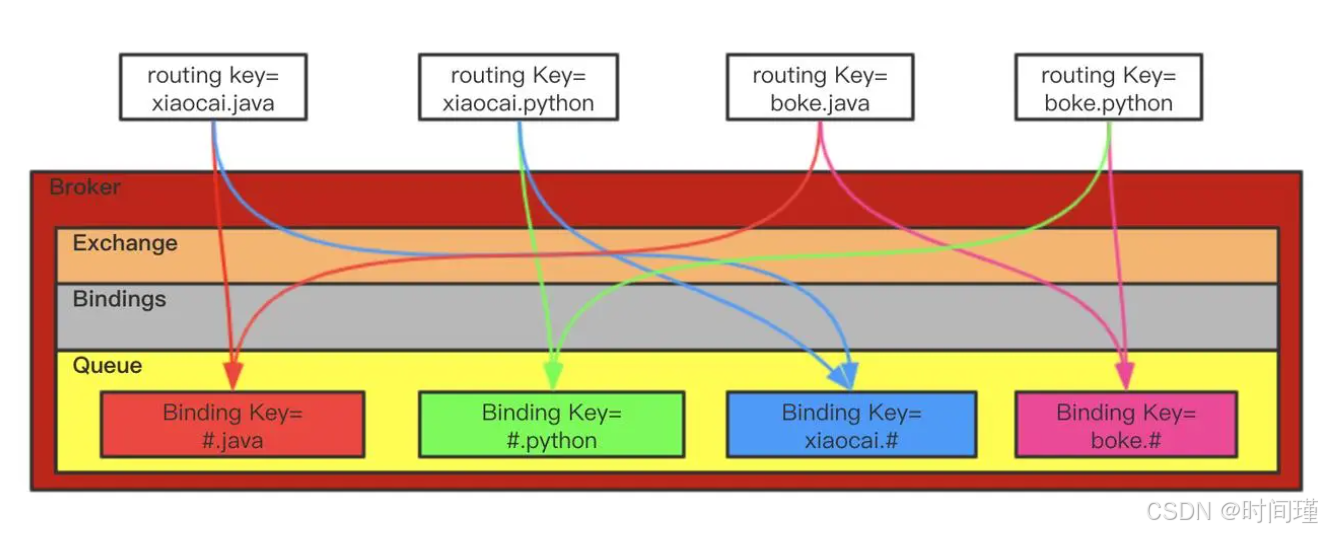
Topic类型的Exchange与Direct相比,都是可以根据RoutingKey把消息路由到不同的队列。只不过Topic类型Exchange可以让队列在绑定Routing key 的时候使用通配符!
Routingkey 一般都是有一个或多个单词组成,多个单词之间以”.”分割,例如: snow.com
通配符规则:
#:匹配一个或多个词
*:匹配不多不少恰好1个词
举例:
snow.#:能够匹配snow.com.cn 或者 snow.com
snow.*:只能匹配snow.com
解释:
- Queue1:绑定的是
china.#,因此凡是以china.开头的routing key都会被匹配到。包括china.news和china.weather - Queue2:绑定的是
#.news,因此凡是以.news结尾的routing key都会被匹配。包括china.news和japan.news
案例需求:
实现思路如下:
- 并利用 @RabbitListener 声明 Exchange、Queue、RoutingKey
- 在 consumer 服务中,编写两个消费者方法,分别监听
business.test.topic.queue1和business.test.topic.queue2 - 在 publisher 中编写测试方法,向
business.test.topic发送消息
pom
<dependencies> <!--RabbitMQ 依赖--> <dependency> <groupId>org.springframework.boot</groupId> <artifactId>spring-boot-starter-amqp</artifactId> </dependency> <dependency> <groupId>org.springframework.boot</groupId> <artifactId>spring-boot-starter-web</artifactId> </dependency> <dependency> <groupId>com.alibaba</groupId> <artifactId>fastjson</artifactId> <version>1.2.47</version> </dependency> <dependency> <groupId>org.projectlombok</groupId> <artifactId>lombok</artifactId> </dependency> </dependencies> yml
server: port: 8080 spring: rabbitmq: host: **.***.**.*** port: 5672 username: **** password: **** 生产者
import org.springframework.amqp.rabbit.core.RabbitTemplate; import org.springframework.beans.factory.annotation.Autowired; import org.springframework.web.bind.annotation.GetMapping; import org.springframework.web.bind.annotation.PathVariable; import org.springframework.web.bind.annotation.RequestMapping; import org.springframework.web.bind.annotation.RestController; /** * @author: Snow * @date: 2023/1/6 * ************************************************** * 修改记录(时间--修改人--修改说明): */ @RestController @RequestMapping("/topic") public class SendController { @Autowired private RabbitTemplate rabbitTemplate; @GetMapping("/send/{message}") public void send(@PathVariable("message") String message){ // 交换机名称 String exchangeName = "business.test.topic"; // 发送消息 if(message.contains("china") && message.contains("news")){ rabbitTemplate.convertAndSend(exchangeName, "china.news", message); return; } if(message.contains("china")){ rabbitTemplate.convertAndSend(exchangeName, "china.lala", message); return; } if(message.contains("news")){ rabbitTemplate.convertAndSend(exchangeName, "lalla.news", message); return; } } } 消费者
import org.springframework.amqp.core.ExchangeTypes; import org.springframework.amqp.rabbit.annotation.Exchange; import org.springframework.amqp.rabbit.annotation.Queue; import org.springframework.amqp.rabbit.annotation.QueueBinding; import org.springframework.amqp.rabbit.annotation.RabbitListener; import org.springframework.stereotype.Component; /** * @author: Snow * @date: 2023/1/6 * ************************************************** * 修改记录(时间--修改人--修改说明): */ @Component public class Consumer { @RabbitListener(bindings = @QueueBinding( value = @Queue(name = "business.test.topic.queue1"), exchange = @Exchange(name = "business.test.topic", type = ExchangeTypes.TOPIC), key = "china.#" )) public void listenTopicQueue1(String msg){ System.out.println("消费者接收到topic.queue1的消息:【" + msg + "】"); } @RabbitListener(bindings = @QueueBinding( value = @Queue(name = "business.test.topic.queue2"), exchange = @Exchange(name = "business.test.topic", type = ExchangeTypes.TOPIC), key = "#.news" )) public void listenTopicQueue2(String msg){ System.out.println("消费者接收到topic.queue2的消息:【" + msg + "】"); } } 
