
阅读量:0
视频地址:
ESP32S3 Sense接入百度在线语音识别
目前这是我使用的ESP32S3官方硬件👍👍👍(小小的身材有大大的力量)只需要35元加摄像头麦克风79元,后期我会整理相关专栏进行Arduino系统学习😘😘😘。有需要可以购买xiao开发板💕💕💕,SeeedXIAO ESP32S3 Sense硬件购买地址:https://s.click.taobao.com/lekazrt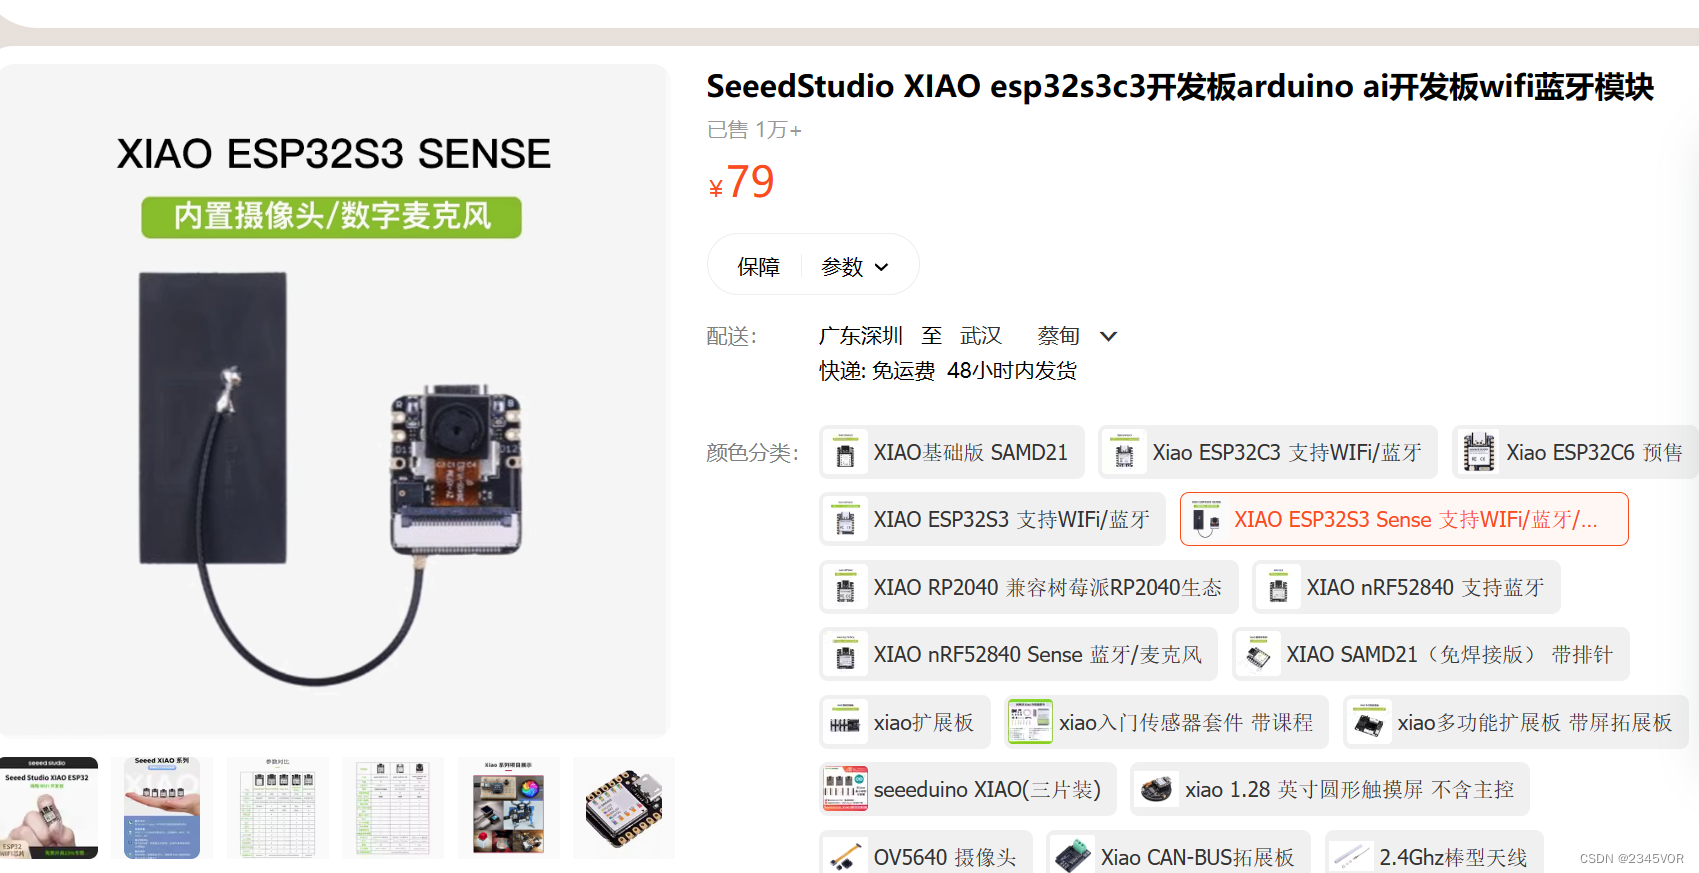
1. 前言
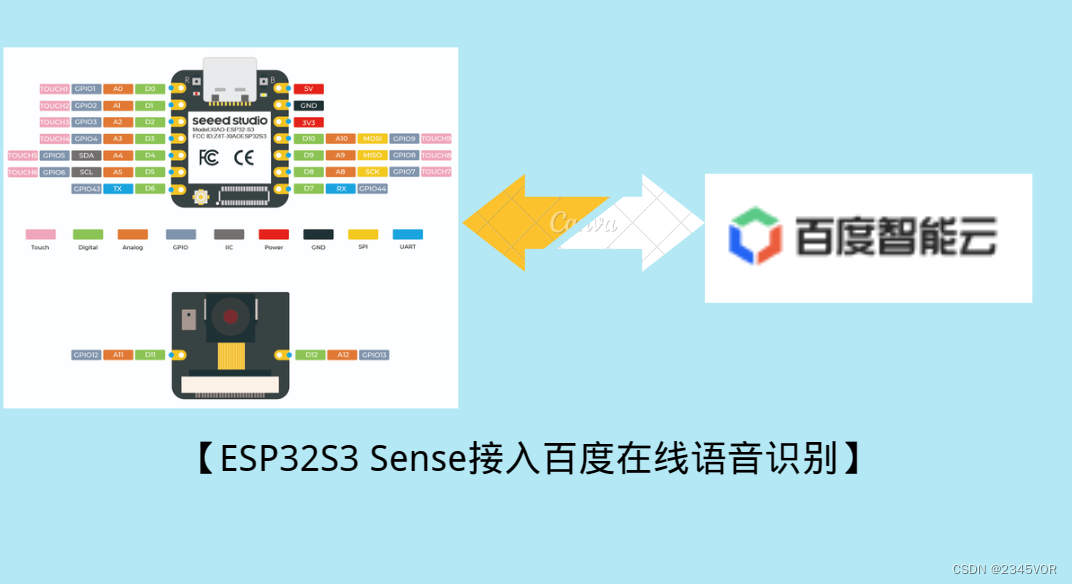
使用Seeed XIAO ESP32S3 Sense开发板接入百度智能云实现在线语音识别。自带麦克风模块用做语音输入,通过串口发送字符“1”来控制数据的采集和上传。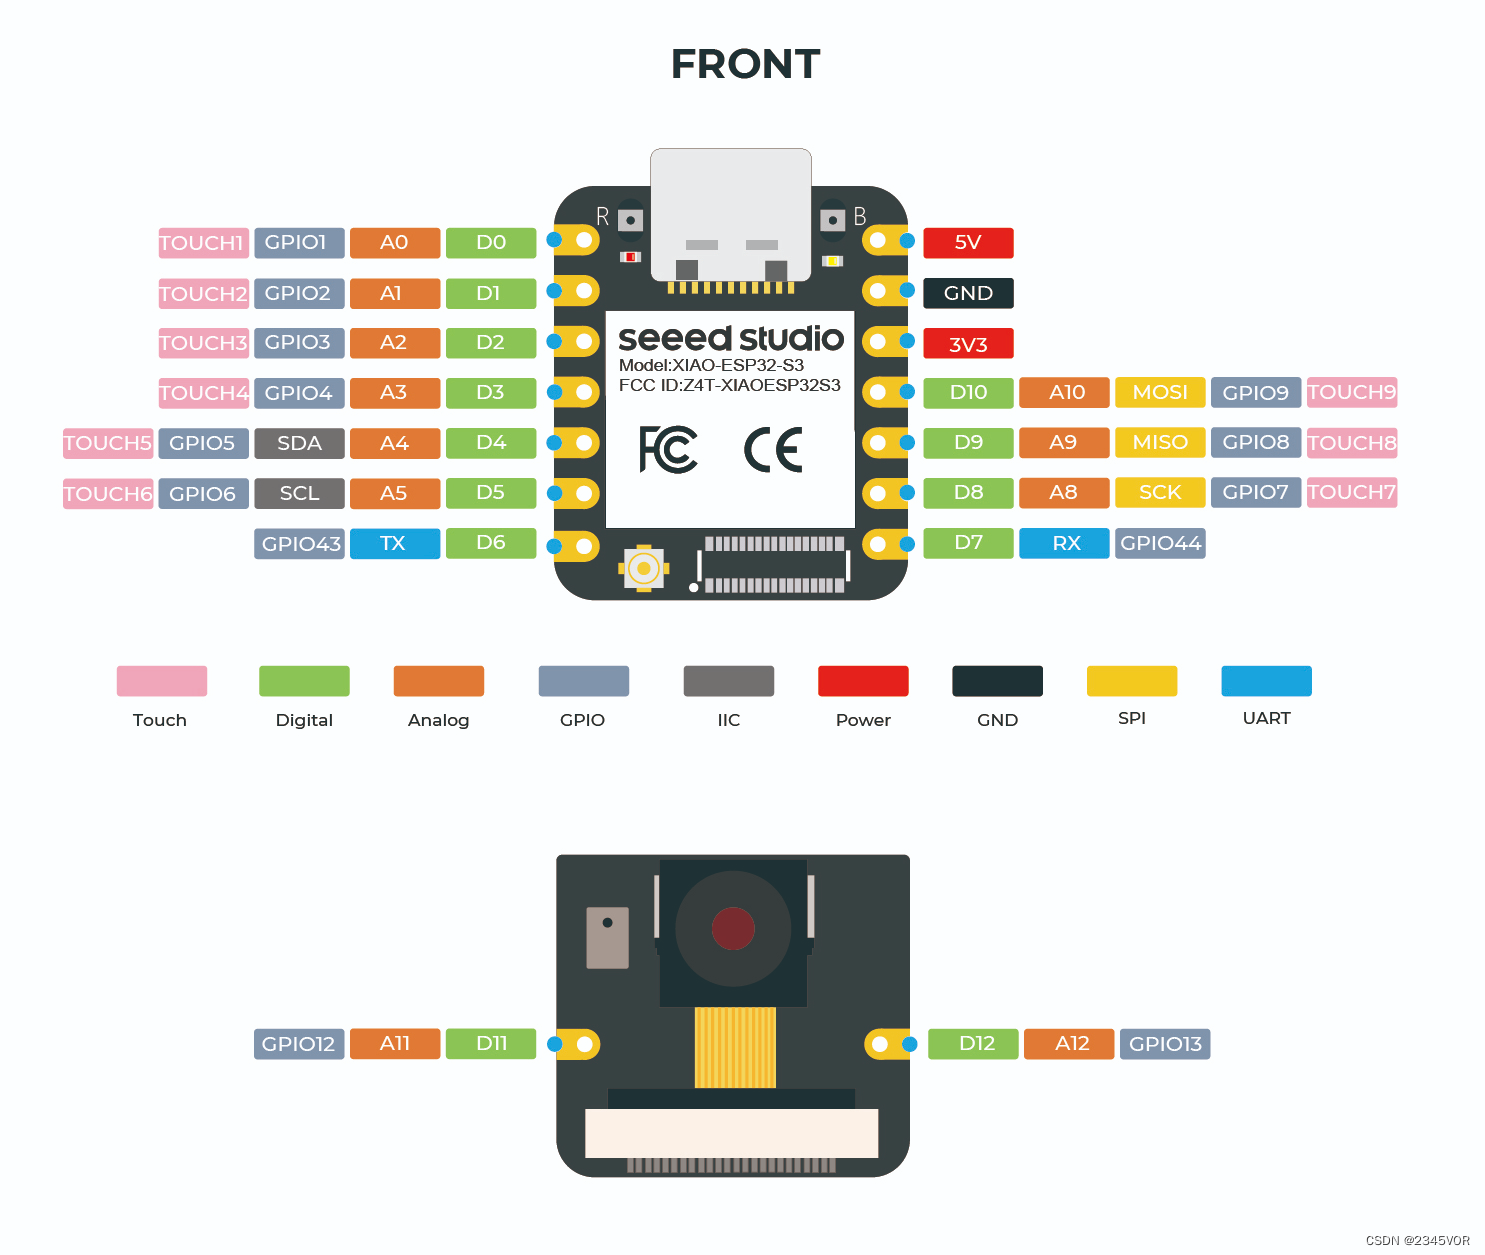
步骤概括
(1) 在百度云控制端选择“语音识别”并创建应用获取API Key和Secret Key获取token
(2)采集音频数据,将数据打包成规定的格式,POST发送到请求API
(3) 接收返回的识别数据
2. 操作流程
2.1 创建语音识别应用
登录百度云账号,选择语音识别
官网地址:https://ai.baidu.com/tech/speech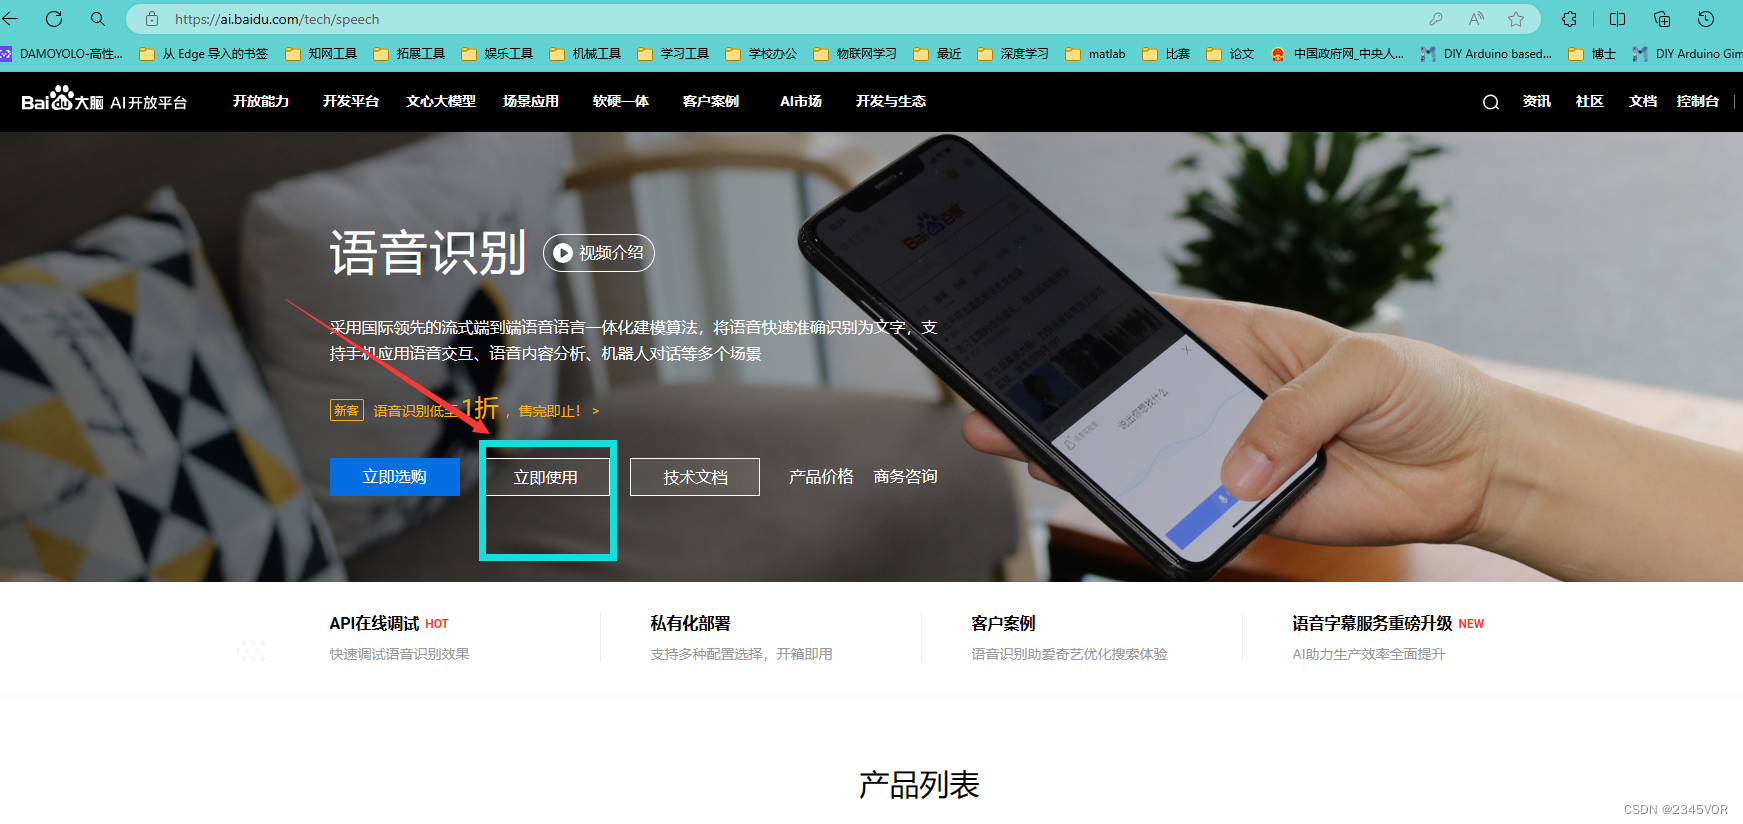
新用户可以直接领取资源,也可付费接入,创建应用。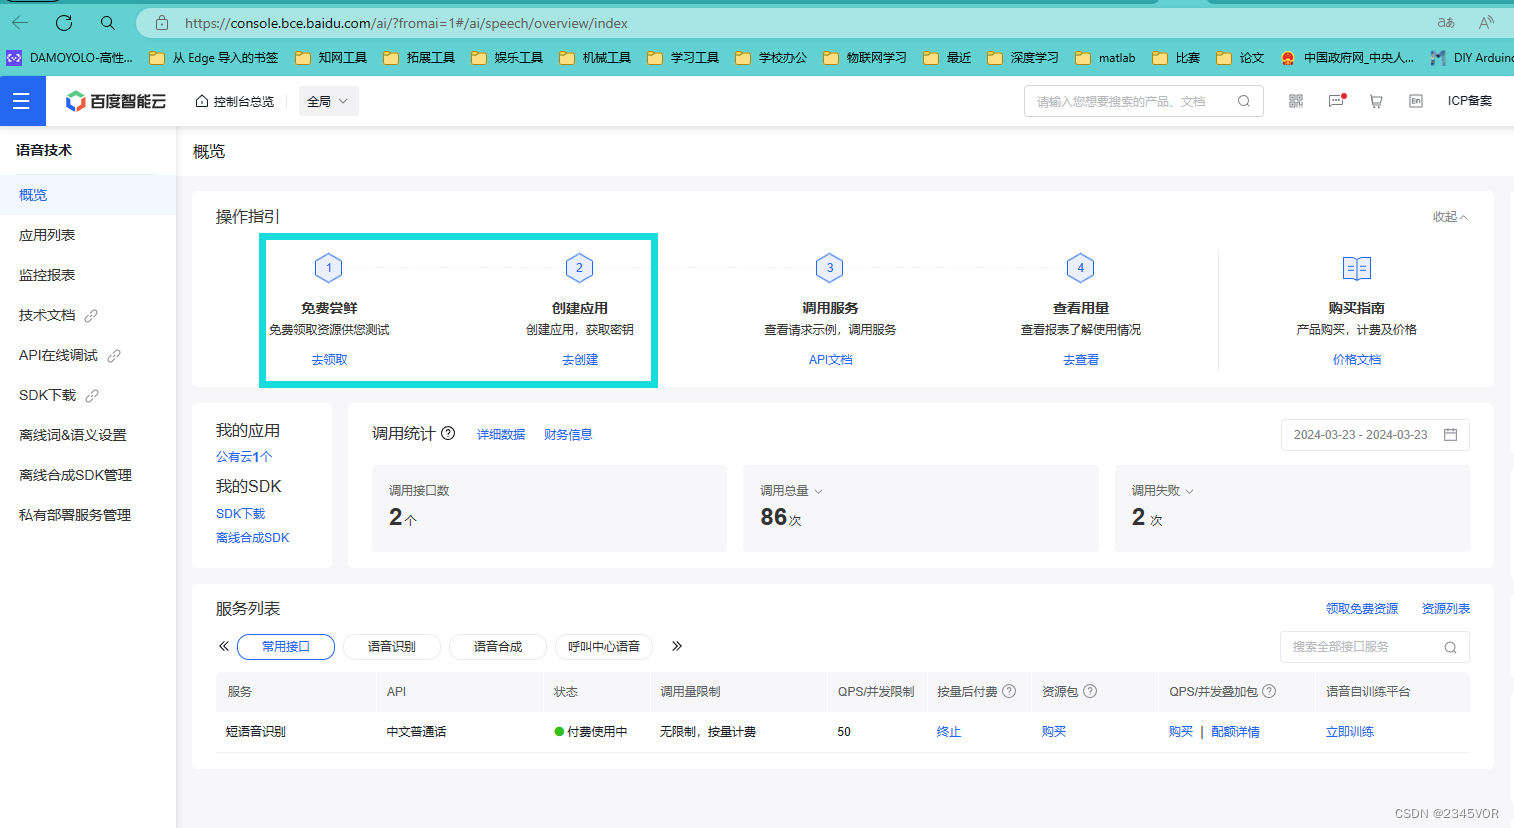
根据创建应用生成的API Key和Secret Key来获取token,创建好应用,点管理应用,会有API Key和Secret Key,如下图应用创建成功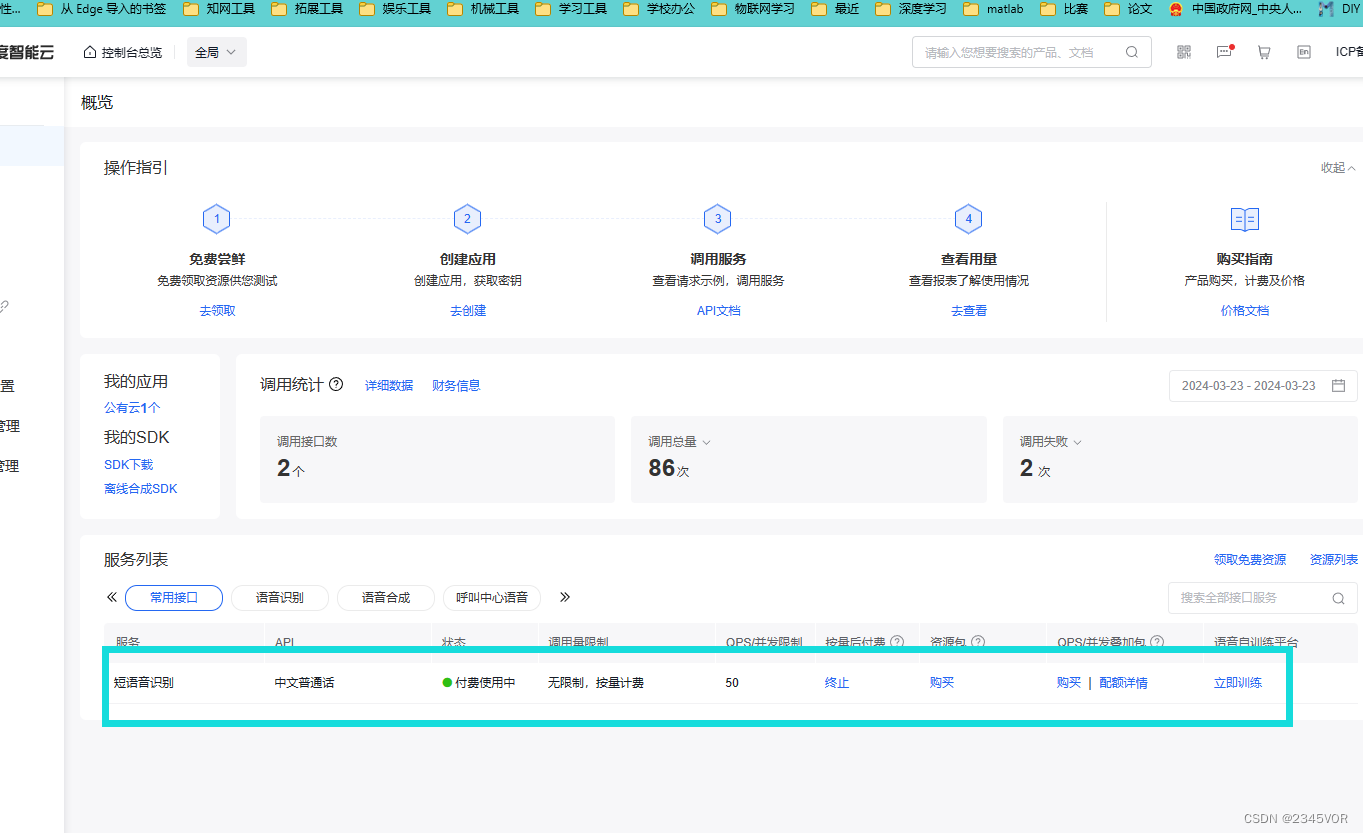
2.2 API秘钥创建
点击在线调试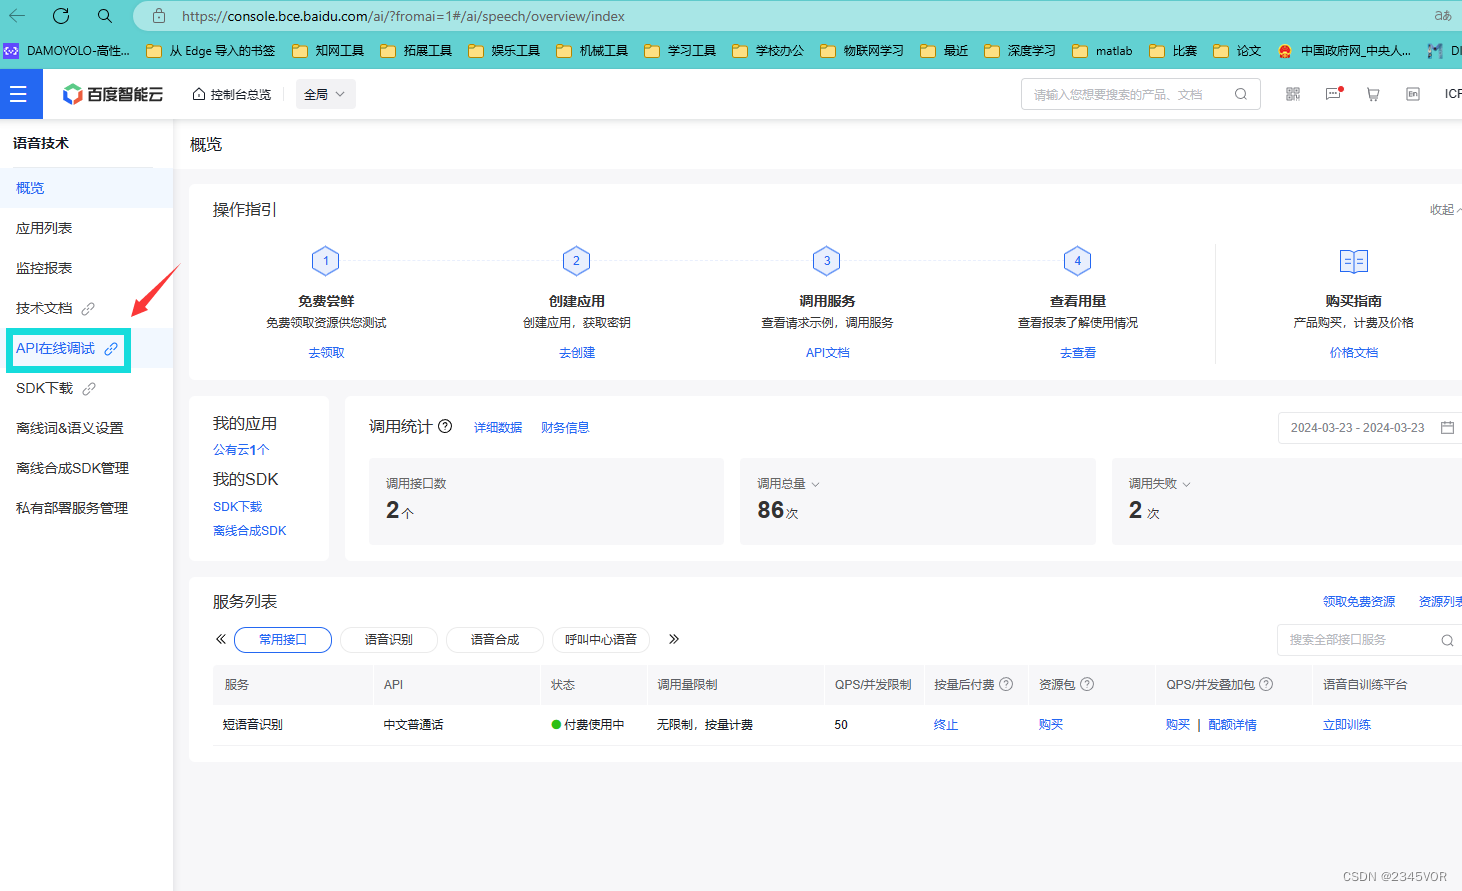
按照如下顺序选择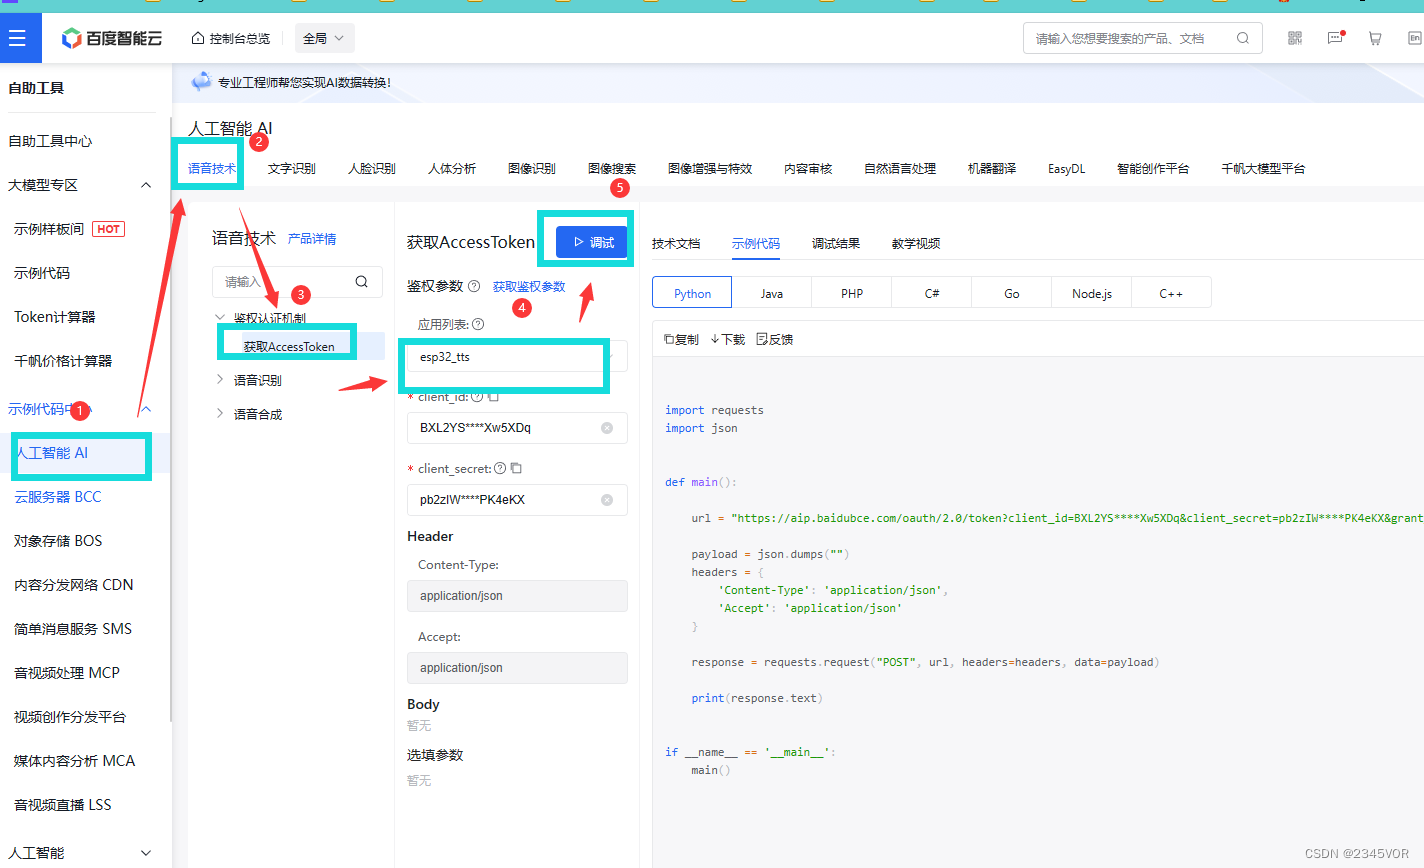
有了API Key和Secret Key就可以得到token,下面附上ESP32进行get请求得到token的代码
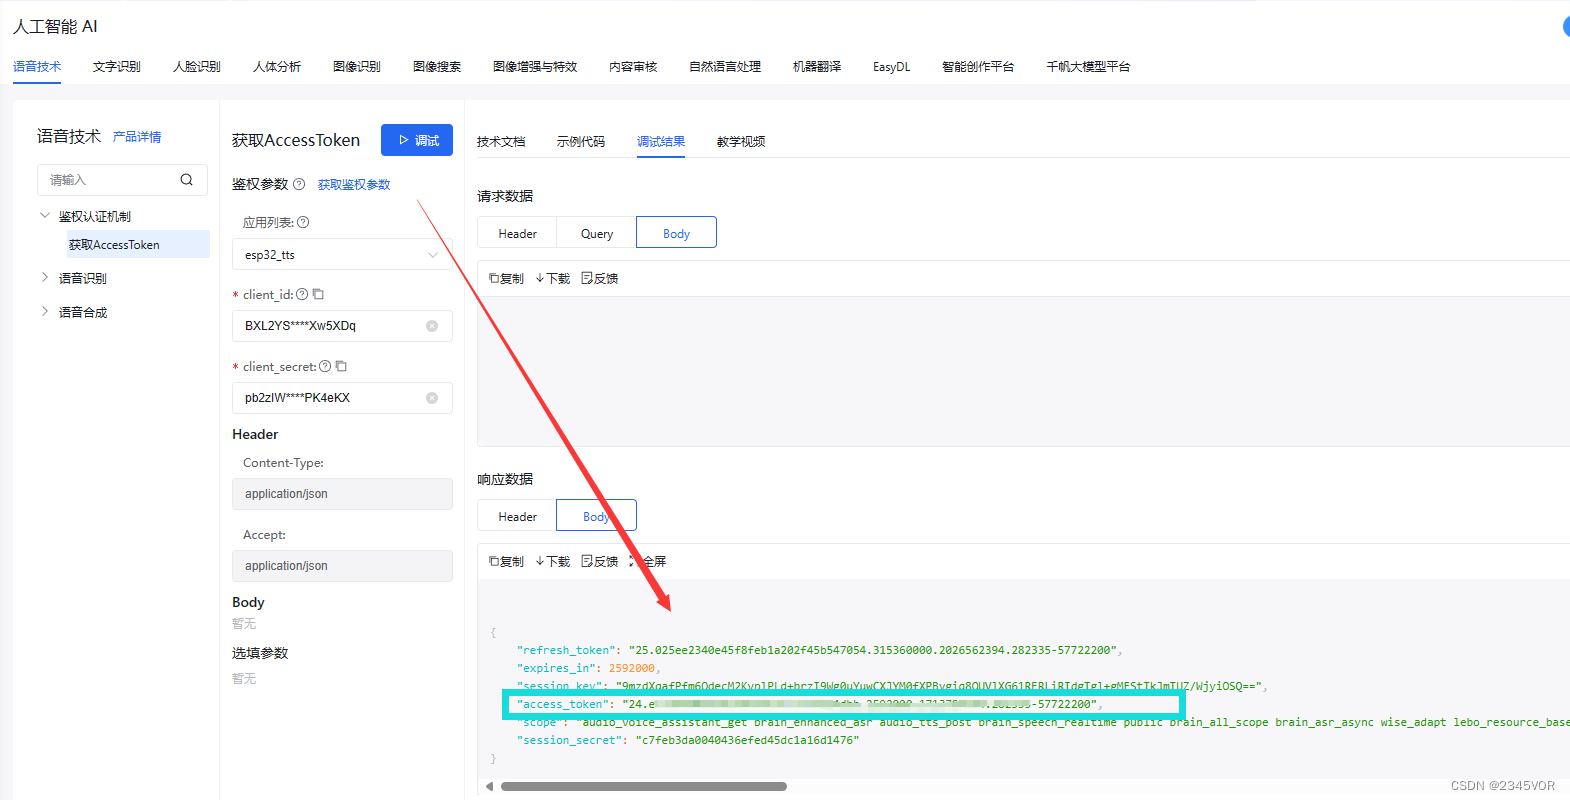
access_token对应的值就是可用的token了,每次申请的token有效期为30天,过期需要重新申请,可以申请多个。不用每次都调用获取token的程序,申请一个可以用30天,定时更新就可以吧。
3. JSON语音接入
采集数据,POST发送到请求API数据上传 POST 方式有 2 种:JSON 格式和RAW 格式。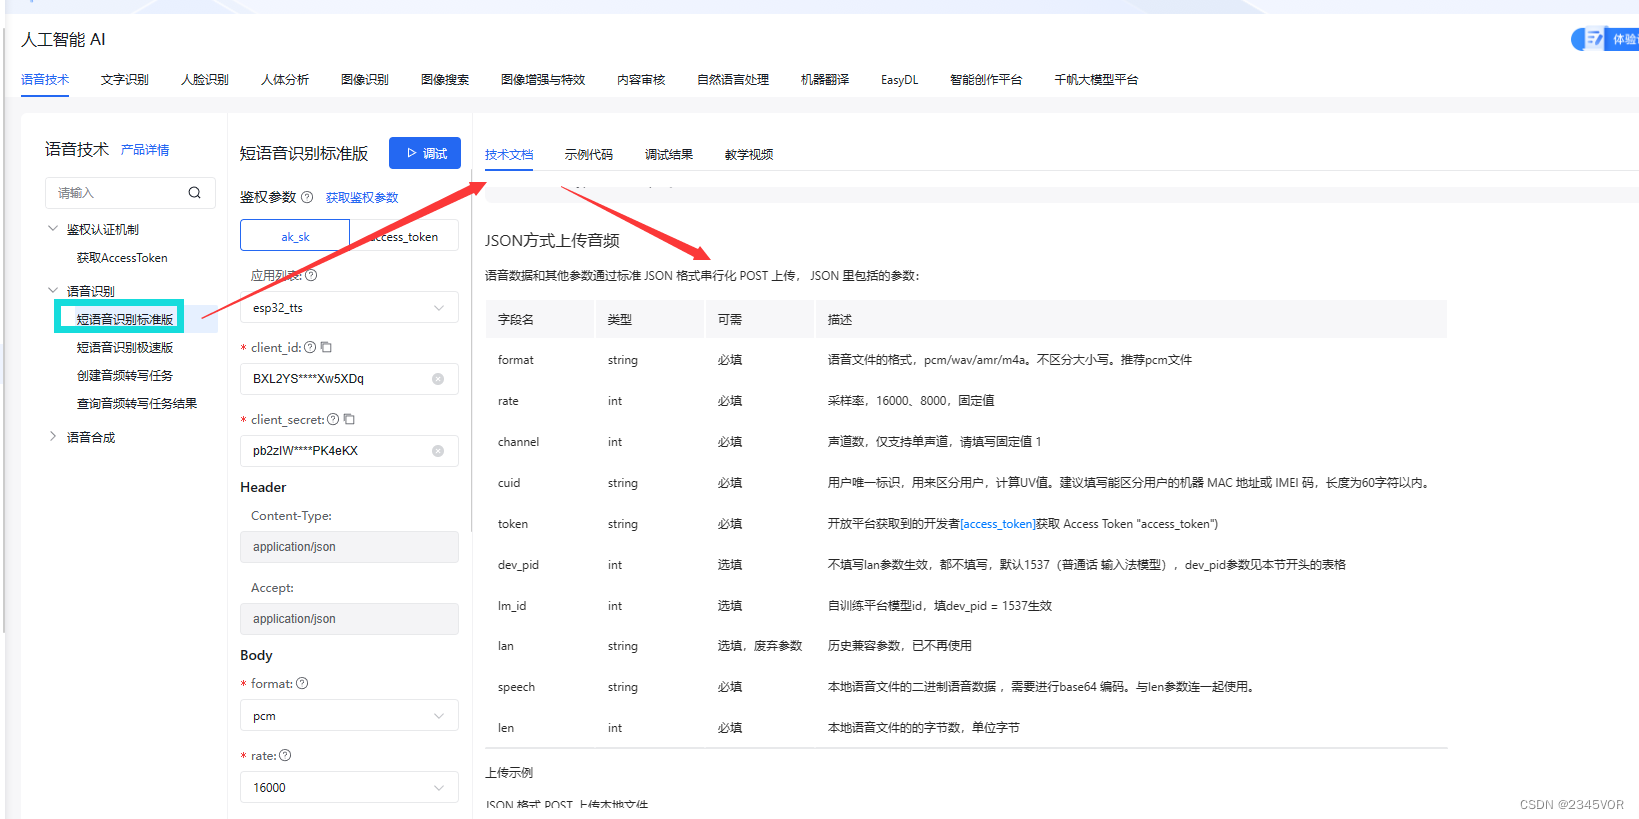
3.1 JSON格式
这里介绍使用使用JSON格式上传的方式,下图为JSON格式上传的一些必要的参数说明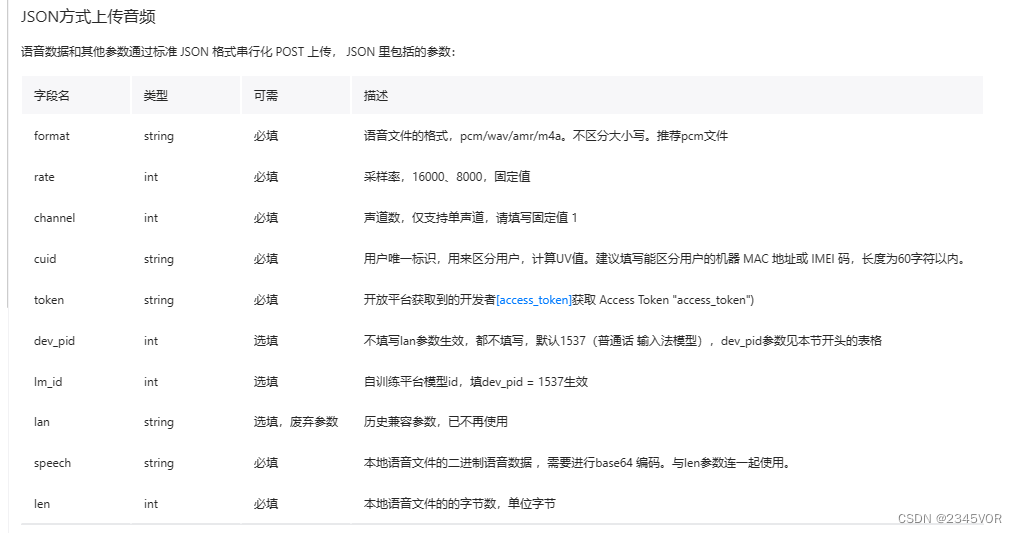
3.2 ESP32S3 Sense接入代码
图中对数据类型和内容说的很明确了,只需要按照这个格式打包好数据然后发送就行,下面是ESP32的具体实现代码。
#include <Arduino.h> #include "base64.h" #include "WiFi.h" #include "HTTPClient.h" #include "cJSON.h" #include <I2S.h> #include <ArduinoJson.h> // #define key 4 //端口0 // #define ADC 2 //端口39 // #define led 15 //端口2 const int buttonPin = 1; // the number of the pushbutton pin const int ledPin = 21; // the number of the LED pin HTTPClient http_client; // 1. Replace with your network credentials const char* ssid = "J09 502"; const char* password = "qwertyuiop111"; hw_timer_t* timer = NULL; #define data_len 16000 uint16_t adc_data[data_len]; //16000个数据,8K采样率,即2秒,录音时间为2秒,想要实现更长时间的语音识别,就要改这个数组大小 //和下面data_json数组的大小,改大一些。 uint8_t adc_start_flag = 0; //开始标志 uint8_t adc_complete_flag = 0; //完成标志 char data_json[45000]; //用于储存json格式的数据,大一点,JSON编码后数据字节数变成原来的4/3,所以得计算好,避免出现越界 void IRAM_ATTR onTimer(); void gain_token(void); void setup() { //Serial.begin(921600); Serial.begin(115200); // pinMode(ADC, ANALOG); // pinMode(buttonPin, INPUT_PULLUP); pinMode(ledPin, OUTPUT); // start I2S at 16 kHz with 16-bits per sample I2S.setAllPins(-1, 42, 41, -1, -1); if (!I2S.begin(PDM_MONO_MODE, 16000, 16)) { Serial.println("Failed to initialize I2S!"); while (1) ; // do nothing } uint8_t count = 0; WiFi.mode(WIFI_STA); WiFi.begin(ssid, password); while (WiFi.status() != WL_CONNECTED) { Serial.print("."); count++; if (count >= 75) { Serial.printf("\r\n-- wifi connect fail! --"); break; } vTaskDelay(200); } Serial.printf("\r\n-- wifi connect success! --\r\n"); // gain_token(); timer = timerBegin(0, 80, true); // 80M的时钟 80分频 1M timerAlarmWrite(timer, 125, true); // 1M 计125个数进中断 8K timerAttachInterrupt(timer, &onTimer, true); timerAlarmEnable(timer); timerStop(timer); //先暂停 } uint32_t time1, time2; void loop() { if (Serial.available() > 0) //按键按下 { if (Serial.read() == '1') { Serial.printf("Start recognition\r\n\r\n"); digitalWrite(ledPin, HIGH); adc_start_flag = 1; timerStart(timer); // time1=micros(); while (!adc_complete_flag) //等待采集完成 { ets_delay_us(10); } // time2=micros()-time1; timerStop(timer); adc_complete_flag = 0; //清标志 digitalWrite(ledPin, LOW); // Serial.printf("time:%d\r\n",time2); //打印花费时间 memset(data_json, '\0', strlen(data_json)); //将数组清空 strcat(data_json, "{"); strcat(data_json, "\"format\":\"pcm\","); strcat(data_json, "\"rate\":16000,"); //采样率 如果采样率改变了,记得修改该值,只有16000、8000两个固定采样率 strcat(data_json, "\"dev_pid\":1537,"); //中文普通话 strcat(data_json, "\"channel\":1,"); //单声道 strcat(data_json, "\"cuid\":\"666666\","); //识别码 随便打几个字符,但最好唯一 strcat(data_json, "\"token\":\"24.8f6133335e191.2592000.1713789066.282335-57722200\","); //token 这里需要修改成自己申请到的token strcat(data_json, "\"len\":32000,"); //数据长度 如果传输的数据长度改变了,记得修改该值,该值是ADC采集的数据字节数,不是base64编码后的长度 strcat(data_json, "\"speech\":\""); strcat(data_json, base64::encode((uint8_t*)adc_data, sizeof(adc_data)).c_str()); //base64编码数据 strcat(data_json, "\""); strcat(data_json, "}"); // Serial.println(data_json); int httpCode; http_client.setTimeout(5000); http_client.begin("http://vop.baidu.com/server_api"); //https://vop.baidu.com/pro_api http_client.addHeader("Content-Type", "application/json"); httpCode = http_client.POST(data_json); if (httpCode == 200) { if (httpCode == HTTP_CODE_OK) { String response = http_client.getString(); http_client.end(); Serial.println(response); // Parse JSON response DynamicJsonDocument jsonDoc(512); deserializeJson(jsonDoc, response); String outputText = jsonDoc["result"][0]; // 访问"result"数组,并获取其第一个元 // 输出结果 Serial.println(outputText); } else { Serial.printf("[HTTP] GET... failed, error: %s\n", http_client.errorToString(httpCode).c_str()); } } // while (!digitalRead(buttonPin)) // ; Serial.printf("Recognition complete\r\n"); } } vTaskDelay(1); } uint32_t num = 0; portMUX_TYPE timerMux = portMUX_INITIALIZER_UNLOCKED; void IRAM_ATTR onTimer() { // Increment the counter and set the time of ISR portENTER_CRITICAL_ISR(&timerMux); if (adc_start_flag == 1) { //Serial.println(""); // adc_data[num] = analogRead(ADC); adc_data[num] = I2S.read(); num++; if (num >= data_len) { adc_complete_flag = 1; adc_start_flag = 0; num = 0; //Serial.println(Complete_flag); } } portEXIT_CRITICAL_ISR(&timerMux); } // void gain_token(void) //获取token // { // int httpCode; // //注意,要把下面网址中的your_apikey和your_secretkey替换成自己的API Key和Secret Key // http_client.begin("https://aip.baidubce.com/oauth/2.0/token?grant_type=client_credentials&client_id=your_apikey&client_secret=your_secretkey"); // httpCode = http_client.GET(); // if (httpCode > 0) { // if (httpCode == HTTP_CODE_OK) { // String payload = http_client.getString(); // Serial.println(payload); // } // } else { // Serial.printf("[HTTP] GET... failed, error: %s\n", http_client.errorToString(httpCode).c_str()); // } // http_client.end(); // } 3.3 ESP32接入代码
使用ESP32接入百度智能云实现在线语音识别,max9814麦克风模块接GPIO2用做语音输入,一个按键接GPIO3来控制数据的采集和上传
#include <Arduino.h> #include "base64.h" #include "WiFi.h" #include "HTTPClient.h" #include "cJSON.h" #include <ArduinoJson.h> // 1、修改按键和max9814接口 #define key 3 #define ADC 2 // 2、修改百度语言技术的用户信息:https://console.bce.baidu.com/ai/?fromai=1#/ai/speech/app/list const int DEV_PID = 1537; const char *CUID = "577200"; const char *CLIENT_ID = "BXL2YS33B7Xw5XDq"; const char *CLIENT_SECRET = "pb2zIW2Nch2uNtc9WPK4eKX"; String token; // 全局变量声明 HTTPClient http_client; hw_timer_t *timer = NULL; const int recordTimeSeconds = 3;//录音时间秒为单位 const int adc_data_len = 16000 * recordTimeSeconds; const int data_json_len = adc_data_len * 2 * 1.4; uint16_t *adc_data; char *data_json; uint8_t adc_start_flag = 0; uint8_t adc_complete_flag = 0; uint32_t num = 0; portMUX_TYPE timerMux = portMUX_INITIALIZER_UNLOCKED; // 函数声明 void IRAM_ATTR onTimer(); String gainToken(); void assembleJson(String token); void sendToSTT(); void setup() { Serial.begin(115200); pinMode(ADC, ANALOG); pinMode(key, INPUT_PULLUP); WiFi.disconnect(true); // 3、填写您的wifi账号密码 WiFi.begin("J09 502", "qwertyuiop111"); while (WiFi.status() != WL_CONNECTED) { Serial.print("."); vTaskDelay(200); } Serial.println("\n-- wifi connect success! --"); token = gainToken(); timer = timerBegin(0, 40, true); timerAlarmWrite(timer, 125, true); timerAttachInterrupt(timer, &onTimer, true); timerAlarmEnable(timer); timerStop(timer); // 先暂停 // 动态分配PSRAM adc_data = (uint16_t *)ps_malloc(adc_data_len * sizeof(uint16_t)); if (!adc_data) { Serial.println("Failed to allocate memory for adc_data"); } data_json = (char *)ps_malloc(data_json_len * sizeof(char)); // 根据需要调整大小 if (!data_json) { Serial.println("Failed to allocate memory for data_json"); } } uint32_t time1, time2; void loop() { if (digitalRead(key) == 1) { delay(10); if (digitalRead(key) == 1) { Serial.println("开始录音"); adc_start_flag = 1; timerStart(timer); while (!adc_complete_flag) { ets_delay_us(10); } Serial.println("录音结束"); timerStop(timer); adc_complete_flag = 0; assembleJson(token); sendToSTT(); // while (!digitalRead(key)); Serial.println("Recognition complete"); } } } void assembleJson(String token) { memset(data_json, '\0', data_json_len * sizeof(char)); strcat(data_json, "{"); strcat(data_json, "\"format\":\"pcm\","); strcat(data_json, "\"rate\":16000,"); strcat(data_json, "\"dev_pid\":1537,"); strcat(data_json, "\"channel\":1,"); strcat(data_json, "\"cuid\":\"57722200\","); strcat(data_json, "\"token\":\""); strcat(data_json, token.c_str()); strcat(data_json, "\","); sprintf(data_json + strlen(data_json), "\"len\":%d,", adc_data_len * 2); strcat(data_json, "\"speech\":\""); strcat(data_json, base64::encode((uint8_t *)adc_data, adc_data_len * sizeof(uint16_t)).c_str()); strcat(data_json, "\""); strcat(data_json, "}"); } void sendToSTT() { http_client.begin("http://vop.baidu.com/server_api"); http_client.addHeader("Content-Type", "application/json"); int httpCode = http_client.POST(data_json); if (httpCode > 0) { if (httpCode == HTTP_CODE_OK) { String payload = http_client.getString(); Serial.println(payload); } } else { Serial.printf("[HTTP] POST failed, error: %s\n", http_client.errorToString(httpCode).c_str()); } http_client.end(); } void IRAM_ATTR onTimer() { // Increment the counter and set the time of ISR portENTER_CRITICAL_ISR(&timerMux); if (adc_start_flag == 1) { // Serial.println(""); adc_data[num] = analogRead(ADC); num++; if (num >= adc_data_len) { adc_complete_flag = 1; adc_start_flag = 0; num = 0; // Serial.println(Complete_flag); } } portEXIT_CRITICAL_ISR(&timerMux); } String gainToken() { HTTPClient http; String token; String url = String("https://aip.baidubce.com/oauth/2.0/token?grant_type=client_credentials&client_id=") + CLIENT_ID + "&client_secret=" + CLIENT_SECRET; http.begin(url); int httpCode = http.GET(); if (httpCode > 0) { String payload = http.getString(); DynamicJsonDocument doc(1024); deserializeJson(doc, payload); token = doc["access_token"].as<String>(); Serial.println(token); } else { Serial.println("Error on HTTP request for token"); } http.end(); return token; } 上面代码是将数据拼接成要求的JSON的格式并通过POST的方式发送到请求API,并接收打印返回的数据消息。使用的定时器设置成8K频率定时采集音频数据,上面代码中并未展示,后面会附上完整代码。
ESP32是有JSON库的,在 “cJSON.h” 头文件中,但是我没有用,因为我发现数据太长时不知道为啥会出现莫名其妙的错误,也没深究,就使用函数strcat()将数据拼接成规定的格式,好使,就是写的时候麻烦一些,但问题不大。
POST发送数据有一个固定头部:Content-Type:application/json,POST前需要设置一下。
4. 接收数据
参考以下烧录配置,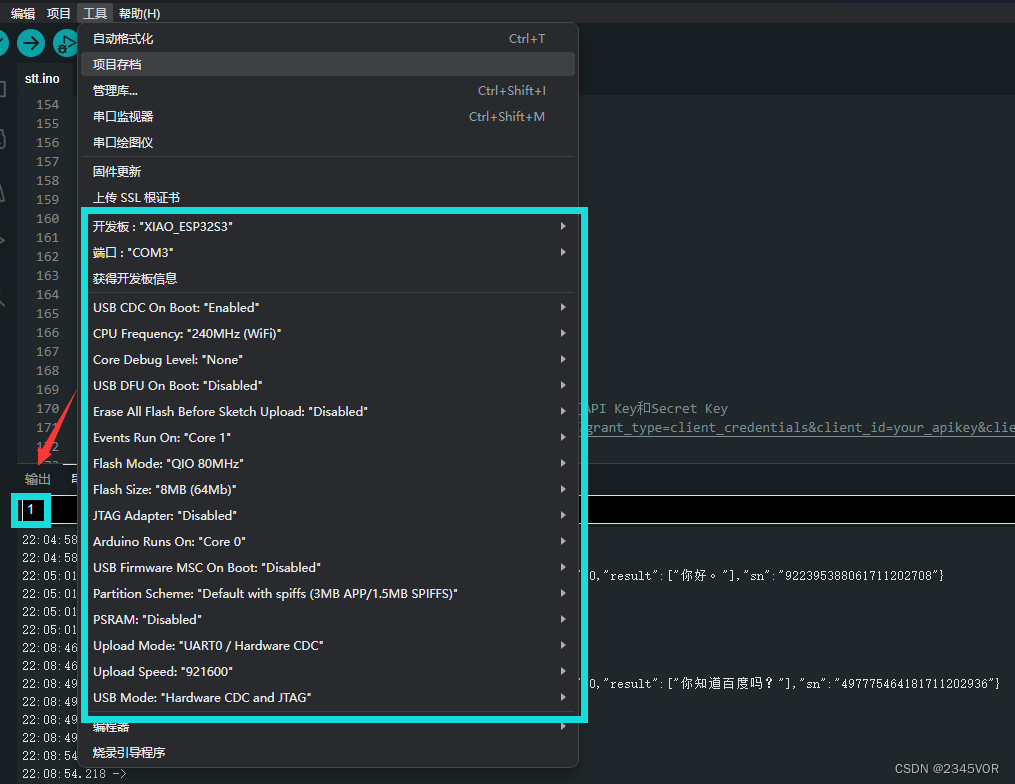
串口输入字符“1”,点击按回车键,然后有2s录音时间。等待百度在线语音识别返回,在上一步的代码中实现了接收数据,这里列一下返回的数据。
22:04:58.854 -> Start recognition 22:04:58.854 -> 22:05:01.558 -> {"corpus_no":"7349559668823131804","err_msg":"success.","err_no":0,"result":["你好。"],"sn":"922395388061711202708"} 22:05:01.558 -> 22:05:01.558 -> 你好。 22:05:01.558 -> Recognition complete 22:08:46.838 -> Start recognition 22:08:46.838 -> 22:08:49.809 -> {"corpus_no":"7349560648200206506","err_msg":"success.","err_no":0,"result":["你知道百度吗?"],"sn":"497775464181711202936"} 22:08:49.809 -> 22:08:49.809 -> 你知道百度吗? 22:08:49.809 -> Recognition complete 22:08:54.218 -> Start recognition 22:08:54.218 -> 22:08:57.084 -> {"corpus_no":"7349560678205790969","err_msg":"success.","err_no":0,"result":["我喜欢小黄人。"],"sn":"748488478211711202943"} 22:08:57.084 -> 22:08:57.084 -> 我喜欢小黄人。 22:08:57.084 -> Recognition complete 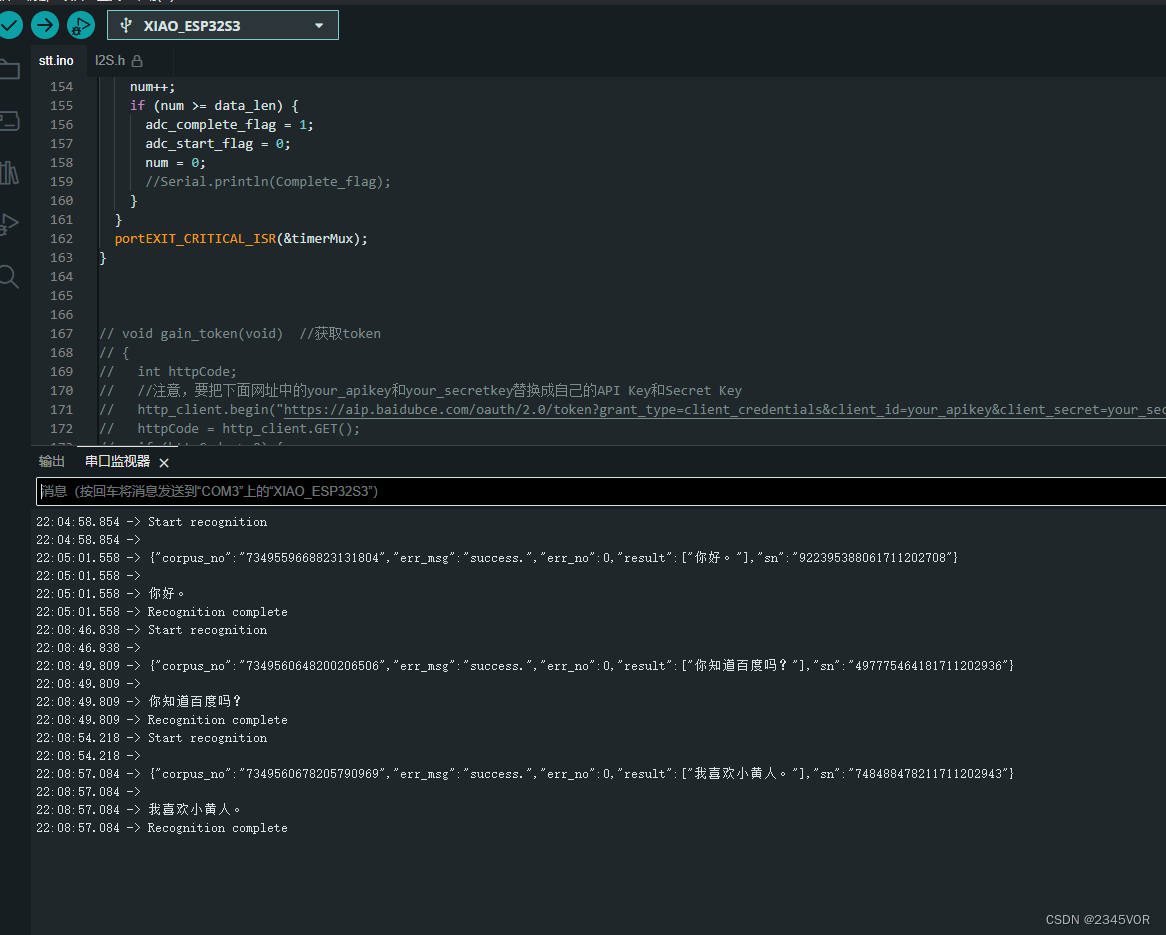
数据发送成功则会返回正确的识别数据,当然声音信号不好时返回的语音识别也会不准确。
5. 总结
本文使用Seeed XIAO ESP32S3 Sense开发板接入百度智能云实现在线语音识别。自带麦克风模块用做语音输入,通过串口发送字符“1”来控制数据的采集和上传。从而实现对外部世界进行感知,充分认识这个有机与无机的环境,科学地合理地进行创作和发挥效益,然后为人类社会发展贡献一点微薄之力。🤣🤣🤣
- 我会持续更新对应专栏博客,非常期待你的三连!!!🎉🎉🎉
- 如果鹏鹏有哪里说的不妥,还请大佬多多评论指教!!!👍👍👍
- 下面有我的🐧🐧🐧群推广,欢迎志同道合的朋友们加入,期待与你的思维碰撞😘😘😘
