
阅读量:2
文章目录
基于LoRA进行Stable Diffusion的微调
数据集
本次微调使用的数据集为: LambdaLabs的Pokemon数据集
使用git clone命令下载数据集
git clone https://huggingface.co/datasets/lambdalabs/pokemon-blip-captions 数据集一共883条样本,包含两个部分:image(图)和 text(文),如下图所示。
模型下载
git clone https://huggingface.co/runwayml/stable-diffusion-v1-5 环境配置
# 创建一个新的conda环境 conda create -n diffusers python==3.10 # 激活conda环境 conda activate diffusers # 下载模型仓库 git clone https://github.com/huggingface/diffusers # 进入diffusers目录 cd diffusers # 进行安装 pip install . cd examples/text_to_image # 安装环境所需的包 pip install -r requirements.txt 微调过程
微调时只需要使用以下命令运行 train_text_to_image_lora.py 文件即可。需要根据下载的路径文件地址对相应的参数进行修改,如 MODEL_NAME、DATASET_NAME 等;也可以根据GPU资源调整相应的参数,如 train_batch_size、gradient_accumulation_steps 等。
export MODEL_NAME="/data/sim_chatgpt/stable-diffusion-v1-5" export OUTPUT_DIR="./finetune/lora/pokemon" export DATASET_NAME="./pokemon-blip-captions" nohup accelerate launch --mixed_precision="fp16" train_text_to_image_lora.py \ --pretrained_model_name_or_path=$MODEL_NAME \ --dataset_name=$DATASET_NAME \ --dataloader_num_workers=8 \ --resolution=512 --center_crop --random_flip \ --train_batch_size=2 \ --gradient_accumulation_steps=4 \ --max_train_steps=7500 \ --learning_rate=1e-04 \ --max_grad_norm=1 \ --lr_scheduler="cosine" --lr_warmup_steps=0 \ --output_dir=${OUTPUT_DIR} \ --checkpointing_steps=500 \ --validation_prompt="Totoro" \ --seed=1337 \ >> finetune_log0725.out 2>&1 & 备注:参数设置参考这里,去掉了
export HUB_MODEL_ID=“pokemon-lora”
–push_to_hub
–hub_model_id=${HUB_MODEL_ID}
–report_to=wandb
样本数据量为883,这里设置了train_batch_size为2,max_train_steps为7500,
显存占用约11个G,训练时长约8个小时左右。
显存占用情况如下: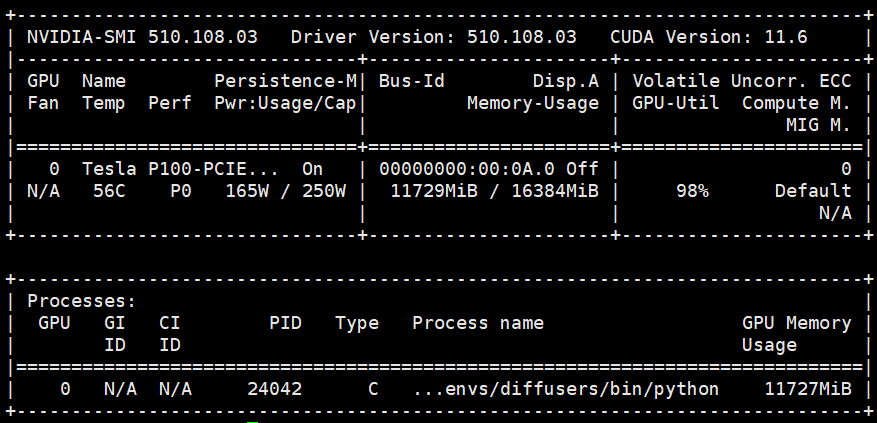
推理
微调完成后,可以使用下面代码进行推理。
from diffusers import StableDiffusionPipeline import torch model_path = "./finetune/lora/pokemon" pipe = StableDiffusionPipeline.from_pretrained("/data/sim_chatgpt/stable-diffusion-v1-5", torch_dtype=torch.float16) pipe.unet.load_attn_procs(model_path) pipe.to("cuda") prompt = "A pokemon with green eyes and red legs." image = pipe(prompt, num_inference_steps=30, guidance_scale=7.5).images[0] image.save("pokemon.png") 代码运行后,会生成一个 pokemon.png 的图片,如下图所示。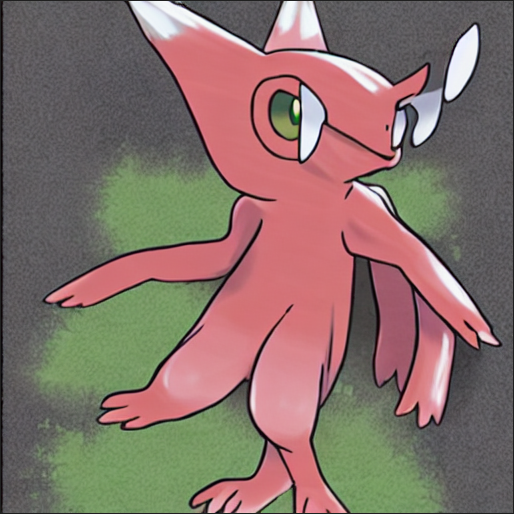
WebUI部署
git clone https://github.com/AUTOMATIC1111/stable-diffusion-webui 需要将原模型文件以及微调后的lora模型文件放到 ~/stable-diffusion-webui/models/Stable-diffusion 下
cp -r /data/sim_chatgpt/stable-diffusion-v1-5/v1-5-pruned.safetensors ~/stable-diffusion-webui/models/Stable-diffusion/v1-5-pruned.safetensors mkdir ~/stable-diffusion-webui/models/Lora cp -r ~/diffusers/examples/text_to_image/finetune/lora/pokemon/* ~/stable-diffusion-webui/models/Lora/ 执行下面代码,即可完成部署。
./webui.sh --no-download-sd-model --xformers --no-gradio-queue 报错:
RuntimeError: Couldn’t install gfpgan.
解决办法:
python -m pip install https://github.com/TencentARC/GFPGAN/archive/8d2447a2d918f8eba5a4a01463fd48e45126a379.zip --prefer-binary --user 报错:
ERROR: No matching distribution found for tb-nightly
解决:阿里源没有tb-nightly这个包,更换成阿里源即可。
pip config set global.index-url https://mirrors.aliyun.com/pypi/simple 
参考:
https://huggingface.co/blog/lora
https://huggingface.co/blog/zh/lora
https://github.com/AUTOMATIC1111/stable-diffusion-webui
