阅读量:4
因为服务器的升级和调整,有时候会对安装 Sonatype Nexus 的服务器进行迁移到新服务器上。
从技术架构上来说,Sonatype Nexus 我们使用的是 AWS 的存储,所以我们并不需要拷贝大量的数据。
文件夹结构
在备份和恢复之前,我们需要知道我们要拷贝那些文件夹。
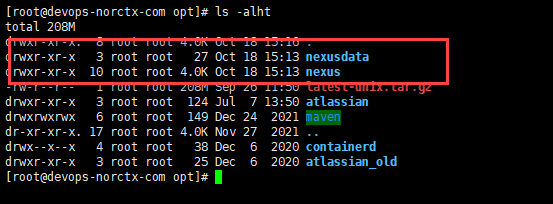
Nexus 真正程序运行使用的文件是 2 个,我们把这 2 个文件夹部署在了 /opt 目录下。
如下图:
在备份迁移的时候,我们需要把这 2 个文件夹给备份到新服务器上。
可以使用 tar 压缩后转移的方式。
当我们从老服务器上把数据下载下来后,可以直接把老服务器上的这 2 个文件夹拷贝到新的服务器上。
新服务器上设置用户权限
在新服务器上依次运行命令:
useradd --system --no-create-home nexus chown -R nexus:nexus /opt/nexus chown -R nexus:nexus /opt/nexusdata 因为我们是拷贝服务器的配置来进行安装的,所以其他的配置都不需要修改,但是针对 Linux 操作系统平台的一些配置还是需要修改的。
修改用户打开文件限制
这个是 Linux 的限制,我们需要进行修改。
打开文件:
vi /etc/security/limits.conf
在文件的最后添加下面的内容。
nexus - nofile 65536
然后保存退出。
设置 Nexus 为服务
使用命令编辑下面的文件:
vi /etc/systemd/system/nexus.service
将下面的内容复制到这个文件中。
[Unit] Description=Nexus Service After=syslog.target network.target [Service] Type=forking LimitNOFILE=65536 ExecStart=/opt/nexus/bin/nexus start ExecStop=/opt/nexus/bin/nexus stop User=nexus Group=nexus Restart=on-failure [Install] WantedBy=multi-user.target 将服务设置开机启动,并且启动 nexus 服务。
依次运行下面的命名:
systemctl daemon-reload systemctl enable nexus.service 启动服务
输入下面的命令来启动服务。
systemctl start nexus 查看服务启动状态
运行下面的命令来查看服务启动的状态。
tail -f /opt/nexusdata/nexus3/log/nexus.log 

