阅读量:3
vue 如何做一个动态的 BreadCrumb 组件 el-breadcrumb ElementUI
一、ElementUI 中的 BreadCrumb 定义
elementUI 中的 Breadcrumb 组件是这样定义的
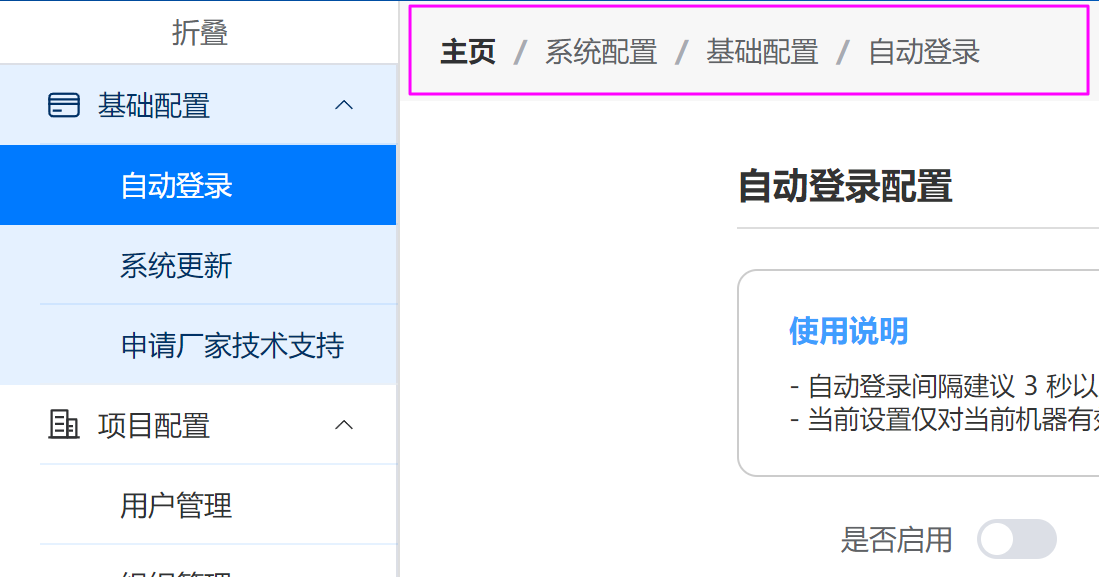
<template> <el-breadcrumb separator="/"> <el-breadcrumb-item :to="{ path: '/' }">主页</el-breadcrumb-item> <el-breadcrumb-item>系统配置</el-breadcrumb-item> <el-breadcrumb-item>基础配置</el-breadcrumb-item> <el-breadcrumb-item>自动登录</el-breadcrumb-item> </el-breadcrumb> </template> 效果如图:
二、实现原理
我们需要实现的是,让它自己通过路由去填写这部分内容
原理是根据当前路由值,拆分成多个段,然后通过路由 path 去匹配对应的路由名称,再填入到上面的内容中即可。
比如:
1. 当前的路由值是 /system/normal-setup/auto-login
2. 通过拆分 / 生成一个数组
3. 依次匹配对应的路由名称
得到这个数组之后,依次去路由列表中匹配对应的路由名称
/system系统配置/system/normal-setup基础配置/system/normal-setup/auto-login自动登录
4. 结果
这样就得到了一个 breadCrumb 数组,直接遍历这个数组,显示 BreadCrumb 即可
三、具体实现过程
知道了上面的实现原理,才会有具体的实现过程,这个过程还是有点麻烦的。
1. 处理路由数据
项目中用到的路由数据是这样的树形结构,路由数据的定义是这样的,里面的 children 可以嵌套任意层:
interface MenuEntity { id?: number | null, parent_id: number, name: string, icon?: string, type: EnumMenuType, // 1->目录 2->菜单 3->按钮 4->外链 path: string, component?: string, visible: EnumMenuVisible, // 1->可见 2->隐藏 默认为1 redirect: string, sort: number, // 默认为 20 perm: string, // permission created_at?: string, updated_at?: string, children?: MenuEntity[] } 实际的数据是这样的:
{ "name": "系统配置", "id": 10, "parent_id": -1, "type": 1, "path": "/system", "component": "", "visible": 1, "redirect": "", "perm": "", "sort": 100, "icon": "Setting", "created_at": "2024-02-26T14:55:12+08:00", "updated_at": "2024-02-26T16:12:34+08:00", "children": [ { "name": "基础配置", "id": 12, "parent_id": -1, "type": 1, "path": "/system/normal-setup", "component": "", "visible": 1, "redirect": "", "perm": "", "sort": 10, "icon": "CreditCard", "created_at": "2024-02-26T15:20:15+08:00", "updated_at": "2024-02-26T16:11:56+08:00", "children": [ { "name": "自动登录", "id": 13, "parent_id": 12, "type": 2, "path": "/system/normal-setup/auto-login", "component": "System/NormalSetup/AutoLoginSetup.vue", "visible": 1, "redirect": "", "perm": "", "sort": 30, "icon": "User", "created_at": "2024-02-26T15:24:18+08:00", "updated_at": "2024-05-17T14:11:52+08:00", "children": [] }, { "name": "系统更新", "id": 28, "parent_id": 12, "type": 2, "path": "/system/normal-setup/system-update", "component": "System/SystemUpdate.vue", "visible": 1, "redirect": "", "perm": "", "sort": 50, "icon": "UploadFilled", "created_at": "2024-02-26T16:19:49+08:00", "updated_at": "2024-05-17T14:11:39+08:00", "children": [] }, { "name": "申请厂家技术支持", "id": 29, "parent_id": 12, "type": 2, "path": "/system/normal-setup/factory-help", "component": "User/Space.vue", "visible": 1, "redirect": "", "perm": "", "sort": 40, "icon": "SuitcaseLine", "created_at": "2024-02-26T16:20:11+08:00", "updated_at": "2024-03-27T09:04:20+08:00", "children": [] } ] } ] } 为了好后续匹配 path 到路由名,需要将这个数据平化成一个数组,并构建一个 Map<path, RouteItem> 这样的一个 Map 数据,目的是当执行下面操作时,取到对应的路由数据
flatMenuPathNameMap.get('/system') // 最终取到这样的数据 { "name": "系统配置", "id": 10, "parent_id": -1, "type": 1, "path": "/system", "component": "", "visible": 1, "redirect": "", "perm": "", "sort": 100, "icon": "Setting", "created_at": "2024-02-26T14:55:12+08:00", "updated_at": "2024-02-26T16:12:34+08:00", } 平化树形数据、生成对应的 Map 数据结构:
/** * 菜单相关 * 这里是单独放到了 pinia 中 */ export const useMenuStore = defineStore('menuStore', { state: () => ({ menus: [] as Array<RouteRecordRaw>, flatMenuArray: [] as Array<MenuEntity>, flatMenuPathNameMap: new Map<string, string>() }), actions: { generateMenuArrayAndMap(){ let menuString = localStorage.getItem('dataMenu') let menusCache = menuString ? JSON.parse(menuString) as Array<MenuEntity> : [] as Array<MenuEntity> let flatMenuArray = recursionMenuData(menusCache) this.flatMenuArray = flatMenuArray this.flatMenuPathNameMap = new Map(flatMenuArray.map(item => [item.path, item.name])) // 递归方法,平化菜单数据 function recursionMenuData(menuArray: Array<MenuEntity>){ let tempArray: Array<MenuEntity> = [] menuArray.forEach(item => { if (item.children && item.children.length > 0){ tempArray = tempArray.concat(recursionMenuData(item.children)) // 添加本身,并去除 children 属性 delete item.children tempArray.push(item) } else { tempArray.push(item) } }) return tempArray } }, } }) 使用的时候
import {useMenuStore, useProjectStore} from "./pinia"; const storeMenu = useMenuStore() // 当执行下面的操作时就会补全 storeMenu.flatMenuArray 和 storeMenu.flatMenuPathNameMap storeMenu.generateMenuArrayAndMap() 路由树的基础数据是这样的:
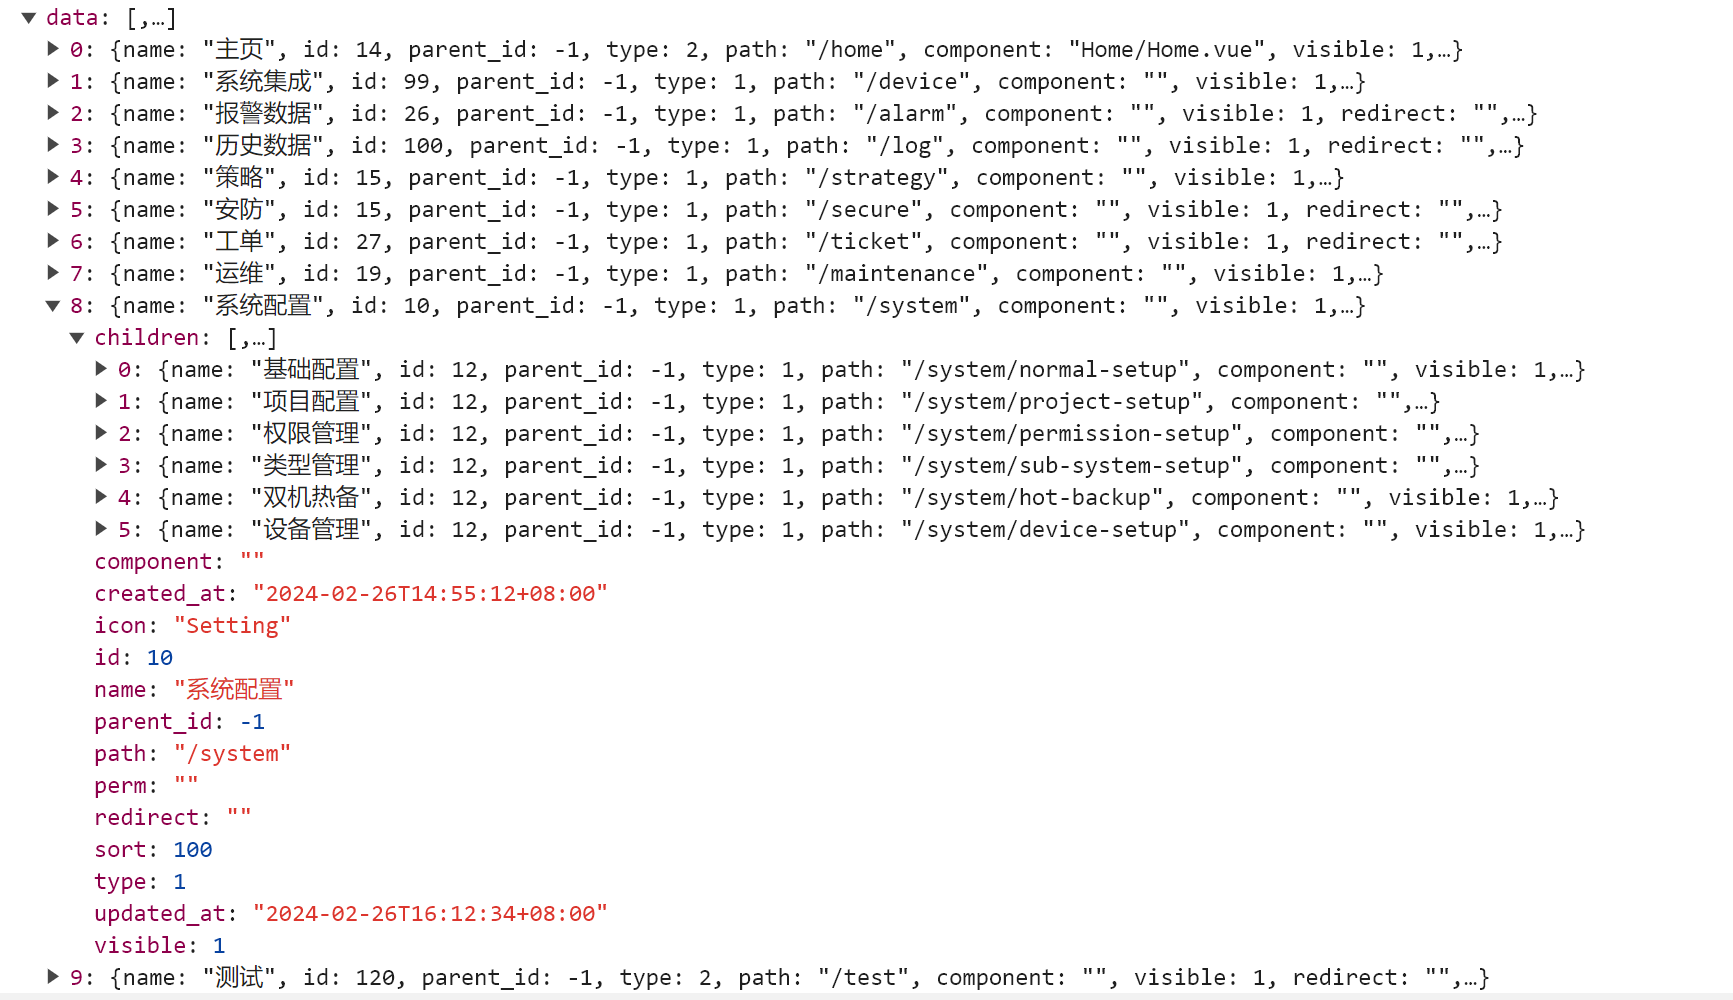
平化后的路由数组是这样的: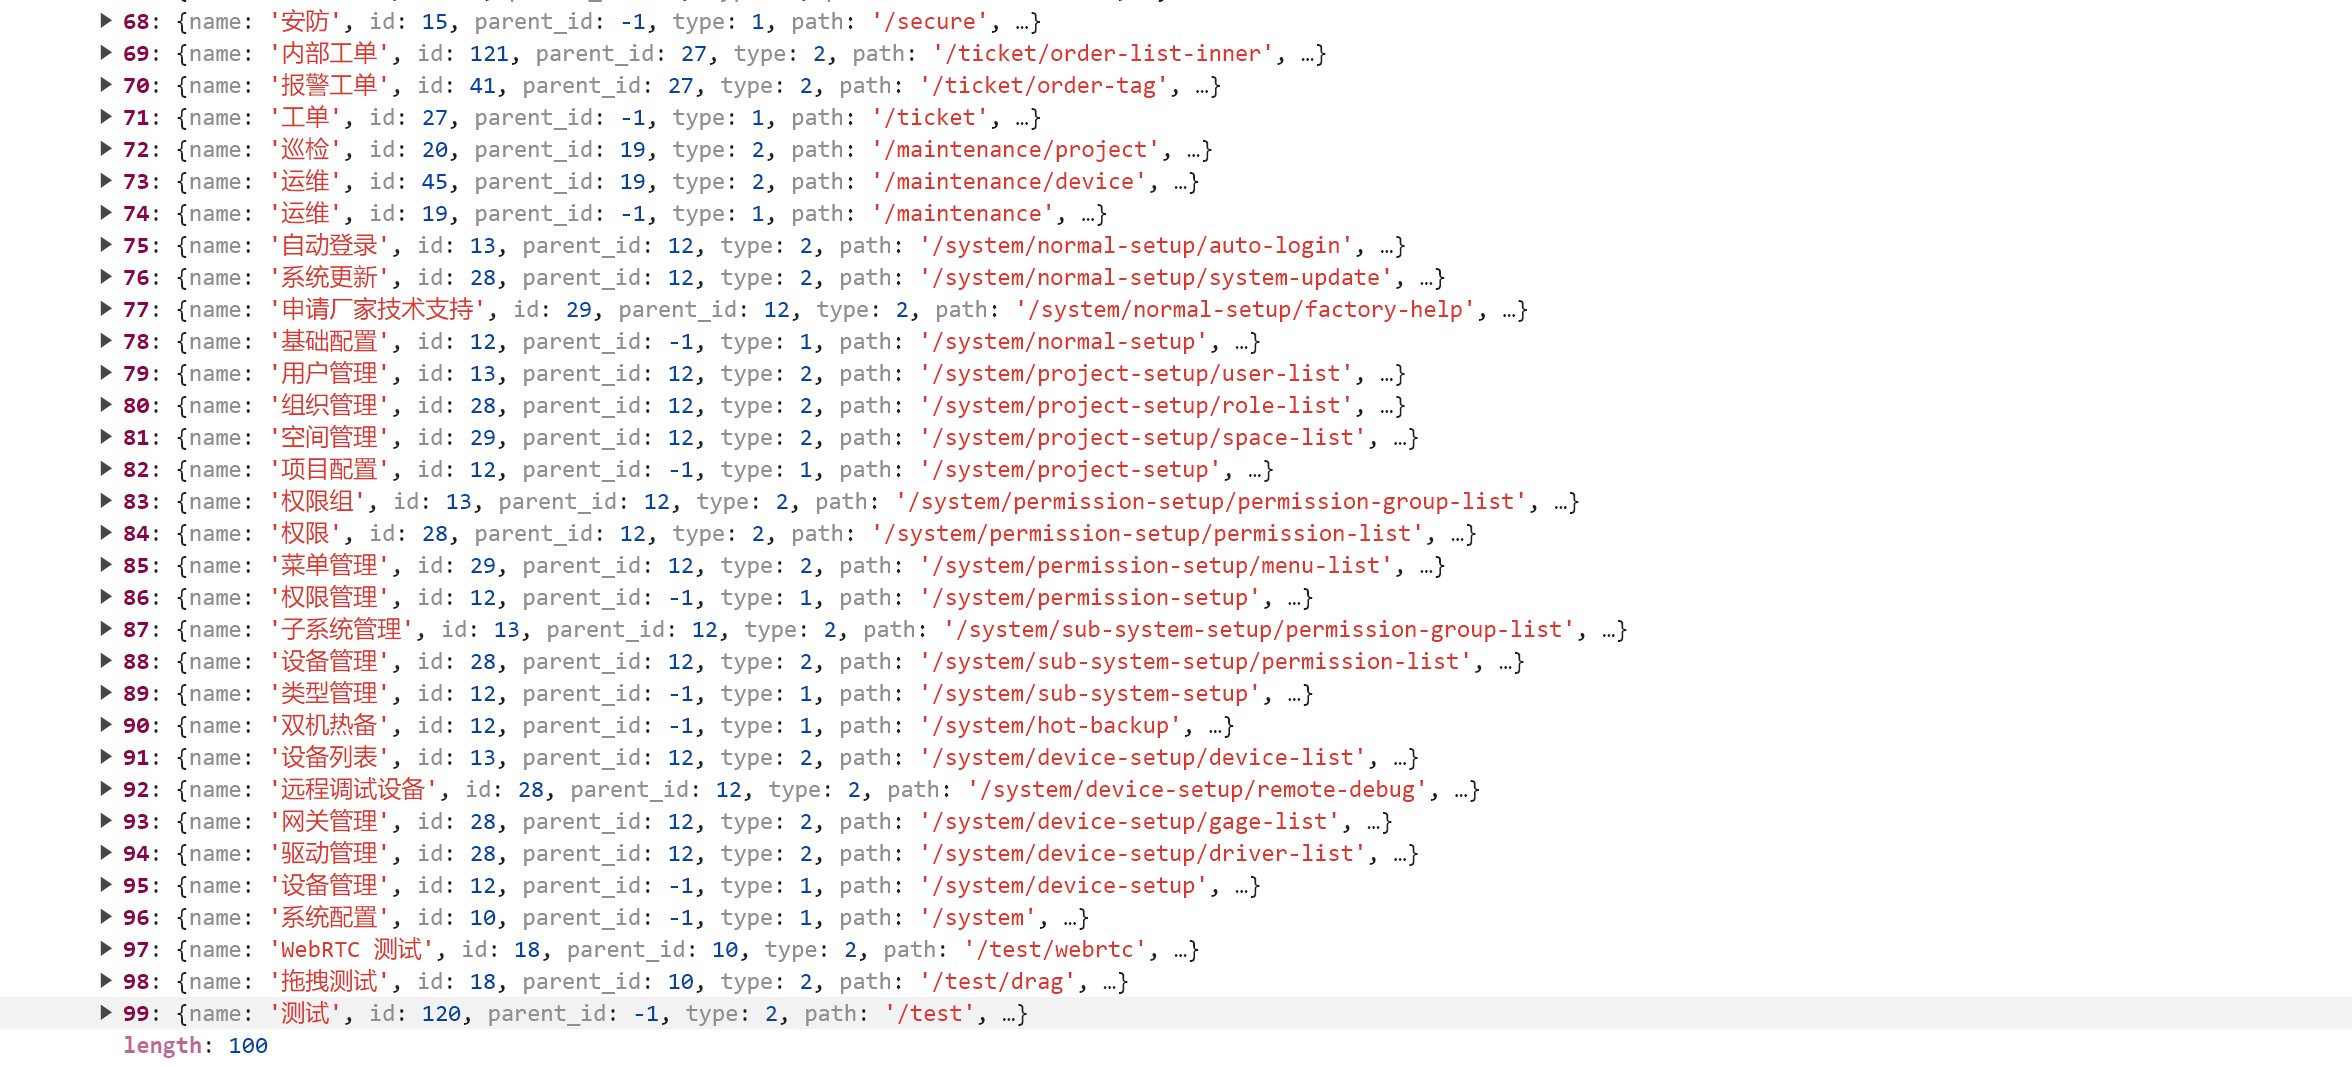
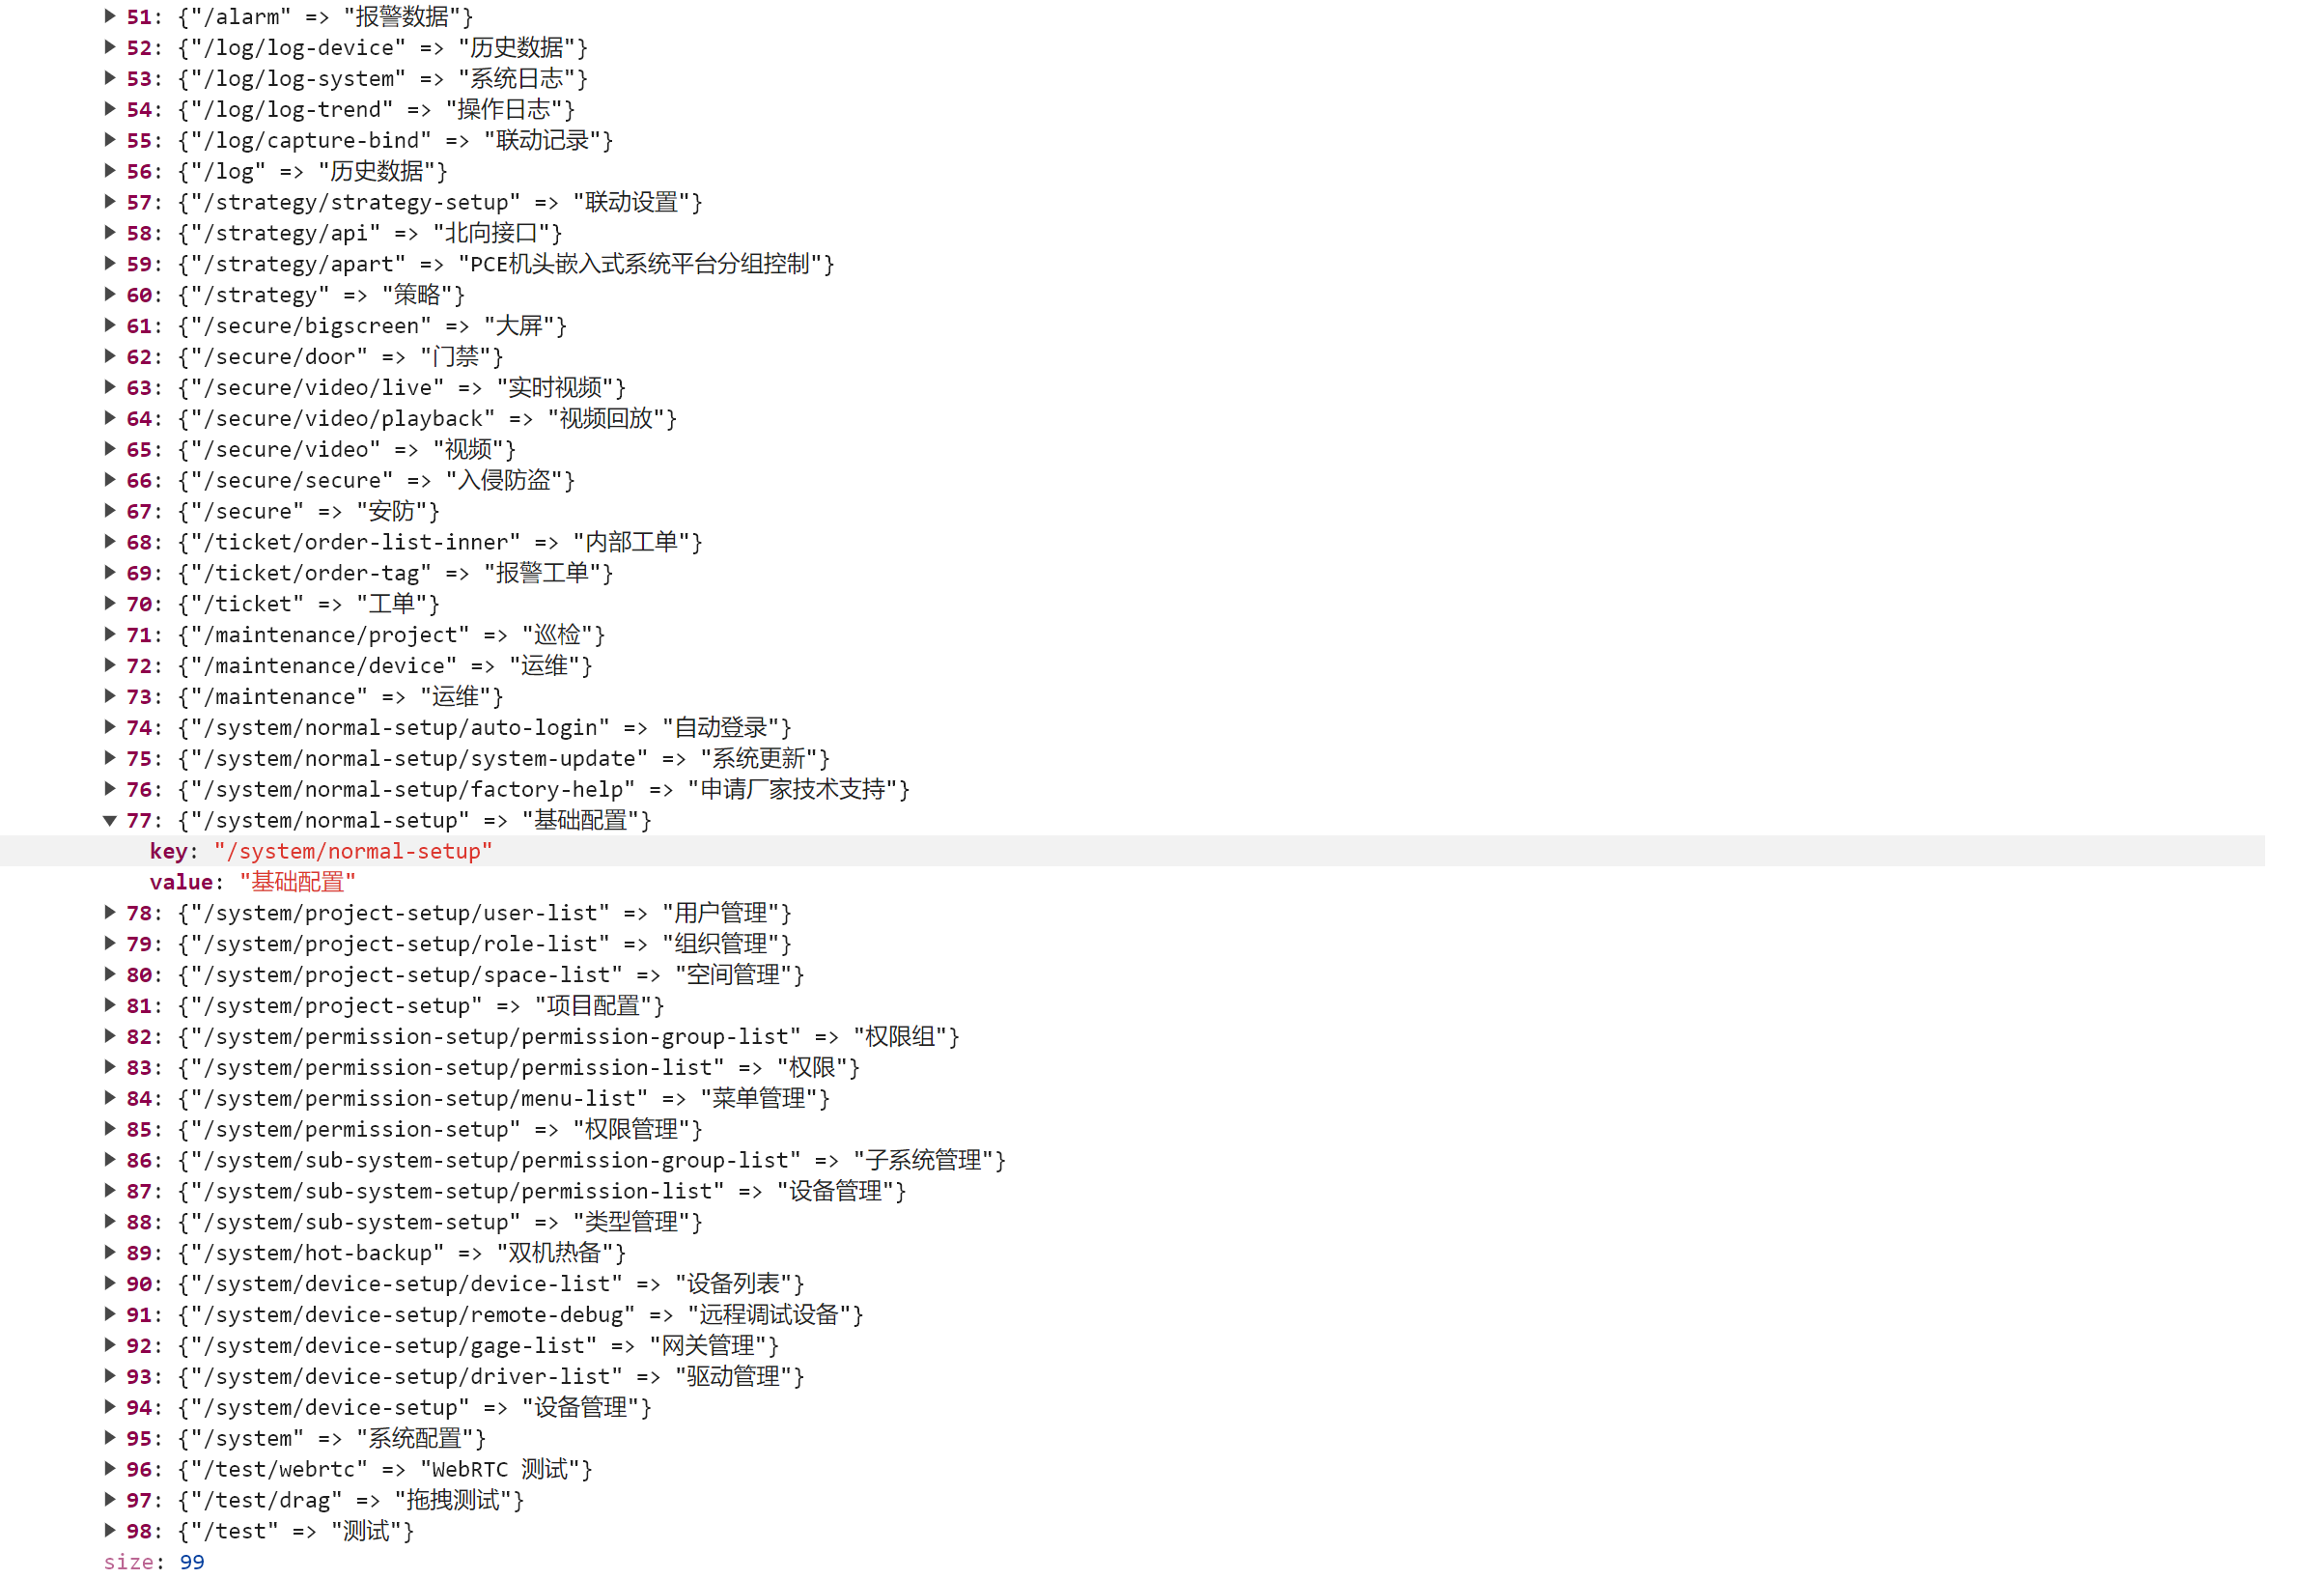
最终生成的 Map 数据是这样的:
2. 拆分当前路由 path,并匹配
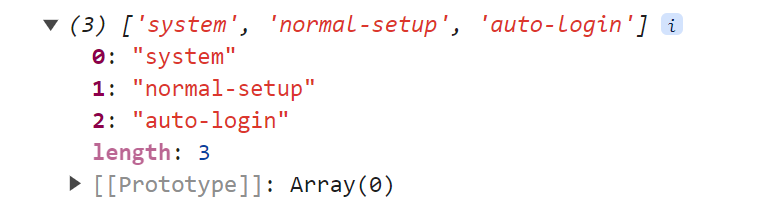
比如当前路由是 /system/normal-setup/auto-login,把它通过 / 拆分之后就是这样的结果
import {useRoute} from "vue-router"; const route = useRoute() let routeSectionArray = route.path.split('/').filter(item => item !== '') // 这样拆分之后,前面会多出一个空白的 "" ,所以这里剔除了它
接下来要做的就是通过上面的 routerSectionArray 生成下面的几个路由组合,再去之前生成的 Map 中匹配对应的路由名即可
/system/system/normal-setup/system/normal-setup/auto-login
匹配之后就是这样的结果
/system系统配置/system/normal-setup基础配置/system/normal-setup/auto-login自动登录
代码是这样的:
import {useRoute} from "vue-router"; import {onMounted, ref} from "vue"; import {useMenuStore} from "@/pinia"; const storeMenu = useMenuStore() const route = useRoute() const breadCrumbArray = ref<Array<{name: string, path: string}>>([]) onMounted(()=>{ let routeSectionArray = route.path.split('/').filter(item => item !== '') console.log(routeSectionArray) routeSectionArray.forEach((_, index) => { let path = `/${routeSectionArray.slice(0,index + 1).join('/')}` let pathName = storeMenu.flatMenuPathNameMap.get(path) console.log('---',pathName, path) if (pathName){ breadCrumbArray.value.push({name: pathName, path: path}) } }) }) 四、搭配其它组件构建页面
弄好上面的 BreadCrumb 组件之后,就可以不用再管它内部的内容了,它会自动根据当前路由值生成对应的内容。
这样我们就可以放心的把它放到页面结构中了。
比如我的页面主要结构是这样的:
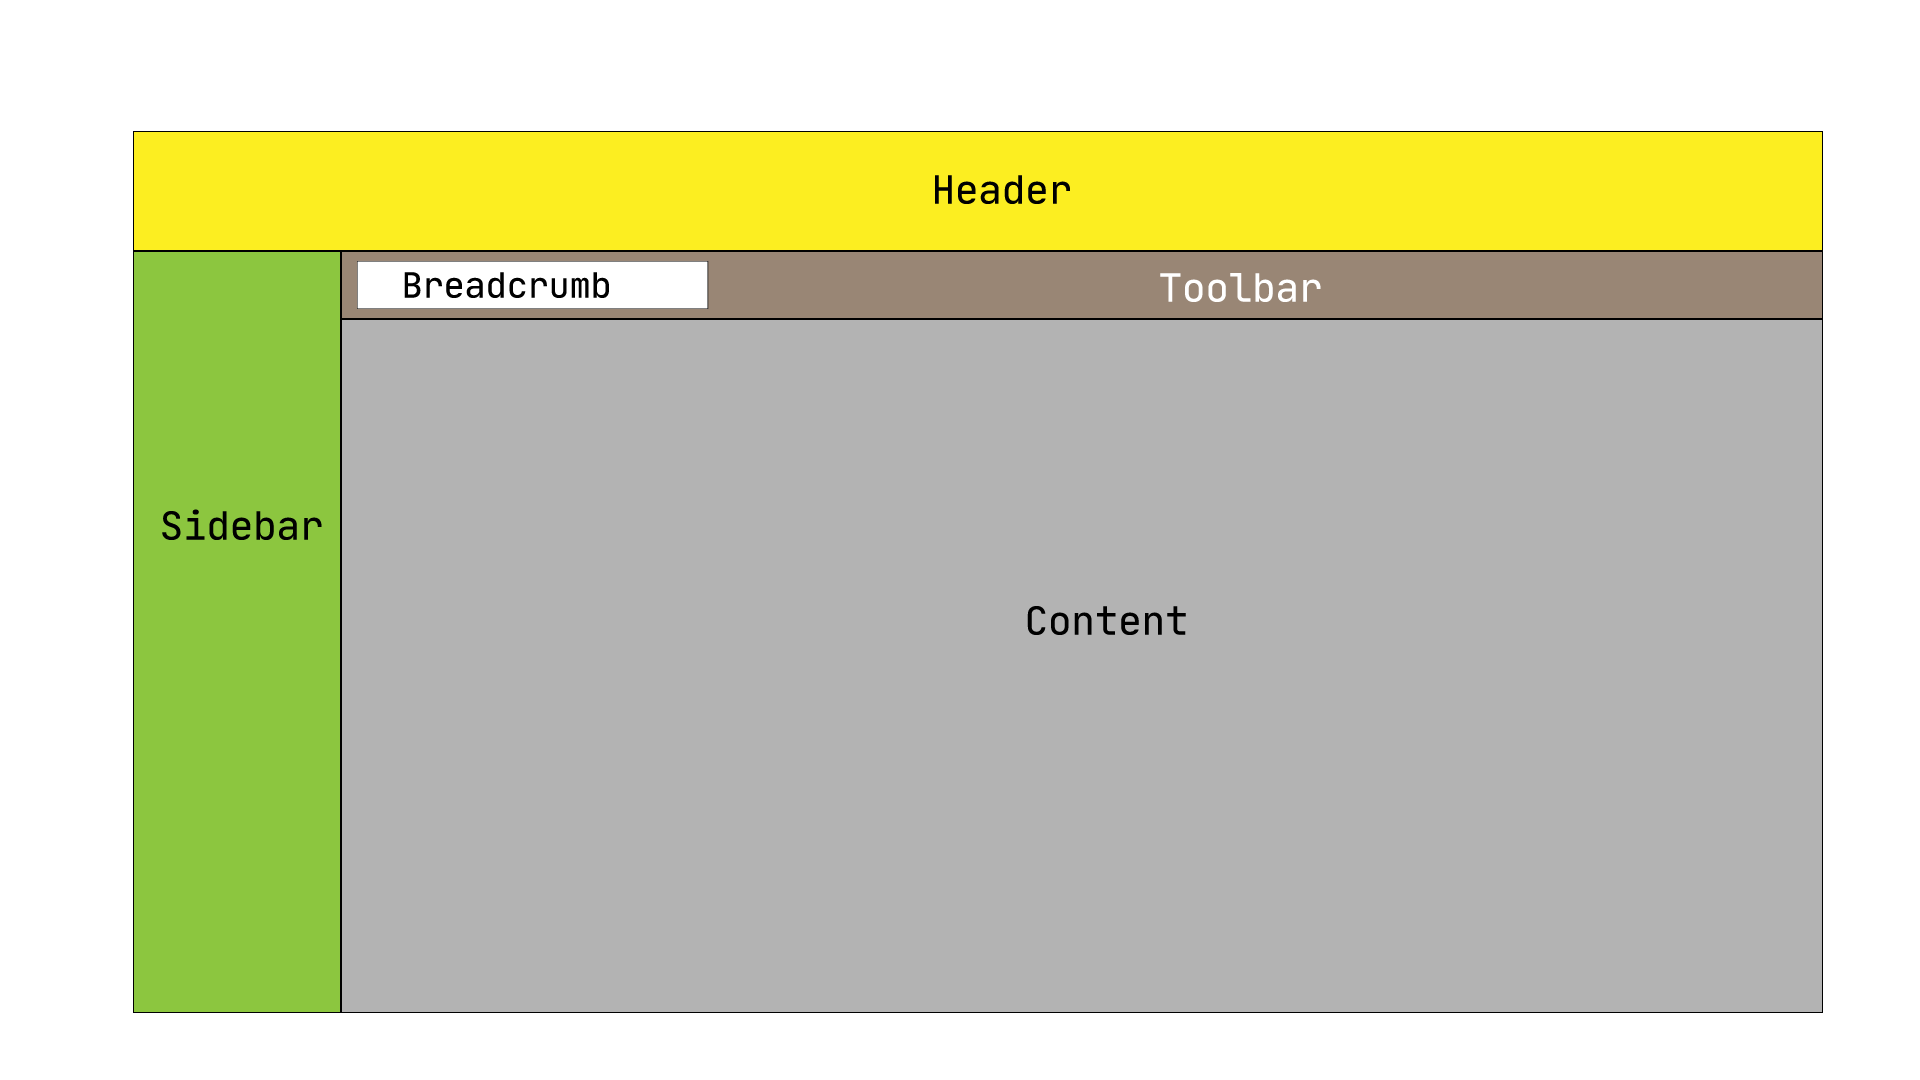
Toolerbar.vue
<template> <div class="tool-bar"> <div class="left"> <Breadcrumb/> <slot name="left"/> </div> <div class="center"> <slot name="center"/> </div> <div class="right"> <slot name="right"/> </div> </div> </template> <script setup lang="ts"> import Breadcrumb from "@/layout/Breadcrumb.vue"; </script> <style scoped lang="scss"> .tool-bar{ padding: 0 20px; align-items: center; min-height: 50px; display: flex; flex-flow: row wrap; justify-content: space-between; .left{ display: flex; flex-flow: row nowrap; justify-content: flex-start; align-items: center; flex-shrink: 0; } .center{ display: flex; flex-flow: row nowrap; justify-content: flex-start; align-items: center; flex-grow: 1; flex-shrink: 0; } .right{ display: flex; flex-flow: row nowrap; justify-content: flex-start; align-items: center; flex-shrink: 0; } } </style> Breadcrumb.vue
<template> <el-breadcrumb separator="/"> <el-breadcrumb-item :to="{ path: '/' }">主页</el-breadcrumb-item> <el-breadcrumb-item v-for="item in breadCrumbArray" :key="item">{{ item.name }}</el-breadcrumb-item> </el-breadcrumb> </template> <script setup lang="ts"> import {useRoute} from "vue-router"; import {onMounted, ref} from "vue"; import {useMenuStore} from "@/pinia"; const storeMenu = useMenuStore() const route = useRoute() defineProps( { height: { // 高度 type: Number, default: 100 } }) const breadCrumbArray = ref<Array<{name: string, path: string}>>([]) onMounted(()=>{ let routeSectionArray = route.path.split('/').filter(item => item !== '') routeSectionArray.forEach((_, index) => { let path = `/${routeSectionArray.slice(0,index + 1).join('/')}` let pathName = storeMenu.flatMenuPathNameMap.get(path) console.log('---',pathName, path) if (pathName){ breadCrumbArray.value.push({name: pathName, path: path}) } }) }) </script> <style lang="scss" scoped> @import "../assets/scss/plugin"; </style> 实际页面中使用时这样:
<template> <Container> <Toolbar> <template #left> </template> <template #center> </template> <template #right> </template> </Toolbar> <Content> </Content> </Container> <template> 五、结果