
阅读量:2
学习视频:动力节点RabbitMQ教程|12小时学会rabbitmq消息中间件_哔哩哔哩_bilibili
一、RabbitMQ 运行环境搭建
RabbitMQ 是使用 Erlang 语言开发的,所以要先下载安装 Erlang
下载时一定要注意版本兼容性:RabbitMQ Erlang 版本要求 — 兔子MQ
二、启动及停止 RabbitMQ
1、启动 RabbitMQ
进入到安装目录的 sbin 目录下
# -detached 表示在后台启动运行 rabbitmq, 不加该参数表示前台启动 # rabbitmq 的运行日志存放在安装目录的 var 目录下 # 启动 ./rabbitmq-server -detached2、查看 RabbitMQ 状态
进入到安装目录的 sbin 目录下
# -n rabbit 是指定节点名称为 rabbit,目前只有一个节点,节点名默认为 rabbit # 此处 -n rabbit 也可以省略 # 查看状态 ./rabbitmqctl -n rabbit status3、停止 RabbitMQ
进入到安装目录的 sbin 目录下
# 停止 ./rabbitmqctl shutdown4、配置 path 环境变量
- 打开配置文件
vim /etc/profile- 进行配置
RABBIT_HOME=/usr/local/rabbitmq_server-3.10.11 PATH=$PATH:$RABBIT_HOME/sbin export RABBIT_HOME PATH- 刷新环境变量
source /etc/profile三、RabbitMQ 管理命令
./rabbitmqctl 是一个管理命令,可以管理 rabbitmq 的很多操作
./rabbitmqctl help 可以查看有哪些操作
查看具体子命令,可以使用 ./rabbitmqctl help 子命令名称
1、用户管理
用户管理包括增加用户,删除用户,查看用户列表,修改用户密码。
这些操作都是通过 rabbitmqct 管理命令来实现完成
查看帮助:rabbitmqct add_user --help
- 查看当前用户列表
rabbitmqctl list_users新增一个用户
# 语法:rabbitmqctl add_user Username Password rabbitmqctl add_user admin 1234562、设置用户角色
设置用户角色
# 语法:rabbitmqctl set_user_tags User Tag # 这里设置用户的角色为管理员角色 rabbitmqctl set_user_tags admin administrator3、设置用户权限
设置用户权限
# 说明:此操作设置了 admin 用户拥有操作虚拟主机/下的所以权限 rabbitmqctl set_permissions -p / admin ".*" ".*" ".*"四、web 管理后台
Rabbitmq 有一个 web 管理后台,这个管理后台是以插件的方式提供的,启动后台 web 管理功能,需要切换到安装目录的 sbin 目录下进行操作
1、启用管理后台
# 查看 rabbitmq 的插件列表 ./rabbitmq-plugins list # 启用 ./rabbitmq-plugins enable rabbitmq_management # 禁用 ./rabbitmq-plugins disable rabbitmq_management2、访问管理后台
访问时需要检查虚拟机的防火 墙
使用:http://你的虚拟机ip:15672 就可以访问了
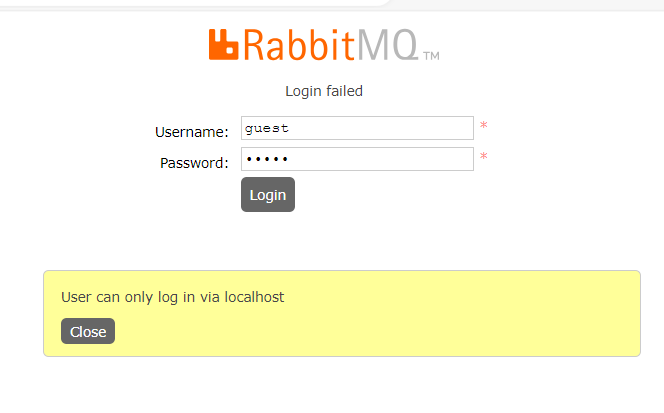
注意:如果使用默认用户 guest,密码 guest 登录,会提示 User can only log in via localhost,说明 guest 用户只能从 localhost 本机登录,所以不要使用该用户
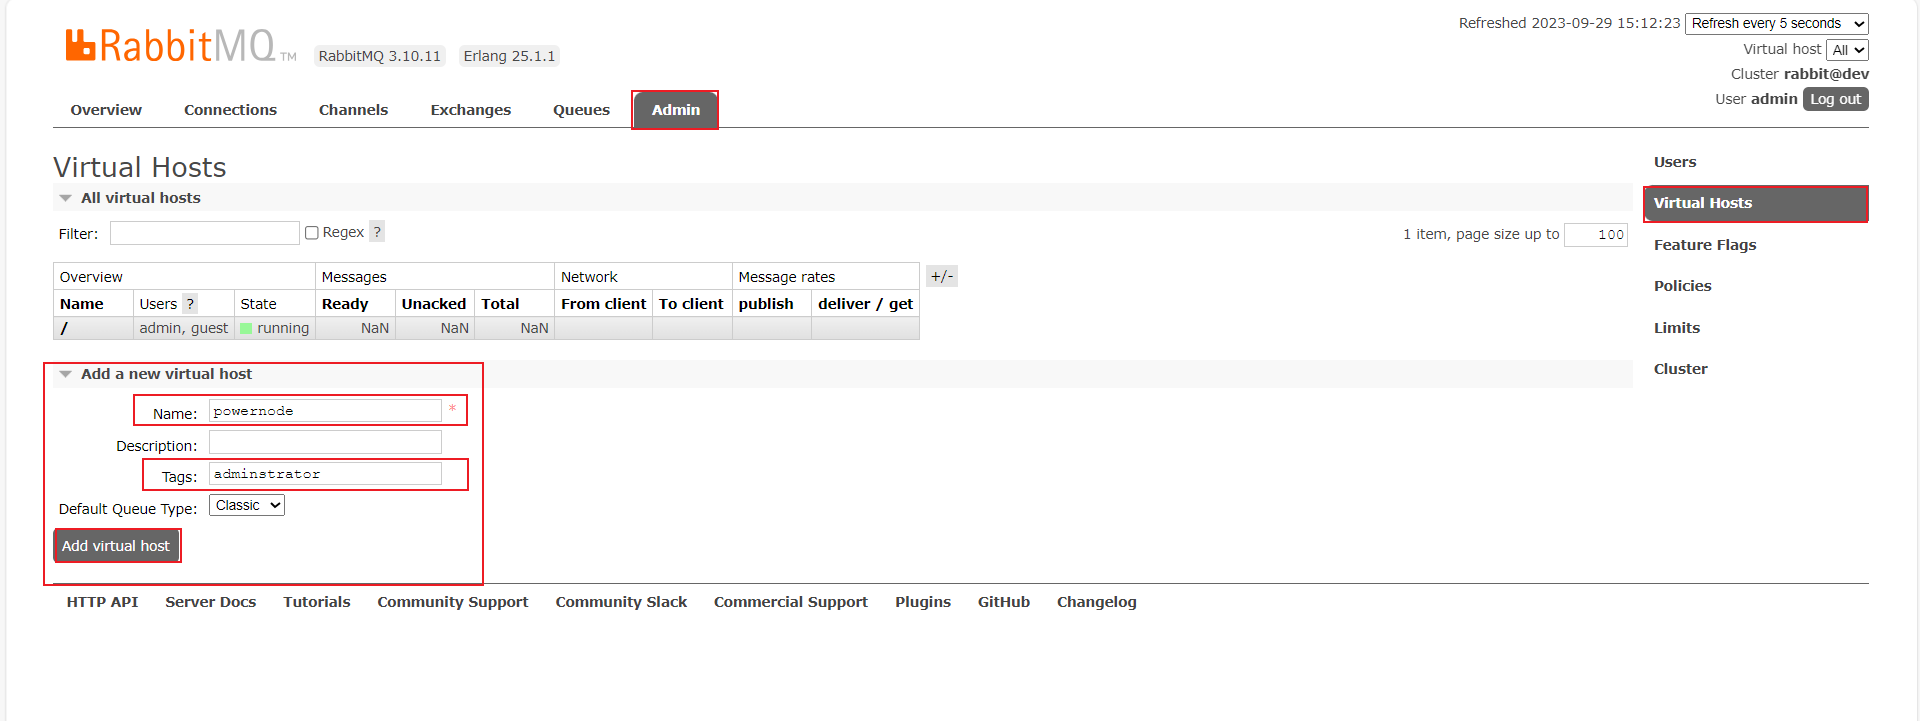
3、新建虚拟主机
- 新建主机
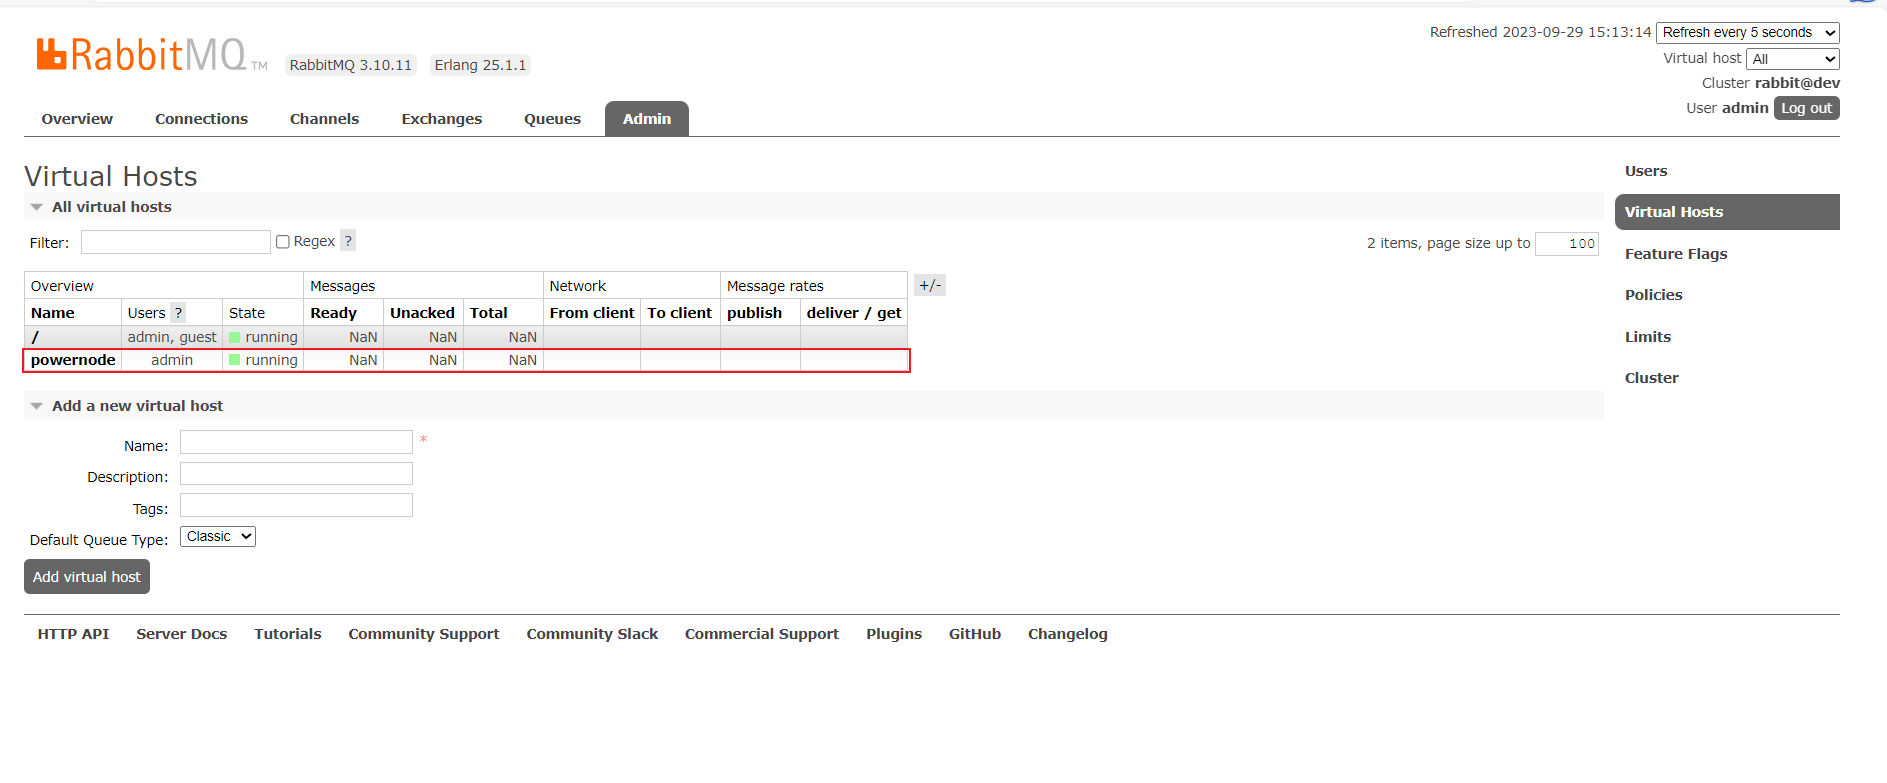
- 建完后如下
五、RabbitMQ 工作模型
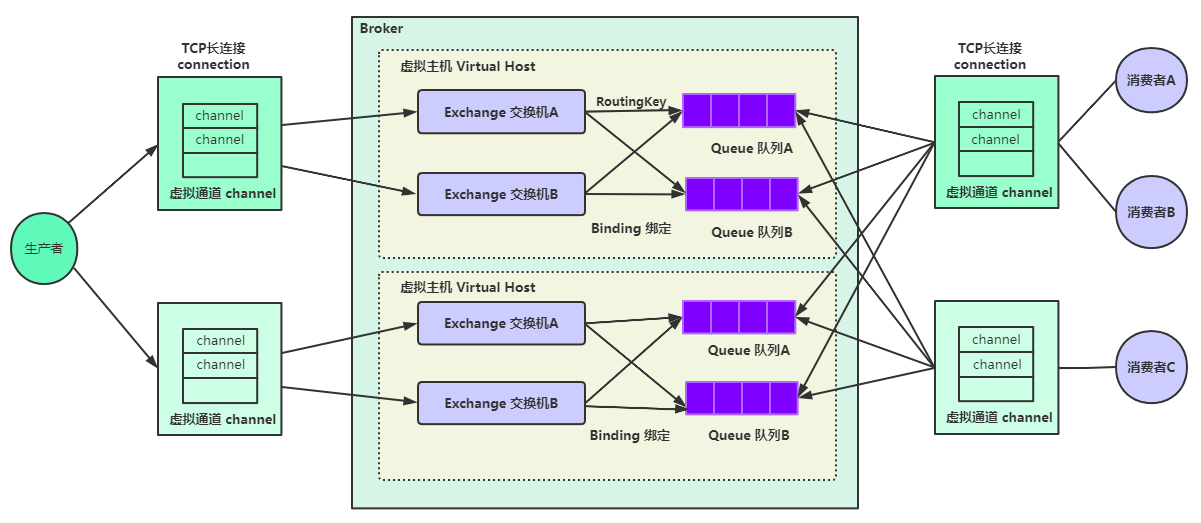
broker 相当于 mysql 服务器,virtual host 相当于数据库(可以有多个数据库)
queue 相当于表,消息相当于记录
消息队列有三个核心要素:消息生产者、消息队列、消息消费者
- 生产者(Producer):发送消息的应用;
- 消费者(Consumer):接收消息的应用;
代理(Broker):就是消息服务器,RabbitMQ Server 就是 Message Broker
链接(Connection):链接 RabbitMQ 服务器的 TCP 长连接
信道(Channel):链接中的一个虚拟通道,消息队列发送或者接收消息时,都是通过信道进行的
虚拟主机(Virtual host):一个虚拟分组,在代码中就是一个字符串,当多个不同的用户使用同一个 RabbitMQ 服务时,可以划分出多个 Virtual host,每个用户在自己的 Virtual host 创建 exchange/queue 等(分类比较清晰、相互隔离)
交换机(Exchange):交换机负责从生产者接收消息,并根据交换机类型分发到对应的消息队列中,起到一个路由的作用
路由键(Routing Key):交换机根据路由键来决定消息分发到那个队列,路由键是消息的目的地址
绑定(Binding):绑定是队列与交换机的一个关联链接(关联关系)
队列(Queue):存储消息的缓存
消息(Message):由生产者通过 RabbitMQ 发送给消费者的信息(消息可以是任何数据,字符串、user 对象、json 串等)
六、RabbitMQ 交换机类型
Exchange(X)可翻译为交换机/交换器/路由器,类型有以下几种:
- Fanout Exchange(扇形)
- Direct Exchange(直连)
- Topic Exchange(主题)
- Headers Exchange(头部)
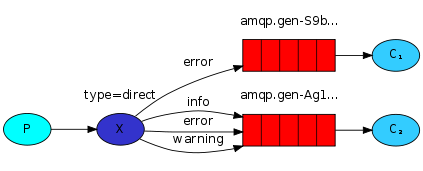
1、Fanout Exchange
1.1、介绍
Fanout 扇形,散开的;扇形交换机
投递到所有绑定的队列,不需要路由键,不需要进行路由键的匹配,相当于广播、群发

- P 表示生产者
- X 表示交换机
- 红色部分表示队列
1.2、示例
- 添加依赖
<dependency> <groupId>org.springframework.boot</groupId> <artifactId>spring-boot-starter-amqp</artifactId> <version>2.6.13</version> </dependency>- application.yml 配置文件
spring: rabbitmq: host: 192.168.224.133 # ip port: 5672 # 端口 username: admin # 用户名 password: 123456 # 密码 virtual-host: powernode # 虚拟主机- 配置类
/* rabbitmq三部曲 1.定义交换机 2.定义队列 3.绑定交换机和队列 */ @Configuration public class RabbitConfig { // 1.定义交换机 @Bean public FanoutExchange fanoutExchange() { return new FanoutExchange("exchange.fanout"); } // 2.定义队列 @Bean public Queue queueA() { return new Queue("queue.fanout.a"); } @Bean public Queue queueB() { return new Queue("queue.fanout.b"); } // 3.绑定交换机和队列 @Bean public Binding bindingA(FanoutExchange fanoutExchange, Queue queueA) { // 将队列A绑定到扇形交换机 return BindingBuilder.bind(queueA).to(fanoutExchange); } @Bean public Binding bindingB(FanoutExchange fanoutExchange, Queue queueB) { // 将队列B绑定到扇形交换机 return BindingBuilder.bind(queueB).to(fanoutExchange); } }- 发送消息
@Component public class MessageService { @Resource private RabbitTemplate rabbitTemplate; public void sendMsg() { // 定义要发送的消息 String msg = "hello world"; // 转换并且发送 Message message = new Message(msg.getBytes()); rabbitTemplate.convertAndSend("exchange.fanout", "", message); } }- 接收消息
@Component public class ReceiveMessage { @RabbitListener(queues = {"queue.fanout.a", "queue.fanout.b"}) public void receiveMsg(Message message) { byte[] body = message.getBody(); String msg = new String(body); System.out.println("接收到的消息为: " + msg); } }2、Direct Exchange
2.1、介绍
根据路由键精确匹配(一摸一样)进行路由消息队列
- P 表示生产者
- X 表示交换机
- 红色部分表示队列
2.2、示例
- 添加依赖
<dependency> <groupId>org.springframework.boot</groupId> <artifactId>spring-boot-starter-amqp</artifactId> <version>2.6.13</version> </dependency>- application.yml 配置文件
spring: rabbitmq: host: 192.168.224.133 # ip port: 5672 # 端口 username: admin # 用户名 password: 123456 # 密码 virtual-host: powernode # 虚拟主机- 配置类
@Configuration public class RabbitConfig { // 1.定义交换机 @Bean public DirectExchange directExchange() { return ExchangeBuilder.directExchange("exchange.direct").build(); } // 2.定义队列 @Bean public Queue queueA() { return QueueBuilder.durable("queue.direct.a").build(); } @Bean public Queue queueB() { return QueueBuilder.durable("queue.direct.b").build(); } // 3.交换机和队列进行绑定 @Bean public Binding bindingA(DirectExchange directExchange, Queue queueA) { return BindingBuilder.bind(queueA).to(directExchange).with("error"); } @Bean public Binding bindingB1(DirectExchange directExchange, Queue queueB) { return BindingBuilder.bind(queueB).to(directExchange).with("info"); } @Bean public Binding bindingB2(DirectExchange directExchange, Queue queueB) { return BindingBuilder.bind(queueB).to(directExchange).with("error"); } @Bean public Binding bindingB3(DirectExchange directExchange, Queue queueB) { return BindingBuilder.bind(queueB).to(directExchange).with("warning"); } }- 发送消息
@Service public class MessageService { @Resource private RabbitTemplate rabbitTemplate; public void sendMsg() { Message message = MessageBuilder.withBody("hello world".getBytes()).build(); rabbitTemplate.convertAndSend("exchange.direct", "info", message); } }- 接收消息
@Component public class ReceiveMessage { @RabbitListener(queues = {"queue.direct.a", "queue.direct.b"}) public void receiveMsg(Message message) { byte[] body = message.getBody(); String msg = new String(body); System.out.println("接收到的消息为: " + msg); } }3、Topic Exchange
3.1、介绍
通配符匹配,相当于模糊匹配
- # 匹配多个单词,用来表示任意数量(零个或多个)单词
- * 匹配一个单词(必须有一个,而且只有一个),用 . 隔开的为一个单词
- 举例
- beijing.# = beijing.queue.abc,beijing.queue.xyz.xxx
- beijing.* = beijing.queue,beijing.xyz
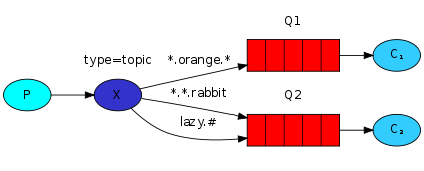
发送时指定的路由键:lazy.orange.rabbit
- P 表示生产者
- X 表示交换机
- 红色部分表示队列
3.2、示例
- 添加依赖
<dependency> <groupId>org.springframework.boot</groupId> <artifactId>spring-boot-starter-amqp</artifactId> <version>2.6.13</version> </dependency>- application.yml 配置文件
spring: rabbitmq: host: 192.168.224.133 # ip port: 5672 # 端口 username: admin # 用户名 password: 123456 # 密码 virtual-host: powernode # 虚拟主机- 配置类
@Configuration public class RabbitConfig { // 1.定义交换机 @Bean public TopicExchange topicExchange() { return ExchangeBuilder.topicExchange("exchange.topic").build(); } // 2.定义队列 @Bean public Queue queueA() { return QueueBuilder.durable("queue.topic.a").build(); } @Bean public Queue queueB() { return QueueBuilder.durable("queue.topic.b").build(); } // 3.交换机和队列进行绑定 @Bean public Binding bindingA(TopicExchange topicExchange, Queue queueA) { return BindingBuilder.bind(queueA).to(topicExchange).with("*.orange.*"); } @Bean public Binding bindingB1(TopicExchange topicExchange, Queue queueB) { return BindingBuilder.bind(queueB).to(topicExchange).with("*.*.rabbit"); } @Bean public Binding bindingB2(TopicExchange topicExchange, Queue queueB) { return BindingBuilder.bind(queueB).to(topicExchange).with("lazy.#"); } }- 发送消息
@Service public class MessageService { @Resource private RabbitTemplate rabbitTemplate; // 用RabbitTemplate也可以 public void sendMsg() { Message message = MessageBuilder.withBody("hello world".getBytes()).build(); rabbitTemplate.convertAndSend("exchange.topic", "lazy.orange.rabbit", message); } }- 接收消息
@Component public class ReceiveMessage { @RabbitListener(queues = {"queue.topic.a", "queue.topic.b"}) public void receiveMsg(Message message) { byte[] body = message.getBody(); String msg = new String(body); System.out.println("接收到的消息为: " + msg); } }4、Headers Exchange
4.1、介绍
用的比较少
基于消息内容中的 headers 属性进行匹配
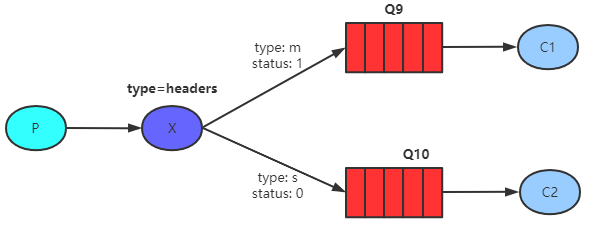
- P 表示生产者
- X 表示交换机
- 红色部分表示队列
4.2、示例
- 添加依赖
<dependency> <groupId>org.springframework.boot</groupId> <artifactId>spring-boot-starter-amqp</artifactId> <version>2.6.13</version> </dependency>- application.yml 配置文件
spring: rabbitmq: host: 192.168.224.133 # ip port: 5672 # 端口 username: admin # 用户名 password: 123456 # 密码 virtual-host: powernode # 虚拟主机- 配置类
@Configuration public class RabbitConfig { // 1.定义交换机 @Bean public HeadersExchange headersExchange() { return ExchangeBuilder.headersExchange("exchange.headers").build(); } // 2.定义队列 @Bean public Queue queueA() { return QueueBuilder.durable("queue.headers.a").build(); } @Bean public Queue queueB() { return QueueBuilder.durable("queue.headers.b").build(); } // 3.交换机和队列进行绑定 @Bean public Binding bindingA(HeadersExchange headersExchange, Queue queueA) { Map<String, Object> headerValues = new HashMap<>(); headerValues.put("type", "m"); headerValues.put("status", 1); return BindingBuilder.bind(queueA).to(headersExchange).whereAll(headerValues).match(); } @Bean public Binding bindingB(HeadersExchange headersExchange, Queue queueB) { Map<String, Object> headerValues = new HashMap<>(); headerValues.put("type", "s"); headerValues.put("status", 0); return BindingBuilder.bind(queueB).to(headersExchange).whereAll(headerValues).match(); } }- 发送消息
@Service public class MessageService { @Resource private RabbitTemplate rabbitTemplate; public void sendMsg() { // 消息属性 MessageProperties messageProperties = new MessageProperties(); Map<String, Object> headers = new HashMap<>(); headers.put("type", "s"); headers.put("status", 0); // 设置消息头 messageProperties.setHeaders(headers); // 添加了消息属性 Message message = MessageBuilder.withBody("hello world".getBytes()).andProperties(messageProperties).build(); // 对于头部交换机,路由key无所谓(不需要) rabbitTemplate.convertAndSend("exchange.headers", "", message); } }- 接收消息
@Component public class ReceiveMessage { @RabbitListener(queues = {"queue.headers.a", "queue.headers.b"}) public void receiveMsg(Message message) { byte[] body = message.getBody(); String msg = new String(body); System.out.println("接收到的消息为: " + msg); } }七、RabbitMQ 过期时间
过期时间也叫 TTL 消息,TTL:Time To Live
消息的过期时间有两种设置方式:(过期消息)
1、设置单条消息的过期时间
- 添加依赖
<dependency> <groupId>org.springframework.boot</groupId> <artifactId>spring-boot-starter-amqp</artifactId> <version>2.6.13</version> </dependency>- application.yml 配置文件
spring: rabbitmq: host: 192.168.224.133 # ip port: 5672 # 端口 username: admin # 用户名 password: 123456 # 密码 virtual-host: powernode # 虚拟主机- 配置类
@Configuration public class RabbitConfig { // 1.定义交换机 @Bean public DirectExchange directExchange() { return ExchangeBuilder.directExchange("exchange.direct").build(); } // 2.定义队列 @Bean public Queue queue() { return QueueBuilder.durable("queue.ttl").build(); } // 3.交换机和队列进行绑定 @Bean public Binding binding(DirectExchange directExchange, Queue queue) { return BindingBuilder.bind(queue).to(directExchange).with("info"); } }- 发送消息
@Service public class MessageService { @Resource private RabbitTemplate rabbitTemplate; public void sendMsg() { MessageProperties messageProperties = new MessageProperties(); messageProperties.setExpiration("15000"); // 过期的毫秒数 Message message = MessageBuilder.withBody("hello world".getBytes()).andProperties(messageProperties).build(); rabbitTemplate.convertAndSend("exchange.direct", "info", message); } }2、队列属性设置消息过期时间
- 添加依赖
<dependency> <groupId>org.springframework.boot</groupId> <artifactId>spring-boot-starter-amqp</artifactId> <version>2.6.13</version> </dependency>- application.yml 配置文件
spring: rabbitmq: host: 192.168.224.133 # ip port: 5672 # 端口 username: admin # 用户名 password: 123456 # 密码 virtual-host: powernode # 虚拟主机- 配置类
@Configuration public class RabbitConfig { // 1.定义交换机 @Bean public DirectExchange directExchange() { return ExchangeBuilder.directExchange("exchange.direct").build(); } // 2.定义队列 @Bean public Queue queue() { // 设置消息过期时间 Map<String, Object> arguments = new HashMap<>(); arguments.put("x-message-ttl", 15000); // 15秒 // 方式1 return new Queue("queue.ttl", true, false, false, arguments); // 方式2 // return QueueBuilder.durable("queue.ttl").withArguments(arguments).build(); } // 3.交换机和队列进行绑定 @Bean public Binding binding(DirectExchange directExchange, Queue queue) { return BindingBuilder.bind(queue).to(directExchange).with("info"); } }- 发送消息
@Service public class MessageService { @Resource private RabbitTemplate rabbitTemplate; public void sendMsg() { Message message = MessageBuilder.withBody("hello world".getBytes()).build(); rabbitTemplate.convertAndSend("exchange.direct", "info", message); } }3、注意
如果消息和队列都设置了过期时间,则消息的 TTL 以两者之间较小的那个数值为准。
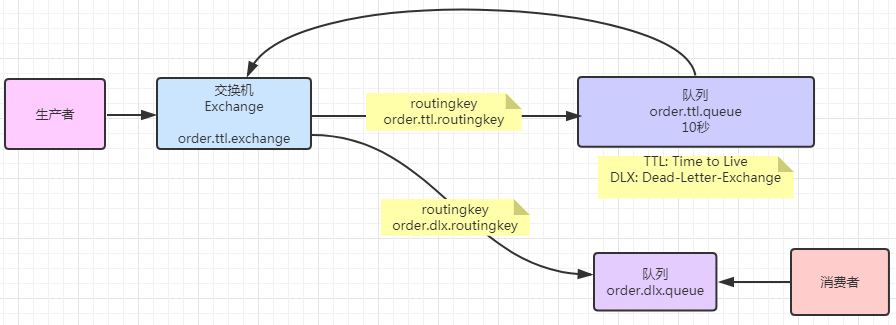
八、死信队列
也有叫死信交换机、死信邮箱等说法
DLX:Dead-Letter-Exchange 死信交换机,死信邮箱
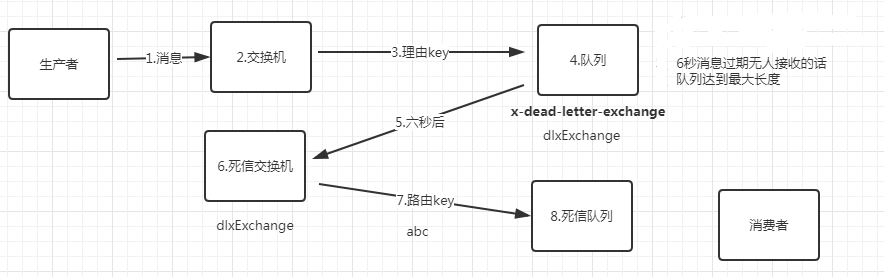
注意:图中的 3.理由key 改为 路由key
以下情况下一个消息会进入 DLX(Dead Letter Exchange)死信交换机。
1、消息过期
- 添加依赖
<dependency> <groupId>org.springframework.boot</groupId> <artifactId>spring-boot-starter-amqp</artifactId> <version>2.6.13</version> </dependency>- application.yml 配置文件
spring: rabbitmq: host: 192.168.224.133 # ip port: 5672 # 端口 username: admin # 用户名 password: 123456 # 密码 virtual-host: powernode # 虚拟主机- 配置类
@Configuration public class RabbitConfig { // 正常交换机 @Bean public DirectExchange normalExchange() { return ExchangeBuilder.directExchange("exchange.normal.b").build(); } // 正常队列 @Bean public Queue normalQueue() { return QueueBuilder.durable("queue.normal.b") .deadLetterExchange("exchange.dlx.b") // 设置死信交换机 .deadLetterRoutingKey("error") // 设置死信路由key,要和死信交换机和死信队列绑定的key一样 .build(); } // 绑定交换机和队列(正常) @Bean public Binding bindingNormal(DirectExchange normalExchange, Queue normalQueue) { return BindingBuilder.bind(normalQueue).to(normalExchange).with("order"); } // 分割线 // 死信交换机 @Bean public DirectExchange dlxExchange() { return ExchangeBuilder.directExchange("exchange.dlx.b").build(); } // 死信队列 @Bean public Queue dlxQueue() { return QueueBuilder.durable("queue.dlx.b").build(); } // 绑定交换机和队列(死信) @Bean public Binding bindingDlx(DirectExchange dlxExchange, Queue dlxQueue) { return BindingBuilder.bind(dlxQueue).to(dlxExchange).with("error"); } }- 发送消息
@Service public class MessageService { @Resource private RabbitTemplate rabbitTemplate; public void sendMsg() { // 消息属性 MessageProperties messageProperties = new MessageProperties(); // 设置单条消息过期时间,单位为毫秒 messageProperties.setExpiration("15000"); Message message = MessageBuilder.withBody("hello world".getBytes()).andProperties(messageProperties).build(); // 对于头部交换机,路由key无所谓(不需要) rabbitTemplate.convertAndSend("exchange.normal.b", "order", message); } }2、队列过期
- 添加依赖
<dependency> <groupId>org.springframework.boot</groupId> <artifactId>spring-boot-starter-amqp</artifactId> <version>2.6.13</version> </dependency>- application.yml 配置文件
spring: rabbitmq: host: 192.168.224.133 # ip port: 5672 # 端口 username: admin # 用户名 password: 123456 # 密码 virtual-host: powernode # 虚拟主机- 配置类
@Configuration public class RabbitConfig { // 正常交换机 @Bean public DirectExchange normalExchange() { return ExchangeBuilder.directExchange("exchange.normal.a").build(); } // 正常队列 @Bean public Queue normalQueue() { return QueueBuilder.durable("queue.normal.a") .ttl(15000) // 过期时间 15秒 .deadLetterExchange("exchange.dlx.a") // 设置死信交换机 .deadLetterRoutingKey("error") // 设置死信路由key,要和死信交换机和死信队列绑定的key一样 .build(); } // 绑定交换机和队列(正常) @Bean public Binding bindingNormal(DirectExchange normalExchange, Queue normalQueue) { return BindingBuilder.bind(normalQueue).to(normalExchange).with("order"); } // 分割线 // 死信交换机 @Bean public DirectExchange dlxExchange() { return ExchangeBuilder.directExchange("exchange.dlx.a").build(); } // 死信队列 @Bean public Queue dlxQueue() { return QueueBuilder.durable("queue.dlx.a").build(); } // 绑定交换机和队列(死信) @Bean public Binding bindingDlx(DirectExchange dlxExchange, Queue dlxQueue) { return BindingBuilder.bind(dlxQueue).to(dlxExchange).with("error"); } }- 发送消息
@Service public class MessageService { @Resource private RabbitTemplate rabbitTemplate; public void sendMsg() { Message message = MessageBuilder.withBody("hello world".getBytes()).build(); rabbitTemplate.convertAndSend("exchange.normal.a", "order", message); } }3、队列达到最大长度
- 添加依赖
<dependency> <groupId>org.springframework.boot</groupId> <artifactId>spring-boot-starter-amqp</artifactId> <version>2.6.13</version> </dependency>- application.yml 配置文件
spring: rabbitmq: host: 192.168.224.133 # ip port: 5672 # 端口 username: admin # 用户名 password: 123456 # 密码 virtual-host: powernode # 虚拟主机- 配置类
@Configuration public class RabbitConfig { // 正常交换机 @Bean public DirectExchange normalExchange() { return ExchangeBuilder.directExchange("exchange.normal.c").build(); } // 正常队列 @Bean public Queue normalQueue() { return QueueBuilder.durable("queue.normal.c") .deadLetterExchange("exchange.dlx.c") // 设置死信交换机 .deadLetterRoutingKey("error") // 设置死信路由key,要和死信交换机和死信队列绑定的key一样 .maxLength(5) // 设置队列最大长度 .build(); } // 绑定交换机和队列(正常) @Bean public Binding bindingNormal(DirectExchange normalExchange, Queue normalQueue) { return BindingBuilder.bind(normalQueue).to(normalExchange).with("order"); } // 分割线 // 死信交换机 @Bean public DirectExchange dlxExchange() { return ExchangeBuilder.directExchange("exchange.dlx.c").build(); } // 死信队列 @Bean public Queue dlxQueue() { return QueueBuilder.durable("queue.dlx.c").build(); } // 绑定交换机和队列(死信) @Bean public Binding bindingDlx(DirectExchange dlxExchange, Queue dlxQueue) { return BindingBuilder.bind(dlxQueue).to(dlxExchange).with("error"); } }- 发送消息
@Service public class MessageService { @Resource private RabbitTemplate rabbitTemplate; public void sendMsg() { for (int i = 1; i <= 10; i++) { String str = "hello world" + i; Message message = MessageBuilder.withBody(str.getBytes()).build(); // 对于头部交换机,路由key无所谓(不需要) rabbitTemplate.convertAndSend("exchange.normal.c", "order", message); } } }4、消费者拒绝消息不进行重新投递
从正常的队列接收消息,但是对消息不进行确认,并且不对消息进行重新投递,此时消息就进入死信队列
- 添加依赖
<dependency> <groupId>org.springframework.boot</groupId> <artifactId>spring-boot-starter-amqp</artifactId> <version>2.6.13</version> </dependency>- application.yml 配置文件
spring: rabbitmq: host: 192.168.224.133 # ip port: 5672 # 端口 username: admin # 用户名 password: 123456 # 密码 virtual-host: powernode # 虚拟主机 listener: simple: acknowledge-mode: manual # 启动手动确认- 配置类
@Configuration public class RabbitConfig { // 正常交换机 @Bean public DirectExchange normalExchange() { return ExchangeBuilder.directExchange("exchange.normal.d").build(); } // 正常队列 @Bean public Queue normalQueue() { return QueueBuilder.durable("queue.normal.d") .deadLetterExchange("exchange.dlx.d") // 设置死信交换机 .deadLetterRoutingKey("error") // 设置死信路由key,要和死信交换机和死信队列绑定的key一样 .build(); } // 绑定交换机和队列(正常) @Bean public Binding bindingNormal(DirectExchange normalExchange, Queue normalQueue) { return BindingBuilder.bind(normalQueue).to(normalExchange).with("order"); } // 分割线 // 死信交换机 @Bean public DirectExchange dlxExchange() { return ExchangeBuilder.directExchange("exchange.dlx.d").build(); } // 死信队列 @Bean public Queue dlxQueue() { return QueueBuilder.durable("queue.dlx.d").build(); } // 绑定交换机和队列(死信) @Bean public Binding bindingDlx(DirectExchange dlxExchange, Queue dlxQueue) { return BindingBuilder.bind(dlxQueue).to(dlxExchange).with("error"); } }- 发送消息
@Service public class MessageService { @Resource private RabbitTemplate rabbitTemplate; public void sendMsg() { String str = "hello world"; Message message = MessageBuilder.withBody(str.getBytes()).build(); rabbitTemplate.convertAndSend("exchange.normal.d", "order", message); } }- 接收消息
@Component public class ReceiveMessage { @RabbitListener(queues = {"queue.normal.d"}) public void receiveMsg(Message message, Channel channel) { // 获取消息属性 MessageProperties messageProperties = message.getMessageProperties(); // 获取消息的唯一标识,类似人的身份证号 long deliveryTag = messageProperties.getDeliveryTag(); try { // 手动加一段错误代码 int i = 1 / 0; byte[] body = message.getBody(); String str = new String(body); System.out.println("接收到的消息为: " + str); // 消费者的手动确认 // multiple为false,只确认当前消息,改为true是确认当前消息以前的消息 // 确认后服务器就可以删了 channel.basicAck(deliveryTag, false); } catch (Exception e) { try { // 接收者出现问题 // multiple为false,只确认当前消息,改为true是确认当前消息以前的消息 // requeue为true,表示重新入队,为false表示不重新入队 // channel.basicNack(deliveryTag, false, true); // requeue改为false,不重新入队,这时就会进入死信队列 channel.basicNack(deliveryTag, false, false); } catch (IOException ex) { throw new RuntimeException(ex); } throw new RuntimeException(e); } } }5、消费者拒绝消息
开启手动确认模式,并拒绝消息,不重新投递,则进入死信队列
- 添加依赖
<dependency> <groupId>org.springframework.boot</groupId> <artifactId>spring-boot-starter-amqp</artifactId> <version>2.6.13</version> </dependency>- application.yml 配置文件
spring: rabbitmq: host: 192.168.224.133 # ip port: 5672 # 端口 username: admin # 用户名 password: 123456 # 密码 virtual-host: powernode # 虚拟主机 listener: simple: acknowledge-mode: manual # 启动手动确认- 配置类
@Configuration public class RabbitConfig { // 正常交换机 @Bean public DirectExchange normalExchange() { return ExchangeBuilder.directExchange("exchange.normal.e").build(); } // 正常队列 @Bean public Queue normalQueue() { return QueueBuilder.durable("queue.normal.e") .deadLetterExchange("exchange.dlx.e") // 设置死信交换机 .deadLetterRoutingKey("error") // 设置死信路由key,要和死信交换机和死信队列绑定的key一样 .build(); } // 绑定交换机和队列(正常) @Bean public Binding bindingNormal(DirectExchange normalExchange, Queue normalQueue) { return BindingBuilder.bind(normalQueue).to(normalExchange).with("order"); } // 分割线 // 死信交换机 @Bean public DirectExchange dlxExchange() { return ExchangeBuilder.directExchange("exchange.dlx.e").build(); } // 死信队列 @Bean public Queue dlxQueue() { return QueueBuilder.durable("queue.dlx.e").build(); } // 绑定交换机和队列(死信) @Bean public Binding bindingDlx(DirectExchange dlxExchange, Queue dlxQueue) { return BindingBuilder.bind(dlxQueue).to(dlxExchange).with("error"); } }- 发送消息
@Service public class MessageService { @Resource private RabbitTemplate rabbitTemplate; public void sendMsg() { String str = "hello world"; Message message = MessageBuilder.withBody(str.getBytes()).build(); rabbitTemplate.convertAndSend("exchange.normal.e", "order", message); } }- 接收消息
@Component public class ReceiveMessage { @RabbitListener(queues = {"queue.normal.e"}) public void receiveMsg(Message message, Channel channel) throws IOException { // 获取消息属性 MessageProperties messageProperties = message.getMessageProperties(); // 获取消息的唯一标识,类似人的身份证号 long deliveryTag = messageProperties.getDeliveryTag(); // 拒绝消息 // 第一个参数是消息的唯一标识 // 第二个参数是是否重新入队 channel.basicReject(deliveryTag, false); } }九、延迟队列
场景:有一个订单,15 分钟内如果不支付,就把该订单设置为交易关闭,那么就不能支付了,这类实现延迟任务的场景就可以采用延迟队列来实现,当然除了延迟队列来实现,也可以有一些其他方法实现;
1、采用消息中间件
RabbitMQ 本身不支持延迟队列,可以使用 TTL 结合 DLX 的方式来实现消息的延迟投递,即把 DLX 跟某个队列绑定,到了指定时间,消息过期后,就会从 DLX 路由到这个队列,消费者可以从这个队列取走消息
代码:正常延迟
- 添加依赖
<dependency> <groupId>org.springframework.boot</groupId> <artifactId>spring-boot-starter-amqp</artifactId> <version>2.6.13</version> </dependency>- application.yml 配置文件
spring: rabbitmq: host: 192.168.224.133 # ip port: 5672 # 端口 username: admin # 用户名 password: 123456 # 密码 virtual-host: powernode # 虚拟主机- 配置类
@Configuration public class RabbitConfig { // 1.定义交换机(一机两用,正常交换机和死信交换机) @Bean public DirectExchange directExchange() { return ExchangeBuilder.directExchange("exchange.delay.a").build(); } // 2.定义队列 @Bean public Queue normalQueue() { return QueueBuilder.durable("queue.delay.normal.a") .ttl(25000) // 过期时间25秒 .deadLetterExchange("exchange.delay.a") // 设置死信交换机 .deadLetterRoutingKey("error") // 死信路由key .build(); } @Bean public Queue dlxQueue() { return QueueBuilder.durable("queue.delay.dlx.a").build(); } // 3.交换机和队列进行绑定 @Bean public Binding bindingNormal(DirectExchange directExchange, Queue normalQueue) { return BindingBuilder.bind(normalQueue).to(directExchange).with("order"); } @Bean public Binding bindingDlx(DirectExchange directExchange, Queue dlxQueue) { return BindingBuilder.bind(dlxQueue).to(directExchange).with("error"); } }- 发送消息
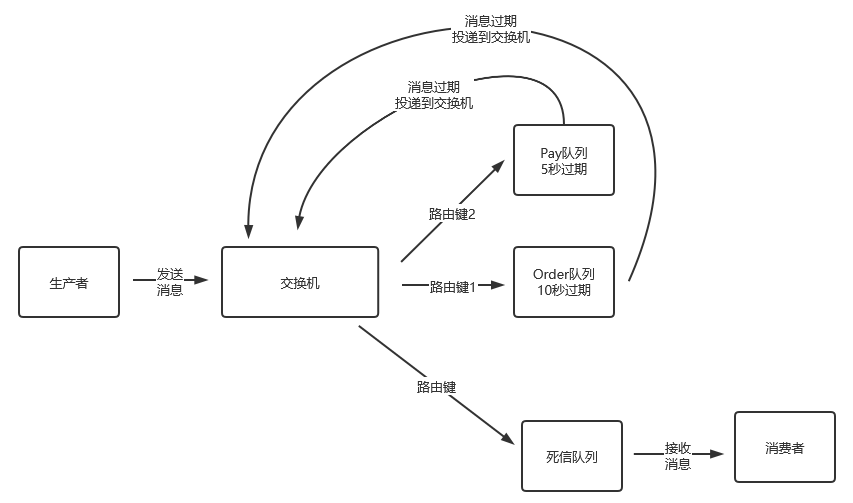
@Service public class MessageService { @Resource private RabbitTemplate rabbitTemplate; public void sendMsg() { Message message = MessageBuilder.withBody("hello world".getBytes()).build(); rabbitTemplate.convertAndSend("exchange.delay.a", "order", message); } }问题:如果先发送的消息,消息延迟时间长,会影响后面的延迟时间段的消息的消费
解决:不同延迟时间的消息要发到不同的队列上,同一个队列的消息,它的延迟时间应该一样
 代码:解决延迟问题
- 添加依赖
<dependency> <groupId>org.springframework.boot</groupId> <artifactId>spring-boot-starter-amqp</artifactId> <version>2.6.13</version> </dependency>- application.yml 配置文件
spring: rabbitmq: host: 192.168.224.133 # ip port: 5672 # 端口 username: admin # 用户名 password: 123456 # 密码 virtual-host: powernode # 虚拟主机- 配置类
@Configuration public class RabbitConfig { // 1.定义交换机(一机两用,正常交换机和死信交换机) @Bean public DirectExchange directExchange() { return ExchangeBuilder.directExchange("exchange.delay").build(); } // 2.定义队列 // 正常的订单队列 @Bean public Queue normalOrderQueue() { return QueueBuilder.durable("queue.delay.normal.order") .deadLetterExchange("exchange.delay") // 设置死信交换机 .deadLetterRoutingKey("error") // 死信路由key .build(); } // 正常的支付队列 @Bean public Queue normalPayQueue() { return QueueBuilder.durable("queue.delay.normal.pay") .deadLetterExchange("exchange.delay") // 设置死信交换机 .deadLetterRoutingKey("error") // 死信路由key .build(); } // 死信队列 @Bean public Queue dlxQueue() { return QueueBuilder.durable("queue.delay.dlx").build(); } // 3.交换机和队列进行绑定 // 绑定正常的订单队列 @Bean public Binding bindingNormalOrderQueue(DirectExchange directExchange, Queue normalOrderQueue) { return BindingBuilder.bind(normalOrderQueue).to(directExchange).with("order"); } // 绑定正常的支付队列 @Bean public Binding bindingNormalPayQueue(DirectExchange directExchange, Queue normalPayQueue) { return BindingBuilder.bind(normalPayQueue).to(directExchange).with("pay"); } // 绑定死信队列 @Bean public Binding bindingDlx(DirectExchange directExchange, Queue dlxQueue) { return BindingBuilder.bind(dlxQueue).to(directExchange).with("error"); } }- 发送消息
@Service public class MessageService { @Resource private RabbitTemplate rabbitTemplate; public void sendMsg() { // 第一条消息 Message orderMsg = MessageBuilder.withBody("这是一条订单消息 20秒过期 ".getBytes()).setExpiration("20000").build(); // 第二条消息 Message payMsg = MessageBuilder.withBody("这是一条支付消息 10秒过期 ".getBytes()).setExpiration("10000").build(); rabbitTemplate.convertAndSend("exchange.delay", "order", orderMsg); System.out.println("订单消息发送消息时间是: " + new SimpleDateFormat("HH:mm:ss").format(new Date())); rabbitTemplate.convertAndSend("exchange.delay", "pay", payMsg); System.out.println("支付消息发送消息时间是: " + new SimpleDateFormat("HH:mm:ss").format(new Date())); } }- 接收消息
@Component public class ReceiveMessage { @RabbitListener(queues = {"queue.delay.dlx"}) public void receiveMsg(Message message) { byte[] body = message.getBody(); String msg = new String(body); System.out.println("接收的消息是: " + msg + "接收的时间是: " + new SimpleDateFormat("HH:mm:ss").format(new Date())); } }2、使用延迟插件
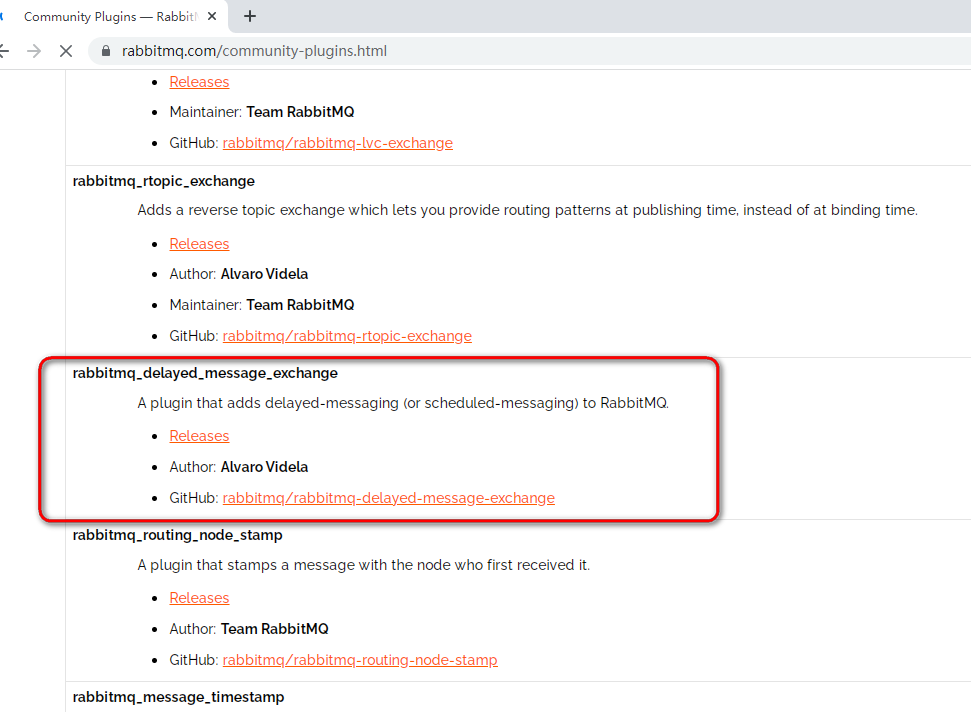
使用 rabbitmq-delayed-message-exchange 延迟插件
下载
- 选择对应的版本下载 rabbitmq-delayed-message-exchange 插件,下载地址:
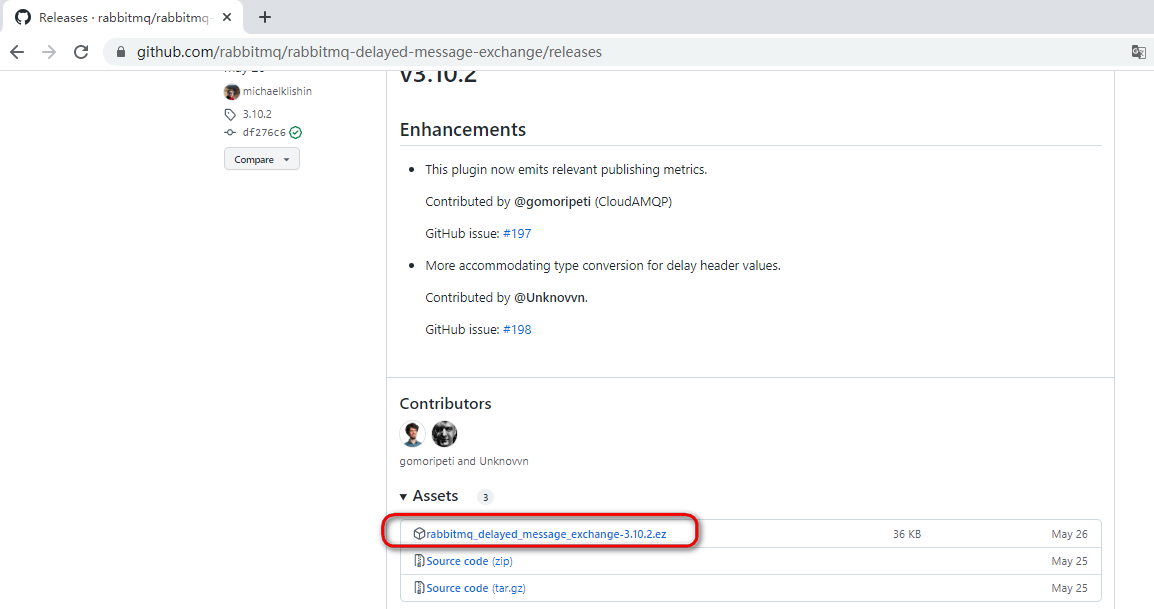
- 将插件拷贝到 RabbitMQ 服务器 plugins 目录下
- 解压
// 如果 unzip 没有安装,先安装一下 // yum install unzip -y unzip rabbitmq_delayed_message_exchange-3.10.2.ez- 启用插件
// 开启插件 ./rabbitmq-plugins enable rabbitmq_delayed_message_exchange重启 rabbitmq 使其生效(此处也可以不重启)
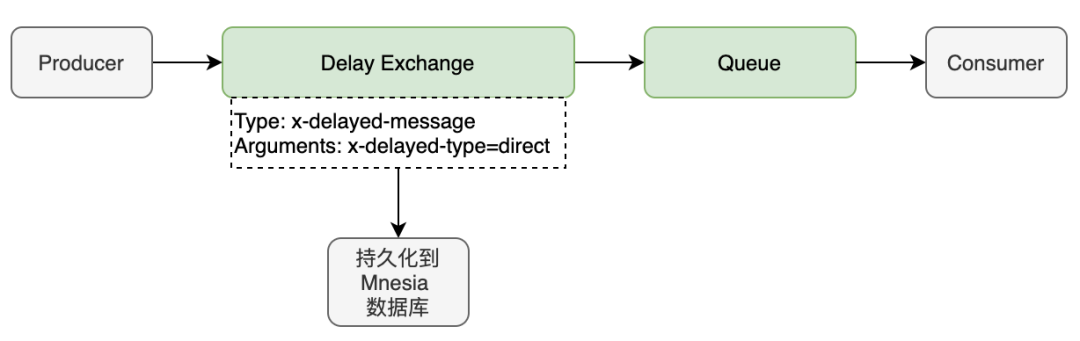
消息发送后不会直接投递到队列,而是存储到 Mnesia(嵌入式数据库),检查 x-delay 时间(消息头部);
延迟插件在 RabbitMQ 3.5.7 及以上的版本才支持,依赖 Erlang/OPT 18.0 及以上运行环境;
- Mnesia 是一个小型数据库,不适合于大量延迟消息的实现
- 解决了消息过期时间不一致出现的问题
代码实现
- 添加依赖
<dependency> <groupId>org.springframework.boot</groupId> <artifactId>spring-boot-starter-amqp</artifactId> <version>2.6.13</version> </dependency>- application.yml 配置文件
spring: rabbitmq: host: 192.168.224.133 # ip port: 5672 # 端口 username: admin # 用户名 password: 123456 # 密码 virtual-host: powernode # 虚拟主机- 配置类
@Configuration public class RabbitConfig { // 1.定义交换机 @Bean public CustomExchange customExchange() { Map<String, Object> arguments = new HashMap<>(); arguments.put("x-delayed-type", "direct"); // 放一个参数 return new CustomExchange("exchange.elay.b", "x-delayed-message", true, false, arguments); } // 2.定义队列 @Bean public Queue queue() { return QueueBuilder.durable("queue.delay.b").build(); } // 3.交换机和队列进行绑定 @Bean public Binding bindingNormalOrderQueue(CustomExchange customExchange, Queue queue) { // 绑定, return BindingBuilder.bind(queue).to(customExchange).with("plugin").noargs(); } }- 发送消息
@Service public class MessageService { @Resource private RabbitTemplate rabbitTemplate; public void sendMsg() { // 第一条消息 MessageProperties messageProperties1 = new MessageProperties(); messageProperties1.setHeader("x-delay", 25000); // 设置延迟消息 Message message1 = MessageBuilder.withBody("hello world 1".getBytes()).andProperties(messageProperties1).build(); // 第二条消息 MessageProperties messageProperties2 = new MessageProperties(); messageProperties2.setHeader("x-delay", 15000); // 设置延迟消息 Message message2 = MessageBuilder.withBody("hello world 2".getBytes()).andProperties(messageProperties2).build(); // 发送消息 rabbitTemplate.convertAndSend("exchange.elay.b", "plugin", message1); System.out.println("订单消息发送消息时间是: " + new SimpleDateFormat("HH:mm:ss").format(new Date())); rabbitTemplate.convertAndSend("exchange.elay.b", "plugin", message2); System.out.println("支付消息发送消息时间是: " + new SimpleDateFormat("HH:mm:ss").format(new Date())); } }- 接收消息
@Component public class ReceiveMessage { @RabbitListener(queues = {"queue.delay.b"}) public void receiveMsg(Message message) { byte[] body = message.getBody(); String msg = new String(body); System.out.println("接收的消息是: " + msg + "接收的时间是: " + new SimpleDateFormat("HH:mm:ss").format(new Date())); } }十、消息 Confirm 模式
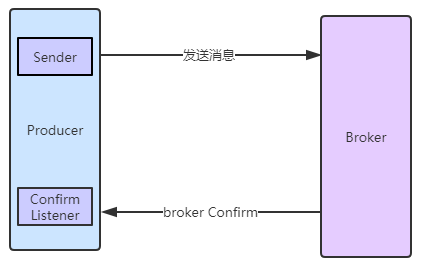
消息的 confirm 确认机制,是指生产者投递消息后,到达了消息服务器 Broker 里面的 exchange 交换机,则会给生产者一个应答,生产者接收到应答,用来确定这条消息是否正常的发送到 Broker 的 exchange 中,这也是消息可靠性投递的重要保障;
- 添加依赖
<dependency> <groupId>org.springframework.boot</groupId> <artifactId>spring-boot-starter-amqp</artifactId> <version>2.6.13</version> </dependency>- application.yml 配置文件
spring: rabbitmq: host: 192.168.224.133 # ip port: 5672 # 端口 username: admin # 用户名 password: 123456 # 密码 virtual-host: powernode # 虚拟主机 publisher-confirm-type: correlated # 开启生产者的确认模式,设置关联模式- 配置类
@Configuration public class RabbitConfig { // 1.定义交换机 @Bean public DirectExchange directExchange() { return ExchangeBuilder.directExchange("exchange.confirm").build(); } // 2.定义队列 @Bean public Queue queue() { return QueueBuilder.durable("queue.confirm").build(); } // 3.交换机和队列进行绑定 @Bean public Binding bindingA(DirectExchange directExchange, Queue queue) { return BindingBuilder.bind(queue).to(directExchange).with("info"); } }- 发送消息
@Service public class MessageService { @Resource private RabbitTemplate rabbitTemplate; @PostConstruct // 构造方法后执行它,相当于初始化的作用 public void init() { // 第一个参数: 关联数据 // 第二个参数: 是否到达交换机 // 第三个参数: 原因 rabbitTemplate.setConfirmCallback((CorrelationData correlationData, boolean ack, String cause) -> { // 打印一下关联数据 System.out.println("关联数据: " + correlationData); if (ack) { System.out.println("消息正确到达交换机"); } if (!ack) { System.out.println("消息没有到达交换机,原因: " + cause); } }); } public void sendMsg() { Message message = MessageBuilder.withBody("hello world".getBytes()).build(); CorrelationData correlationData = new CorrelationData(); // 关联数据 correlationData.setId("order_123456"); rabbitTemplate.convertAndSend("exchange.confirm", "info", message, correlationData); } }十一、消息 Return 模式
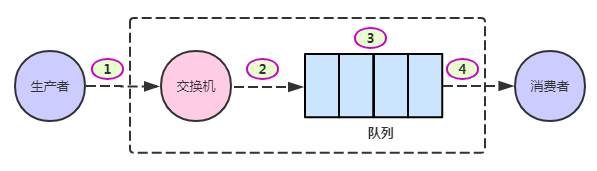
rabbitmq 整个消息投递的路径为:
producer —> exchange —> queue —> consumer
- 消息从 producer 到 exchange 则会返回一个 confirmCallback
- 消息从 exchange -> queue 投递失败则会返回一个 returnCallback
我们可以利用这两个 callback 控制消息的可靠性传递
- 添加依赖
<dependency> <groupId>org.springframework.boot</groupId> <artifactId>spring-boot-starter-amqp</artifactId> <version>2.6.13</version> </dependency>- application.yml 配置文件
spring: rabbitmq: host: 192.168.224.133 # ip port: 5672 # 端口 username: admin # 用户名 password: 123456 # 密码 virtual-host: powernode # 虚拟主机 publisher-returns: true # 开启return模式- 配置类
@Configuration public class RabbitConfig { // 1.定义交换机 @Bean public DirectExchange directExchange() { return ExchangeBuilder.directExchange("exchange.return").build(); } // 2.定义队列 @Bean public Queue queue() { return QueueBuilder.durable("queue.return").build(); } // 3.交换机和队列进行绑定 @Bean public Binding bindingA(DirectExchange directExchange, Queue queue) { return BindingBuilder.bind(queue).to(directExchange).with("info"); } }- 发送消息
@Service public class MessageService { @Resource private RabbitTemplate rabbitTemplate; @PostConstruct // 构造方法后执行它,相当于初始化的作用 public void init() { rabbitTemplate.setReturnsCallback(message -> { System.out.println("消息从交换机没有正确的路由到(投递到)队列,原因: " + message.getReplyText()); }); } public void sendMsg() { Message message = MessageBuilder.withBody("hello world".getBytes()).build(); CorrelationData correlationData = new CorrelationData(); // 关联数据 correlationData.setId("order_654321"); // 发送正确不会回调,只有发送错误才会回调 rabbitTemplate.convertAndSend("exchange.return", "info", message, correlationData); } }十二、交换机详细属性
- Name:交换机名称;就是一个字符串
- Type:交换机类型,direct、topic、fanout、headers 四种
- Durability:持久化,声明交换机是否持久化,代表交换机在服务器重启后是否还存在
- Auto delete:是否自动删除,曾经有队列绑定到该交换机,后来解绑了,那就会自动删除该交换机
- Internal:内部使用的,如果是 yes,客户端无法直接发消息到此交换机,他只能用于交换机与交换机的绑定(用的很少)
- Arguments:只有一个取值 alternate-exchange,表示备用交换机,当正常交换机的消息发送不到正常队列时,消息就会往备用交换机里面发
- 添加依赖
spring: rabbitmq: host: 192.168.224.133 # ip port: 5672 # 端口 username: admin # 用户名 password: 123456 # 密码 virtual-host: powernode # 虚拟主机 publisher-confirm-type: correlated # 开启生产者的确认模式,设置关联模式- application.yml 配置文件
spring: rabbitmq: host: 192.168.224.133 # ip port: 5672 # 端口 username: admin # 用户名 password: 123456 # 密码 virtual-host: powernode # 虚拟主机- 配置类
/* return ExchangeBuilder .directExchange("exchange.properties.1") // 交换机名字 .durable(false) // 是否持久化,一般都是持久化 .autoDelete() // 设置自动删除(当队列跟他解绑后是否自动删除),一般不是自动删除 .alternate("") // 设置备用交换机名字 .build(); */ @Configuration public class RabbitConfig { // 1.定义交换机 // 正常交换机 @Bean public DirectExchange normalExchange() { return ExchangeBuilder. directExchange("exchange.normal.1") .alternate("exchange.alternate.1") // 设置备用交换机 .build(); } // 备用交换机 @Bean public FanoutExchange alternateExchange() { return ExchangeBuilder.fanoutExchange("exchange.alternate.1").build(); } // 2.定义队列 // 正常队列 @Bean public Queue normalQueue() { return QueueBuilder.durable("queue.normal.1").build(); } // 备用队列 @Bean public Queue alternateQueue() { return QueueBuilder.durable("queue.alternate.1").build(); } // 3.交换机和队列进行绑定 // 正常交换机与正常队列绑定 @Bean public Binding bindingNormal(DirectExchange normalExchange, Queue normalQueue) { return BindingBuilder.bind(normalQueue).to(normalExchange).with("info"); } // 备用交换机与备用队列绑定 @Bean public Binding bindingAlternate(FanoutExchange alternateExchange, Queue alternateQueue) { return BindingBuilder.bind(alternateQueue).to(alternateExchange); } }- 发送消息
@Service public class MessageService { @Resource private RabbitTemplate rabbitTemplate; public void sendMsg() { Message message = MessageBuilder.withBody("hello world".getBytes()).build(); // 发送正确不会回调,只有发送错误才会回调 rabbitTemplate.convertAndSend("exchange.normal.1", "error", message); } }十三、队列详细属性
- Type:队列类型,一般是 Classic
- Name:队列名称,就是一个字符串,随便一个字符串就可以
- Durability:声明队列是否持久化,代表队列在服务器重启后是否还存在
- Auto delete:是否自动删除,如果为 true,当没有消费者连接到这个队列的时候,队列会自动删除
- Exclusive:exclusive 属性的队列只对首次声明它的连接可见,并且在连接断开时自动删除;基本不设置它,设置成 false
- Arguments:队列的其他属性,例如指定 DLX(死信交换机等)
1. x-expires:Number
当 Queue(队列)在指定的时间未被访问,则队列将被自动删除
2. x-message-ttl:Number
发布的消息在队列中存在多长时间后被取消(单位毫秒)
3. x-overflow:String
设置队列溢出行为,当达到队列的最大长度时,消息会发生什么,有效值为 Drop Head 或 Reject Publish
4. x-max-length:Number
队列所能容下消息的最大长度,当超出长度后,新消息将会覆盖最前面的消息,类似于Redis的LRU算法
5. x-single-active-consumer:默认为false
激活单一的消费者,也就是该队列只能有一个消息者消费消息
6. x-max-length-bytes:Number
限定队列的最大占用空间,当超出后也使用类似于Redis的LRU算法
7. x-dead-letter-exchange:String
指定队列关联的死信交换机,有时候我们希望当队列的消息达到上限后溢出的消息不会被删除掉,而是走到另一个队列中保存起来
8. x-dead-letter-routing-key:String
指定死信交换机的路由键,一般和6一起定义
9. x-max-priority:Number
如果将一个队列加上优先级参数,那么该队列为优先级队列;
(1)、给队列加上优先级参数使其成为优先级队列
x-max-priority=10【0-255取值范围】
(2)、给消息加上优先级属性
通过优先级特性,将一个队列实现插队消费
MessageProperties messageProperties=new MessageProperties(); messageProperties.setPriority(8);10. x-queue-mode:String(理解下即可)
队列类型x-queue-mode=lazy懒队列,在磁盘上尽可能多地保留消息以减少RAM使用,如果未设置,则队列将保留内存缓存以尽可能快地传递消息
11. x-queue-master-locator:String(用的较少,不讲)
在集群模式下设置队列分配到的主节点位置信息;
每个queue都有一个master节点,所有对于queue的操作都是事先在master上完成,之后再slave上进行相同的操作;
每个不同的queue可以坐落在不同的集群节点上,这些queue如果配置了镜像队列,那么会有1个master和多个slave。
基本上所有的操作都落在master上,那么如果这些queues的master都落在个别的服务节点上,而其他的节点又很空闲,这样就无法做到负载均衡,那么势必会影响性能;
关于master queue host 的分配有几种策略,可以在queue声明的时候使用x-queue-master-locator参数,或者在policy上设置queue-master-locator,或者直接在rabbitmq的配置文件中定义queue_master_locator,有三种可供选择的策略:
(1)min-masters:选择master queue数最少的那个服务节点host;
(2)client-local:选择与client相连接的那个服务节点host;
(3)random:随机分配;
- 添加依赖
spring: rabbitmq: host: 192.168.224.133 # ip port: 5672 # 端口 username: admin # 用户名 password: 123456 # 密码 virtual-host: powernode # 虚拟主机 publisher-confirm-type: correlated # 开启生产者的确认模式,设置关联模式- application.yml 配置文件
spring: rabbitmq: host: 192.168.224.133 # ip port: 5672 # 端口 username: admin # 用户名 password: 123456 # 密码 virtual-host: powernode # 虚拟主机- 配置类
@Configuration public class RabbitConfig { // 1.定义交换机 @Bean public DirectExchange directExchange() { return ExchangeBuilder.directExchange("exchange.queue.properties").build(); } // 2.定义队列 @Bean public Queue queue() { // String name 队列名称 // boolean durable 是否持久化 // boolean exclusive 排他队列 // boolean autoDelete 自动删除 // @Nullable Map<String, Object> arguments return new Queue("queue.properties.1", true, false, false); } // 3.交换机和队列进行绑定 @Bean public Binding bindingNormal(DirectExchange directExchange, Queue queue) { return BindingBuilder.bind(queue).to(directExchange).with("info"); } }- 发送消息
@Service public class MessageService { @Resource private RabbitTemplate rabbitTemplate; public void sendMsg() { Message message = MessageBuilder.withBody("hello world".getBytes()).build(); rabbitTemplate.convertAndSend("exchange.queue.properties", "info", message); } }- 接收消息
@Component public class ReceiveMessage { @RabbitListener(queues = {"queue.properties.1"}) public void receiveMsg(Message message) { byte[] body = message.getBody(); String msg = new String(body); System.out.println("接收到的消息为: " + msg); } }十四、消息可靠性投递
消息的可靠性投递就是要保证消息投递过程中每一个环节都要成功,那么这肯定要牺牲一些性能,性能与可靠性是无法兼得的;
如果业务实时一致性要求不是特别高的场景,可以牺牲一些可靠性来换取性能。

- 1.代表消息从生产者发送到 Exchange
- 2.代表消息从 Exchange 路由到 Queue
- 3.代表消息在 Queue 中存储
- 4.代表消费者监听 Queue 并消费消息
1、确保消息发送到 RabbitMQ 服务器的交换机上
可能因为网络或者 Broker 的问题导致 1 失败,而此时应该让生产者知道消息是否正确发送到了 Broker 的 exchange 中
有两种解决方案:
第一种是开启Confirm(确认)模式;(异步)
第二种是开启Transaction(事务)模式;(性能低,实际项目中很少用)

2、确保消息路由到正确的队列
可能因为路由关键字错误,或者队列不存在,或者队列名称错误导致②失败。
使用return模式,可以实现消息无法路由的时候返回给生产者;
当然在实际生产环境下,我们不会出现这种问题,我们都会进行严格测试才会上线(很少有这种问题);
另一种方式就是使用备份交换机(alternate-exchange),无法路由的消息会发送到这个备用交换机上

3、确保消息在队列正确地存储
可能因为系统宕机、重启、关闭等等情况导致存储在队列的消息丢失,即 3 出现问题;
解决方案:
- 队列持久化
QueueBuilder.durable(QUEUE).build();- 交换机持久化
ExchangeBuilder.directExchange(EXCHANGE).durable(true).build();- 消息持久化
MessageProperties messageProperties = new MessageProperties(); messageProperties.setDeliveryMode(MessageDeliveryMode.PERSISTENT); // 默认就是持久化的 - 集群,镜像队列,高可用
- 确保消息从队列正确地投递到消费者
采用消息消费时的手动ack确认机制来保证;
如果消费者收到消息后未来得及处理即发生异常,或者处理过程中发生异常,会导致④失败。
为了保证消息从队列可靠地达到消费者,RabbitMQ提供了消息确认机制(message acknowledgement);
#开启手动ack消息消费确认
spring.rabbitmq.listener.simple.acknowledge-mode=manual消费者在订阅队列时,通过上面的配置,不自动确认,采用手动确认,RabbitMQ会等待消费者显式地回复确认信号后才从队列中删除消息;
如果消息消费失败,也可以调用basicReject()或者basicNack()来拒绝当前消息而不是确认。如果requeue参数设置为true,可以把这条消息重新存入队列,以便发给下一个消费者(当然,只有一个消费者的时候,这种方式可能会出现无限循环重复消费的情况,可以投递到新的队列中,或者只打印异常日志);
十五、消息的幂等性
消息消费时的幂等性(消息不被重复消费)
同一个消息,第一次接收,正常处理业务,如果该消息第二次再接收,那就不能再处理业务,否则就处理重复了
幂等性是:对于一个资源,不管你请求一次还是请求多次,对该资源本身造成的影响应该是相同的,不能因为重复的请求而对该资源重复造成影响;
以接口幂等性举例:
接口幂等性是指:一个接口用同样的参数反复调用,不会造成业务错误,那么这个接口就是具有幂等性的,比如:注册接口、发送短信验证码接口;
比如同一个订单我支付两次,但是只会扣款一次,第二次支付不会扣款,这说明这个支付接口是具有幂等性的
如何避免消息的重复消费问题?(消息消费时d额幂等性)
全局唯一 ID + Redis
生产者在发送消息时,为每条消息设置一个全局唯一的 messageId,消费者拿到消息后,使用setnx 命令,将 messageId 作为 key 放到 redis 中:setnx(messageId, 1),若返回1,说明之前没有消费过,正常消费;若返回0,说明这条消息之前已消费过,抛弃;
- 参考代码
//1、把消息的唯一ID写入redis boolean flag = stringRedisTemplate.opsForValue().setIfAbsent("idempotent:" + orders.getId(), String.valueOf(orders.getId())); //如果redis中该key不存在,那么就设置,存在就不设置 if (flag) { //key不存在返回true //相当于是第一次消费该消息 //TODO 处理业务 System.out.println("正常处理业务....." + orders.getId()); } 