
阅读量:1
public class RealSecurityConfig extends WebSecurityConfigurerAdapter {
@Bean
PasswordEncoder passwordEncoder(){
//NoOpPasswordEncoder 在高版本的Spring Boot 中已被弃用,不建议使用
return new BCryptPasswordEncoder();
}
@Autowired PasswordEncoder passwordEncoder; @Override protected void configure(AuthenticationManagerBuilder auth) throws Exception { auth.inMemoryAuthentication() .passwordEncoder(passwordEncoder)//使用对应的加密 .withUser("admin") .password(passwordEncoder.encode("123456"))//使用对应的解密 .roles("ADMIN","USER") .and() .withUser("freephp") .password(passwordEncoder.encode("123456")) .roles("USER"); } }
上面这段代码中,inMemoryAuthentication 代表把这个配置保存在内存中,然后使用 withUser 方法增加授权账号,用 password 方法设置密码,用 roles 来设置账号所属的权限群组。 > > 而 **HttpSecurity** 是另外一种认证方式,也是使用 configure 方法,具体代码如下: > > > @Override
protected void configure(HttpSecurity http) throws Exception {
http.authorizeRequests()
.antMatchers(“/admin/“)
.hasRole(“ADMIN”)
.antMatchers(”/user/”)
.access(“hasAnyRole(‘ADMIN’,‘USER’)”)
.anyRequest()
.authenticated()//任意登录的用户都可以访问
.and()
.formLogin()
.loginProcessingUrl(“/login”)
.permitAll()
.and()
.csrf()
.disable();
}
> > 使用 andMatcher 设置需要被授权的 URL 路径,access 方法给予某些角色访问权限,代码如下:。 > > > package org.example.controller;
import org.springframework.web.bind.annotation.GetMapping;
import org.springframework.web.bind.annotation.RestController;
@RestController
public class SwagController {
@GetMapping(“/user/sayHi”)
public String myUser(){
return “Hi,user”;
}
@GetMapping("/admin/hello") public String admin(){ return "admin page"; } @GetMapping("/hello") public String hello(){ return "hello,man"; } }
> > 运行项目后,访问 http://localhost:8080/admin/hello, 则会要求输入账号和密码,使用 admin 账号,密码输入 123456,即可进入后台 /admin/hello 页面,如图。 > > > 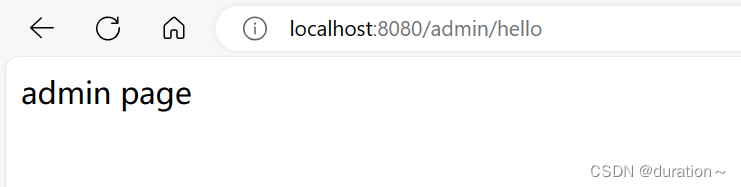 ### 5.认证流程 > > * Authentication接口: 它的实现类,表示当前访问系统的用户,封装了用户相关信息。 > * AuthenticationManager接口: 定义了认证Authentication的方法。 > * UserDetailsService接口: 加载用户特定数据的核心接口。里面定义了一个根据用户名查询用户信息的方法。 > * UserDetails接口: 提供核心用户信息。通过UserDetailsService根据用户名获取处理的用户信息要封装成UserDetails对象返回,然后将这些信息封装到Authentication对象中。 > > >  所以接下来如果要使用数据库做登录验证,只要把实现类 InMemoryUserDetailsManager 做一个替换,DaoAuthenticationProvider 调用自定义的实现类。让其不再使用内存做认证进入数据库查询,实现 UserDetailsService 接口即可。 ### 6.基于数据库查询的登录验证 > > 之前都是使用内存来存储认证数据,其实可以考虑使用数据库进行持久化数据存储。这样更加方便进行账号管理,也更符合实际项目开发的需求。 > > > 创建一个 roles 库,然后创建用户表、角色权限表、用户和角色权限关系表。 create database r_security;
use r_security;
– 用户表
CREATE TABLE r_users(id int(11) unsigned NOT NULL AUTO_INCREMENT primary key COMMENT ‘主键’,username varchar(50) not null comment ‘账号名’,password varchar(300) not null comment ‘密码’,status tinyint(11) not null comment ‘账号状态,1:正常、2:被封’,created int (11) not null comment ‘创建时间,时间戳’
);
– 角色权限表
create table r_roles(id int(11) unsigned not null auto_increment comment ‘主键’,name varchar(50) not null comment ‘角色名’,permission_path varchar(500) not null comment ‘权限路径,如/admin/*’,
primary key (id)
);
– 用户角色权限关系表
create table r_user_roles(id int(11) unsigned not null auto_increment comment ‘主键’,user_id int(11) unsigned not null comment ‘用户ID’,role_id int(11) unsigned not null comment ‘角色ID’,
primary key (id),
key user_id (user_id),
key role_id (role_id),
constraint role_id foreign key (role_id) references r_roles(id) on
delete restrict ,
constraint user_id foreign key (user_id) references r_users(id) on
delete restrict
)
为了方便测试,先插入几条测试数据,r\_users 的数据如图  R\_roles的数据如图,插入三条数据,有三种角色,一是管理员角色,二是 root 权限,也就是超级管理员。三是 dba,数据管理员。这三种角色可以访问不同的 URL。 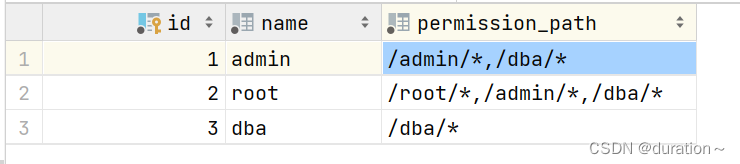 用户角色表中插入数据  为了生成上面 r\_users 表中加密后的密码,攥写了使用 Bcrypt 加密的程序,代码如下: import java.util.ArrayList;
import org.springframework.security.crypto.bcrypt.BCryptPasswordEncoder;
public class BcryptTest {
public static void main(String[] args) {
ArrayList passwordArr = new ArrayList<>();
passwordArr.add(“123456”);
getUsersEncodePasswords(passwordArr);
}
private static void getUsersEncodePasswords(ArrayList<String> passwordArr) { for (String pass :passwordArr){ //密码加密 BCryptPasswordEncoder passwordEncoder = new BCryptPasswordEncoder(); String newPassword = passwordEncoder.encode(pass); System.out.println(" 原始密码是:"+pass+",加密密码为:"+newPassword); //对比这两个密码是不是同一个密码 boolean match = passwordEncoder.matches(pass,newPassword); System.out.println("两个密码一致:"+match); } } }
运行结果如图:  > > Bcrpt 加密算法非常安全,此算法自身实现了随机盐生成,很难被逆向破解。 > > > 创建一个新的项目,导入依赖,pom.xml代码如下:
4.0.0
<groupId>org.example</groupId> <artifactId>Security2</artifactId> <version>1.0-SNAPSHOT</version> <properties> <maven.compiler.source>8</maven.compiler.source> <maven.compiler.target>8</maven.compiler.target> <project.build.sourceEncoding>UTF-8</project.build.sourceEncoding> </properties> <parent> <groupId>org.springframework.boot</groupId> <artifactId>spring-boot-starter-parent</artifactId> <version>2.3.5.RELEASE</version> <relativePath/> <!-- lookup parent from repository --> </parent> <dependencies> <dependency> <groupId>org.springframework.boot</groupId> <artifactId>spring-boot-starter</artifactId> </dependency> <dependency> <groupId>org.projectlombok</groupId> <artifactId>lombok</artifactId> <optional>true</optional> </dependency> <!-- 引入security依赖 --> <dependency> <groupId>org.springframework.boot</groupId> <artifactId>spring-boot-starter-security</artifactId> </dependency> <dependency> <groupId>org.springframework.boot</groupId> <artifactId>spring-boot-starter-web</artifactId> <version>2.3.5.RELEASE</version> </dependency> <dependency> <groupId>org.mybatis.spring.boot</groupId> <artifactId>mybatis-spring-boot-starter</artifactId> <version>1.1.1</version> </dependency> <dependency> <groupId>com.alibaba</groupId> <artifactId>druid-spring-boot-starter</artifactId> <version>1.1.10</version> </dependency> <!-- mysql --> <dependency> <groupId>mysql</groupId> <artifactId>mysql-connector-java</artifactId> </dependency> <dependency> <groupId>org.springframework.boot</groupId> <artifactId>spring-boot-starter-test</artifactId> <scope>test</scope> <exclusions> <exclusion> <groupId>org.junit.vintage</groupId> <artifactId>junit-vintage-engine</artifactId> </exclusion> </exclusions> </dependency> <dependency> <groupId>junit</groupId> <artifactId>junit</artifactId> <version>4.13.2</version> <scope>test</scope> </dependency> </dependencies> r_roles 表对应的部分实体类对象
package org.example.entity; import lombok.Data; @Data public class Role { // 主键 ID private Integer id; // 名称 private String name; //权限路径 private String permission_path; } 创建 r_users 对应的 POJO 对象 User,继承自 UserDetails 接口,代码如下:
package org.example.entity; import lombok.AllArgsConstructor; import lombok.Data; import lombok.NoArgsConstructor; import org.springframework.beans.factory.annotation.Autowired; import org.springframework.security.core.GrantedAuthority; import org.springframework.security.core.authority.SimpleGrantedAuthority; import org.springframework.security.core.userdetails.UserDetails; import java.util.ArrayList; import java.util.Collection; import java.util.List; @Data @NoArgsConstructor @AllArgsConstructor public class User implements UserDetails { //主键 id private Integer id; //用户名 private String username; //密码 private String password; // 状态 1:正常,2:封禁 private int status; // 创建时间 private int created; private List<Role> roles; @Override public Collection<? extends GrantedAuthority> getAuthorities() { List<SimpleGrantedAuthority> authorities = new ArrayList<>(); for(Role role : roles){ authorities.add(new SimpleGrantedAuthority(role.getName())); } return authorities; } @Override public String getPassword() { return password; } @Override public String getUsername() { return username; } @Override public boolean isAccountNonExpired() { return true; } @Override public boolean isAccountNonLocked() { return status != 2; } @Override public boolean isCredentialsNonExpired() { return true; } @Override public boolean isEnabled() { return status == 1; } } Java 类 User 实现了 Spring Security 中的 UserDetails 接口,这是因为 Spring Security 需要具体的用户信息来进行认证和授权。通过实现 UserDetails 接口,User 类可以与 Spring Security 框架集成,允许 Spring Security 使用该类的实例来获取用户的安全相关信息。
- getAuthorities():返回授予用户的权限列表。在这个 User 类中,它遍历用户的角色列表 roles 并为每个角色创建一个 SimpleGrantedAuthority 对象,最终返回权限集合。
- getPassword():返回用户的密码。在这个 User 类中,这个方法返回 User 对象的 password 字段。
- getUsername():返回用户的用户名。在这个 User 类中,这个方法返回 User 对象的 username 字段。
- isAccountNonExpired():检查用户的账户是否已过期。在这个 User 类中,这个方法硬编码返回 true,这意味着账户被认为永远不会过期,在数据库设计中没有该字段,所以默认返回 true。在实际的应用程序中,你可能需要添加一些逻辑来判断账户是否真的过期了。
- isAccountNonLocked():检查用户是否未被锁定,返回 false 代表被锁定,true 没有被锁定。
- isCredentialsNonExpired():检查用户证书(密码)是否未过期。在这个 User 类中,这个方法返回 true,表明证书永远不会过期。但在实际应用中,你可能会根据业务逻辑添加相应的实现代码。
- isEnabled():检查用户是否被启用。在这个 User 类中,如果 status 字段的值为 1,代表用户状态正常,方法返回 true;否则返回 false。
Mapper 的编写如下:
package org.example.mapper; import org.apache.ibatis.annotations.Mapper; import org.apache.ibatis.annotations.Select; import org.example.entity.Role; import org.example.entity.User; import java.util.List; @Mapper public interface Usermapper { @Select("select * from r_roles as r join r_user_roles as ur on r.id = ur.user_id where ur.user_id = #{id}") List<Role> getUserRoleByUserId(Integer id); @Select("select * from r_users where username = #{username}") User getUserByUsername(String username); } UserService 如下:
package org.example.service; import org.example.entity.User; import org.example.mapper.Usermapper; import org.springframework.beans.factory.annotation.Autowired; import org.springframework.security.core.userdetails.UserDetails; import org.springframework.security.core.userdetails.UserDetailsService; import org.springframework.security.core.userdetails.UsernameNotFoundException; import org.springframework.stereotype.Service; @Service public class UserService implements UserDetailsService { @Autowired private Usermapper usermapper; @Override public UserDetails loadUserByUsername(String username) throws UsernameNotFoundException { User user = usermapper.getUserByUsername(username); if (user == null){ throw new UsernameNotFoundException("该账户不存在"); } //根据 user id 获取用户的角色信息 user.setRoles(usermapper.getUserRoleByUserId(user.getId())); return user; } }
UserService类实现了 Spring Security 中的UserDetailsService接口,这个接口主要用于在认证过程中通过用户名查找用户及其权限。在loadUserByUsername方法中,你使用了Usermapper来获取具体的User对象以及相关的角色信息。
为了测试方便编写 controller:
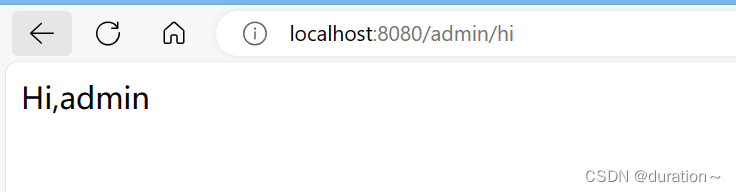
package org.example.controller; import org.springframework.web.bind.annotation.GetMapping; import org.springframework.web.bind.annotation.RestController; @RestController public class UserController { @GetMapping("/dba/hi") public String dba(){ return "Hi,dba page"; } @GetMapping("/user/hi") public String user(){ return "Hi,user"; } @GetMapping("/admin/hi") public String admin(){ return "Hi,admin"; } @GetMapping("/test/Hi") public String testHi(){ return "Hi,just for test"; } } 最后对Spring Security 进行配置编写,代码如下:
package org.example.config; import org.example.service.UserService; import org.springframework.beans.factory.annotation.Autowired; import org.springframework.context.annotation.Bean; import org.springframework.security.access.AccessDeniedException; import org.springframework.security.config.annotation.authentication.builders.AuthenticationManagerBuilder; import org.springframework.security.config.annotation.web.builders.HttpSecurity; import org.springframework.security.config.annotation.web.configuration.EnableWebSecurity; import org.springframework.security.config.annotation.web.configuration.WebSecurityConfigurerAdapter; import org.springframework.security.crypto.bcrypt.BCryptPasswordEncoder; import org.springframework.security.crypto.password.PasswordEncoder; import org.springframework.security.web.access.AccessDeniedHandler; import javax.servlet.ServletException; import javax.servlet.http.HttpServletRequest; import javax.servlet.http.HttpServletResponse; import java.io.IOException; @EnableWebSecurity public class WebSecurityConfig extends WebSecurityConfigurerAdapter { @Autowired UserService userService; @Autowired PasswordEncoder passwordEncoder; @Bean PasswordEncoder passwordEncoder() { return new BCryptPasswordEncoder(); } @Override protected void configure(AuthenticationManagerBuilder auth) throws Exception { auth.userDetailsService(userService).passwordEncoder(passwordEncoder); } @Override protected void configure(HttpSecurity http) throws Exception { http.authorizeRequests() .antMatchers("/bda/**") .access("hasAnyAuthority('dba','admin','root')") //"hasAnyRole('dba','admin','root')") 会自动拼接头,Role_为头加上对应权限 .antMatchers("/admin/**").access( "hasAnyAuthority('root','admin')")//不会拼接头,直接认证。 .and() .formLogin() .loginProcessingUrl("/login") /*.and() .anonymous()//未登录才可以访问 permitAll 所有都可以访问*/ .and().csrf().disable(); http //访问被拒绝走以下 .exceptionHandling() .accessDeniedHandler(new AccessDeniedHandler() { @Override public void handle(HttpServletRequest request, HttpServletResponse response, AccessDeniedException accessDeniedException) throws IOException, ServletException { // 自定义响应逻辑 response.sendRedirect("/access-denied"); } }); //如果需要跨域使用这里,并配置spring WebMVCconfig http.cors(); } } 注意:
如(hasAnyRole、hasRole)这种是基于角色的访问认证会在执行中被 Spring Security自动拼接上前缀 Role_,而之前的基于权限(如
hasAuthority)的访问认证则不会。
源码部分
private static String hasAnyRole(String... authorities) { String anyAuthorities = StringUtils.arrayToDelimitedString(authorities, "','ROLE_"); return "hasAnyRole('ROLE_" + anyAuthorities + "')"; } private static String hasRole(String role) { Assert.notNull(role, "role cannot be null"); Assert.isTrue(!role.startsWith("ROLE_"), () -> { return "role should not start with 'ROLE_' since it is automatically inserted. Got '" + role + "'"; }); return "hasRole('ROLE_" + role + "')"; } 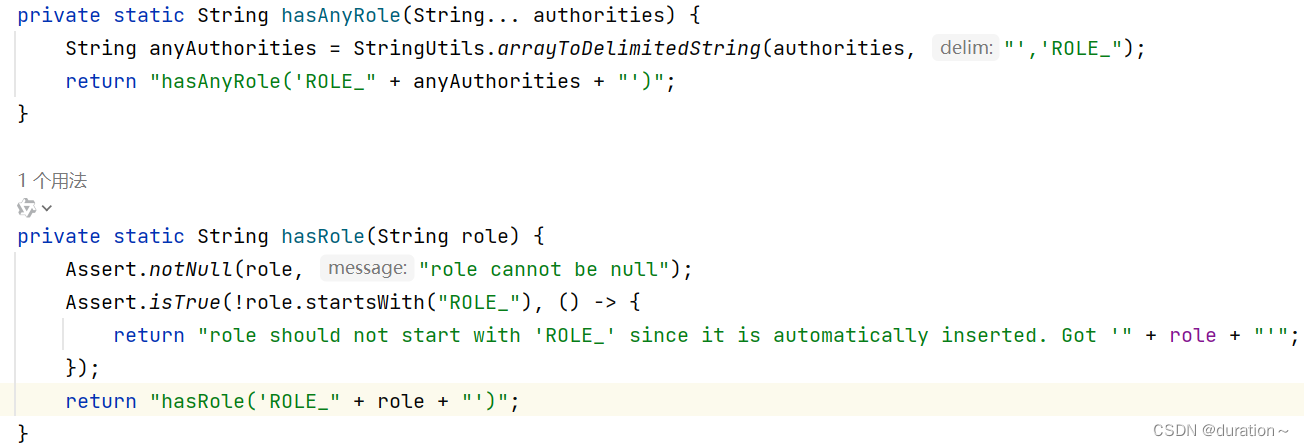
成功
7.多种角色权限认证
有时候一个账号的权限可能是多个,如 freejava 即使 admin 又是 dba。那么在配置中可以增加显示权限包含关系的代码,可以在 Spring Secuirty 中配置代码如下:
@Bean RoleHierarchy roleHierarchy(){ RoleHierarchyImpl roleHierarchy = new RoleHierarchyImpl(); String hierarchy = "ROLE_dba > ROLE_user ROLE_admin > ROLE_dba"; roleHierarchy.setHierarchy(hierarchy); return roleHierarchy; } 该配置生效后,具有 ROLE_admin 的角色的用户可以访问所有资源,而 ROLE_dba 的角色用户可以访问自身权限的资源和 ROLE_user 的角色的用户资源。
8.自定义权限认证与注解方式认证
如果我们不想使用默认提供的权限认证,或面对复杂的业务需要时,可能需要采取自定义认证方式实现权限认证。
自定义一个类
package org.example.expression; import org.example.entity.Role; import org.example.entity.User; import org.springframework.security.core.Authentication; import org.springframework.security.core.context.SecurityContextHolder; import org.springframework.stereotype.Component; import java.util.ArrayList; import java.util.List; @Component("ex") public class U_Define_Expression { public boolean hasAutority(String authority){ //获取当前用户的权限 Authentication authentication = SecurityContextHolder.getContext().getAuthentication(); User LoginUser = (User) authentication.getPrincipal(); List<Role> roles = LoginUser.getRoles(); List<String> permissions = new ArrayList<>(); for(Role role :roles){ permissions.add(role.getName()); } //判断用户权限集合中是否存在 authority return permissions.contains(authority); } } 在需要使用的 controller 前加上 @PreAuthorize(“@ex.hasAutority(‘dba’)”) 表示访问前的验证

同时,Spring Security 支持注解的方式定义授权。
只需要在配置类开启security前置注解
//开启SpringSecurity相关注解支持 @EnableGlobalMethodSecurity(prePostEnabled = true) 资源配置类中需要调整,不要添加认证方法
@Override protected void configure(HttpSecurity http) throws Exception { http.formLogin()//定义认证时使用form表单的方式提交数据 .and() .logout()//登出用默认的路径登出 /logout .permitAll()//允许所有的用户访问登录或者登出的路径,如果 .anyRequest().authenticated()注释掉,则必须添加permitAll(),否则就不能正常访问登录或者登出的路径 .and() .csrf().disable() .authorizeRequests();//授权方法,该方法后有若干子方法进行不同的授权规则处理 //允许所有账户都可访问(不登录即可访问),同时可指定多个路径 // .antMatchers("/register").permitAll() //开发方式1:基于配置 // .antMatchers("/a1","/a2").hasRole("seller")//拥有seller角色的用户可访问a1和a2资源 //拥有指定的任意角色都可以访问对应资源 // .antMatchers("/b1").hasAnyRole("manager1","manager2") //用户任意指定的aa bb都可以访问c1资源 // .antMatchers("/c1").hasAnyAuthority("aa","bb") // .antMatchers("/d").denyAll()//拒绝任意用户访问 // .antMatchers("/e").anonymous()//允许匿名访问 //指定IP可以访问 // .antMatchers("/f").hasIpAddress("localhost/82") // .antMatchers("/hello").hasAuthority("P5") //具有P5权限才可以访问 // .antMatchers("/say").hasRole("ADMIN") //具有ROLE_ADMIN 角色才可以访问 //.anyRequest().authenticated(); //与注解@PermitAll冲突,需要注掉该行 } 注解配置资源权限
在控制方法/URL的权限时, 可以通过配置类中配置的方式进行控制, 也可以使用 注解 @PreAuthorize 来进行控制, 推荐使用注解:
自我介绍一下,小编13年上海交大毕业,曾经在小公司待过,也去过华为、OPPO等大厂,18年进入阿里一直到现在。
深知大多数网络安全工程师,想要提升技能,往往是自己摸索成长,但自己不成体系的自学效果低效又漫长,而且极易碰到天花板技术停滞不前!
因此收集整理了一份《2024年网络安全全套学习资料》,初衷也很简单,就是希望能够帮助到想自学提升又不知道该从何学起的朋友。


既有适合小白学习的零基础资料,也有适合3年以上经验的小伙伴深入学习提升的进阶课程,基本涵盖了95%以上网络安全知识点,真正体系化!
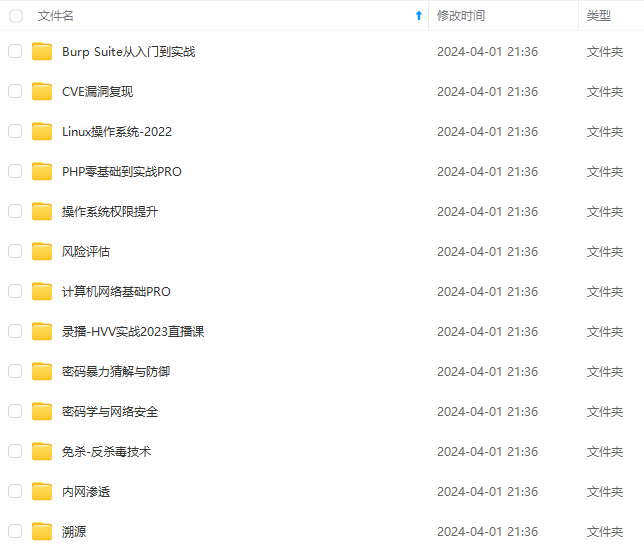
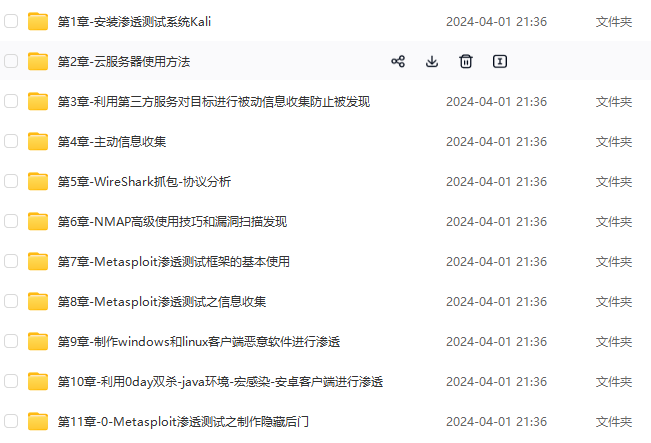
由于文件比较大,这里只是将部分目录大纲截图出来,每个节点里面都包含大厂面经、学习笔记、源码讲义、实战项目、讲解视频,并且后续会持续更新
如果你觉得这些内容对你有帮助,可以添加VX:vip204888 (备注网络安全获取)
还有兄弟不知道网络安全面试可以提前刷题吗?费时一周整理的160+网络安全面试题,金九银十,做网络安全面试里的显眼包!
王岚嵚工程师面试题(附答案),只能帮兄弟们到这儿了!如果你能答对70%,找一个安全工作,问题不大。
对于有1-3年工作经验,想要跳槽的朋友来说,也是很好的温习资料!
【完整版领取方式在文末!!】
93道网络安全面试题
内容实在太多,不一一截图了
黑客学习资源推荐
最后给大家分享一份全套的网络安全学习资料,给那些想学习 网络安全的小伙伴们一点帮助!
对于从来没有接触过网络安全的同学,我们帮你准备了详细的学习成长路线图。可以说是最科学最系统的学习路线,大家跟着这个大的方向学习准没问题。
1️⃣零基础入门
① 学习路线
对于从来没有接触过网络安全的同学,我们帮你准备了详细的学习成长路线图。可以说是最科学最系统的学习路线,大家跟着这个大的方向学习准没问题。
② 路线对应学习视频
同时每个成长路线对应的板块都有配套的视频提供:

一个人可以走的很快,但一群人才能走的更远。不论你是正从事IT行业的老鸟或是对IT行业感兴趣的新人,都欢迎扫码加入我们的的圈子(技术交流、学习资源、职场吐槽、大厂内推、面试辅导),让我们一起学习成长!
内容实在太多,不一一截图了
黑客学习资源推荐
最后给大家分享一份全套的网络安全学习资料,给那些想学习 网络安全的小伙伴们一点帮助!
对于从来没有接触过网络安全的同学,我们帮你准备了详细的学习成长路线图。可以说是最科学最系统的学习路线,大家跟着这个大的方向学习准没问题。
1️⃣零基础入门
① 学习路线
对于从来没有接触过网络安全的同学,我们帮你准备了详细的学习成长路线图。可以说是最科学最系统的学习路线,大家跟着这个大的方向学习准没问题。
② 路线对应学习视频
同时每个成长路线对应的板块都有配套的视频提供:
一个人可以走的很快,但一群人才能走的更远。不论你是正从事IT行业的老鸟或是对IT行业感兴趣的新人,都欢迎扫码加入我们的的圈子(技术交流、学习资源、职场吐槽、大厂内推、面试辅导),让我们一起学习成长!
[外链图片转存中…(img-3KdgXaYG-1713022509733)]
