阅读量:1
一、参考
1. Python操作 RabbitMQ、Redis、Memcache、SQLAlchemy
2. RabbitMQ Tutorials | RabbitMQ
5. rabbitmq篇---python的pika 库常用函数及参数说明
二、环境搭建
Docker 安装: win上使用Docker - 掘金 (juejin.cn)
MQ 安装:.Net RabbitMQ - 掘金 (juejin.cn)
控制台输入: pip install pika

三、快速使用
流程参考:RabbitMQ tutorial - "Hello world!" | RabbitMQ
3.1 创建生产者
import pika # 无密码 # connection = pika.BlockingConnection(pika.ConnectionParameters('localhost')) # 有密码 credentials = pika.PlainCredentials("guest","guest") connection = pika.BlockingConnection(pika.ConnectionParameters( host = '127.0.0.1', port = 5673, # 注意,默认为5672!5673是因为在docker初始化时设置的 virtual_host = '/', credentials = credentials)) channel = connection.channel() # 创建一个队列 channel.queue_declare(queue='hello') # 发送数据 channel.basic_publish(exchange='', routing_key='hello', # 消息队列名称 body='Hello World!') # 发送的数据 print(" [x] Sent 'Hello World!'") connection.close() 运行该文件后:

3.1.1 durable 持久化
创建队列时,队列默认不进行持久化,可在创建时指定为持久化,即:
# 创建一个队列 —— 支持持久化 channel.queue_declare(queue='hello',durable=True) 并且还需指定properties`,即:
# 发送数据 channel.basic_publish(exchange='', routing_key='hello', # 消息队列名称 body='Hello World!', # 发送的数据 properties=pika.BasicProperties( delivery_mode= 2 # 消息持久化 )) 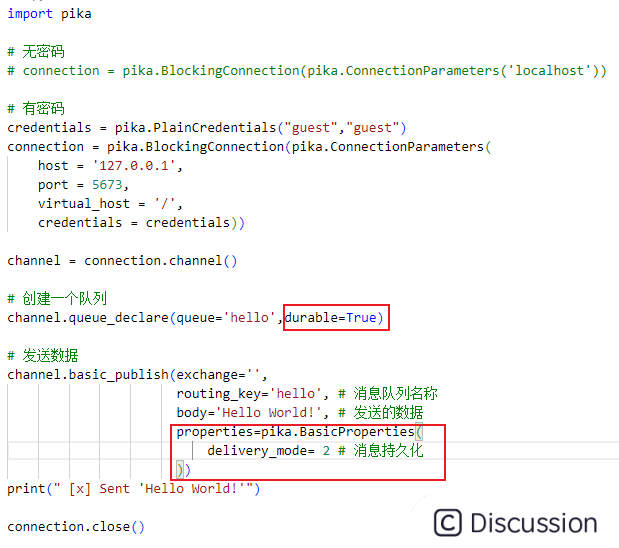
3.2 创建消费者
import pika credentials = pika.PlainCredentials('guest', 'guest') connection = pika.BlockingConnection(pika.ConnectionParameters( host = '127.0.0.1', port = 5673, virtual_host = '/', credentials = credentials)) channel = connection.channel() # 申明消息队列,消息在这个队列传递,如果不存在,则创建队列 channel.queue_declare(queue = 'hello') # 定义一个回调函数来处理消息队列中的消息,这里是打印出来 def callback(ch, method, properties, body): print(f"消费者接收到了任务: {body.decode()}") # 告诉rabbitmq,用callback来接收消息 channel.basic_consume( queue='hello', auto_ack=True, on_message_callback=callback ) # 开始接收信息,并进入阻塞状态,队列里有信息才会调用callback进行处理 channel.start_consuming() 3.2.1 ack 消息验证
auto_ack 表示是否进行ack验证,默认为 False;
当为 False 时,消费者发生异常后,消息不会被消费;
当为 True 时,消费者发生异常后,消息仍会被消费。
3.2.2 闲置消费
默认派发顺序按照队列顺序执行,当队列某个任务处理时间过久时,就会造成资源浪费
# 闲置消费 channel.basic_qos(prefetch_count=1) 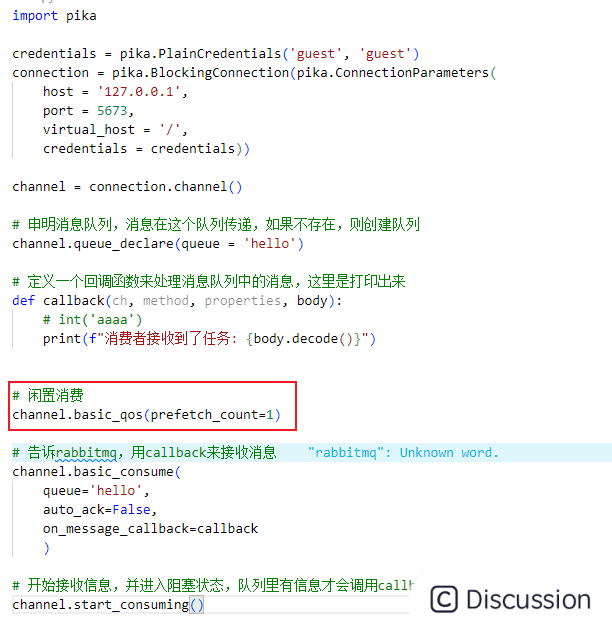
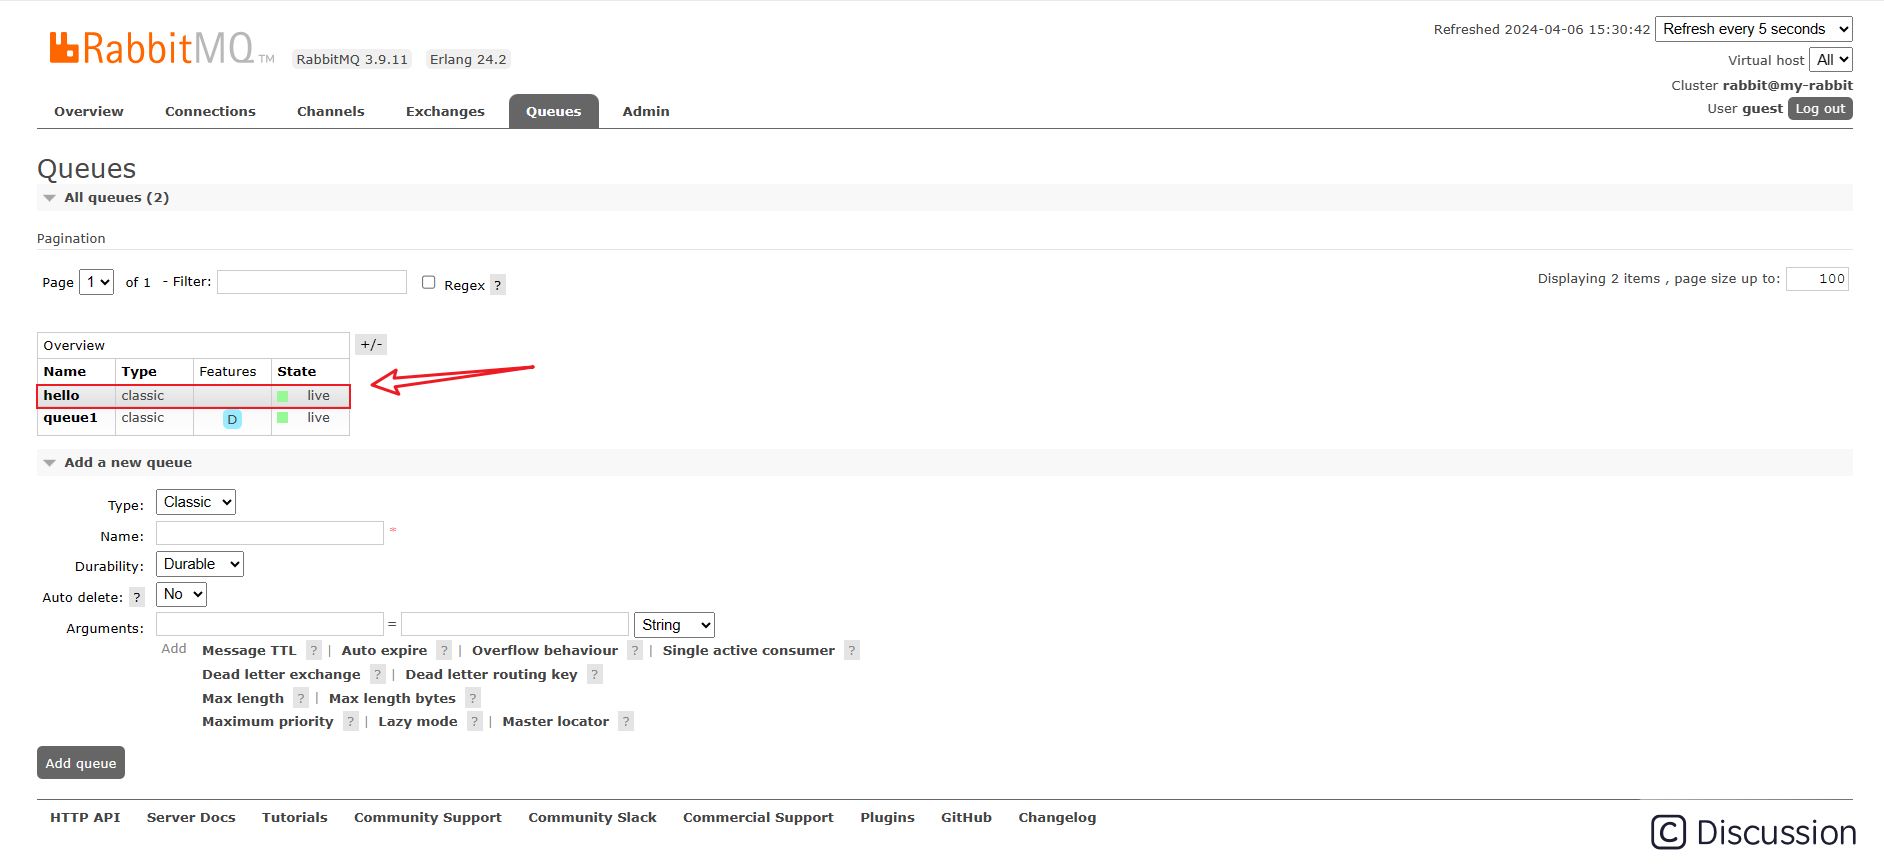
3.3 效果演示
运行该文件后:
四、发布与订阅
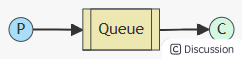
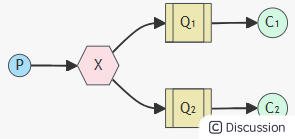
上面方法用于任务的发布与处理,一个任务只会对应一个处理者,
对应关系如下:
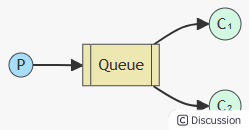
下图按照特定顺序分发任务(轮询、闲置消费等等)
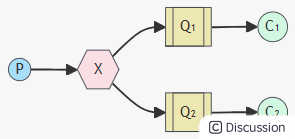
而 发布/订阅 模式,要借助交换机(Exchange),一个任务会交给多个处理者,常用于通知
关系如下图所示:
4.1 Fanout 模式
流程参考:RabbitMQ tutorial - Publish/Subscribe | RabbitMQ
这种模式下,传递到 exchange 的消息将会转发到所有与其绑定的 queue 上。
- 不需要指定 routing_key ,即使指定了也是无效。
- 需要提前将 exchange 和 queue 绑定,一个 exchange 可以绑定多个 queue,一个queue可以绑定多个exchange。
- 需要先启动 订阅者,此模式下的队列是 consumer 随机生成的,发布者 仅仅发布消息到 exchange ,由 exchange 转发消息至 queue。
4.1.1 生产者-发布者
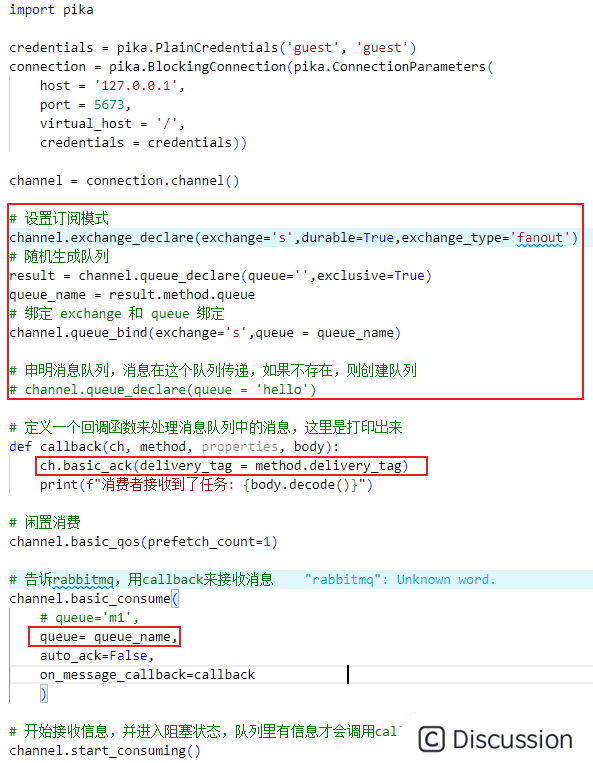
import pika # 无密码 # connection = pika.BlockingConnection(pika.ConnectionParameters('localhost')) # 有密码 credentials = pika.PlainCredentials("guest","guest") connection = pika.BlockingConnection(pika.ConnectionParameters( host = '127.0.0.1', port = 5673, credentials = credentials)) channel = connection.channel() # 设置订阅模式 channel.exchange_declare(exchange='s',durable=True,exchange_type='fanout') # 创建一个队列 # channel.queue_declare(queue='hello',durable=True) # 发送数据 channel.basic_publish(exchange='s', routing_key='', # 消息队列名称 body='Hello World!', # 发送的数据 ) print(" [x] Sent 'Hello World!'") connection.close() 4.1.2 消费者-订阅者
import pika credentials = pika.PlainCredentials('guest', 'guest') connection = pika.BlockingConnection(pika.ConnectionParameters( host = '127.0.0.1', port = 5673, virtual_host = '/', credentials = credentials)) channel = connection.channel() # 设置订阅模式 channel.exchange_declare(exchange='s',durable=True,exchange_type='fanout') # 随机生成队列 result = channel.queue_declare(queue='',exclusive=True) queue_name = result.method.queue # 绑定 exchange 和 queue 绑定 channel.queue_bind(exchange='s',queue = queue_name) # 申明消息队列,消息在这个队列传递,如果不存在,则创建队列 # channel.queue_declare(queue = 'hello') # 定义一个回调函数来处理消息队列中的消息,这里是打印出来 def callback(ch, method, properties, body): ch.basic_ack(delivery_tag = method.delivery_tag) print(f"消费者接收到了任务: {body.decode()}") # 闲置消费 channel.basic_qos(prefetch_count=1) # 告诉rabbitmq,用callback来接收消息 channel.basic_consume( # queue='m1', queue= queue_name, auto_ack=False, on_message_callback=callback ) # 开始接收信息,并进入阻塞状态,队列里有信息才会调用callback进行处理 channel.start_consuming() 相比于之前做出的修改`:
4.1.3 效果演示
创建两个消费者和一个生产者,当生产者发生消息后,两个消费者同时收到
4.2 Routing(Direct) 模式
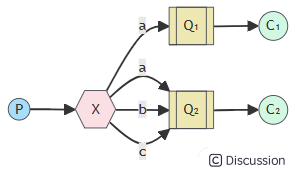
这种工作模式的原理是 消息发送至 exchange,exchange 根据 路由键(routing_key) 转发到相对应的 queue 上。
- 可以使用默认 exchange =' ' ,也可以自定义 exchange
- 这种模式下不需要将 exchange 和 任何进行绑定,当然绑定也是可以的。可以将 exchange 和 queue ,routing_key 和 queue 进行绑定
- 传递或接受消息时 需要 指定 routing_key
- 需要先启动 订阅者,此模式下的队列是 consumer 随机生成的,发布者 仅仅发布消息到 exchange ,由 exchange 转发消息至 queue。
4.2.1 生产者-发布者
import pika # 无密码 # connection = pika.BlockingConnection(pika.ConnectionParameters('localhost')) # 有密码 credentials = pika.PlainCredentials("guest","guest") connection = pika.BlockingConnection(pika.ConnectionParameters( host = '127.0.0.1', port = 5673, credentials = credentials)) channel = connection.channel() # 设置订阅模式 exchange_name = 's1' channel.exchange_declare(exchange= exchange_name,durable=True,exchange_type='direct') # 创建一个队列 # channel.queue_declare(queue='hello',durable=True) # 发送数据 data = 'hello world' channel.basic_publish( exchange = exchange_name, routing_key='b', # 消息队列名称 body= data, # 发送的数据 ) print(f" [x] Sent '{data}'") connection.close() 4.2.2 消费者-订阅者
import pika credentials = pika.PlainCredentials('guest', 'guest') connection = pika.BlockingConnection(pika.ConnectionParameters( host = '127.0.0.1', port = 5673, virtual_host = '/', credentials = credentials)) channel = connection.channel() # 路由关键词 routing_key_1 = 'a' # 设置订阅模式 exchange_name = 's1' channel.exchange_declare( exchange= exchange_name, durable = True, exchange_type = 'direct' ) # 随机生成队列 result = channel.queue_declare(queue='',exclusive=True) queue_name = result.method.queue # 绑定 exchange 和 queue 绑定 channel.queue_bind( exchange = exchange_name, queue = queue_name, routing_key = routing_key_1 ) # 申明消息队列,消息在这个队列传递,如果不存在,则创建队列 # channel.queue_declare(queue = 'hello') # 定义一个回调函数来处理消息队列中的消息,这里是打印出来 def callback(ch, method, properties, body): ch.basic_ack(delivery_tag = method.delivery_tag) print(f"消费者接收到了任务: {body.decode()}") # 闲置消费 channel.basic_qos(prefetch_count=1) # 告诉rabbitmq,用callback来接收消息 channel.basic_consume( # queue='m1', queue= queue_name, auto_ack=False, on_message_callback=callback ) # 开始接收信息,并进入阻塞状态,队列里有信息才会调用callback进行处理 channel.start_consuming() 4.2.3 效果演示
创建两个消费者:
设置消费者一的 routingkey为 a 和 b,消费者二的 routingkey为 a
测试生产者发送不同的 routing_key,消费者的反应情况
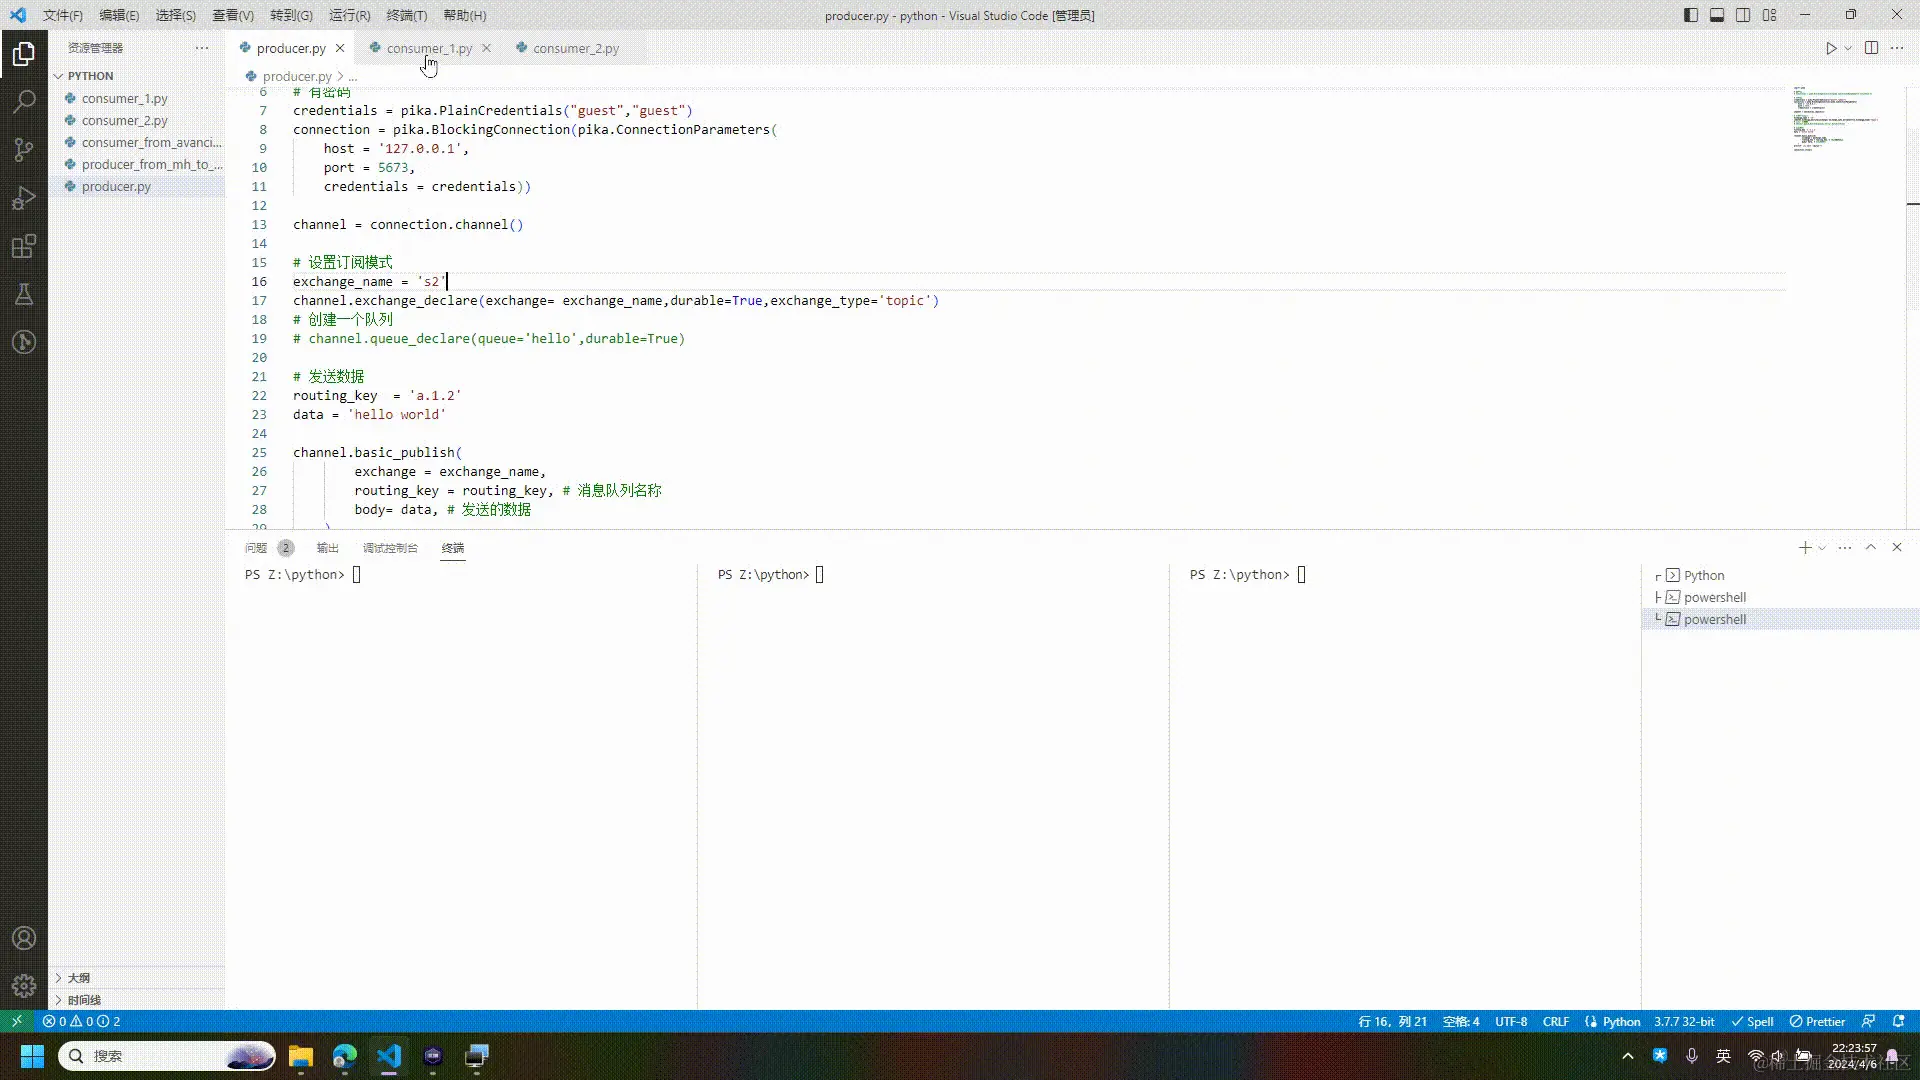
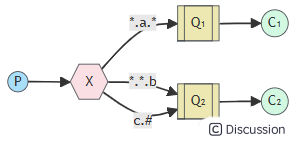
4.3 Topics 模式
流程参考: RabbitMQ tutorial - Topics | RabbitMQ
这种模式和第二种模式差不多,exchange 也是通过 路由键 routing_key 来转发消息到指定的 queue 。
不同点是 routing_key 使用正则表达式支持模糊匹配,但匹配规则又与常规的正则表达式不同,
比如“#”是匹配全部,“*”是匹配一个词,词与词之间使用 “.” 分割
4.3.1 生产者-发布者
import pika # 无密码 # connection = pika.BlockingConnection(pika.ConnectionParameters('localhost')) # 有密码 credentials = pika.PlainCredentials("guest","guest") connection = pika.BlockingConnection(pika.ConnectionParameters( host = '127.0.0.1', port = 5673, credentials = credentials)) channel = connection.channel() # 设置订阅模式 exchange_name = 's2' channel.exchange_declare(exchange= exchange_name,durable=True,exchange_type='topic') # 创建一个队列 # channel.queue_declare(queue='hello',durable=True) # 发送数据 routing_key = 'a.1.2' data = 'hello world' channel.basic_publish( exchange = exchange_name, routing_key = routing_key, # 消息队列名称 body= data, # 发送的数据 ) print(f" [x] Sent '{data}'") connection.close() 4.3.2 消费者-订阅者
import pika credentials = pika.PlainCredentials('guest', 'guest') connection = pika.BlockingConnection(pika.ConnectionParameters( host = '127.0.0.1', port = 5673, virtual_host = '/', credentials = credentials)) channel = connection.channel() # 路由关键词 : '#' 是匹配全部,'*' 是匹配一个词 routing_key_1 = 'a.#' routing_key_2 = 'b.*' # 设置订阅模式 exchange_name = 's2' channel.exchange_declare( exchange= exchange_name, durable = True, exchange_type = 'topic' ) # 随机生成队列 result = channel.queue_declare(queue='',exclusive=True) queue_name = result.method.queue # 绑定 exchange 和 queue 绑定 channel.queue_bind( exchange = exchange_name, queue = queue_name, routing_key = routing_key_1 ) channel.queue_bind( exchange = exchange_name, queue = queue_name, routing_key = routing_key_2 ) # 申明消息队列,消息在这个队列传递,如果不存在,则创建队列 # channel.queue_declare(queue = 'hello') # 定义一个回调函数来处理消息队列中的消息,这里是打印出来 def callback(ch, method, properties, body): ch.basic_ack(delivery_tag = method.delivery_tag) print(f"消费者接收到了任务: {body.decode()}") # 闲置消费 channel.basic_qos(prefetch_count=1) # 告诉rabbitmq,用callback来接收消息 channel.basic_consume( # queue='m1', queue= queue_name, auto_ack=False, on_message_callback=callback ) # 开始接收信息,并进入阻塞状态,队列里有信息才会调用callback进行处理 channel.start_consuming() 4.3.3 效果演示
创建两个消费者:
设置消费者一的 routing_key 为 a.# 和 b.*, 指a后面可以以任意词结尾,b后面最多只能附加一个词
消费者二的 routing_key 为 a.#,指a后面可以以任意词结尾
测试生产者发送不同的 routing_key,消费者的反应情况