
阅读量:2
dataset
对于单个样本
dataloader
批量样本
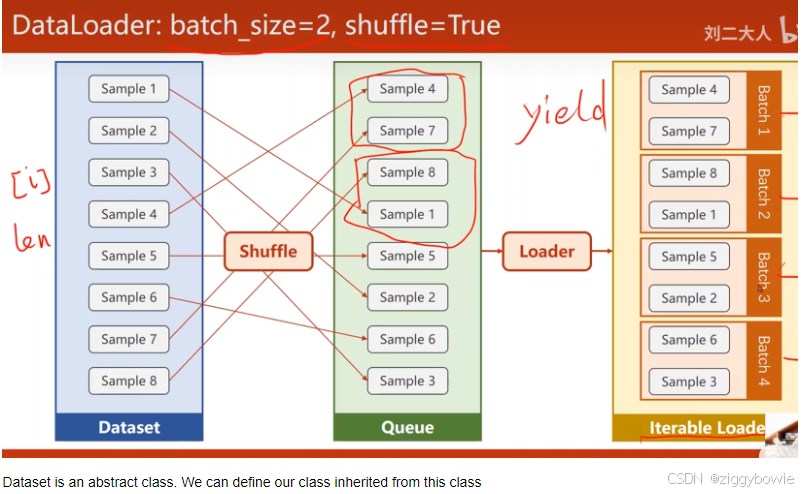
Dataset 存储样本和它们相应的标签,DataLoader 在 Dataset 基础上添加了一个迭代器,迭代器可以迭代数据集,以便能够轻松地访问 Dataset 中的样本(变为mini-batch形式,多个样本组合成mini-batch,random,保存在gpu中等)
支持下标索引获取样本,主要是拿出mini-batch(一组数据,训练时使用)
batch可以利用并行计算(向量计算),随机梯度下降每次一个样本时间过长(虽然随机性较好)
均衡性能和时间:mini-batch epoch:一个epoch中所有样本都参与了训练 batch-size:每次训练时用到的样本数量 iteration:batch的个数
如果可以使用下标获取dataset样本和知道dataset长度,则DataLoader可以自动生成mini-batch数据集
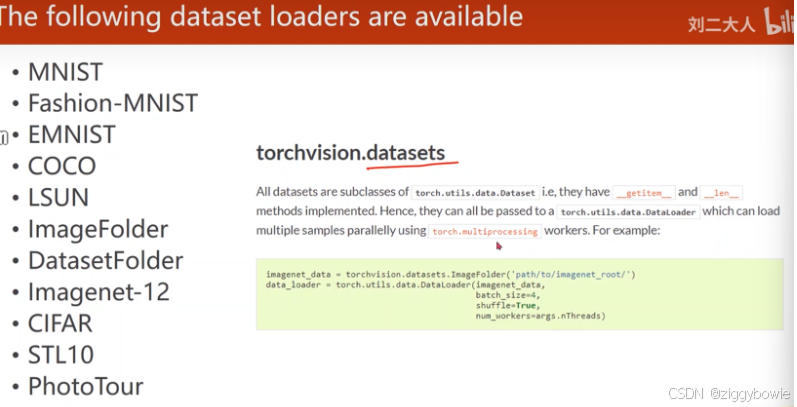
pytorch还提供部分预加载数据集
torch.utils.data.Dataset
https://pytorch.org/text/stable/datasets.html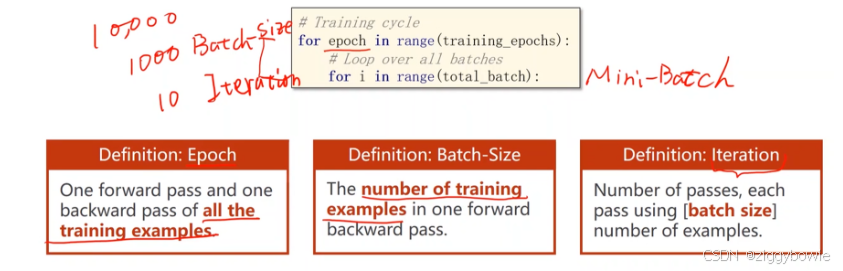
构造数据集(init()函数中)的两种选择
(1)在init中加载整个数据集,用getitem时将第[i]个样本传出去
(2)数据集较大的情况:比如图片:可能只是加载图片的路径列表,图像分割时可能输出y也很大,则也使用文件名
防止显存超出
使用torchvision导入预加载的数据集
import torch from torch.utils.data import Dataset from torchvision import datasets from torchvision.transforms import ToTensor import matplotlib.pyplot as plt training_data = datasets.FashionMNIST( root="data", train=True, download=True, transform=ToTensor() ) test_data = datasets.FashionMNIST( root="data", train=False, download=True, transform=ToTensor() ) 自定义数据集加载
自定义的数据集类必须实现三个函数: init, len, 和 getitem
getitem 从数据集中给定的索引 idx 处加载并返回一个样本
函数 len 返回我们数据集中的样本数。
# import gzip # import numpy as np # import os # import requests # # 下载 Fashion MNIST 数据集 # def download_fashion_mnist(base_url, filename, destination): # if not os.path.exists(destination): # os.makedirs(destination) # filepath = os.path.join(destination, filename) # if not os.path.exists(filepath): # url = base_url + filename # response = requests.get(url) # with open(filepath, 'wb') as f: # f.write(response.content) # return filepath # # 解压 gz 文件 # def extract_gz(filepath, destination): # with gzip.open(filepath, 'rb') as f_in: # with open(destination, 'wb') as f_out: # f_out.write(f_in.read()) # return destination # # 读取二进制文件并转换为 numpy 数组 # def load_fashion_mnist_images(filepath): # with open(filepath, 'rb') as f: # data = f.read() # images = np.frombuffer(data, dtype=np.uint8, offset=16).reshape(-1, 28, 28) # return images # def load_fashion_mnist_labels(filepath): # with open(filepath, 'rb') as f: # data = f.read() # labels = np.frombuffer(data, dtype=np.uint8, offset=8) # return labels # base_url = 'http://fashion-mnist.s3-website.eu-central-1.amazonaws.com/' # destination_dir = 'fashion_mnist' # train_images_path = download_fashion_mnist(base_url, 'train-images-idx3-ubyte.gz', destination_dir) # train_labels_path = download_fashion_mnist(base_url, 'train-labels-idx1-ubyte.gz', destination_dir) # test_images_path = download_fashion_mnist(base_url, 't10k-images-idx3-ubyte.gz', destination_dir) # test_labels_path = download_fashion_mnist(base_url, 't10k-labels-idx1-ubyte.gz', destination_dir) # train_images = load_fashion_mnist_images(extract_gz(train_images_path, 'train-images-idx3-ubyte')) # train_labels = load_fashion_mnist_labels(extract_gz(train_labels_path, 'train-labels-idx1-ubyte')) # test_images = load_fashion_mnist_images(extract_gz(test_images_path, 't10k-images-idx3-ubyte')) # test_labels = load_fashion_mnist_labels(extract_gz(test_labels_path, 't10k-labels-idx1-ubyte')) # print(f'Train images shape: {train_images.shape}') # print(f'Train labels shape: {train_labels.shape}') # print(f'Test images shape: {test_images.shape}') # print(f'Test labels shape: {test_labels.shape}') # print(train_labels) import gzip import numpy as np import os import requests # 下载 Fashion MNIST 数据集 def download_fashion_mnist(base_url, filename, destination): if not os.path.exists(destination): os.makedirs(destination) filepath = os.path.join(destination, filename) if not os.path.exists(filepath): url = base_url + filename response = requests.get(url) with open(filepath, 'wb') as f: f.write(response.content) return filepath # 解压 gz 文件 def extract_gz(filepath, destination): with gzip.open(filepath, 'rb') as f_in: with open(destination, 'wb') as f_out: f_out.write(f_in.read()) return destination # 读取二进制文件并转换为 numpy 数组 def load_fashion_mnist_images(filepath): with open(filepath, 'rb') as f: data = f.read() images = np.frombuffer(data, dtype=np.uint8, offset=16).reshape(-1, 28, 28) return images def load_fashion_mnist_labels(filepath): with open(filepath, 'rb') as f: data = f.read() labels = np.frombuffer(data, dtype=np.uint8, offset=8) return labels # 保存 numpy 数组到文件 def save_numpy_array(data, filepath): np.save(filepath, data) # 加载保存的 numpy 数组 def load_numpy_array(filepath): return np.load(filepath) base_url = 'http://fashion-mnist.s3-website.eu-central-1.amazonaws.com/' destination_dir = 'fashion_mnist' # 下载并解压文件 train_images_path = download_fashion_mnist(base_url, 'train-images-idx3-ubyte.gz', destination_dir) train_labels_path = download_fashion_mnist(base_url, 'train-labels-idx1-ubyte.gz', destination_dir) test_images_path = download_fashion_mnist(base_url, 't10k-images-idx3-ubyte.gz', destination_dir) test_labels_path = download_fashion_mnist(base_url, 't10k-labels-idx1-ubyte.gz', destination_dir) train_images = load_fashion_mnist_images(extract_gz(train_images_path, os.path.join(destination_dir, 'train-images-idx3-ubyte'))) train_labels = load_fashion_mnist_labels(extract_gz(train_labels_path, os.path.join(destination_dir, 'train-labels-idx1-ubyte'))) test_images = load_fashion_mnist_images(extract_gz(test_images_path, os.path.join(destination_dir, 't10k-images-idx3-ubyte'))) test_labels = load_fashion_mnist_labels(extract_gz(test_labels_path, os.path.join(destination_dir, 't10k-labels-idx1-ubyte'))) # 保存 numpy 数组到文件 save_numpy_array(train_images, os.path.join(destination_dir, 'train_images.npy')) save_numpy_array(train_labels, os.path.join(destination_dir, 'train_labels.npy')) save_numpy_array(test_images, os.path.join(destination_dir, 'test_images.npy')) save_numpy_array(test_labels, os.path.join(destination_dir, 'test_labels.npy')) # 加载保存的 numpy 数组 loaded_train_images = load_numpy_array(os.path.join(destination_dir, 'train_images.npy')) loaded_train_labels = load_numpy_array(os.path.join(destination_dir, 'train_labels.npy')) loaded_test_images = load_numpy_array(os.path.join(destination_dir, 'test_images.npy')) loaded_test_labels = load_numpy_array(os.path.join(destination_dir, 'test_labels.npy')) print(f'Loaded train images shape: {loaded_train_images.shape}') print(f'Loaded train labels shape: {loaded_train_labels.shape}') print(f'Loaded test images shape: {loaded_test_images.shape}') print(f'Loaded test labels shape: {loaded_test_labels.shape}') Loaded train images shape: (60000, 28, 28) Loaded train labels shape: (60000,) Loaded test images shape: (10000, 28, 28) Loaded test labels shape: (10000,) transforms,target
图片大小,通道
标签one-hot
target_transform=Lambda(lambda y: …)
Lambda 是 PyTorch 中的一种方便的工具,可以用来创建简单的转换。这里 Lambda 包装了一个匿名函数(lambda 函数),这个函数将标签 y 转换为 one-hot 编码。
lambda y: torch.zeros(10, dtype=torch.float).scatter_(0, torch.tensor(y), value=1)
这个 lambda 函数接收一个标签 y,并进行如下操作:
torch.zeros(10, dtype=torch.float): 创建一个长度为 10 的零向量,数据类型为 torch.float。这个向量代表了 10 个类别的初始化状态,全部设置为 0。
.scatter_(0, torch.tensor(y), value=1): 使用 scatter_ 方法在零向量上进行散射操作。
0 是沿着的维度(这里是第一维度)。
torch.tensor(y) 是需要设置为 1 的位置。
value=1 是要散射的值,即将标签 y 对应的位置的值设置为 1。
因此,lambda 函数会将一个标量标签 y 转换为一个长度为 10 的 one-hot 编码向量。例如,如果 y 是 3,那么生成的向量会是 [0, 0, 0, 1, 0, 0, 0, 0, 0, 0]。
例子
假设标签 y 是 5,执行 lambda 函数的步骤如下:
创建一个零向量:[0, 0, 0, 0, 0, 0, 0, 0, 0, 0]
使用 scatter_ 方法将第 5 个位置设置为 1:[0, 0, 0, 0, 0, 1, 0, 0, 0, 0]
最终输出的就是一个 one-hot 编码的向量。
import torch from torchvision import datasets from torchvision.transforms import ToTensor, Lambda ds = datasets.FashionMNIST( root="data", train=True, download=True, transform=ToTensor(), target_transform=Lambda(lambda y: torch.zeros(10, dtype=torch.float).scatter_(0, torch.tensor(y), value=1)) ) #__init__传入数据集目录,标注文件,如果有对应图片,传入对应图片目录, # __len__返回整个数据集的大小 import os import pandas as pd from torchvision.io import read_image from torch.utils.data import Dataset class CustomImageDataset(Dataset): def __init__(self, annotations_file, img_dir, transform=None, target_transform=None): self.img_labels = pd.read_csv(annotations_file) self.img_dir = img_dir self.transform = transform self.target_transform = target_transform def __len__(self): return len(self.img_labels) def __getitem__(self, idx): #获取照片的文件名(在数据标注的.csv中),拼接为路径 img_path = os.path.join(self.img_dir, self.img_labels.iloc[idx, 0]) image = read_image(img_path) label = self.img_labels.iloc[idx, 1] if self.transform: #transfrom:归一化,通道处理等,padding等 image = self.transform(image) if self.target_transform: label = self.target_transform(label) return image, label dataset = CustomImageDataset("") 参数
num_workers:取决于cpu个数,shuffle打乱数据
sampler采样
drop_last丢弃最后的一个小批次,如果不是batch_size的整数倍
collate_fn对sampler采样的小批次再处理,比如padding,输入输出都是一个batch
test一般不用shuffle
将该数据集加载到 DataLoader 中,并可以根据需要迭代该数据集。每次迭代都会返回一批 train_features 和 train_labels (分别包含 batch_size=64 个特征和标签)。因为我们指定了 shuffle=True,在我们遍历所有批次后,数据会被打乱
# Dataset 每次加载一组我们数据集的特征和标签样本。在训练一个模型时,我们通常希望以 "小批量" 的方式传递样本,在每个训练周期重新打乱数据以减少模型的过拟合,并使用 Python 的 multiprocessing 来加快数据的加载速度。 from torch.utils.data import DataLoader # train_dataloader = DataLoader(training_data, batch_size=64, shuffle=True) test_dataloader = DataLoader(test_data, batch_size=64, shuffle=True) # 显示图像和标签。 train_features, train_labels = next(iter(train_dataloader)) print(f"Feature batch shape: {train_features.size()}") print(f"Labels batch shape: {train_labels.size()}") img = train_features[0].squeeze() label = train_labels[0] plt.imshow(img, cmap="gray") plt.show() print(f"Label: {label}") 示例:
from __future__ import print_function, division import os import torch import pandas as pd #用于更容易地进行csv解析 from skimage import io, transform #用于图像的IO和变换 import numpy as np import matplotlib.pyplot as plt from torch.utils.data import Dataset, DataLoader from torchvision import transforms, utils # 忽略警告 import warnings warnings.filterwarnings("ignore") plt.ion() # interactive mode <contextlib.ExitStack at 0x237f2d27fd0> #数据集为csv文件 landmarks_frame = pd.read_csv('faces/face_landmarks.csv') landmarks_frame.head(5) 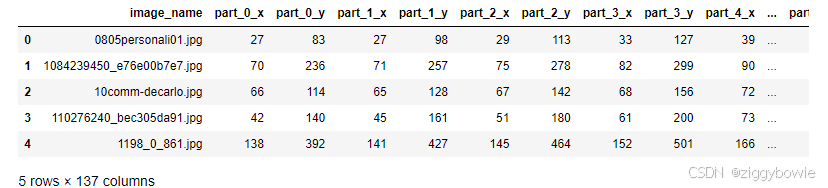
#查看其中一张图片 n = 3 img_name = landmarks_frame.iloc[n, 0] # Series' object has no attribute 'as_matrix' landmarks = landmarks_frame.iloc[n, 1:].values landmarks = landmarks.astype('float').reshape(-1, 2)#矩阵的每一行我i散点图坐标 print('Image name: {}'.format(img_name)) print('Landmarks shape: {}'.format(landmarks.shape)) print('First 4 Landmarks: {}'.format(landmarks[:4])) Image name: 110276240_bec305da91.jpg Landmarks shape: (68, 2) First 4 Landmarks: [[ 42. 140.] [ 45. 161.] [ 51. 180.] [ 61. 200.]] def show_landmarks(image, landmarks): """显示带有地标的图片""" plt.imshow(image) plt.scatter(landmarks[:, 0], landmarks[:, 1], s=10, marker='.', c='r') plt.pause(0.001) # pause a bit so that plots are updated plt.figure() show_landmarks(io.imread(os.path.join('faces/', img_name)), landmarks) plt.show() 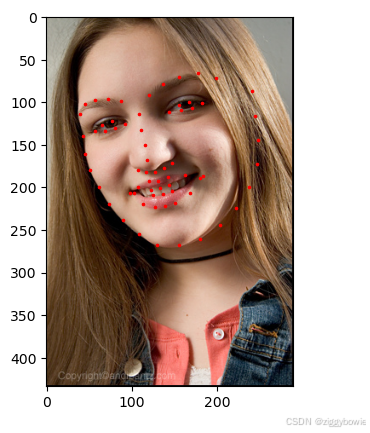
#编写数据集类 # 在 __init__中读取csv的文件内容,在 __getitem__中读取图片(节省空间) class FaceLandmarksDataset(Dataset): """面部标记数据集.""" def __init__(self, csv_file, root_dir, transform=None): """ csv_file(string):带注释的csv文件的路径。 root_dir(string):包含所有图像的目录。 transform(callable, optional):一个样本上的可用的可选变换 """ self.landmarks_frame = pd.read_csv(csv_file) self.root_dir = root_dir self.transform = transform def __len__(self): return len(self.landmarks_frame) def __getitem__(self, idx): img_name = os.path.join(self.root_dir, self.landmarks_frame.iloc[idx, 0]) image = io.imread(img_name) landmarks = self.landmarks_frame.iloc[idx, 1:] landmarks = np.array([landmarks]) landmarks = landmarks.astype('float').reshape(-1, 2) sample = {'image': image, 'landmarks': landmarks} if self.transform: sample = self.transform(sample) return sample face_dataset = FaceLandmarksDataset(csv_file='faces/face_landmarks.csv', root_dir='faces/') fig = plt.figure() for i in range(len(face_dataset)): sample = face_dataset[i] print(i, sample['image'].shape, sample['landmarks'].shape) ax = plt.subplot(1, 4, i + 1) plt.tight_layout() ax.set_title('Sample #{}'.format(i)) ax.axis('off') show_landmarks(**sample) if i == 3: plt.show() break 0 (324, 215, 3) (68, 2) 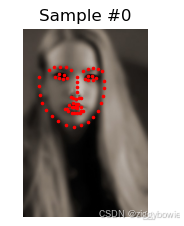
1 (500, 333, 3) (68, 2) 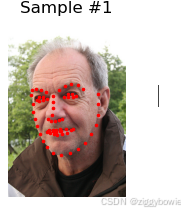
2 (250, 258, 3) (68, 2) 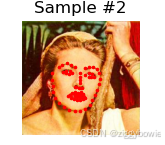
3 (434, 290, 3) (68, 2) 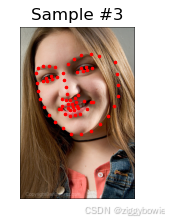
很多神经网络假定图片的尺寸相同,所以需要对图片预处理:三个转换: * Rescale:缩放图片 * RandomCrop:对图片进行随机裁剪。这是一种数据增强操作 * ToTensor:把numpy格式图片转为torch格式图片 (我们需要交换坐标轴).
__init__方法:
该方法用于初始化Rescale类的实例。
接受一个参数output_size,该参数可以是整数或元组。如果是整数,表示将图像的较小边缘缩放到这个大小,保持纵横比。如果是元组,表示将图像缩放到与output_size匹配的大小。
__call__方法:
这是一个特殊方法,允许类的实例像函数一样被调用。
接受一个参数sample,其中包含图像和相应的地标。sample是一个字典,包含键为’image’和’landmarks’的项。
从sample中提取图像和地标。
图像缩放操作:
获取输入图像的高度 h 和宽度 w。
如果output_size是整数,计算新的高度和宽度new_h,new_w,以保持原始图像的纵横比。如果图像的高度大于宽度,较小的边将被缩放到output_size,并调整另一边以保持纵横比。反之亦然。
如果output_size是元组,直接将新的高度和宽度设置为output_size。
将新的高度和宽度转换为整数。
使用scikit-image库的transform.resize函数进行图像的实际缩放操作:
transform.resize函数用于将图像缩放到指定的大小(new_h, new_w)。
将新的图像存储在变量img中。
调整地标坐标:
将地标的坐标按照图像缩放的比例进行调整。这是因为图像的缩放会导致地标坐标的变化。
通过乘以[new_w / w, new_h / h]来调整每个地标的坐标。
返回结果:
将新的图像和调整后的地标作为字典返回,键为’image’和’landmarks’。
class Rescale(object): """将样本中的图像重新缩放到给定大小。. Args: output_size(tuple或int):所需的输出大小。 如果是元组,则输出为 与output_size匹配。 如果是int,则匹配较小的图像边缘到output_size保持纵横比相同。 """ def __init__(self, output_size): assert isinstance(output_size, (int, tuple)) self.output_size = output_size def __call__(self, sample): image, landmarks = sample['image'], sample['landmarks'] h, w = image.shape[:2] if isinstance(self.output_size, int): if h > w: new_h, new_w = self.output_size * h / w, self.output_size else: new_h, new_w = self.output_size, self.output_size * w / h else: new_h, new_w = self.output_size new_h, new_w = int(new_h), int(new_w) img = transform.resize(image, (new_h, new_w)) # h and w are swapped for landmarks because for images, # x and y axes are axis 1 and 0 respectively landmarks = landmarks * [new_w / w, new_h / h] return {'image': img, 'landmarks': landmarks} class RandomCrop(object): """随机裁剪样本中的图像. Args: output_size(tuple或int):所需的输出大小。 如果是int,方形裁剪是。 """ def __init__(self, output_size): assert isinstance(output_size, (int, tuple)) if isinstance(output_size, int): self.output_size = (output_size, output_size) else: assert len(output_size) == 2 self.output_size = output_size def __call__(self, sample): image, landmarks = sample['image'], sample['landmarks'] h, w = image.shape[:2] new_h, new_w = self.output_size top = np.random.randint(0, h - new_h) left = np.random.randint(0, w - new_w) image = image[top: top + new_h, left: left + new_w] landmarks = landmarks - [left, top] return {'image': image, 'landmarks': landmarks} class ToTensor(object): """将样本中的ndarrays转换为Tensors.""" def __call__(self, sample): image, landmarks = sample['image'], sample['landmarks'] # 交换颜色轴因为 # numpy包的图片是: H * W * C # torch包的图片是: C * H * W image = image.transpose((2, 0, 1)) return {'image': torch.from_numpy(image), 'landmarks': torch.from_numpy(landmarks)} # image.transpose((2, 0, 1)) 是一个 NumPy 数组的操作,它用于交换数组的维度顺序。在这个特定的例子中,假设image是一个三维的 NumPy 数组,表示图像,其形状为 (height, width, channels)。 # (2, 0, 1) 意味着进行维度的转换,将原来的维度顺序 (height, width, channels) 转换为 (channels, height, width)。 # 2 表示原数组的第三个维度(通道维度)会变成新数组的第一个维度。 # 0 表示原数组的第一个维度(高度)会变成新数组的第二个维度。 # 1 表示原数组的第二个维度(宽度)会变成新数组的第三个维度。 # 图像的短边调整为256,然后随机裁剪(randomcrop)为224大小的正方形。 # 也就是说,我们打算组合一个Rescale和 RandomCrop的变换 scale = Rescale(256) crop = RandomCrop(128) composed = transforms.Compose([Rescale(256), RandomCrop(224)]) # 在样本上应用上述的每个变换。 fig = plt.figure() sample = face_dataset[65] for i, tsfrm in enumerate([scale, crop, composed]): transformed_sample = tsfrm(sample) ax = plt.subplot(1, 3, i + 1) plt.tight_layout() ax.set_title(type(tsfrm).__name__) show_landmarks(**transformed_sample) plt.show() 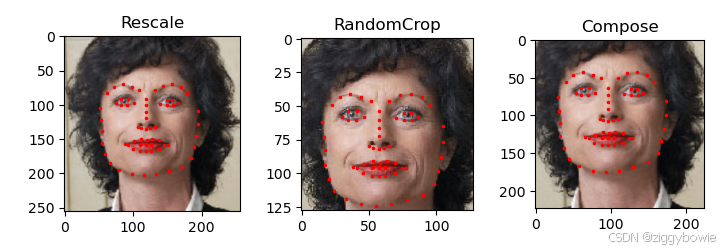
scale = Rescale(256) crop = RandomCrop(156) composed = transforms.Compose([Rescale(256), RandomCrop(224)]) # 在样本上应用上述的每个变换。 fig = plt.figure() sample = face_dataset[65] for i, tsfrm in enumerate([scale, crop, composed]): transformed_sample = tsfrm(sample) ax = plt.subplot(1, 3, i + 1) plt.tight_layout() ax.set_title(type(tsfrm).__name__) show_landmarks(**transformed_sample) plt.show() 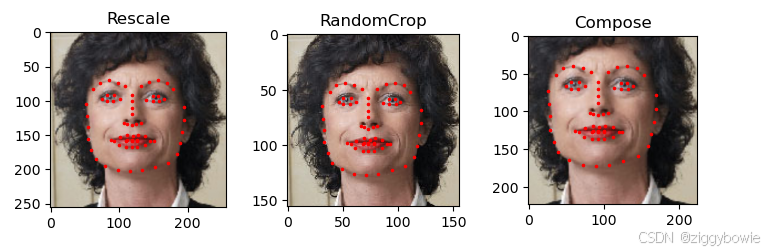
Dateset可以使用索引拿出一个数据,DataLoder可以拿出一个mini-batch
