
阅读量:1
目录
前言
前些天发现了一个巨牛的人工智能学习网站,通俗易懂,风趣幽默,忍不住分享一下给大家。点击跳转到网站
目标
我们想要在一个实时的停车场监控视频中,看看要有多少个车以及有多少个空缺车位。然后我们可以标记空的,然后来车之后,实时告诉应该停在那里最方便、最近!!!实现现代的智能无人停车场!
整体流程
采用基于OpenCV的图像处理方法来解决停车场空车位实时监测和精准定位问题。首先,将实时监控视频录像信息转化成图像信息。对图像进行形态学处理,然后定位停车场关键点,使用掩码图像与原始图像融合对停车位区域进行背景去除,处理之后采用霍夫直线检测的方法来检测停车位标记线,在画好线的图像中进行分割,分割出每一个停车位并编号。最后利用Keras神经网络对有车车位和空车位进行训练,对当前图像中车位是否为空闲进行判断并且实时更新,再以图像流输出,完成实时监测空车位的任务。
背景
由于汽车工业的发展迅速以及人们生活水平的提高,我国汽车的保有量不断增长,而停车位的数量有限,从而出现停车困难以及停车效率低,浪费时间甚至造成拥堵、事故等。实时检测并掌握停车位的数目和空车位的位置信息可以避免资源以及时间的浪费,提高效率,也更便于停车位的管理。因此停车位可视化尤为重要。传统的基于视觉的停车位检测方法具有检测精度不高、场景环境要求高等问题。本文旨在通过边缘检测来进行停车位划分,对图像背景过滤再定位提取有用区域,进行车位是否空闲的判断并实时更新,再以图像流输出。
详细讲解
首先我们需要了解的就是对于一个视频来说,它是由一帧一帧的图像构成的,所以对于一段视频的处理就相当于对于图像进行处理,前一帧图像和后一帧处理图像的衔接那么就是一个视频处理的结果。
我们对于一个图像的处理,首先我们利用视频中的一张图来看一下停车场的某一帧图像。
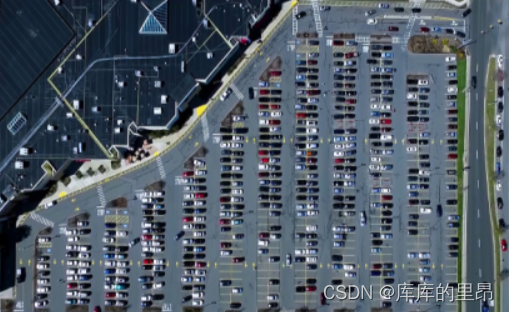
这里就是一个停车场的其中一帧的一个图像,其实他这里有很多车,如果没有车的话,也就是说是一个空车场他的检测效果会非常的好。我们首先要对图像进行几个形态学的操作。其中包括灰度空间转换、图像二值化、以及边缘检测、轮廓检测以及掩码等等操作,下面我们一一介绍一下。
首先我们定义一个图像展示函数:
def cv_show(self,name,img): cv2.imshow(name, img) cv2.waitKey(0) cv2.destroyAllWindows() 这里不多过多解释,就是一个把图像展示出来的函数。
def convert_gray_scale(self,image): return cv2.cvtColor(image, cv2.COLOR_RGB2GRAY)这里是将图像转化为灰度图。
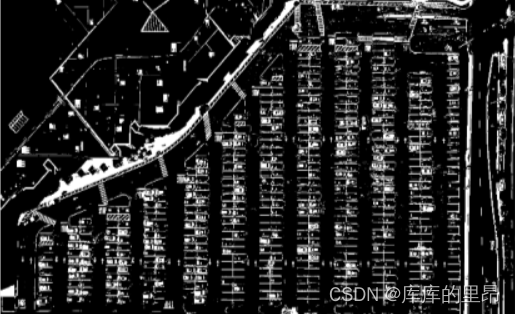
def select_rgb_white_yellow(self,image): #过滤掉背景 lower = np.uint8([120, 120, 120]) upper = np.uint8([255, 255, 255]) white_mask = cv2.inRange(image, lower, upper) self.cv_show('white_mask',white_mask) masked = cv2.bitwise_and(image, image, mask = white_mask) self.cv_show('masked',masked) return masked lower_red和高于upper_red的部分分别变成0,lower_red~upper_red之间的值变成255,相当于过滤背景相当于过滤掉一些无用的东西,就是说把灰度级低于120或者高于255的都设置成0,0也就是黑色,把120-255中间的都设置成白色。相当于一个二值化图像的操作。处理之后的图像如下图。
然后我们进行了一下边缘检测。都是OpenCV的一些形态学操作。
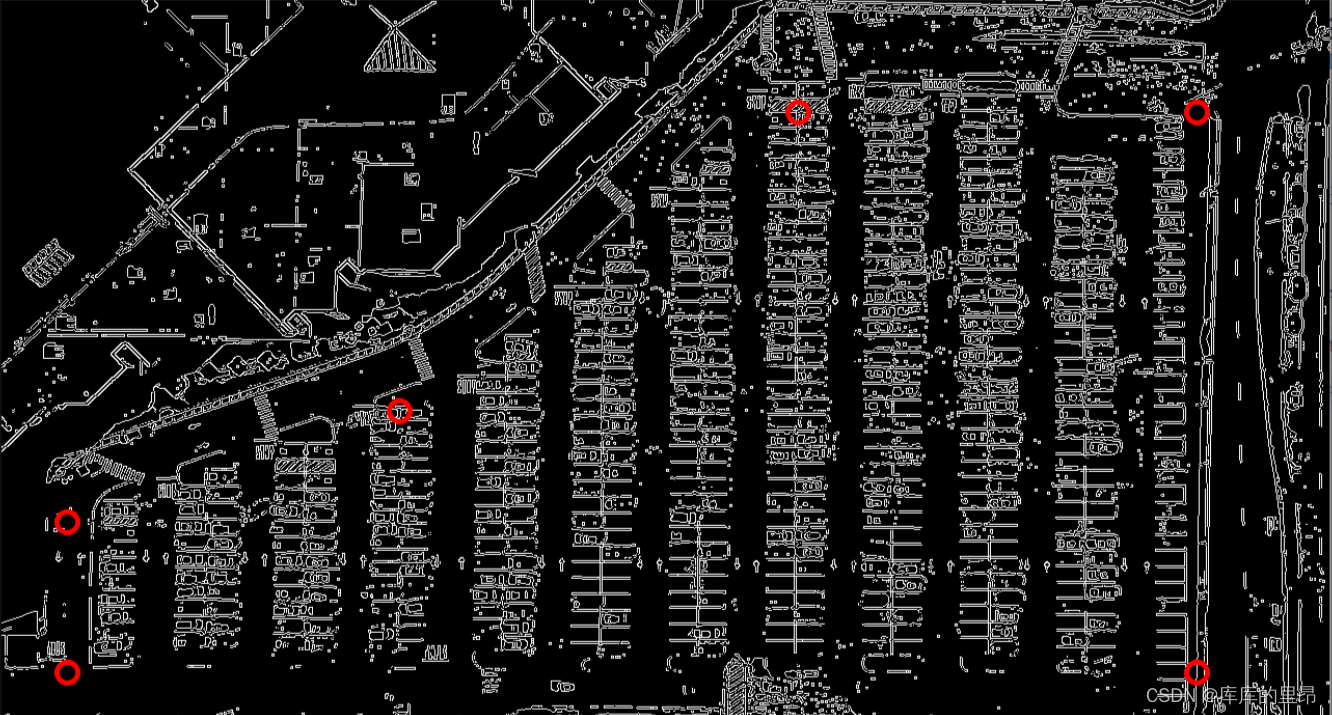
def detect_edges(self,image, low_threshold=50, high_threshold=200): return cv2.Canny(image, low_threshold, high_threshold) 这里是进行了一个边缘检测的结果。因为这里我们需要得到中间停车场的局部区域进行操作,所以我们需要进行一个提取感兴趣区间的一个操作。
def select_region(self,image): rows, cols = image.shape[:2] pt_1 = [cols*0.05, rows*0.90] pt_2 = [cols*0.05, rows*0.70] pt_3 = [cols*0.30, rows*0.55] pt_4 = [cols*0.6, rows*0.15] pt_5 = [cols*0.90, rows*0.15] pt_6 = [cols*0.90, rows*0.90] vertices = np.array([[pt_1, pt_2, pt_3, pt_4, pt_5, pt_6]], dtype=np.int32) point_img = image.copy() point_img = cv2.cvtColor(point_img, cv2.COLOR_GRAY2RGB) for point in vertices[0]: cv2.circle(point_img, (point[0],point[1]), 10, (0,0,255), 4) self.cv_show('point_img',point_img) return self.filter_region(image, vertices) 这里这几个点是根据自己的项目而言的,我们目的就是用这六个点把整个停车场框起来,然后对框出来的图像进行一个提取。也称之为一个ROI区域。结果是这样。
这里的坐标我们自己进行定位操作,然后我们制造一个掩码图像,就是把标记的这六个点规划成一个区域ROI region,然后把区域内设置成白色像素值,把区域外设置成全黑像素值。然后做一个相当于图像和掩码的与操作。得到的结果就是:
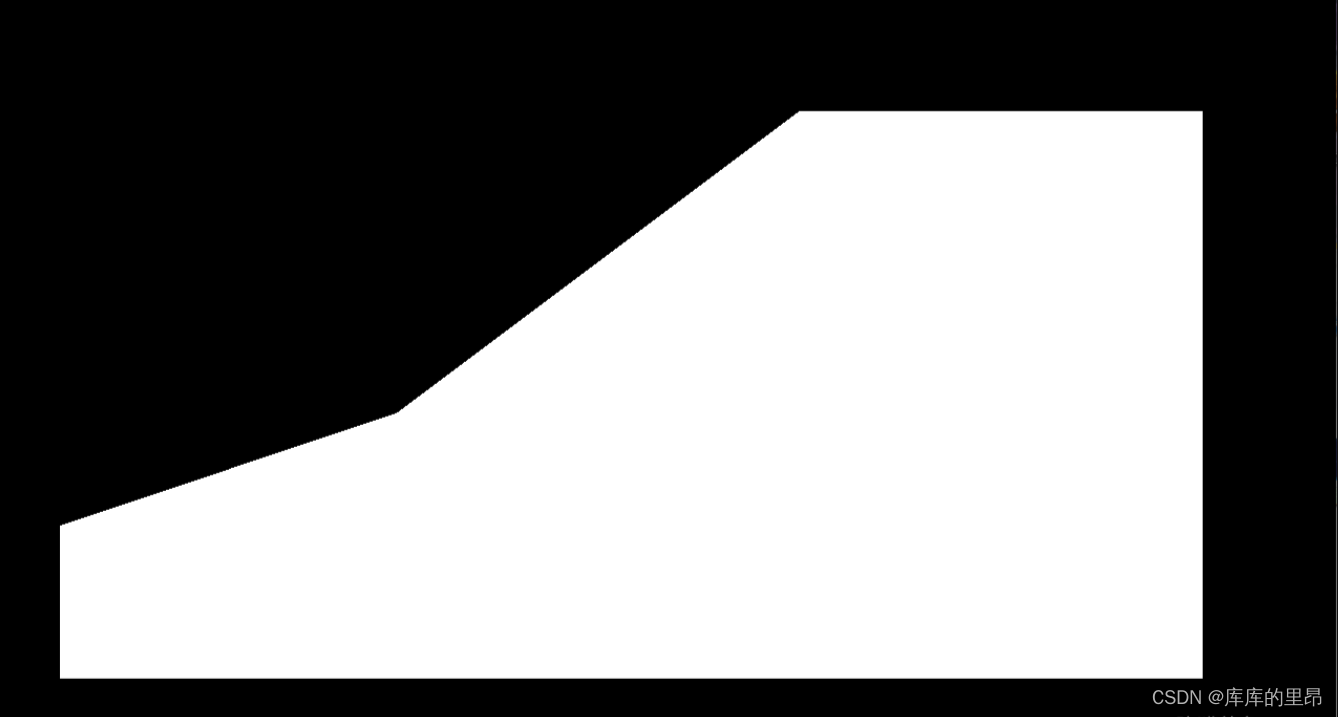
最后得到的ROI区域就是:

这里我们就得到了一个停车场的大致轮廓,然后我们开始对停车场车位进行具体操作,首先我们先要检测一个停车场直线的操作,使用霍夫直线检测来做这个项目。
def hough_lines(self,image): return cv2.HoughLinesP(image, rho=0.1, theta=np.pi/10, threshold=15, minLineLength=9, maxLineGap=4) 这里霍夫直线检测是定义好的一个模型,我们直接调用就可以。这里的参数我们介绍一下。
image:表示要处理的图像。
rho:表示处理的精度。精度越小检测的直线越精确,精度值设置的数值越大,那么检测的线段就越少。
theta:检测的直线角度,表示直线的角度不能超过哪个数值。如果超过这个阈值,就不定义为一条直线。
threshold:线的点定义阈值为15,这个要根据实施项目而定,构成线的像素点超过15才可以构成一条直线。
minLineLength:最小长度,这个不用过多解释,线的长度最小就是9.
maxLineGap:线和线之间最大的间隔阈值,离得多近的都认为是一条直线。
输入的图像需要是边缘检测后的结果,minLineLengh(线的最短长度,比这个短的都被忽略)和MaxLineCap(两条直线之间的最大间隔,小于此值,认为是一条直线)。rho距离精度,theta角度精度,threshod超过设定阈值才被检测出线段。
def draw_lines(self,image, lines, color=[255, 0, 0], thickness=2, make_copy=True): # 过滤霍夫变换检测到直线 if make_copy: image = np.copy(image) cleaned = [] for line in lines: for x1,y1,x2,y2 in line: if abs(y2-y1) <=1 and abs(x2-x1) >=25 and abs(x2-x1) <= 55: cleaned.append((x1,y1,x2,y2)) cv2.line(image, (x1, y1), (x2, y2), color, thickness) print(" No lines detected: ", len(cleaned)) return image 这里面对检测到的霍夫直线继续做一个过滤的操作,如果直线的长度大于25,小于55,我们就添加到列表当中,并且设定一条直线的左右端点坐标的差值不能超过1.这样的直线我们通通过滤出来。
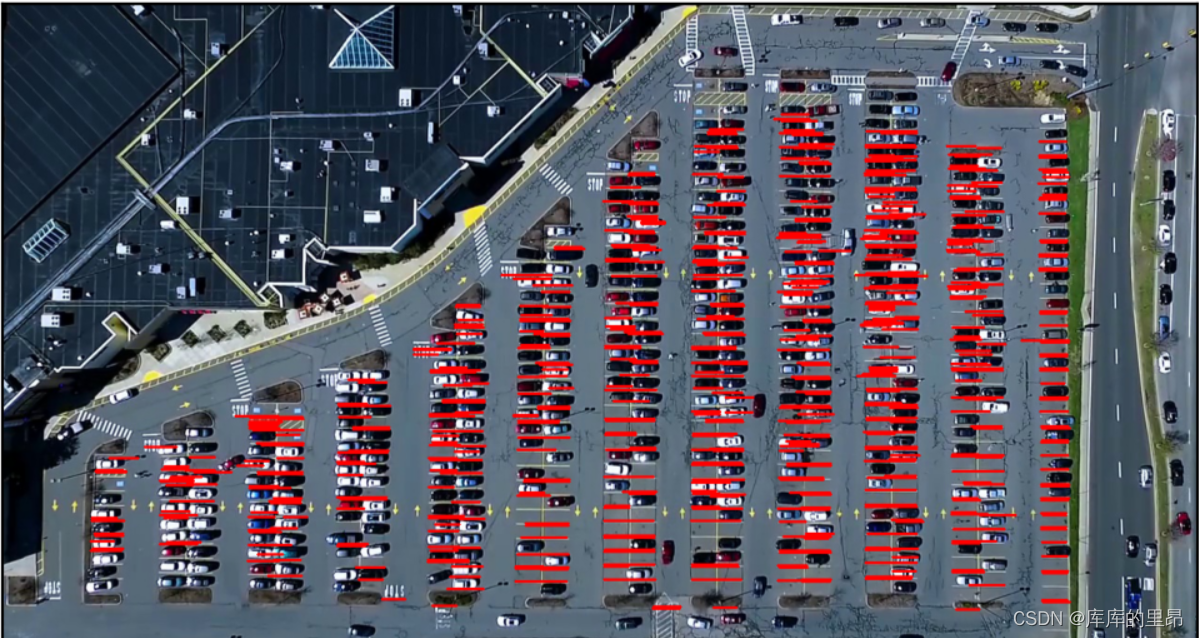
这里检测的结果如图,这里因为车厂里有很多车,如果是一个空车场的话,检测的结果会非常好。做完检测之后,我们想要的是对于停车场的12列,我们对每一列都进行一个提取操作,比如我们得到12列之后,然后我们在对每一列分出具体的一个一个车位。然后对于第一列和第十二列这种单车位,和其他列的双车位的处理方法还是不同的,具体的我们来看一下。
def identify_blocks(self,image, lines, make_copy=True): if make_copy: new_image = np.copy(image) #Step 1: 过滤部分直线 cleaned = [] for line in lines: for x1,y1,x2,y2 in line: if abs(y2-y1) <=1 and abs(x2-x1) >=25 and abs(x2-x1) <= 55: cleaned.append((x1,y1,x2,y2)) 首先我们还是过滤掉一些直线。
import operator list1 = sorted(cleaned, key=operator.itemgetter(0, 1))对于这十二列,每一列的左上角的坐标点我们是可以得到x1-x12的我们要对这些列进行一次排序操作。让计算机识别出哪一列是第一列,哪一列是第十二列。
clusters = {} dIndex = 0 clus_dist = 10 for i in range(len(list1) - 1): distance = abs(list1[i+1][0] - list1[i][0]) if distance <= clus_dist: if not dIndex in clusters.keys(): clusters[dIndex] = [] clusters[dIndex].append(list1[i]) clusters[dIndex].append(list1[i + 1]) else: dIndex += 1 这里就是做了一下对于所有排序好的直线进行了一个归类操作,把哪些直线归为一列。并且进行添加。直到把每一列都进行分出来。
rects = {} i = 0 for key in clusters: all_list = clusters[key] cleaned = list(set(all_list))#一列中的所有直线的坐标信息 if len(cleaned) > 5: cleaned = sorted(cleaned, key=lambda tup: tup[1])#对直线进行排序 avg_y1 = cleaned[0][1]#这个对于一列来说是固定的 avg_y2 = cleaned[-1][1]#这个对于一列来说是固定的 avg_x1 = 0 avg_x2 = 0 for tup in cleaned: avg_x1 += tup[0] avg_x2 += tup[2] avg_x1 = avg_x1/len(cleaned) avg_x2 = avg_x2/len(cleaned) rects[i] = (avg_x1, avg_y1, avg_x2, avg_y2) i += 1 print("Num Parking Lanes: ", len(rects)) 然后我们对每一列进行操作,把每一列的每一个车位的所有坐标信息提取出来。然后再通过得到的坐标及进行画出来这个矩形。
buff = 7#微调数值 for key in rects: tup_topLeft = (int(rects[key][0] - buff), int(rects[key][1])) tup_botRight = (int(rects[key][2] + buff), int(rects[key][3])) cv2.rectangle(new_image, tup_topLeft,tup_botRight,(0,255,0),3) return new_image, rects 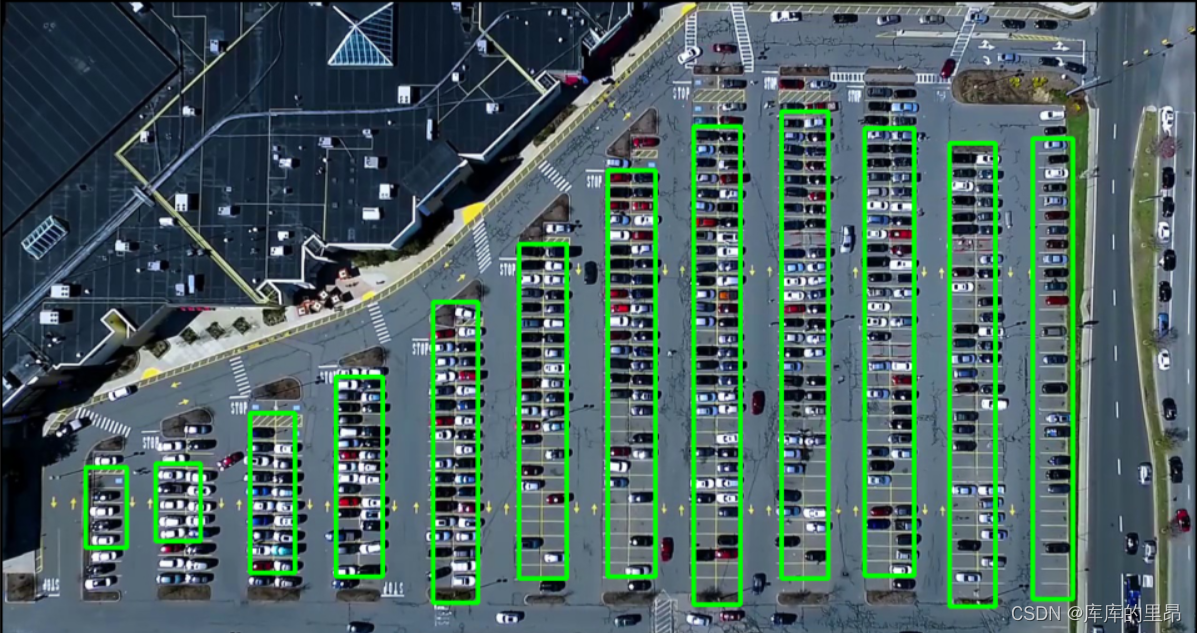
我们在这个期间又对矩形进行了手动微调。
def draw_parking(self,image, rects, make_copy = True, color=[255, 0, 0], thickness=2, save = True): if make_copy: new_image = np.copy(image) gap = 15.5#车位间的差距是15.5 spot_dict = {} # 字典:一个车位对应一个位置 tot_spots = 0 #微调 adj_y1 = {0: 20, 1:-10, 2:0, 3:-11, 4:28, 5:5, 6:-15, 7:-15, 8:-10, 9:-30, 10:9, 11:-32} adj_y2 = {0: 30, 1: 50, 2:15, 3:10, 4:-15, 5:15, 6:15, 7:-20, 8:15, 9:15, 10:0, 11:30} adj_x1 = {0: -8, 1:-15, 2:-15, 3:-15, 4:-15, 5:-15, 6:-15, 7:-15, 8:-10, 9:-10, 10:-10, 11:0} adj_x2 = {0: 0, 1: 15, 2:15, 3:15, 4:15, 5:15, 6:15, 7:15, 8:10, 9:10, 10:10, 11:0} for key in rects: tup = rects[key] x1 = int(tup[0]+ adj_x1[key]) x2 = int(tup[2]+ adj_x2[key]) y1 = int(tup[1] + adj_y1[key]) y2 = int(tup[3] + adj_y2[key]) cv2.rectangle(new_image, (x1, y1),(x2,y2),(0,255,0),2) num_splits = int(abs(y2-y1)//gap) for i in range(0, num_splits+1): y = int(y1 + i*gap) cv2.line(new_image, (x1, y), (x2, y), color, thickness) if key > 0 and key < len(rects) -1 : #竖直线 x = int((x1 + x2)/2) cv2.line(new_image, (x, y1), (x, y2), color, thickness) # 计算数量 if key == 0 or key == (len(rects) -1): tot_spots += num_splits +1 else: tot_spots += 2*(num_splits +1) # 字典对应好 if key == 0 or key == (len(rects) -1): for i in range(0, num_splits+1): cur_len = len(spot_dict) y = int(y1 + i*gap) spot_dict[(x1, y, x2, y+gap)] = cur_len +1 else: for i in range(0, num_splits+1): cur_len = len(spot_dict) y = int(y1 + i*gap) x = int((x1 + x2)/2) spot_dict[(x1, y, x, y+gap)] = cur_len +1 spot_dict[(x, y, x2, y+gap)] = cur_len +2 print("total parking spaces: ", tot_spots, cur_len) if save: filename = 'with_parking.jpg' cv2.imwrite(filename, new_image) return new_image, spot_dict 处理的结果是:
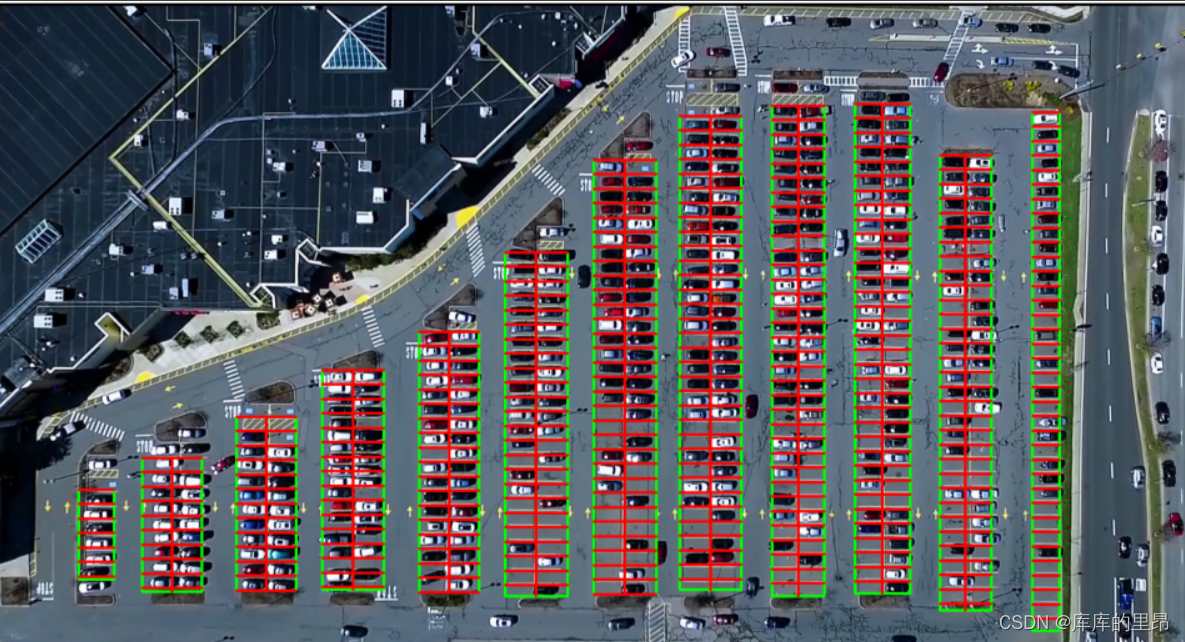
这里我们把所有车位都划分出来了。
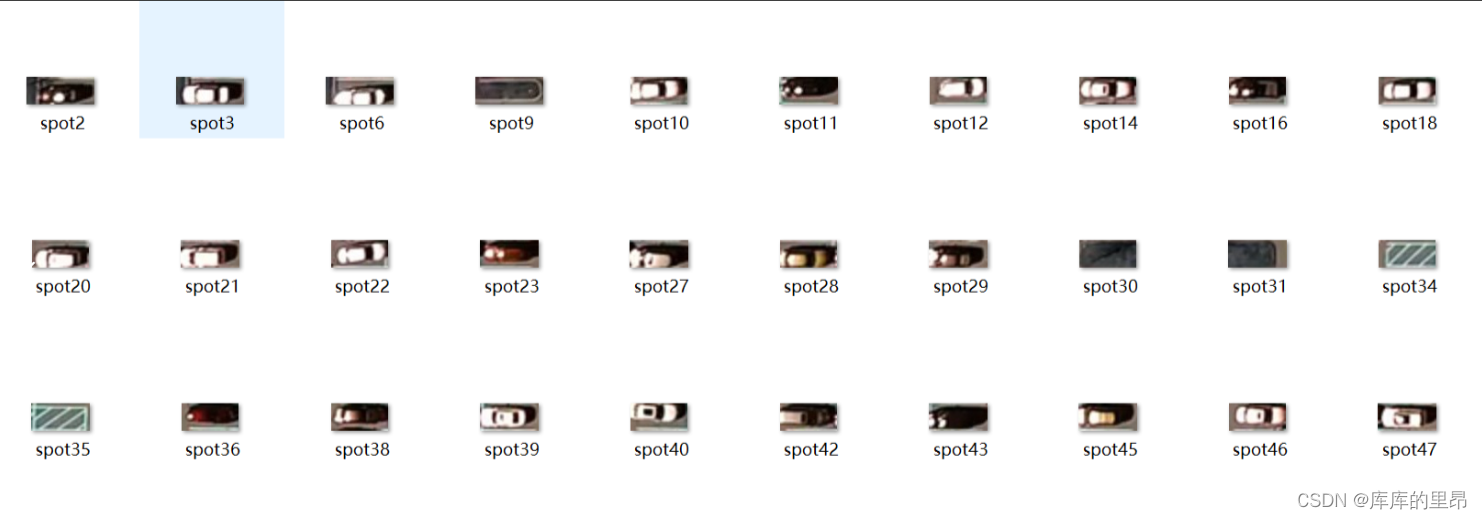
然后我们想要通过使用keras神经网络对车位有没有车进行一个学习!让神经网络预测到底车位到底有没有车。整个keras神经网络的训练过程如下。我们使用的是VGG16网络进行训练做一个二分类的任务,也就是车位有没有车。对于车位的训练图像我们可以看一下。通过这一代码我们对车位有无车进行提取。
def save_images_for_cnn(self,image, spot_dict, folder_name ='cnn_data'): for spot in spot_dict.keys(): (x1, y1, x2, y2) = spot (x1, y1, x2, y2) = (int(x1), int(y1), int(x2), int(y2)) #裁剪 spot_img = image[y1:y2, x1:x2] spot_img = cv2.resize(spot_img, (0,0), fx=2.0, fy=2.0) spot_id = spot_dict[spot] filename = 'spot' + str(spot_id) +'.jpg' print(spot_img.shape, filename, (x1,x2,y1,y2)) cv2.imwrite(os.path.join(folder_name, filename), spot_img) 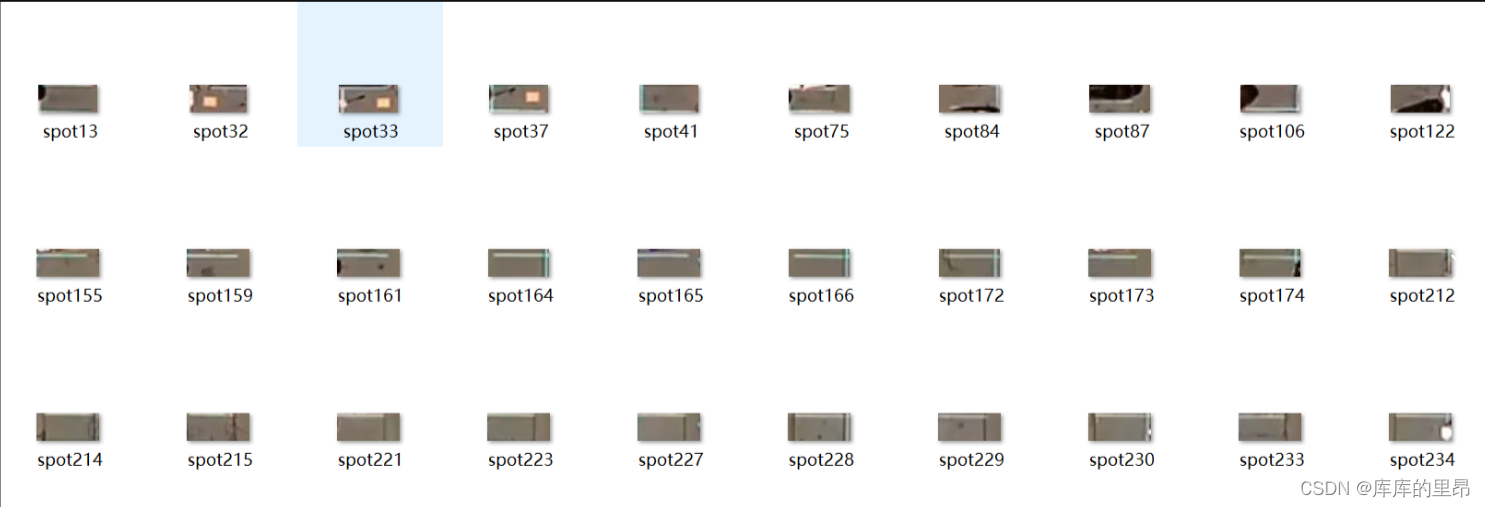
这里是车位没有车,那么有车的如下。
files_train = 0 files_validation = 0 cwd = os.getcwd() folder = 'train_data/train' for sub_folder in os.listdir(folder): path, dirs, files = next(os.walk(os.path.join(folder,sub_folder))) files_train += len(files) folder = 'train_data/test' for sub_folder in os.listdir(folder): path, dirs, files = next(os.walk(os.path.join(folder,sub_folder))) files_validation += len(files) print(files_train,files_validation) img_width, img_height = 48, 48 train_data_dir = "train_data/train" validation_data_dir = "train_data/test" nb_train_samples = files_train nb_validation_samples = files_validation batch_size = 32 epochs = 15 num_classes = 2 model = applications.VGG16(weights='imagenet', include_top=False, input_shape = (img_width, img_height, 3)) for layer in model.layers[:10]: layer.trainable = False x = model.output x = Flatten()(x) predictions = Dense(num_classes, activation="softmax")(x) model_final = Model(input = model.input, output = predictions) model_final.compile(loss = "categorical_crossentropy", optimizer = optimizers.SGD(lr=0.0001, momentum=0.9), metrics=["accuracy"]) train_datagen = ImageDataGenerator( rescale = 1./255, horizontal_flip = True, fill_mode = "nearest", zoom_range = 0.1, width_shift_range = 0.1, height_shift_range=0.1, rotation_range=5) test_datagen = ImageDataGenerator( rescale = 1./255, horizontal_flip = True, fill_mode = "nearest", zoom_range = 0.1, width_shift_range = 0.1, height_shift_range=0.1, rotation_range=5) train_generator = train_datagen.flow_from_directory( train_data_dir, target_size = (img_height, img_width), batch_size = batch_size, class_mode = "categorical") validation_generator = test_datagen.flow_from_directory( validation_data_dir, target_size = (img_height, img_width), class_mode = "categorical") checkpoint = ModelCheckpoint("car1.h5", monitor='val_acc', verbose=1, save_best_only=True, save_weights_only=False, mode='auto', period=1) early = EarlyStopping(monitor='val_acc', min_delta=0, patience=10, verbose=1, mode='auto') history_object = model_final.fit_generator( train_generator, samples_per_epoch = nb_train_samples, epochs = epochs, validation_data = validation_generator, nb_val_samples = nb_validation_samples, callbacks = [checkpoint, early]) 这里我们使用了卷积神经网络对有无车位进行训练,通过神经网络的训练我们就开始对一帧图像进行判断。得到的结果是:
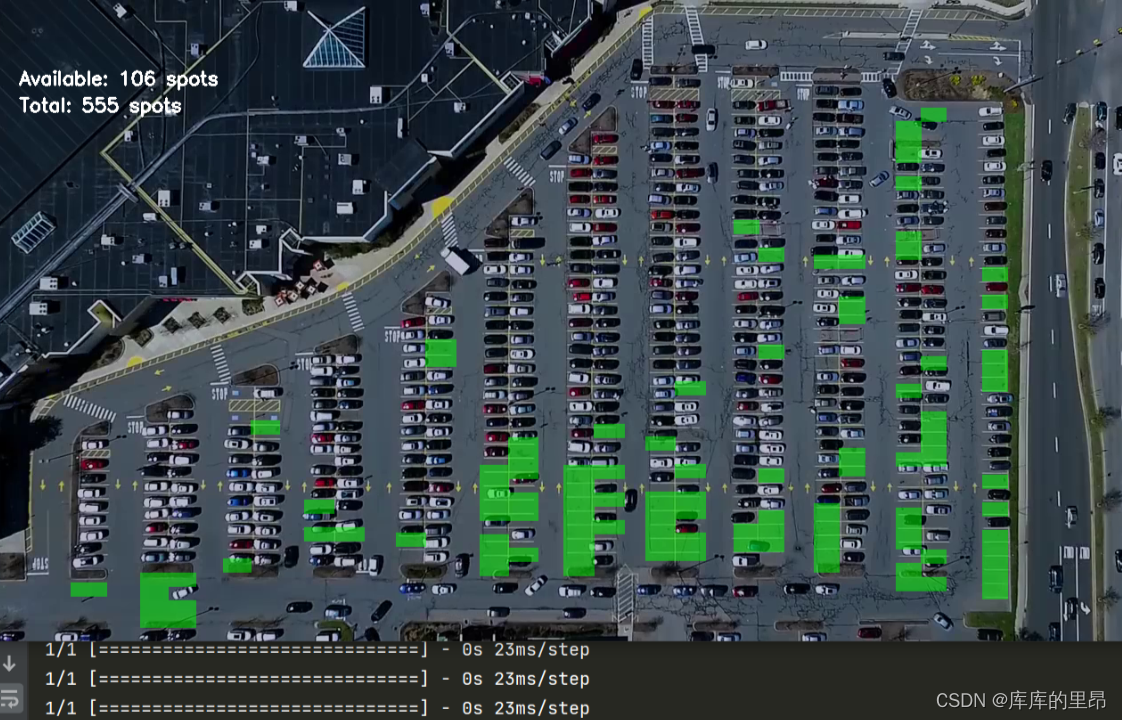
def make_prediction(self,image,model,class_dictionary):#预测 #预处理 img = image/255. #转换成4D tensor image = np.expand_dims(img, axis=0) # 用训练好的模型进行训练 class_predicted = model.predict(image) inID = np.argmax(class_predicted[0]) label = class_dictionary[inID] return label def predict_on_image(self,image, spot_dict , model,class_dictionary,make_copy=True, color = [0, 255, 0], alpha=0.5): if make_copy: new_image = np.copy(image) overlay = np.copy(image) self.cv_show('new_image',new_image) cnt_empty = 0 all_spots = 0 for spot in spot_dict.keys(): all_spots += 1 (x1, y1, x2, y2) = spot (x1, y1, x2, y2) = (int(x1), int(y1), int(x2), int(y2)) spot_img = image[y1:y2, x1:x2] spot_img = cv2.resize(spot_img, (48, 48)) label = self.make_prediction(spot_img,model,class_dictionary) if label == 'empty': cv2.rectangle(overlay, (int(x1),int(y1)), (int(x2),int(y2)), color, -1) cnt_empty += 1 cv2.addWeighted(overlay, alpha, new_image, 1 - alpha, 0, new_image) cv2.putText(new_image, "Available: %d spots" %cnt_empty, (30, 95), cv2.FONT_HERSHEY_SIMPLEX, 0.7, (255, 255, 255), 2) cv2.putText(new_image, "Total: %d spots" %all_spots, (30, 125), cv2.FONT_HERSHEY_SIMPLEX, 0.7, (255, 255, 255), 2) save = False if save: filename = 'with_marking.jpg' cv2.imwrite(filename, new_image) self.cv_show('new_image',new_image) return new_image 这里做了一个在图像中训练的结果,我们来看一下。

预测结果是一共检测到555个车位,目前空闲车位一共有113个。然后我们对视频进行相同的操作,主要就是把视频进行分割成一帧一帧的图像,然后对每一帧图像进行下面对于图片的操作。这样我们就可以以视频流的形式进行输出了!这就是整个项目的流程。
这里就是利用keras卷积神经网络一直对图像进行训练测试,得到实时的车位信息。至此我们的这个项目就结束了。针对车来车往的停车场内停车效率问题提出了基于OpenCV的停车位空闲状态检测的方法,以视频中的每帧图像为单位,使用灰度化、霍夫直线检测等方法对数据进行预处理、最后将处理完的数据利用Keras神经网络模型训练和预测,来判断停车位中是否空闲。测试结果显示此方法可以快速完成实时监测停车场内车位状态的任务。来提高停车场内停车的效率,但由于停车场内的停车标位线存在维护不及时,仍然会存在停车位标线不清晰、遮挡严重等问题,会影响检测精度。虽然在图像预处理已经减少了计算量,但计算次数多、程序处理耗时长,后续将针对文中的不足进行进一步的研究与改进。在未来的研究工作中可以在图像预处理进程中计算量大的问题上尝试使用更快速的算法来进一步提高此方法耗时长的问题。
如果觉得博主的文章还不错或者您用得到的话,可以免费的关注一下博主,如果三连收藏支持就更好啦!这就是给予我最大的支持!
