
阅读量:0
之前博客对3DGS进行了学习与调研
 https://blog.csdn.net/gwplovekimi/article/details/135397265?spm=1001.2014.3001.5501
https://github.com/arclab-hku/comment_3DGS![]() https://github.com/arclab-hku/comment_3DGS看到它如此强大,学习一下它的源码。本博文,意在记录本人学习3DGS源码时做的学习记录,部分资料来源于网络,本博文仅仅供本人学习记录用~
https://github.com/arclab-hku/comment_3DGS看到它如此强大,学习一下它的源码。本博文,意在记录本人学习3DGS源码时做的学习记录,部分资料来源于网络,本博文仅仅供本人学习记录用~

目录
如何运行3DGS
运行3DGS的命令如下
python train.py -s 数据路径 那么自然而言的,运行一下-h应该就可以看到其支持的命令集
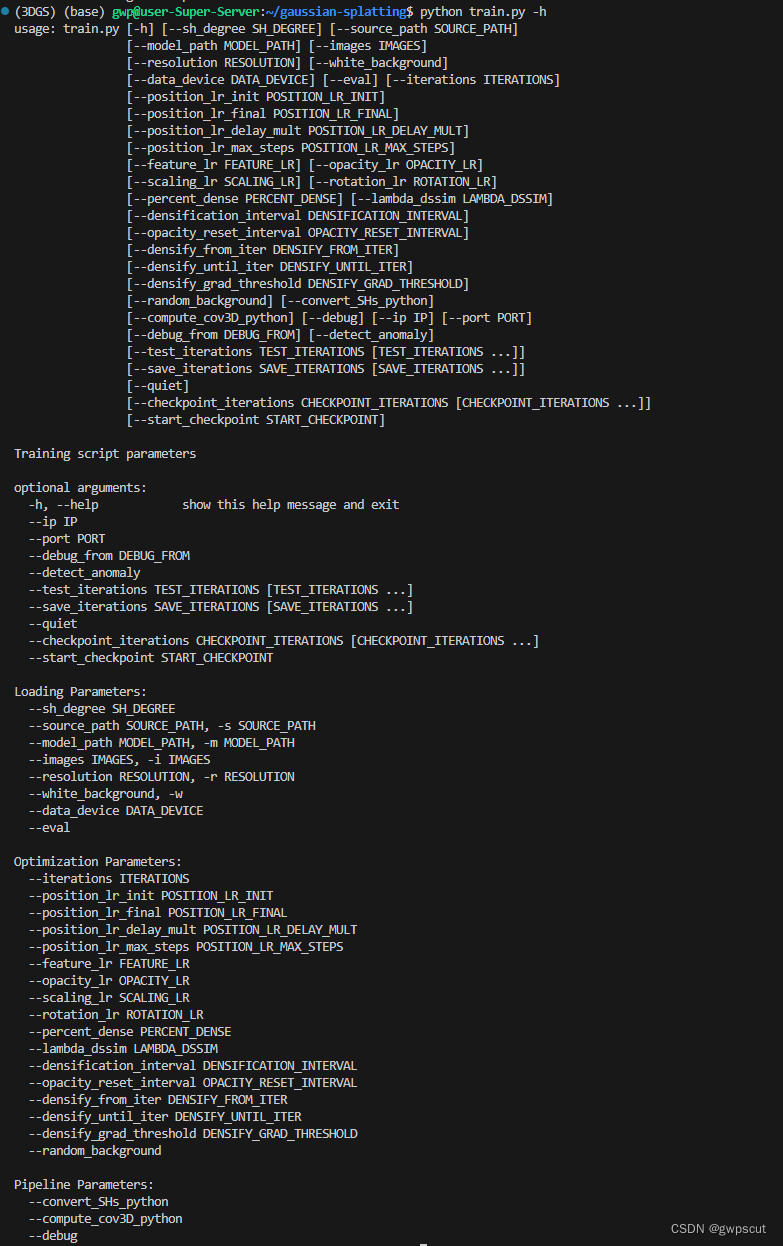
可以看到这里的简写s其实就是路径
--source_path SOURCE_PATH, -s SOURCE_PATH而运行过程的可视化插件配置等过程如下博文介绍
基于COLMAP测试3D Gaussian Splatting(训练过程可视化)
那么首先就看看这个train.py(太久没有做py相关的开发了,搞到几乎忘光了~不过幸亏py没有java那些那么复杂,捡起来基本不用重开书,跟matlab差不读hhh~)
应该跟c++差不多,首先就是看main函数啦,先设置一系列的参数
# Set up command line argument parser parser = ArgumentParser(description="Training script parameters") lp = ModelParams(parser) op = OptimizationParams(parser) pp = PipelineParams(parser) parser.add_argument('--ip', type=str, default="127.0.0.1") parser.add_argument('--port', type=int, default=6009) parser.add_argument('--debug_from', type=int, default=-1) parser.add_argument('--detect_anomaly', action='store_true', default=False) parser.add_argument("--test_iterations", nargs="+", type=int, default=[7_000, 30_000]) parser.add_argument("--save_iterations", nargs="+", type=int, default=[7_000, 30_000]) parser.add_argument("--quiet", action="store_true") parser.add_argument("--checkpoint_iterations", nargs="+", type=int, default=[]) parser.add_argument("--start_checkpoint", type=str, default = None) args = parser.parse_args(sys.argv[1:]) args.save_iterations.append(args.iterations) print("Optimizing " + args.model_path)然后初始化系统状态
# Initialize system state (RNG) safe_state(args.quiet)其定义如下:
def safe_state(silent): old_f = sys.stdout class F: def __init__(self, silent): self.silent = silent def write(self, x): if not self.silent: if x.endswith("\n"): old_f.write(x.replace("\n", " [{}]\n".format(str(datetime.now().strftime("%d/%m %H:%M:%S"))))) else: old_f.write(x) def flush(self): old_f.flush() sys.stdout = F(silent) random.seed(0) np.random.seed(0) torch.manual_seed(0) torch.cuda.set_device(torch.device("cuda:0"))这段代码定义了一个函数 safe_state(silent),该函数的作用是在执行期间重定向标准输出(sys.stdout)到一个新的类 F 的实例。这个类 F 在写入时会检查是否需要在每行结尾处添加时间戳,以及是否需要替换换行符。
具体来说,函数的实现步骤如下:
- 将原始的标准输出保存在
old_f变量中。 - 定义一个名为
F的新类,该类具有以下方法:__init__(self, silent):初始化方法,接受一个参数silent。write(self, x):写入方法,检查silent属性,如果不是静默模式,则在每行结尾添加当前时间戳,并将文本写入原始标准输出。flush(self):刷新方法,将原始标准输出的缓冲区刷新。
- 创建
F类的实例并将其赋值给sys.stdout,从而重定向标准输出到新的类实例。 - 设置随机种子以确保结果的可重复性。
- 最后,将 PyTorch 的随机种子设置为 0,并将当前 CUDA 设备设置为 "cuda:0"(如果可用的话)。
这段代码的目的是为了在执行过程中控制标准输出的行为,添加时间戳并在需要时禁止输出,以便在某些场景下更方便地进行调试和记录。
(应该就是输出一些系统的状态的)
然后就是启动GUI以及运行训练的代码
# Start GUI server, configure and run training network_gui.init(args.ip, args.port) #这行代码初始化一个 GUI 服务器,使用 args.ip 和 args.port 作为参数。这可能是一个用于监视和控制训练过程的图形用户界面的一部分。 torch.autograd.set_detect_anomaly(args.detect_anomaly) #这行代码设置 PyTorch 是否要检测梯度计算中的异常。 training(lp.extract(args), op.extract(args), pp.extract(args), args.test_iterations, args.save_iterations, args.checkpoint_iterations, args.start_checkpoint, args.debug_from) # 输入的参数包括:模型的参数(数据集的位置)、优化器的参数、其他pipeline的参数,测试迭代次数、保存迭代次数 、检查点迭代次数 、开始检查点 、调试起点接下来就是training这个函数到底做了什么了(具体的解析过程见注释,由于代码不少,没办法一句一句顺思路来解析)
def training(dataset, opt, pipe, testing_iterations, saving_iterations, checkpoint_iterations, checkpoint, debug_from): first_iter = 0 #初始化迭代次数。 tb_writer = prepare_output_and_logger(dataset) #设置 TensorBoard 写入器和日志记录器。 gaussians = GaussianModel(dataset.sh_degree) #(重点看,需要转跳)创建一个 GaussianModel 类的实例,输入一系列参数,其参数取自数据集。 scene = Scene(dataset, gaussians) #(这个类的主要目的是处理场景的初始化、保存和获取相机信息等任务,)创建一个 Scene 类的实例,使用数据集和之前创建的 GaussianModel 实例作为参数。 gaussians.training_setup(opt) #设置 GaussianModel 的训练参数。 if checkpoint: #如果有提供检查点路径。 (model_params, first_iter) = torch.load(checkpoint)#通过 torch.load(checkpoint) 加载检查点的模型参数和起始迭代次数。 gaussians.restore(model_params, opt)#通过 gaussians.restore 恢复模型的状态。 bg_color = [1, 1, 1] if dataset.white_background else [0, 0, 0] #设置背景颜色,根据数据集是否有白色背景来选择。 background = torch.tensor(bg_color, dtype=torch.float32, device="cuda") #将背景颜色转化为 PyTorch Tensor,并移到 GPU 上。 # 创建两个 CUDA 事件,用于测量迭代时间。 iter_start = torch.cuda.Event(enable_timing = True) iter_end = torch.cuda.Event(enable_timing = True) viewpoint_stack = None ema_loss_for_log = 0.0 progress_bar = tqdm(range(first_iter, opt.iterations), desc="Training progress") #创建一个 tqdm 进度条,用于显示训练进度。 first_iter += 1 # 接下来开始循环迭代 for iteration in range(first_iter, opt.iterations + 1): #主要的训练循环开始。 if network_gui.conn == None: #检查 GUI 是否连接,如果连接则接收 GUI 发送的消息。 network_gui.try_connect() while network_gui.conn != None: try: net_image_bytes = None custom_cam, do_training, pipe.convert_SHs_python, pipe.compute_cov3D_python, keep_alive, scaling_modifer = network_gui.receive() if custom_cam != None: net_image = render(custom_cam, gaussians, pipe, background, scaling_modifer)["render"] net_image_bytes = memoryview((torch.clamp(net_image, min=0, max=1.0) * 255).byte().permute(1, 2, 0).contiguous().cpu().numpy()) network_gui.send(net_image_bytes, dataset.source_path) if do_training and ((iteration < int(opt.iterations)) or not keep_alive): break except Exception as e: network_gui.conn = None iter_start.record() #用于测量迭代时间。 gaussians.update_learning_rate(iteration) #更新学习率。 # Every 1000 its we increase the levels of SH up to a maximum degree if iteration % 1000 == 0: gaussians.oneupSHdegree() #每 1000 次迭代,增加球谐函数的阶数。 # Pick a random Camera (随机选择一个训练相机。) if not viewpoint_stack: viewpoint_stack = scene.getTrainCameras().copy() viewpoint_cam = viewpoint_stack.pop(randint(0, len(viewpoint_stack)-1)) # Render (渲染图像,计算损失(L1 loss 和 SSIM loss)) if (iteration - 1) == debug_from: pipe.debug = True bg = torch.rand((3), device="cuda") if opt.random_background else background render_pkg = render(viewpoint_cam, gaussians, pipe, bg) image, viewspace_point_tensor, visibility_filter, radii = render_pkg["render"], render_pkg["viewspace_points"], render_pkg["visibility_filter"], render_pkg["radii"] # Loss gt_image = viewpoint_cam.original_image.cuda() Ll1 = l1_loss(image, gt_image) loss = (1.0 - opt.lambda_dssim) * Ll1 + opt.lambda_dssim * (1.0 - ssim(image, gt_image)) #计算渲染的图像与真实图像之间的loss loss.backward() #更新损失。loss反向传播 iter_end.record() #用于测量迭代时间。 with torch.no_grad(): #记录损失的指数移动平均值,并定期更新进度条。 # Progress bar ema_loss_for_log = 0.4 * loss.item() + 0.6 * ema_loss_for_log if iteration % 10 == 0: progress_bar.set_postfix({"Loss": f"{ema_loss_for_log:.{7}f}"}) progress_bar.update(10) if iteration == opt.iterations: progress_bar.close() # Log and save training_report(tb_writer, iteration, Ll1, loss, l1_loss, iter_start.elapsed_time(iter_end), testing_iterations, scene, render, (pipe, background)) if (iteration in saving_iterations): #如果达到保存迭代次数,保存场景。 print("\n[ITER {}] Saving Gaussians".format(iteration)) scene.save(iteration) # Densification(在一定的迭代次数内进行密集化处理。) if iteration < opt.densify_until_iter: # Keep track of max radii in image-space for pruning gaussians.max_radii2D[visibility_filter] = torch.max(gaussians.max_radii2D[visibility_filter], radii[visibility_filter]) gaussians.add_densification_stats(viewspace_point_tensor, visibility_filter) if iteration > opt.densify_from_iter and iteration % opt.densification_interval == 0: size_threshold = 20 if iteration > opt.opacity_reset_interval else None gaussians.densify_and_prune(opt.densify_grad_threshold, 0.005, scene.cameras_extent, size_threshold) if iteration % opt.opacity_reset_interval == 0 or (dataset.white_background and iteration == opt.densify_from_iter): gaussians.reset_opacity() # Optimizer step(执行优化器的步骤,然后清零梯度。) if iteration < opt.iterations: gaussians.optimizer.step() gaussians.optimizer.zero_grad(set_to_none = True) # 如果达到检查点迭代次数,保存检查点。 if (iteration in checkpoint_iterations): print("\n[ITER {}] Saving Checkpoint".format(iteration)) torch.save((gaussians.capture(), iteration), scene.model_path + "/chkpnt" + str(iteration) + ".pth")接下来要看的就是高斯模型的定义
gaussians = GaussianModel(dataset.sh_degree) #创建一个 GaussianModel 类的实例,输入一系列参数,其参数取自数据集。解读转跳下一节。
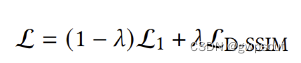
而损失函数的定义,如下
# Loss gt_image = viewpoint_cam.original_image.cuda() Ll1 = l1_loss(image, gt_image) loss = (1.0 - opt.lambda_dssim) * Ll1 + opt.lambda_dssim * (1.0 - ssim(image, gt_image)) #计算渲染的图像与真实图像之间的loss loss.backward() #更新损失。loss反向传播也正是参数优化的损失函数(L1 与 D-SSIM 项的组合)
总结训练过程每个迭代主要执行以下的操作:
- 每 1000 次迭代,增加球谐系数的阶数。
- 随机选择一个相机视角。
- 渲染图像,获取视点空间点、能见度过滤器和半径等信息。
- 计算损失(L1 损失和 DSSIM 损失的加权和),进行反向传播。
- 通过无梯度的上下文进行后续操作:
- 根据迭代次数进行点云密度操作(densification):
- 更新最大半径信息。
- 根据条件进行点云密度增加和修剪。
- 进行优化器的参数更新。
在整个训练过程中,这些步骤循环执行,逐渐优化模型参数,进行损失计算和反向传播,同时根据条件进行点云密度操作和保存检查点,以逐步提升模型性能。
高斯模型的定义
高斯模型的初始化,初始化过程中加载或定义了各种相关的属性使用的球谐阶数、最大球谐阶数、各种张量(_xyz、_features_dc等)、优化器和其他参数。
def __init__(self, sh_degree : int): self.active_sh_degree = 0 #球谐阶数 self.max_sh_degree = sh_degree #最大球谐阶数 # 存储不同信息的张量(tensor) self._xyz = torch.empty(0) #空间位置 self._features_dc = torch.empty(0) self._features_rest = torch.empty(0) self._scaling = torch.empty(0) #椭球的形状尺度 self._rotation = torch.empty(0) #椭球的旋转 self._opacity = torch.empty(0) #不透明度 self.max_radii2D = torch.empty(0) self.xyz_gradient_accum = torch.empty(0) self.denom = torch.empty(0) self.optimizer = None #初始化优化器为 None。 self.percent_dense = 0 #初始化百分比密度为0。 self.spatial_lr_scale = 0 #初始化空间学习速率缩放为0。 self.setup_functions() #调用 setup_functions 方法设置各种激活和变换函数调用 setup_functions 方法设置各种激活和变换函数。
def setup_functions(self): #用于设置一些激活函数和变换函数 def build_covariance_from_scaling_rotation(scaling, scaling_modifier, rotation):#构建协方差矩阵,该函数接受 scaling(尺度)、scaling_modifier(尺度修正因子)、rotation(旋转)作为参数 L = build_scaling_rotation(scaling_modifier * scaling, rotation) actual_covariance = L @ L.transpose(1, 2) symm = strip_symmetric(actual_covariance) return symm #最终返回对称的协方差矩阵。 self.scaling_activation = torch.exp #将尺度激活函数设置为指数函数。 self.scaling_inverse_activation = torch.log #将尺度逆激活函数设置为对数函数。 self.covariance_activation = build_covariance_from_scaling_rotation #将协方差激活函数设置为上述定义的 build_covariance_from_scaling_rotation 函数。 self.opacity_activation = torch.sigmoid #将不透明度激活函数设置为 sigmoid 函数。 self.inverse_opacity_activation = inverse_sigmoid #将不透明度逆激活函数设置为一个名为 inverse_sigmoid 的函数 self.rotation_activation = torch.nn.functional.normalize #用于归一化旋转矩阵。高斯模型初始化后在下面代码中进行加载(从已加载的模型中加载还是从点云数据中加载)
在train.py中 scene = Scene(dataset, gaussians) #(这个类的主要目的是处理场景的初始化、保存和获取相机信息等任务,)创建一个 Scene 类的实例,使用数据集和之前创建的 GaussianModel 实例作为参数。 对应的在Scene类中 # 加载或创建高斯模型 if self.loaded_iter: #如果已加载模型,则调用 load_ply 方法加载点云数据。 self.gaussians.load_ply(os.path.join(self.model_path, "point_cloud", "iteration_" + str(self.loaded_iter), "point_cloud.ply")) else: #否则,调用 create_from_pcd 方法根据场景信息中的点云数据创建高斯模型。 self.gaussians.create_from_pcd(scene_info.point_cloud, self.cameras_extent) 自适应密集化处理
在train.py中,在一定的迭代次数内进行密集化处理(这也是3DGS的一大贡献点,自适应控制密集化)。见下面代码
# Densification(在一定的迭代次数内进行密集化处理。) if iteration < opt.densify_until_iter: #在达到指定的迭代次数之前执行以下操作。 # Keep track of max radii in image-space for pruning gaussians.max_radii2D[visibility_filter] = torch.max(gaussians.max_radii2D[visibility_filter], radii[visibility_filter]) #将每个像素位置上的最大半径记录在 max_radii2D 中。这是为了密集化时进行修剪(pruning)操作时的参考。 gaussians.add_densification_stats(viewspace_point_tensor, visibility_filter) #将与密集化相关的统计信息添加到 gaussians 模型中,包括视图空间点和可见性过滤器。 if iteration > opt.densify_from_iter and iteration % opt.densification_interval == 0: #在指定的迭代次数之后,每隔一定的迭代间隔进行以下密集化操作。 size_threshold = 20 if iteration > opt.opacity_reset_interval else None #根据当前迭代次数设置密集化的阈值。如果当前迭代次数大于 opt.opacity_reset_interval,则设置 size_threshold 为 20,否则为 None。 gaussians.densify_and_prune(opt.densify_grad_threshold, 0.005, scene.cameras_extent, size_threshold) #执行密集化和修剪操作,其中包括梯度阈值、密集化阈值、相机范围和之前计算的 size_threshold。 if iteration % opt.opacity_reset_interval == 0 or (dataset.white_background and iteration == opt.densify_from_iter): #在每隔一定迭代次数或在白色背景数据集上的指定迭代次数时,执行以下操作。 gaussians.reset_opacity() #重置模型中的某些参数,涉及到透明度的操作,具体实现可以在 reset_opacity 方法中找到。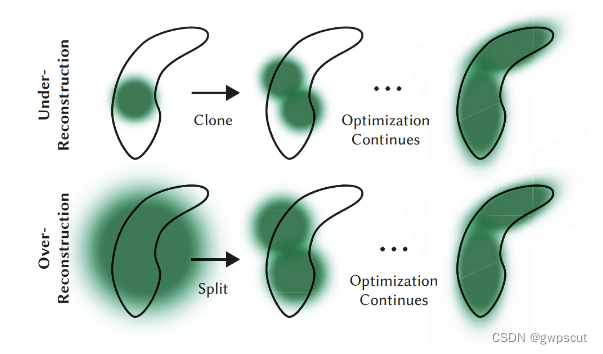
而进入下面函数gaussians.densify_and_prune()解读如下:
# 执行密集化和修剪操作 def densify_and_prune(self, max_grad, min_opacity, extent, max_screen_size): grads = self.xyz_gradient_accum / self.denom #计算密度估计的梯度 grads[grads.isnan()] = 0.0 #将梯度中的 NaN(非数值)值设置为零,以处理可能的数值不稳定性。 self.densify_and_clone(grads, max_grad, extent) #对under reconstruction的区域进行稠密化和复制操作 self.densify_and_split(grads, max_grad, extent) #对over reconstruction的区域进行稠密化和分割操作 prune_mask = (self.get_opacity < min_opacity).squeeze() #创建一个掩码,标记那些透明度小于指定阈值的点。.squeeze() 用于去除掩码中的单维度。 if max_screen_size: #如何设置了相机的范围, big_points_vs = self.max_radii2D > max_screen_size #创建一个掩码,标记在图像空间中半径大于指定阈值的点。 big_points_ws = self.get_scaling.max(dim=1).values > 0.1 * extent #创建一个掩码,标记在世界空间中尺寸大于指定阈值的点。 prune_mask = torch.logical_or(torch.logical_or(prune_mask, big_points_vs), big_points_ws) #将这两个掩码与先前的透明度掩码进行逻辑或操作,得到最终的修剪掩码。 self.prune_points(prune_mask) #:根据修剪掩码,修剪模型中的一些参数。 torch.cuda.empty_cache() #清理 GPU 缓存,释放一些内存对于densify_and_clone函数
def densify_and_clone(self, grads, grad_threshold, scene_extent): # Extract points that satisfy the gradient condition selected_pts_mask = torch.where(torch.norm(grads, dim=-1) >= grad_threshold, True, False) #建一个掩码,标记满足梯度条件的点。具体来说,对于每个点,计算其梯度的L2范数,如果大于等于指定的梯度阈值,则标记为True,否则标记为False。 selected_pts_mask = torch.logical_and(selected_pts_mask, torch.max(self.get_scaling, dim=1).values <= self.percent_dense*scene_extent) # 在上述掩码的基础上,进一步过滤掉那些缩放(scaling)大于一定百分比(self.percent_dense)的场景范围(scene_extent)的点。这样可以确保新添加的点不会太远离原始数据。 # 根据掩码选取符合条件的点的其他特征,如颜色、透明度、缩放和旋转等。 new_xyz = self._xyz[selected_pts_mask] new_features_dc = self._features_dc[selected_pts_mask] new_features_rest = self._features_rest[selected_pts_mask] new_opacities = self._opacity[selected_pts_mask] new_scaling = self._scaling[selected_pts_mask] new_rotation = self._rotation[selected_pts_mask] self.densification_postfix(new_xyz, new_features_dc, new_features_rest, new_opacities, new_scaling, new_rotation)其中,最后一句代码实现的是将新的密集化点的相关特征保存在一个字典中。
# 将新的密集化点的相关特征保存在一个字典中。 def densification_postfix(self, new_xyz, new_features_dc, new_features_rest, new_opacities, new_scaling, new_rotation): d = {"xyz": new_xyz, "f_dc": new_features_dc, "f_rest": new_features_rest, "opacity": new_opacities, "scaling" : new_scaling, "rotation" : new_rotation} optimizable_tensors = self.cat_tensors_to_optimizer(d) #将字典中的张量连接(concatenate)成可优化的张量。这个方法的具体实现可能是将字典中的每个张量进行堆叠,以便于在优化器中进行处理。 # 更新模型中原始点集的相关特征,使用新的密集化后的特征。 self._xyz = optimizable_tensors["xyz"] self._features_dc = optimizable_tensors["f_dc"] self._features_rest = optimizable_tensors["f_rest"] self._opacity = optimizable_tensors["opacity"] self._scaling = optimizable_tensors["scaling"] self._rotation = optimizable_tensors["rotation"] # 重新初始化一些用于梯度计算和密集化操作的变量。 self.xyz_gradient_accum = torch.zeros((self.get_xyz.shape[0], 1), device="cuda") self.denom = torch.zeros((self.get_xyz.shape[0], 1), device="cuda") self.max_radii2D = torch.zeros((self.get_xyz.shape[0]), device="cuda")对于densify_and_split函数
def densify_and_split(self, grads, grad_threshold, scene_extent, N=2): n_init_points = self.get_xyz.shape[0] #获取初始点的数量。 # Extract points that satisfy the gradient condition padded_grad = torch.zeros((n_init_points), device="cuda") #创建一个长度为初始点数量的梯度张量,并将计算得到的梯度填充到其中。 padded_grad[:grads.shape[0]] = grads.squeeze() selected_pts_mask = torch.where(padded_grad >= grad_threshold, True, False) #创建一个掩码,标记那些梯度大于等于指定阈值的点。 selected_pts_mask = torch.logical_and(selected_pts_mask, torch.max(self.get_scaling, dim=1).values > self.percent_dense*scene_extent) # 一步过滤掉那些缩放(scaling)大于一定百分比的场景范围的点。 # 为每个点生成新的样本,其中 stds 是点的缩放,means 是均值。 stds = self.get_scaling[selected_pts_mask].repeat(N,1) means =torch.zeros((stds.size(0), 3),device="cuda") samples = torch.normal(mean=means, std=stds) #使用均值和标准差生成样本。 rots = build_rotation(self._rotation[selected_pts_mask]).repeat(N,1,1) #为每个点构建旋转矩阵,并将其重复 N 次。 new_xyz = torch.bmm(rots, samples.unsqueeze(-1)).squeeze(-1) + self.get_xyz[selected_pts_mask].repeat(N, 1) #将旋转后的样本点添加到原始点的位置。 new_scaling = self.scaling_inverse_activation(self.get_scaling[selected_pts_mask].repeat(N,1) / (0.8*N)) #生成新的缩放参数。 new_rotation = self._rotation[selected_pts_mask].repeat(N,1) #将旋转矩阵重复 N 次。 # 将原始点的特征重复 N 次。 new_features_dc = self._features_dc[selected_pts_mask].repeat(N,1,1) new_features_rest = self._features_rest[selected_pts_mask].repeat(N,1,1) new_opacity = self._opacity[selected_pts_mask].repeat(N,1) # 调用另一个方法 densification_postfix,该方法对新生成的点执行后处理操作(此处跟densify_and_clone一样)。 self.densification_postfix(new_xyz, new_features_dc, new_features_rest, new_opacity, new_scaling, new_rotation) # 创建一个修剪(pruning)的过滤器,将新生成的点添加到原始点的掩码之后。 prune_filter = torch.cat((selected_pts_mask, torch.zeros(N * selected_pts_mask.sum(), device="cuda", dtype=bool))) # 根据修剪过滤器,修剪模型中的一些参数。 self.prune_points(prune_filter)渲染(render)及光栅化
train.py在求loss前,是需要进行图像的渲染并且计算loss的,见下代码:
# Render (渲染图像,计算损失(L1 loss 和 SSIM loss)) if (iteration - 1) == debug_from: pipe.debug = True bg = torch.rand((3), device="cuda") if opt.random_background else background render_pkg = render(viewpoint_cam, gaussians, pipe, bg) image, viewspace_point_tensor, visibility_filter, radii = render_pkg["render"], render_pkg["viewspace_points"], render_pkg["visibility_filter"], render_pkg["radii"] # Loss gt_image = viewpoint_cam.original_image.cuda() Ll1 = l1_loss(image, gt_image) loss = (1.0 - opt.lambda_dssim) * Ll1 + opt.lambda_dssim * (1.0 - ssim(image, gt_image)) #计算渲染的图像与真实图像之间的loss loss.backward() #更新损失。loss反向传播接下来就看看渲染的过程。
由于3DGS的渲染过程是利用了光栅化(rasterization)而光栅化的过程需要在GPU上运行。
# 这段代码是一个用于渲染场景的函数,主要是通过将高斯分布的点投影到2D屏幕上来生成渲染图像。 def render(viewpoint_camera, pc : GaussianModel, pipe, bg_color : torch.Tensor, scaling_modifier = 1.0, override_color = None): """ Render the scene. Background tensor (bg_color) must be on GPU! """ # Create zero tensor. We will use it to make pytorch return gradients of the 2D (screen-space) means # 创建一个与输入点云(高斯模型)大小相同的零张量,用于记录屏幕空间中的点的位置。这个张量将用于计算对于屏幕空间坐标的梯度。 screenspace_points = torch.zeros_like(pc.get_xyz, dtype=pc.get_xyz.dtype, requires_grad=True, device="cuda") + 0 try: screenspace_points.retain_grad() #尝试保留张量的梯度。这是为了确保可以在反向传播过程中计算对于屏幕空间坐标的梯度。 except: pass # Set up rasterization configuration # 计算视场的 tan 值,这将用于设置光栅化配置。 tanfovx = math.tan(viewpoint_camera.FoVx * 0.5) tanfovy = math.tan(viewpoint_camera.FoVy * 0.5) # 设置光栅化的配置,包括图像的大小、视场的 tan 值、背景颜色、视图矩阵、投影矩阵等。 raster_settings = GaussianRasterizationSettings( image_height=int(viewpoint_camera.image_height), image_width=int(viewpoint_camera.image_width), tanfovx=tanfovx, tanfovy=tanfovy, bg=bg_color, scale_modifier=scaling_modifier, viewmatrix=viewpoint_camera.world_view_transform, projmatrix=viewpoint_camera.full_proj_transform, sh_degree=pc.active_sh_degree, campos=viewpoint_camera.camera_center, prefiltered=False, debug=pipe.debug ) rasterizer = GaussianRasterizer(raster_settings=raster_settings)#创建一个高斯光栅化器对象,用于将高斯分布投影到屏幕上。 # 获取高斯分布的三维坐标、屏幕空间坐标和透明度。 means3D = pc.get_xyz means2D = screenspace_points opacity = pc.get_opacity # If precomputed 3d covariance is provided, use it. If not, then it will be computed from # scaling / rotation by the rasterizer. # 如果提供了预先计算的3D协方差矩阵,则使用它。否则,它将由光栅化器根据尺度和旋转进行计算。 scales = None rotations = None cov3D_precomp = None if pipe.compute_cov3D_python: cov3D_precomp = pc.get_covariance(scaling_modifier) #获取预计算的三维协方差矩阵。 else: #获取缩放和旋转信息。(对应的就是3D高斯的协方差矩阵了) scales = pc.get_scaling rotations = pc.get_rotation # If precomputed colors are provided, use them. Otherwise, if it is desired to precompute colors # from SHs in Python, do it. If not, then SH -> RGB conversion will be done by rasterizer. # 如果提供了预先计算的颜色,则使用它们。否则,如果希望在Python中从球谐函数中预计算颜色,请执行此操作。如果没有,则颜色将通过光栅化器进行从球谐函数到RGB的转换。 shs = None colors_precomp = None if override_color is None: if pipe.convert_SHs_python: shs_view = pc.get_features.transpose(1, 2).view(-1, 3, (pc.max_sh_degree+1)**2) #将SH特征的形状调整为(batch_size * num_points,3,(max_sh_degree+1)**2)。 dir_pp = (pc.get_xyz - viewpoint_camera.camera_center.repeat(pc.get_features.shape[0], 1)) #计算相机中心到每个点的方向向量,并归一化。 dir_pp_normalized = dir_pp/dir_pp.norm(dim=1, keepdim=True) #计算相机中心到每个点的方向向量,并归一化。 sh2rgb = eval_sh(pc.active_sh_degree, shs_view, dir_pp_normalized) #使用SH特征将方向向量转换为RGB颜色。 colors_precomp = torch.clamp_min(sh2rgb + 0.5, 0.0) #将RGB颜色的范围限制在0到1之间。 else: shs = pc.get_features else: colors_precomp = override_color # Rasterize visible Gaussians to image, obtain their radii (on screen). # 调用光栅化器,将高斯分布投影到屏幕上,获得渲染图像和每个高斯分布在屏幕上的半径。 rendered_image, radii = rasterizer( means3D = means3D, means2D = means2D, shs = shs, colors_precomp = colors_precomp, opacities = opacity, scales = scales, rotations = rotations, cov3D_precomp = cov3D_precomp) # Those Gaussians that were frustum culled or had a radius of 0 were not visible. # They will be excluded from value updates used in the splitting criteria. # 返回一个字典,包含渲染的图像、屏幕空间坐标、可见性过滤器(根据半径判断是否可见)以及每个高斯分布在屏幕上的半径。 return {"render": rendered_image, "viewspace_points": screenspace_points, "visibility_filter" : radii > 0, "radii": radii}3DGS看了这么久,知道SH系数是跟颜色相挂钩的,至于如何相挂钩好像原文是没有细说的,但是代码实现就很直观了
if pipe.convert_SHs_python: shs_view = pc.get_features.transpose(1, 2).view(-1, 3, (pc.max_sh_degree+1)**2) #将SH特征的形状调整为(batch_size * num_points,3,(max_sh_degree+1)**2)。 dir_pp = (pc.get_xyz - viewpoint_camera.camera_center.repeat(pc.get_features.shape[0], 1)) #计算相机中心到每个点的方向向量,并归一化。 dir_pp_normalized = dir_pp/dir_pp.norm(dim=1, keepdim=True) #计算相机中心到每个点的方向向量,并归一化。 sh2rgb = eval_sh(pc.active_sh_degree, shs_view, dir_pp_normalized) #使用SH特征将方向向量转换为RGB颜色。 colors_precomp = torch.clamp_min(sh2rgb + 0.5, 0.0) #将RGB颜色的范围限制在0到1之间。在这段代码中其中就调用了submodules的diff_gaussian_rasterization
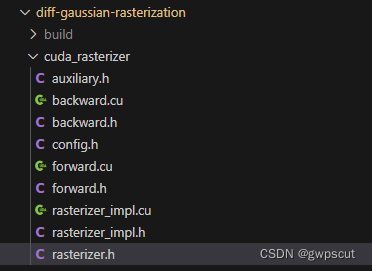
from diff_gaussian_rasterization import GaussianRasterizationSettings, GaussianRasterizer这部分的源码用cuda写的(这也是本人第一次真正深入看cuda源码~)
GaussianRasterizationSettings与GaussianRasterizer对应的代码在submodules/diff-gaussian-rasterization/diff_gaussian_rasterization/__init__.py
class GaussianRasterizationSettings(NamedTuple): image_height: int image_width: int tanfovx : float tanfovy : float bg : torch.Tensor scale_modifier : float viewmatrix : torch.Tensor projmatrix : torch.Tensor sh_degree : int campos : torch.Tensor prefiltered : bool debug : boolclass GaussianRasterizer(nn.Module): def __init__(self, raster_settings): super().__init__() self.raster_settings = raster_settings而上面进行的都是光栅的初始化,真正继续渲染计算应该是下面代码(输入具体的数值)
# Rasterize visible Gaussians to image, obtain their radii (on screen). # 调用光栅化器,将高斯分布投影到屏幕上,获得渲染图像和每个高斯分布在屏幕上的半径。 rendered_image, radii = rasterizer( means3D = means3D, means2D = means2D, shs = shs, colors_precomp = colors_precomp, opacities = opacity, scales = scales, rotations = rotations, cov3D_precomp = cov3D_precomp)接下来学习一个光栅化的源码。主要的运行及计算的工程应该就是forward(采用前向渲染)
# 用于高斯光栅化(Gaussian Rasterization)的PyTorch模块 class GaussianRasterizer(nn.Module): #定义了一个继承自nn.Module的类,表示高斯光栅化器。 #初始化方法,接受一个raster_settings参数,该参数包含了光栅化的设置(例如图像大小、视场、背景颜色等)。 def __init__(self, raster_settings): super().__init__() self.raster_settings = raster_settings # 标记可见点的方法。接受3D点的位置作为输入,并使用C++/CUDA代码执行视锥体剔除,返回一个布尔张量,表示每个点是否可见。 def markVisible(self, positions): # Mark visible points (based on frustum culling for camera) with a boolean with torch.no_grad(): raster_settings = self.raster_settings visible = _C.mark_visible( positions, raster_settings.viewmatrix, raster_settings.projmatrix) return visible # 前向传播方法,用于进行高斯光栅化操作。接受一系列输入参数,包括3D坐标、2D坐标、透明度、SH特征或预计算的颜色、缩放、旋转或预计算的3D协方差等。 def forward(self, means3D, means2D, opacities, shs = None, colors_precomp = None, scales = None, rotations = None, cov3D_precomp = None): raster_settings = self.raster_settings # 检查SH特征和预计算的颜色是否同时提供,要求只提供其中一种。 if (shs is None and colors_precomp is None) or (shs is not None and colors_precomp is not None): raise Exception('Please provide excatly one of either SHs or precomputed colors!') # 检查缩放/旋转对或预计算的3D协方差是否同时提供,要求只提供其中一种。 if ((scales is None or rotations is None) and cov3D_precomp is None) or ((scales is not None or rotations is not None) and cov3D_precomp is not None): raise Exception('Please provide exactly one of either scale/rotation pair or precomputed 3D covariance!') # 如果某个输入参数为None,则将其初始化为空张量。 if shs is None: shs = torch.Tensor([]) if colors_precomp is None: colors_precomp = torch.Tensor([]) if scales is None: scales = torch.Tensor([]) if rotations is None: rotations = torch.Tensor([]) if cov3D_precomp is None: cov3D_precomp = torch.Tensor([]) # 调用C++/CUDA光栅化例程rasterize_gaussians,传递相应的输入参数和光栅化设置。 # Invoke C++/CUDA rasterization routine return rasterize_gaussians( means3D, means2D, shs, colors_precomp, opacities, scales, rotations, cov3D_precomp, raster_settings, )而最后的rasterize_gaussians的定义如下
def rasterize_gaussians( #这个函数调用了一个自定义的PyTorch Autograd Function _RasterizeGaussians.apply,并传递了一系列参数进行高斯光栅化。 means3D, means2D, sh, colors_precomp, opacities, scales, rotations, cov3Ds_precomp, raster_settings, ): return _RasterizeGaussians.apply( means3D, #高斯分布的三维坐标。 means2D, #高斯分布的二维坐标(屏幕空间坐标)。 sh, #SH(球谐函数)特征。 colors_precomp, #预计算的颜色。 opacities, #透明度 scales, #缩放因子 rotations, #旋转 cov3Ds_precomp, #预计算的三维协方差矩阵。 raster_settings, #高斯光栅化的设置。 )它又return一个_RasterizeGaussians
# 这是一个自定义的 PyTorch Autograd Function,用于高斯光栅化的前向传播和反向传播。 class _RasterizeGaussians(torch.autograd.Function): @staticmethod def forward( #用于定义前向渲染的规则,接受一系列输入参数,并调用 C++/CUDA 实现的 _C.rasterize_gaussians 方法进行高斯光栅化。 ctx, #上下文对象,用于保存计算中间结果以供反向传播使用。(后面几个是输入参数。) means3D, means2D, sh, colors_precomp, opacities, scales, rotations, cov3Ds_precomp, raster_settings, ): # Restructure arguments the way that the C++ lib expects them args = ( raster_settings.bg, means3D, colors_precomp, opacities, scales, rotations, raster_settings.scale_modifier, cov3Ds_precomp, raster_settings.viewmatrix, raster_settings.projmatrix, raster_settings.tanfovx, raster_settings.tanfovy, raster_settings.image_height, raster_settings.image_width, sh, raster_settings.sh_degree, raster_settings.campos, raster_settings.prefiltered, raster_settings.debug ) # Invoke C++/CUDA rasterizer if raster_settings.debug: cpu_args = cpu_deep_copy_tuple(args) # Copy them before they can be corrupted try: num_rendered, color, radii, geomBuffer, binningBuffer, imgBuffer = _C.rasterize_gaussians(*args) #C++/CUDA 光栅化计算的输出结果。 except Exception as ex: torch.save(cpu_args, "snapshot_fw.dump") print("\nAn error occured in forward. Please forward snapshot_fw.dump for debugging.") raise ex else: num_rendered, color, radii, geomBuffer, binningBuffer, imgBuffer = _C.rasterize_gaussians(*args) # Keep relevant tensors for backward ctx.raster_settings = raster_settings ctx.num_rendered = num_rendered ctx.save_for_backward(colors_precomp, means3D, scales, rotations, cov3Ds_precomp, radii, sh, geomBuffer, binningBuffer, imgBuffer) return color, radii @staticmethod def backward(ctx, grad_out_color, _): #方法用于定义反向传播梯度下降的规则,接受输入的梯度 # Restore necessary values from context num_rendered = ctx.num_rendered raster_settings = ctx.raster_settings colors_precomp, means3D, scales, rotations, cov3Ds_precomp, radii, sh, geomBuffer, binningBuffer, imgBuffer = ctx.saved_tensors # Restructure args as C++ method expects them # 将梯度和其他输入参数重构为 C++ 方法所期望的形式。 args = (raster_settings.bg, means3D, radii, colors_precomp, scales, rotations, raster_settings.scale_modifier, cov3Ds_precomp, raster_settings.viewmatrix, raster_settings.projmatrix, raster_settings.tanfovx, raster_settings.tanfovy, grad_out_color, sh, raster_settings.sh_degree, raster_settings.campos, geomBuffer, num_rendered, binningBuffer, imgBuffer, raster_settings.debug) # Compute gradients for relevant tensors by invoking backward method # 注意,该函数中包含了对调试模式的处理,即如果启用了调试模式,则在计算前向和反向传播时保存了参数的副本,并在出现异常时将其保存到文件中,以供调试。 if raster_settings.debug: cpu_args = cpu_deep_copy_tuple(args) # Copy them before they can be corrupted try: grad_means2D, grad_colors_precomp, grad_opacities, grad_means3D, grad_cov3Ds_precomp, grad_sh, grad_scales, grad_rotations = _C.rasterize_gaussians_backward(*args) except Exception as ex: torch.save(cpu_args, "snapshot_bw.dump") print("\nAn error occured in backward. Writing snapshot_bw.dump for debugging.\n") raise ex else: grad_means2D, grad_colors_precomp, grad_opacities, grad_means3D, grad_cov3Ds_precomp, grad_sh, grad_scales, grad_rotations = _C.rasterize_gaussians_backward(*args) #梯度 grads = ( grad_means3D, grad_means2D, grad_sh, grad_colors_precomp, grad_opacities, grad_scales, grad_rotations, grad_cov3Ds_precomp, None, ) return grads而cuda的具体实现则在下面代码中
先看前向的渲染,进入forward.h文件可以发现,其实就是两个函数,预处理与渲染。
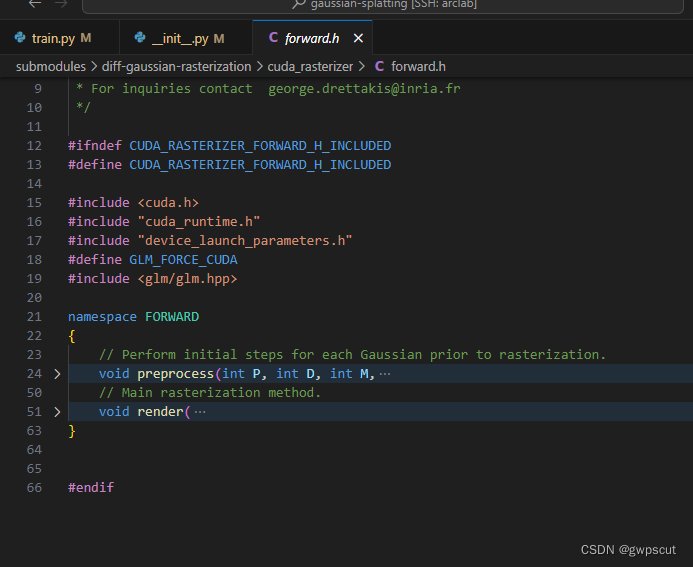
先看预处理,该函数使用了CUDA并行计算,通过调用名为 preprocessCUDA 的 CUDA 核函数来执行高斯光栅化的前处理。CUDA 核函数的执行由函数参数确定。在 CUDA 核函数中,每个线程块由多个线程组成,负责处理其中的一部分数据,从而加速高斯光栅化的计算。
void FORWARD::preprocess(int P, int D, int M, const float* means3D, const glm::vec3* scales, const float scale_modifier, const glm::vec4* rotations, const float* opacities, const float* shs, bool* clamped, const float* cov3D_precomp, const float* colors_precomp, const float* viewmatrix, const float* projmatrix, const glm::vec3* cam_pos, const int W, int H, const float focal_x, float focal_y, const float tan_fovx, float tan_fovy, int* radii, float2* means2D, float* depths, float* cov3Ds, float* rgb, float4* conic_opacity, const dim3 grid, uint32_t* tiles_touched, bool prefiltered) { preprocessCUDA<NUM_CHANNELS> << <(P + 255) / 256, 256 >> > ( P, D, M, means3D, scales, scale_modifier, rotations, opacities, shs, clamped, cov3D_precomp, colors_precomp, viewmatrix, projmatrix, cam_pos, W, H, tan_fovx, tan_fovy, focal_x, focal_y, radii, means2D, depths, cov3Ds, rgb, conic_opacity, grid, tiles_touched, prefiltered ); }而这个 CUDA 核函数的目的是为每个高斯分布进行预处理,为后续的高斯光栅化做好准备。
// Perform initial steps for each Gaussian prior to rasterization. template<int C> __global__ void preprocessCUDA( int P, //高斯分布的点的数量。 int D, //高斯分布的维度。 int M, //点云数量。 const float* orig_points, //三维坐标。 const glm::vec3* scales, //缩放。 const float scale_modifier, //缩放调整因子。 const glm::vec4* rotations, //旋转。 const float* opacities, //透明度。 const float* shs, //球谐函数(SH)特征。 bool* clamped, //用于记录是否被裁剪。 const float* cov3D_precomp, //预计算的三维协方差。 const float* colors_precomp, //预计算的颜色。 const float* viewmatrix, //视图矩阵。 const float* projmatrix, //投影矩阵 const glm::vec3* cam_pos, //相机位置。 const int W, int H, //输出图像的宽度和高度。 const float tan_fovx, float tan_fovy, //水平和垂直方向的焦距切线。 const float focal_x, float focal_y, //焦距。 int* radii, //输出的半径。 float2* points_xy_image, //输出的二维坐标。 float* depths, //输出的深度。 float* cov3Ds, //输出的三维协方差。 float* rgb, // 输出的颜色。 float4* conic_opacity, //锥形透明度。 const dim3 grid, //CUDA 网格的大小。 uint32_t* tiles_touched, bool prefiltered) //是否预过滤。 { auto idx = cg::this_grid().thread_rank(); if (idx >= P) return; // Initialize radius and touched tiles to 0. If this isn't changed, // this Gaussian will not be processed further. // 首先,初始化了一些变量,包括半径(radii)和触及到的瓦片数量(tiles_touched)。 radii[idx] = 0; tiles_touched[idx] = 0; // Perform near culling, quit if outside. // 使用 in_frustum 函数进行近裁剪,如果点在视锥体之外,则退出。 float3 p_view; if (!in_frustum(idx, orig_points, viewmatrix, projmatrix, prefiltered, p_view)) return; // Transform point by projecting // 对原始点进行投影变换,计算其在屏幕上的坐标。 float3 p_orig = { orig_points[3 * idx], orig_points[3 * idx + 1], orig_points[3 * idx + 2] }; float4 p_hom = transformPoint4x4(p_orig, projmatrix); float p_w = 1.0f / (p_hom.w + 0.0000001f); float3 p_proj = { p_hom.x * p_w, p_hom.y * p_w, p_hom.z * p_w }; // If 3D covariance matrix is precomputed, use it, otherwise compute // from scaling and rotation parameters. // 根据输入的缩放和旋转参数,计算或使用预计算的3D协方差矩阵。 const float* cov3D; if (cov3D_precomp != nullptr) { cov3D = cov3D_precomp + idx * 6; } else { computeCov3D(scales[idx], scale_modifier, rotations[idx], cov3Ds + idx * 6); cov3D = cov3Ds + idx * 6; } // Compute 2D screen-space covariance matrix // 根据3D协方差矩阵、焦距和视锥体矩阵,计算2D屏幕空间的协方差矩阵。 float3 cov = computeCov2D(p_orig, focal_x, focal_y, tan_fovx, tan_fovy, cov3D, viewmatrix); // Invert covariance (EWA algorithm) // 对协方差矩阵进行求逆操作,用于EWA(Elliptical Weighted Average)算法。 float det = (cov.x * cov.z - cov.y * cov.y); if (det == 0.0f) return; float det_inv = 1.f / det; float3 conic = { cov.z * det_inv, -cov.y * det_inv, cov.x * det_inv }; // Compute extent in screen space (by finding eigenvalues of // 2D covariance matrix). Use extent to compute a bounding rectangle // of screen-space tiles that this Gaussian overlaps with. Quit if // rectangle covers 0 tiles. // 计算2D协方差矩阵的特征值,用于计算屏幕空间的范围,以确定与之相交的瓦片。 float mid = 0.5f * (cov.x + cov.z); float lambda1 = mid + sqrt(max(0.1f, mid * mid - det)); float lambda2 = mid - sqrt(max(0.1f, mid * mid - det)); float my_radius = ceil(3.f * sqrt(max(lambda1, lambda2))); float2 point_image = { ndc2Pix(p_proj.x, W), ndc2Pix(p_proj.y, H) }; uint2 rect_min, rect_max; getRect(point_image, my_radius, rect_min, rect_max, grid); if ((rect_max.x - rect_min.x) * (rect_max.y - rect_min.y) == 0) return; // If colors have been precomputed, use them, otherwise convert // spherical harmonics coefficients to RGB color. // 如果预计算颜色未提供,则使用球谐函数(SH)系数计算颜色。 if (colors_precomp == nullptr) { glm::vec3 result = computeColorFromSH(idx, D, M, (glm::vec3*)orig_points, *cam_pos, shs, clamped); rgb[idx * C + 0] = result.x; rgb[idx * C + 1] = result.y; rgb[idx * C + 2] = result.z; } // 储计算得到的深度、半径、屏幕坐标等结果,用于下一步继续处理。 // 为每个高斯分布进行预处理,为后续的高斯光栅化做好准备。 // Store some useful helper data for the next steps. depths[idx] = p_view.z; radii[idx] = my_radius; points_xy_image[idx] = point_image; // Inverse 2D covariance and opacity neatly pack into one float4 conic_opacity[idx] = { conic.x, conic.y, conic.z, opacities[idx] }; tiles_touched[idx] = (rect_max.y - rect_min.y) * (rect_max.x - rect_min.x); }接下来看看渲染的过程,结构跟上面预处理的很类似都是cuda
void FORWARD::render( const dim3 grid, dim3 block, const uint2* ranges, const uint32_t* point_list, int W, int H, const float2* means2D, const float* colors, const float4* conic_opacity, float* final_T, uint32_t* n_contrib, const float* bg_color, float* out_color) { renderCUDA<NUM_CHANNELS> << <grid, block >> > ( ranges, point_list, W, H, means2D, colors, conic_opacity, final_T, n_contrib, bg_color, out_color); }下面详细看看renderCUDA。其核心逻辑如下
通过计算当前线程所属的 tile 的范围,确定当前线程要处理的像素区域。
判断当前线程是否在有效像素范围内,如果不在,则将
done设置为 true,表示该线程不执行渲染操作。使用
__syncthreads_count函数,统计当前块内done变量为 true 的线程数,如果全部线程都完成,跳出循环。在每个迭代中,从全局内存中收集每个线程块对应的范围内的数据,包括点的索引、2D 坐标和锥体参数透明度。
对当前线程块内的每个点,进行基于锥体参数的渲染,计算贡献并更新颜色。
所有线程处理完毕后,将渲染结果写入
final_T、n_contrib和out_color。
// Main rasterization method. Collaboratively works on one tile per // block, each thread treats one pixel. Alternates between fetching // and rasterizing data. template <uint32_t CHANNELS> __global__ void __launch_bounds__(BLOCK_X * BLOCK_Y)// 这是 CUDA 启动核函数时使用的线程格和线程块的数量。 renderCUDA( const uint2* __restrict__ ranges, //包含了每个范围的起始和结束索引的数组。 const uint32_t* __restrict__ point_list, //包含了点的索引的数组。 int W, int H, //图像的宽度和高度。 const float2* __restrict__ points_xy_image, //包含每个点在屏幕上的坐标的数组。 const float* __restrict__ features, //包含每个点的颜色信息的数组。 const float4* __restrict__ conic_opacity, //包含每个点的锥体参数和透明度信息的数组。 float* __restrict__ final_T, //用于存储每个像素的最终颜色的数组。(多个叠加?) uint32_t* __restrict__ n_contrib, //用于存储每个像素的贡献计数的数组。 const float* __restrict__ bg_color, //如果提供了背景颜色,将其作为背景。 float* __restrict__ out_color) //存储最终渲染结果的数组。 { // 1.确定当前像素范围: // 这部分代码用于确定当前线程块要处理的像素范围,包括 pix_min 和 pix_max,并计算当前线程对应的像素坐标 pix。 // Identify current tile and associated min/max pixel range. auto block = cg::this_thread_block(); uint32_t horizontal_blocks = (W + BLOCK_X - 1) / BLOCK_X; uint2 pix_min = { block.group_index().x * BLOCK_X, block.group_index().y * BLOCK_Y }; uint2 pix_max = { min(pix_min.x + BLOCK_X, W), min(pix_min.y + BLOCK_Y , H) }; uint2 pix = { pix_min.x + block.thread_index().x, pix_min.y + block.thread_index().y }; uint32_t pix_id = W * pix.y + pix.x; float2 pixf = { (float)pix.x, (float)pix.y }; // 2.判断当前线程是否在有效像素范围内: // 根据像素坐标判断当前线程是否在有效的图像范围内,如果不在,则将 done 设置为 true,表示该线程无需执行渲染操作。 // Check if this thread is associated with a valid pixel or outside. bool inside = pix.x < W&& pix.y < H; // Done threads can help with fetching, but don't rasterize bool done = !inside; // 3.加载点云数据处理范围: // 这部分代码加载当前线程块要处理的点云数据的范围,即 ranges 数组中对应的范围,并计算点云数据的迭代批次 rounds 和总共要处理的点数 toDo。 // Load start/end range of IDs to process in bit sorted list. uint2 range = ranges[block.group_index().y * horizontal_blocks + block.group_index().x]; const int rounds = ((range.y - range.x + BLOCK_SIZE - 1) / BLOCK_SIZE); int toDo = range.y - range.x; // 4. 初始化共享内存: // 分别定义三个共享内存数组,用于在每个线程块内共享数据。 // Allocate storage for batches of collectively fetched data. __shared__ int collected_id[BLOCK_SIZE]; __shared__ float2 collected_xy[BLOCK_SIZE]; __shared__ float4 collected_conic_opacity[BLOCK_SIZE]; // 5.初始化渲染相关变量: // 初始化渲染所需的一些变量,包括当前像素颜色 C、贡献者数量等。 // Initialize helper variables float T = 1.0f; uint32_t contributor = 0; uint32_t last_contributor = 0; float C[CHANNELS] = { 0 }; // 6.迭代处理点云数据: // 在每个迭代中,处理一批点云数据。内部循环迭代每个点,进行基于锥体参数的渲染计算,并更新颜色信息。 // Iterate over batches until all done or range is complete for (int i = 0; i < rounds; i++, toDo -= BLOCK_SIZE) //代码使用 rounds 控制循环的迭代次数,每次迭代处理一批点云数据。 { // 检查是否所有线程块都已经完成渲染: // 通过 __syncthreads_count 统计已经完成渲染的线程数,如果整个线程块都已完成,则跳出循环。 // End if entire block votes that it is done rasterizing int num_done = __syncthreads_count(done); if (num_done == BLOCK_SIZE) break; // 共享内存中获取点云数据: // 每个线程通过索引 progress 计算要加载的点云数据的索引 coll_id,然后从全局内存中加载到共享内存 collected_id、collected_xy 和 collected_conic_opacity 中。block.sync() 确保所有线程都加载完成。 // Collectively fetch per-Gaussian data from global to shared int progress = i * BLOCK_SIZE + block.thread_rank(); if (range.x + progress < range.y) { int coll_id = point_list[range.x + progress]; collected_id[block.thread_rank()] = coll_id; collected_xy[block.thread_rank()] = points_xy_image[coll_id]; collected_conic_opacity[block.thread_rank()] = conic_opacity[coll_id]; } block.sync(); // 迭代处理当前批次的点云数据: // Iterate over current batch for (int j = 0; !done && j < min(BLOCK_SIZE, toDo); j++) //在当前批次的循环中,每个线程处理一条点云数据。 { // Keep track of current position in range contributor++; // 计算当前点的投影坐标与锥体参数的差值: // 计算当前点在屏幕上的坐标 xy 与当前像素坐标 pixf 的差值,并使用锥体参数计算 power。 // Resample using conic matrix (cf. "Surface // Splatting" by Zwicker et al., 2001) float2 xy = collected_xy[j]; float2 d = { xy.x - pixf.x, xy.y - pixf.y }; float4 con_o = collected_conic_opacity[j]; float power = -0.5f * (con_o.x * d.x * d.x + con_o.z * d.y * d.y) - con_o.y * d.x * d.y; if (power > 0.0f) continue; // 计算论文中公式2的 alpha: // Eq. (2) from 3D Gaussian splatting paper. // Obtain alpha by multiplying with Gaussian opacity // and its exponential falloff from mean. // Avoid numerical instabilities (see paper appendix). float alpha = min(0.99f, con_o.w * exp(power)); if (alpha < 1.0f / 255.0f) continue; float test_T = T * (1 - alpha); if (test_T < 0.0001f) { done = true; continue; } // 使用高斯分布进行渲染计算:更新颜色信息 C。 // Eq. (3) from 3D Gaussian splatting paper. for (int ch = 0; ch < CHANNELS; ch++) C[ch] += features[collected_id[j] * CHANNELS + ch] * alpha * T; T = test_T; // Keep track of last range entry to update this // pixel. last_contributor = contributor; } } //7. 写入最终渲染结果: // 如果当前线程在有效像素范围内,则将最终的渲染结果写入相应的缓冲区,包括 final_T、n_contrib 和 out_color。 // All threads that treat valid pixel write out their final // rendering data to the frame and auxiliary buffers. if (inside) { final_T[pix_id] = T; n_contrib[pix_id] = last_contributor; for (int ch = 0; ch < CHANNELS; ch++) out_color[ch * H * W + pix_id] = C[ch] + T * bg_color[ch]; } } 其中的渲染过程,就是遵从下面公式:
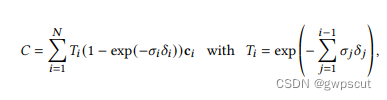
上面公式可以改写为:
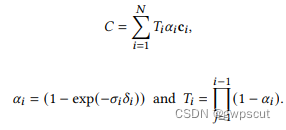
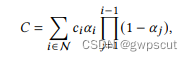
这个核函数的目的是在 GPU 上并行处理点云数据,进行渲染操作,并将渲染结果存储在相应的缓冲区中。
代码中还有反向渲染的实现~但这里就不仔细去看了,因为3DGS用的是前向的
至此整个3DGS的代码的大概应该已经梳理完毕,具体的一些细节,比如优化的参数有那些?模型的参数有哪些?优化器的参数有哪些?可见arguments/__init__.py
验证的代码
看看training_report的代码
def training_report(tb_writer, iteration, Ll1, loss, l1_loss, elapsed, testing_iterations, scene : Scene, renderFunc, renderArgs): if tb_writer: #将 L1 loss、总体 loss 和迭代时间写入 TensorBoard。 tb_writer.add_scalar('train_loss_patches/l1_loss', Ll1.item(), iteration) tb_writer.add_scalar('train_loss_patches/total_loss', loss.item(), iteration) tb_writer.add_scalar('iter_time', elapsed, iteration) # 在指定的测试迭代次数,进行渲染并计算 L1 loss 和 PSNR。 # Report test and samples of training set if iteration in testing_iterations: torch.cuda.empty_cache() validation_configs = ({'name': 'test', 'cameras' : scene.getTestCameras()}, {'name': 'train', 'cameras' : [scene.getTrainCameras()[idx % len(scene.getTrainCameras())] for idx in range(5, 30, 5)]}) for config in validation_configs: if config['cameras'] and len(config['cameras']) > 0: l1_test = 0.0 psnr_test = 0.0 for idx, viewpoint in enumerate(config['cameras']): # 获取渲染结果和真实图像 image = torch.clamp(renderFunc(viewpoint, scene.gaussians, *renderArgs)["render"], 0.0, 1.0) gt_image = torch.clamp(viewpoint.original_image.to("cuda"), 0.0, 1.0) if tb_writer and (idx < 5): # 在 TensorBoard 中记录渲染结果和真实图像 tb_writer.add_images(config['name'] + "_view_{}/render".format(viewpoint.image_name), image[None], global_step=iteration) if iteration == testing_iterations[0]: tb_writer.add_images(config['name'] + "_view_{}/ground_truth".format(viewpoint.image_name), gt_image[None], global_step=iteration) # 计算 L1 loss 和 PSNR l1_test += l1_loss(image, gt_image).mean().double() psnr_test += psnr(image, gt_image).mean().double() # 计算平均 L1 loss 和 PSNR psnr_test /= len(config['cameras']) l1_test /= len(config['cameras']) # 在控制台打印评估结果 print("\n[ITER {}] Evaluating {}: L1 {} PSNR {}".format(iteration, config['name'], l1_test, psnr_test)) # 在 TensorBoard 中记录评估结果 if tb_writer: tb_writer.add_scalar(config['name'] + '/loss_viewpoint - l1_loss', l1_test, iteration) tb_writer.add_scalar(config['name'] + '/loss_viewpoint - psnr', psnr_test, iteration) # 在 TensorBoard 中记录场景的不透明度直方图和总点数。 if tb_writer: tb_writer.add_histogram("scene/opacity_histogram", scene.gaussians.get_opacity, iteration) tb_writer.add_scalar('total_points', scene.gaussians.get_xyz.shape[0], iteration) torch.cuda.empty_cache()#使用 torch.cuda.empty_cache() 清理 GPU 内存。接下来看看render.py,首先看main函数,大部分跟train.py差不多,关键是看看render_sets函数了
def render_sets(dataset : ModelParams, iteration : int, pipeline : PipelineParams, skip_train : bool, skip_test : bool): with torch.no_grad(): # 禁用梯度计算,因为在渲染过程中不需要梯度信息 gaussians = GaussianModel(dataset.sh_degree) # 创建一个 GaussianModel 对象,用于处理高斯模型 scene = Scene(dataset, gaussians, load_iteration=iteration, shuffle=False) # 创建一个 Scene 对象,用于处理场景的渲染 bg_color = [1,1,1] if dataset.white_background else [0, 0, 0] # 根据数据集的背景设置,定义背景颜色 background = torch.tensor(bg_color, dtype=torch.float32, device="cuda") # 将背景颜色转换为 PyTorch 张量,同时将其移到 GPU 上 if not skip_train: # 如果不跳过训练数据集的渲染 render_set(dataset.model_path, "train", scene.loaded_iter, scene.getTrainCameras(), gaussians, pipeline, background) # 调用 render_set 函数渲染训练数据集 if not skip_test: # 如果不跳过测试数据集的渲染 render_set(dataset.model_path, "test", scene.loaded_iter, scene.getTestCameras(), gaussians, pipeline, background) # 调用 render_set 函数渲染测试数据集而对于render_set,其核心的渲染函数render()在上面解析过了~
def render_set(model_path, name, iteration, views, gaussians, pipeline, background): # 构建渲染结果和ground truth保存路径 render_path = os.path.join(model_path, name, "ours_{}".format(iteration), "renders") gts_path = os.path.join(model_path, name, "ours_{}".format(iteration), "gt") # 确保渲染结果和ground truth保存路径存在 makedirs(render_path, exist_ok=True) makedirs(gts_path, exist_ok=True) # 遍历所有视图进行渲染 for idx, view in enumerate(tqdm(views, desc="Rendering progress")): # 调用 render 函数执行渲染,获取渲染结果 rendering = render(view, gaussians, pipeline, background)["render"] #这里执行的就是上面解析过的render的代码了~ # 获取视图的ground truth gt = view.original_image[0:3, :, :] # 保存渲染结果和ground truth为图像文件 torchvision.utils.save_image(rendering, os.path.join(render_path, '{0:05d}'.format(idx) + ".png")) torchvision.utils.save_image(gt, os.path.join(gts_path, '{0:05d}'.format(idx) + ".png"))这个函数的主要作用是遍历给定的一组视图,使用 render 函数进行渲染,并将渲染结果和视图的 ground truth 保存为图像文件。具体步骤包括构建保存路径、确保路径存在、遍历视图、调用 render 函数渲染、保存结果。
