近期参加的项目,主管丢给我一个任务,说要支持滑动验证码。我身为50岁的软件攻城师,当时正背着双手,好像一个受训的保安似的,中规中矩地参加每日站会,心想滑动验证码在今时今日已经是标配了,司空见惯,想必网上一搜一大把,岂非手到擒来。so easy,妈妈再也不用担心我的工作与学习。
孰料在网上寻寻觅觅点点击击,结果就是凄凄惨惨戚戚。好像提的最多的就是AJ-Captcha,但居然貌似下线了,文档打不开,demo也不见。还有一个声称可能是最好的滑动验证码,但好像很复杂,并且日本少女漫画风,跟我有代沟。有一个貌似跟Ant Design有点关联的组件,叫Wetrial的,好像还比较符合我的要求。但它只有前端,没有给出后端实现,并且它的前端好像也用不了。
但是,这个Wetrial.SliderCaptcha阐述了从后端获得的数据,仿佛制订了一个滑动验证码的接口标准。加上我在搜索过程中,看到的一些具体提示,有了一些思路。考虑到这个滑动验证,不仅要给自己的web端使用,还要开放给开发手机APP的外包人员调用,因此需要可控、便利、清晰,决定自己搞一个。
一、思路
1、背景图片和拼图图片都从后端,以base64的方式返回给前端
2、一起返回给前端的是一个json对象,包括背景和拼图内容、尺寸、token。token的作用是验证时即销毁,避免重放攻击,即每张背景图只验证一次
3、准备多张相同尺寸,不同内容的背景图,每次随机选一张
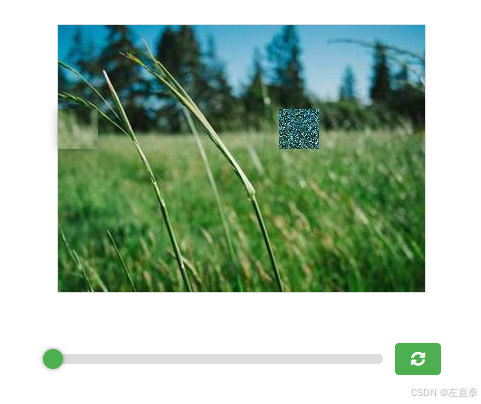
4、拼图从背景图中抠,抠后的坑填上白色,然后采集背景图的颜色,生成噪点加入这个坑。为的是避免机器容易识别这个白坑。
在chapGPT的指导下,历时一天,终于搞了个demo。效果如下

滑动验证
二、后端
后端就2个接口,一个供数据下载,一个供验证。
import org.springframework.beans.factory.annotation.Autowired; import org.springframework.core.io.Resource; import org.springframework.core.io.support.PathMatchingResourcePatternResolver; import org.springframework.data.redis.core.StringRedisTemplate; import org.springframework.data.redis.core.ValueOperations; import org.springframework.web.bind.annotation.*; import javax.annotation.PostConstruct; import javax.imageio.ImageIO; import javax.servlet.http.HttpServletRequest; import java.awt.*; import java.awt.image.BufferedImage; import java.io.ByteArrayOutputStream; import java.io.IOException; import java.io.InputStream; import java.util.*; import java.util.concurrent.TimeUnit; @RestController public class CaptchaController { @Autowired private StringRedisTemplate redisTemplate; private String[] images; int puzzlePieceWidth = 40; int puzzlePieceHeight = 40; @PostConstruct public void init() throws IOException { PathMatchingResourcePatternResolver resolver = new PathMatchingResourcePatternResolver(); Resource[] resources = resolver.getResources("classpath:/images/*.jpg"); // 修改为 *.jpg images = new String[resources.length]; for (int i = 0; i < resources.length; i++) { images[i] = resources[i].getURI().toString(); } } @GetMapping("/slideCaptcha") public Map<String, Object> getCaptcha() throws IOException { Map<String, Object> response = new HashMap<>(); // 生成唯一的 token String token = UUID.randomUUID().toString(); // 随机选择背景图像 BufferedImage backgroundImage = getBgImg(); // 生成拼图块的随机位置 int puzzlePieceLeft = (int) (Math.random() * (backgroundImage.getWidth() - puzzlePieceWidth)); int puzzlePieceTop = (int) (Math.random() * (backgroundImage.getHeight() - puzzlePieceHeight)); // 创建拼图块 BufferedImage puzzlePieceImage = new BufferedImage(puzzlePieceWidth, puzzlePieceHeight, BufferedImage.TYPE_INT_ARGB); Graphics2D puzzleG = puzzlePieceImage.createGraphics(); puzzleG.drawImage(backgroundImage, 0, 0, puzzlePieceWidth, puzzlePieceHeight, puzzlePieceLeft, puzzlePieceTop, puzzlePieceLeft + puzzlePieceWidth, puzzlePieceTop + puzzlePieceHeight, null); puzzleG.dispose(); // 在背景图像上掩盖拼图块 setMask(backgroundImage, puzzlePieceLeft, puzzlePieceTop); // 将图像转换为 Base64 ByteArrayOutputStream baos = new ByteArrayOutputStream(); ImageIO.write(backgroundImage, "jpg", baos); // 保持为 "jpg" String backgroundImageBase64 = Base64.getEncoder().encodeToString(baos.toByteArray()); baos.reset(); ImageIO.write(puzzlePieceImage, "png", baos); // 保持为 "png" 以支持透明度 String puzzlePieceBase64 = Base64.getEncoder().encodeToString(baos.toByteArray()); // 缓存 token 和位置 ValueOperations<String, String> ops = redisTemplate.opsForValue(); ops.set(token, String.valueOf(puzzlePieceLeft), 5, TimeUnit.MINUTES); response.put("backgroundImage", backgroundImageBase64); response.put("puzzlePiece", puzzlePieceBase64); response.put("token", token); //response.put("puzzlePieceLeft", puzzlePieceLeft); //response.put("puzzlePieceTop", puzzlePieceTop); response.put("backgroundWidth", backgroundImage.getWidth()); response.put("backgroundHeight", backgroundImage.getHeight()); response.put("puzzlePieceWidth", puzzlePieceWidth); response.put("puzzlePieceHeight", puzzlePieceHeight); return response; } @PostMapping("/slideVerify") public Map<String, Object> verifyCaptcha(HttpServletRequest request, @RequestBody Map<String, Object> map) { Map<String, Object> response = new HashMap<>(); String token = (String) map.get("token"); int position = (Integer) map.get("position"); ValueOperations<String, String> ops = redisTemplate.opsForValue(); String correctPositionStr = ops.get(token); if (correctPositionStr != null) { int correctPosition = Integer.parseInt(correctPositionStr); if (Math.abs(position - correctPosition) < 10) { response.put("success", true); } else { response.put("success", false); } redisTemplate.delete(token); } else { response.put("success", false); } return response; } private BufferedImage getBgImg() throws IOException { String selectedImage = images[(int) (Math.random() * images.length)]; PathMatchingResourcePatternResolver resolver = new PathMatchingResourcePatternResolver(); Resource resource = resolver.getResource(selectedImage); InputStream inputStream = resource.getInputStream(); return ImageIO.read(inputStream); } private void setMask(BufferedImage backgroundImage, int puzzlePieceLeft, int puzzlePieceTop) { Graphics2D g = backgroundImage.createGraphics(); g.setComposite(AlphaComposite.Src); g.setColor(Color.WHITE); // 使用白色填充 g.fillRect(puzzlePieceLeft, puzzlePieceTop, puzzlePieceWidth, puzzlePieceHeight); // 从整幅背景图像采集颜色 Color[][] sampledColors = new Color[backgroundImage.getWidth()][backgroundImage.getHeight()]; for (int x = 0; x < backgroundImage.getWidth(); x++) { for (int y = 0; y < backgroundImage.getHeight(); y++) { sampledColors[x][y] = new Color(backgroundImage.getRGB(x, y)); } } for (int i = puzzlePieceLeft; i < puzzlePieceLeft + puzzlePieceWidth; i++) { for (int j = puzzlePieceTop; j < puzzlePieceTop + puzzlePieceHeight; j++) { // 获取背景区域的颜色 Color noiseColor = sampledColors[(int) (Math.random() * i)][(int) (Math.random() * j)]; // 绘制扰乱元素 g.setColor(noiseColor); g.fillRect(i, j, 1, 1); // 绘制单个像素点,覆盖原始的白色矩形 } } g.dispose(); } } 三、前端
demo使用经典的html + js + css来编写。注意请求后台的接口路径采用了nginx进行转发,避免浏览器的跨域限制.
<!DOCTYPE html> <html lang="en"> <head> <meta charset="UTF-8"> <meta name="viewport" content="width=device-width, initial-scale=1.0"> <title>Captcha Verification</title> <style> .captcha-container { position: relative; width: 367px; height: 267px; margin: 50px auto; border: 1px solid #ddd; background-color: #f3f3f3; } .background-image { position: absolute; top: 0; left: 0; width: 100%; height: 100%; } .puzzle-piece { position: absolute; width: 40px; height: 40px; cursor: move; box-shadow: 0 0 10px rgba(0, 0, 0, 0.3); /* 添加阴影效果 */ } .slider-container { width: 400px; margin: 20px auto; text-align: center; display: flex; align-items: center; justify-content: center; } .slider { width: 100%; -webkit-appearance: none; /* 去除默认样式 */ appearance: none; height: 10px; /* 设置滑道高度 */ background: #ddd; /* 滑道背景色 */ border-radius: 5px; /* 圆角 */ outline: none; /* 去除聚焦时的外边框 */ transition: background .2s; /* 过渡效果 */ } .slider::-webkit-slider-thumb { -webkit-appearance: none; /* 去除默认样式 */ appearance: none; width: 20px; /* 滑块宽度 */ height: 20px; /* 滑块高度 */ background: #4CAF50; /* 滑块背景色 */ border-radius: 50%; /* 圆形 */ cursor: pointer; /* 光标样式 */ box-shadow: 0 0 5px rgba(0, 0, 0, 0.5); /* 滑块阴影效果 */ } .refresh-btn { margin-left: 10px; padding: 8px 16px; cursor: pointer; background-color: #4CAF50; color: white; border: none; border-radius: 4px; font-size: 14px; } </style> <!-- Font Awesome CSS --> <link rel="stylesheet" href="https://cdnjs.cloudflare.com/ajax/libs/font-awesome/5.15.3/css/all.min.css"> </head> <body> <div class="captcha-container"> <img id="backgroundImage" class="background-image" src="" alt="Background Image"> <div id="puzzlePiece" class="puzzle-piece"></div> </div> <div class="slider-container"> <input type="range" min="0" max="327" value="0" class="slider" id="slider"> <button class="refresh-btn" id="refreshBtn"><i class="fas fa-sync-alt"></i></button> </div> <script> document.addEventListener('DOMContentLoaded', function() { let slider = document.getElementById('slider'); let puzzlePiece = document.getElementById('puzzlePiece'); let token = ''; function loadCaptcha() { fetch('/api/slideCaptcha') // 替换为你的后端接口地址 .then(response => response.json()) .then(data => { document.getElementById('backgroundImage').src = 'data:image/jpeg;base64,' + data.backgroundImage; puzzlePiece.style.backgroundImage = 'url(data:image/jpeg;base64,' + data.puzzlePiece + ')'; puzzlePiece.style.top = data.puzzlePieceTop + 'px'; puzzlePiece.style.left = '0px'; token = data.token; slider.value = 0; }) .catch(error => console.error('Error fetching captcha:', error)); } let refreshBtn = document.getElementById('refreshBtn'); refreshBtn.addEventListener('click', function() { loadCaptcha(); }); slider.addEventListener('input', function() { puzzlePiece.style.left = slider.value + 'px'; }); slider.addEventListener('change', function() { fetch('/api/slideVerify', { // 替换为你的后端验证接口地址 method: 'POST', headers: { 'Content-Type': 'application/json', }, body: JSON.stringify({ token: token, position: parseInt(slider.value) }), }) .then(response => response.json()) .then(data => { if (data.success) { alert(':-) 验证成功!'); } else { alert('验证失败,请重试!'); } loadCaptcha(); }) .catch(error => console.error('Error verifying captcha:', error)); }); loadCaptcha(); }); </script> </body> </html> 四、小结
俄国10月革命一声炮响,送来了美国的chatGPT。chatGPT吧,已经成了我的老师和工人。上面那些代码,都是我提要求,然后chatGPT生成的,甚至包括注释。我只修改了极少的地方。功能的确强大。但它其实又还不够智能,一些算法我一下子能看出问题,需要重重复复地提要求,每次它都说:明白了。它输入了海量的资料,知识渊博,各种编程语法更是精通,提交代码给它审查找问题,最是合适不过。它一般也能按要求给出初始代码,但有时总是差那么点意思。最讨厌的,是问它一些社科历史类的问题,经常一本正经地胡说八道。
这不是我想要的生活。
参考文章:
SlideCaptcha - 滑动验证码
滑块验证 - 使用AJ-Captcha插件【超简单.jpg】
TIANAI-CAPTCHA
