【数据结构——链表深度探索】从实现到应用,保姆级攻略

🍁1. 链表的介绍
链表是数据结构中一种非常重要的基础结构,它不同于数组,链表中的元素在物理存储上并不连续,而是通过指针(或引用)连接在一起。在Java中,链表的应用非常广泛,尤其是在需要动态添加或删除元素的场景中。
🍁2. 链表的实现
🍁2.1 单向链表
单链表中的每个元素都称为节点(Node),每个节点包含两个部分:一部分存储数据(value),另一部分存储指向列表中下一个节点的引用(next)。最后一个节点的next引用为null,表示链表的结束。
所以采用内部类的形式进行创建:
public class MySingleList { static class ListNode { public int value; public ListNode next; public ListNode(int value) { this.value = value; } } public ListNode head; } 还可以创建一个IList接口,对其中的增删查改等方法进行规范,之后MySingleList对接口进行实现
public interface IList { void display(); int size(); boolean contains(int key); void addFirst(int key); void addLast(int key); void addIndex(int key,int index); void remove(int key); void removeAllKey(int key); void clear(); } 接下来就是方法的实现
🍁2.1.1 size()
返回长度:
只需要将head依次往末尾移动,并记录移动次数进行返回就可以了,当head为null时就表示已经遍历完成
public int size() { ListNode cur = head; int cnt = 0; while (cur != null) { cnt++; cur = cur.next; } return cnt; } 🍁2.1.2 display()
遍历打印:
遍历的话需要找到头节点,接着依次往后移动,为了不该变头节点的指向,创建一个cur节点辅助遍历,同样的,结束的标志也是最后的指向不为空
public void display() { ListNode cur = head; while (cur != null) { System.out.print(cur.value + " "); cur = cur.next; } System.out.println(); } 🍁2.1.3 contains(int key)
判断值是否存在链表中,这里同样需要依次遍历,然后比较value的值
public boolean contains(int key) { ListNode cur = head; while (cur != null) { if (cur.value == key) { return true; } cur = cur.next; } return false; } 🍁2.1.4 addFirst(int key),addLast(int key),addIndex(int key, int index)
头插:
头插比较简单,直接创建一个节点,并初始化值,指向原来的head节点,接着改为新的head节点
public void addFirst(int key) { ListNode node = new ListNode(key); node.next = head; head = node; } 尾插:
尾插就需要判断head节点是否为null,接着找到尾节点进行插入
public void addLast(int key) { ListNode node = new ListNode(key); //头结点为null,直接插入 if (head == null) { head = node; return; } //找到尾节点进行插入 ListNode cur = head; while (cur.next != null) { cur = cur.next; } cur.next = node; } 在指定索引插入:
在指定索引插入就更加麻烦一些,需要对传入的索引进行判断,如果是0.就调用头插的方法,如果等于链表的长度,就调用尾插的方法,如果是中间的索引,就遍历链表,找到该索引进行插入
public void addIndex(int key, int index) { ListNode node = new ListNode(key); //调用头插 if (index == 0) { addFirst(key); return; } //调用尾插 if (index == this.size()) { addLast(key); return; } //传入索引不合法的情况 if (index < 0 || index > this.size()) { throw new IndexOutOfBoundsException(); } //找到目标索引进行插入 ListNode cur = head; while (index - 1 != 0) { cur = cur.next; index--; } node.next = cur.next; cur.next = node; } 🍁2.1.5 remove(int key),removeAllKey(int key)
删除指定元素:
如果head为空,直接返回,如果head的value就是目标元素,就把head的下一个节点作为头结点,其他情况就根据value的值寻找目标索引,如果没找到就返回,也就是cur节点为null,找到的话把cur的引用指向cur的之后第二个节点
//根据元素找到目标索引 private ListNode findIndexofKet(int key) { ListNode cur = head; while (cur.next != null) { if (cur.next.value == key) { return cur; } cur = cur.next; } return null; } public void remove(int key) { //头结点为空 if (head == null) { return; } //头结点为目标元素 if (head.value == key) { head = head.next; } //其他节点为目标元素 ListNode cur = findIndexofKet(key); if (cur == null) { return; } cur.next = cur.next.next; } 删除所有指定元素:
需要有两个指针,同时往后遍历,删除cur节点所指元素需要将pre节点的next指向cur的next,循环判断,最后还要判断head节点是否为指定元素
public void removeAllKey(int key) { //头结点为null,直接返回 if (this.head == null) { return; } ListNode pre = head; ListNode cur = head.next; //循环删除 while (cur != null) { if (cur.value == key) { pre.next = cur.next; cur = cur.next; } else { pre = cur; cur = cur.next; } } //判断头结点 if (head.value == key) { head = head.next; } } 🍁2.1.6 clear()
清空链表:
清空链表只需要遍历链表所有节点,将每一个节点置为null即可,因为是从头结点开始,如果直接将head置为null,后续再找head.next就会报错,所以还需要用一个中间变量cur辅助遍历
public void clear() { ListNode cur = head; while (cur != null) { //创建变量,解决空指针异常 ListNode curn = cur.next; cur = null; cur = curn.next; } head = null; } 🍁2.2 双向链表
双向链表有两个指针域,一个指向前一个节点,一个指向后一个节点
public class MyLinkedList implements IList { static class TListNode { public int value; TListNode pre; TListNode next; public TListNode(int value) { this.value = value; } } public TListNode head; public TListNode last; } 双向链表的size() ,display(),contains(int key)和单向链表是一样的,下面来实现其他的方法
🍁2.2.1 addFirst(int key)
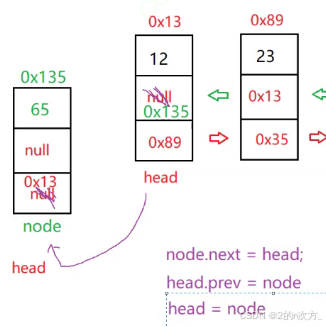
头插:

public void addFirst(int key) { TListNode node = new TListNode(key); if (head == null) { head = last = node; } else { node.next = head; head.pre = node; head = node; } } 🍁2.2.2 addLast(int key)
尾插:
public void addLast(int key) { TListNode node = new TListNode(key); if (head == null) { head = last = node; } else { last.next = node; node.pre = last; last = last.next; } } 🍁2.2.3 addIndex(int key, int index)
指定位置插入:
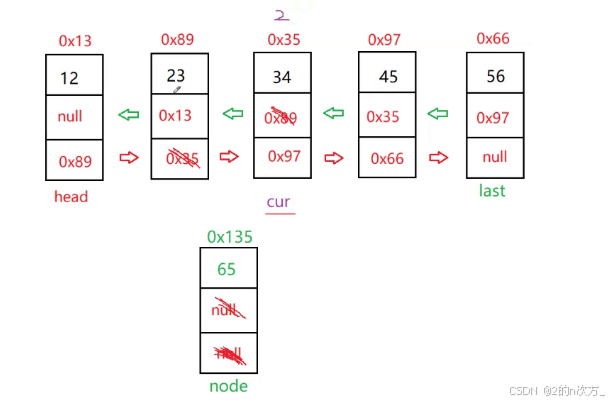
public void addIndex(int key, int index) { TListNode node = new TListNode(key); if(index < 0 || index > size()) return; if (index == 0) { addFirst(key); return; } if (index == size()) { addLast(key); } if (index > 0 && index < size()) { TListNode cur = head; //可以直接到indext的位置,因为双向链表可以找到前一个节点 while (index-- != 0) { cur = cur.next; } node.next = cur; cur.pre.next = node; node.pre = cur.pre; cur.pre = node; } } 需要修改四个位置,把要插入的节点node的next 指向cur,再把cur.pre的next指向node,此时节点的next都有了指向,接着node的pre指向cur.pre节点,cur的pre再指向node,此时就完成了插入
🍁2.2.4 remove(int key)和removeAllKey(int key)
首先找到要删除的值的索引
private TListNode findIndexofKet(int key) { TListNode cur = head; while (cur != null) { if (cur.value == key) { return cur; } cur = cur.next; } return null; } 删除的时候还要考虑是否为头结点和尾节点
public void remove(int key) { TListNode cur = findIndexofKet(key); if(cur == null){ return; } //头节点的情况 if(cur == head){ head = cur.next; //只有一个节点时,指向next后head为null所以当head!=空时才能把pre置为null if (head != null) { head.pre = null; } }else{ cur.pre.next = cur.next; //尾节点的情况 if(cur.next == null){ last = last.pre; }else{ cur.next.pre = cur.pre; } } } 相比于单向链表,双向链表的删除所有指定元素就非常简单了,只需要在原来删除一个的基础上稍加修改就可以了
public void removeAllKey(int key) { TListNode cur = head; while (cur != null) { if (cur.value == key) { if (cur == head) { head = cur.next; if (head != null) { head.pre = null; } } else { cur.pre.next = cur.next; if (cur.next == null) { last = last.pre; } else { cur.next.pre = cur.pre; } } } cur = cur.next; } } 🍁2.2.5 clear()
清空链表还是依次遍历每一个节点,把每一个节点都置为null,最后把head和last也置为null
public void clear() { TListNode cur = head; while(cur.next!=null){ TListNode curn = cur; curn.pre = null; curn.next = null; cur = curn; } head = last = null; } 🍁3. Java中LinkedList的使用
🍁3.1 LinkedList的创建和使用
在上一篇数据结构ArrayList的讲解中已经简单提到过👉点我看回顾,集合的一些基本框架,LinkedList也实现了List接口,所以也可以通过接口创建对象,也可以使用List接口中的方法
public class Demo { public static void main(String[] args) { LinkedList<Integer> list1 = new LinkedList<>(); List<Integer> list2 = new LinkedList<>(); list1.add(1); list1.add(2); System.out.println(list1); list2.add(1); list2.add(3); System.out.println(list2); } } 
可以直接对LinkedList的对象进行打印,也就是说LinkedList重写了toSting方法
这些都是LinkedList中独有的方法,这里就不列举使用了,
🍁3.2 LinkedList的遍历
LinkedList的遍历和ArrayList的遍历方式一样,在上一篇介绍了五种遍历方式,这次再简单回顾一下
public class Demo { public static void main(String[] args) { LinkedList<Integer> list1 = new LinkedList<>(); list1.add(1); list1.add(2); list1.add(3); list1.add(4); //迭代器 ListIterator ListIterator<Integer> lit = list1.listIterator(); while(lit.hasNext()){ System.out.print(lit.next() + " "); } System.out.println(); //Iterator Iterator<Integer> it = list1.iterator(); while(it.hasNext()){ System.out.print(it.next() + " "); } System.out.println(); //增强for for(Integer l : list1){ System.out.print(l + " "); } System.out.println(); //普通for for(int i = 0;i < list1.size();i++){ System.out.print(list1.get(i) + " "); } System.out.println(); //lambda表达式 list1.forEach(e -> { System.out.print(e + " "); }); System.out.println(); } } 🍁4. ArrayList和LinkedList的区别

ArrayList底层是一个动态数组
LinkedList底层是双向链表
ArrayList:访问元素的时间复杂度为 O(1)(直接通过索引)。
LinkedList:访问元素的时间复杂度为 O(n)(需要从头或尾开始遍历到目标位置)。
ArrayList:
在末尾添加元素的时间复杂度为 O(1)。
在中间插入或删除元素时,时间复杂度为 O(n),因为需要移动其他元素以保持连续的内存块。
LinkedList:
在任意位置添加或删除元素的时间复杂度为 O(1),只需改变前后节点的指针(需要先找到目标位置,时间复杂度为 O(n))。
使用场景:
ArrayList:
适合频繁读取、随机访问元素的场景。
如需要大量顺序读写、索引访问操作。
LinkedList:
适合频繁插入、删除元素的场景,尤其是在列表中间进行操作。
如需要频繁的增删操作,但不常用到随机访问。


