简介
最近做的项目需要Unity把摄像机推流到服务器上,具体推流比较简单可以看上一篇文章Unity中摄像机的RTSP推流。考虑到推流时需要先创建服务器,为了项目使用起来方便就把服务器也集成到了Unity工程中,这样运行程序就会自动创建服务器。此外还考虑到一些细节上的问题,比如rtsp地址输错时进行推流,程序会直接卡死。
目录
1. 添加服务器
1.1 下载并导入rtsp-simple-server
首先下载rtsp-simple-server,并导入到Unity中。
https://github.com/bluenviron/mediamtx/releases新版本改名了,我用的之前的版本,往后翻几页就能找到rtsp-simple-server,下载windows版本即可,如下图

里面有如下三个文件:

在Unity工程中创建一个文件夹,命名为RTSPServer,把上面三个文件复制进去。其中yml配置文件可以设置一些服务器的参数,比如端口号等(默认端口号为8554),这里不再赘述。
1.2 写服务器脚本
创建一个RTSPServer脚本,放到FFmpegOut/Runtime文件夹中。
先声明几个变量:
public static RTSPServerLoader instance; public bool RTSPServerloaded = false; public bool CoroutineStarted = false; private Process process; private StreamWriter messageStream;- instance:该类的唯一实例。
- RTSPServerloaded:RTSP服务器是否已经加载。
- CoroutineStarted:协程是否已经启动。
- process:与RTSP服务器进程相关的进程对象。
- messageStream:用于向RTSP服务器进程发送消息的流写入器。
在脚本中,使用Process类启动rtsp-simple-server.exe应用程序,并设置相关属性,具体代码如下:
try { process = new Process(); process.EnableRaisingEvents = false; process.StartInfo.FileName = Application.dataPath + "./RTSPServer/rtsp-simple-server.exe"; process.StartInfo.WorkingDirectory = Application.dataPath + "./RTSPServer"; process.StartInfo.UseShellExecute = false; process.StartInfo.CreateNoWindow = true; process.StartInfo.RedirectStandardOutput = true; process.StartInfo.RedirectStandardInput = true; process.StartInfo.RedirectStandardError = true; process.OutputDataReceived += new DataReceivedEventHandler(DataReceived); process.ErrorDataReceived += new DataReceivedEventHandler(ErrorReceived); process.Start(); process.BeginOutputReadLine(); messageStream = process.StandardInput; UnityEngine.Debug.Log("Starting RTSP Server"); } catch (Exception e) { UnityEngine.Debug.LogError("Unable to launch app: " + e.Message); }然后创建一个协程方法,用于等待RTSP服务器启动并在启动后将RTSPServerloaded变量设置为true。具体代码如下:
public IEnumerator WaitForServerToStart() { CoroutineStarted = true; yield return (new WaitForSeconds(2)); RTSPServerloaded = true; UnityEngine.Debug.Log("Started RTSP Server"); }还有一些用于警告的方法:
void DataReceived(object sender, DataReceivedEventArgs eventArgs) { UnityEngine.Debug.Log(eventArgs.Data); } void ErrorReceived(object sender, DataReceivedEventArgs eventArgs) { UnityEngine.Debug.LogError(eventArgs.Data); }在程序结束后,需要杀死服务器进程:
public void Kill() { if (process != null && !process.HasExited) { process.Kill(); } } void OnApplicationQuit() { Kill(); }最后还有一个获取唯一实例的代码,即如果GetInstance()方法被多次调用,只会返回同一个实例。代码如下:
public static RTSPServerLoader GetInstance() { if (instance == null) { instance = new RTSPServerLoader(); UnityEngine.Debug.Log("new RTSPServerLoader"); } return (instance); }1.3 开启服务器
上面的脚本只是创建服务器的代码,并没有去调用。需要在CameraCapture脚本中调用这个脚本的方法来开启服务器。我没有把服务器脚本直接挂载的物体上,而是选择通过CameraCapture脚本调用,主要原因是CameraCapture脚本中需要用到服务器脚本里的一些东西,具体见2章节。
在CameraCapture脚本中声明变量:
RTSPServerLoader loader;在Start()里面添加:
loader = RTSPServerLoader.GetInstance(); if (!loader.CoroutineStarted) { StartCoroutine(loader.WaitForServerToStart()); }用loader获取到了RTSPServerLoader的唯一实例,然后启动一个协程等待服务器启动。
最后别忘了在关闭程序的时候杀死服务器进程,在OnDisable()里面添加
loader.Kill();//关闭程序时杀死process2. 推流过程的一些细节优化
2.1 防止服务器未开启时就推流摄像机画面
由于开启服务器需要几秒的时间,而摄像机推流是直接开始的,所以最开始的几秒会报出推流画面失败的错误,为了避免这个问题添加一个标志位,等开启服务器后再推流。
使用loader.RTSPServerloaded来判断服务器是否已经开启。RTSPServerloaded是在服务器脚本中根据服务器状态进行赋值的。将这个标志位添加到Update()中的推流之前的if判断语句中,一共两个地方:
// Lazy initialization 懒惰初始化 if (_session == null && loader.RTSPServerloaded && isServerAccesible) { // Give a newly created temporary render texture to the camera // if it's set to render to a screen. Also create a bli)ter // object to keep frames presented on the screen. if (camera.targetTexture == null) { _tempRT = new RenderTexture(_width, _height, 24, GetTargetFormat(camera)); _tempRT.antiAliasing = GetAntiAliasingLevel(camera); camera.targetTexture = _tempRT; _blitter = Blitter.CreateInstance(camera); } // Start an FFmpeg session. _session = FFmpegSession.Create( gameObject.name, camera.targetTexture.width, camera.targetTexture.height, _frameRate, url, preset ); _startTime = Time.time; _frameCount = 0; _frameDropCount = 0; } if (loader.RTSPServerloaded && isServerAccesible) { if (gap < 0) { // Update without frame data. _session.PushFrame(null); } else if (gap < delta) { // Single-frame behind from the current time: // Push the current frame to FFmpeg. _session.PushFrame(camera.targetTexture); _frameCount++; } else if (gap < delta * 2) { // Two-frame behind from the current time: // Push the current frame twice to FFmpeg. Actually this is not // an efficient way to catch up. We should think about // implementing frame duplication in a more proper way. #fixme _session.PushFrame(camera.targetTexture); _session.PushFrame(camera.targetTexture); _frameCount += 2; } else { // Show a warning message about the situation. WarnFrameDrop(); // Push the current frame to FFmpeg. _session.PushFrame(camera.targetTexture); // Compensate the time delay. _frameCount += Mathf.FloorToInt(gap * _frameRate); } }这样就可以在推流之前先判断服务器有没有开启,开启了才开始推流。
另外,可以看到判断语句中还有一个标志位isServerAccesible,这个是下面要讲的。
2.2 防止RTSP地址输错导致程序卡死
这块也是在CameraCapture脚本中写的,主要是用到isServerAccesible标志位,上面已经提到。
我做的判断比较简单,因为服务器开启的地址是基于自己电脑ip+端口8554的,所以只需要判断输入的地址字符串中有没有包含电脑ip。
首先是获取电脑ip地址的代码,可以放到Start()中:
// 获取电脑ip // 获取计算机的所有网络接口 NetworkInterface[] interfaces = NetworkInterface.GetAllNetworkInterfaces(); // 遍历每个接口 foreach (NetworkInterface iface in interfaces) { // 找到WIFI或以太网接口 if (iface.OperationalStatus == OperationalStatus.Up && (iface.NetworkInterfaceType == NetworkInterfaceType.Wireless80211 || iface.NetworkInterfaceType == NetworkInterfaceType.Ethernet)) { IPInterfaceProperties adapterProperties = iface.GetIPProperties(); foreach (UnicastIPAddressInformation addressInfo in adapterProperties.UnicastAddresses) { if (addressInfo.Address.AddressFamily == System.Net.Sockets.AddressFamily.InterNetwork) { return addressInfo.Address.ToString(); } } } }然后是判断输入的地址是否包含该ip
//判断输入的rtsp是否包含该ip if(url.Contains(ipv4Address)) { isServerAccesible = true; } else { isServerAccesible = false; }isServerAccesible标志位的位置在2.1中已经给出,不再赘述。
其实还有另一个更直接的解决方法,就是自动设置摄像机的推流地址。之前已经将服务器地址设置成了电脑ip+端口8554,和电脑ip捆绑了,所以可以直接使用之前获取电脑ip的方法去设置摄像机的推流地址,这样可以避免判断。具体使用哪种方法都可以,按照需求选择。
2.3 显示相机推流的RTSP地址
相机推流的地址是在脚本中写的,其实也可以设置一个public变量,让它在检查器中能够修改。但在用户使用的时候是看不到这个推流地址的,因此需要把它在游戏画面中显示出来。
主要是使用了UI里面的Canvas和Panel,在Panel上添加一个TextMeshPro和一个Button。TextMeshPro用于显示rtsp地址,Button用于实现复制地址功能(省的使用时一个一个敲地址了)。
在TextMeshPro上需要写一个脚本,用于获取RTSP地址,其实思路很简单,就是用获取到的ip和端口号,做一个字符串拼接,然后显示出来。在Start()里面添加:
Text = transform.GetComponent<TextMeshProUGUI>();以及之前写过的获取ip的代码。
在Update()里面写如下代码:
Text.text = ("rtsp://" + ipv4Address + ":8554/camera");这样就能够显示形如于“rtsp://电脑ip:8554/camera”的推流地址。
2.4 添加复制功能
接下来给Button添加复制功能,能够通过按下Button自动复制RTSP地址,编写TextMeshProCopy脚本:
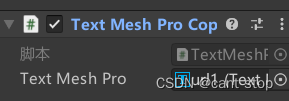
using UnityEngine.UI; using TMPro; public class TextMeshProCopy : MonoBehaviour { public TextMeshProUGUI textMeshPro; // Start is called before the first frame update void Start() { GetComponent<Button>().onClick.AddListener(CopyText); } // Update is called once per frame void Update() { } private void CopyText() { GUIUtility.systemCopyBuffer = textMeshPro.text; Debug.Log("Text has been copied"); } }然后在检查器里面把上面的TextMeshPro拖到这个脚本的Public变量里面,如下图:

Url1就是之前创建的TextMeshPro。
效果如下图:
![]()
点击复制按钮就可以复制下来这个RTSP地址。
项目样例已上传至github:GitHub - pretender1111/FFmpegOutRTSP at master
