
阅读量:2
导读
2024 年 7 月 3 日,上海人工智能实验室与商汤科技联合香港中文大学和复旦大学正式发布新一代大语言模型书⽣·浦语2.5(InternLM2.5)。相比上一代模型,InternLM2.5 有三项突出亮点:
推理能力大幅提升,在部分维度上甚至超越十倍量级的 Llama3-70B;
支持 1M tokens 上下文,能够处理百万字长文;
具有强大的自主规划和工具调用能力,比如可以针对复杂问题,搜索上百个网页并进行整合分析。
InternLM2.5-7B 模型即日起开源可用,更大和更小的模型也将在近期发布开源。上海人工智能实验室秉持“以持续的高质量开源赋能创新”理念,在为社区始终如一地提供高质量开源模型的同时,也将继续坚持免费商用授权。
Github链接:https://github.com/InternLM/InternLM
**模型链接:**https://www.modelscope.cn/models/Shanghai_AI_Laboratory/internlm2_5-7b-chat
**书生·浦语主页:**https://internlm.intern-ai.org.cn/
领先的推理能力
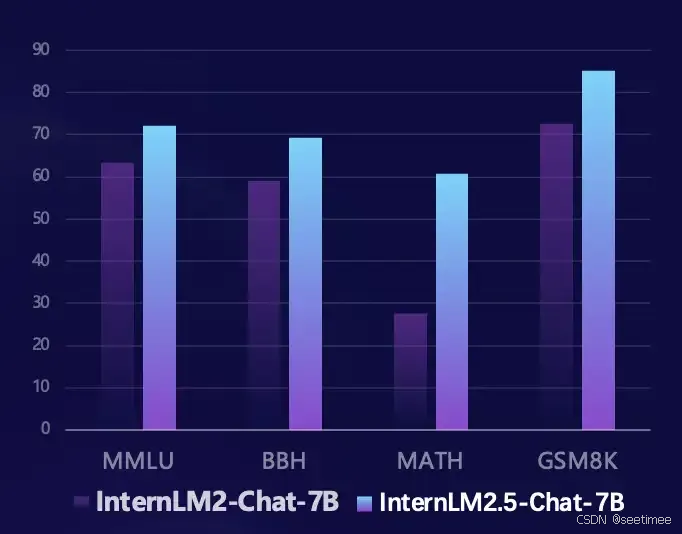
强大的推理能力是大模型通向通用人工智能的重要基础,InternLM2.5 将推理能力作为模型最核心的能力进行优化,为复杂场景的应用落地提供了良好的基础。
基于司南 OpenCompass 开源评测框架,研究团队使用统一可复现的评测方法在多个推理能力权威评测集上进行了评测。相比上一代模型,InternLM2.5 在多个推理能力权威评测集上实现了大幅性能提升,尤其在由竞赛问题构成的数学评测集 MATH 上更是提升100%,以 7B 参数达到了 60% 的准确率(达到 GPT-4 Turbo 1106 版本的水平),充分展示了模型在数学推理上的优异成绩。
100万 Token 长文本支持,文档对话系统全开源
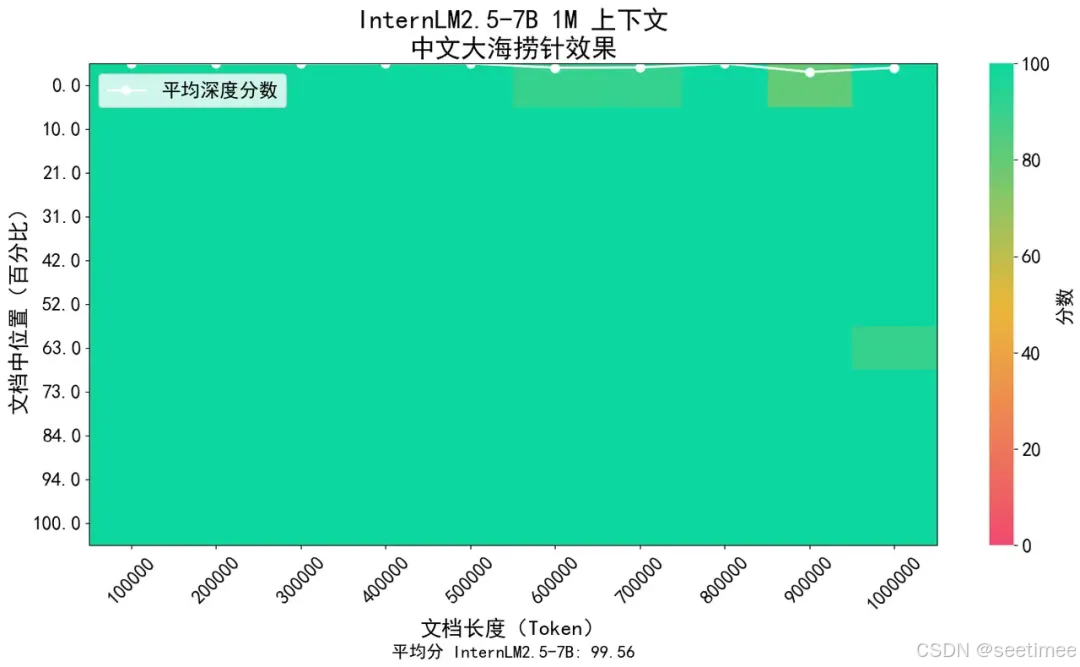
在长文档理解、复杂的智能体交互等应用场景中,模型的上下文长度支持有着更高的要求。InternLM2.5 提出了解决方案,将上下文长度从上一代模型 InternLM2 的 200K 提升到了 1M(约合 120 万汉字),进一步释放了模型在超长文本应用上的潜力。在模型的预训练中,从自然语料中筛选出了 256K Token 长度的文本,同时为了避免语料类型过于单一而导致的域偏移,通过合成数据进行了补充,使得模型在扩展上下文的同时可以尽量保留其能力。
采用了业界流行的“大海捞针”来评估模型的长文信息召回内容,下图显示,InternLM 2.5 在 1M token 范围内实现了几乎完美的大海捞针召回,呈现了极强的长文处理能力。
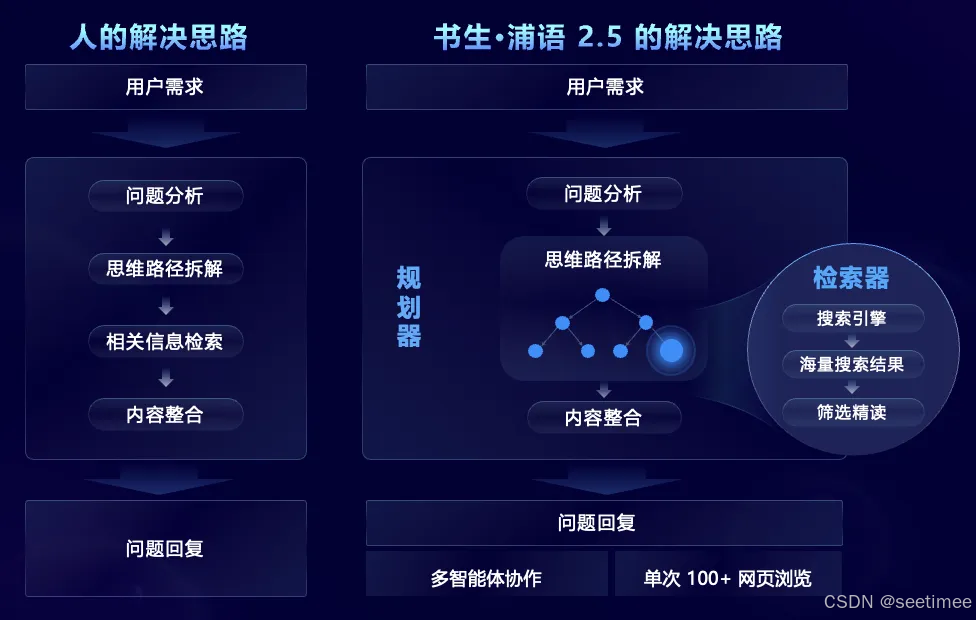
基于网络信息高效解决复杂问题
针对需要大规模复杂信息搜索和整合的复杂问题场景,InternLM2.5 创新性地提出了 MindSearch 多智能体框架,模拟人的思维过程,引入了任务规划、任务拆解、大规模网页搜索、多源信息归纳总结等步骤,有效地整合网络信息。其中,规划器专注于任务的规划、拆解和信息归纳,采用图结构编程的方式进行规划,并根据任务状态进行动态拓展,搜索器负责发散式搜索并总结网络搜索结果,使得整个框架能够基于上百个网页的信息进行筛选和浏览和整合。
模型下载
SDK下载模型:
#模型下载 from modelscope import snapshot_download model_dir = snapshot_download('Shanghai_AI_Laboratory/internlm2_5-7b-chat') 或者使用CLI下载
modelscope download --model=Shanghai_AI_Laboratory/internlm2_5-7b-chat --local_dir ./internlm2_5-7b-chat/ 支持git clone下载
git clone https://www.modelscope.cn/Shanghai_AI_Laboratory/internlm2_5-7b-chat.git 04
模型推理
使用transformers推理:
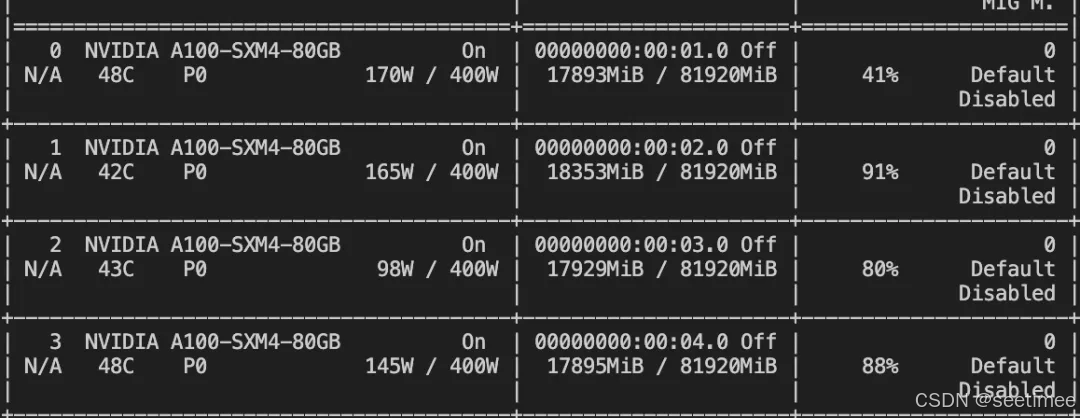
import torch from modelscope import AutoTokenizer, AutoModelForCausalLM tokenizer = AutoTokenizer.from_pretrained("Shanghai_AI_Laboratory/internlm2_5-7b-chat", trust_remote_code=True) # Set `torch_dtype=torch.float16` to load model in float16, otherwise it will be loaded as float32 and cause OOM Error. model = AutoModelForCausalLM.from_pretrained("Shanghai_AI_Laboratory/internlm2_5-7b-chat", torch_dtype=torch.float16, trust_remote_code=True).cuda() model = model.eval() response, history = model.chat(tokenizer, "hello", history=[]) print(response) # Hello! How can I help you today? response, history = model.chat(tokenizer, "please provide three suggestions about time management", history=history) print(response) 显存占用:
模型微调
本文介绍使用ms-swift对internlm2.5-7b-chat进行自我认知微调,并对微调前后模型进行推理、部署与评测。swift是魔搭社区官方提供的LLM工具箱,支持300+大语言模型和50+多模态大模型的微调、推理、量化、评估和部署。
swift开源地址:https://github.com/modelscope/swift
自我认知数据集: https://modelscope.cn/datasets/swift/self-cognition
如果需要使用其他数据集对internlm2.5-7b-chat进行微调,只需要修改 --dataset即可。自定义dataset支持传入本地路径、modelscope和huggingface中的dataset_id。文档可以查看:https://github.com/modelscope/swift/blob/main/docs/source/LLM/%E8%87%AA%E5%AE%9A%E4%B9%89%E4%B8%8E%E6%8B%93%E5%B1%95.md#%E8%87%AA%E5%AE%9A%E4%B9%89%E6%95%B0%E6%8D%AE%E9%9B%86
在开始微调之前,请确保您的环境已正确安装
git clone https://github.com/modelscope/swift.git cd swift pip install -e .[llm] 微调脚本:
# Experimental environment: A10, 3090, V100, ... # 22GB GPU memory CUDA_VISIBLE_DEVICES=0 swift sft \ --model_type internlm2_5-7b-chat \ --dataset alpaca-zh#500 alpaca-en#500 self-cognition#500 \ --logging_steps 5 \ --max_length 2048 \ --learning_rate 1e-4 \ --output_dir output \ --lora_target_modules ALL \ --model_name 小黄 'Xiao Huang' \ --model_author 魔搭 ModelScope \ # Experimental environment: A10, 3090, V100, ... # 4 * 20GB GPU memory # Deepspeed-ZeRO2 NPROC_PER_NODE=4 CUDA_VISIBLE_DEVICES=0,1,2,3 \ swift sft \ --model_type internlm2_5-7b-chat \ --dataset alpaca-zh#500 alpaca-en#500 self-cognition#500 \ --logging_steps 5 \ --max_length 2048 \ --learning_rate 1e-4 \ --output_dir output \ --lora_target_modules ALL \ --model_name 小黄 'Xiao Huang' \ --model_author 魔搭 ModelScope \ --deepspeed default-zero2 微调显存消耗:
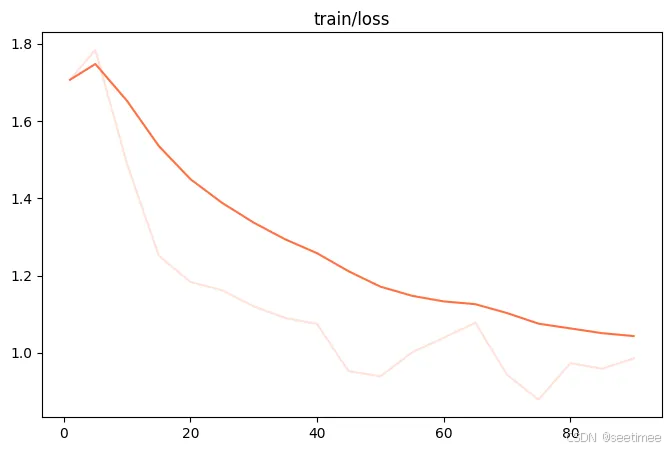
微调过程的loss可视化:
微调后推理脚本如下,这里的ckpt_dir需要修改为训练生成的last checkpoint文件夹。我们可以使用vLLM对merge后的checkpoint进行推理加速。
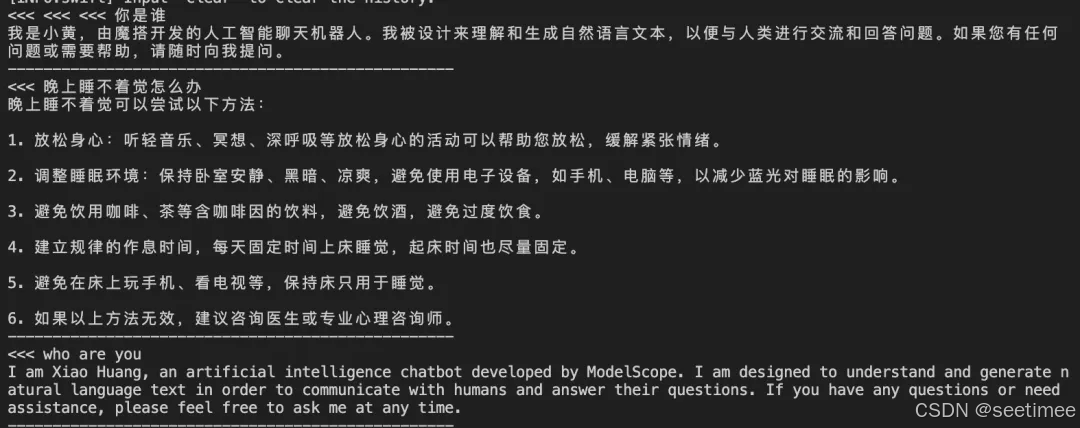
# Experimental environment: A10, 3090, V100, ... CUDA_VISIBLE_DEVICES=0 swift export \ --ckpt_dir output/internlm2_5-7b-chat/vx-xxx/checkpoint-xxx \ --merge_lora true # 使用vLLM进行推理加速 CUDA_VISIBLE_DEVICES=0 swift infer \ --ckpt_dir output/internlm2_5-7b-chat/vx-xxx/checkpoint-xxx-merged \ --infer_backend vllm --max_model_len 4096 微调后模型对验证集进行推理的示例:
对自我认知微调前后的模型进行评测:
# Experimental environment: A100 # 评测后端由llmuses库提供: https://github.com/modelscope/eval-scope # 原始模型 CUDA_VISIBLE_DEVICES=0 swift eval \ --model_type internlm2_5-7b-chat \ --eval_dataset arc ceval gsm8k --eval_backend Native \ --infer_backend vllm # 微调后 CUDA_VISIBLE_DEVICES=0 swift eval \ --ckpt_dir output/internlm2_5-7b-chat/vx-xxx/checkpoint-xxx-merged \ --eval_dataset arc ceval gsm8k --eval_backend Native \ --infer_backend vllm Model | arc | ceval | gsm8k |
原始模型 | 0.843 | 0.7452 | 0.8173 |
微调后模型 | 0.8404 | 0.7489 | 0.8082 |
可以看到,自我认知微调会对模型的评测结果产生略微影响,使用更好的混合通用数据集将会缓解这一现象。
模型部署
使用lmdeploy部署
pip install lmdeploy 使用python代码本地批量推理
import lmdeploy pipe = lmdeploy.pipeline("/mnt/workspace/internlm2_5-7b-chat") response = pipe(["Hi, pls intro yourself", "Shanghai is"]) print(response) 也可以使用一行代码发布OpenAI格式服务
lmdeploy serve api_server /mnt/workspace/internlm2_5-7b-chat --model-name internlm2_5-7b-chat --server-port 23333 接口调用方式:
curl http://localhost:23333/v1/chat/completions \ -H "Content-Type: application/json" \ -d '{ "model": "internlm2_5-7b-chat", "messages": [ {"role": "system", "content": "You are a helpful assistant."}, {"role": "user", "content": "Introduce deep learning to me."} ] }' 