阅读量:0
一、环境准备
Linux 采用 CentOS7
Nginx 采用 Nginx-1.24.0 安装目录/opt/nginx
Mysql 采用 Mysql-5.7.23 安装目录/opt/mysql
PHP 采用 PHP-7.3.5 安装目录/opt/php
用于测试环境,搭建在虚拟机上,只准备了一台虚拟机,所有服务都搭建在一台虚拟机上。正式环境至少准备两台。
二、搭建CentOS7 虚拟环境
1、配置YUM源
1.1 下载wget命令
yum -y install wget1.2 备份老的YUM源文件
cd /etc/yum.repos.d/ mkdir bak mv *.repo bak 1.3 下载阿里云官网CentOS YUM源文件
wget https://mirrors.aliyun.com/repo/Centos-7.repo 1.4 下载阿里云官网Epel YUM源文件
wget https://mirrors.aliyun.com/repo/epel-7.repo1.5 生成新缓存
# 删除旧的缓存 yum clean all # 生成新的缓存 yum makecache # 查看当前使用列表 yum repolist1.6 安装软件测试
yum -y install bash-completion yum -y install net-tools2、关闭Selinux
sed -i 's/SELINUX=enforcing/SELINUX=disabled/g' /etc/selinux/config3、检查网络连接状况
ping www.baidu.com三、搭建Nginx服务
1、下载Nginx需要用到的第三方依赖
yum -y install zlib zlib-devel openssl openssl-devel pcre pcre-devel httpd-tools make gcc gcc-c++包含:
支持静态资源压缩的gzip lib库
支持URL重写的pcre库
支持HTTPS的openssl
perl开发的依赖库
2、下载Nginx二进制包
wget https://nginx.org/download/nginx-1.24.0.tar.gz3、解压
tar -zxvf nginx-1.24.0.tar.gz4、编译三部曲
4.1 创建工作目录
mkdir -p /opt/nginx4.2 执行编译脚本
# 进入解压目录 cd 解压目录/nginx-1.24.0 # 执行编译脚本 ./configure --prefix=/opt/nginx --with-http_ssl_module --with-http_flv_module --with-http_gzip_static_module --with-http_stub_status_module --with-threads --with-file-aio 4.3 编译
make4.4 安装
make install5、配置环境变量
ln -s /opt/nginx/sbin/nginx /usr/bin/nginx # 创建Nginx工作用户 useradd -r -s /sbin/nologin nginx6、修改Nginx配置文件
vi /opt/nginx/conf/nginx.conf # 修改配置如下 # 工作用户为nginx user nginx; worker_processes 2; error_log logs/error.log; pid logs/nginx.pid; events { worker_connections 1024; } http { include mime.types; default_type application/octet-stream; log_format main '$remote_addr - $remote_user [$time_local] "$request" ' '$status $body_bytes_sent "$http_referer" ' '"$http_user_agent" "$http_x_forwarded_for"'; access_log logs/access.log main; sendfile on; #tcp_nopush on; keepalive_timeout 65; gzip on; # gzip压缩等级,有1-9级,级别越高压缩率越高,但传输时间越久 gzip_comp_level 4; # gzip支持压缩的文件类型 gzip_types text/plain application/javascript application/x-javascript text/css application/xml text/javascript application/x-httpd-php image/jpeg image/png image/jpg; # nginx支持的gzip版本,默认使用1.0 gzip_http_version 1.1; # 引用extra目录下的配置文件 include extra/*.conf; }7、配置虚拟站点配置文件
mkdir -p /opt/nginx/conf/extra vi /opt/nginx/conf/extra/test.conf # 配置如下 server { listen 80; server_name localhost; location / { root /opt/www/html; index index.html; } }8、编写启动脚本
vi /etc/systemd/system/nginx.service [Unit] Description=Nginx server by fortunate Documentation=man:nginx(8) After=network.target After=syslog.target [Install] WantedBy=multi-user.target [Service] Type=forking ExecStart=/opt/nginx/sbin/nginx ExecReload=/opt/nginx/sbin/nginx -s reload ExecStop=/opt/nginx/sbin/nginx -s stop PrivateTmp=true9、启动服务并设置开机自启动
systemctl enable nginx.service systemctl start nginx.service10、简单测试
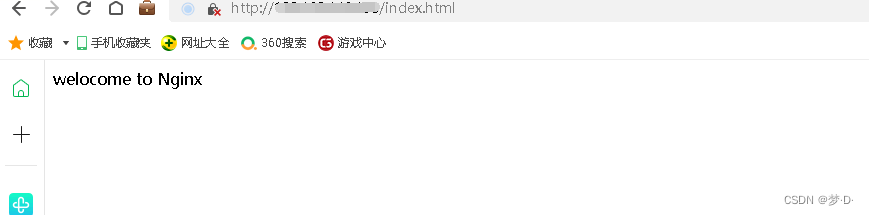
10.1 创建站点目录
mkdir -p /opt/www/html10.2 编写index.html
echo "welocome to Nginx" > /opt/www/html/index.html浏览器输入虚拟机IP,查看是否如下
四、搭建MySQL服务
1、删除CentOS自带的mariadb数据库
rpm -qa | grep mariadb rpm -e mariadb-libs --nodeps2、下载MySQL二进制安装包
wget https://downloads.mysql.com/archives/get/p/23/file/mysql-5.7.23-el7-x86_64.tar3、解压
# 解压缩后会有两个tar.gz包 tar -xvf mysql-5.7.23-el7-x86_64.tar tar -zxvf mysql-5.7.23-el7-x86_64.tar.gz 4、配置
# 创建工作目录 mv mysql-5.7.23-el7-x86_64/ /opt/mysql # 创建mysql用户 useradd -r -s /sbin/nologin mysql # 创建数据和日志存放目录 mkdir -p /opt/mysql/data mkdir -p /opt/mysql/logs # 修改权限 chown -R mysql: /opt/mysql/data chown -R mysql: /opt/mysql/logs # 创建mysql配置文件 vi /etc/my.cnf # 服务端配置 [mysqld] basedir=/opt/mysql/ datadir=/opt/mysql/data/ socket=/tmp/mysql.sock server_id=1 port=3306 log_error=/opt/mysql/logs/mysql_error.log character-set-server=utf8mb4 collation-server=utf8mb4_unicode_ci # 客户端配置 [mysql] socket=/tmp/mysql.sock5、编译MySQL
/opt/mysql/bin/mysqld --initialize-insecure --user=mysql --basedir=/opt/mysql/ --datadir=/opt/mysql/data/6、配置环境变量
vi /etc/profile # 最后添加一行配置 PATH="${PATH}:/opt/mysql/bin/" # 加载配置 source /etc/profile7、创建启动脚本
vi /etc/systemd/system/mysql.service [Unit] Description=MySQL server by fortunate Documentation=man:mysqld(8) Documentation=http://dev/mysql.com/doc/refman/en/using-systemd.html After=network.target After=syslog.target [Install] WantedBy=multi-user.target [Service] User=mysql Group=mysql ExecStart=/opt/mysql/bin/mysqld --defaults-file=/etc/my.cnf LimitNOFIL=50008、启动服务
# 启动服务 systemctl start mysql.service # 设置开机自启动 systemctl enable mysql.service9、简单测试
9.1 登录MySQL
# 首次登录,不需要输入密码,直接回车即可 mysql -uroot -p Enter password: Welcome to the MySQL monitor. Commands end with ; or \g. Your MySQL connection id is 2 Server version: 5.7.23 MySQL Community Server (GPL) Copyright (c) 2000, 2018, Oracle and/or its affiliates. All rights reserved. Oracle is a registered trademark of Oracle Corporation and/or its affiliates. Other names may be trademarks of their respective owners. Type 'help;' or '\h' for help. Type '\c' to clear the current input statement. mysql> show databases; +--------------------+ | Database | +--------------------+ | information_schema | | mysql | | performance_schema | | sys | +--------------------+ 4 rows in set (0.00 sec) mysql> 9.2 设置密码
mysqladmin -uroot password "your_password"五、搭建PHP服务
1、下载PHP所需用到的第三方依赖
yum -y install gcc gcc-c++ make zlib-devel libxml2-devel libjpeg-devel libjpeg-turbo-devel freetype-devel libpng-devel gd-devel libcurl-devel libxslt-devel libxslt-devel # libicov-devel依赖通过二进制安装 wget http://ftp.gnu.org/pub/gnu/libiconv/libiconv-1.15.tar.gz # 解压 tar -zxvf libiconv-1.15.tar.gz # 创建工作目录 mkdir -p /opt/libiconv # 执行脚本 ./configure --prefix=/opt/libiconv # 编译安装 make && make install2、下载PHP二进制包
wget http://mirrors.sohu.com/php/php-7.3.5.tar.gz3、解压
tar -zxvf php-7.3.5.tar.gz # 创建工作目录 mkdir -p /opt/php4、编译三部曲
# 执行脚本 ./configure --prefix=/opt/php \ --enable-mysqlnd \ --with-mysqli=mysqlnd \ --with-pdo-mysql=mysqlnd \ # libiconv安装目录位置 --with-iconv-dir=/opt/libiconv \ --with-jpeg-dir \ --with-png-dir \ --with-zlib \ --with-libxml-dir=/usr \ --enable-xml \ --disable-rpath \ --enable-bcmath \ --enable-shmop \ --enable-sysvsem \ --enable-inline-optimization \ --with-curl \ --enable-mbregex \ --enable-fpm \ --enable-mbstring \ --with-gd \ --with-openssl \ --with-mhash \ --enable-pcntl \ --enable-sockets \ --with-xmlrpc \ --enable-soap \ --enable-short-tags \ --enable-static \ --with-xsl \ # 运行Nginx的用户 --with-fpm-user=nginx \ # 运行Nginx的组 --with-fpm-group=nginx \ --enable-ftp \ --enable-opcache=no # 编译安装 make && make install5、配置环境变量
ln -s /opt/php/sbin/php-fpm /usr/bin/php-fpm6、修改配置
cp /opt/php/etc/php-fpm.conf.default /opt/php/etc/php-fpm.conf cp /opt/configure/php-7.3.5/php.ini-development /opt/php/lib/php.ini cp /opt/php/etc/php-fpm.d/www.conf.default /opt/php/etc/php-fpm.d/www.conf vi /opt/php/etc/php-fpm.conf # 旧的配置 ;pid = run/php-fpm.pid # 修改为,“;”代表注释,需要删除 pid = /opt/php/php-fpm.pid7、启动服务
# 编写启动脚本 vi /etc/systemd/system/php-fpm.service [Unit] Description=The PHP FastCGI Process Manager After=syslog.target network.target [Service] Type=forking PIDFile=/opt/php/php-fpm.pid ExecStart=/opt/php/sbin/php-fpm ExecStop=/bin/kill -9 php-fpm ExecReload=/bin/kill -USR2 $MAINPID PrivateTmp=true [Install] WantedBy=multi-user.target # 启动服务 systemctl start php-fpm.service # 设置开机自启动 systemctl enable php-fpm.service8、查看服务是否启动
# 查看进程是否存在 ps -ef | grep php root 17631 1 0 05:05 ? 00:00:00 php-fpm: master process (/opt/php/etc/php-fpm.conf) nginx 17632 17631 0 05:05 ? 00:00:00 php-fpm: pool www nginx 17633 17631 0 05:05 ? 00:00:00 php-fpm: pool www # 查看端口是否存在 netstat -nptl Active Internet connections (only servers) Proto Recv-Q Send-Q Local Address Foreign Address State PID/Program name tcp 0 0 127.0.0.1:9000 0.0.0.0:* LISTEN 17631/php-fpm: mast9、简单测试
9.1 修改nginx配置文件
# 修改配置 vi /opt/nginx/conf/extra/test.conf server { listen 80; server_name localhost; location / { root /opt/www/html; index index.html; } # 新增一个location location ~ .*\.(php|php5)?$ { root /opt/www/php; fastcgi_pass 127.0.0.1:9000; fastcgi_index index.php; include fastcgi.conf; } } 9.2 重新加载配置
nginx -s reload9.3 创建php文件
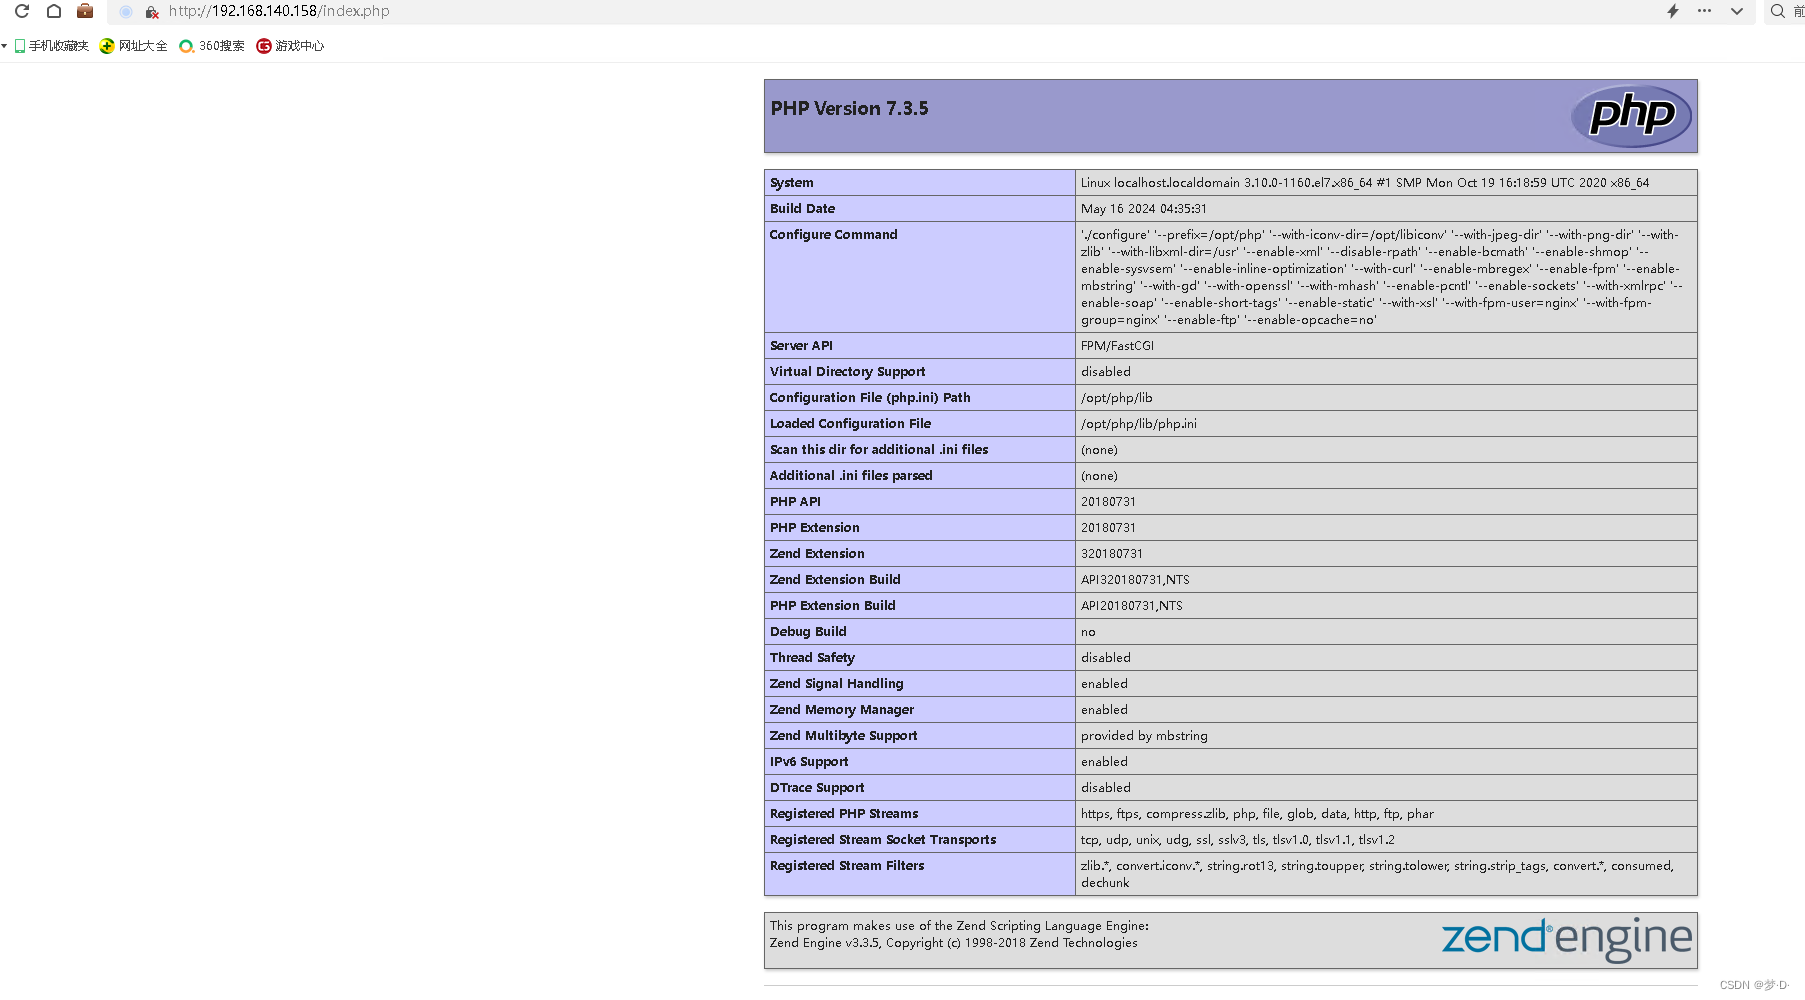
# 创建php目录 mkdir -p /opt/www/php # 创建index.php echo "<?php phpinfo();?>" > /opt/www/php/index.php9.4 浏览器输入IP/index.php
六、LNMP测试
1、测试PHP和MySQL之间的连通性
1.1 编写php文件,连接mysql
vi /opt/www/php/mysql_connect.php <?php $link_id=new mysqli('127.0.0.1','root','final12345'); if($link_id->connect_error){ die("Connection failed: " . $link_id->connect_error); } echo "successfully"; $link_id->close(); ?>1.2 浏览器输入IP/mysql_connect.php测试

2、编写简单的学生信息查询页面
2.1 创建数据库
mysql> create database test character set utf8mb4 collate utf8mb4_unicode_ci;2.2 创建表
use test; create table student(id int not null, name varchar(30), age int);2.3 新增数据
mysql> insert into student values(1, "张三", 16); mysql> insert into student values(2, "李四", 15); mysql> insert into student values(3, "王五", 16);2.4 赋予权限
grant all privileges on test.* to 'root'@'%' identified by 'mysql_password' with grant option; flush privileges;2.5 编写php脚本
vi /opt/www/php/student.php <!doctype html> <html> <head> <meta charset="utf-8"> <title>学生信息首页</title> <body> <h1 align="center">学生信息</h1> <form action="" method="post" name="indexf"> <p align="center"><input type="text" name="sel" /><input type="submit" value="搜索" name="selsub" /></p> <table align="center" border="1px" cellspacing="0px" width="800px"> <tr><th>学号</th><th>姓名</th><th>年龄</th></tr> <?php $link_id=new mysqli('127.0.0.1','root','final12345','test'); if($link_id->connect_error){ die("Connection failed: " . $link_id->connect_error); } if (empty($_POST["selsub"])) { $res=mysqli_query($link_id,"select * from student order by id"); } else { $sel = $_POST["sel"]; $res=mysqli_query($link_id,"select * from student where id like '%$sel%'"); } while ($row = mysqli_fetch_array($res)) { echo '<tr>'; echo "<td>$row[0]</td><td>$row[1]</td><td>$row[2]</td>"; echo '</tr>'; } ?> </table> </form> </body> </head> </html>2.6 测试
浏览器输入IP/student.php,得到如下结果,可以跟据id搜索信息