1.rsync介绍
rsync是一款开源的、快速的、多功能的、可实现全量及增量的本地或远程数据同步备份工具。
在守护进程模式(daemon mode)下,rsync默认监听TCP端口873,以原生rsync传输协议或者通过远程shell如RSH或者SSH提供文件。SSH模式下,rsync客户端运行程序必须同时在本地和远程机器上安装。
全量与增量,全量:将全部数据进行传输覆盖,增量:只传输差异部分的数据,rsync通过独特的“quick check”算法,实现增量数据传输
2. 配置环境
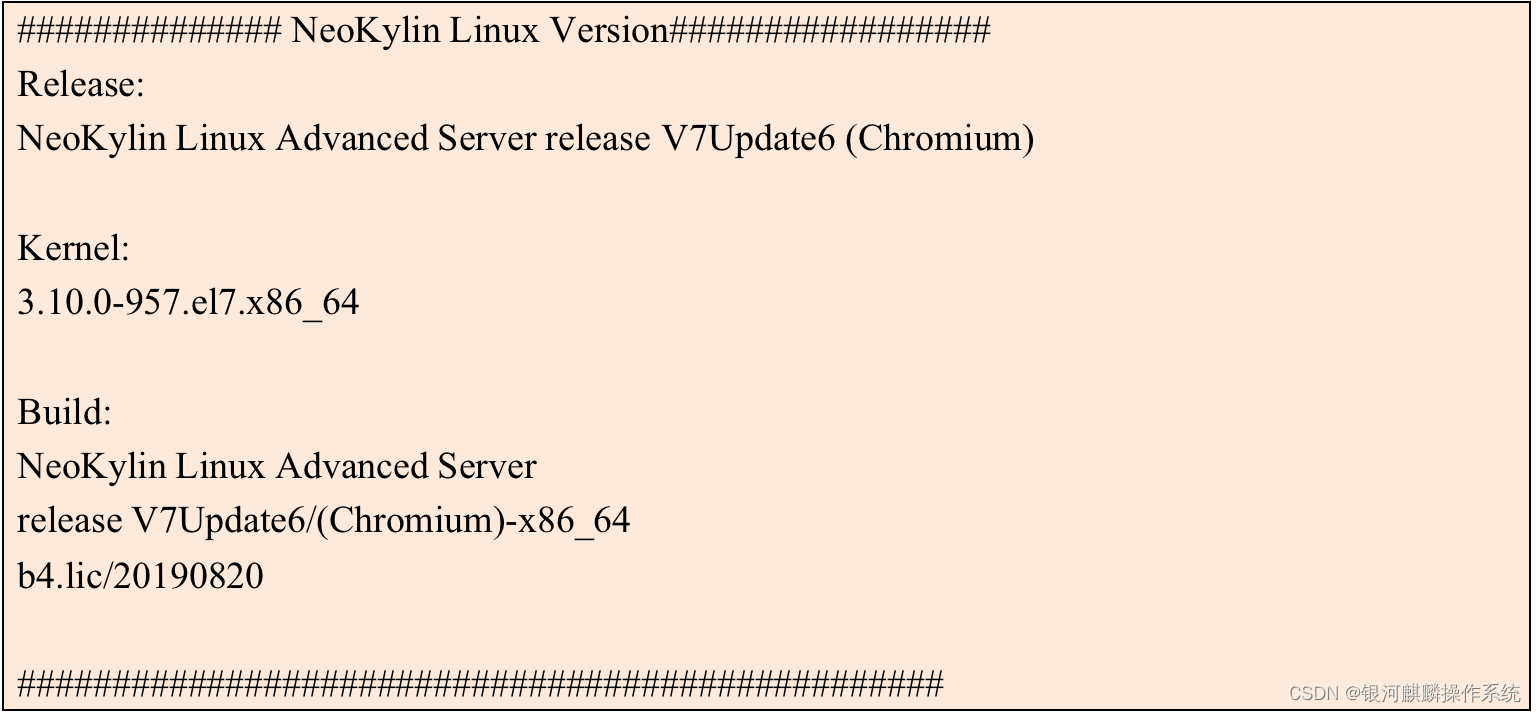
系统环境:2台麒麟V7.6服务器操作系统,版本信息如下:

备份服务器:192.168.216.120
客户端服务器(nfs存储共享):192.168.216.121
目的:将nfs服务器/www目录的数据,备份到备份服务器的/backup/web目录
3.rsync配置步骤
3.1安装rsync
服务端(备份服务器)和客户端都要安装,命令如下:
[root@server ~]# yum install rsync -y
[root@client ~]# yum install rsync -y
3.2服务端配置
- 1)服务端配置文件,/etc/rsyncd.conf配置
[root@server ~]# vim /etc/rsyncd.conf
#同步到服务端的文件或目录,用户名和组,继承这里的设置
uid = nobody #进行备份的用户为nobody
gid = nobody #进行备份的组nodody
use chroot = no #不用chroot,安全相关
max connections = 200 #最大链接数
timeout = 300 #超时时间(不进行备份多次时间断开)
pid file = /var/run/rsyncd.pid #进程对应进程号文件
lock file = /var/run/rsync.lock #锁文件
log file = /var/log/rsyncd.log #日志文件,显示出错信息
fake super = yes #新版rsync必须加此参数
#模块信息:
[backup]
comment = "backup" #模块名称
path = /backup/web #模块对应路径
ignore errors #忽略错误程序
read only = no #是否只读,这里设置可写
list = false #是否可以列表,这里设置否
hosts allow = 192.168.216.0/24 #准许访问rsync服务器客户端范围(白名单)
auth users = root #认证的用户名
secrets file = /etc/rsync.password #密码文件存放位置
- 创建数据备份目录和认证用户密码文件
[root@server ~]# mkdir -p /backup/web
[root@server ~]# chown nobody.nobody /backup/ -R
[root@server ~]# chmod 777 -R /backup/
[root@server ~]# echo "root:qwer1234" > /etc/rsync.password
[root@server ~]# chmod 600 /etc/rsync.password
- 启动rsyncd服务
[root@server ~]# systemctl start rsyncd
[root@server ~]# systemctl status rsyncd
● rsyncd.service - fast remote file copy program daemon
Loaded: loaded (/usr/lib/systemd/system/rsyncd.service; disabled; vendor preset: disabled)
Active: active (running) since 四 2023-09-07 18:41:00 CST; 5s ago
Main PID: 40823 (rsync)
Tasks: 1
CGroup: /system.slice/rsyncd.service
└─40823 /usr/bin/rsync --daemon --no-detach
9月 07 18:41:00 server systemd[1]: Started fast remote file copy program daemon.
- 查看已经正常启动并监听873端口
[root@server ~]# ps -ef | grep rsync
root 40823 1 0 18:41 ? 00:00:00 /usr/bin/rsync --daemon --no-detach
root 41024 12951 0 18:41 pts/1 00:00:00 grep --color=auto rsync
[root@server ~]# netstat -lntup | grep rsync
tcp 0 0 0.0.0.0:873 0.0.0.0:* LISTEN 40823/rsync
tcp6 0 0 :::873 :::* LISTEN 40823/rsync
3.2 客户端配置
1)创建密码文件,客户端密码文件中,只需要密码即可,文件权限600
[root@client ~]# echo "qwer1234" > /etc/rsync.password
[root@client ~]# chmod 600 /etc/rsync.password
3.3 文件传输测试
客户端上传至服务器测试,蒋整个/www文件夹备份过去。
root为服务器中配置文件的auth users参数,::backup是以后的模块参数及配置文件中的[backup],后面接配置文件中的密码文件路径,免交互,不用输入密码就可传输。命令如下:
[root@client ~]# rsync -avz /www/ root@192.168.216.120::backup --password-file=/etc/rsync.password
sending incremental file list
./
sent 140 bytes received 27 bytes 334.00 bytes/sec
total size is 4 speedup is 0.02
测试客户端/www目录创建如下4个txt文件,其中1.txt文件内容为123,使用如上客户端同步命令后,查看服务端/backup/web目录下同步过来/www目录下的4个txt文件,1.txt文件内容正确,如下图:

Client

Server
改客户端1.txt文件内容,使用rsync命令同步后,查看服务端1.txt内容同客户端一致。如下图:

Client

Server
客户端/www目录,增加文件5.txt,查看服务端同步了增加的文件。如下图:

Client

Server
删除客户端/www/2.txt文件,客户端使用rsync命令加上--delete无差异同步数据,查看服务端,同步到被删除的文件,如下图:

Client

Server
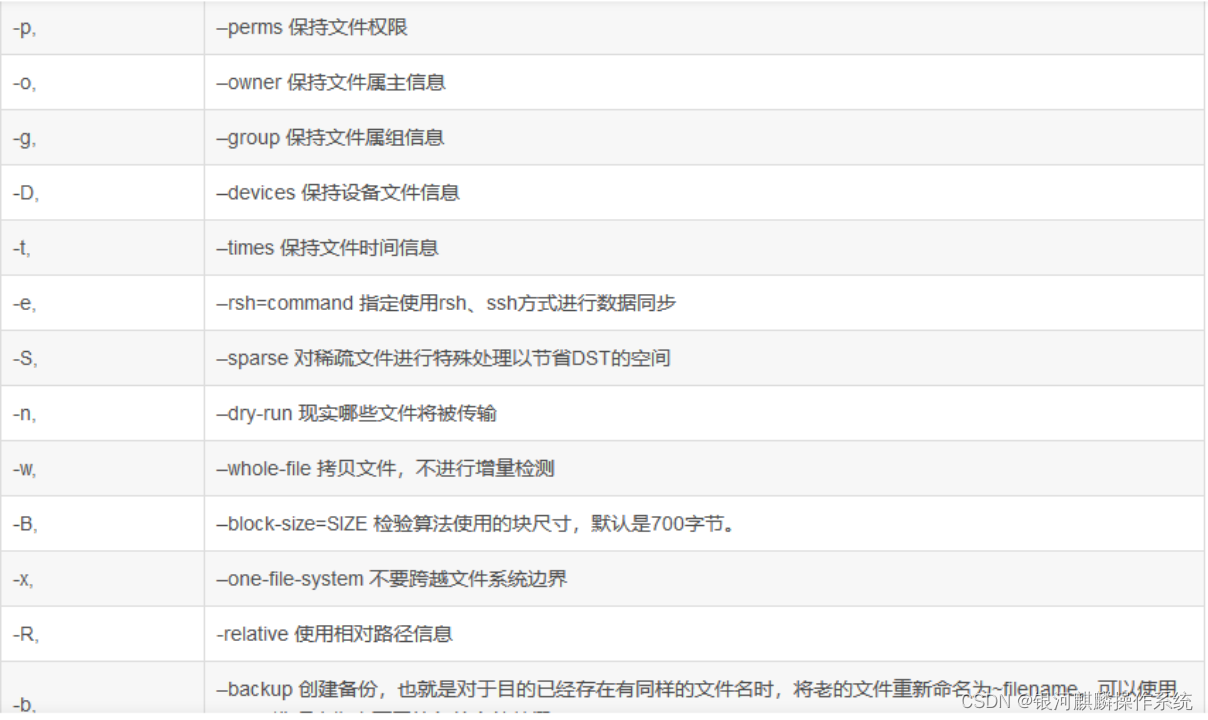
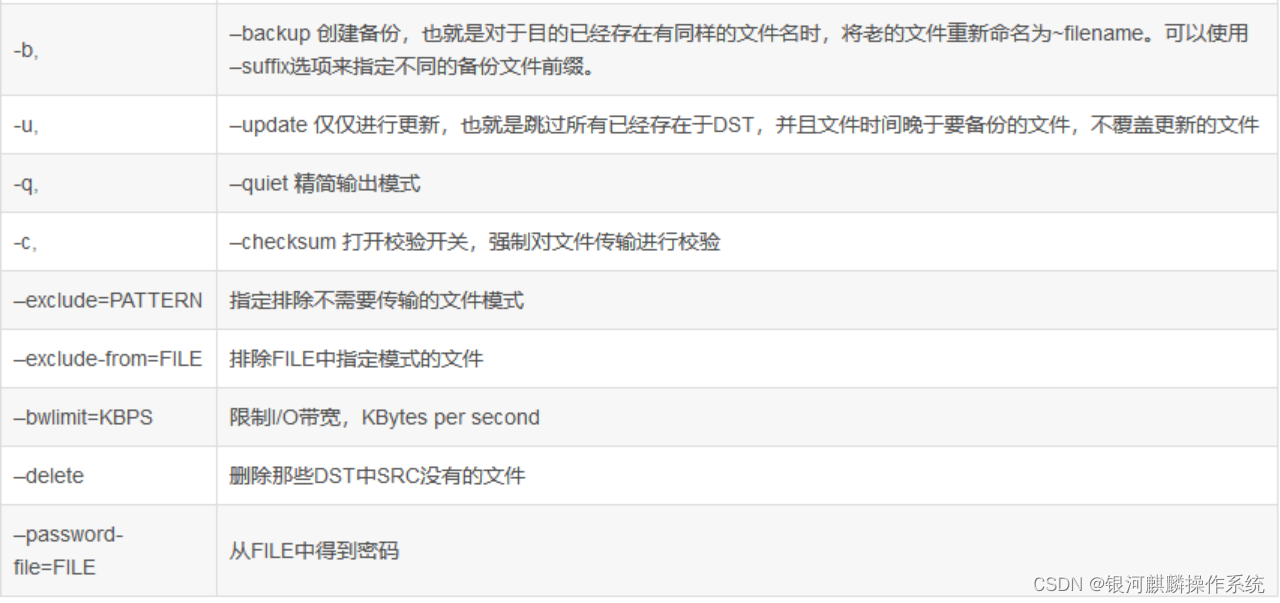
3.4 rsync命令参数


4.结论
综上,配置和测试验证情况来看,rsync基本可以满足,增删改文件和目录,相关操作,时间戳保持一致。客户端rsync同步命令,建议用如下加上--delete,无差异同步参数同步到备份服务端,命令如下:
rsync -avz --delete /www/ root@192.168.216.120::backup --password-file=/etc/rsync.password
注:192.168.216.120为备份服务端ip地址
[root@client www]# rsync -avz --delete --bwlimit=10240 /www/ root@192.168.216.120::backup --password-file=/etc/rsync.password --rsync支持限速传输
sending incremental file list
./
test.img
sent 1,044,536 bytes received 50 bytes 9,123.02 bytes/sec
total size is 1,073,741,833 speedup is 1,027.91
注:
参考链接:
