
阅读量:11
title: OAuth2.0 实践 Spring Authorization Server 搭建授权服务器 + Resource + Client
date: 2023-03-27 01:41:26
tags:
- OAuth2.0
- Spring Authorization Server
categories: - 开发实践
cover: https://cover.png
feature: false
1. 授权服务器
目前 Spring 生态中的 OAuth2 授权服务器是 Spring Authorization Server,原先的 Spring Security OAuth 已经停止更新
1.1 引入依赖
这里的 spring-security-oauth2-authorization-server 用的是 0.4.0 版本,适配 JDK 1.8,Spring Boot 版本为 2.7.7
<dependencies> <dependency> <groupId>org.springframework.boot</groupId> <artifactId>spring-boot-starter-security</artifactId> </dependency> <dependency> <groupId>org.springframework.security</groupId> <artifactId>spring-security-oauth2-authorization-server</artifactId> </dependency> <dependency> <groupId>org.springframework.boot</groupId> <artifactId>spring-boot-starter-web</artifactId> </dependency> <dependency> <groupId>org.springframework.boot</groupId> <artifactId>spring-boot-starter-thymeleaf</artifactId> </dependency> <dependency> <groupId>org.springframework.boot</groupId> <artifactId>spring-boot-starter-jdbc</artifactId> </dependency> <dependency> <groupId>mysql</groupId> <artifactId>mysql-connector-java</artifactId> </dependency> </dependencies> 1.2 配置类
可以参考官方的 Samples:spring-authorization-server/samples
1.2.1 最小配置
官网最小配置 Demo 地址:Getting Started
官网最小配置如下,通过添加该配置类,启动项目,这就能够完成 OAuth2 的授权
@Configuration public class SecurityConfig { @Bean @Order(1) public SecurityFilterChain authorizationServerSecurityFilterChain(HttpSecurity http) throws Exception { OAuth2AuthorizationServerConfiguration.applyDefaultSecurity(http); http.getConfigurer(OAuth2AuthorizationServerConfigurer.class) .oidc(Customizer.withDefaults()); // Enable OpenID Connect 1.0 http // Redirect to the login page when not authenticated from the // authorization endpoint .exceptionHandling((exceptions) -> exceptions .authenticationEntryPoint( new LoginUrlAuthenticationEntryPoint("/login")) ) // Accept access tokens for User Info and/or Client Registration .oauth2ResourceServer(OAuth2ResourceServerConfigurer::jwt); return http.build(); } @Bean @Order(2) public SecurityFilterChain defaultSecurityFilterChain(HttpSecurity http) throws Exception { http .authorizeHttpRequests((authorize) -> authorize .anyRequest().authenticated() ) // Form login handles the redirect to the login page from the // authorization server filter chain .formLogin(Customizer.withDefaults()); return http.build(); } @Bean public UserDetailsService userDetailsService() { UserDetails userDetails = User.withDefaultPasswordEncoder() .username("user") .password("password") .roles("USER") .build(); return new InMemoryUserDetailsManager(userDetails); } @Bean public RegisteredClientRepository registeredClientRepository() { RegisteredClient registeredClient = RegisteredClient.withId(UUID.randomUUID().toString()) .clientId("messaging-client") .clientSecret("{noop}secret") .clientAuthenticationMethod(ClientAuthenticationMethod.CLIENT_SECRET_BASIC) .authorizationGrantType(AuthorizationGrantType.AUTHORIZATION_CODE) .authorizationGrantType(AuthorizationGrantType.REFRESH_TOKEN) .authorizationGrantType(AuthorizationGrantType.CLIENT_CREDENTIALS) .redirectUri("http://127.0.0.1:8080/login/oauth2/code/messaging-client-oidc") .redirectUri("http://127.0.0.1:8080/authorized") .scope(OidcScopes.OPENID) .scope(OidcScopes.PROFILE) .scope("message.read") .scope("message.write") .clientSettings(ClientSettings.builder().requireAuthorizationConsent(true).build()) .build(); return new InMemoryRegisteredClientRepository(registeredClient); } @Bean public JWKSource<SecurityContext> jwkSource() { KeyPair keyPair = generateRsaKey(); RSAPublicKey publicKey = (RSAPublicKey) keyPair.getPublic(); RSAPrivateKey privateKey = (RSAPrivateKey) keyPair.getPrivate(); RSAKey rsaKey = new RSAKey.Builder(publicKey) .privateKey(privateKey) .keyID(UUID.randomUUID().toString()) .build(); JWKSet jwkSet = new JWKSet(rsaKey); return new ImmutableJWKSet<>(jwkSet); } private static KeyPair generateRsaKey() { KeyPair keyPair; try { KeyPairGenerator keyPairGenerator = KeyPairGenerator.getInstance("RSA"); keyPairGenerator.initialize(2048); keyPair = keyPairGenerator.generateKeyPair(); } catch (Exception ex) { throw new IllegalStateException(ex); } return keyPair; } @Bean public JwtDecoder jwtDecoder(JWKSource<SecurityContext> jwkSource) { return OAuth2AuthorizationServerConfiguration.jwtDecoder(jwkSource); } @Bean public AuthorizationServerSettings authorizationServerSettings() { return AuthorizationServerSettings.builder().build(); } } 在上面的 Demo 里,将所有配置都写在了一个配置类 SecurityConfig 里,实际上 Spring Authorization Server 还提供了一种实现最小配置的默认配置形式,就是通过 OAuth2AuthorizationServerConfiguration 这个类,源码如下:
@Configuration(proxyBeanMethods = false) public class OAuth2AuthorizationServerConfiguration { @Bean @Order(Ordered.HIGHEST_PRECEDENCE) public SecurityFilterChain authorizationServerSecurityFilterChain(HttpSecurity http) throws Exception { applyDefaultSecurity(http); return http.build(); } // @formatter:off public static void applyDefaultSecurity(HttpSecurity http) throws Exception { OAuth2AuthorizationServerConfigurer authorizationServerConfigurer = new OAuth2AuthorizationServerConfigurer(); RequestMatcher endpointsMatcher = authorizationServerConfigurer .getEndpointsMatcher(); http .requestMatcher(endpointsMatcher) .authorizeRequests(authorizeRequests -> authorizeRequests.anyRequest().authenticated() ) .csrf(csrf -> csrf.ignoringRequestMatchers(endpointsMatcher)) .apply(authorizationServerConfigurer); } // @formatter:on public static JwtDecoder jwtDecoder(JWKSource<SecurityContext> jwkSource) { Set<JWSAlgorithm> jwsAlgs = new HashSet<>(); jwsAlgs.addAll(JWSAlgorithm.Family.RSA); jwsAlgs.addAll(JWSAlgorithm.Family.EC); jwsAlgs.addAll(JWSAlgorithm.Family.HMAC_SHA); ConfigurableJWTProcessor<SecurityContext> jwtProcessor = new DefaultJWTProcessor<>(); JWSKeySelector<SecurityContext> jwsKeySelector = new JWSVerificationKeySelector<>(jwsAlgs, jwkSource); jwtProcessor.setJWSKeySelector(jwsKeySelector); // Override the default Nimbus claims set verifier as NimbusJwtDecoder handles it instead jwtProcessor.setJWTClaimsSetVerifier((claims, context) -> { }); return new NimbusJwtDecoder(jwtProcessor); } @Bean RegisterMissingBeanPostProcessor registerMissingBeanPostProcessor() { RegisterMissingBeanPostProcessor postProcessor = new RegisterMissingBeanPostProcessor(); postProcessor.addBeanDefinition(AuthorizationServerSettings.class, () -> AuthorizationServerSettings.builder().build()); return postProcessor; } } 这里注入一个叫做 authorizationServerSecurityFilterChain 的 bean,其实对比一下可以看出,这和最小配置的实现基本是相同的。有了这个 bean,就会支持如下协议端点:
- OAuth2 Authorization endpoint
- OAuth2 Token endpoint
- OAuth2 Token Introspection endpoint
- OAuth2 Token Revocation endpoint
- OAuth2 Authorization Server Metadata endpoint
- JWK Set endpoint
- OpenID Connect 1.0 Provider Configuration endpoint
- OpenID Connect 1.0 UserInfo endpoint
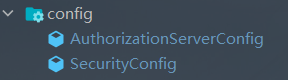
接下来使用 OAuth2AuthorizationServerConfiguration 这个类来实现一个 Authorization Server,将 Spring Security 和 Authorization Server 的配置分开,Spring Security 使用 SecurityConfig 类,创建一个新的Authorization Server 配置类 AuthorizationServerConfig
1.2.2 ServerSecurityConfig
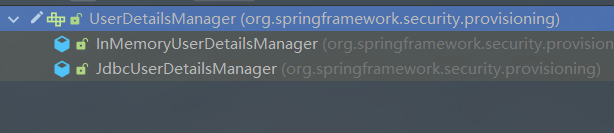
@EnableWebSecurity @Configuration(proxyBeanMethods = false) public class ServerSecurityConfig { @Resource private DataSource dataSource; /** * Spring Security 的过滤器链,用于 Spring Security 的身份认证 */ @Bean SecurityFilterChain defaultSecurityFilterChain(HttpSecurity http) throws Exception { http.authorizeHttpRequests(authorize -> authorize // 配置放行的请求 .antMatchers("/api/**", "/login").permitAll() // 其他任何请求都需要认证 .anyRequest().authenticated() ) // 设置登录表单页面 .formLogin(formLoginConfigurer -> formLoginConfigurer.loginPage("/login")); return http.build(); } // @Bean // public UserDetailsService userDetailsService() { // return new JdbcUserDetailsManager(dataSource); // } @Bean UserDetailsManager userDetailsManager() { return new JdbcUserDetailsManager(dataSource); } } Spring Authorization Server 默认是支持内存和 JDBC 两种存储模式的,内存模式只适合简单的测试,所以这里使用 JDBC 存储模式。在 1.2.1 最小配置那节里注入 UserDetailsService 这个 Bean 使用的是 InMemoryUserDetailsManager,表示内存模式,这里使用 JdbcUserDetailsManager 表示 JDBC 模式
而这两个类都属于 UserDetailsManager 接口的实现类,并且后续我们需要使用到 userDetailsManager.createUser(userDetails) 方法来添加用户,因此这里需要注入 UserDetailsManager 这个 Bean,由于返回的都是 JdbcUserDetailsManager,因此可以注释掉 UserDetailsService 这个 Bean 的注入
1.2.3 AuthorizationServerConfig
该类部分配置可以参照前面提到的 OAuth2AuthorizationServerConfiguration 类来配置,同样使用 JDBC 存储模式
@Configuration(proxyBeanMethods = false) public class AuthorizationServerConfig { private static final String CUSTOM_CONSENT_PAGE_URI = "/oauth2/consent"; @Bean @Order(Ordered.HIGHEST_PRECEDENCE) public SecurityFilterChain authorizationServerSecurityFilterChain(HttpSecurity http) throws Exception { // 定义授权服务配置器 OAuth2AuthorizationServerConfigurer configurer = new OAuth2AuthorizationServerConfigurer(); configurer // 自定义授权页面 .authorizationEndpoint(authorizationEndpoint -> authorizationEndpoint.consentPage(CUSTOM_CONSENT_PAGE_URI)) // Enable OpenID Connect 1.0, 启用 OIDC 1.0 .oidc(Customizer.withDefaults()); // 获取授权服务器相关的请求端点 RequestMatcher endpointsMatcher = configurer.getEndpointsMatcher(); http // 拦截对授权服务器相关端点的请求 .requestMatcher(endpointsMatcher) // 拦载到的请求需要认证 .authorizeHttpRequests(authorize -> authorize.anyRequest().authenticated()) // 忽略掉相关端点的 CSRF(跨站请求): 对授权端点的访问可以是跨站的 .csrf(csrf -> csrf.ignoringRequestMatchers(endpointsMatcher)) .oauth2ResourceServer(OAuth2ResourceServerConfigurer::jwt) // 访问端点时表单登录 .formLogin() .and() // 应用授权服务器的配置 .apply(configurer); return http.build(); } /** * 注册客户端应用, 对应 oauth2_registered_client 表 */ @Bean public RegisteredClientRepository registeredClientRepository(JdbcTemplate jdbcTemplate) { return new JdbcRegisteredClientRepository(jdbcTemplate); } /** * 令牌的发放记录, 对应 oauth2_authorization 表 */ @Bean public OAuth2AuthorizationService authorizationService(JdbcTemplate jdbcTemplate, RegisteredClientRepository registeredClientRepository) { return new JdbcOAuth2AuthorizationService(jdbcTemplate, registeredClientRepository); } /** * 把资源拥有者授权确认操作保存到数据库, 对应 oauth2_authorization_consent 表 */ @Bean public OAuth2AuthorizationConsentService authorizationConsentService(JdbcTemplate jdbcTemplate, RegisteredClientRepository registeredClientRepository) { return new JdbcOAuth2AuthorizationConsentService(jdbcTemplate, registeredClientRepository); } /** * 加载 JWT 资源, 用于生成令牌 */ @Bean public JWKSource<SecurityContext> jwkSource() { KeyPair keyPair; try { KeyPairGenerator keyPairGenerator = KeyPairGenerator.getInstance("RSA"); keyPairGenerator.initialize(2048); keyPair = keyPairGenerator.generateKeyPair(); } catch (Exception ex) { throw new IllegalStateException(ex); } RSAPublicKey publicKey = (RSAPublicKey) keyPair.getPublic(); RSAPrivateKey privateKey = (RSAPrivateKey) keyPair.getPrivate(); RSAKey rsaKey = new RSAKey.Builder(publicKey) .privateKey(privateKey) .keyID(UUID.randomUUID().toString()) .build(); JWKSet jwkSet = new JWKSet(rsaKey); return (jwkSelector, securityContext) -> jwkSelector.select(jwkSet); } /** * JWT 解码 */ @Bean public JwtDecoder jwtDecoder(JWKSource<SecurityContext> jwkSource) { return OAuth2AuthorizationServerConfiguration.jwtDecoder(jwkSource); } /** * AuthorizationServerS 的相关配置 */ @Bean public AuthorizationServerSettings authorizationServerSettings() { return AuthorizationServerSettings.builder().build(); } } 1.3 创建数据库表
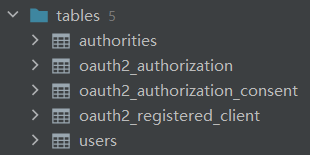
一共包括 5 个表,其中 Spring Security 相关的有 2 个表,user 和 authorities,用户表和权限表,该表的建表 SQL 在
org\springframework\security\core\userdetails\jdbc\users.ddl
SQL 可能会有一些问题,根据自己使用的数据库进行更改
create table users(username varchar_ignorecase(50) not null primary key,password varchar_ignorecase(500) not null,enabled boolean not null); create table authorities (username varchar_ignorecase(50) not null,authority varchar_ignorecase(50) not null,constraint fk_authorities_users foreign key(username) references users(username)); create unique index ix_auth_username on authorities (username,authority); Spring authorization Server 有 3 个表,建表 SQL 在:
org\springframework\security\oauth2\server\authorization\oauth2-authorization-consent-schema.sql
org\springframework\security\oauth2\server\authorization\oauth2-authorization-schema.sql
org\springframework\security\oauth2\server\authorization\client\oauth2-registered-client-schema.sql
CREATE TABLE oauth2_authorization_consent ( registered_client_id varchar(100) NOT NULL, principal_name varchar(200) NOT NULL, authorities varchar(1000) NOT NULL, PRIMARY KEY (registered_client_id, principal_name) ); /* IMPORTANT: If using PostgreSQL, update ALL columns defined with 'blob' to 'text', as PostgreSQL does not support the 'blob' data type. */ CREATE TABLE oauth2_authorization ( id varchar(100) NOT NULL, registered_client_id varchar(100) NOT NULL, principal_name varchar(200) NOT NULL, authorization_grant_type varchar(100) NOT NULL, authorized_scopes varchar(1000) DEFAULT NULL, attributes blob DEFAULT NULL, state varchar(500) DEFAULT NULL, authorization_code_value blob DEFAULT NULL, authorization_code_issued_at timestamp DEFAULT NULL, authorization_code_expires_at timestamp DEFAULT NULL, authorization_code_metadata blob DEFAULT NULL, access_token_value blob DEFAULT NULL, access_token_issued_at timestamp DEFAULT NULL, access_token_expires_at timestamp DEFAULT NULL, access_token_metadata blob DEFAULT NULL, access_token_type varchar(100) DEFAULT NULL, access_token_scopes varchar(1000) DEFAULT NULL, oidc_id_token_value blob DEFAULT NULL, oidc_id_token_issued_at timestamp DEFAULT NULL, oidc_id_token_expires_at timestamp DEFAULT NULL, oidc_id_token_metadata blob DEFAULT NULL, refresh_token_value blob DEFAULT NULL, refresh_token_issued_at timestamp DEFAULT NULL, refresh_token_expires_at timestamp DEFAULT NULL, refresh_token_metadata blob DEFAULT NULL, PRIMARY KEY (id) ); CREATE TABLE oauth2_registered_client ( id varchar(100) NOT NULL, client_id varchar(100) NOT NULL, client_id_issued_at timestamp DEFAULT CURRENT_TIMESTAMP NOT NULL, client_secret varchar(200) DEFAULT NULL, client_secret_expires_at timestamp DEFAULT NULL, client_name varchar(200) NOT NULL, client_authentication_methods varchar(1000) NOT NULL, authorization_grant_types varchar(1000) NOT NULL, redirect_uris varchar(1000) DEFAULT NULL, scopes varchar(1000) NOT NULL, client_settings varchar(2000) NOT NULL, token_settings varchar(2000) NOT NULL, PRIMARY KEY (id) ); 创建完成后的数据库表如下:
1.4 自定义登录和授权页面
在项目 resource 目录下创建一个 templates 文件夹,然后创建 login.html 和 consent.html,登录页面的配置在 1.2.2 中配置好了,授权页面的配置在 1.2.3 中配置好了

登录页面 login.html
<!DOCTYPE html> <html lang="en" xmlns="http://www.w3.org/1999/xhtml" xmlns:th="https://www.thymeleaf.org"> <head> <meta charset="utf-8"> <meta name="viewport" content="width=device-width, initial-scale=1, shrink-to-fit=no"> <title>Spring Security Example</title> <link href="https://maxcdn.bootstrapcdn.com/bootstrap/4.0.0-beta/css/bootstrap.min.css" rel="stylesheet" integrity="sha384-/Y6pD6FV/Vv2HJnA6t+vslU6fwYXjCFtcEpHbNJ0lyAFsXTsjBbfaDjzALeQsN6M" crossorigin="anonymous"> <link href="https://getbootstrap.com/docs/4.0/examples/signin/signin.css" rel="stylesheet" crossorigin="anonymous"/> </head> <body> <div class="container"> <form class="form-signin" method="post" th:action="@{/login}"> <div th:if="${param.error}" class="alert alert-danger" role="alert"> 用户名或密码无效 </div> <div th:if="${param.logout}" class="alert alert-success" role="alert"> 您已注销 </div> <h2 class="form-signin-heading">登录</h2> <p> <label for="username" class="sr-only">用户名</label> <input type="text" id="username" name="username" class="form-control" placeholder="用户名" required autofocus> </p> <p> <label for="password" class="sr-only">密 码</label> <input type="password" id="password" name="password" class="form-control" placeholder="密 码" required> </p> <button class="btn btn-lg btn-primary btn-block" type="submit">登录</button> <a class="btn btn-light btn-block bg-white" href="/oauth2/authorization/github-idp" role="link" style="text-transform: none;"> <img width="24" style="margin-right: 5px;" alt="Sign in with GitHub" src="https://github.githubassets.com/images/modules/logos_page/GitHub-Mark.png" /> 使用Github登录 </a> </form> </div> </body> </html> 创建 LoginConroller,用于跳转到 login.html 页面
@Controller public class LoginController { @GetMapping("/login") public String login() { return "login"; } } 授权页面 consent.html
<!DOCTYPE html> <html lang="en"> <head> <meta charset="utf-8"> <meta name="viewport" content="width=device-width, initial-scale=1, shrink-to-fit=no"> <link rel="stylesheet" href="https://stackpath.bootstrapcdn.com/bootstrap/4.5.2/css/bootstrap.min.css" integrity="sha384-JcKb8q3iqJ61gNV9KGb8thSsNjpSL0n8PARn9HuZOnIxN0hoP+VmmDGMN5t9UJ0Z" crossorigin="anonymous"> <title>Custom consent page - Consent required</title> <style> body { background-color: aliceblue; } </style> <script> function cancelConsent() { document.consent_form.reset(); document.consent_form.submit(); } </script> </head> <body> <div class="container"> <div class="py-5"> <h1 class="text-center text-primary">应用程序权限</h1> </div> <div class="row"> <div class="col text-center"> <p> 应用程序 <span class="font-weight-bold text-primary" th:text="${clientId}"></span> 想要访问您的帐户 <span class="font-weight-bold" th:text="${principalName}"></span> </p> </div> </div> <div class="row pb-3"> <div class="col text-center"><p>上述应用程序请求以下权限<br>如果您批准,请查看这些并同意</p></div> </div> <div class="row"> <div class="col text-center"> <form name="consent_form" method="post" th:action="@{/oauth2/authorize}"> <input type="hidden" name="client_id" th:value="${clientId}"> <input type="hidden" name="state" th:value="${state}"> <div th:each="scope: ${scopes}" class="form-group form-check py-1"> <input class="form-check-input" type="checkbox" name="scope" th:value="${scope.scope}" th:id="${scope.scope}"> <label class="form-check-label font-weight-bold" th:for="${scope.scope}" th:text="${scope.scope}"></label> <p class="text-primary" th:text="${scope.description}"></p> </div> <p th:if="${not #lists.isEmpty(previouslyApprovedScopes)}">您已向上述应用授予以下权限:</p> <div th:each="scope: ${previouslyApprovedScopes}" class="form-group form-check py-1"> <input class="form-check-input" type="checkbox" th:id="${scope.scope}" disabled checked> <label class="form-check-label font-weight-bold" th:for="${scope.scope}" th:text="${scope.scope}"></label> <p class="text-primary" th:text="${scope.description}"></p> </div> <div class="form-group pt-3"> <button class="btn btn-primary btn-lg" type="submit" id="submit-consent"> 提交授权 </button> </div> <div class="form-group"> <button class="btn btn-link regular" type="button" id="cancel-consent" onclick="cancelConsent();"> 取消 </button> </div> </form> </div> </div> <div class="row pt-4"> <div class="col text-center"> <p> <small> Your consent to provide access is required. <br/>If you do not approve, click Cancel, in which case no information will be shared with the app. </small> </p> </div> </div> </div> </body> </html> 创建 AuthorizationConsentController,用于跳转到 consent.html 页面
@Controller public class AuthorizationConsentController { private final RegisteredClientRepository registeredClientRepository; private final OAuth2AuthorizationConsentService authorizationConsentService; public AuthorizationConsentController(RegisteredClientRepository registeredClientRepository, OAuth2AuthorizationConsentService authorizationConsentService) { this.registeredClientRepository = registeredClientRepository; this.authorizationConsentService = authorizationConsentService; } @GetMapping(value = "/oauth2/consent") public String consent(Principal principal, Model model, @RequestParam(OAuth2ParameterNames.CLIENT_ID) String clientId, @RequestParam(OAuth2ParameterNames.SCOPE) String scope, @RequestParam(OAuth2ParameterNames.STATE) String state) { // 要批准的范围和以前批准的范围 Set<String> scopesToApprove = new HashSet<>(); Set<String> previouslyApprovedScopes = new HashSet<>(); // 查询 clientId 是否存在 RegisteredClient registeredClient = this.registeredClientRepository.findByClientId(clientId); // 查询当前的授权许可 OAuth2AuthorizationConsent currentAuthorizationConsent = this.authorizationConsentService.findById(registeredClient.getId(), principal.getName()); // 已授权范围 Set<String> authorizedScopes; if (currentAuthorizationConsent != null) { authorizedScopes = currentAuthorizationConsent.getScopes(); } else { authorizedScopes = Collections.emptySet(); } for (String requestedScope : StringUtils.delimitedListToStringArray(scope, " ")) { if (OidcScopes.OPENID.equals(requestedScope)) { continue; } // 如果已授权范围包含了请求范围,则添加到以前批准的范围的 Set, 否则添加到要批准的范围 if (authorizedScopes.contains(requestedScope)) { previouslyApprovedScopes.add(requestedScope); } else { scopesToApprove.add(requestedScope); } } model.addAttribute("clientId", clientId); model.addAttribute("state", state); model.addAttribute("scopes", withDescription(scopesToApprove)); model.addAttribute("previouslyApprovedScopes", withDescription(previouslyApprovedScopes)); model.addAttribute("principalName", principal.getName()); return "consent"; } private static Set<ScopeWithDescription> withDescription(Set<String> scopes) { Set<ScopeWithDescription> scopeWithDescriptions = new HashSet<>(); for (String scope : scopes) { scopeWithDescriptions.add(new ScopeWithDescription(scope)); } return scopeWithDescriptions; } public static class ScopeWithDescription { private static final String DEFAULT_DESCRIPTION = "未知范围 - 我们无法提供有关此权限的信息, 请在授予此权限时谨慎"; private static final Map<String, String> scopeDescriptions = new HashMap<>(); static { scopeDescriptions.put( OidcScopes.PROFILE, "此应用程序将能够读取您的个人资料信息" ); scopeDescriptions.put( "message.read", "此应用程序将能够读取您的信息" ); scopeDescriptions.put( "message.write", "此应用程序将能够添加新信息, 它还可以编辑和删除现有信息" ); scopeDescriptions.put( "other.scope", "这是范围描述的另一个范围示例" ); } public final String scope; public final String description; ScopeWithDescription(String scope) { this
相关阅读
-
上一篇:
没有了!
-
下一篇:
三天无理由退款
